Lopez de Lacalle L.N., Lamikiz A. Machine Tools for High Performance Machining
Подождите немного. Документ загружается.

11 Micromilling Machines 385
limitations are solved by using hydrostatic guides as shown in the example in
Sect. 11.4.3. Here possible configurations of aerostatic guides depending on the
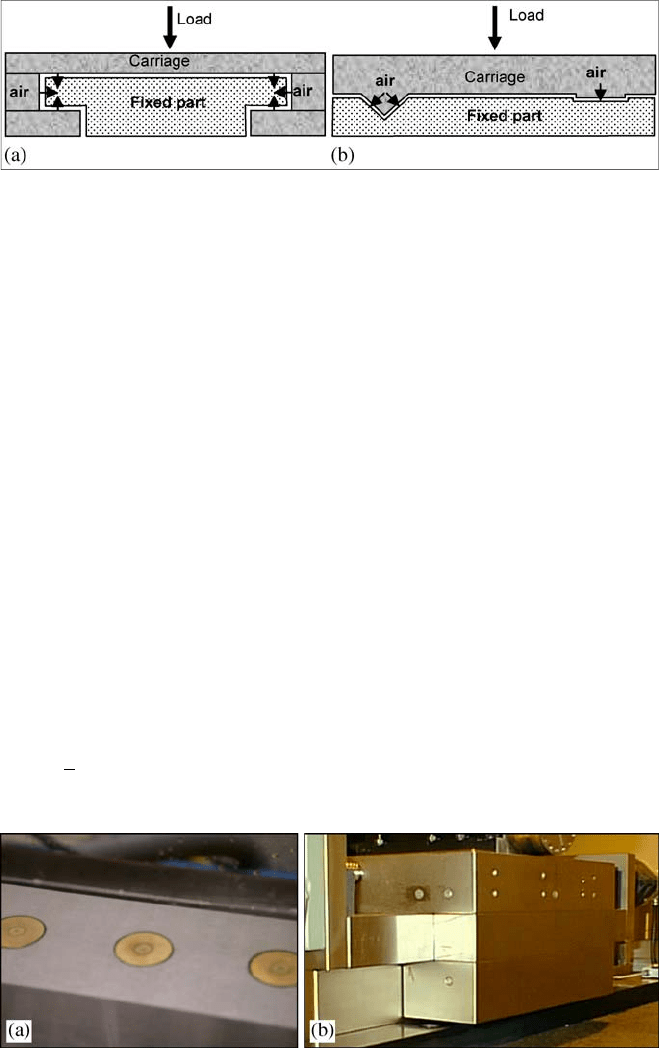
way the preload is done are described (Fig. 11.14).
11.5.2.1 Bearing Pads in Opposition
This configuration consists on a double set of bearing pads located in opposition,
both in vertical and lateral directions as shown in Fig. 11.14a. An application case
for micromilling machines is shown in Fig. 11.15. Air supply is done by an orifice
in the centre of a compensation cavity. The optimal pressure ratio between cavity
and supply is approximately ½. The accuracy of aerostatic guides is intrinsically
high, but it depends a lot on the machining accuracy of the components. As a gen-
eral rule, the maximum peak-to-valley value of roughness should be lower than
¼ of the air gap. Repeatability also depends strongly in the stability of air supply
and in the accuracy of the air restrictors.
With such a configuration, the carriage of Fig. 11.15 has achieved a static stiff-
ness value of 250
N/μm in the vertical direction and 150
N/μm in the lateral direc-
tion. The air consumption is 40
l/min and the straightness achieved in the move-
ment is +
0.1
μm in the 150
mm of travel range.
Fig. 11.14 Aerostatic guides configurations. a Bearing pads in opposition. b Preload by the
carriage weight
Fig. 11.15 Aerostatic guides in opposition. a Bearing pads detail. b General view

386 L. Uriarte, J. Eguia and F. Egaña
11.5.2.2 Preload by Carriage Weight
This configuration gives good accuracy due to the constant force of the preload,
however the load capacity and stiffness is achieved only in one sense of the verti-
cal direction, and lateral forces should be also very low. If preload is not constant
the accuracy of the movement starts to get worse, but still is possible to design
a relatively good accuracy slide in a cheap way (Fig. 11.16).
Bearing
Air bearin
g
Motor Core
Carriage
Magnet Track
Fig. 11.16 “Cheap” aerostatic carriage with constant preload [16]
The goal is to use preload air bearings for minimal cost, using the magnetic at-
tractive force of the motor, so air bearings need only ride on two surfaces instead
of having to wrap around a beam; thus many precision tolerances to establish
bearing gap can be eliminated. The magnet attraction force is 5
×
greater than the
motor force, so it can be positioned at an angle such that even preload is applied to
all the bearings. As long as the magnet attraction net vertical and horizontal force
are proportional to the bearing areas and is applied through the effective centres of
the bearings, they will be evenly loaded without any applied moments. Its draw-
back is that the magnet pitch may cause the carriage to pitch as the motor’s iron
core windings pass over the magnets.
11.5.3 New Tendencies: Magnetic and Flexure Guidance Systems
There are other guiding systems which currently are appearing in the market, not
only for micromilling machines, but in general for any kind of ultraprecision ma-
chine. Among them we would like to point out the magnetic guides and the guid-
ing systems based on compliant mechanisms.
11.5.3.1 Magnetic Guides
Magnetic levitation guides have the advantage of no friction with its associated
beneficial effects: no wear and no need of lubrication. In combination with linear

11 Micromilling Machines 387
motors, they allow avoiding any mechanical transmission between the moving
slide and the fixed part. Their main drawbacks are the lack of damping and the
complexity of the control system. However it is possible to found complete mag-
netically levitated and actuated tables, with moving capacity in two directions.
Figure 11.17 presents a two dimensional magnetic drive [5], where the moving
part of the system is free of any contact and wires. The lightness of the moving
part along with the big forces the 2D drive is capable of providing, makes feasible
the obtaining of great accelerations. It has a compact sensoring system, and pro-
tected in a way that any collisions will not damage its important parts. The table
has a range of movement of 160
×
125
mm. A resolution of 0.02
µm is obtained in
each of the moving axes.
Force actuation in 6 degrees of freedom, or DOF. is needed to obtain the levita-
tion of the system in addition to the propulsion in two of them. Required forces are
generated by means of four 2D actuators, so eight independent forces can be ob-
tained, creating an over constrained system. Each of the actuators is made of a kit
of permanent magnets in the moving part, and by means of a winding in the static
part of the system and facing the permanent magnets. The permanent magnet set is
designed in such a way that the magnetic flux is projected in its maximum value
towards the windings. This configuration is known as the “Halbach array”.
It has been demonstrated that 2D drives can help to simplify the design of me-
chanical systems that require at least movement in two dimensions. This kind of
solution, when mechanically well designed, can also increase the dynamic behav-
iour and the overall precision as they allow the integration of the measuring sys-
tem in the centre of movement location.
11.5.3.2 Flexure Guidance Systems (Compliant Mechanisms)
Compliant mechanisms base their performance in the elastic properties of materi-
als. Their main advantages as guiding solutions are no friction, no backlash and
no stick-slip effects. Their main limitations are the low movement range and load
capacity. But, with an adequate design they are able to achieve some tens of
millimetres (Fig. 11.18).
Fig. 11.17 Magnetically levitated 2D table. a Final assembly. b Magnets and forces location
388 L. Uriarte, J. Eguia and F. Egaña
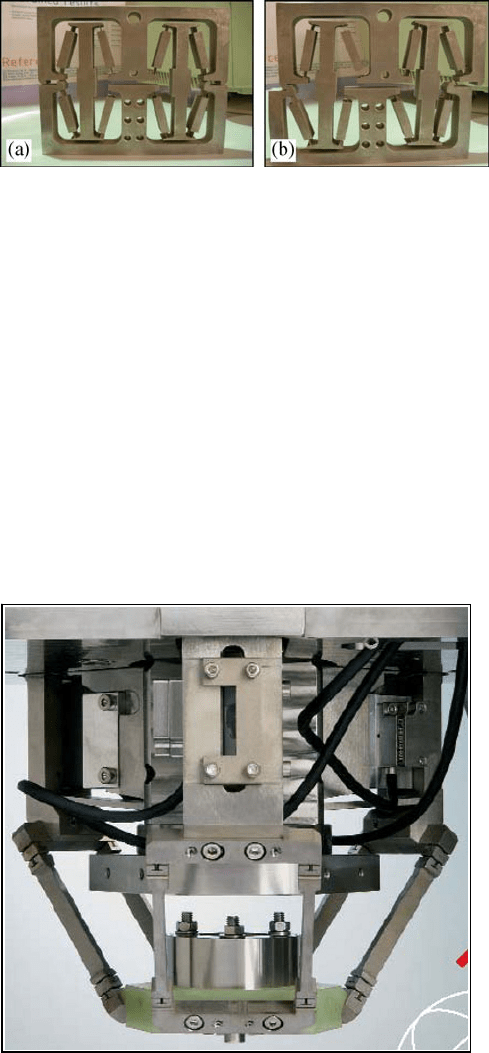
Fig. 11.18 Linear motion of 20 mm by a compliant mechanism. a Static position. b Deformed
Figure 11.18 shows a compliant mechanism for a lineal movement of 20
mm
long, with a general size of 160
×
180
mm, and a parasitic movement perpendicular
to the main direction of 0.1
μm, but highly repeatable, so it is easy to compensate.
Although basic principles of compliant mechanisms are well-known since
years, design methods and applications have remained fragmented without a de-
tailed methodology. The advance in precision machining by wire-EDM allows
currently the production of complex monolithic structures with good accuracy and
surface roughness. Recently, the growth of applications by compliant mechanisms
(space, scientific instruments and ultraprecision machines) has produced a system-
atic approach to their design.
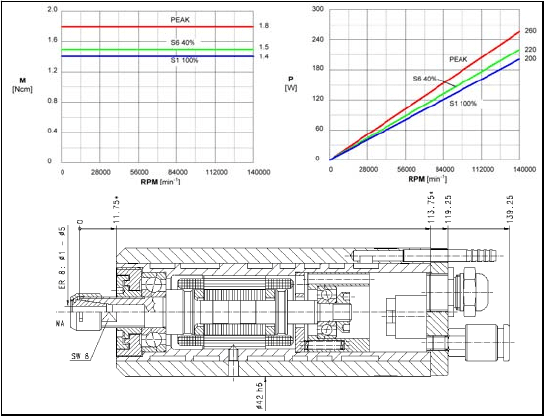
Figure 11.19 shows a 3D positioning device for a microEDM machine, with
a travel range of 6
×
6
×
6
mm, and a positioning accuracy of 0.1 by means of
a parallel Delta-type kinematic robot.
Fig. 11.19 3D compliant mechanism for a microEDM machine (courtesy of Agie
®
)
11 Micromilling Machines 389
11.6 The High Speed Spindle and Collet
Standard solutions are achieved by high speed ball bearing spindles. Several
builders are developing spindle designs that provide high rotational speeds and
extreme stiffness so that very low runout is experienced at the tool tip.
Using small tools, the spindle must rotate at high revolutions (120,000
~160,000
rev/min) to achieve the adequate cutting speed for most materials. Apart
from the speed, the spindle must be stiff (>
25
N/μm) and must present a small
runout (<
1
μm) in order to ensure high precision in the cutting process. To reach
such high speeds, the spindles have ceramic ball bearings that are continuously
refrigerated and lubricated. They are usually low power electro-spindles (200
~500
W) or aerostatic spindles.
Usually the tool is clamped manually using special collets to reduce the runout.
The most used collets are the precision “ER type” collets (clamp a small range of
diameters close to a nominal value) and the super-precision ER type collets (only
clamp the nominal diameter). The precision collets can present big runout errors
that depend on the clamped diameter, and the super-precision collets present runout
errors smaller than 2
μm. Tool wear during micromilling is quite high and that is
the reason why it is usual to use 2 or more mills per operation (one for rough ma-
chining, other for finishing). Tool change is a critical operation because the tool
runout, tool height and collet runout are modified; thus it must be performed care-
fully cleaning all the shank, collets, tools and nuts and applying controlled torques.
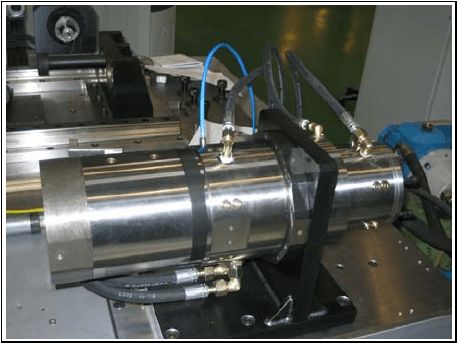
Figure 11.20 shows the case of a ceramic angular ball bearing spindle from
Ibag™, with a rotational speed range from 14,000 to 140,000
rpm and a maximum
Fig. 11.20 High speed ball bearing spindle for micromilling (courtesy of Ibag
®
)
390 L. Uriarte, J. Eguia and F. Egaña
power of 200
W. Nominal torque is only 1.4
N⋅cm, but high enough for micro-
milling applications. The bearings require continuous oil-air nebulised lubrication,
and the stator is cooled with water.
11.6.1 Alternatives: Hydrostatic and Magnetic Spindles
Although current available rotational speeds are quite high, there is a need for
higher speeds. Taking into account the small tool diameter, 0.1
mm or smaller, the
achieved cutting speeds are already far away from high speed cutting condition.
Vibration and runout are other limitations of existing spindles.
11.6.1.1 Hydrostatic Spindles
They are able to provide a soft and accurate rotation, with good vibration perform-
ance due to their high damping. However power losses due to the heat generated
in the bearings limit the maximum achievable rotational speeds. Special spindles
are available with a good compromise between speed and stiffness.
Figure 11.21 shows a high speed hydrostatic spindle with a maximum rotational
speed of 30,000
rpm. The diameter of the spindle should be size limited in order to
minimise peripheral speed in the bearings, and consequently the heat generated,
which compromises the spindle stiffness. So, the main difficulties to achieve the
expected requirements of precision and stiffness are the geometrical restrictions.
Other limitations comes from the strict thermal requirements that force the use of
low thermal expansion materials such as Invar that is less stiff than for example
steel but has a ten times lower expansion coefficient in comparison with steel.
Fig. 11.21 Hydrostatic high speed spindle for micromilling
11 Micromilling Machines 391
11.6.1.2 Magnetic Spindles
Since there is a growing interest in higher rotational speeds for micromilling, the
conventional solution of ceramic bearings should be overcome. This challenge has
been mainly polarised towards the development of motors and rotating devices
without mechanical contact between the rotating and static parts, controlling the
rotor’s position by means of magnetic forces. Magnetic bearings [6] introduce
some advantages to this kind of spindle, where they provide superior value com-
pared to other types of bearings. Value is a function of the following: longer life,
clean environment, extreme conditions, quieter operation, impact detection, and
physical signal estimation (such as cutting forces and linear accelerations).
They have some drawbacks mainly that the spindle is bigger, since magnetic
bearings need bigger volume for the same cutting force, and that the needed elec-
tric installation is also bigger. Product price could be another disadvantage for this
kind of spindle, but as they are providing high reliability and long service inter-
vals, and lower power consumption (due to frictionless bearings), the total opera-
tion cost should show better figures than ball bearing high speed spindles.
Apparently, micromilling should be an ideal application for magnetic spindles.
They are widely used in other fields of application such as semiconductor manu-
facturing; vacuum pumps, natural gas pipeline compression equipment and energy
storage flywheels. However they are not in widespread use in micromilling. The
two main reasons are the low damping capacity, which determines its poor chatter-
Fig. 11.22 High speed magnetically levitated spindle for micromilling, byTekniker
®
392 L. Uriarte, J. Eguia and F. Egaña
free performance even more drastically than its stiffness, and the need of rotational
speeds higher than natural frequencies of the spindle, which makes complex the
control strategy. The literature shows cases of active magnetic bearings used for
active damping or chatter suppression by means of appropriate control algorithms.
However bandwidth of the magnetic bearings prevents active control of vibration
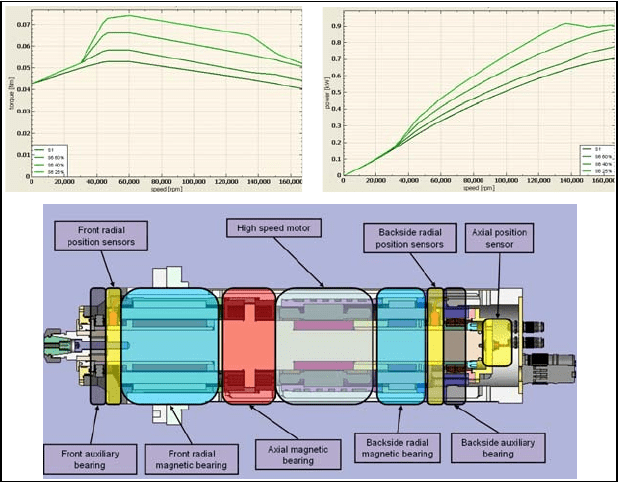
in micromilling applications. Figure 11.22 shows the case of a magnetic levitated
spindle from Tekniker
®
, with a maximum rotational speed range of 165,000
rpm
and a maximum power of 700
W, and a nominal torque of 4.5
N⋅cm.
11.7 Measuring Systems
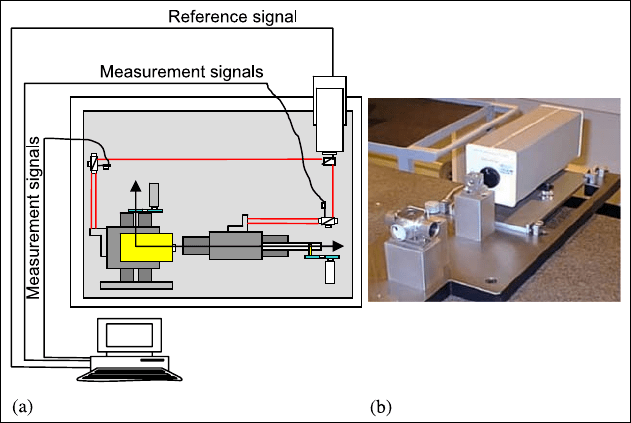
The first available micromilling machines used a laser interferometer for position
control. For example, Fig. 11.23 shows the case of a three axes travelling column
micromilling machine with a laser interferometer of the He-Ne Michelson type
(wavelength 632
nm, red colour), heterodyne with planar optics and a 9
mm beam.
That system allowed a resolution of 2.5
nm, with a final position uncertainty of
0.5
μm/m. However this system required a specific acquisition card, incompatible
with commercial NC.
For such systems, the error of atmospheric compensation is the main source of
uncertainty. The value of this error depends on the compensation method, on the
atmosphere in which the laser is operating and on the atmospheric changes during
laser operation.
Fig. 11.23 Laser interferometer for micromilling. a The configuration. b The application in the
machine

11 Micromilling Machines 393
However, the latest developments in optical linear scales make them much
more suitable for industrial application. They assure a bigger robustness of the
system, no beam loss as in the laser; they are compatible with commercial NCs,
which allow three and five axes linear and circular interpolation. Besides, the final
accuracy of the machine is at the same level as using a laser interferometer. Com-
mercial scales achieve resolution in the order of 0.01
μm and accuracy of 0.1
μm.
Their main requirement is a careful mounting in the machine, and to assure a good
level of cleanliness.
11.8 Examples
One of the first machines that we can find in the modern literature is the Nanocen-
tre
®
from Cranfield University, with three lineal axes and position measurement
by a laser interferometer system (resolution 1.25
nm), plus two rotational axes
(resolution 0.35
arcsec). Each of the axes has an independent temperature control
system with 0.001ºC of resolution. It is ready to work only with monocrystalline
diamond tools. Final result was a laboratory machine with a positioning accuracy
of 10
nm in X and Y axes, and 100
nm in vertical Z axis. It has been used to ma-
chine mirrors up to Ø100
mm, with a final roughness of 2.4
nm Ra in aluminium
and 0.8
nm Ra in germanium. But it should be considered as an excellent example
of a lab prototype.
Nowadays there are a full range of manufacturers (Kern
®
, Fanuc
®
, Kugler
®
,
Makino
®
, etc.) which offer also a wide range of models for micromilling. Herein-
after we show two examples of micromilling machines available in the market,
and their main characteristics.
11.8.1 The Kern
®
Pyramid Nano
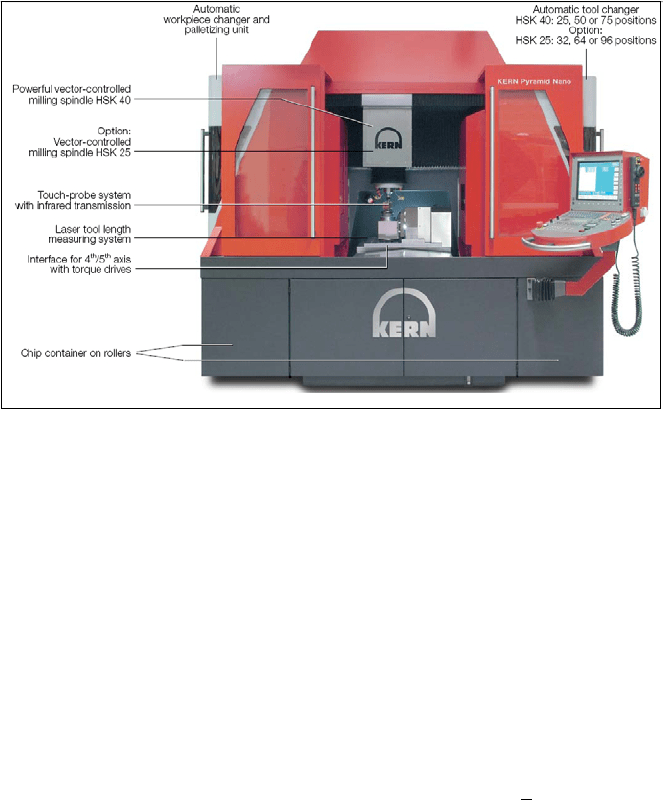
Among other models, the Pyramid Nano™ (Fig. 11.24) is a CNC machining cen-
tre for large chip production. The two main specific characteristics of this model
are:
• All the possible rolling elements have been substituted by hydrostatic elements:
guides, feed screw, and thrust axial and radial support bearing.
• Both the combined structural and thermal design assure an ultraprecision per-
formance even in a conventional workshop.
It has been developed for applications which require maximum accuracy
(+
3
μm) and surface finish (0.05
μm Ra) on larger workpieces. An integrated auto-
matic workpiece changer allows unmanned operations even for 5-axis simultan-
eous jobs.
394 L. Uriarte, J. Eguia and F. Egaña
Fig. 11.24 Kern
®
Pyramid Nano showing the main components
The portal machine frame of the Kern Pyramid Nano is symmetric. This design
concept allows for maximum rigidity and thermo-symmetric stability. High shear
and tensile strength combined with an extraordinary vibration dampening are the
main features of the new material Kern Armorith
®
. The low thermal conductivity
of the material in combination with the integrated temperature management sys-
tem of the machine desensitises the entire system against variations in tempera-
tures. The intelligent temperature management (Fig. 11.25) system is composed of
the following three separate circuits:
• A separate water cooling system for the milling spindle, hydraulic unit and the
electrical cabinet.
• Permanently cooled circulating hydraulic oil flows through the machine base,
guideways and drives of the axes.
• Temperature management of the central cooling tower within +
0.25
K.
Hydrostatic drives and guideways of the X-, Y- and Z-axes allow maximum
surface finishes in nano precision. The hydrostatic drives provide fast acceleration
with maximum vibration dampening. The advantages of the hydrostatic system are
as follows:
• The finest surface finishes with hydrostatic damping.
• The smallest movements of the axes at 0.1
μm.
• Wear-free guideways and drives.
• Almost frictionless movements – no “slip stick” effect, even when moving in
small increments.
• Low sensitivity at high machining forces.
