Lopez de Lacalle L.N., Lamikiz A. Machine Tools for High Performance Machining
Подождите немного. Документ загружается.

6 Machine Tool Performance and Precision 243
prevent any entry of sunlight and ambient heat. Continuous temperature reading is
also recommended at various points of the workshop every hour, to register the
temperature changes.
There are some typical heat sources in the machine tool which can increase the
temperature of the surrounding elements. The general recommendation is to set
these heat sources as far as possible away from the working area. This is quite
easy with some elements such as electrical systems, coolers or even servo drives.
However, elements such as ball screws generate heat and increase its temperature.
Ball screws are used to convert rotary into linear axis motion. They are very
accurate and efficient, and about 90% of the energy is transmitted [2]. However,
the rest of the energy is translated into heat, which causes the thermal expansion of
the ball screw being a source of positioning errors. The thermal variation of ball
screws is generally unpredictable and non-uniform, so it is very difficult to
compensate. A good practice is installing the shaft with a high pre-stress; in this
manner the initial deformation can absorb some of the thermal dilatation without
a significant reduction of shaft stiffness.
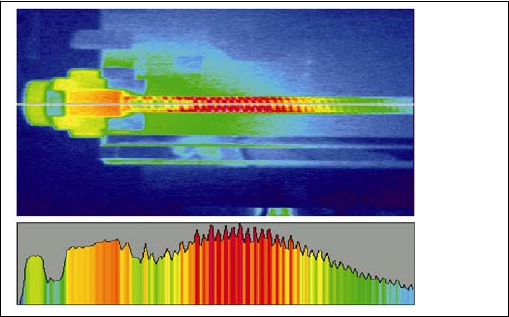
In Fig. 6.17, a real example of ball screw heating is shown, with an infrared
image of the ball screw after six hours of reversing traverse at 24
m/min between
two points 150
mm apart. One can observe the thermal distribution and hot area
located in the screw middle area.
This effect is one of the most important errors when the position measuring
system is based on the encoder of the servomotor (Fig. 6.9a). To solve this prob-
lem, there are two solutions. First, the use of linear scales for direct measuring of
the axis position (Fig. 6.9b). Direct measurement will increase machine tool preci-
sion not only because the thermal expansion of the ball screw, but also other de-
formations which cannot be measured by the encoder. The second solution is to
minimise the ball screw thermal variation by cooling the system. One technique
that has been widely used in recent years is to run coolant through the machine
50.5ºC
27.9ºC
Fig. 6.17 Positioning error as a result of local temperature rise in the recirculating ball screw
(Courtesy of Heidenhain
®
)
244 A. Lamikiz, L. N. Lopez de Lacalle and A. Celaya
screws. It is a more expensive solution than the simple solid ball screws, because
it is necessary to hollow out the ball screws and insert the coolant through rotary
joints. Thus, not only high precision machines but also some high speed milling
centres use cooled ball screws nowadays.
Finally, one of the main heat inputs is the machine main spindle. It is usually
a high power electric motor and, despite being highly cooled, its temperature in-
creases during machining. The temperature variation can lead to a thermal expan-
sion which “pushes” the tool axially toward the workpiece. This effect is clearly
shown in Sect. 3.5.4.
6.2.6 CNC Interpolation Errors
The latest generation CNCs incorporate algorithms that reduce machine velocity
and acceleration in those part zones where complex interpolations have to be per-
formed, such as corners or trajectories with very low radii of curvature. The accel-
eration reduction results in lower inertia forces. These forces can deform machine
structural parts or deviate trajectories. Furthermore, these algorithms also provided
jerk control, resulting in a smoother behaviour of the feed drives.
The CNC function for reducing the machine feed rate along complex interpola-
tions is called look-ahead. Basically it is based on reading hundreds of CNC
blocks prior to executing them, adjusting the feed rate depending on the trajectory
complexity. This function runs in real-time, modifying the actual feed with respect
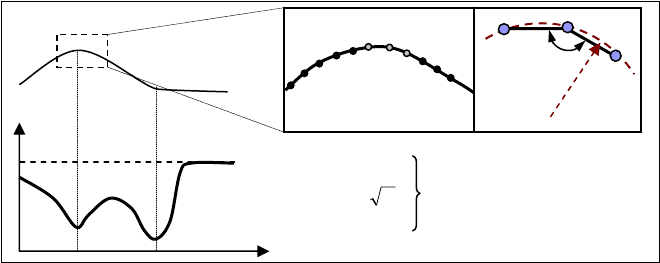
to that programmed. An example of feed rate calculation is shown in Fig. 6.18,
being something different for other CNC manufacturers. Here a machining tool-
path obtained from the CAM system is translated into a sequence of short linear
interpolations (between 0.1
mm and 1
μm length). The look-ahead algorithm
evaluates each set of three consecutive points and calculates two geometrical pa-
rameters, the α angle between two successive chords and the radius of curvature R
of the circle involving the three points. The CNC estimates two feed rates; the first
R
D
D
D
cos KF
Angle
RKF
RRadii
F= min(F
Angle
,F
Radii
,F
CNCprogram
)
CNCprogram
F
F
F
CNCProgram
Fig. 6.18 Example of a simple look-ahead algorithm, the feed calculation for a general toolpath
6 Machine Tool Performance and Precision 245
is the function of the α angle, the second is the function of the R radius. Compar-
ing these two calculated feed rates with the programmed one, the most restrictive
of the three is selected and sent to the CNC axis control function.
Obviously, these algorithms imply feed reduction and consequently increase ma-
chining time; e.g., milling times can be up to 80% higher than expected using the
programmed feedrate as reference. For this reason, the look-ahead parameters (the
K factors in Fig. 6.18) can be changed along the CNC program inserting some auxil-
iary functions in the program. These auxiliary functions call a set of parameters stored
in a CNC table. Usually, for rough operations without precision requirements but
where high productivity is desired, the look-ahead parameters to be selected do not
greatly reduce the programmed feed rate. In contrast, in the case of finishing oper-
ations it is important to active look-ahead parameters for reducing the feed rate and in
this way the inertial forces, thus allowing a smooth motion along the full path.
6.3 Errors Originated by the Machining Process
The previous sections have described the main sources of error originated by the
machine tool and its components. In addition to these errors, there are important
errors that come from the machining process. Sometimes they can be greater than
deviations caused by the machine itself.
Errors from the manufacturing process can start in the early stage, the CNC
program generation, being followed by tool wear, tool deflection and deformation
of parts due to the fixture pressure.
Of course, human error is always possible. In recent years, multi-task and
multi-axis machines have extended the probability of collisions of tool against
part. For this reason, specially developed software for the virtual simulation of the
machining process along with machine movements are becoming interesting.
These packages allow checking machining programs on the PC screen. An exam-
ple is Vericut™ by CGTech
®
. All the same, this risk and other human errors are
not considered in the error budget.
In a general point of view, errors originated by the machining process can be re-
duced by taking special care of the fixture of the part and the tool clamping system
on one side, and making a good selection of the machining parameters on the other.
Some models can be used to estimate repetitive errors caused by the cutting forces;
however it is impossible to avoid others, so they have to be considered in the ma-
chine tool error budget to obtain the total error budget of the part to be machined.
6.3.1 Errors Originated in the CNC Program Generation
The CNC programs generation can be carried out in three different ways, i.e.,
manual programming, conversational programming or using a computer aided
246 A. Lamikiz, L. N. Lopez de Lacalle and A. Celaya
manufacturing (CAM) system. Manual and conversational programming are sim-
ple, direct and, assuming that no mistakes have been made, accurate because it is
the user who sets the position of the tool at each point. Nonetheless they are only
valid for very simple parts. For medium and high complexity parts, CAM systems
must be used.
CAM systems use as inputs the part CAD geometry and a number of parameters to
be defined by the user. In the 1980s and early 1990s, the calculation of the tool with
respect to the part surface was based on the triangularisation of the CAD surface,
which was an additional source of error. Nowadays, CAM software works with the
real CAD surface to calculate tool positions. Nevertheless another discretisation is
introduced, because the final CNC program is generally based on a sequence of short
linear interpolations. The deviation between these interpolations and the original
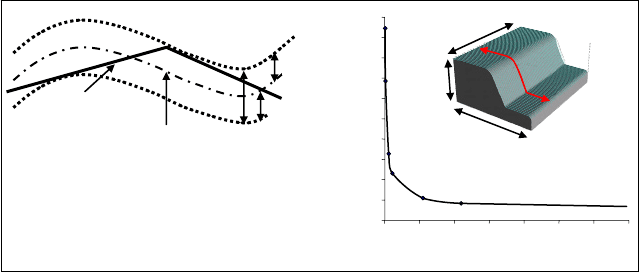
CAD geometry is controlled by the CAM system, using a tolerance value or, which is
much more widespread, two tolerance values called intol and outol (see Fig. 6.19).
Obviously, the lower are the tolerance values, the higher is the precision of the CNC
program. But if intol and outol are very low, the number of linear blocks increases
exponentially and consequently the size of the CNC file. Figure 6.19 shows the pro-
gram size for different intol and outol values; the CNC file size is less than 500
Kb for
a tolerance of 1
μm, but the part size is only 300
×
300
×
150
mm and the geometry is
quite simple. In the cases of large parts, such as automotive stamping dies, the CNC
file size for a finishing program can be up to 700
MB or even more. In industrial ap-
plications the file size is important because it implies memory requirements for the
CNC and for the mass storage systems.
Some CAM systems are able to generate toolpaths using high-order curves
such as splines or NURBS. This method can obtain complex trajectories with
much fewer points, so it may seem the perfect solution to obtain more precise
trajectories. However, the most extended technique is still the toolpath linear dis-
cretisation due to the lack of standardisation in CNC NURB and spline program-
ming on one side, and the higher calculation power and bigger storage capacity of
the current CNCs on the other.
Toler
Outol
Intol
Theoretical
Trajectory
Real Trajectory
0
50
100
150
0 0.1 0.2
CNC file size
(
Kb
)
500
450
400
350
300
250
200
Intol+Outol (mm)
300 mm
300 mm
150 mm
0.70.60.50.40.3
Fig. 6.19 CNC file size for a test part with different intol and outol values
6 Machine Tool Performance and Precision 247
Nevertheless, in a strict sense, deviation caused by CAM systems is not a con-
ventional source of error because the maximum deviation can be controlled. How-
ever, it is necessary to take into account the value of this error, considering it
within the total error budget of the part.
6.3.2 Errors Originated by the Tool Wear
During the last twenty years, new substrate materials, coatings and tool geome-
try have been developed to increase the cutting speed and chip load. These
developments also result in a longer tool life. Unfortunately tool wear is an
unavoidable effect originated by several degradation processes, such as abra-
sion, diffusion, plastic deformation, etc. Wear can be located on different zones
of the tool edges. Hence, if wear is located on the tool rake face the cutting
edge resistance is badly affected and the edge may break, but this wear type
does not have a direct consequence on the workpiece dimension. On the other
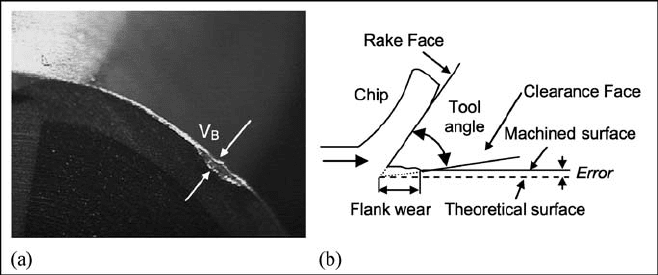
hand, if wear is located on the flank face, both the tool shape and dimension
change, affecting the accuracy of the workpiece. Therefore, flank wear must be
measured and controlled as with any other source of error, as it is shown in
Fig. 6.20.
Flank wear is measured by the VB parameter. There is a direct relationship
between VB and the tool dimension which depends on the tool diameter in the
milling case or on the tool edge angle in the turning case. Therefore, the higher
the VB parameter, the higher the tool tip deviation and the inaccuracy of the
machined part. The mean value of VB must be under 0.3
mm for general ap-
plications (or 0.5
mm in some cases). However, this reference value must be
lower for high added value precise parts, where a new tool can be required for
each part.
Fig. 6.20 a Flank wear. b Flank wear and consequences on the
p
art dimension
248 A. Lamikiz, L. N. Lopez de Lacalle and A. Celaya
6.3.3 Tool Deflection Error
Some machining operations require the use of slender tools in order to finish deep
and narrow cavities, for example the milling of moulds for plastic components.
Then there are important errors coming from the deflection of the cutting tool, or
more exactly, from the distortion of the entire machine-toolholder-tool system
under the action of the cutting forces [15].
There are several research works about the effect of tool deflection on machined
surfaces. For example, in [9] errors of 100
μm were measured in a hardened steel
mould for a 78
mm overhang and 10
mm diameter cemented carbide ball-end mill.
The magnitude of this figure explains why some die and mould makers have to
repeat the finishing CNC program to re-machine the stock material left over from
the previous finishing, with the resultant increase in cost and production time.
The first approximation to the study of tool deflection error is considering tool
as a cylindrical cantilever beam. This basic model predicts deflection as:
4
3
3
64
D
L
E
F
T
π
δ
=
(6.5)
As seen, tool deflection is a function of the following parameters: E, the
Young’s modulus for the tool material, L
T
3
/D
4
, the tool slenderness parameter
including D, the equivalent tool diameter, and L
T
, the overhang length. Finally,
F is the cutting force perpendicular to the tool axis. Considering the previous
model, the use of short and high diameter mills is highly recommended, but opera-
tions in narrow cavities usually require high overhangs and low diameters.
The tool is placed at the end of a system where the machine, the shank and the
toolholder also introduce flexibility. Typical values of system flexibility (meas-
Fig. 6.21 Configuration of the tests for obtaining the shank-spindle rigidity (a), the tool-
toolholder angular rigidity (b) and tool-toolholder radial rigidity (c)
6 Machine Tool Performance and Precision 249
ured at the tool tip) range from 0.4 to 1.8
µm/N; this feature depends on the type of
toolholder, machine stiffness and tool slenderness.
One of the most common shanks is the HSK type (see Sect. 3.4.3) which
is based in a double-face contact in the spindle nose, both in the tapered and
the flanges shank faces. This feature provides excellent performance in terms
of axial and radial stiffness. In [1] the radial stiffness of HSK50 shanks is meas-
ured, which ranges from 19
N/μm at 5,000
rpm to 17
N/μm at 25,000
rpm. Com-
paring these values with those of the tool derived from the cantilever beam
model, which are about 0.15
N/μm for 6∅ mm and 4.4
N/μm for 12∅ mm; it can
be noted that in the stiffer case, tool stiffness is approximately four times lesser
than the shank.
On the other hand, comparing the stiffness of the tool with respect to the ma-
chine tool, in the case of the most flexible tool, machine flexibility is less than
45% of the global value measured at the tool tip, whereas it increases to 69.5% in
the case of the most rigid tool.
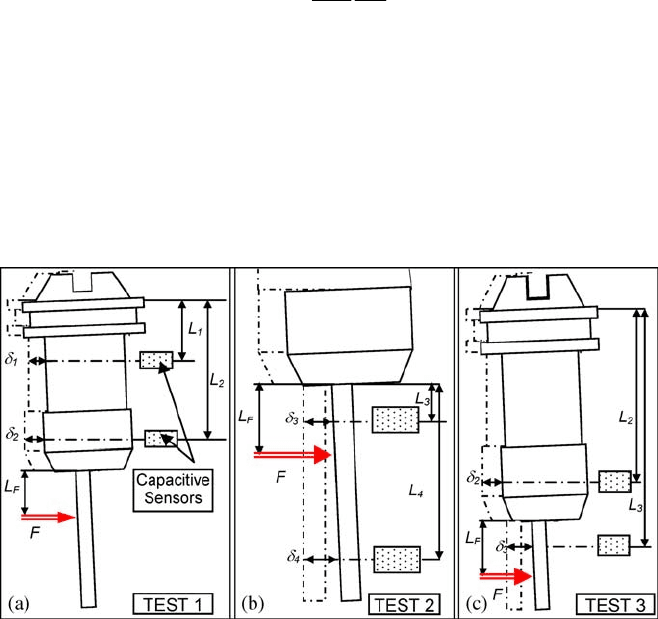
An experimental study with HSK 63 toolholder was carried out by the authors (see
Fig. 6.21), because this shank is one of the most used in high speed milling applica-
tions. Three different tests to study the stiffness of the spindle–shank and tool-
toolholder interfaces were done, measuring the tool displacement δ with two capaci-
tive sensors and applying a constant force F, measured by a dynamometer table.
In the first test, the capacitive sensors were located measuring the shank dis-
placement at two separated points. In the second test, the sensors were both lo-
cated measuring tool displacements at two tool points and finally, in the third test
one of the sensors measured the toolholder displacement while the other measured
the tool displacement.
The radial and angular stiffness of each element can be obtained from the meas-
urement of
δ
1
,
δ
2
and
δ
3
, combined with the position of the capacitive sensors and
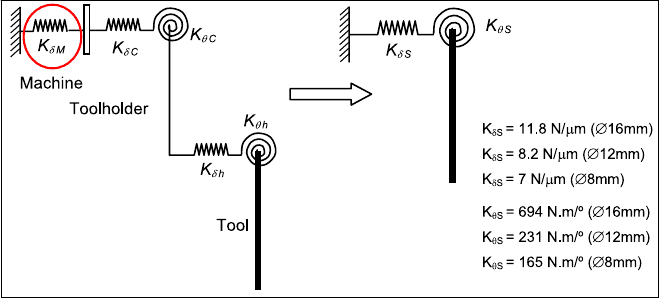
the force application point. The effect of the stiffness of the machine in itself can be
added to the so-obtained equivalent coefficients. As can be seen in Fig. 6.22, where
Fig. 6.22 Equivalent radial and angular rigidity for different tool diameters
250 A. Lamikiz, L. N. Lopez de Lacalle and A. Celaya
the values of equivalent angular K
θ
and radial K
δ
stiffness are shown, tool-
toolholder-machine stiffness depends on the tool diameter. It must be taken into
account that rigidity is different for each machine axis and using the lower value
implies estimating the worst stiffness case. The complete calculation of the equiva-
lent rigidity calculation is fully developed in [15].
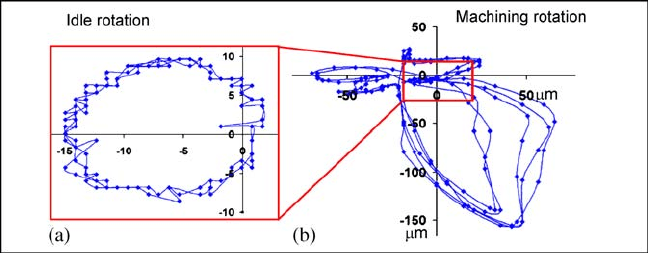
For rigid tools, tool deflection is lower than initial tool runout, so deflection er-
ror due to cutting forces can be ignored. Nevertheless, for slender tools cutting
forces causes tool tip deflection up to 10 times the runout value. In Fig. 6.23, the
real displacement of an 8
mm diameter end-mill is presented, measured with two
capacitive sensors, one for the X and the other for the Y axis. In Fig. 6.23a the tool
is running without machining, so displacement corresponds to the initial runout.
The tool in Fig. 6.23b is machining a hard tool steel with tool deflection being
more than 100
μm.
To evaluate the error generated by the tool-toolholder-machine flexibility, it is
necessary to consider the magnitude of the cutting force too. Therefore we can
distinguish two different cases for machining operations.
• Turning operations: Turning operations present constant chip load resulting in
constant cutting force. Therefore, the error caused by the tool tip deflection can
be predicted relatively easily, using the equivalent stiffness value of the system.
In this case, it is important to distinguish between sensitive and non-sensitive
errors (see Fig. 6.14).
• Milling operations: Error caused by the tool deflection is much more complex
to evaluate. Milling involves variable cutting forces, so tool deflection is also
variable along each rotation. Usually, tool deflection is a quasi-static phenome-
non, so the deflection is proportional to the cutting force but time dependent.
On the other hand milling is a three-dimensional operation.
In this respect, the error on the part surface caused by the tool deflection de-
pends on the instant at which the tool cuts the theoretical surface of the workpiece,
while what happens along the rest of the tool rotation will not have any effect on
the part precision. For the downmilling case, the instant that must be considered is
Fig. 6.23 a Initial runout. b Tool axis displacement during machining, 8
mm diameter endmill
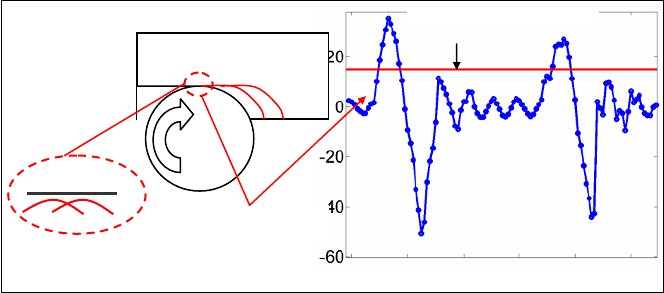
6 Machine Tool Performance and Precision 251
when the cutting edge exits from the workpiece; for the upmilling case it is when
the cutting edge engages into the workpiece, as is the case shown in Fig. 6.24. On
the right of this figure, the tool axis displacement and the tool deflection error is
represented. The surface error is produced when the cutting edge engages into the
workpiece, and the rest of the rotation does not cause any error in the workpiece
surface.
There are some research works that explain the calculation of errors due to
tool deflection including some solutions [15,
21] but they are difficult to apply.
First, it is necessary to estimate the cutting forces at the instant when the tool
contacts the theoretical surface of the part. In addition, the calculation of the cut-
ting force must be done with the real chip load, as the tool deflection reduces the
theoretical chip thickness. On the other hand it is necessary to calculate the
equivalent stiffness of the complete system machine-toolholder-tool, which would
be necessary to evaluate for every tool and toolholder combination. Finally, it
would be necessary to compensate the estimated errors in the CAM system or
directly in the CNC.
The practical solution is to use machine tools, toolholders and tools as rigid as
possible. Tool rigidity depends on the slenderness so the objective is to maximise
the tool diameter and minimise the overhang. Another practical solution is to
reduce the chip load for finishing operations in order to minimise the cutting
force, and therefore tool deflection. Again, this solution has the disadvantage of
a lower productivity, but it may eliminate later finishing operations.
6.4 Verification Procedures
The objective of the machine verification is to know and measure all machine
errors to understand and document its capabilities. An important purpose of verifi-
Cemented carbide
endmill
8mm /2flutes
a
e
:1.5mm
a
p
: 1.5mm
fz : 0.05mm
Measured machining error
Tool centre displacement due to cutting forces
Machining Error
Contact Area
Theoretical surface
Erro
r
Fig. 6.24 Error caused by tool deflection for an upmilling case: the instant of the cutting edge
engagement is when the tool deflection causes the machining error
252 A. Lamikiz, L. N. Lopez de Lacalle and A. Celaya
cation procedures is the detection of systematic errors, providing the necessary
information to compensate them. Therefore, the definition of standard procedures
has been a key factor to increase machines precision.
From a general point of view, machine tool testing and verification procedures
can be grouped into two types. First, geometric validations tests that measure and
calibrate the machine tool in no-load operating conditions. Second, the machining
of test parts, which can be performed either by the machine builder or the
customer to verify machine performance during its normal function.
6.4.1 Standard Procedures for Machine Tool Validation
Geometric validation tests measure the machine tool accuracy and repeatability
with a series of simple positioning tests, generally operating under no-load condi-
tions. Standards determine how to measure, giving admissible tolerances for linear
and rotary axes.
The testing procedures establish a series of target points, the accuracy and re-
peatability is obtained measuring several approximations to each target point. The
results are the straightness, parallelism and squareness of linear axes, the concen-
tricity errors of rotary axes, etc. These errors are measured with high precision
measurement devices like laser interferometers, collimators or calibrated rules, so
measurements are quite simple to perform and information is very accurate.
Many machine tool builders try to simplify the specification of the accuracy
and repeatability of their machines given a numeric value, but often the user re-
ceives it without any reference about the tested conditions. In fact this is a bad
practice, because the numerical value of the accuracy can vary significantly de-
pending on the measurement procedures. For example, the accuracy is different
when fewer control points are measured, or if measurements in a forward direc-
tion instead of bi-directional measurements are done. The repeatability may also
vary depending on the number of measures at each control point. The fact that the
accuracy and repeatability values can differ significantly makes it very difficult to
compare the performance of different machine brands.
To generalise the same definition of accuracy and repeatability, some interna-
tional standards have been presented. The most important ones are the ISO 230-2,
JIS B6201-1993 and ASME B5.54. These standards establish both test procedures
and statistical parameters to be measured, to calculate the accuracy and repeat-
ability for linear and rotary machine motions. Nevertheless, there are some impor-
tant differences among these standards, mainly in the number of target points and
measurements needed to define the value of machine accuracy.
The ISO 230-2 is probably the most accepted standard in the world, including
some important advantages. Testing according to the ISO 230-2 has the following
bases:
