Klocke F. Manufacturing Processes 1: Cutting
Подождите немного. Документ загружается.

3.6 Mechanical and Thermal Strain on the Cutting Section 61
extrapolating the undeformed chip thickness to h = 1 mm. The tangent of the angle
between the straight line and the x-axis is the desired gradient value (1–m
c
).
Corresponding equations and characteristic values can be defined for resultant
force components F
f
and F
p
:
F
’
f
= k
f1.1
· h
(1−m
f
)
(3.5)
F
p
= k
p1.1
· h
(1−m
p
)
(3.6)
The values determined in this way are however only valid for undeformed chip
thicknesses of h > 0.1 mm. Values for k
c
and (1–m) can be found in [Köni82].
According to DIN 6584, the energy for cutting is the result of the product of the
paths to be travelled or paths travelled and the components of the resultant force act-
ing in their direction. Correspondingly the powers arising during the cutting process
result from the product of the speed components and the components of the result
force acting in their direction.
Cutting energy W
c
and cutting power P
c
:
W
c
= l
c
· F
c
(3.7)
P
c
= v
c
· F
c
(3.8)
Feed energy W
f
and feed power P
f
:
W
f
= l
f
· F
f
(3.9)
P
f
= v
f
· F
f
(3.10)
Effective energy W
e
and effective power P
e
are understood as the sum of all
corresponding cut and feed amounts:
W
e
= W
c
+ W
f
(3.11)
P
e
= P
c
+ P
f
(3.12)
Due to the relatively low feed speeds and feed paths, feed energy/power dur-
ing turning amounts to only about 0.03–3% of the corresponding cutting energy or
cutting power. For this reason, we can assume W
e
≈ W
c
and P
e
≈ P
c
for most
cases.
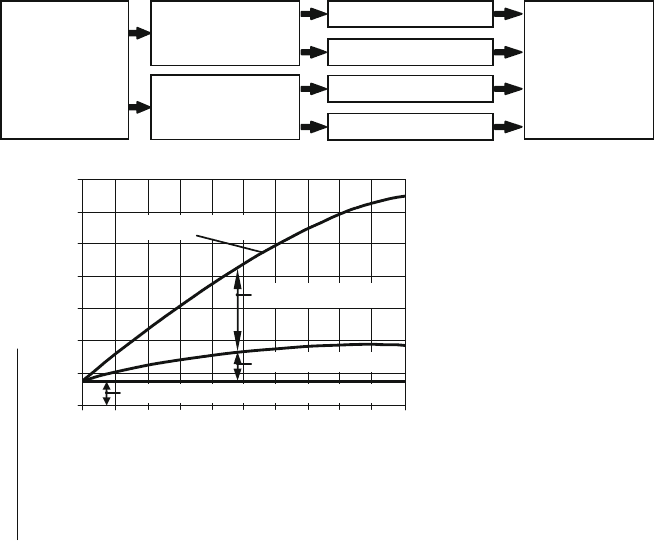
Figure 3.26 provides an overview of the segmentation of the total active energy
into shear, cutting and friction energy as a function of the undeformed chip thickness
[Vier70]. The illustration shows that the amounts of the different types of energy
depend on the undeformed chip thickness, whereby shear energy has the largest
share for most undeformed chip thicknesses.
The mechanical work used in cutting is almost completely converted into thermal
energy. Since the heat centres are identical with the deformation centres, the shear
62 3 Fundamentals of Cutting
Width of undeformed chip:
h / mm
Material: 55NiCrMoV6
Tensile strength: R
m
= 800 N/mm
2
Cutting speed: v
c
= 100 m/min
Width of undeformed chip:
b
= 4.25 mm
Tool orthogonal clearance:
α
ο
= 5
°
γ
ο
= 10
°
Tool orthogonal rake angle:
0
200
400
600
1.0
100
300
500
700
0
Friction of flank face and cutting energy
Friction of rakeface
Total energy
Shear energy
Effective
energy W
e
W
e
= F
e
·I
e
Deformation energy
Friction energy
Shear energy
Cutting energy
Friction of flank face
Friction of rake face
Latent energy
and
heat
Path length due to primary
motion
Effective energy W
e
/ (m·daN/m)
0.2
0.4
0.6 0.8
Fig. 3.26 Segmentation of effective energy in cutting process depending on chip thickness, acc.
to V
IEREGGE [Vier59, Vier70]
zone and the friction zones on the tool come into consideration as heat sources.
As Fig. 3.13 shows, the degree of deformation on the bottom of the chip is much
higher in the flow zone than in the shear zone, so one can expect the highest tem-
peratures between the chip and the tool. Since the thickness of the flow zone is very
small in comparison with the shear zone however, these higher temperatures should
not also be equated with a high energy conversion.
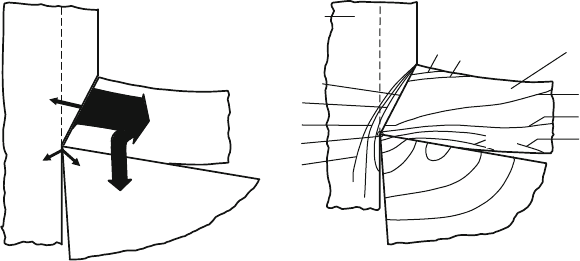
The illustration in Fig. 3.27 left gives information about heat that is
absorbed/dissipated by the workpiece, chip and tool. Most of the heat is dissipated
by the chip. Most of the mechanical energy (in this case 75% and generally more
than 50%) is converted in the shear zone. The heat arising in the individual develop-
ment locations is dissipated by thermal conduction, radiation and convection to the
environment. As a result of this heat balance, corresponding temperature fields form
in the workpiece and tool that change until equilibrium between added and removed
heat is achieved. The right side of the figure shows such a temperature field.
If we consider one material particle in the cutting zone, its temperautre will be
at least equal to that of a particle in the shear zone. As it glides further into the
contact zone, the material is intensively heated on the chip bottom side and the tool
on the rake face, because the energy required to overcome friction between the chip
3.6 Mechanical and Thermal Strain on the Cutting Section 63
600
700
650
600
400
450
500
300
310
380
o
C
130
80
500
30
Workpiece
Chip
Tool
5%
2%
18%
75%
For steel
Material: Steel
Flow stress: k
f
= 850 N/mm
2
Tool material: HW-P20
Cutting speed: v
c
= 60 m/min
Width of undeformed chip: h = 0.32 mm
Tool orthogonal rake angle: γ
o
= 10
o
Fig. 3.27 Distribution of heat and temperature in workpiece, chip, and tool in the process of steel
cutting, acc. to K
RONENBERG [Kron54]andVIEREGGE [Vier59]
and the rake face is almost completely converted into heat. Since this process only
takes place in boundary layers of the chip and cutting tool material it heats up the
rake and chip bottom side all the more strongly the less time is available for heat
dissipation due to the higher cutting speeds. The maximum temperature does not
appear directly on the cutting edge, but rather at a certain distance from it on the
rake face depending on the cutting conditions.
Determining the temperatures arising during cutting has long been the s ubject
of intensive research [Gott25, Lang49, Schm53, Küst54, Vier55, Küst56, Axer55].
Already in 1956, K
ÜSTERS demonstrated temperatures of over 1000
◦
Contherake
face when cutting steel with cemented carbide [Küst56]. Later investigations have
qualitatively confirmed these results again and again [Cass94, Denk90, Ehme70a,
Lenz66, Laus88, Beye72, Dama90, LoCa94 ]. The level of the temperatures acting
on the cutting section depends on the machined material, the cutting tool material,
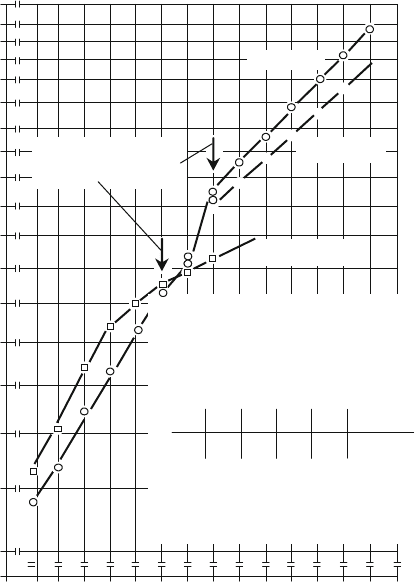
the selected cutting conditions, tool wear and the cooling medium. Figure 3.28 pro-
vides an impression of the order of magnitude of the mean cutting temperatures to
be expected on the rake face as a function of cutting speed for various cutting tool
materials. In the v
c
= 20–50 m/min range, the temperature profile is non-linear in
the double logarithmic coordinate system. The reason for this is the the growth of
built up-edge arising in this cutting speed range (see Sect. 3.7.2), which interferes
with direct heat conduction.
In comparison to the rake face, temperatures on the flank face are generally low
(Fig. 3.29)[Denk90, Ehme70a, Axer55, Laus88, Beye72, Dama90]. The size of the
temperature difference between the rake face and the flank face, about 200–300
◦
C
64 3 Fundamentals of Cutting
Tool material: HW–P10, P30
High speed steel HS12–1–4–5
Material: C53E
Geometry of cutting section:
6
°
6
°
0° 70°
84° 0.8 mm
Cross section of undeformed chip:
a
p
· f = 3 x 0.25 mm
2
Cutting time: t
c
= 15 s
300
350
400
450
500
550
600
650
700
750
800
850
900
950
1000
1050
1150
10 16 25 40 63 100 250
x
x
x
x
x
x
HW-P1
HW-P30
HS12–1–4–5
End of growth of–
build–up edge
Cutting speed v
c
/ (m/min)
1100
Temperature of rake face ϑ / °C
α
o
γ
o
κ
r
ε
r
r
ε
λ
s
Fig. 3.28 Mean rake face temperature
when cutting with cemented carbide tools according to [Ehme70a], is strongly co-
determined by the position of the contact zone on the rake face. The closer the rake
face moves t owards the cutting edge, the more the temperatures prevalent on the
rake and flank faces conform. This means that temperatures are very high on the
flank face as well, especially during finishing operations with high cutting speeds
and small feeds. According to the information provided by the literature [Ehme70a,
Vier53, Schm53, Küst54, Vier55, Küst56, Axer55, Beye72], temperatures of over
800
◦
C can be found on the flank face depending on the selected marginal conditions
when cutting with cemented carbide tools.
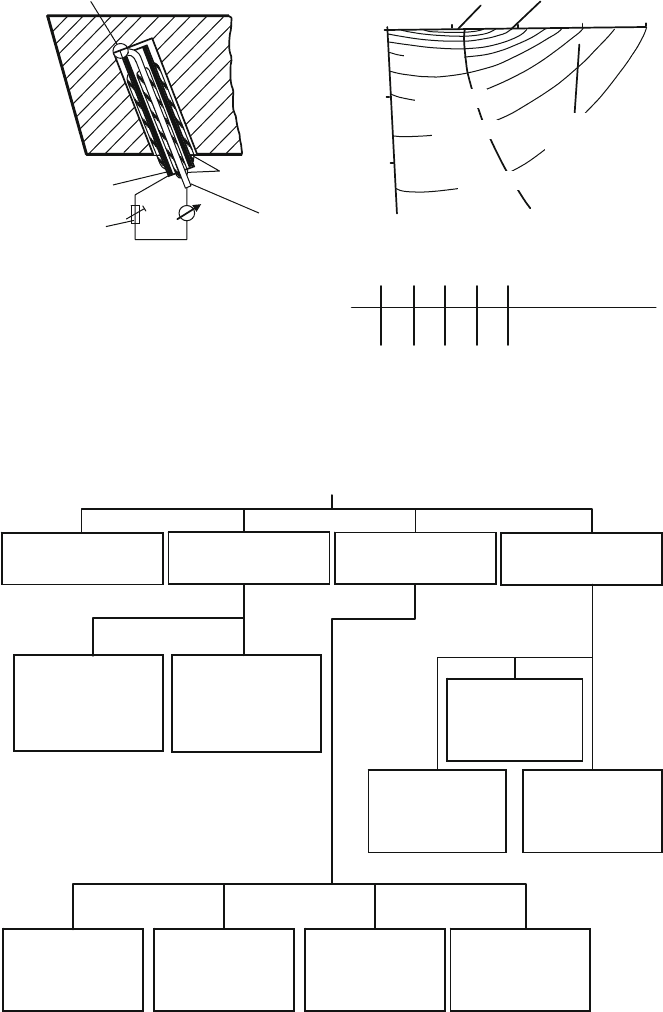
There are various methods and devices available for temperature measurement
during the cutting process (Fig. 3.30)[Lowa67], which vary according to technique,
experimental setup and measurement position. The only metrological techniques
that come into question for measuring temperature during the cutting process are
time-resolution measurement techniques, since the cutting process duration (and
thus the achievement of a thermally stationary state) is too short for other methods
3.6 Mechanical and Thermal Strain on the Cutting Section 65
0
1
2
3
4
1
2
1200°C
800°C
600°C
500°C
400 °C
Weld
Isolation of silicon
varnish
CrNi-Wire
∅ 0.07 mm
mV
Compensating
resistance
Ni-tube
∅ 0.13−0.20
Example for the
distribution of
temperature
inside the
cutting edge
Material: 30Mn4
Cutting tool material: HW-P10
Cutting speed: v
c
= 180 m/min
Cross section of
undeformed chip: a
p
·f = 3 ·0.74 mm
2
Cutting wedge geometry
45° 90°
γ
o
α
o
λ
s
κ
γ
ε
r
r
ε
Bevel width: 0.5 mm
45° to cutting edge
0° 4° 0°
1000°C
Fig. 3.29 Measurement of temperature with embedded thermocouple on cemented carbide, acc.
to Küsters [Küst56]
2. Measurement with
thermo-colours
1. Caloric heat
measurement
3. Thermo-electric
measurement
4. Radiation-
measurement
2.1. Coat of paint at
an uninvolved
surface of the
tool
2.2. Coat of paint
at the inner
surface of a
splitted tool
4.1. Radiation
pyrometer
3.1. One-chisel
method
3.2. Two-chisel-
method
3.3. Assembly of a
complete
thermocouple
3.4. Assembly of
an isolated
wire as
themocouple
Temperature measurment during machining
4.3. Measurement
of infrared
radiation
with PDS-cell
4.2. Infrared
photo-
thermometry
Fig. 3.30 Temperature measurement in cutting processes
66 3 Fundamentals of Cutting
(e.g. coating with temperature-sensitive colours or powders with constant melting
points). Of the processes introduced in Fig. 3.30, the one and two-chisel methods,
temperature measurement with thermocouples, pyrometers and photo thermometry
are of technical interest.
G
OTTWEIN developed the one-chisel method as the first direct method for mea-
suring temperature and then, in cooperation with R
EICHEL, the two-chisel method
[Gott25, Herb26, Vier70]. Both methods are based upon the principle of a thermo-
couple. Both tool and workpiece form the heat soldering joints, while the tool clamp
is the cold soldering joint. The workpiece and the tool must be clamped in isola-
tion, since the thermoelectric voltage arising in t he contact zone between the cutting
insert and the chip would otherwise be dismantled through the machine in a short
circuit. Contact between the passing chip and the workpiece outside of the contact
zone must therefore also be avoided. Both methods require electrically conductive
materials and cutting tool materials. In the case of the two-chisel method, cutting
tool materials with varying thermoelectric properties must be used. The greatest dis-
advantage of the single-chisel method is the protracted and elaborate process needed
to calibrate the thermocouple which must be carried out again for every cutting tool
material and workpiece material combination. This process can detect temperatures
of up to 1200
◦
C.
Temperature measurement with thermocouples is among the most common tech-
niques today. Installing a thermocouple into the tool or workpiece allows for a
point-wise determination of the temperature field (Fig. 3.29). The thermocouples
included are classified as encapsulated thermocouples, sheathed thermocouples and
single filament thermocouples. Thermocouples can be applied in blind holes in
the tool [Küst56, Qure66, Abra97] or in the workpiece [Osul02]. Temporal res-
olution is influenced by the response time of the thermocouple and heat transfer
between the thermocouple and the device under test. These techniques generally
have low temporal resolution. Also problematic is the contact heat transfer resis-
tance between the surface under test and the thermocouple due to the roughness of
the bore. This causes a difference in temperature between the measurement surface
and the thermocouple. In the case of sheathed thermocouples with isolated mea-
suring points, there is also the distance between the thermocouple surface and the
internal measurement point. Due to the extremely high temperature gradients with
short test times characteristic of cutting processes, this can lead to much lower mea-
surements. The maximum values dominant in the friction zones cannot be measured
in this way. Thermal compounds are used to improve heat transfer between the ther-
mocouple and the surface. Another disadvantage is that direct contact between the
thermocouple and the test object is necessary and that the holes used to position the
thermocouples can significantly affect the distribution of temperature.
The most important techniques in radiation measurement, which determines tem-
perature by measuring the heat radiation emitted from a surface, are pyrometry and
thermography. Pyrometry is the contact-free determination of absolute temperature
by measuring the inherent radiation of a body without spatial scanning of the object
field. Thermography provides a pictorial representation of temperature distribu-
tion. Radiation techniques have decisive advantages compared with thermoelectric
3.6 Mechanical and Thermal Strain on the Cutting Section 67
methods: the time resolution is much higher (whereby pyrometers are principally
faster than infrared cameras), and they are also contact-free.
One significant problem when measuring for an exact absolute temperature with
a radiation method is the dependence of the radiation emitted on the grade of
emission of the surface. Since the emission grade is the function of many factors like
temperature, wavelength, angular position, material and surface condition, calibrat-
ing the measurement device for a particular surface is very difficult. The precision of
total radiation and broadband partial radiation pyrometers are especially influenced
by factors that alter the spectral grade of emission of the surface. In cutting, effects
such as surface roughness and oxidation influence the grade of emission of different
surfaces greatly. To limit the influence of the grade of emission on measured tem-
peratures, narrow-band partial radiation, two-colour and multi-colour pyrometers
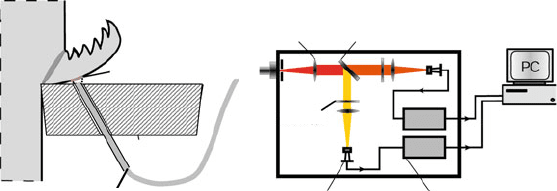
have been developed. The two-colour pyrometer (Fig. 3.31) has the advantage that
the spectral grades of emission ε
1
and ε
2
of the surface need not be known. Since
the two selected wavelengths lie directly next to each other, ε
λ1
∼ ε
λ2
.Anerrorin
measurement will only result i f both wavelengths λ
1
and λ
2
differ greatly. Further
advantages of this principle are that the measured temperature is independent of
signal dampening, due to dust for example, so long as both signals are dampened
equally. Moreover, the temperature of objects that are smaller than the optical field
of vision can be measured without error [Müll85].
Thermography with infrared cameras can be used as an alternative to pyrometri-
cal measurements. The advantage to this is the pictoral representation of temperature
information. Commercial cameras usually work with long wavelengths and large
broad-bands, which makes it possible to measure lower temperatures but which also
has a negative effect on the attainable accuracy. Scanning cameras that work with
a single detector are too slow for fast processes. Some high-speed infrared cameras
Insert
Workpiece Chip
Point of measurement
Lens
Dichroic
beam-splitter
Photodiode
Amplifier
IR-filter
Glass fiber
(∅ = 0.42 mm)
Characteristics
• Measurement of two discrete wavelength bands
1
= 1.7 µm, and
2
= 2 µm
which are set into ratio
• High temporal resolution (approx. 2 µs)
• Independence from grade of emission (no calibration required)
• Large range of temperature measurement (250–1200 °C)
• Contact free measurement
λ
λ
Fig. 3.31 Build-up of a two-colour pyrometer in principle, acc. to MÜLLER [Müll85]
68 3 Fundamentals of Cutting
offer integration times in the range of microseconds, making it possible to capture
fast processes without motion blur.
One major problem in the metrological determination of cutting tempera-
tures, besides poor accessibility, is the limited local resolution of the available
measurement techniques as well as the small range (only a few micrometers) within
which the maximum temperatures arise. Local temperatures in the boundary layer
between the cutting tool material and the sliding chip also cannot be captured with
existing measurement methods. Promising attempts to determine thermal tool load
more accurately than previously have been made with sensors in thin-film technol-
ogy, which are applied to tool contact zones and determine temperature distribution
within the contact zones during the machining process [Zieb95, Töns95, Kloc97].
This technology is however not yet suitable for cutting processes with high wear.
Another highly promising method for determining temperatures in the boundary
layers between the material and the cutting tool material is the implantation of a
window made of diamond in the tool contact zone. Heat radiation emitted from the
chip bottom side passes through the window via a mirror integrated into the chisel
holder and reaches an infrared camera [Müll96].
A direct comparison of the temperatures measured by various authors is only
rarely possible, since experimental conditions generally deviate from each other.
There are numerous parameters that may have an effect on temperature: the type
of cutting process, materials, cutting tool materials, possible coatings of the cutting
tool materials, the use of cutting fluids and cutting parameters such as feed, cut-
ting speed, depth of cut and cutting section geometry. Moreover, the measurement
position is also crucial as well as metrological parameters like local or temporal res-
olution. The duration of the cutting process and the measurement time must also be
taken into consideration.
Cutting speed clearly has the greatest influence on the maximum temperatures
that arise in the contact zone between the chip and the tool. I n the case of the
basic process, most measurements indicate an apparent rise in temperature at low
to average cutting speeds, while at high speeds there is an approximately constant
temperature level.
3.6.1 Influence of the Geometry of the Cutting Section
Depending on the cutting task at hand, we can select from a diverse array of cutting
section geometries. Geometry selection depends on
• the cutting tool material,
• material,
• cutting parameters and
• tool geometry.
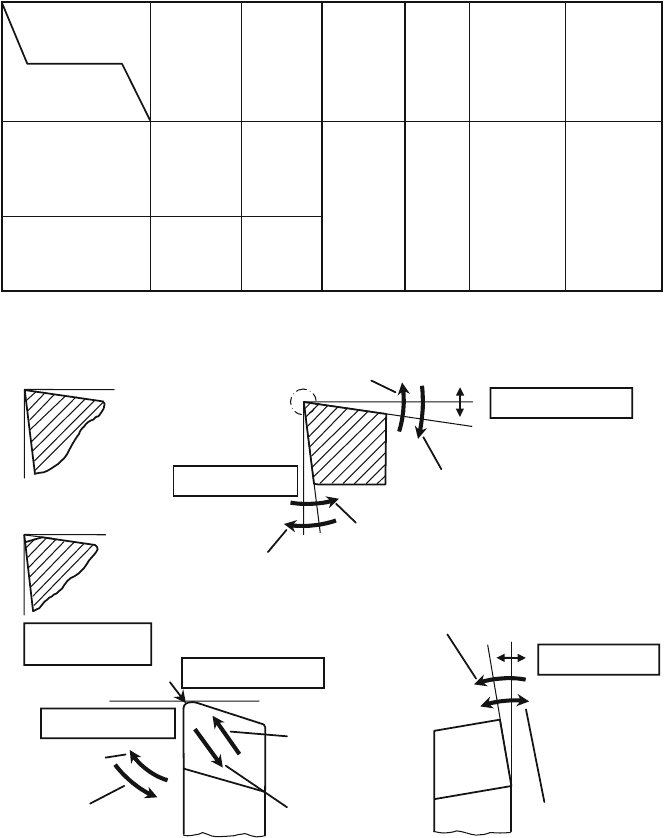
Typical tool angles in steel cutting are given i n Fig. 3.32. Determining the tool
angle always involves a compromise that can only do approximate justice to various
requirements.
Figure 3.33 shows how a change in cutting section geometry influences cutting
parameters.
3.6 Mechanical and Thermal Strain on the Cutting Section 69
Geometry of
cutting section
Cutting tool
material
Tool
orthogonal
rake angle
Tool
orthogonal
clearance
Cutting
edge
inclination
λ
s
κ
r
ε
r
Cutting
edge
angle
Tool
included
angle
Corner
radius
r
ε
High speed steel
(HSS)
Cemented carbide
–6° to +20°
–6° to +15°
–6°
to
+6°
10°
to
100°
60°
to
120°
0.4
to
2 mm
6° to 8°
6° to 12°
α
ο
γ
ο
Fig. 3.32 Tool angle for machining of steel
Lower minimum chip thickness
Increasing stability of cutting section
Improved chip formation
Improved surface
Reduced cutting force
Decreasing wear
Decreasing
wear
Increasing stability
of cutting section
Increased stability of cutting
section
Chamfer of the
rake face
Decreasing wear
Decreasing chatter,
Decreasing cutting
force
o
= –10° to +20°
α
o
= 6° to 12°
κ
r
= 10° to 100°
r
ε
= 0.4 to 2 mm
Decreasing chatter,
Decreasing cutting
force
Increasing
surface quality
Controlled
chip flow
Increasing of passive forces,
Increasing stability of cutting
section
s
=
–6° to +6°
+
–
+
–
γ
λ
Fig. 3.33 Influence of cutting edge geometry on characteristic machining values
3.6.1.1 Tool Orthogonal Clearance α
o
Wear on the flank face (denoted by the width of flank wear land VB) is mostly
determined by the size of the tool orthogonal clearance. If it is large, the cutting
section is weakened in two respects: a heat build-up can ensue in the tool that can
possibly lead to impaired or loss of hot hardness; also, if the wedge angle is too
small, this increases the danger of breaking on the cutting edge. If α
o
→ 0
◦
, surface
70 3 Fundamentals of Cutting
wear increases because pressure weldings appear on the contact areas of the friction
partners to a greater extent.
3.6.1.2 Tool Orthogonal Rake Angle γ
o
, Wedge Angle β
o
The tool orthogonal rake angle γ
o
can, in contrast to α
o
, be either positive or neg-
ative. It is responsible for the detachment of the material to be cut. The size of the
tool orthogonal rake angle γ
o
affects the stability of the wedge; highly positive tool
orthogonal rake angles can thus lead to tool breakage as a result of cutting s ection
weakening. The primary advantages of a positive tool orthogonal rake angle are the
low cutting and feed forces as well as a usually improved workpiece surface qual-
ity. However, a chip flow that is supported by a positive tool orthogonal rake angle
often has insufficient chip breakage (tendency towards the formation of continuous
chips). Negative tool orthogonal rake angles increase cutting edge stability (used for
example for planing and machining workpieces with apertures, rolling skin or cast
skin). The thereby increased deformation of the passing chip and the large cutting
forces result in a high temperature load on the cutting section. Increased crater wear
appears on the rake face, which can lead to a decreased tool service life. Together
with the wedge angle β
o
, the tool orthogonal rake angle γ
o
and the tool orthogonal
clearance form a right angle α
o
(Fig. 3.8).
3.6.1.3 Tool Included Angle ε
r
Due to the tool stability that is desired under extreme cutting conditions, the tool
included angle ε
r
should be as large as possible. Small tool included angles are
required especially for copier and NC machining. The possible range is limited by
specifying the position of the major cutting edge and by making sure that the angle
between the minor cutting edge and the feed direction is at least 2
◦
in order to avoid
subsequent shaving of the minor cutting edge on the workpiece.
3.6.1.4 Cutting Edge Angle κ
r
At constant feed and depth of cut, the width of undeformed chip b increases with
decreasing κ
r
. This causes the specific cutting edge wear to sink, so small cutting
edge angles are used especially to machine high strength materials in order to keep
tool load and wear low. On the other hand, the passive force F
p
rises with decreasing
κ
r
, increasing the danger of clattering vibrations due to growing instability of the
cutting process.
3.6.1.5 Cutting Edge Inclination λ
s
A negative cutting edge inclination can stabilize the cutting process to a large extent
since the lead of the tool does not take place on the cutting edge but rather towards
the middle of the cutting edge. This results in an improved load profile, so that the
danger of cutting edge breakage due to local overloading is reduced. First cuts that
have minimal loads are of particular importance especially in the case of interrupted
