FTA (изд-во). Flexography: Principles And Practices. Vol.1-6
Подождите немного. Документ загружается.


176 FLEXOGRAPHY: PRINCIPLES & PRACTICES
Doctor Blades
Many flexographic printing presses are
equipped with metal doctor blades. This thin
metal strip is sharp when new, and can
become razor sharp after being used. Extreme
care must be taken when cleaning or installing
new blades in the blade holders. Wearing steel
or fiber mesh gloves will prevent cuts. Plastic
gloves are a poor alternative.
Doctor blades should be properly dis-
posed of after removal. Since they are
extremely sharp, blades should never be put
in any container that a coworker may reach
into unknowingly.
Extreme caution must be used during
press wash-ups. Usually wash-ups are done
with cloth or paper rags that are easily cut by
the doctor blade material.
Use of Rags
Rag use and the storage of soiled rags raise
both personal safety and environmental con-
cerns. From a safety stand-point, rags should
be folded neatly when used for cleaning.
Folding the rags helps prevent loose ends
from being entangled when wiping a rotating
anilox roll.
Soiled rags should only be placed in desig-
nated containers with tight closing lids
(Figure ).
Color-coded rags are sometimes used to
distinguish ink clean-ups from general shop
use. These rags should always be kept sepa-
rate from each other. General-purpose rags
often contain metal filings which may dam-
age rolls or plates if used carelessly.
Die-Cutting Safety
Care must be used when handling and
installing dies onto the press. Wearing gloves
will help prevent cuts to hands or nicks to
the die. Extreme care must also be taken
when the press is running and the dies are
rotating. Personnel must keep hands and
loose clothing clear of the rotating die. Stop
the press completely before clearing any
items that are caught or stuck in the die nip.

S
etting up a narrow-web press
is different from machine to
machine. This variation is due to
the wide variety of presses used
in the market today. For this rea-
son, this section will focus on
the basics of set up that are common to most
narrow-web printers.
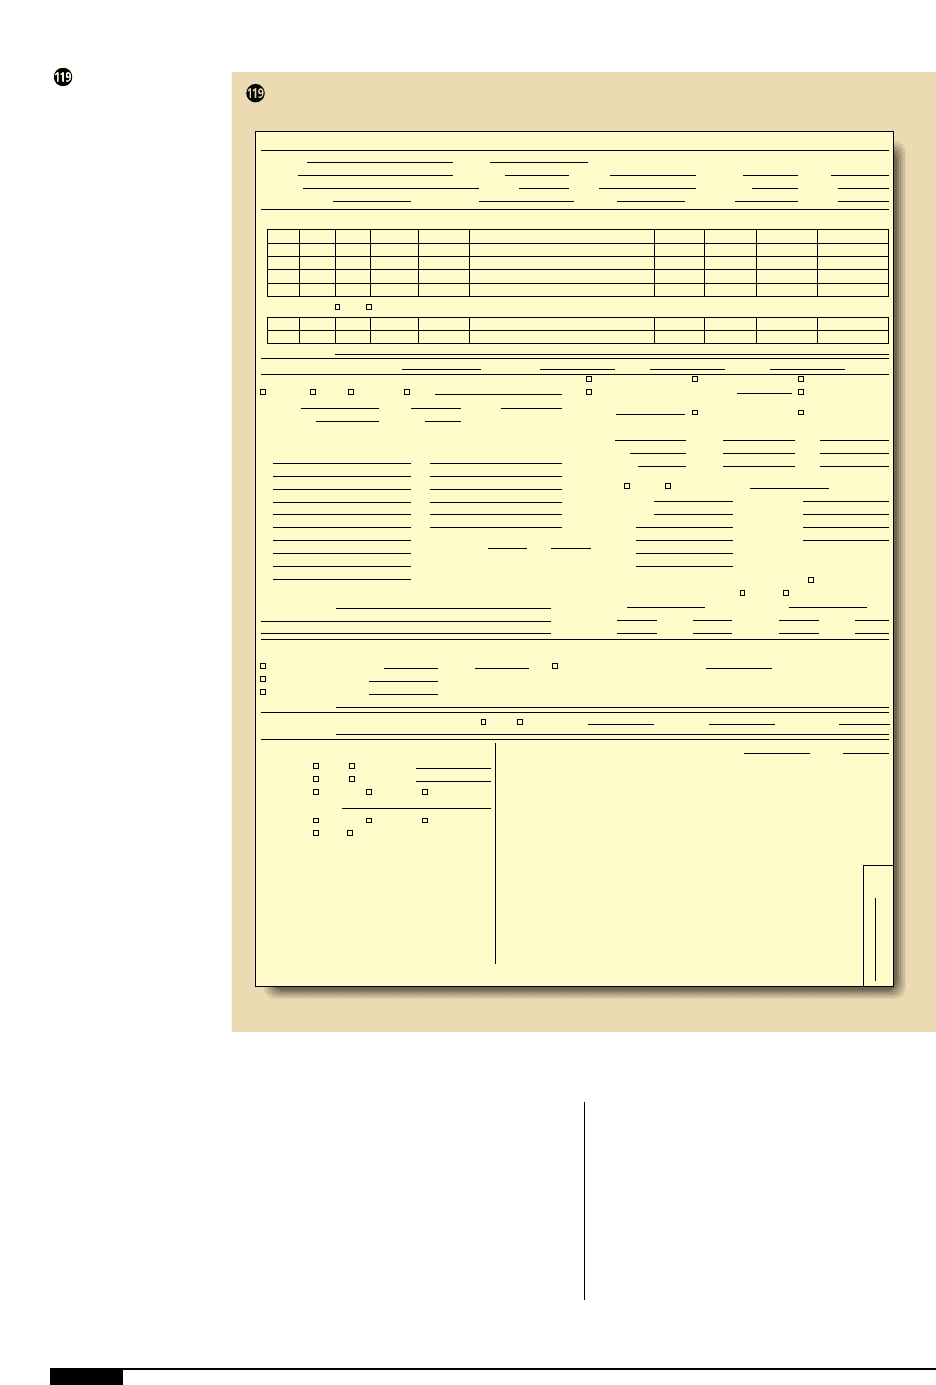
The first step to setting up any job on the
press is to read the job jacket (Figure ).
A job jacket is a folder or envelope that
stores valuable information about the job to
be run. In many cases a prepress proof, art
or a sample from a previous pressrun will be
in the job jacket. The operator must visualize
the final product and how it will be used by
the customer by reviewing the information
on the job jacket and sample. Afterwards,
the operator can develop a set-up plan.
PRESS SETUP
In the next section, we’ll discuss the pro-
cedures for setting up the press:
Select the Print Stations
Generally, art is designed to print the light-
est color first and darkest color last when the
job is to print on the face of the substrate. In
order to hide the areas where two colors
overlap for registration (trap), the darkest
color must print on top of the lightest. The
operator must keep this technique in mind,
and also consider the following items, when
determining which print stations to use:
Existing Colors in the Press. It is important to
think ahead and plan a strategy for all the jobs
being printed, not just the present one. In
some cases, existing colors from a previous
job will meet the requirements for the next
job. If planned from job to job, color strategies
will alleviate unneeded wash-ups and reduce
changeover time.
Anilox Roll Requirements. If the operator can
set up a job to take advantage of existing
anilox rolls, less time will be spent on
changeovers.
Drying Capacity Between Ink Stations. With
large solid ink coverages, it may be neces-
sary to leave an open print station between
colors. This additional web travel length
allows extra drying time for the ink to dry
thoroughly.
Prepare the Dies
The first step of set-up is to locate all tool-
ing required for the job. This process begins
by locating the necessary dies. Care must be
taken to avoid nicking the sharp cutting edge
of the die. To avoid blade damage do not
wear rings when handling dies.
Operators should wipe the shaft and bear-
ers clean and check the blades for built-up
adhesive, ink and dust before the die is put
into the press.
All foreign material must be removed prior
to use. Extreme care must be used when
cleaning the blades on a die. A clean rag and
solvent may be used.
A wooden or plastic paint stick may also
be used to scrape away any debris. A metal
object should never be used to clean a die.
Inspect the Mounted Plates
Mounted-plate cylinders should be brought
to the press area and readied for placement in
the assigned print stations. Plates should be
checked against the design on the prepress
PRESSROOM PRACTICES 177
Narrow-Web Procedures
178 FLEXOGRAPHY: PRINCIPLES & PRACTICES
proof or the previously printed sample, as
well as to the information on the job jacket.
Plates must also be inspected for damage, ink
buildup left from previous runs, and any other
defects. The plate edges should be checked to
make sure there is no lifting from the sticky-
back. Repairs or remounts of the plate should
be done before placement in the press.
Change Anilox Rolls
The operator may need to change anilox
rolls for the job if the rolls are not present in
the press or in the correct ink station. The
appropriate anilox needed to deliver the
required color density must be determined
by either reading the job jacket or job history
sheet, or viewing the prepress proof or a
A job jacket
is a folder or envelope
that stores valuable
information about the
job to be run.
SHIPPING
SHIPPING
OTHER OPERATIONS
PRESSROOM
PLATEROOM
STOCK
JOB JACKET
SAMPLES TO:
PACKING SLIP
SHIP VIA:
BILL/LADING
OLS
OLS
REGULAR
PLAIN
PLAIN
OTHER
OTHER
SPECIAL INSTRUCTIONS:
SHIP TO:
NEXT DAY 2ND DAY
REWINDING
BURSTING
TRIMMING
COLLECT
OTHERSHIP FROM:
PREPAID
OLS
COD
SPECIAL INSTRUCTIONS:
SPECIAL INSTRUCTIONS:
CARRIER
AMOUNT PER ROLL
FINISHED SIZE
FINISHED SIZE
CORE SIZE
CYLINDER SIZE
NO. ACROSS
NO. AROUND
DIE SPECS
GRAPHICS SPECS
MARG. LEFT
MARG. RIGHT
HORZ.
HORZ.
VERT.
VERT.
PERFS:
FANFOLD ATPINFEED:
NO. PER SHEET
REWIND
POSITION
HORZ.
HORZ.
VERT.
VERT.
SLITS:
DIE NO(S)
PERF/SHEETER
PRINT CYL(S).SIZE
ORDERED
ORDERED
ORDERED
REC'D
REC'D
REC'D
SPACING
SPACING
CYLINDER SIZE
NO. ACROSS
NO. AROUND
SPACING
SPACING
DATE SENT
CARTON SIZEOTHER
AMOUNT PER PACKAGE
SPECIAL INSTRUCTIONS:
AMT. PER CTN.
INITIALS
JOB NO.
PLAINOLSSHIPPING LABEL
SHRINKWRAPPING
FLEXO
LEFT RIGHT
LETTERPRESS
SAME
MACHINEHAND
BUTT CUTDIE CUT
SHEETEDOTHERCARRIERCARDLABEL
FRONT
ROLLS
CONTINUOUS
SIZE ACROSS
CORNER RADIUS
CUSTOMER NO.
CUSTOMER
DESCRIPTION
REQUESTED SHIP DATE
RUSH NO.
SALES PERSON
PREP’D BY
ACTUAL SHIP DATE % OVERRUN % UNDERRUN
QUOTE NO.
PO NO.
REPEAT NO.
DATE ORDERED
JOB NO.
TOTAL QTY.
PRESS NO.
1)
2)
3)
4)
5)
6)
7)
8)
9)
10)
BACK
1)
2)
3)
4)
5)
6)
AROUND
PRESS DRAW
LINER SIZE
COLORS
NO. OF NEW PLATES
HERE
VARNISH: OVERALL SPOT
SPECIAL INSTRUCTIONS:
YESOVERLAMINATE NO
NO. OF REMARKS MADE BY MOUNTED BY
printed sample if the job has been run before.
When handling an anilox roll, operators
must remember that the engraving on the
surface is very fragile and can be easily dam-
aged. Although a ceramic coated anilox roll
surface is very hard, it is also brittle, and can
be chipped if the roll comes into contact with
anything made of metal. Roll covers protect
the surface from damage during handling.
Die Installation and Setup
The following procedure details a typical
die installation and setup:
1. Apply spacers on the journals of the
gear side of the die. Spacers are usually
nylon, brass or fiber washers.
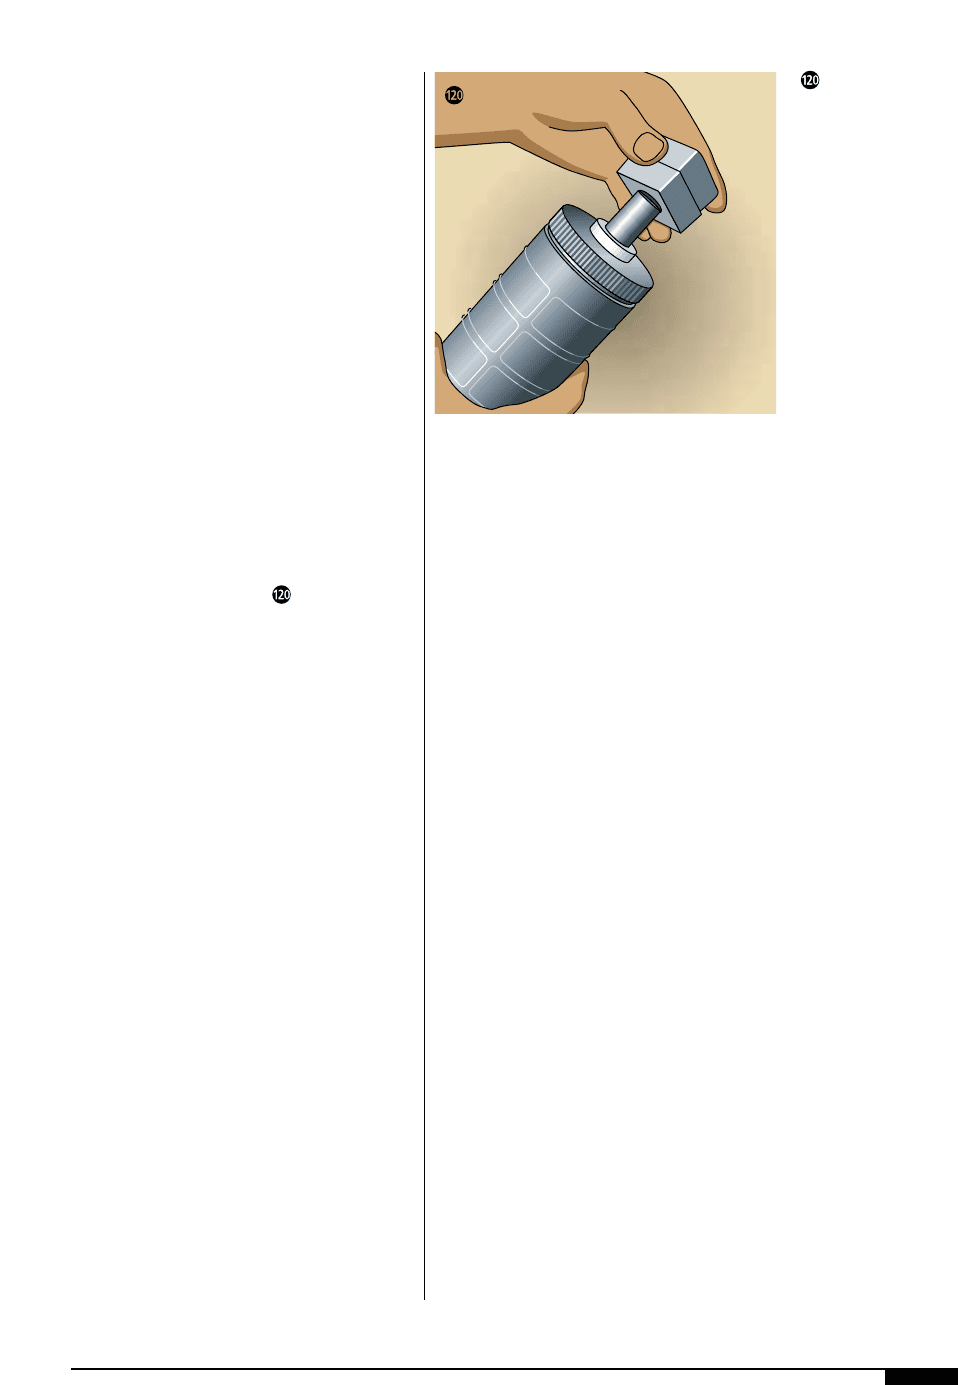
2. Slip on a bearing block on the gear side
of the die. A bearing block has an inner
diameter that matches the diameter of
the journal (Figure ).
3. Slide the die journal with the bearing
block into the slot on the gear side of the
press. Care must be taken not to let the
die strike the anvil roll. Place the die
gently against the anvil roll.
4. Check to see that the die is pushed firm-
ly against the gear side of the press.
5. Check the alignment of the gears and
bearers on the die with the gears and
bearers on the anvil roll. If the gears and
bearers are not aligned, add or subtract
spacers until alignment is reached.
6. Slide spacers and the bearing block on
the operator’s side die journal. Once
again, add or subtract spacers until the
die slides smoothly into the press with
no side to side play. Adjustable bearing
blocks can be used to eliminate the need
for spacers. The procedure might vary
depending on the press manufacturer
and the type of press used.
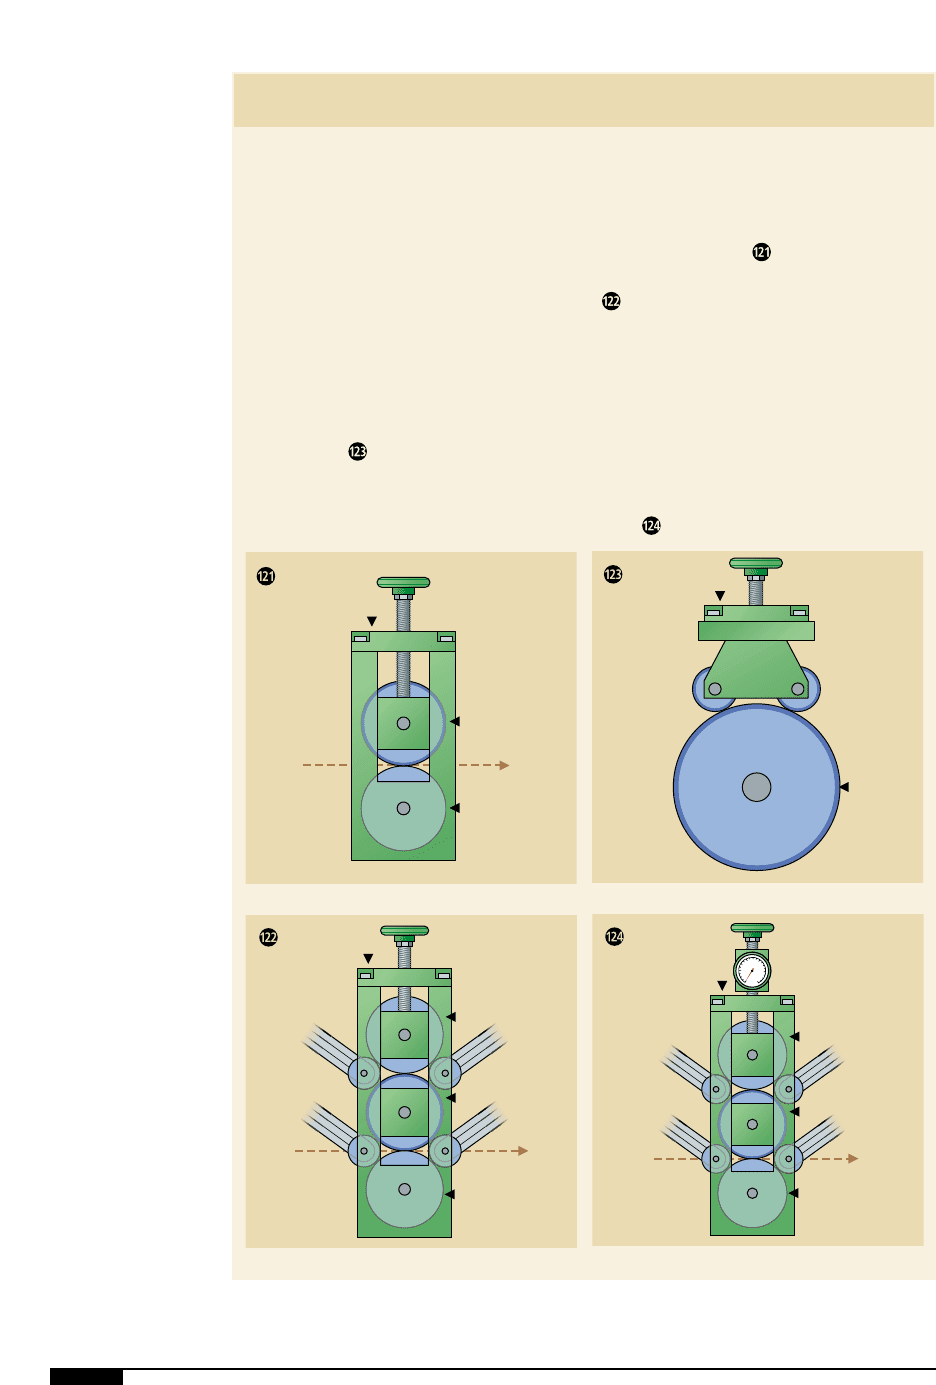
7. Install appropriate pressure assemblies,
using one of the downward-pressure
methods detailed in Table 1.
8. Install felt bearer wipers. The wipers
should be positioned to ride on the nip
and should be in contact with the bear-
ers on each roll in the die station. The
wipers keep the bearers clean and free
of dust, which may change die settings
during the press run. Oil is placed on the
wipers to lubricate the bearers of the die
station assembly.
9. Run several feet of web through the die
station. Strip away the waste matrix
from the web and attach it to the waste
rewind or bring it through to the vacuum
system. This method will vary depend-
ing on the initial setup.
10. Examine the liner to see if the die is cut-
ting with the correct pressure. If the
liner does not appear to be damaged, the
die is cutting with the correct pressure.
If the liner is damaged or if the label is
not releasing properly, the die needs to
be adjusted for the proper cut depth.
To assist in stripping the matrix, it is often
necessary to underscore the material to pro-
vide extra support to the matrix ladder.
Underscoring the edges of the stock places a
slight “U” shape on the back side of stock –
making the matrix ladder much stronger
than a flat ladder. Many times an 0.125" to a
0.025" extra substrate must be allowed on the
edge of the web to allow room for under-
scoring. This may seem like wasted material,
PRESSROOM PRACTICES 179
Die installation
begins by applying
a spacer, then fitting
on a bearing block.
180 FLEXOGRAPHY: PRINCIPLES & PRACTICES
Table 1
There are three methods of exerting downward force to hold the die bearers firmly against the anvil roll.
Each method uses a bridge that is held on top of the press frame at each side by pins or bolts. Threaded
rods run through the bridge and apply pressure to the die when screwed down.
Method 1: The screws apply pressure directly to the die bearing blocks. The pressure, in turn, presses
downward on the shafts of the die to hold the die against the anvil roll (Figure ).
Method 2:
An assist roll is added to the assembly. An assist roll has some form of bearing on each end. Some
are removable and some are in a fixed position (Figure ). The assist roll assembly is placed in the same
slots as the die blocks, and its bearers ride on top of the die bearers. The bridge is fixed in position and the pres-
sure screws are screwed down to apply pressure on the assist roll shafts. The pressure exerted tends to be dis-
placed through the bearings on the assist roll. This displacement puts pressure directly on the die bearers.
Method 3: This method utilizes a tractor-style hold down and is similar to the assist roll method. The main
difference, however, is that the pressure is brought directly over the bearer on the die, not through the bear-
ings (Figure ). Hydraulic die pressure gauge assemblies are available to use in place of the pressure
bridge. This system allows operators to observe the force applied to the rotary die, calibrated in pounds of
force. The assembly also enables the operator to make adjustments more consistently, as well as maintain
the minimum die pressure throughout the press run (Figure ).
METHODS OF EXERTING DOWNWARD FORCE
Pressure Screw
Rotary Die
Anvil Roll
Bridge
Bearing
Block
Pressure Screw
Rotary Die
Bearer Wipers
Anvil Roll
Bridge
Bearing
Blocks
Assist Roll
Pressure Screw
Tractor
Assembly
Rotary Die
Bridge
Bearer
Tractor method of applying pressure.
Assist roll used to apply pressure.
Pressure screw applies pressure to the die bearing blocks.
Pressure Screw
Hydraulic
Pressure
Gauge
Rotary Die
Bearer Wipers
Anvil Roll
Bridge
PSI
0
400
800 1200
1600
2000
Bearing
Blocks
Assist Roll
Hydraulic-pressure gauge and felt wipers.

but the benefits of more effective stripping
will offset the extra stock substantially.
If a problem occurs with predispensing
labels, and more die pressure cannot be used,
strip the matrix directly from the die using no
assist roll. By stripping directly from the die,
the adhesive on the pressure sensitive materi-
al will not flow back to cause this problem.
Use Setup Stock
When setting up the press, substitute a
cheaper, lower-grade stock, called set-up
stock, for the more expensive stock that may
be specified on the job jacket. This substitu-
tion prevents the wasting of valuable material
when setting up the printing stations. The set-
up stock should be wide enough to cover the
print area and be of similar gauge to the actu-
al job. The substrate is one of the more costly
portions of a job, making it important to min-
imize stock waste when possible.
Set Edge Guides
The edge guide keeps one edge of the
web in the same position at all times to pro-
vide side to side register during production.
The sensor that monitors the position of the
web must be positioned at the edge of the
substrate.
Set Auxiliary Stations
At this point in the setup process, the auxil-
iary stations should be set up. Auxiliary station
functions may include slitting and laminating.
Dry Registration
In order to eliminate waste when setting
up a press, it is advisable to dry-register the
print stations. Dry registration of the print
stations simply means the process of setting
up the plate cylinders in the print stations as
close as possible to the required position for
color-to-color registration, and setting the
ink and impression settings before inking
the plates. The following procedure is a gen-
eral dry-register technique used by some
printers. There are many other methods to
accomplish this task.
First, use check gauges to establish paral-
lelism between the anilox to plate cylinder
and plate cylinder to impression cylinder.
This gauging also establishes a starting point
for ink and impression settings. Check
gauges are wheels that temporarily slide onto
the plate-cylinder shaft in place of the plate
cylinder. The outer diameter of the wheel is
the same as the plate-cylinder repeat length.
One check-gauge wheel is placed on each
side of the plate-cylinder shaft. Adjust the
press settings so that the wheels barely touch
the anilox roll and the web on the impression
cylinder. This adjustment is done by using a
thin piece of paper, such as a piece of release
liner, as a feeler gauge. The piece of paper
used as the feeler gauge must be thinner than
the stock being run. Keep adjusting the set-
tings until some pressure on the piece of
paper is felt from both the web and the
anilox roll. This setting ensures that the plate
roll is parallel to the anilox and impression
cylinder, and also establishes a start point for
ink and impression settings. After all adjust-
ments are made, remove the two check
gauges from the shaft and prepare to install
the plate cylinders.
Second, install the plate cylinder for each
color in the correct station in approximately
the same location. If this step is done correct-
ly, the location of the printed images will be
very close to alignment from color to color.
This step minimizes the number of register
adjustments needed during setup, and
reduces the amount of wasted stock. Each
print cylinder or gear should be marked in the
same location. This marked tooth or spot on
the cylinder is used when mounting the plates
to line up the center marks of each plate to
the accompanying cylinder. Therefore, the
images on the plates should be in close regis-
tration from cylinder to cylinder in relation-
ship to that mark. When loading the cylinders
in the press, this mark can be used to install
PRESSROOM PRACTICES 181
182 FLEXOGRAPHY: PRINCIPLES & PRACTICES
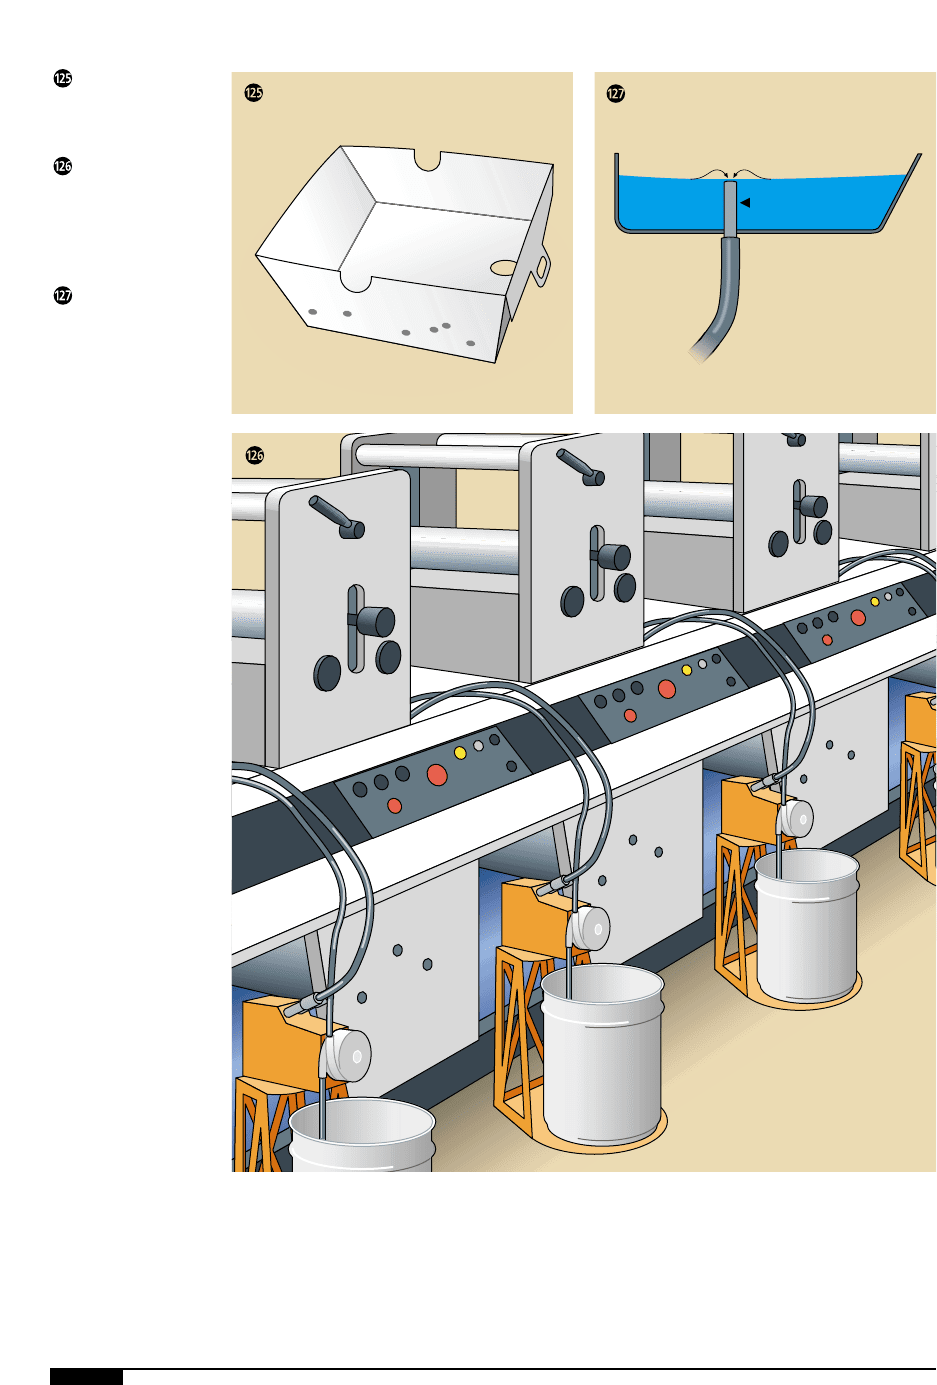
A paper fountain pan
liner reduces cleanup
time short runs.
Ink pumps lift the ink
from the buckets to
the pans in a steady
manner, thus ensuring
color consistency.
When using an ink
pump, a stand pipe will
ensure constant ink
levels in the ink pan.
Ink Pan
Stand Pipe
Ink Return Hose
the cylinders very closely (within a gear
tooth) to each other in each station. This
alignment is accomplished by drawing a mark
on the web. The mark on the web is aligned
with the mark on the cylinder or gear in the
first station. The web is then jogged forward
to the next station, where the next cylinder is
aligned to the mark. Even with 360° registra-
tion control, this method can reduce the
amount of wasted substrate and setup time.
Set Ink Distribution Unit
The ink distribution unit must be set up
before the press run can begin. The follow-
ing procedure details a typical ink distribu-
tion setup:
1. Clean all fountain pans and ink wipes.
2. Install wiper assemblies and pans into
the press following the manufacturer’s
specifications.
3. Install paper or plastic fountain pans
or liners if the press can accommodate
their use (Figure ). Using the paper
or plastic liners saves on changeover
time during short run work.
4. Install ink pumps if the job requires a
fairly long press run. Ink pumps
ensure color consistency throughout
the press run (Figure ). Pumps
come in different styles, but all per-
form the same function of getting the
ink from the ink bucket to the pan.
5. Place ink into the fountain. This pro-
cedure varies depending on whether
an ink pump is being used, or if the ink
will be poured directly into the foun-
tain. When an ink pump is being used,
place a stand pipe in the drain hole of
the fountain (Figure ). The stand
pipe keeps the ink at a constant level
in the fountain pan. Then place the ink
into the pumping unit and the supply
hose into the pan. Start the pump to
begin circulating the ink through the
ink distribution unit.
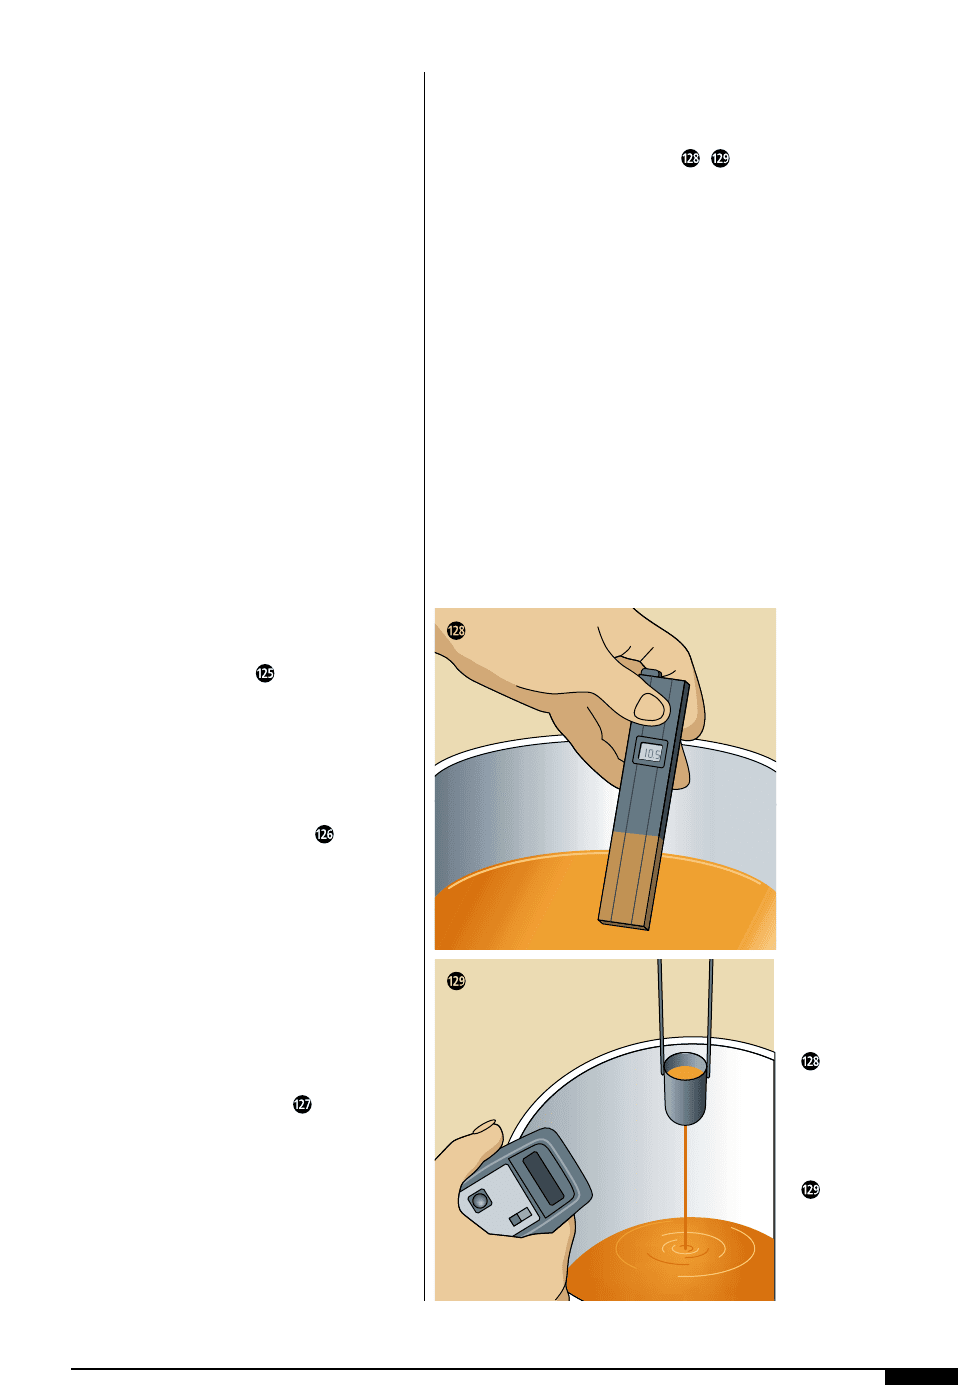
6. Check the ink’s pH and viscosity if using
water-based ink, or viscosity if using
solvent-based ink. This step should be
done to ensure that the ink is at its run-
ning parameters (Figures ).
For short runs when the ink is placed direct-
ly into the fountain, the ink must be mixed in
its container for a time. After mixing, pour a
sample of the ink into a disposable paper cup.
Check pH and viscosity in the cup to ensure it
is within its running parameters. If not, the ink
needs to be adjusted and rechecked to speci-
fications before the pressrun begins.
Set the Fountain Roll
and/or Doctor Blade
Once the ink is in the fountain and is with-
in its recommended running pH and viscos-
PRESSROOM PRACTICES 183
Testing the pH of
a water-based ink
ensures that the ink
is at proper running
condition.
Another method of
ensuring that the
ink is at running
parameters is to test
the viscosity using a
Zahn cup.
M
IN
S
E
C
/1
0
0
184 FLEXOGRAPHY: PRINCIPLES & PRACTICES
ity parameters, the anilox roll may be inked.
When using a two-roll system, the fountain
roll is adjusted to squeeze against the anilox
roll. Once the press is started, the rubber roll
is adjusted to evenly squeeze the ink off the
anilox using the minimum amount of pres-
sure. This pressure setting is checked by back-
ing the fountain roll off until the operator can
see the nip flood with ink. Then the operator
squeezes back in with both sides of the rubber
roll, making sure they are even, until the flood-
ing on the surface goes away. By doing this
several times, the ink wipe is set. On many
narrow-web presses, a doctor blade is used in
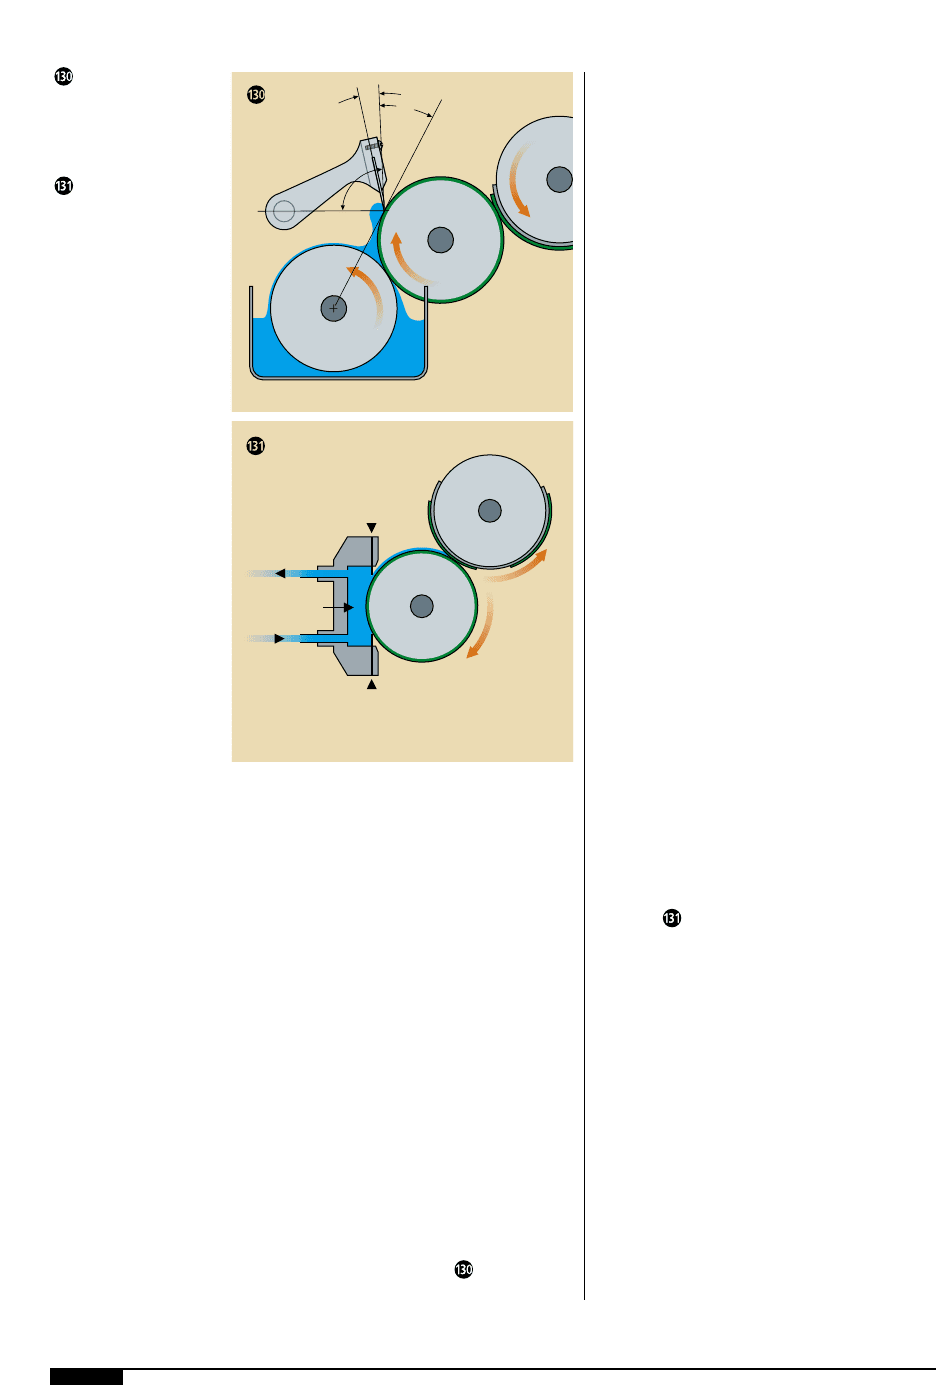
conjunction with the rubber fountain roll. In
this case, the doctor blade must be set to
meter the anilox roll (Figure ).
When setting a station with a doctor blade,
the fountain roll pressure should be set a lit-
tle loose. This setting allows for extra ink to
go through to the doctor blade where it will
be metered off. The doctor blade assembly is
set into its holder and then slowly tightened
down until it touches the anilox. As the
blade is tightened to the anilox, the operator
will notice that the ink will meter from the
center of the anilox roll outward to the ends.
When the ink is metered off of the ends of
the anilox roll, the wipe is set. Similar to the
procedure for setting fountain-roll pressure,
the doctor blade should be backed out and
brought back in to the anilox several times
in order to set the wipe with the minimum
amount of pressure. Over tightening the doc-
tor blade can cause the blade to fold under
the pressure, causing the ink to dry due to
the friction and heat buildup behind the
blade. If ink drying occurs, the dried ink pig-
ments can cause damage to the anilox roll.
Once the ink is metered correctly, the ink
fountain covers should be placed on the foun-
tains. The covers reduce the amount of amine
or solvent evaporating out of the ink and help
keep the ink more stable during the pressrun.
If the press is equipped with a chambered
doctor-blade assembly, install the assembly
before the pump is turned on. The ink wipe
should be set in the same manner as a single
blade, and there is no rubber roll to set
(Figure ).
Set Impression, Inking
and Registration
The following procedure details a typical
impression, inking and registration setup:
1. With the press running at a slow speed,
start with the last color to be printed
and achieve the correct impression
and ink settings. First, turn down the
impression slightly so the plate comes
into contact with the web.
2. Turn in the anilox-to-plate adjustment
to begin inking the plate. While looking
at the print on the web, make adjust-
Maintaining proper
blade angle is impor-
tant to effective
metering.
A chambered doctor-
blade eliminates the
need for a fountain roll.
Anilox Roll
Plate
Cylinder
3
0
°
90
°
Fountain
Roll
Doctor
Blade
Holder
2°–10°
Plate
Cylinder
Anilox Roll
Reservoir
Ink “Out”
Return
Ink “In”
Supply
Containing
Doctor Blade
Metering
Doctor Blade

ments to the impression and ink set-
tings until there is a clear print with no
images missing.
3. Similar to the setting of the rubber roll
or doctor blade, back in and out on the
settings to achieve both ink and im-
pression settings with the minimum
amount of pressure.
4. Set the remaining ink and impression
settings, working backward to each
print station in order from last to first.
5. After all the settings are complete for
each print station, adjust for color-to-
color registration. Start with the first
station (front of the press) and set reg-
ister for each station in order.
6. Once all the colors for the job are in
register with each other, check print-
to-die registration. Register the die cut-
ter and slitter to the printed image. In
all flexo press settings, it is important
to use the minimum amount of pres-
sure to do the job.
Check Colors to Standard
Once the press is set up and all settings are
complete, the printing must be checked for
accuracy against a color standard approved
by the customer in the design stage of the
job. A color standard may be a previously
printed sample, a Pantone
®10
sample, an ink
drawdown or a spectrophotometer reading.
All visual color-matching should take
place in a viewing booth designed for this
purpose. This type of booth provides a stan-
dardized light source with a neutral gray
background to check color, eliminating the
color variations during the color-matching
process caused by lighting conditions.
A sample of the print should be compared
to the color standard to ensure that the print-
ed job meets the customer requirements. The
operator should check to make sure the color
is printing at the correct density (lightness
and darkness) either visually or with the use
of a densitometer. If the color is not printing
at the correct density, the anilox may be
changed to achieve a density match with the
standard. This change is especially useful
when working with ultraviolet inks. For slight
density changes that are needed when work-
ing with conventional inks, the ink viscosity
may be changed by adding solvent, or the ink
may be extended to reach the color standard.
The ink hue should also be checked visual-
ly in a light booth or with the aid of a spec-
trophotometer. If changes in hue are needed,
the operator should add the correct ink bases
to reach the color standard. All of the infor-
mation from the color-matching process
should be documented so the job can be
reprinted without additional downtime.
Approval Form
Many companies use a checklist approval
form that is filled out after the job has been
set up and approved (Figure ). This form
helps ensure that all the details for printing
the job have been covered and that the job
matches the specifications on the job jacket.
PRESSRUN PROCEDURES
Next, we’ll discuss the areas that must be
monitored during pressrun:
Ink Viscosity and pH
Maintaining viscosity, or pH and viscosity
in the case of water-based inks, is essential
for producing consistent print throughout
the production run. If an ink is color-matched
at a 25-second viscosity, a higher viscosity
will make the color print darker. A higher vis-
cosity occurs because the solvent or amines
evaporate out of the ink during the pressrun,
causing the customer’s product to become
inconsistent as the run progresses. In order
to maintain the same density of print
throughout the press run, viscosity (solvent-
PRESSROOM PRACTICES 185
10
Pantone, PMS and the Pantone Matching System are trademarks of Pantone,
Inc.
