Clarke Joe, Lynch Colleen C. M&R Professional Screen Printing Series
Подождите немного. Документ загружается.

PAGE
55
. 13
A panel that is closer is less susceptible to drafts from open doors, windows and
the like. Further, it allows a lower operating temperature or less time to flash, and
both of these conditions are very desirable. Howeve,r if you are going to be close
to the platen, as we have advised, you must be accurate.
We recommend that you do not try to set the flash by eye, particularly if it is to
be set at a low clearance. Note that there is no focus distance required with the
M&R infrared panel flashes. You should only set the flash after the press is cali-
brated (refer to
page4.15). You will
need a 3/4 open
end wrench, a tape
measure or a ruler
and four pieces of
shim stock to
match the thickness
of the distance
from the flash to
the panel. If you
are using the rec-
ommended 3/8 as your standard, strips of squeegee blades 3/8 thick will work
well as the shim stock.
There will be times, in most shops, that the flash distance needs to be moved to
allow for thicker stock, but it is critical it remain as close to the platen as possible
for top efficiency in
production. It is
best with an Omni
or Uni flash to
move it as close as
possible. Three-
eighths of an inch
is recommended.
The graph in figure
5.13 gives a profile
Flashing
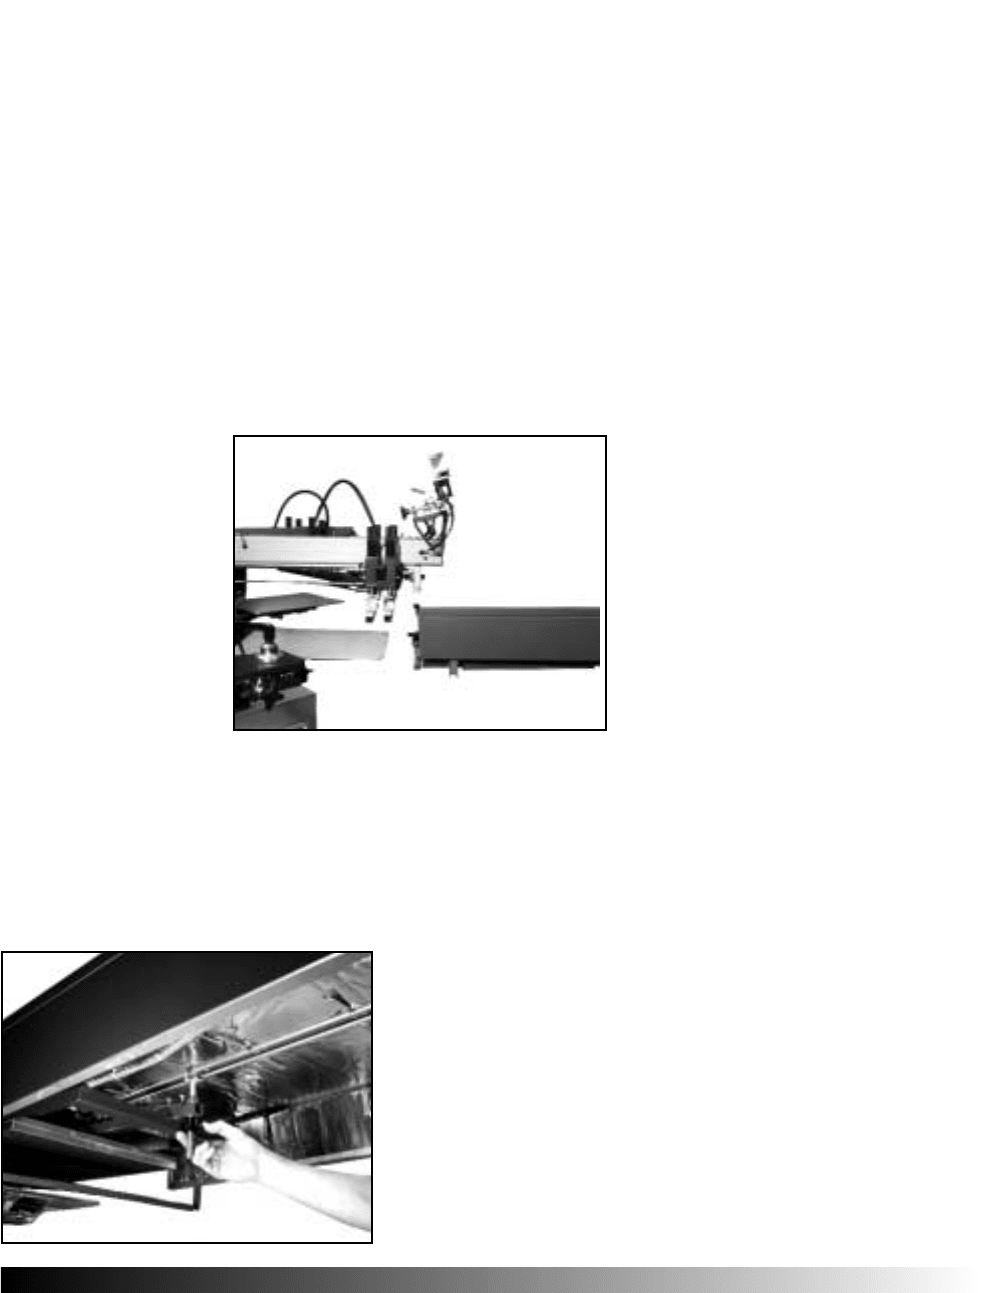
Figure 5.11 This photo-
graph shows a side view of
the Omni-Uni Flash and the
platen. In the case of panels,
you will want to be three-
eighths of an inch from the
platen. The Quartz flashes
need to be positioned two-
and-one-quarter inches from
the platen. Note that all
measurements are with the
platen in the up position.
Figure 5.12 This picture
shows the operator adjusting
the Omni-Uni Flash for par-
allelism to the platen surface.
As the panel distance
becomes closer, for more effi-
cient operation, the position
must be more accurate. A
panel that is close and out-of-
level will produce inconsistent
gel across the garment.
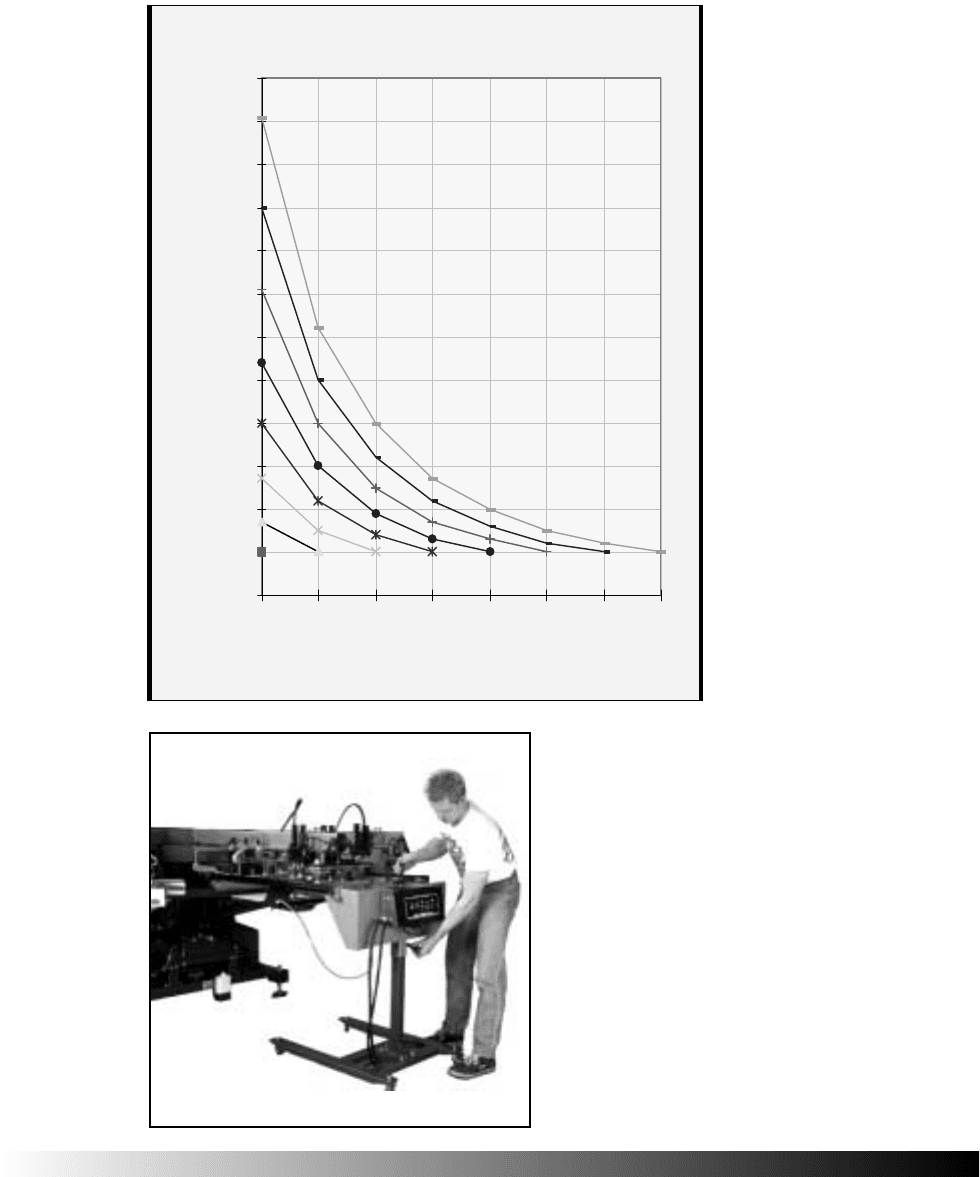
of each colored curved data line. The 1.0 represents the multiplier of watt density at your current distance. The 1.0 is one
hundred percent of the watt density. Travel downward and to the right on that curved line until you are directly above the
new distance, which is listed on the horizontal axis. The data point at this location is the percentage of watt density that you
will have at this distance. For example, if your current distance is three-eighths inch and you want to move farther from the
platen to one inch, the watt density is one hundred percent at three-eighths inches and will be fourteen percent at one inch.
PAGE
55
. 14
of the results of moving the flash closer. The difference in the operation is a
higher watt density. This allows you to operate at a lower temperature and/or
faster cycle rate.
TTeemmppeerraattuurree aanndd
WWaavveelleennggtthh
Once you select a dis-
tance, step two is to
consider the operating
temperature of the
flashit is part and par-
cel to the wavelength
generated.
The wavelength can be
determined from the
Chapter 5
Figure 5.13 This chart illus-
trates the results of moving the
flash closer to the platen. Find your
current flash-to-platen distance on
the horizontal axis of the graph.
The range is from three-eighths inch
to one-and-one-quarter inches. Look
to the bottom horizontal line in the
plot area where you will see a 1.0
at the base of each colored, curved
data line. The 1.0 represents the
multiplier of watt density at your
current distance. The 1.0 is one
hundred percent of the watt density.
Travel upward and to the left on
that curved line until you are direct-
ly above the new distance, which is
also listed on the horizontal axis.
The data point at this location is
the percentage of watt density you
will have at this distance. For
example, if your current distance is
one inch and you want to move clos-
er to the platen, to a distance of
one-half inch. Follow the green line
until it is above 0.50 on the hori-
zontal axis. The old watt density
was one-hundred percent at one
inch, and will be four times as great
at one-half inch.
Moving Flash Closer To Platen
1.0
1.7
2.7
1.5
4.0
2.2
1.4
5.4
3.0
1.9
1.3
7.1
4.0
2.5
1.7
1.3
9.0
5.0
3.2
2.2
1.6
1.2
11.1
6.2
4.0
2.7
2.0
1.5
1.2
1.0
1.0
1.0
1.0
1.0
1.0
1.0
0.0
1.0
2.0
3.0
4.0
5.0
6.0
7.0
8.0
9.0
10.0
11.0
12.0
0.38 0.50 0.63 0.75 0.88 1.00 1.13 1.25
Old and New Distance in Inches
Watt Density Multiplier
Figure 5.14
After the distance is
set and you are cer-
tain of parallel
planes between the
platen and the
quartz tubes or
infrared panel, it is
time to set a temper-
ature. All flash con-
trols are conveniently
located at the rear of
the flash unit.
PAGE
55
. 15
results of the wattage or the
temperature itself. The panels
can produce a range of
infrared wavelengths but all of
the IR emitters used in the
screen-printing industry are
medium wavelength. The look
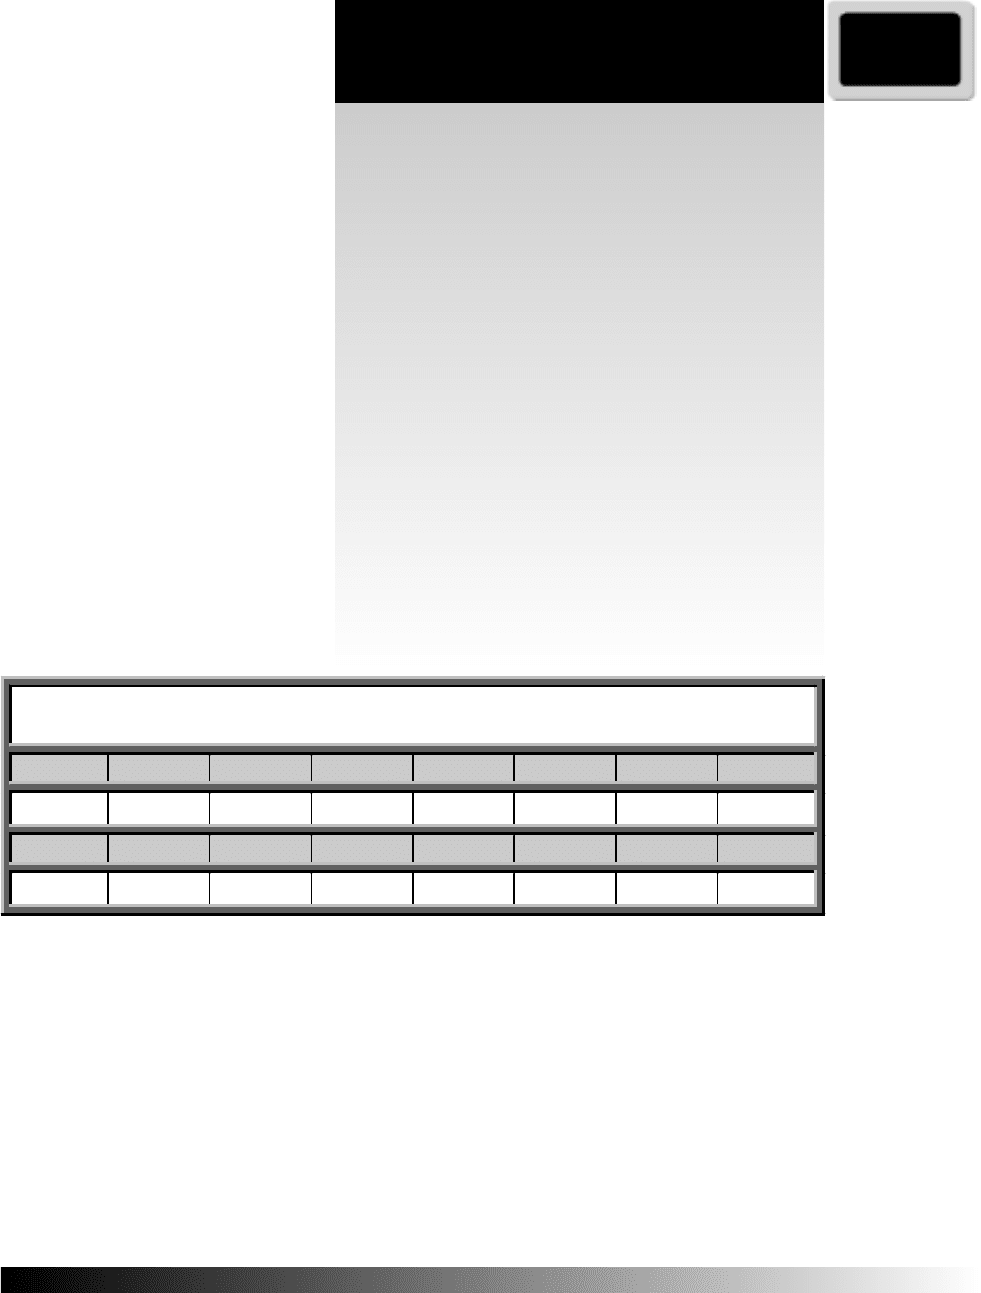
up table below lists a range of
practical temperatures and
resultant wavelengths.
The plastisol resin likes wave-
lengths around 5.0m or 600°,
but this measurement is irrel-
evant for two reasons. Until
the plasticizers are in motion,
and they like much higher
temperatures and shorter
wavelengths, you cant work
on the resin. Second, the goal
is for the flash times to be
very short, so a temperature that is too low would not make production sense
(refer to figure 5.17 for details). Cotton T-shirts like shorter wavelengths than
the resin, so scorching can be avoided by using moderate settings. Once you
have determined the distance from flash panel to platen, we suggest a wave-
Flashing
To calibrate flash distance, follow these steps:
1. Be certain the flash is disconnected from power.
2. Be certain the flash is totally cooled and at room
temperature.
3. Put the platens in the down position.
4. Place the four shims on the corners of the platen.
5. Measure or eyeball a minimum of two-and-one-half
inches clearance between the platen and the flash;
move platen accordingly.
6. Raise the platens.
7. Adjust the flash so that there is zero clearance
between the flash and the shims.
8. Drop the platens and remove the shim stock.
Note: the press must be calibrated before you calibrate
the flash distance. That is the platens must be parallel to
the flash panels or tubes.
Calabrating Flash Distance
How To
Instructions
Temperature to Wavelength
Look Up Table
600° F
650° F
700° F
750° F
800° F
850° F
900° F
950° F
5.0m
4.8m
4.6m
4.4m
4.2m
4.0m
3.9m
3.7m
1000° F
1050° F
1100° F
1150° .
1200° F
1250° F
1300° F
1350° F
3.6m
3.5m
3.4m
3.2m
3.1m
3.0m
3.0m
2.9m
Figure 5.16 There is a linear relationship between wavelength and temperature. The chart above lists a range of tem-
peratures from 600° F. to 1350° and directly below the temperature lists the wavelength generated. As you can see from
the look-up table above, considering the nature of the ink, there is not a lot of change in the wavelength as compared to
the temperature. When you flash cure, you are taking the ink to a gel state. You can't work on the resin part until you get
the liquid moving. The liquids are plasticizers and they typically have peak absorption at or near 2.2 microns and 2.2-
micron wavelength equates to a 1910° F. emitter temperature, which is impractical and dangerous. Gel with the flash, cure
with the dryerthat is the way it was intended.
PAGE
55
. 16
length that is above scorching, yet low enough to trigger the
plasticizer at high production speeds.
TTiimmee
There is one common thread among all printers when it comes
to flash curing: no one goes fast enough. Time is the con-
straint, so the point of this exercise is to allow you to flash
more shirts per hour, with minimal downtime. Take a given
distance and a given temperature and set them against dwell
If you are using an Omni or Uni
panel type flash, we have some
sound advice. Do not run the
flash in and out at high speeds.
You will gain nothing in produc-
tion and it can rattle the flash to
death. The carriage drive on the
Gauntlet and Challenger presses is
rugged and is intended to run as
fast as you can load and unload.
All of its components are rugged
enough to withstand the shock
indefinitely. The flash panel how-
ever has thermal connections,
which given enough abuse, will
begin to erode. This erosion will
cause an amperage increase and
get worse as time goes on.
Run the panel in and out at slow
speeds as is intended, there is
absolutely no reduction in produc-
tivity and your flash will last a lot
longer.
Chapter 5
Dont Crash
Dont Crash
The Flash
The Flash
Temperature & Wavelength
600
700
800
900
1000
1100
1200
1300
1400
5.0 4.8 4.6 4.4 4.2 4.0 3.9 3.7 3.6 3.5 3.4 3.2 3.1 3.0 3.0 2.9
Wavelength in Microns
Degrees Fahrenheit
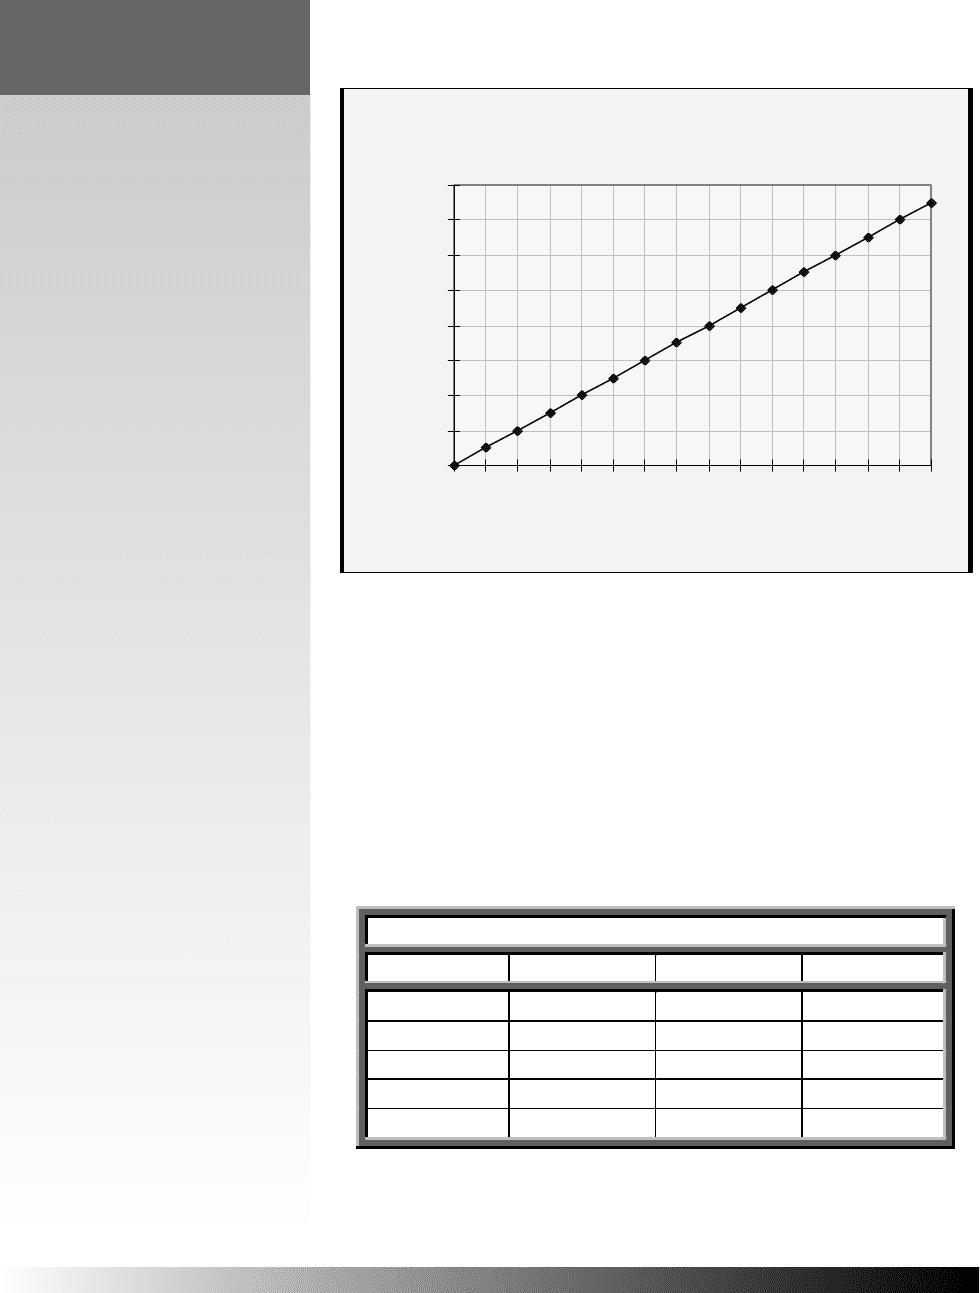
Figur5.16 This chart illustrates the relationship between degrees Fahrenheit and wavelength.
Find your temperature in degrees Fahrenheit on the vertical axis, and then move along the gray
lines to the blue dot. Drop down to the horizontal axis and read the corresponding wavelength.
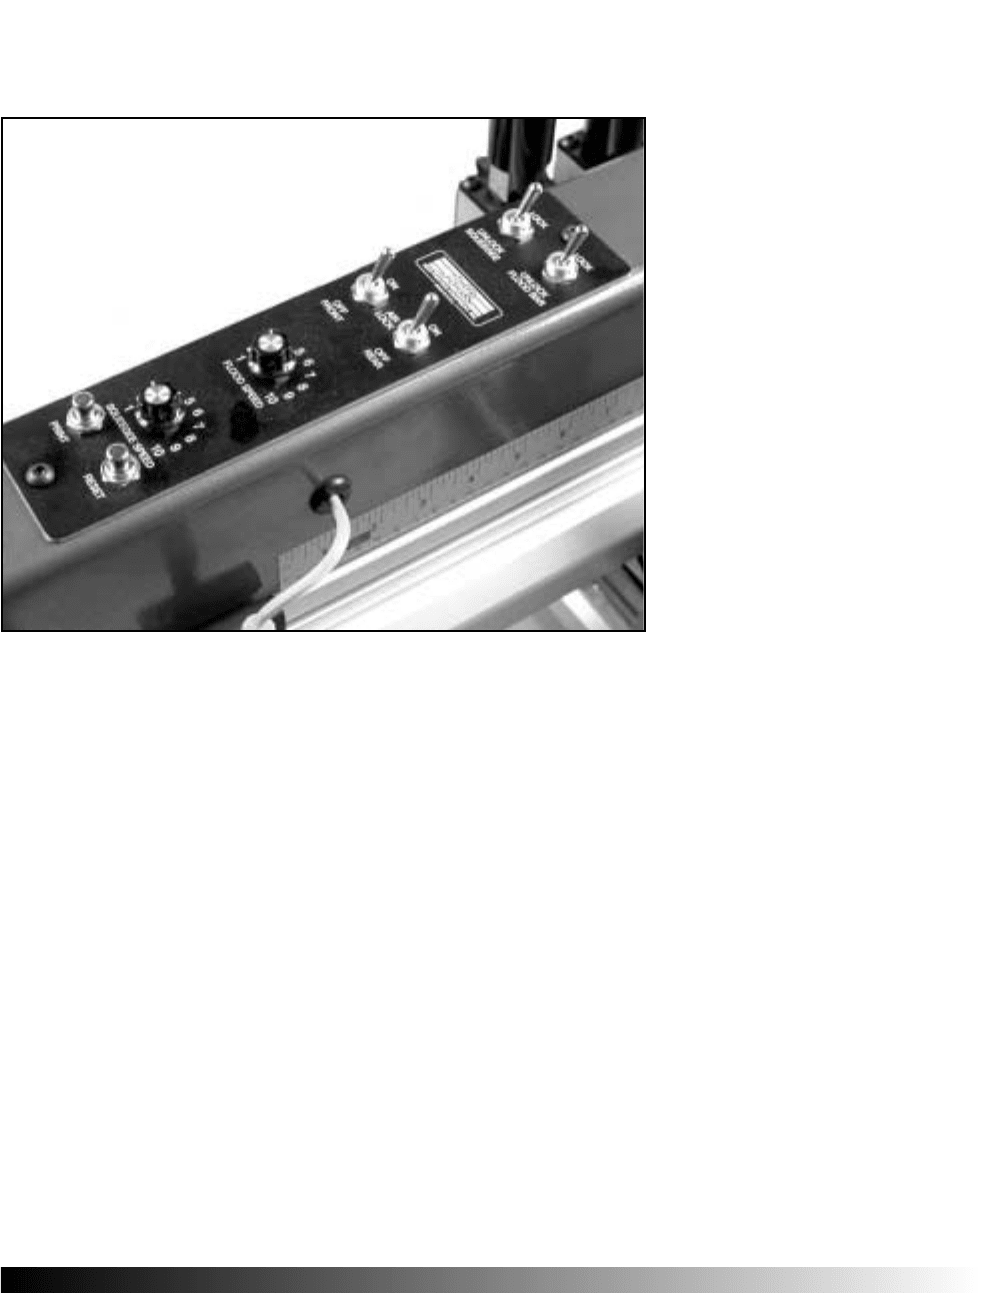
Figure 15.17 This is a table to show the relationship between cycle rates, dwell set-
ting and squeegee speed. You will do well to set a low dwell time and then if additional
flash time is needed, adjust the squeegee speed to fine-tune the flash time.
The Squeegee Speeds Effect On Cycle Rate When Flashing
Dwell
Slow
Medium
Fast
1
56.7
65.5
65.9
3
49.3
53.8
54.1
5
41.9
42.1
42.4
7
34.4
34.6
34.8
9
27.0
27.1
27.2
PAGE
55
. 17
(and squeegee) time to maximize your throughput. The look-up table on the pre-
vious page will serve as a map to help you establish the optimal conditions for
your plant.
Operations
Now that you are aware of the functionality of the components of flash curing,
we can set the flash to run efficiently and quickly. The next table takes a standard
Omni or Uni flash setting and alters it based on typical conditions in most shops.
BBaasseelliinnee FFllaasshh SSeettttiinnggss
The standard setting for a flash panel (excluding quartz units) is: 950° at 3/8 for
2 seconds. This will allow the press to run at 70 dozen per hour and faster if
your blade speed, screen parameters and ink will permit. You can take advantage
of this setting if your ink deposit is approximately 2 mils and the ink that you are
flashing is designed or modified to gel fast. There are a number of things that
you can do to depart from the standard and a few of these are listed in the table
below to act not as absolutes but as a map to allow you to maneuver through a
variety of conditions with ease.
Now you know after a certain point, hotter is not so much better, and closer is
Flashing
Figure 5.17 This
picture shows the speed
controls on the
Challenger carriage
arm. The duration of
the flash is based not
only on the dwell set-
ting, but also on the
time of the slowest or
longest stroke head. You
do not have to shorten a
stroke nor run the
blades at light speed,
but you must remember
that both of these set-
tings affect the time of
flash.

PAGE
55
. 18
much better than farther. Begin production by letting the flash warm up until the
thermostat indicates that the flash has reached the preset temperature. You have
one of two options at the outset, either preheat the platens or begin production
at a slower rate and then as the platens heat up, increase the speed.
PPrree-HHeeaatt
This technique works best if the shop and press are very cold. It is worth the
time and effort, as it need not interfere with production. The press can warm
itself up, while you prepare for the next press run.
Turn the flashes on at the preset temperatures and put the press on automatic
mode. You will need an open press head to do this. Expect it to take about ten
minutes (of course this depends on shop ambient temperature, the dwell setting,
time of exposure, distance and initial flash temperature). Run at a slow squeegee
speed for the warm-up cycling, since longer time under the flash will elevate the
platen temperature the fastest. Bring the platen temperature up to 120° and begin
production.
When you put ink in the screen, it has specific properties that are about to radi-
cally change when the ink gets warm. At approximately 110° the ink thins and
becomes very fluid. At this stage it will tend to transfer more ink at given settings
and will leave a flatter, smoother ink film. Not until the ink reaches the range of
160° does it achieve gel state. Gel is the point when the ink can be printed upon
without any detrimental affects to its surface. You will find as the ink warms, you
Chapter 5
Standard and Adjusted Flash Settings
Variable
Standard
Thicker
Ink Deposit
Bulky
Garment
Slower
Gelling Ink
Speed Above
70 Dz./Hr.
Temperature
950
°°
F.
1050°
1100°
1100°
1050°
Wavelength
3.7
mm
3.5m
3.4 m
3.4 m
3.5 m
Panel* Distance
3/8” gap
3/8”
3/4” gap
3/8”
3/8”
Flash Time
2.0 sec.
3.0 sec.
3.0 sec.
5.0 sec.
1.5 sec.
Ink Deposit
2 mil
3 mil
2 mil
2 mil
2 mil
Ink Gel Rate
Fast
Fast
Fast
Slow
Fast
Garment
T’s / fleece
T’s / fleece
Hoods, etc.
T’s / fleece
T’s / fleece
*Note for quartz tubes, substitute 2 1/4 and 950°.
Figure 5.18 The gray area gives a standard setting for an Omni Flash or Omni-Uni Flash. In each of the next four
columns one variable (shown in red) is changed and the temperature of the flash is adjusted to compensate. For example if
the ink deposit is thicker as indicated in Column Three, increase the flash temperature from the standard of 950° to
1050°, if you are experiencing any difficulties. You may note the only time the gel is over three seconds is with slow-gelling
ink and with such ink you will experience after-tack issues.
PAGE
55
. 19
are able to reduce squeegee pressure and flash
time and these adjustments are advisable.
If the ink is taken beyond the gel stage, the ink
is nearing fusion or that stage where any addi-
tional time or temperature does not improve the inks properties. This will occur
around 300° and should be avoided, even by multiple flashes, at all costs. As the
ink nears fusion, its surface alters and becomes more and more difficult to print
upon-certainly to printed upon wet-on-wet. Should you approach this stage, the
best thing to do is allow the press to totally cool and properly dispose of the
inks in the screens and try again.
Whether you call them Ink Traps or End Caps (refer to page 3.17), M&Rs
Flashing
Use the following steps when setting your flash to maxi-
mize productivity:
1. Set the flash panel as close as possible.
2. Set the quartz tube at minimal focal distance.
3. Calibrate the press.
4. Now calibrate the flash.
5. Use an ink wedge to test for proper settings.
6. Use a sharp squeegee blade and thin screen mesh.
7. Use inks with high gel, low plasticizer levels.
8. Reduce dwell time as production stabilizes.
9. Eliminate drafts around flash unit.
10. Sequence the fastest inks earliest.
11. Use heat resistant spray adhesive.
12. Install a Kool Mist between heads.
13. Use a cooling station with a curtain transvector.
14. Use flash additive, if needed.
Maximizing Productivity
With The Flash
How To
Instructions
Figure 5.19 The Kool Mist from M&R
is the failsafe answer to top production rates
with virtually any deposit, ink system or
number of flashes. It was designed and engi-
neered originally for auditory T-shirts, where
the controlled film conductive circuit was
screened directly onto the shirt. Any distur-
bance of a printed trace would alter the cir-
cuit. The Kool Mist can definitely keep your
operation cooler with water and a five-percent
solution of food-grade silicone. The unit fits
between stations, so there is no loss of color
capacity and no need to have a cool down
station.

PAGE
55
. 20
attachments can help you
solve the ink stability issue.
Since they keep the ink in a
confined area, they will act to
stabilize its temperature over
a longer period of time with-
out the need to overload the
screen with ink. Note that
low quantities of ink are
more apt to change faster
than large ones; just like the
road surface of the bridges
freezing faster in the winter.
OOvveerr HHeeaattiinngg
The flash is an extension of
the dryer, because heat will
build additively. For example,
if a 72° room temperature
garment goes through a dryer,
it comes out at a nominal 280°. Then put another garment under a flash and
take it to a nominal 160°. Then immediately put it through the dryer, it will exit
at 340°. The flash does not operate alone; consider it a preheat station. If you
inspect at the end of the dryer, be sure that the cause of rejects was not at the
press end. Several problems occur when the ink is over heated under a flash:
1. After tack increases (refer to sidebar on page 3.26).
2. The ink becomes less receptive to the over print color (refer to
the how-to on page 3.28).
3. Platen temperatures exceed safe limits (130°).
4. Dye migration and sublimation are at risk (refer to sidebars on
pages 3.8 and 3.9).
5. Blistering ink and scorching garments are at risk (refer to figure
5.16).
6. Garment shrinkage.
Sooner, rather than later, production must be interrupted.
Chapter 5
Use the following steps to determine proper flash set-
tings:
1. Calibrate your press.
2. Calibrate the flash distance.
3. Use the tables on pages 5.12 and 5.14.
4. Begin at 950° F. or 3.7m wavelength.
5. Preheat the flash and platens.
6. Make a note the start temperature with a heat gun.
(page5.25).
7. Run an ink wedge to relate ink, deposit and flash.
8. Adjust press dwell to minimize time.
9. Monitor the settings and results with a heat gun.
Determining Flash Settings
How To
Instructions

PAGE
55
. 21
FFaaccttoorrss ooff AAfftteerr TTaacckk
If you have read much of this chapter you realize that time is
the greatest enemy of successful flashing. Further, a double
stroke (which increases time) will be the demise of your ability
to predict and control your flash parameters. You may have a
tendency to approach flashing gingerly and inadvertently run
slowwrong. You must set your conditions wisely and then go
as quickly as possible to keep the time factor at a minimum.
Avoid the use of high plasticizer level inks, whether the ink
maker or you put the excess plasticizer in the pail. This
includes plasticizer reducers and curable reducers, which are
mostly plasticizers.
Be sure that you have sufficient tension and optimal off con-
tact (Refer to Chapter V for details) to allow running at high
speeds. Use a true and sharp-edged blade when ever possible,
enabling speed and a thinner deposit.
We have generally recommended plain-woven mesh, but for
flashing, it is imperative. Twill mesh puts more mesh in con-
tact with the flashed print at any one time and this allows dif-
fusion adhesion.
The worst news is that the better you make your stencil, the
more affinity it will have for the flashed, hot under-printer. But
under no circumstances should you consider altering the sten-
cil. Remember identify, and then fix, the problem, not what
surrounds it.
Flash curing successfully relies upon the balance of inks, flash
and press. If you have adhered to the recommendations given
in this book and are still having problems on the press, change
inks.
IInnccrreeaassee SSppeeeedd
Begin at a slower speed for the first five-minutes. Then every
five-minutes you can increase the speed of the press (see fig-
ure 5.21). Remember that cycle rate is a combination of dwell
time and squeegee speed (refer to page 6.7 for details on pro-
duction rates and cycle times). If you start at 72° with a stan-
After-flash tack is a form of dif-
fusion adhesion. This is a tempo-
rary bond between two hot, flat,
compatible plastic surfacesthe
ink and the stencil. The solution is
as multifaceted as the causes and
depending on the setting, may be
very complex. One method of
eliminating ink-to-screen sticking
is adding, flash additive to the
under-printing color.
Flash additive is similar to the
resin your plastisol is made from.
It is PVC (poly vinyl chloride)
blending resin. Named so due to
its primary usage, to modify a fin-
ished plastisol for specific per-
formance properties.
This particular resin is large
enough to be properly stirred into
the ink. The resin proceeds to
use-up the excess plasticizer in the
system.
Before you add flash additive to
your ink, be certain the ink has
been thoroughly stirred. Flash
additive is very efficient, requiring
only a small amount, so it should
always be added by weight. Since
it affects the ratio of available-to-
absorbed plasticizer it should be
added at least 24 hours, and
preferably 72 hours, before going
to press. This gives the ink a
chance to achieve equilibrium and
you will find you will need less
resin to solve your problems.
Adding resin worsens the hand
and drape. You know you have
added too much when it com-
promises squeegee speed. Now
time becomes the problem. If you
add too much flash additive, dis-
pose of it and begin again.
Flashing
Use of Flash A
Use of Flash A
dditiv
dditiv
e
e

PAGE
55
. 22
dard flash setting (see figure
5.23), the platens will be at
90° in seven-minutes and up
to 120° in fifteen-minutes. Of
course this depends on shop
ambient temperature, the
dwell setting, time of expo-
sure, distance and initial flash
temperature. If you are dou-
ble stroking and trying to
flash (refer to pages 6.5 and
6.5), then review the table
below. Time is the deadliest
enemy with flash curing, not
only does it cost productivity
and money, but it is like a jet
airplane-they dont fly very
well at slow speeds.
SSeeqquueennccee tthhee FFaasstteesstt IInnkkss FFiirrsstt
We have discovered some
interesting facts; the only pos-
sible real-world flash technique is unfortunately over flashing. Heat has an addi-
tive property and preheating affects the final outcome. We know sticking occurs
more often at elevated temperatures.
Therefore, the first color flashed, is the most critical. It is our chance to keep
the heat at a minimum level, to finish from the dryer at a lower temperature
point. Consequently, it is best to run the fastest flashing colors, earliest in the
sequence.
These fast-flashing colors will generally be the ones with the lowest plasticizer
level. This is information you will want to get from your ink supplier. If the
plasticizer level is too high, the addition of flash additive (refer to page 3.26 for
details) may be helpful in reducing the flash time and temperature.
The benchmark for addition of flash additive is when the ink will not run at top
speed. In this scenario, the solution becomes the problem. If you have to run
slower, the addition of flash additive may have been self-defeating, as time is a
greater enemy than temperature.
Chapter 5
To minimize flash tempertures follow these steps:
1. Calibrate press and flash.
2. Use low plasticizer level ink.
3. Add flash additive if needed.
4. Minimize flash to platen distance.
5. Engineer for single stroke.
6. Minimize dwell time as run progresses.
7. Maximize squeegee and flood speed.
8. Minimize ink deposit.
9. Use a thin flat screen mesh.
10. Prepare a sharp, true-edged squeegee blade.
Minimizing Flash Temperatures
How To
Instructions
