ASM Metals HandBook Vol. 8 - Mechanical Testing and Evaluation
Подождите немного. Документ загружается.

Testing Machines and Strain Sensors
Joel W. House, Air Force Research Laboratory; Peter P. Gillis, University of Kentucky
Strain Measurement
Deformation of the specimen can be measured in several ways, depending on the size of specimen,
environmental conditions, and measurement requirements for accuracy and precision of anticipated strain
levels. A simple method is to use the velocity of the crosshead while tracking the load as a function of time. For
the load and time data pair, the stress in the specimen and the amount of deformation, or strain, can be
calculated. When the displacement of the platen is assumed to be equal to the specimen displacement, an error
is introduced by the fact that the entire load frame has been deflected under the stress state. This effect is related
to the concept of machine stiffness, as previously discussed.
Extensometry. The elongation of a specimen during load application can be measured directly with various
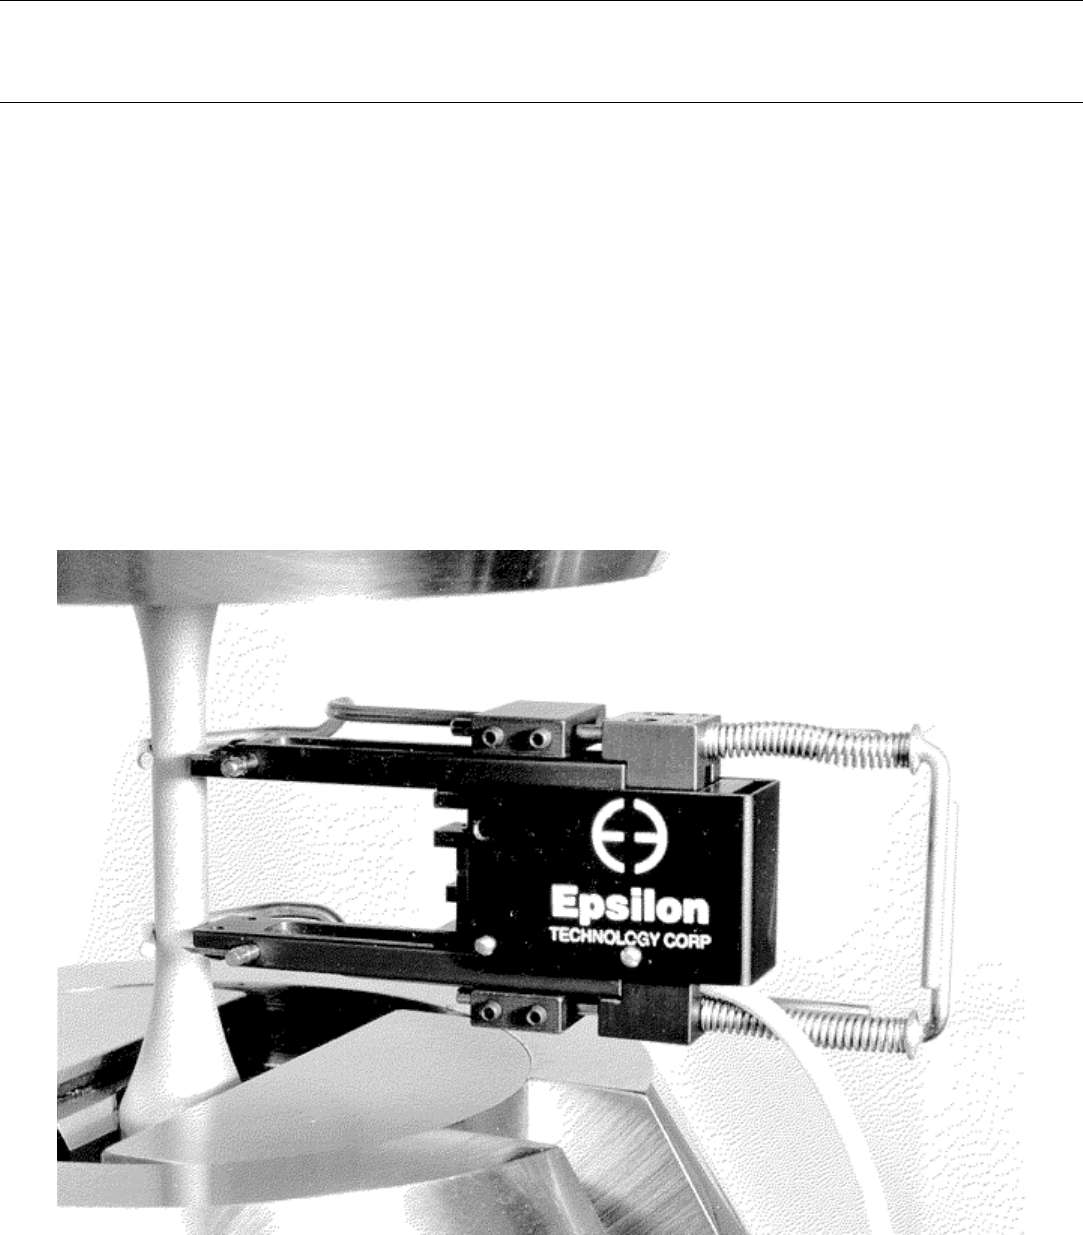
types of devices, such as clip-on extensometers (Fig. 10), directly-mounted strain gages (Fig. 11), and various
optical devices. These devices are used extensively and can provide a high degree of deformation- (strain-)
measurement accuracy. Other more advanced instrumentations, such as laser interferometry and video
extensometers, are also available.
Fig. 10 Test specimen with an extensometer attached to measure specimen deformation. Courtesy of
Epsilon Technology Corporation

Fig. 11 Strain gages mounted directly to a specimen
Various types of extensometers and strain gages are described below. Selection of a device for strain
measurement depends on various factors:
• The useable range and accuracy of the gage
• Techniques for mounting the gage
• Specimen size
• Environmental test conditions
• Electronic circuit configuration and analysis for signal processing
The last item should include the calibration of the extensometer device over its full operating range. In addition,
one challenge of working with clip-on extensometers is to ensure proper attachment to the specimen. If the
extensometer slips as the specimen deforms, the resulting signal will give a false reading.
Clip-on extensometers can be attached to a test specimen to measure elongation or strain as the load is applied.
This is particularly important for metals and similar materials that exhibit high stiffness. Typical extensometers
have fixed gage lengths such as 25 or 50 mm (1 or 2 in.). They are also classified by maximum percent
elongation so that a typical 25 mm (1 in.) gage length unit would have different models for 10, 50, or 100%
maximum strain. Extensometers are used to measure axial strain in specimens. There also are transverse strain-
measuring devices that indicate the reduction in width or diameter as the specimen is tested.
The two basic types of clip-on extensometers are linear variable differential transformer (LVDT) devices and
strain-gage devices. These two types are described along with a description of earlier dial-type extensometers.

Early extensometers were held to the specimen with center points matching the specimen gage-length punch
marks, and elongation was indicated between the points by a dial indicator. Because of mechanical problems
associated with these early devices, most dial extensometers use knife edges and leaf-spring pressure for
specimen attachment. An extensometer using a dial indicator to measure elongation is shown in Fig. 12. The
dial indicator usually is marked off in 0.0025 mm (0.0001 in.) increments and measures the total extension
between the gage points. This value divided by the gage length gives strain in mm/mm, or in./in.
Fig. 12 Dial-type extensometer, 50 mm (2 in.) gage length
LVDT extensometers employ an LVDT with a core, which moves from specimen deformation and produces an
electrical signal proportional to amount of core movement (Fig. 13). LVDT extensometers are small, light
weight, and easy to use. Knife edges provide an exact point of contact and are mechanically set to the exact
gage length. Unless the test report specifies total elongation, center punch marks or scribed lines are not
required to define the gage length. They are available with gage lengths ranging from 10 to 2500 mm (0.4 to
100 in.) and can be fitted with breakaway features (Fig. 14), sheet metal clamps, low-pressure clamping
arrangements (film clamps, as shown in Fig. 15), and other devices. Thus, they can be used on small
specimens—such as thread, yarn, and foil—and on large test specimens—such as reinforcing bars, heavy steel
plate, and tubing up to 75 mm (3 in.) in diameter.

Fig. 13 Averaging LVDT extensometer (50 mm, or 2 in. gage length) mounted on a threaded tension
specimen

Fig. 14 Breakaway-type LVDT extensometer (50 mm, or 2 in. gage length) that can remain on the
specimen through rupture
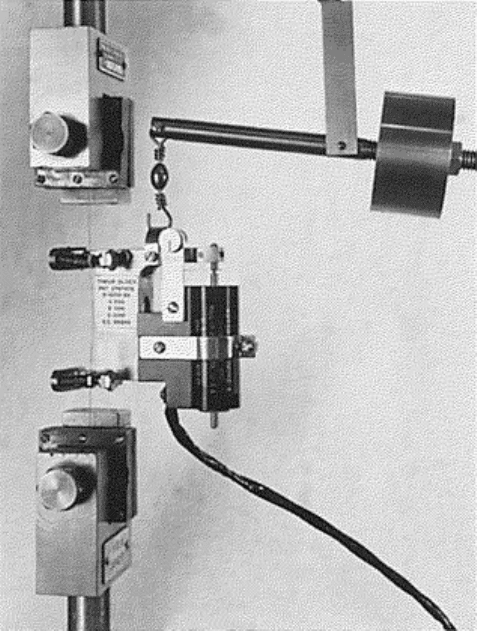
Fig. 15 Averaging LVDT extensometer (50 mm, or 2 in. gage length) mounted on a 0.127 mm (0.005 in.)
wire specimen. The extensometer is fitted with a low-pressure clamping arrangement (film clamps) and
is supported by a counterbalance device.
Modifications of the LVDT extensometer also permit linear measurements at temperatures ranging from -75 to
1205 °C (-75 to 2200 °F). Accurate measurements can also be made in a vacuum. For standard instruments, the
working temperature range is approximately -75 to 120 °C (-100 to 250 °F). However, by substituting an
elevated-temperature transformer coil, the usable range of the instrument can be extended to -130 to 260 °C (-
200 to 500 °F).
Strain-gage extensometers, which use strain gages rather than LVDTs, are also common and are lighter in
weight and smaller in size, but strain gages are somewhat more fragile than LVDTs. The strain gage usually is
mounted on a pivoting beam, which is an integral part of the extensometer. The beam is deflected by the
movement of the extensometer knife edge when the specimen is stressed. The strain gage attached to the beam
is an electrically conductive small-sized grid that changes its resistance when deformed in tension,
compression, bending, or torsion. Thus, strain gages can be used to supply the information necessary to
calculate strain, stress, angular torsion, and pressure.
Strain gages have been improved and refined, and their use has become widespread. Basic types include wire
gages, foil gages, and capacitive gages. Wire and foil bonded resistance strain gages are used for measuring
stress and strain and for calibration of load cells, pressure transducers, and extensometers. These gages typically
measure 9.5 to 13 mm (⅜ to ½in.) in width and 13 to 19 mm (½ to ¾in.) in length and are adhesively bonded to
a metal element (Fig. 16).
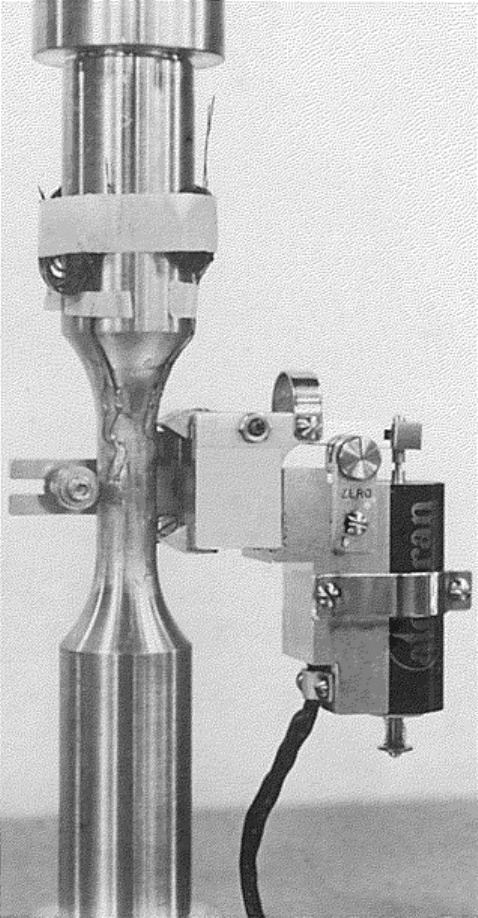
Fig. 16 Fatigue test specimen with bonded resistance strain gages and a 25 mm (1 in.) gage length
extensometer mounted on the reduced section
Operation of strain-gage extensometers is based on gages that are bonded to a metallic element and connected
to a bridge circuit. Deflection of the element, due to specimen strain, changes the gage's resistance that
produces an output signal from a bridge circuit. This signal is amplified and processed by signal conditioners
before being displayed on a digital readout, chart recorder, or computer. The circuitry in the strain-measuring
system allows multiple ranges of sensitivity, so one transducer can be used over broad ranges. The
magnification ratio, which is the ratio of output to extensometer deflection, can be as high as 10,000 to 1.
Strain Gages Mounted Directly to the Test Specimen. For some strain measurements, strain gages are mounted
on the part being tested (Fig. 11). When used in this manner, they differ from extensometers in that they
measure average unit elongation over nominal gage length rather than total elongation between definite gage
points. For some testing applications, strain gages are used in conjunction with extensometers (Fig. 16).
In conventional use, wire or foil strain gages, when mounted on structures and parts for stress analysis, are
discarded with the tested item. Thus, strain gages are seldom used in production testing of standard tension
specimens. Foil strain gages currently are the most widely used, due to the ease of their attachment.
Averaging Extensometers. Typically extensometers are either nonaveraging or averaging types. A
nonaveraging extensometer has one fixed nonmovable knife edge or center point and one movable knife edge
or center point on the same side of the specimen. This arrangement results in extension measurements that are

taken on one side of the specimen only; such measurements do not take into account that elongation may be
slightly different on the other side.
For most specimens, notably those with machined rounds or reduced gage length flats, there is no significant
difference in elongation between the two sides. However, for as-cast specimens, high-modulus materials, some
forged parts, and specimens made from tubing, a difference in elongation sometimes exists on opposite sides of
the specimen when subjected to a tensile load. This is due to part configuration and/or internal stress.
Misalignment of grips also contributes to elongation measurement variations in the specimen. For these
situations, averaging extensometers are used. Averaging extensometers use dual-measuring elements that
measure elongation on both sides of a sample; the measurements are then averaged to obtain a mean strain.
Optical Systems. Lasers and other systems can also be used to obtain linear strain measurements. Optical
extensometers are particularly useful with materials such as rubber, thin films, plastics, and other materials
where the weight of a conventional extensometer would distort the workpiece and affect the readings obtained.
In the past, such strain-measuring systems were expensive, and their principal use has been primarily in
research and development work. However, these optical techniques are becoming more accessible for
commercial testing machines. For example, bench-top UTM systems with a laser extensometer are available
(Fig. 17). This laser extensometer allows accurate measurement of strain in thin films, which would not
otherwise be practical by mechanical attachment of extensometer devices. Optical systems also allow non-
contact measurement from environmental test chambers.
Fig. 17 Bench-top UTM with laser extensometer. Courtesy of Tinius Olsen Testing Machine Company,
Inc.
Calibration, Classification, and Verification of Extensometers. All types of extensometers for materials testing
must be verified, classified, and calibrated in accordance with applicable standards. Calibration of
extensometers refers to the procedure of determining the magnitude of error in strain measurements.
Verification is a calibration to ascertain whether the errors are within a predetermined range. Verification also
implies certification that an extensometer meets stated accuracy requirements, which are defined by
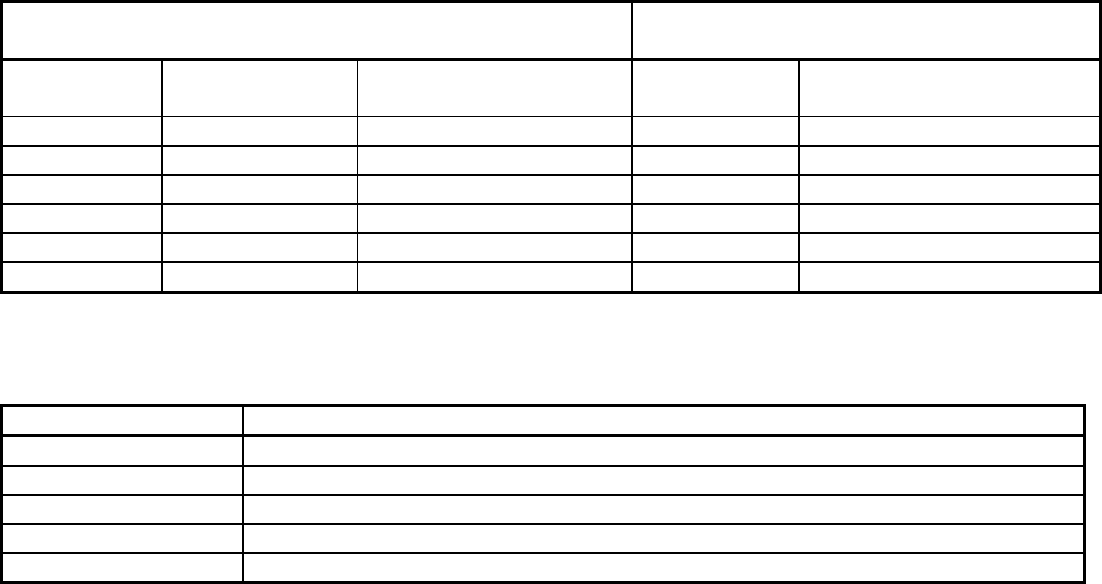
classifications such as those in ASTM E 83 (Table 3).
Table 3 Classification of extensometer systems
Error of strain not to exceed the greater of
(a)
:
Error of gage length not to exceed the greater
of:
Classification
Fixed error,
in./in.
Variable error, % of
strain
Fixed error,
in.
Variable error, % of gage
length
Class A 0.00002 ±0.1 ±0.001
±0.01
Class B-1 0.0001 ±0.5 ±0.0025
±0.25
Class B-2 0.0002 ±0.5 ±0.005
±0.5
Class C 0.001 ±1 ±0.01
±1
Class D 0.01 ±1 ±0.01
±1
Class E 0.1 ±1 ±0.01 ±1
(a) Strain of extensometer system—ratio of applied extension to the gage length.
Source: ASTM E 83
Several calibration devices can be used, including an interferometer, calibrated standard gage blocks and an
indicator, and a micrometer screw. Applicable standards for extensometer calibration or verification include:
Specification number
Specification title
DIN EN 10002-4
Part 4: Verification of Extensometers Used in Uniaxial Testing, Tensile
ISO 9513
Metallic Materials—Verification of Extensometers Used in Uniaxial Testing
BS EN 10002-4
Verification of Extensometers Used in Uniaxial Testing
ASTM E 83
Standard Practice for Verification and Classification of Extensometers
BS 3846 Methods for Calibration and Grading of Extensometers for Testing of Materials
Verification and classification of extensometers are applicable to instruments of both the averaging and
nonaveraging type.
Procedures for the verification and classification of extensometers can be found in ASTM E 83. It establishes
six classes of extensometers (Table 3), which are based on allowable error deviations, as discussed later in this
article. This standard also establishes a verification procedure to ascertain compliance of an instrument to a
particular classification. In addition, it stipulates that a certified calibration apparatus must be used for all
applied displacements and that the accuracy of the apparatus must be five times more precise than allowable
classification errors. Ten displacement readings are required for verification of a classification.
Class A extensometers, if available, would be used for determining precise values of the modulus of elasticity
and for precise measurements of permanent set or very slight deviations from Hooke's law. Currently, however,
there are no commercially available extensometers manufactured that are certified to comply with class A
requirements.
Class B-1 extensometers are frequently used to determine values of the modulus of elasticity and to measure
permanent set or deviations from Hooke's law. They are also used for determining values such as the yield
strength of metallic materials.
Class B-2 extensometers are used for determining the yield strength of metallic materials.
All LVDT and strain-gage extensometers can comply with class B-1 or class B-2 requirements if their
measuring ranges do not exceed 0.5 mm (0.02 in.). Instruments with measuring ranges of over 0.5 mm (0.02
in.) can be class C instruments.
Most electrical differential transformer extensometers of 500-strain magnification and higher can conform to
class B-1 requirements throughout their measuring range. Extensometers of less than 500-strain magnification
can comply only with class B-1 requirements in their lower (40%) measuring range and are basically class B-2
instruments.
Dial Extensometers. Although all dial instruments usually are considered class C instruments, the majority (up
to a gage length of 200 mm, or 8 in.) are class B-1 and class B-2 in their initial 40% measuring range, and class
C throughout the remainder of the range. Dial instruments are used universally for determining yield strength
by the extension-under-load method and yield strength of 0.1% offset and greater.
Class C and D Extensometers. Extensometers with a gage length of 610 mm (24 in.) begin in class C, although
their overall measuring range must be considered as class D.
Testing Machines and Strain Sensors
Joel W. House, Air Force Research Laboratory; Peter P. Gillis, University of Kentucky
Gripping Techniques
The use of proper grips and faces for testing materials in tension is critical in obtaining meaningful results. Trial
and error often will solve a particular gripping problem. Tension testing of most flat or round specimens can be
accommodated with wedge-type grips (Fig. 18). Wire and other forms may require different grips, such as
capstan or snubber types. The load capacities of grips range from under 4.5 kgf (10 lbf) to 45,000 kgf (100,000
lbf) or more. ASTM E 8 describes the various types of gripping devices used to transmit the measured load
applied by the test machine to the tension test specimen.
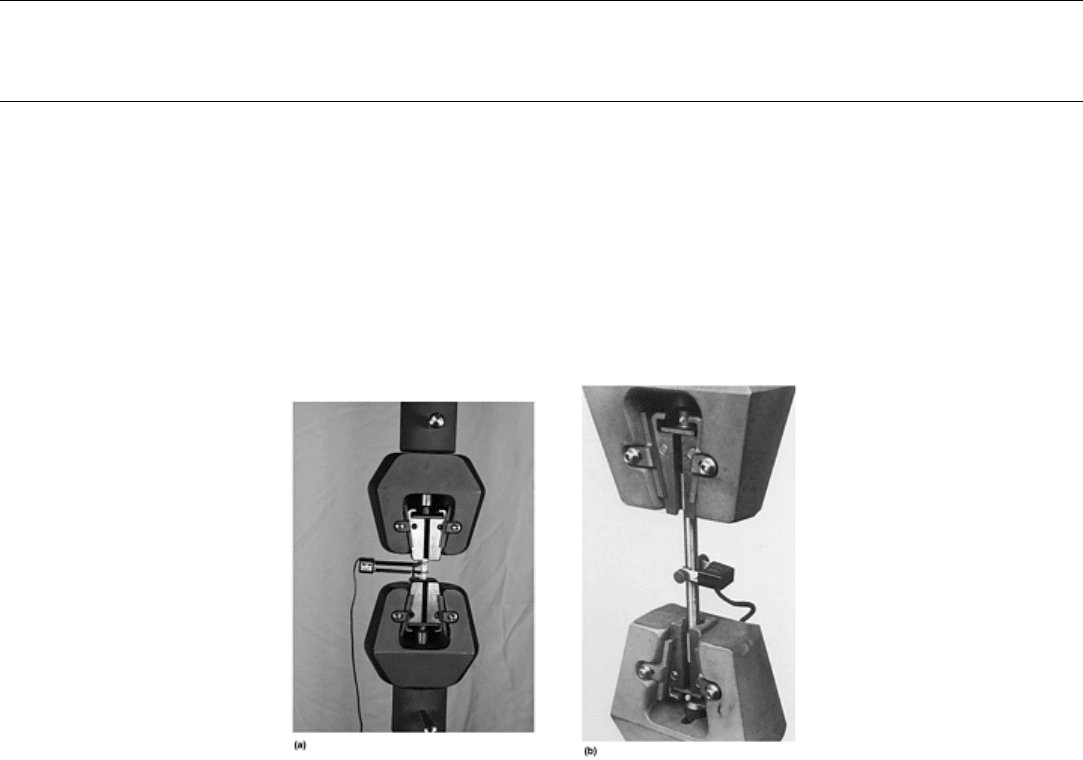
Fig. 18 Test setup using wedge grips on (a) a flat specimen with axial extensometer and (b) a round
specimen with diametral extensometer
Screw-action grips, or mechanical grips, are low in cost and are available with load capacities of up to 450 kgf
(1000 lbf). This type of grip, which is normally used for testing flat specimens, can be equipped with
interchangeable grip faces that have a variety of surfaces. Faces are adjustable to compensate for different
specimen thicknesses.
Wedge-type grips (Fig. 18) are self-tightening and are built with capacities of up to 45,000 kgf (100,000 lbf) or
more. Some units can be tightened without altering the vertical position of the faces, making it possible to
preselect the exact point at which the specimen will be held. The wedge-action design works well on hard-to-
hold specimens and prevents the introduction of large compressive forces that cause specimen buckling.
Pneumatic-action grips are available in various designs with capacities of up to 90 kgf (200 lbf). This type of
grip clamps the specimen by lever arms that are actuated by compressed air cylinders built into the grip bodies.
A constant force maintained on the specimen compensates for decrease of force due to creep of the specimen in
the grip. Another advantage of this design is the ability to optimize gripping force by adjusting the air pressure,
which makes it possible to minimize specimen breaks at the grip faces.
Buttonhead grips enable the rapid insertion of threaded-end or mechanical-end specimens. They can be
manually or pneumatically operated, as required by the type of material or test conditions.
