ASM Metals HandBook Vol. 8 - Mechanical Testing and Evaluation
Подождите немного. Документ загружается.

of these notches is to cause regions of stress concentrations and, thus, to better simulate actual processing
conditions, particularly for metals with limited forgeability.
Plane-Strain Compression Test. The purpose of this test is basically to determine the yield stress of the material
under plane-strain conditions. The results are used to calculate the forces required in processes such as rolling
of wide sheet and some regions of the workpiece in forging operations.
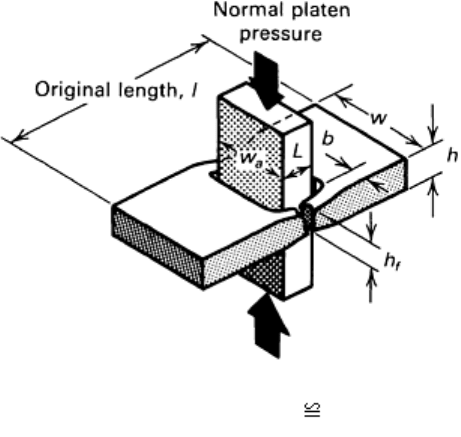
Partial-width indentation tests (Fig. 6) involve partial indentation of a simple wrought or as-cast rectangular
slab. As a result, the overhangs (ribs) are subjected to secondary tensile stresses. The reduction in rib height (h
f
)
is a measure of the ductility of the metal. This test can be performed cold or hot.
Fig. 6 Schematic of the partial-width-indentation test. L h; b = h/2; w
a
= 2L; 1 = 4L. Source: Ref 1
Torsion tests are generally performed on tubular specimens with reduced midsections in order to localize and
control strains. Unlike in tension testing the specimen does not undergo necking (there is no plastic instability),
and unlike in compression testing, there is no friction.
From test results, shear stress-shear strain curves are constructed. However, these curves are applicable to a
limited number of processes, such as shearing (cropping) and power spinning of conical workpieces. Torsion
tests at elevated temperatures (hot-twist tests) have long been found to be somewhat more suitable (as a
measure of forgeability) than upsetting tests, particularly for alloy steels.
Sample Size and Aspect Ratio. As stated earlier, it has long been established that sample size and aspect ratio
(length-to-cross section) have significant effects on mechanical test results, particularly ductility. These effects
can be summarized as follows. In tension tests, the total percent elongation increases with increasing cross-
sectional area and decreases with increasing gage length. For compression tests, the higher the aspect ratio, the
higher is the tendency for buckling of the specimen and for double barreling.
Sample Location. Sample location as well as sample size can be important in applications where there are
significant variations or gradients in the chemistry and defects present. Variations are, hence, present also in the
mechanical properties of the workpiece material.
Even in seemingly simple metalworking operations (such as open-die forging, direct extrusion, and bending of
thick plates), deformation of the metal is usually complex. There can be severe localized plastic deformation,
therefore, property gradients within the workpiece. One example is the presence of shear bands (Fig. 7),
developed during high deformation-rate processes and with metals whose strength decreases rapidly within a
narrow temperature range. This phenomenon is similar to the formation of segmented or serrated chips in metal
cutting, particularly in machining titanium.
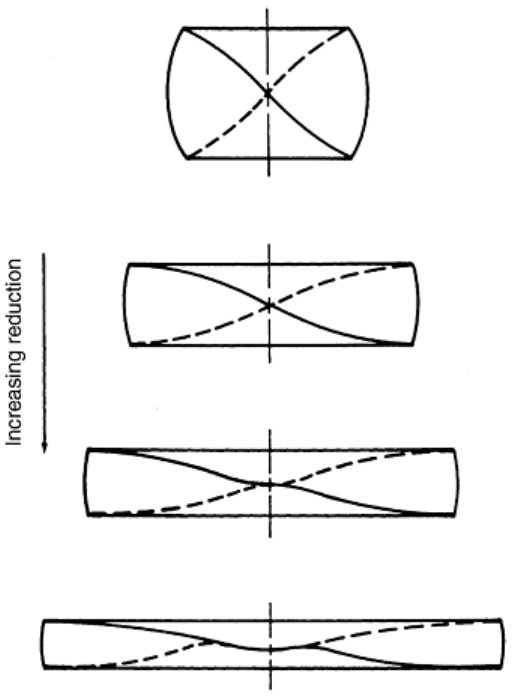
Fig. 7 Schematic of the mechanism of shear-band formation in upsetting. Source: Ref 1
Sample Orientation. Few metalworking processes involve simple, uniaxial deformation of the workpiece.
Depending on the nature of the process, the metal is usually deformed in various directions. For example, in
extrusion and rod drawing, the deformation is usually axisymmetric. Most forgings are typically
multidirectional, and rolling of sheet is usually under plane-strain conditions, with the deformation principally
in the direction of rolling. Because of the resulting anisotropy of the cold rolled metal, sample orientation can
therefore by very significant, particularly in regard to subsequent processing such as bending or stamping.
In sheet metals, anisotropy is also important in springback behavior; this is because the amount of springback
depends on the yield stress. All other variables being the same, the springback increases with increasing yield
stress. (Note, for example, how helical or leaf springs are heat treated to increase their yield stress and, thus,
attain full springback.) Control of springback is an important consideration in most sheet forming operations.
There are two basic types of anisotropy: preferred orientation and mechanical fibering. Preferred orientation
(also called crystallographic anisotropy) arises from the alignment of grains in the general direction of material
flow during deformation. (This type of anisotropy can be eliminated or minimized by annealing.) Mechanical
fibering is due to the alignment of impurities, inclusions (stringers), and voids in the material during
deformation processing. This phenomenon is typically observed in metals and alloys with poor quality.
An important beneficial effect of anisotropy is in deep drawing of sheet metals whereby the deep drawability
increases with increasing normal anisotropy. On the other hand, planar anisotropy causes earing of the drawn
cup (discussed in the section “Deep Drawing” in “Factors Influencing Formability in Sheet Metal Forming” in
this article).
References cited in this section
1. G.E. Dieter, Ed., Workability Testing Techniques, ASM International, 1984, p 16, 33, 49, 61, 63, 163,
202, 206
2. G.E. Dieter, Mechanical Metallurgy, 3rd ed., McGraw-Hill, 1986
3. S. Kalpakjian, Manufacturing Processes for Engineering Materials, 3rd ed., Addison-Wesley, 1997, p
44, 45, 50, 398, 399, 409, 416, 438
4. J.S. Schey, Introduction to Manufacturing Processes, 3rd ed, McGraw-Hill, 1999
5. G.E. Dieter, Engineering Design: A Materials and Processing Approach, 2nd ed., McGraw-Hill, 1994
6. K. Lange, Ed., Handbook of Metal Forming, McGraw-Hill, 1985
Mechanical Testing for Metalworking Processes
Serope Kalpakjian, Illinois Institute of Technology
Quality Control
In addition to the various factors and parameters described so far, other considerations outlined in this section
can have a direct and significant influence on workpiece quality.
Surface integrity includes both purely geometric features of a surface (such as roughness and lay) and its
properties (such as the presence of cracks, discontinuities, and surface and subsurface defects). Because of the
often large strains to which workpiece surfaces are subjected during processing, surface integrity can be of
major importance.
For example, workpiece materials that are sensitive to surface scratches (notch sensitivity and lack of fracture
toughness) can develop major flaws in the product, either in bulk or sheet form. Likewise, sheet blanks with
poor edge conditions (roughness and severe strain and hardness gradients) have poor bendability due to
premature cracking.
Structural Integrity. Depending on its processing history, a workpiece to be subjected to further metalworking
operations may contain significant structural defects such as voids (microporosity), impurities, inclusions,
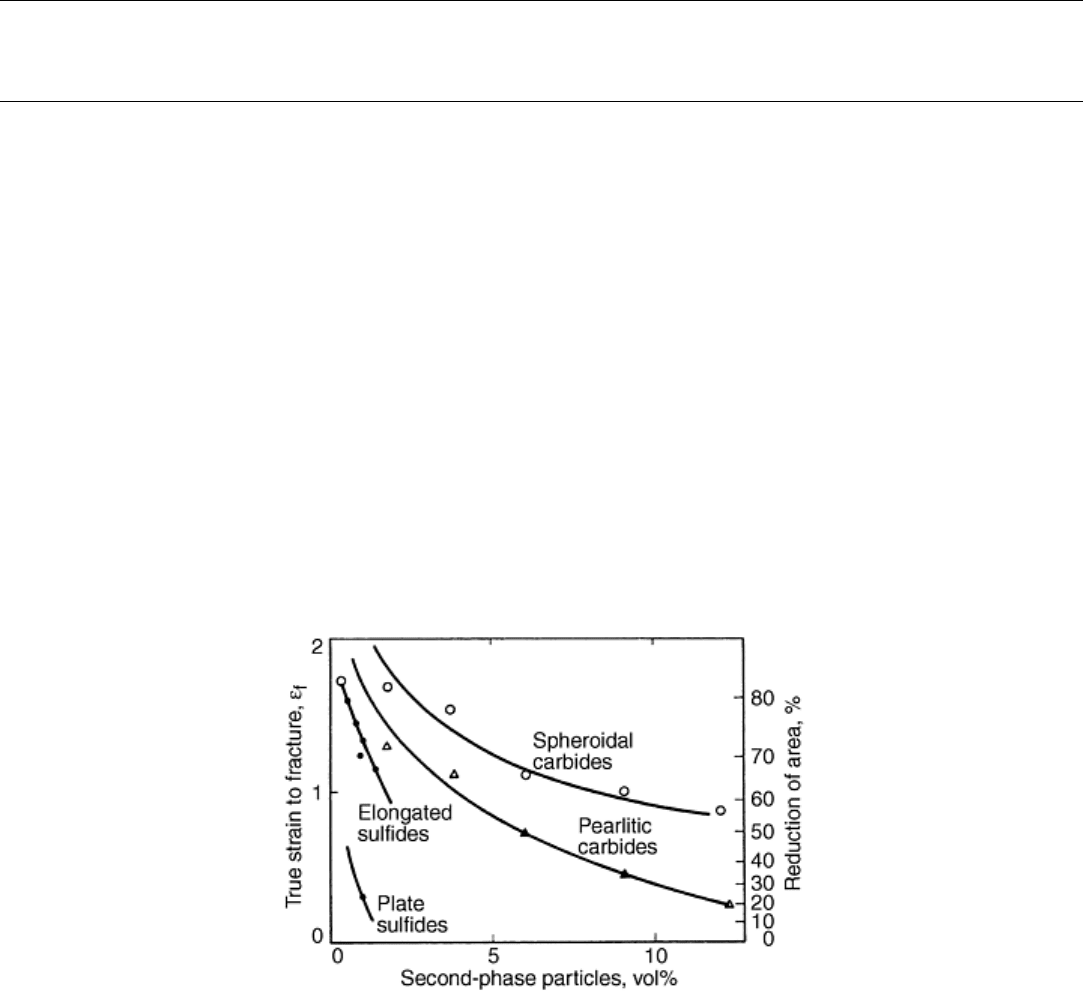
inhomogeneities, internal cracks (chevron), and second-phase particles. These defects can have a major adverse
effect on the ductility and workability of the metal (Fig. 8). Furthermore, the defects may or may not be
distributed uniformly throughout the workpiece.
Fig. 8 The effect of volume fraction of second-phase particles on tensile ductility of steels. Source: Ref 1
Depending on the state of stress during deformation, these flaws can lead to major defects in the final product.
For example, voids can form, coalesce, and open; external or internal cracks can propagate throughout the
material. High shear bands can develop in certain regions, possibly leading to failure during the service life of
the product.

In elevated temperature metalworking, minute amounts of impurities, small changes in composition, and phase
changes throughout the workpiece (such as in bulk deformation of titanium alloys) can cause a major reduction
in ductility. Embrittlement of grain boundaries (hot shortness) due to the presence of low-melting-point
impurities can be a severe problem (liquid-metal or solid-metal embrittlement).
Residual Stresses. These internal stresses result typically from nonuniform deformation of the metal during
metalworking and heat treatment and from thermal gradients. Residual stresses can have beneficial effects
(improved fatigue life, if compressive on the surface) as well as adverse effects, such as stress cracking and
distortion after subsequent processing (removing a layer of material, drilling a hole, or blanking). Stress
relieving is commonly used to reduce the adverse effects.
Tribological Considerations. Equally important in product quality are tribological factors, namely friction,
lubrication, and wear (Ref 3, 4, 6). Friction at tool, die, and workpiece interfaces can have a major effect on
material flow (e.g., die filling in forging or the distribution of stresses in sheet forming), external and internal
defect formation (e.g., poor surface finish, severe surface shear stresses, or excessive temperature rise during
processing), and force and energy requirements in processing, because of the frictional energy involved.
Consequently, proper lubrication to control friction as well as to reduce tool and die wear are major concerns.
These considerations are, in themselves, complex phenomena, and it is essential to select and apply appropriate
lubricants, which are now largely water-based for environmental concerns.
Because the wear of tools and dies is inevitable, identification of the specific mechanisms of wear (adhesive,
abrasive, corrosive, fatigue, and impact) is important. This helps determine the proper action to take in order to
minimize or reduce the rate of wear, thereby improving the dimensional accuracy and surface finish of the
products, as well as the overall economy of production.
References cited in this section
1. G.E. Dieter, Ed., Workability Testing Techniques, ASM International, 1984, p 16, 33, 49, 61, 63, 163,
202, 206
3. S. Kalpakjian, Manufacturing Processes for Engineering Materials, 3rd ed., Addison-Wesley, 1997, p
44, 45, 50, 398, 399, 409, 416, 438
4. J.S. Schey, Introduction to Manufacturing Processes, 3rd ed, McGraw-Hill, 1999
6. K. Lange, Ed., Handbook of Metal Forming, McGraw-Hill, 1985
Mechanical Testing for Metalworking Processes
Serope Kalpakjian, Illinois Institute of Technology
Factors Influencing Workability in Bulk Deformation Processes
Forging is a basic bulk deformation process typically involving a variety of processes such as open-die,
impression-die, and closed-die forging (Ref 1, 3, 4, 6, 7, 8, 9, 10, 11). It is generally agreed that forgeability
involves three basic parameters:flow stress, ductility, and the coefficient of friction, with temperature and speed
being additional variables. Although no standard forgeability test has yet been devised, nearly all conventional
mechanical tests have been utilized such as compression, tension, bend, torsion (twist), and impact tests.
Upsetting a solid cylindrical blank (pancaking) has been studied most extensively since it incorporates all the
major factors involved. Typically, a solid cylindrical specimen is upset between flat dies (platens), and the
cylindrical surfaces are inspected for the initiation of cracks. The original surface condition of the specimen is
important in that the presence of defects (such as seams) can cause premature crack initiation.
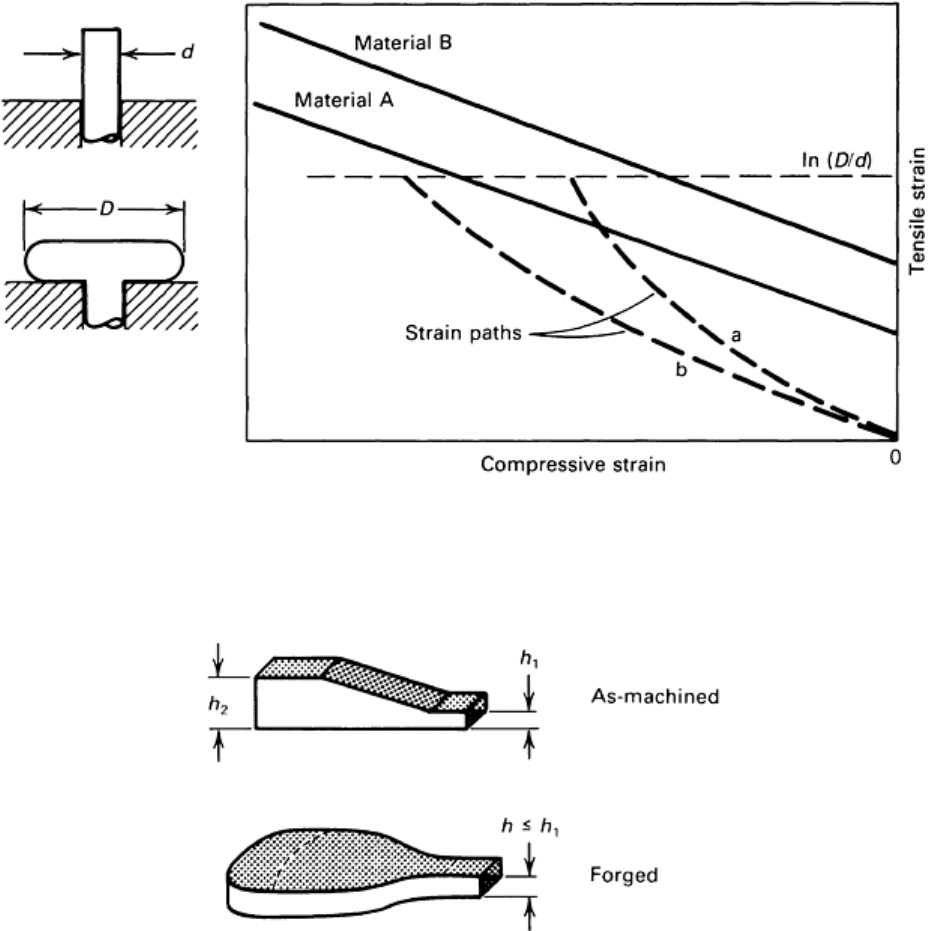
In cold upsetting tests, linear relationships have been observed between the total surface strains at fracture, and
the fracture loci have been established (Fig. 9). These plots consist of tensile strains versus compressive strains
on the surface of the specimen (typically with a slope of -0.5), and they represent material limits to plastic
deformation.
Fig. 9 Comparison of strain paths and fracture locus lines in cold upsetting. Source: Ref 1
A tapered, wedge-shaped test specimen has also been used (Fig. 10) whereby, as the upper flat die descends, the
specimen undergoes varying degrees of deformation throughout its length. The onset of surface cracking can
then be observed and related to the reduction in height at that particular location.
Fig. 10 Schematic illustration of a wedge-test specimen showing deformation after upsetting. Source: Ref
1
Forging of solid round blanks in the diametral direction in a manner similar to the disk test has also been
investigated. In upsetting a round blank with flat dies, an internal lateral tensile stress develops at the center of
the blank, leading to a vertical crack (Fig. 11). Although such a crack would normally be considered a defect,
this phenomenon is the principle of the Mannesmann process for the production of seamless tubing and pipe.
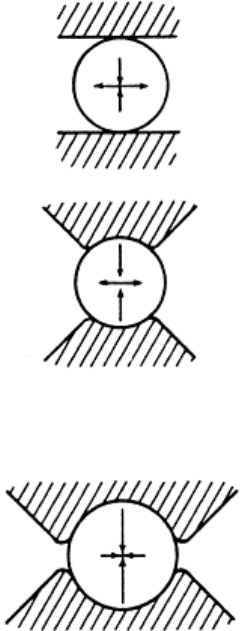
Fig. 11 Effect of contact area between dies and workpiece in forging a solid round billet. Source: Ref 1
Note in Fig. 11 that as the contact area between the dies and the billet surface increases, the lateral tensile stress
decreases and becomes compressive. Consequently, the tendency for internal crack formation is eliminated with
increasing contact area.
Another test (hot twist) has been shown to be a good indicator of forgeability. A solid round bar with specific
length (typically 10 to 50 mm) and diameter (typically 8 to 25 mm) is heated and twisted continuously until it
fractures. Round tubular specimens can also be used for this test. In addition to temperature as a parameter,
rotational (twisting) speeds are varied, particularly because of the greater sensitivity of the metal to higher
strain rates at elevated temperatures. The torque and shear strains (which can then be converted to normal
strains and effective strains) are monitored as an indication of the strength and ductility of the metal at various
temperatures.
Rolling. One of the most important primary metalworking processes (performed either hot or cold), rolling
involves several parameters. Control of these parameters is essential to avoiding defects such as alligatoring,
edge cracking, and surface damage (Ref 1, 2, 3, 4, 6). In cold rolling, the quality and surface condition of the
billet, slab, or plate to be rolled is as important as they are in all metalworking operations.
Deformation of the metal in the roll gap can be complex, because inhomogeneities usually exist throughout the
thickness of the stock being rolled, depending primarily on the interrelationship between roll radius, R, and roll-
strip contact length, L. These inhomogeneities also lead to residual stresses in cold rolled products. These
stresses can be important because of the possibility of distortion and warping in subsequent processing of the
rolled product (when it is cut into individual blanks), as well as the possibility of affecting springback and
stress-corrosion cracking.
Alligatoring has been attributed to inhomogeneous deformation during rolling and the presence of defects such
as piping in the original ingot. Barreling (or double barreling) in rolling can cause edge cracking. This tendency
can be minimized by using edge-restraint rolling (Ref 4) and controlling the quality of the original edges of the
sheet or plate. Surface damage in rolling can be controlled primarily by effective lubrication.
Extrusion. Although the extrusion process has been studied extensively, there is as yet no criterion or coined
term (like forgeability or machinability) for establishing the capability of a material to be extruded (Ref 2, 3, 4,
6, 8, 11, 12).
Internal defects in extrusion, known variously as chevron or centerburst cracking, have been studied
extensively. It has been established that these internal cracks are due to a high hydrostatic tensile stress
component at the centerline in the deformation zone during extrusion.
These stresses can be reduced or eliminated by (a) increasing the extrusion ratio (i.e., the ratio of billet-to-
extrusion cross-sectional areas), (b) decreasing the die angle, and (c) ensuring that the billet does not contain
significant amounts of inclusions, voids, or impurities, which otherwise act as stress raisers, particularly if they
are concentrated along the center-line of the billet.
Although not commercially practiced to a significant extent, hydrostatic extrusion can be employed to enhance
the ductility of the metal. Further increase in ductility can be obtained by extruding the material into a second
chamber of pressurized fluid (fluid-to-fluid extrusion).
Rod and wire drawing is a process in which the force and energy required for deformation is applied through
the product (rod or wire) itself. Drawability is usually defined in terms of the maximum reduction in cross-
sectional area per pass. The analysis is based on the condition that it is the tensile stress that causes failure
(breakage of rod or wire), and that this stress must be below the flow stress of the metal at the die exit. Thus,
strain hardening, die angle, and friction are important parameters (Ref 2, 3, 4, 6, 11, 12).
In the analysis of maximum reduction per pass, there are the underlying assumptions that the metal is
sufficiently ductile to undergo the strains involved in this process without fracture, and that the magnitude of
the tensile stress in the exiting material causes failure. For round bars or wire, the maximum reduction per pass
is shown theoretically to be 63% in the absence of friction, redundant work, and strain hardening. As expected,
friction and redundant work decrease this reduction. For plane-strain drawing of sheet and plate under the same
conditions, the maximum reduction per pass is 57%.
The effect of strain hardening of the material is to increase the maximum reduction per pass from the theoretical
limits. This is because of the higher strength of the exiting rod or wire as compared to the average strength that
the material exhibits in the die gap. In practice, however, reductions per pass are much lower than these
theoretical limits, typically being on the order of 10 to 45% to ensure successful drawing.
The possibility of chevron or centerburst cracking also exists in rod and wire drawing. The relevant parameters
are the same as in extrusion, namely reduction per pass, die angle, and the quality of the material entering the
die, particularly along its centerline where the hydrostatic tensile stress component is highest. As in
forgeability, hot-twist tests have been shown to give some qualitative measure of the workability of metals in
drawing.
In addition to internal defects, external defects such as circumferential surface cracks (fir-tree cracking and
bamboo defects), crow's feet cracking (approximately at 45 °), and splitting of the product in the longitudinal
direction may also develop in drawing. In additional to the inherent ductility of the metal, other important
parameters are the states of stress and strain and frictional behavior.
Spinning. Power spinning studies have been conducted to predict spinnability (maximum reduction in thickness
per pass before failure) from the mechanical properties of the material. It has been shown, both experimentally
and analytically, that the maximum reduction per pass can be predicted from the tensile reduction of area of the
material, both for conical and tube spinning (Ref 3).
From the experimental data shown (Fig. 12), a maximum spinning reduction per pass of about 80% is possible
when the metal possesses a tensile reduction of area of about 50%. Beyond this tensile reduction, there is no
further increase in spinnability. Increased ductility beyond 50% thus, has no additional benefit. For metals with
a reduction in area of less than this critical value, spinnability depends on the ductility. It is interesting to note
that in bending of sheet metal, maximum bendability is achieved again at a tensile reduction of area of about
50%.
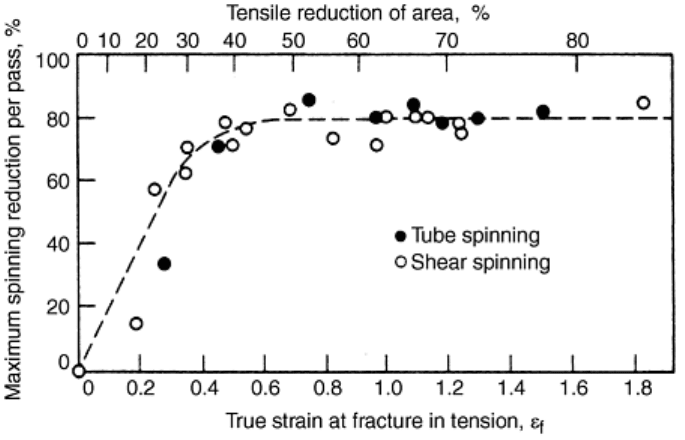
Fig. 12 Experimental data showing the relationship between maximum spinning reduction per pass and
the tensile reduction of area of the material. Source: Ref 3
References cited in this section
1. G.E. Dieter, Ed., Workability Testing Techniques, ASM International, 1984, p 16, 33, 49, 61, 63, 163,
202, 206
2. G.E. Dieter, Mechanical Metallurgy, 3rd ed., McGraw-Hill, 1986
3. S. Kalpakjian, Manufacturing Processes for Engineering Materials, 3rd ed., Addison-Wesley, 1997, p
44, 45, 50, 398, 399, 409, 416, 438
4. J.S. Schey, Introduction to Manufacturing Processes, 3rd ed, McGraw-Hill, 1999
6. K. Lange, Ed., Handbook of Metal Forming, McGraw-Hill, 1985
7. T. Altan, S.I. Oh, and H.C. Gegel, Metal Forming—Fundamentals and Applications, ASM
International, 1983
8. Forming and Forging, Vol 14, ASM Handbook, ASM International, 1988
9. T.G. Byrer, Ed., Forging Handbook, ASM International, 1985
10. H.A. Kuhn and B.L. Ferguson, Powder Forging, Metal Powder Industries Federation, 1990
11. Forming, Vol 2, Tool and Manufacturing Engineers Handbook, 4th ed., Society of Manufacturing
Engineers, 1984
12. H.F. Hosford and R.M. Caddell, Metal Forming: Mechanics and Metallurgy, 2nd ed., Prentice Hall,
1993
Mechanical Testing for Metalworking Processes
Serope Kalpakjian, Illinois Institute of Technology
Factors Influencing Formability in Sheet-Metal Forming
Sheet-metal forming operations consist of a large family of processes, ranging from simple bending to stamping
and deep drawing of complex shapes (Ref 2, 3, 4, 5, 6, 8, 11, 12). Formability of a sheet metal depends greatly
on the nature of the forming operation. In simple stretching operations, for example, the forming limit is
determined by the uniform elongation of the metal as it is related to the strain-hardening exponent, n.
Because most sheet forming operations usually involve stretching and some shallow drawing (see the “Deep
Drawing” section in this article), the product of the strain hardening exponent, n, and the normal anisotropy, R,
of the sheet has been shown to be a significant parameter. Normal anisotropy is the ratio of width to thickness
strains in a simple tension test (also called strain ratio or plastic anisotropy).
The factors influencing formability for major classes of sheet forming are reviewed in the following sections.
Bending. Bending is a common metalworking operation in which bendability is defined as the minimum bend
radius, R (measured to the inner surface of the bent part), to which a sheet metal can be bent without cracking
of its outer surface. It is usually given as the minimum R/T ratio, where T is the sheet thickness.
The most consistent indication of bendability has been shown to be the tensile reduction of the area of the sheet
metal, as obtained from a tension test specimen and cut in the direction of bending. Because of planar
anisotropy of cold rolled sheets (with higher ductility in the rolling direction than in the transverse direction), it
is important to prepare the specimens accordingly.
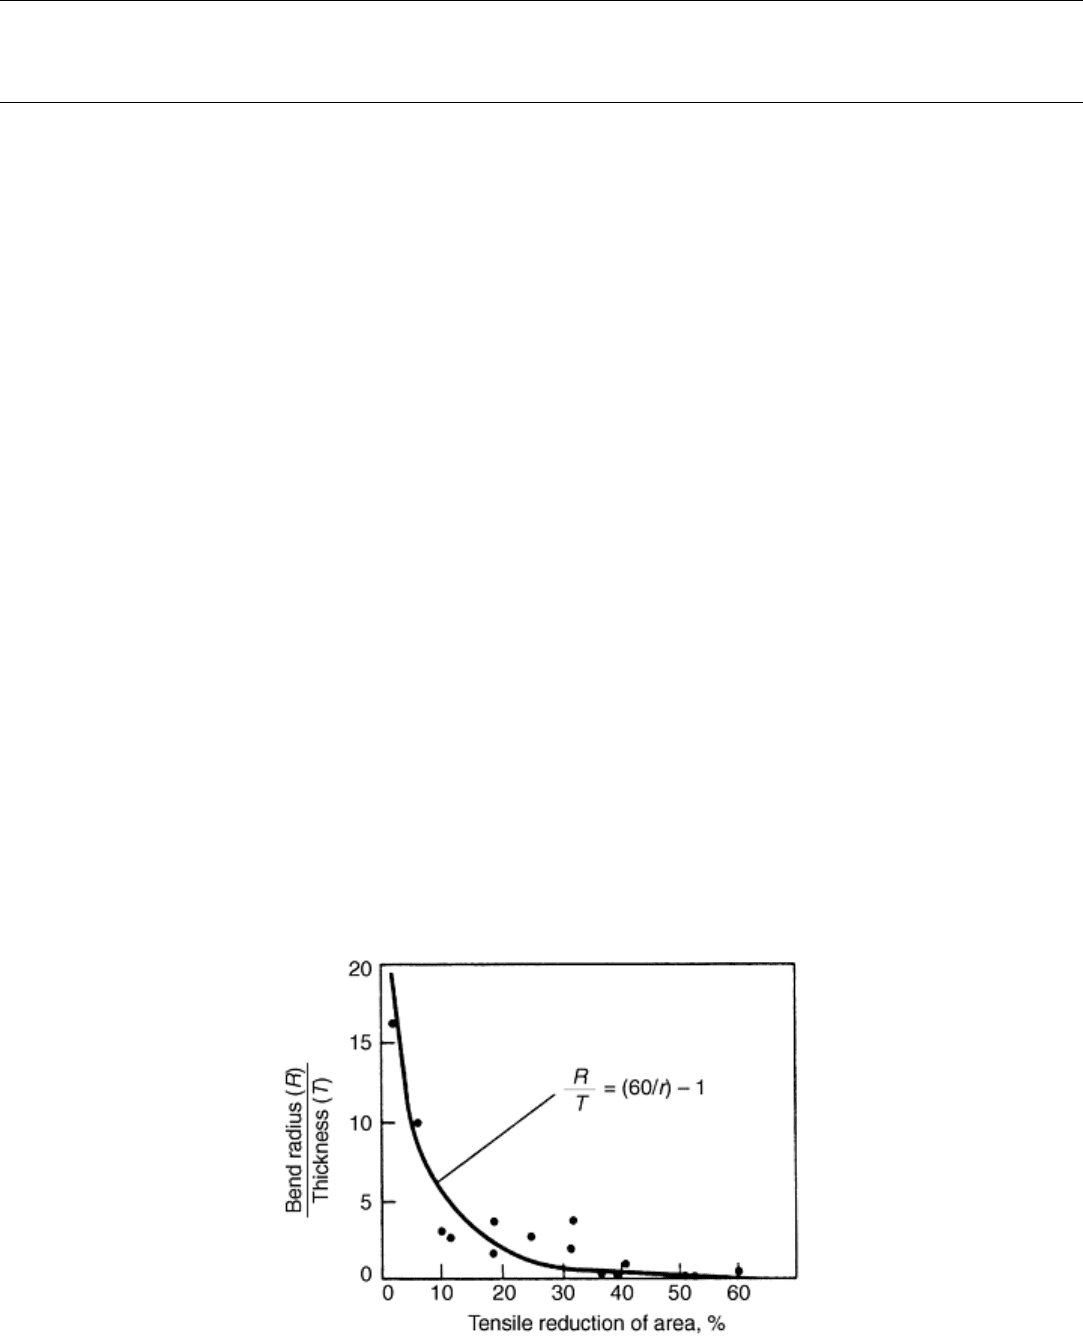
A theoretical relationship for bendability has been obtained:
Minimum R/T = (50/RA) - 1
(Eq 4)
where RA is the tensile reduction of area of the sheet. This equation has been derived by equating the true strain
at which the outer fiber in bending begins to crack to the true fracture strain of the sheet specimen in simple
tension.
Experimental results are in reasonably good agreement with this expression, with a curve-fitting modification
made by increasing the numerator in the equation from 50 to 60 (Fig. 13). Thus, a sheet with a tensile reduction
of area of 60% can be bent completely over itself (hemming) without cracking, much like folding a piece of
paper. Note that in the preceding section, “Spinning,” it was indicated that maximum spinnability is also
obtained at a tensile reduction of area of about 50%.
Fig. 13 Experimental data showing the relationship between bend radius-to-sheet thickness ratio and the
tensile reduction of area for various sheet metals. Source: Ref 3
It has also been shown that as the sheet width-to-thickness ratio increases (thus changing the deformation
condition from one of plane stress to plane strain), bendability decreases (Fig. 14). Edge condition of the sheet
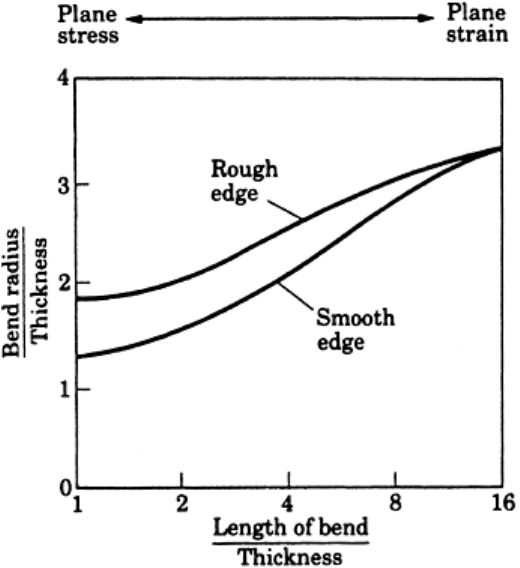
is also significant; the rougher the edge, the greater is the tendency for edge cracking. Bendability, thus,
decreases.
Fig. 14 The effect of length of bend (strip width) and sheared-edge condition on bend radius-to-sheet
thickness ratio for 7075 aluminum. Source: Ref 3
The effects of notch sensitivity, surface finish of the sheet metal and its lay, and rate of deformation are factors
that should be taken into consideration. Note that bending is one of the metalworking processes in which
formability depends not only on the property of the metal but also on the state of stress (geometric factors) and
edge quality.
The beneficial effect of hydrostatic pressure has also been observed in bending. Although specimen size is
limited, bending of metals with limited ductility has been carried out successfully in a pressurized chamber, and
major increases in bendability have been observed.
Forming-Limit Diagrams (FLD). Cupping tests commonly used in the past have been Erichsen and Olsen tests
(which involve stretching of the sheet by a steel ball) and Swift and Fukui tests (which principally involve the
drawing of the sheet into a cavity and some stretching). Although easy to perform and providing some general
and relative indication of formability, these tests rarely represent the biaxial state of stress typically encountered
by the sheet metal during actual forming operations.
A major development in establishing sheet metal formability under biaxial stresses is the construction of
forming limit diagrams (Ref 1, 2, 3, 4, 5, 12). In this test, sheets of different widths are marked with a grid
pattern of circles, using chemical etching or photoprinting techniques. The specimens are then clamped over a
fixture using draw beads (to prevent the sheet for being drawn in) and are stretched with a punch until fracture
(tearing) is observed.
The narrower the specimen is, the closer the state of stress becomes to one of simple stretching. In contrast, a
square specimen undergoes biaxial stretching. By observing and recording the deformation of the original grid
patterns (along the cracked or torn region) from circular to elliptical (Fig. 15), the major and minor strains
(generally engineering strains) can be calculated as percentages. For improved accuracy, the circle diameters
and the thickness of the lines should be as small and thin as practicable in order to locate more accurately the
region of maximum deformation (which would eventually lead to thinning and tearing).
