ASM Metals HandBook Vol. 8 - Mechanical Testing and Evaluation
Подождите немного. Документ загружается.

2. H. Kolsky, An Investigation of the Mechanical Properties of Materials at Very High Rates of Loading,
Proc. Phys. Soc. London, Vol 62-B, 1949, p 676–700
3. B. Hopkinson, The Effects of Momentary Stresses in Metals, Proc. Phys. Soc. London, Vol 74-A, 1905,
p 498–506
4. W.W. Baker and C.H. Yew, Strain Rate Effects in the Propagation of Torsional Plastic Waves, J. Appl.
Mech., Vol 33, 1966, p 917–923
5. J. Duffy, J.D. Campbell, and R.H. Hawley, On the Use of a Torsional Split Hopkinson Bar to Study
Rate Effects in 1100-O Aluminum, J. Appl. Mech., Vol 38, 1971, p 83–91
6. T. Nicholas and J.E. Lawson, On the Determination of the Mechanical Properties of Materials at High
Shear-Strain Rates, J. Mech. Phys. Solids, Vol 20, 1972, p 57–64
7. J.L. Lewis and J.D. Campbell, The Development and Use of a Torsional Hopkinson Bar Apparatus,
Exp. Mech., Vol 12 (No. 11), 1972, p 520–524
8. R.A. Frantz and J. Duffy, The Dynamic Stress-Strain Behavior in Torsion of 1100-O Aluminum
Subjected to a Sharp Increase in Strain Rate, J. Appl. Mech., Vol 39, 1972, p 939–945
9. J.D. Campbell, A.M. Eleiche, and M.C.C. Tsao, Strength of Metals and Alloys at High Strains and
Strain Rates, in Fundamental Aspects of Structural Alloy Design, R.J. Jaffee and B.A. Wilcox, Ed.,
Plenum Press, 1977, p 545–563
10. J. Lipkin, J.D. Campbell, and J.D. Swearengen, The Effects of Strain-Rate Variations on the Flow Stress
of OFHC Copper, J. Mech. Phys. Solids, Vol 26, 1978, p 251–268
11. A. Gilat and Y.H. Pao, High Rate Decremental-Strain Rate Test, Exp. Mech., Vol 28 (No. 3), 1988, p
322–325
12. A.M. Eleiche and J. Duffy, Effects of Temperature on the Static and Dynamic Stress-Strain
Characteristics in Torsion of 1100-O Aluminum, Int. J. Mech. Sci., Vol 17, 1975, p 85–95
13. A. Gilat and X. Wu, Elevated Temperature Testing with the Torsional Split Hopkinson Bar, Exp. Mech.,
Vol 34 (No. 2), 1994, p 166–170
14. L.S. Costin, E.E. Crisman, R.H. Hawley, and J. Duffy, On the Localization of Plastic Flow in Mild Steel
Tubes Under Dynamic Torsional Loading, in Proc. 2nd Int. Conf. Mechanical Properties of Materials
at High Rates of Strain, J. Harding, Ed., The Institute of Physics, 1979, p 287–282
15. A. Marchand and J. Duffy, An Experimental Study of the Formation Process of Adiabatic Shear Bands
in a Structural Steel, J. Mech. Phys. Solids, Vol 36, 1988, p 251–283
16. J.H. Giovanola, Adiabatic Shear Banding Under Pure Shear Loading, Part I: Direct Observation of
Strain Localization and Energy Dissipation Measurements, Mech. Mater., Vol 7, 1988, p 59–71
17. Q. Xue, L.T. Shen, and Y.L. Bai, A Modified Split Hopkinson Torsional Bar in Studying Shear
Localization, Meas. Sci. Technol., Vol 6, 1995, p 1557–1565
18. K.A. Hartley, J. Duffy, and R.H. Hawley, The Torsional Kolsky (Split-Hopkinson) Bar, Mechanical
Testing, Vol 8, ASM Handbook, ASM International, 1985, p 218–228

19. E.K.C. Leung, An Elastic-Plastic Stress Analysis of the Specimen Used in the Torsional Kolsky Bar, J.
Appl. Mech., Vol 47, 1980, p 278–282
20. C.Y. Chiem and J. Duffy, Strain Rate History Effects and Observations of Dislocation Substructure in
Aluminum Single Crystals Following Dynamic Deformation, Mater. Sci. Eng., Vol 57, 1963, p 233–247
21. Y.H. Pao and A. Gilat, High Strain Rate Deformation and Failure of A533B Steel at Various
Temperatures, Acta Metall. Mater., Vol 40, 1992, p 1271–1280
22. J.L. Chiddister and L.E. Malvern, Compression Impact Testing Of Aluminum at Elevated Temperatures,
Exp. Mech., Vol 3, 1963, p 81–90
23. C.G. Schmidt, R.D. Caligiuri, J.H. Giovanola, and D.C. Erlich, Effect of Grain Size on High Strain Rate
Deformation of Copper, Metall. Trans. A, Vol 22, 1991, p 2349–2357
24. J. Duffy, Strain Rate History Effects and Dislocation Substructure at High Strain Rates, in Materials
Behavior Under High Stress and Ultrahigh Loading Rates, J. Mescall and V. Weiss, Ed., Plenum Press,
1983, p 21–37
25. J. Klepaczko, Strain-Rate History Effects for Polycrystalline Aluminum and the Theory of Intersections,
J. Mech. Phys. Solids, Vol 16, 1968, p 255–266
26. K.A. Hartley and J. Duffy, Strain Rate and Temperature History Effects During Deformation of FCC
and BCC Metals, in Mechanical Properties of Materials at High Rates of Strain, J. Harding, Ed., The
Institute of Physics, 1984, p 21–30
Triaxial Hopkinson Techniques
Sia Nemat-Nasser, Jon Isaacs, and Jacob Rome, University of California, San Diego
Introduction
COMPRESSIVE PROPERTIES AND FAILURE MODES of many materials, particularly brittle materials, are
dramatically affected by stress triaxiality. This has been demonstrated through various laboratory experiments,
since the early work of Bridgman (Ref 1), who demonstrated several failure modes peculiar to high pressures,
leading to paradoxical results. The common feature of these paradoxes is that failure always occurs by the
formation of tension cracks in specimens subjected to pure compression. While all these paradoxes have been
fully understood (Ref 2), they do emphasize the importance of controlled triaxial experiments in materials
characterization. Indeed, in axial compression, brittle materials such as rocks or ceramics fail by axial splitting,
faulting, or plastic deformation (barreling), depending on the relative magnitude of the confining pressure that
may accompany the axial compression (Ref 3, 4, 5, and 6). Model studies show that similar results emerge at
high strain rate.
Triaxial Hopkinson techniques can be used to simultaneously subject a sample to axial and lateral
compressions. The lateral compression may be applied through a pneumatic pressure vessel (Ref 7, 8, and 9) or
dynamically using a special Hopkinson technique. These two techniques are reviewed in this article.
References cited in this section
1. P.W. Bridgman, The Physics of High Pressure, Bell, London, 1931

2. C.H. Scholtz, G. Boitnott, and S. Nemat-Nasser, The Bridgman Ring Paradox Revisited, Pure and
Applied Geophysics (PAGEOPH), Vol 124, 1986, p 587–599
3. S. Nemat-Nasser and H. Horii, Compression-Induced Nonplanar Crack Extension with Application to
Splitting, Exfoliation, and Rockburst, J. Geophys. Res., Vol 87 (No. B8), 1982, p 6805–6821
4. S. Nemat-Nasser, J.B. Isaacs, and J.E. Starrett, Hopkinson Techniques for Dynamic Recovery
Experiments, Proc. R. Soc. (London) A, Vol 435, 1991, p 371–391
5. H. Horii and S. Nemat-Nasser, Compression-Induced Microcrack Growth in Brittle Solids: Axial
Splitting and Shear Failure, J. Geophys. Res., Vol 90 (No. B4), 1985, p 3105–3125
6. H. Horii and S. Nemat-Nasser, Brittle Failure in Compression: Splitting, Faulting and Brittle-Ductile
Transition, Philos. Trans. R. Soc. (London) A, Vol 319 (No. 1549), 1986, p 337–374
7. R.J. Christensen, S.R. Swanson, and W.S. Brown, Split Hopkinson Bar Test on Rock under Confining
Pressure, Exp. Mech., Vol 12, 1972, p 508–541
8. L.E. Malvern, D.A. Jenkins, T. Tang, and S. McClure, Dynamic Testing of Laterally Confined
Concrete, Micromechanics of Failure of Quasi Brittle Materials, Elsevier Applied Science, 1991, p
343–352
9. G. Gary and B. Bailly, Behaviour of Quasi-Brittle Material at High Strain Rate, Experiment and
Modelling, Eur. J. Mech., A/Solids, Vol 17 (No. 3), 1998, p 403–420
Triaxial Hopkinson Techniques
Sia Nemat-Nasser, Jon Isaacs, and Jacob Rome, University of California, San Diego
Pneumatic Pressure Vessel
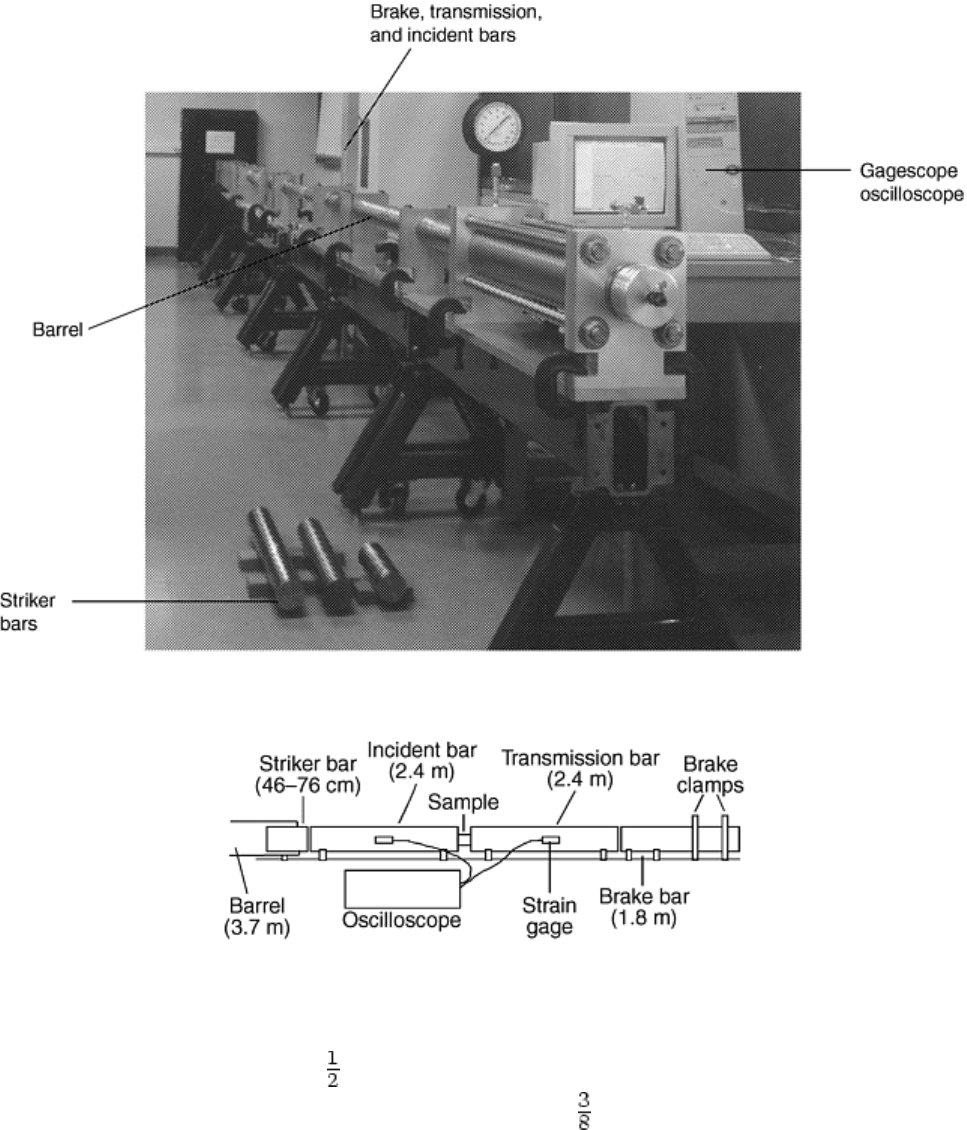
Figures 1 and 2 are a photograph and a schematic, respectively, of a 75 mm (3 in.) Hopkinson system,
particularly designed to test large samples of concrete, rock, polymeric composites, and other materials with
relatively course microstructures. Except for a 6 ft brake bar to absorb the momentum and dissipate the energy,
the system is similar to the classical Hopkinson bar discussed in the article “Classic Split-Hopkinson Pressure
Bar Testing” in this section. The brake bar acts as a simple friction brake. Two clamps are secured around the
brake bar, and the tightness is adjusted to ensure that the brake bar absorbs the energy efficiently.

Fig. 1 Photograph of a 75 mm (3 in.) diam Hopkinson bar test system
Fig. 2 Schematic of a 75 mm (3 in.) diam Hopkinson bar test system
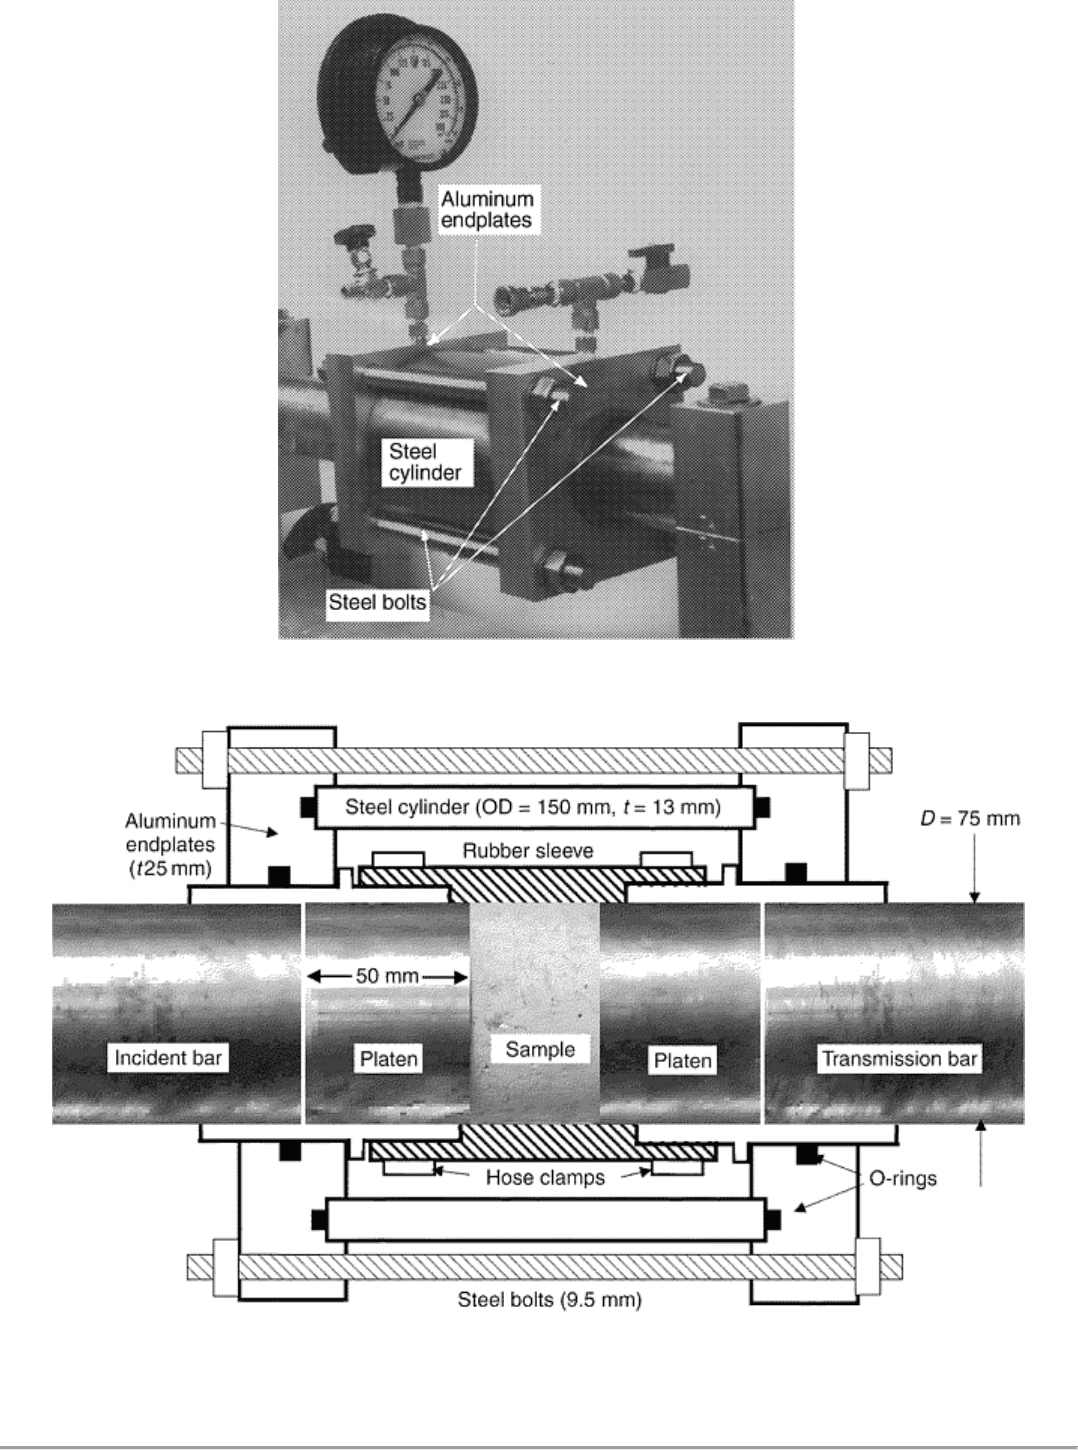
A large diameter pressure vessel provides the pneumatic confinement (Fig. 3, 4). A steel cylinder of 150 mm (6
in.) outside diameter (OD) and 13 mm ( in.) wall thickness surrounds the sample. The aluminum end plates are
each 25 mm (1 in.) thick and are held together by four 9.5 mm ( in.) bolts. A rubber sleeve, secured by hose
clamps, is placed over the sample to prevent direct contact between the sample and the high-pressure gas. O-
rings are used to seal the pressurized chamber. A band clamp and the brake bar restrain the incident and
transmission bars, respectively, to prevent them from moving apart. This pressure vessel provides a constant
radial confinement of up to 7 MPa (1000 psi).

Fig. 3 Photograph of a pneumatic pressure vessel for a 75 mm (3 in.) Hopkinson bar test system
Fig. 4 Schematic of a pneumatic pressure vessel for a 75 mm (3 in.) Hopkinson bar test system. t,
thickness; D, diameter; OD, outside diameter

Triaxial Hopkinson Techniques
Sia Nemat-Nasser, Jon Isaacs, and Jacob Rome, University of California, San Diego
Dynamic Confinement
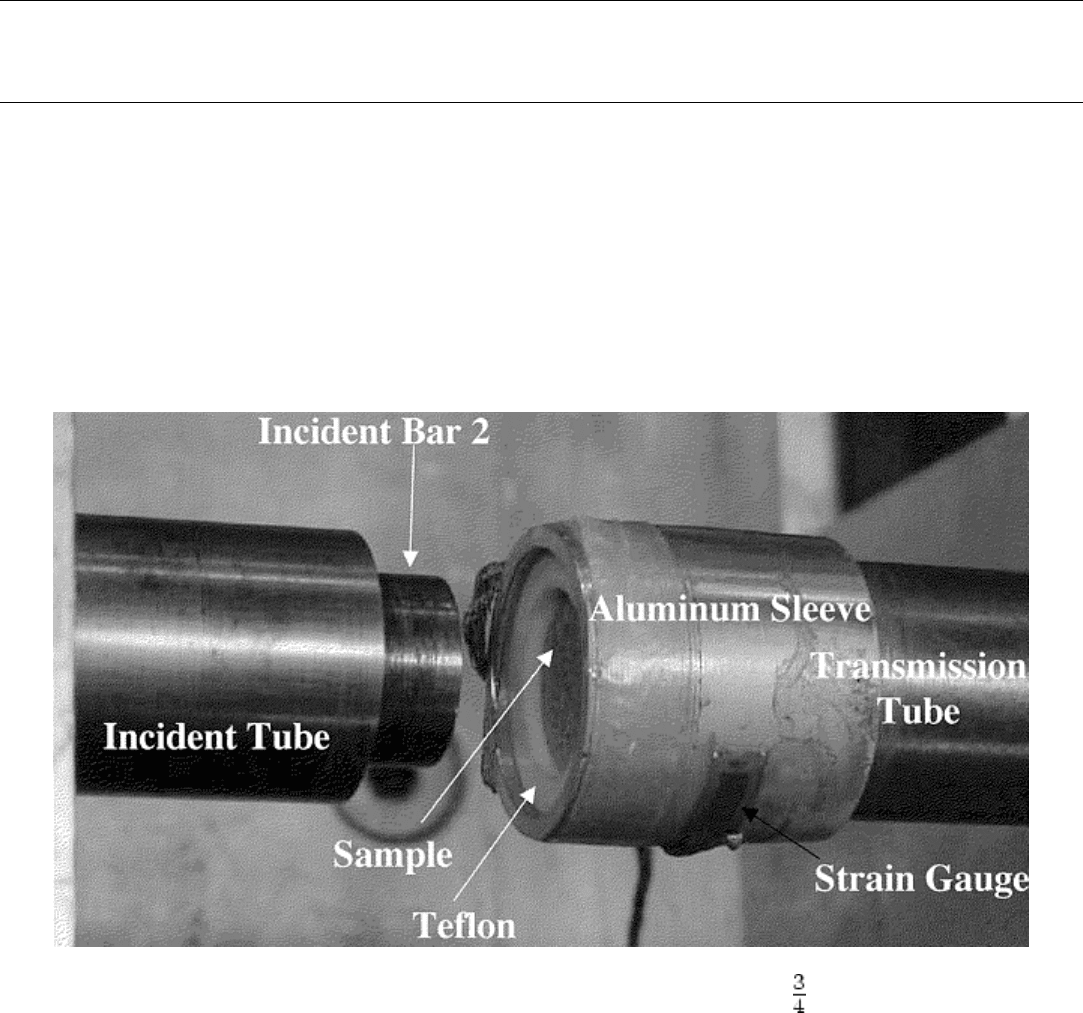
The classical Hopkinson Bar can be modified to allow dynamic triaxial compressive loading of a sample. This
technique simultaneously loads the sample in the axial and radial directions. Figures 5 and 6 are a photograph
and schematic, respectively, of this system. The striker (A) impacts the first incident bar (B), generating the
incident pulse. The wave is transmitted to the second incident bar (C) and the incident tube (F). (Note: With this
design, the reflected pulse cannot be measured directly, so it is calculated as the difference between the
transmitted pulse and the incident pulse.) The sample (D) is inside a Teflon (E.I. DuPont de Nemours & Co.,
Inc., Wilmington, DE) tube (G), which in turn is inside an aluminum sleeve (H).
Fig. 5 Close-up photograph of dynamic triaxial load cell on a 19 mm ( in.) Hopkinson bar

Fig. 6 Schematic of a 19 mm ( in.) Hopkinson bar featuring the dynamic triaxial load cell
The confinement is provided by the Teflon, which is dynamically compressed between the incident tube (F) and
the transmission tube (I). Restrained laterally by the aluminum sleeve, a large hydrostatic stress is produced in
the Teflon. This pressure creates a large radial stress on the sample. The hoop strain in the aluminum sleeve is
measured, and the radial confining stress is calculated. The radial stress can be controlled independently from
the axial stress and strain to a limited extent by, for example, altering the thickness of the aluminum sleeve to
control when the sleeve yields.
The simultaneous loading in the radial and axial directions is ensured by the design of the bar. The stress waves
in the incident bar and the incident tube are generated at the same time. The bar and the tube are made of the
same material and they have nearly the same length. Thus, the stress wave in the incident bar reaches the
sample (loading it axially) at the same time as the stress wave in the incident tube reaches the Teflon (loading
the sample radially).
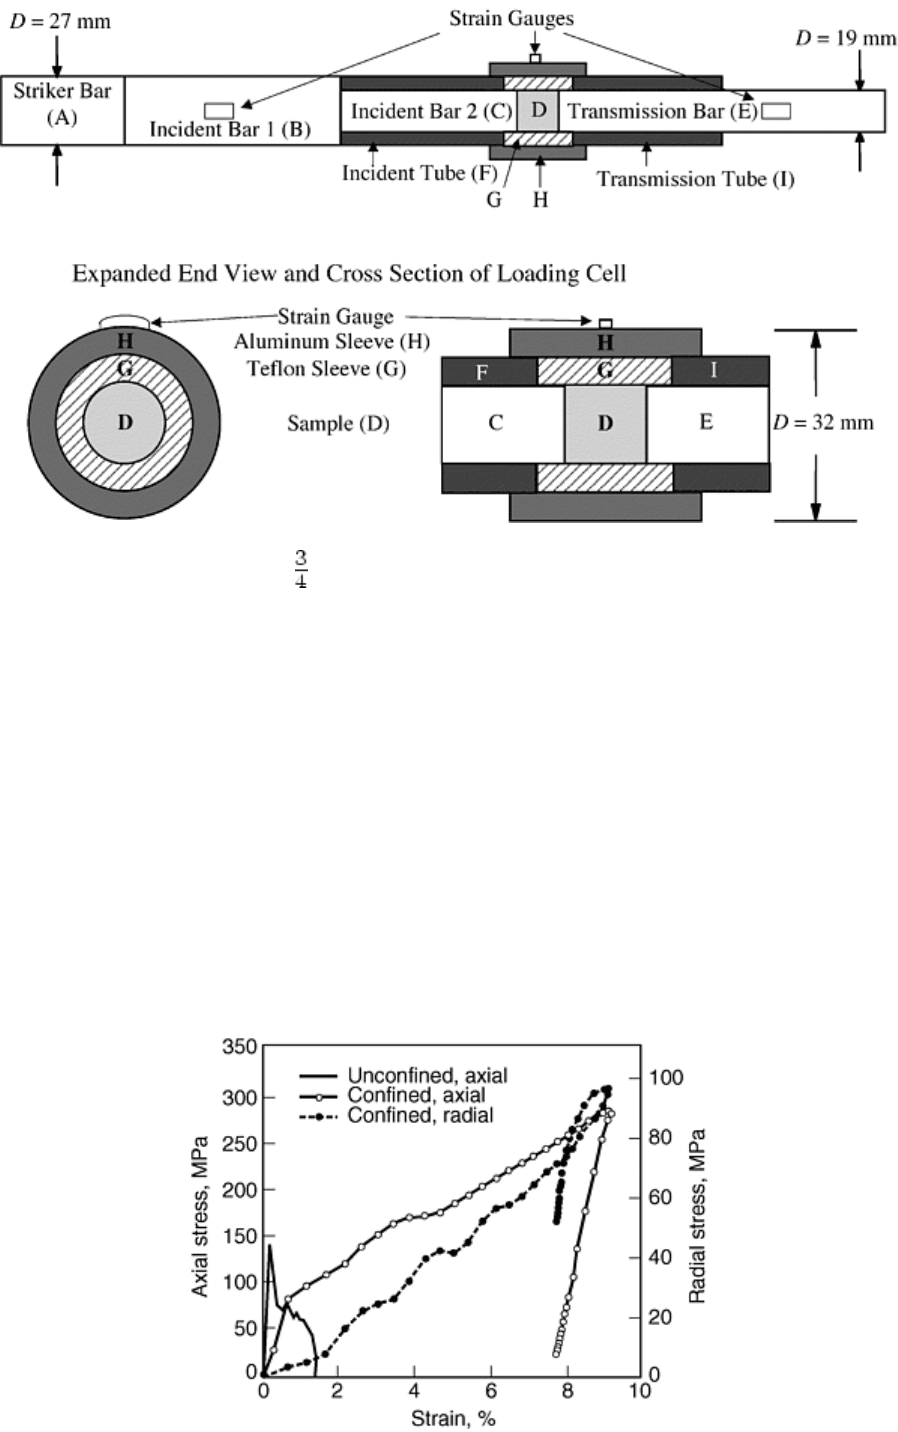
This method has been used to test several samples. In Fig. 7, the response of a mortar sample tested in uniaxial
compression is compared with another mortar sample tested in triaxial compression. These results demonstrate
both the effect radial confinement can have on a brittle material and the simultaneous loading of the sample in
the axial and radial directions.

Fig. 7 Response of mortar tested under uniaxial and triaxial compression at about 500 s
-1
on a 19 mm (
in.) Hopkinson bar
Triaxial Hopkinson Techniques
Sia Nemat-Nasser, Jon Isaacs, and Jacob Rome, University of California, San Diego
References
1. P.W. Bridgman, The Physics of High Pressure, Bell, London, 1931
2. C.H. Scholtz, G. Boitnott, and S. Nemat-Nasser, The Bridgman Ring Paradox Revisited, Pure and
Applied Geophysics (PAGEOPH), Vol 124, 1986, p 587–599
3. S. Nemat-Nasser and H. Horii, Compression-Induced Nonplanar Crack Extension with Application to
Splitting, Exfoliation, and Rockburst, J. Geophys. Res., Vol 87 (No. B8), 1982, p 6805–6821
4. S. Nemat-Nasser, J.B. Isaacs, and J.E. Starrett, Hopkinson Techniques for Dynamic Recovery
Experiments, Proc. R. Soc. (London) A, Vol 435, 1991, p 371–391
5. H. Horii and S. Nemat-Nasser, Compression-Induced Microcrack Growth in Brittle Solids: Axial
Splitting and Shear Failure, J. Geophys. Res., Vol 90 (No. B4), 1985, p 3105–3125
6. H. Horii and S. Nemat-Nasser, Brittle Failure in Compression: Splitting, Faulting and Brittle-Ductile
Transition, Philos. Trans. R. Soc. (London) A, Vol 319 (No. 1549), 1986, p 337–374
7. R.J. Christensen, S.R. Swanson, and W.S. Brown, Split Hopkinson Bar Test on Rock under Confining
Pressure, Exp. Mech., Vol 12, 1972, p 508–541
8. L.E. Malvern, D.A. Jenkins, T. Tang, and S. McClure, Dynamic Testing of Laterally Confined
Concrete, Micromechanics of Failure of Quasi Brittle Materials, Elsevier Applied Science, 1991, p
343–352
9. G. Gary and B. Bailly, Behaviour of Quasi-Brittle Material at High Strain Rate, Experiment and
Modelling, Eur. J. Mech., A/Solids, Vol 17 (No. 3), 1998, p 403–420
Dynamic Indentation Testing
G. Subhash, Michigan Technological University
Introduction
STATIC INDENTATION TESTING is one of the oldest and most widely used methods for characterizing
materials properties. Its immense popularity stems from the simplicity of the testing procedure and its ability to
characterize material response in a wide range of engineering applications. The technique has been used
extensively for determining hardness, which has been related to mechanical properties of materials (e.g., yield
stress, tensile strength, work-hardening rate, wear resistance, and fracture toughness of brittle materials), for
evaluating the effectiveness of heat treatment processes and surface modification techniques, and for measuring
the adhesive strength of thick films and surface coatings. A comprehensive review on static hardness testing
and its applications is available in Ref 1, 2, 3 and in the section “Hardness Testing” in this Volume.
Indentation hardness is defined as the intensity of the indentation load (i.e., indentation load over the projected
area of the indentation imprint). Depending upon its intended application, indentation hardness has been
interpreted broadly. For a machinist, hardness is a measure of resistance to cutting, for a metallurgist, it is
resistance to penetration, and for a tribologist, it is resistance to wear. All these definitions relate to a material's
resistance to permanent deformation (i.e., a measure of yield stress in metals and fracture strength in brittle
ceramics). Therefore, static hardness basically refers to plastic properties that are indirectly derived (or related)
through this method without laborious specimen preparation. However, it is well established in high-strain-rate
literature (e.g., Ref 4) that plastic properties of materials are strongly a function of strain rate for a vast majority
of materials.
The use of static hardness as a measure of yield stress, for example, in a high-speed machining process or under
high-velocity impact applications, may not be appropriate. This is because in a static indentation hardness test,
a predetermined indentation load is applied over 5 to 15 s, causing an imprint of the indenter on a given
material. The rate of deformation (or strain rate) during this test is typically of the order of 10
-5
/s. A machinist
may use this hardness data for selecting suitable process parameters, such as speed, feed, tooling, and so on, to
effectively perform a desired machining operation on a workpiece. Note that the selection of process parameters
is based on a static measure, whereas in a high-speed machining operation, material removal occurs in less than
several hundred microseconds, resulting in a strain rate in excess of 10
3
/s. This strain rate is at least 5 to 6
orders of magnitude greater than that achieved in a static indentation test. At such high strain rates, it is well
established that the inelastic properties of materials are considerably different from their quasi-static
counterparts. For example, metals exhibit an increase in yield strength (Ref 4, 5), and ceramics exhibit an
increase in fracture strength (e.g., Ref 6, 7, 8, 9) and fracture toughness (Ref 10, 11).
Similar situations also may arise while characterizing impact and dynamic wear behavior of materials where the
deformation rates are several orders of magnitude greater than that achieved in a typical static indentation or
uniaxial tension test. In addition, high-strain-rate deformation also results in a significant rise in temperature
due to the adiabatic nature of deformation and strongly influences the plastic response, which also is not
captured in a static indentation test where isothermal conditions prevail during the deformation. Under such
circumstances, use of dynamic hardness where the indentation load is applied in microsecond duration may lead
to a more accurate assessment of material behavior and process parameter selection.
Recently, there has been an increased interest in dynamic indentation technique because of its ability to predict
dynamic plastic properties of materials at high strain rates (>10
3
/s). Such studies have considerable relevance in
the analysis of structures subjected to impact, high-velocity sliding wear, crash, and so on. For example, in the
field of wear of materials, Meng and Ludema (Ref 12) pointed out that 28 generic erosion models have been
used to predict the wear properties of materials. Several inelastic properties such as hardness, yield strength,
and fracture toughness appear in a majority of these equations. However, the exponent of the velocity term in
these models has been observed to range between 2 and 5. Based on the momentum considerations, these
authors argue that the velocity exponent should be around 2. One of the reasons for the observed variability is
rationalized in terms of inappropriate use of static properties. Since wear is a dynamic process, they suggest the
use of dynamic materials properties, such as dynamic hardness, dynamic strength, and dynamic fracture
toughness, which they speculate could make a difference by a factor of 10 in estimating the wear rates.
Although several established techniques, such as split Hopkinson pressure bar and plate-impact experiments,
exist to evaluate the properties of materials at high strain rates, none of these techniques offer the ease and
simplicity that parallel a typical hardness test. Therefore, several approaches have been adopted to evaluate
indentation hardness in time scales much shorter than a few seconds. This article describes a method (based on
split Hopkinson pressure bar testing) for determining the dynamic indentation response of metals and ceramics.
This method of dynamic indentation testing can determine rate-dependent characteristics of metals and
ceramics at moderate strain rates. For example, dynamic indentation testing reveals a significant effect of
loading rates on the hardness and the induced plastic zone size in metals and the hardness and induced crack
sizes of brittle materials.

References cited in this section
1. D. Tabor, A Simple Theory of Static and Dynamic Hardness, Proc. R. Soc. (London), Vol 192A, 1948,
p 247–274
2. D. Tabor, The Hardness of Metals, Oxford University Press, London, 1951, p 1–173
3. H.T. Angus, The Significance of Hardness, Wear, Vol 54, 1979, p 33–78
4. M.A. Meyers, Dynamic Behavior of Materials, John Wiley & Sons, Inc., 1994, p 323–563
5. G. Subhash, The Constitutive Behavior of Refractory Metals as a Function of Strain Rate, JOM, Vol 47
(No. 5), 1995, p 55–58
6. J. Lankford, Mechanisms Responsible for Strain-Rate Dependent Compressive Strength in Ceramic
Materials, J. Am. Ceram. Soc., Vol 64, 1981, p 25–33
7. J. Lankford and C.R. Blanchard, Fragmentation of Brittle Materials at High Rates of Loading, J. Mater.
Sci., Vol 26, 1991, p 3067–3072
8. H.D. Espinosa, G. Raiser, R.J. Clifton, and M. Ortiz, Experimental Observations and Numerical
Modeling of Inelasticity in Dynamically Loaded Ceramics, J. Hard Mater., 1992, Vol 3 (No. 3–4), p
285–295
9. G. Subhash and G. Ravichandran, Mechanical Behavior of Hot-Pressed Aluminum Nitride under
Uniaxial Compression, J. Mater. Sci., Vol 33, 1997, p 1933–1939
10. S. Suresh, T. Nakamura, Y. Yeshurun, K.H. Yang, and J. Duffy, Tensile Fracture Toughness of Ceramic
Materials: Effects of Dynamic Loading and Elevated Temperatures, J. Am. Ceram. Soc., Vol 73 (No. 8),
1990, p 2457–2480
11. K.H. Yang and A.S. Kobayashi, A Hybrid Procedure for Dynamic Characterization of Ceramics at
Elevated Temperatures, Proc. Conf. Hostile Environments and High Temperature Measurements,
Society of Experimental Mechanics, 1989, p 41–44
12. H.C. Meng and K.C. Ludema, Wear Models and Predictive Equations: Their Form and Content, Wear,
Vol 181, 1995, p 443–457
Dynamic Indentation Testing
G. Subhash, Michigan Technological University
Dynamic Hardness Testing: A Review
Rebound Method. To determine dynamic hardness, several methods based on rigid body dynamics have been
used previously (Ref 1, 13, 14, 15). The majority of these techniques use gravity to accelerate an indenter from
a predetermined height onto a specimen and measure the rebound height to determine the hardness of a
specimen. A similar principle is adopted in projectiles shot from a gas gun where both the incident and rebound
velocities are measured. Based on the kinetic energy of the impacting projectile and the energy required to form
the resulting crater, an expression for dynamic hardness is derived. However, unlike a static hardness test,
