ASM Metals HandBook Vol. 17 - Nondestructive Evaluation and Quality Control
Подождите немного. Документ загружается.


Another important feature of the scanning system is that the commercial equipment for this system is usually
transportable, while liquid-surface equipment is usually stationary. In addition, scanning transducers can be coupled to
very large test objects by water columns, while inspection by the liquid-surface system usually requires that the test
objects be small enough to be placed in a water-filled tank and completely immersed.
A useful advantage of the scanning system is its capability for selectively producing either longitudinal or shear waves in
the volume of metal under examination through adjustment of the angle of incidence of the incoming ultrasonic beam.
The liquid-surface system is limited to straight-beam testing, which produces only longitudinal waves.
The scanning system can also be used for accurate surface contouring. Even surfaces inside vessels can be contoured,
without appreciable loss in surface detail, by the use of a scanning system placed outside the vessel.
Acoustical Holography
Revised by B.P. Hildebrand, Failure Analysis Associates, Inc.
Readout Methods
The readout portion of an acoustical holography inspection system provides the means by which the acoustically derived
images generated during the reconstruction process are rendered visible for observation and analysis. A variety of
methods are available to accomplish this end. One of the most rudimentary but effective methods consists of projecting
the image onto the surface of a ground-glass screen for direct viewing. For optimal viewing of the screen, however, the
test results must be observed in a darkened area or through a hood that has been placed over the screen to shield out
ambient light.
If a permanent record of the test results is required, a loaded film holder can be substituted for the ground-glass screen to
record the projected image photographically. This elementary photographic approach requires control of the film-
exposure time interval. Exposure-time control can be effected by:
• Simply turning the laser on and off
• Opening and closing a diaphragm or electro-optical s
hutter placed directly in front of the laser or light
source
• Blocking and passing the laser beam with a hand-
held piece of cardboard or any other optically opaque
substance
• Removing and inserting a rectangular light shield located immediately in front of the film plane
An alternative and more convenient approach is simply to substitute a conventional photographic camera for the film
holder. Polaroid films, because of their very short processing times (15 s per individual exposure for black-and-white
films) and their ease of usage, have been extensively used for holographic recording. This type of film is available as
individual 4 × 5 in. sheet films, 3 × 4 in. film packs, and 3 × 4 in. rolls.
Television Readout. The use of a closed-circuit television system for image readout has the following useful
advantages:
• When making real-time observations, the necessity for direct viewing through laser-
illuminated screens,
which can be tiresome to the eye, is obviated
• A magnification of the image, which is limite
d only by the size of the monitor screen, is realized
without the usual attendant loss in intensity (attributed to the inverse-square law)
• Permanent records of the monitor displays can be made photographically or on videotape
• Special devices can be inserted in the electronic circuits for image enhancement

Time-invariant (steady-state) monitor displays can be photographically recorded with any conventional still camera. If the
display varies with time--which is possible with acoustical holography--or if the recording of a sequence of motionless
images is desired, the imaging data can be effortlessly recorded on videotape. A movie camera can also be used for this
purpose, provided it is accurately synchronized with the monitor display. In both cases, an audio track can be added to
describe the nature of the recording. From a recording standpoint, a videotape recorder offers the following advantages:
• The recording medium does not have to be chemically processed, as movie film does
• Playback of the imaging data can immediately follow the recording phase
• The recording medium is erasable and reusable
• Recordings can be made in full color as well as in black and white
• Many videotape recorders are equipped with a variable-frame-rate feature that enables the mot
ion to be
slowed to any speed or stopped
Electronic image enhancement can take several forms. By means of a display technique referred to as level slicing, points
of uniform intensity in the input image can be displayed as contours. These contours are used in pairs to form the
boundaries of bands corresponding to the extremities of an intensity window of finite but variable width. On a black-and-
white monitor, the bands are discernible as different shades of gray; on a color monitor, as distinct differences in hue.
Other display formats include isometric and profile displays. Not only can regions within the same image be investigated,
but comparisons can be made between two independently selected images to determine the existence of differences in
image content. The image signals can also be digitized to permit a better quantitative analysis of the imaging data. Once
digitized, the data can be fed into a computer for storage, recall, and subsequent numerical analysis. The nature of the
inspection problem, the capabilities of the acoustical holographic approach, and the financial resources available are
prominent factors in determining the degree of analytical sophistication to which the data will be subjected.
Acoustical Holography
Revised by B.P. Hildebrand, Failure Analysis Associates, Inc.
Calibration
In conventional ultrasonic systems, the amplitude of the flaw signal is compared to the amplitude of the signal from a
standard discontinuity in a test block made of metal similar to that of the test object (see the article "Ultrasonic
Inspection" in this Volume). This technique, however, is restricted because signal amplitude depends on the orientation
and roughness of the flaw, not simply on its size. In contrast, an acoustical holographic system provides a series of two-
dimensional images at different depths. As long as sufficient ultrasonic energy is received to produce an image, the size
(and shape) of the flaw can be determined directly from the image. This direct determination provides a better estimate of
size than that obtained from conventional ultrasonic systems, which determine size primarily from the total integrated
sound energy reflected by the flaw and returned to the transducer. In fact, the flaw image produced by acoustical
holography is the most precise characterization obtainable by any nondestructive inspection system used singly. Although
the image produced by acoustical holography is not compared to standard discontinuities in test blocks in the same way
that comparisons are made in conventional ultrasonic systems, test blocks are required to verify the sensitivity and
resolution of the system.
Test Blocks. Figure 11(a) shows an aluminum alloy 1100-F test block that has been used for verification of the
sensitivity and lateral resolution of a scanning acoustical holography system (Ref 3). This block contains 15 flat-bottom
holes, 3.18 mm (0. 125 in.) in diameter and 78 mm (3.1 in.) deep, drilled in three rows from the bottom surface. In the
first row, the holes are separated by 1 mm (0.04 in.); in the second row, by 2 mm (0.08 in.); and in the third row, by 4 mm
(0.16 in.).
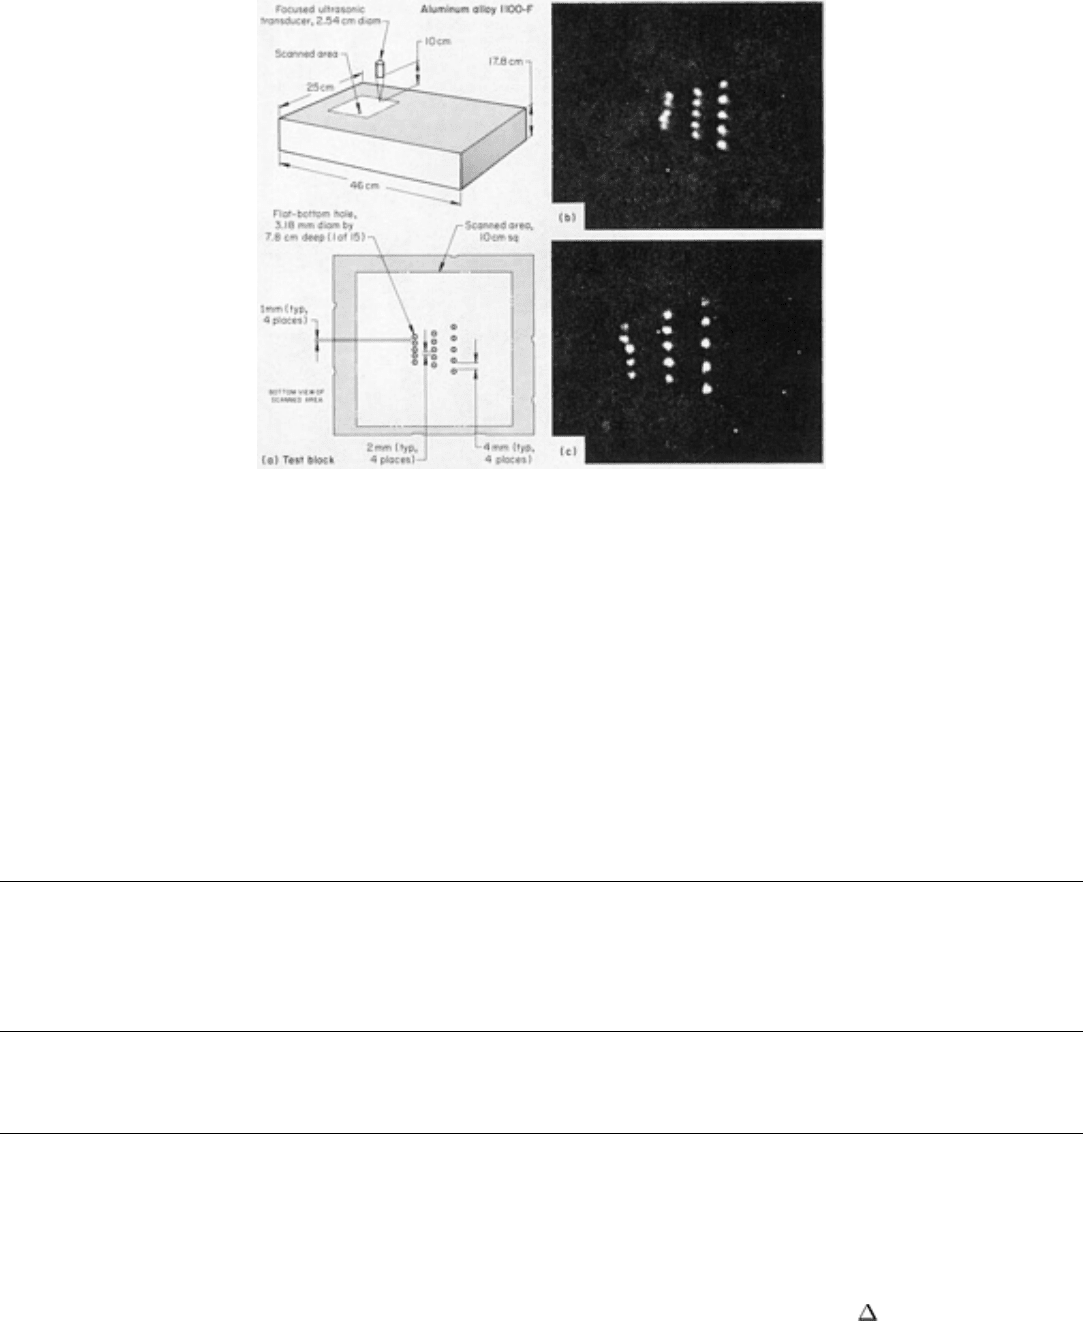
Fig. 11
Test block (a) made to measure resolution in the object plane and to locate the position of the focused
ultrasonic transducer du
ring inspection by scanning acoustical holography. (b) and (c) Reconstructed images of
scanned area taken at 3.12 and 5.1 MHz, respectively
Using a focused ultrasonic transducer with a 25 mm (1 in.) diameter and a 102 mm (4 in.) focal length, two holograms
were constructed of the region of the block containing the holes. When the frequency used to construct the hologram was
3.12 MHz (theoretical lateral resolution in the object plane of 2 mm, or 0.08 in., in aluminum), the holes in the left row
merged while those in the middle row remained completely separate (Fig. 11b). This shows that the actual lateral
resolution was slightly better than 2 mm (0.08 in.). When the frequency was increased to 5.1 MHz (theoretical lateral
resolution of 1 mm, or 0.04 in.), the actual lateral resolution also increased to more than 1 mm (0.04 in.) (the holes in the
left row in Fig. 11(c) are completely separate).
Reference cited in this section
3.
B.P. Hildebrand and H.D. Collins, Evaluation of Acoustical Ho
lography for the Inspection of Pressure
Vessel Sections, Mater. Res. Stand., Vol 12 (No. 12), Dec 1972, p 23-32
Acoustical Holography
Revised by B.P. Hildebrand, Failure Analysis Associates, Inc.
Interpretation of Results
The optical image that is reconstructed from an acoustical hologram is a two-dimensional presentation of a portion of a
three-dimensional object. This portion consists of a subsurface layer of finite thickness oriented perpendicularly to the
direction of propagation of the ultrasonic beam. The layer thickness, in turn, is a function of z, the depth-resolution
capability of the acoustical holographic inspection system. When viewing this two-dimensional presentation, it is
important to keep in mind which area is being viewed and which viewing direction (mode of ultrasonic wave
propagation) was used to produce it.
When viewing ultrasonic images, the viewer should not make interpretations based on experience with optic images. The
long ultrasonic waves limit the resolution so that the images produced are poor compared to those produced by visible

light waves. In addition, the coherence of the ultrasonic energy produces an effect analogous to the results obtained when
viewing an object illuminated by coherent light, that is, a speckled image having highlights.
One further difficulty in the interpretation of images obtained using acoustical holographic techniques, in addition to not
seeing conventional three-dimensional images, is that natural flaws are not of regular geometric configuration. The
simple-shaped calibration holes in test blocks are useful in determining the sensitivity and resolution of the system, but
experience with natural flaws is necessary for a correct interpretation of the reconstructed image. For this reason, it is best
to obtain holograms of the flaw from two directions, but accessibility and orientation of the flaw are often restrictive.
When experience is gained with different types of flaws, such as cracks, pores, and incomplete weld fusion, it is often
found that they exhibit characteristic images from which comparisons can be made. Like other methods of nondestructive
inspection, acoustical holography is not universal in application; often several methods must be used to reinforce its
findings.
Acoustical Holography
Revised by B.P. Hildebrand, Failure Analysis Associates, Inc.
Applications
Liquid-surface and scanning systems of acoustical holography have been used commercially to inspect various types and
sizes of welds and to continuously inspect sleeve-bearing stock. In addition, scanning acoustical holography has been
used commercially for contouring. These applications are discussed in the following sections.
Inspection of Welds in Thin Materials. The liquid-surface equipment shown in Fig. 7 and 8 has been used to
inspect welds in materials that are a few thousandths of an inch to several inches thick. For example, this equipment was
used at 3 MHz to inspect spot welds between two layers of aluminum 4.11 to 4.17 mm (0.162 to 0.164 in.) thick. The
reconstructed images of two welded test strips, which were used in checking machine settings for a subassembly, are
shown in Fig. 12. The good welds can easily be distinguished from the poor or less satisfactory welds. The clearly defined
bright spots in Fig. 12 are good welds; the smaller, less clearly defined spots are less satisfactory welds; and the
completely dark spot (center arrow on left side of Fig. 12) is a poor weld.
Fig. 12 Reconstructed image of spot-welded test strips that were inspected by liquid-
surface acoustical
holography at 3 MHz. Arrows indicate spot-welded areas.
Another example of a weld in thin material inspected by liquid-surface acoustical holography is the weld in 1.6 mm (
in.) thick titanium plate shown in Fig. 13(a). The reconstruction of the image, which was produced at 5 MHz, is shown in
Fig. 13(b). The dark regions of the weld are porous; the bright regions are sound.

Fig. 13 Sine-shaped weld (a) in 1.6 mm (
in.) thick titanium plate. (b) Reconstructed image of weld,
produced at 5 MHz by liquid-surface acoustical holography. Arrows indicate regions containing porosity.
Inspection of Welds in Thick Materials. Most pressure vessels and pressure vessel components are thick, massive
structures that contain many feet of multiple-pass welds. These welds require extensive nondestructive inspection to
ensure consistent high integrity of the vessel. Scanning acoustical holography, using equipment similar to that shown in
Fig. 9, has been used for the inspection of these thick welds.
An example of the use of this equipment is the evaluation of a flaw in the weld of a 152 mm (6 in.) thick steel plate. To
obtain sufficient information to dimension the flaw accurately, three holograms were made, as shown in Fig. 14(a). These
were made by examining the flaw with ±45° shear and 0° longitudinal sound waves. The resulting images are shown in
Fig. 14(b) to (d). The data were taken at 2 MHz with a 25 mm (1 in.) diam transducer focused at the surface of the plate.
A 102 mm (4 in.) focal length produced a cone of sound of approximately 60° for the longitudinal and 40° for the shear
holograms.
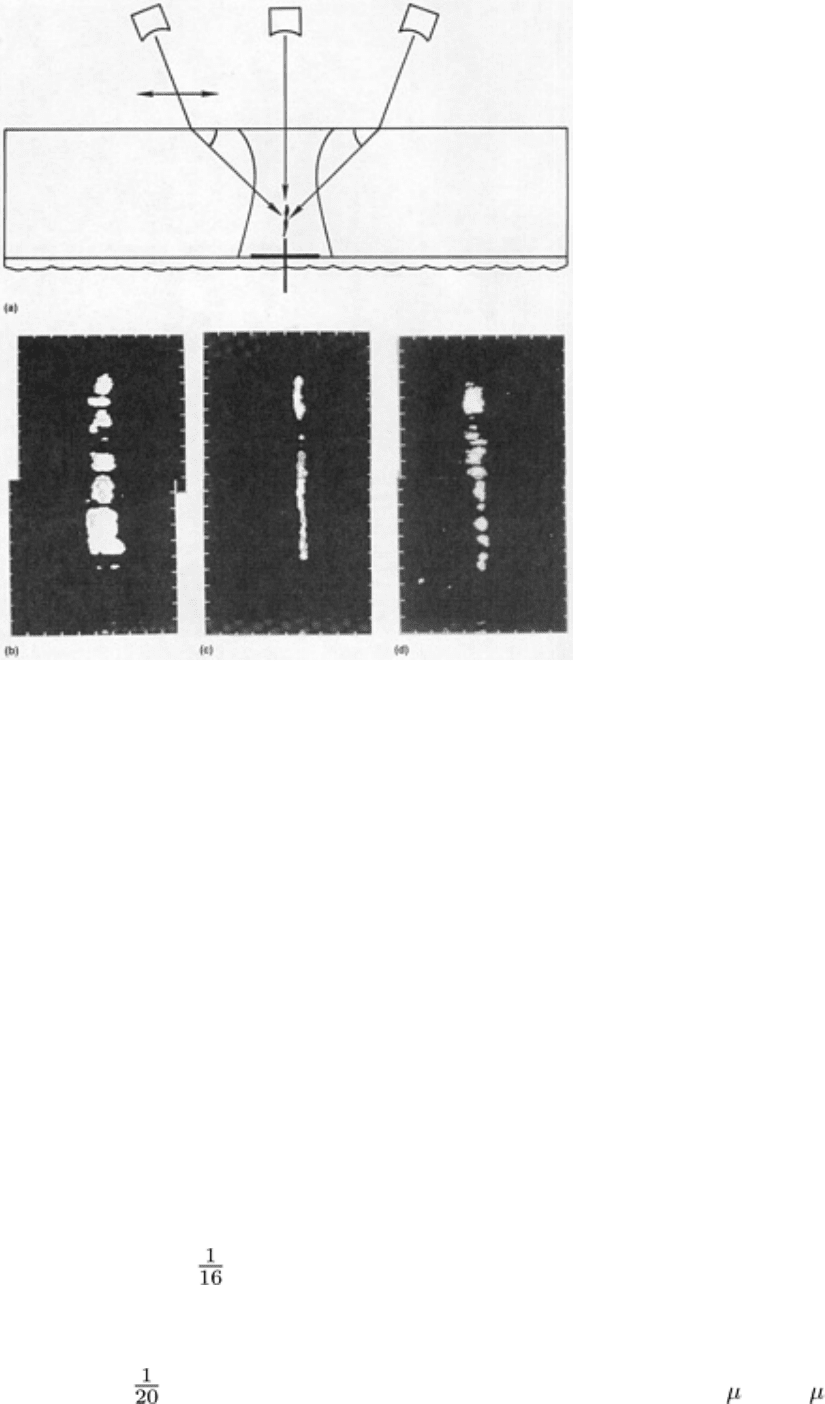
Fig. 14
Use of scanning acoustical holography for the examination of flaws in the butt welding of a 152 mm (6
in.) thick stee
l plate. (a) Transducer locations above plate surface. (b) Flaw detected with +45° shear sound
wave. (c) Flaw detected with 0° longitudinal sound wave. (d) Flaw detected with -45° shear sound wave
These three images, when properly thresholded, can be used to calculate the position and size of the flaw in three
dimensions. This particular flaw was found to be 18° from vertical, with a length of 121 mm (4.76 in.) and a through wall
dimension of 22.4 mm (0.88 in.). Destructive examination showed the flaw to be 114 mm (4.48 in.) in length and 13.5
mm (0.53 in.) in through wall dimension. A complete analysis of test results with ultrasonic holography is presented in
Ref 4, indicating a root mean square error in estimating flaw height of ±5.33 mm (±0.21 in.) and length of ±5.59 mm
(±0.22 in.).
Inspection of Sleeve-Bearing Stock. Sleeve-bearing stock for automobile engines, consisting of 0.25 mm (0.010
in.) thick leaded aluminum alloy bonded to a 2.54 mm (0.100 in.) thick steel base, has been continuously inspected by
acoustical holography for unbounded regions between the two layers, using the liquid-surface equipment illustrated in
Fig. 7 and 8. The stock consists of strips from 102 to 203 mm (4 to 8 in.) wide and several hundred feet long. During
manufacture, the strip moves through the bonding line at a rate of approximately 152 mm/s (6 in./s).
Formerly, the strip was inspected visually for lack of bonding, as evidenced by the presence of blistered areas on the
aluminum side. However, because not all the regions of poor bonding formed blisters, some regions were not physically
detectable. For this reason, destructive tests using a chisel were sometimes required. With acoustical holographic
equipment, unbonded regions as small as 1.6 mm ( in.) in diameter are readily visible on the television monitor.
The contouring of surfaces is readily carried out with commercially available systems for scanning acoustical
holography, such as those shown in Fig. 3 and 9. Contour accuracies are limited by the mechanical accuracy of the
scanning equipment, but can be better than of the wavelength of ultrasound in water at 5 MHz, or about 15 m (600
in.). Two examples of contour images formed by acoustical holography are shown in Fig. 15 and 16.
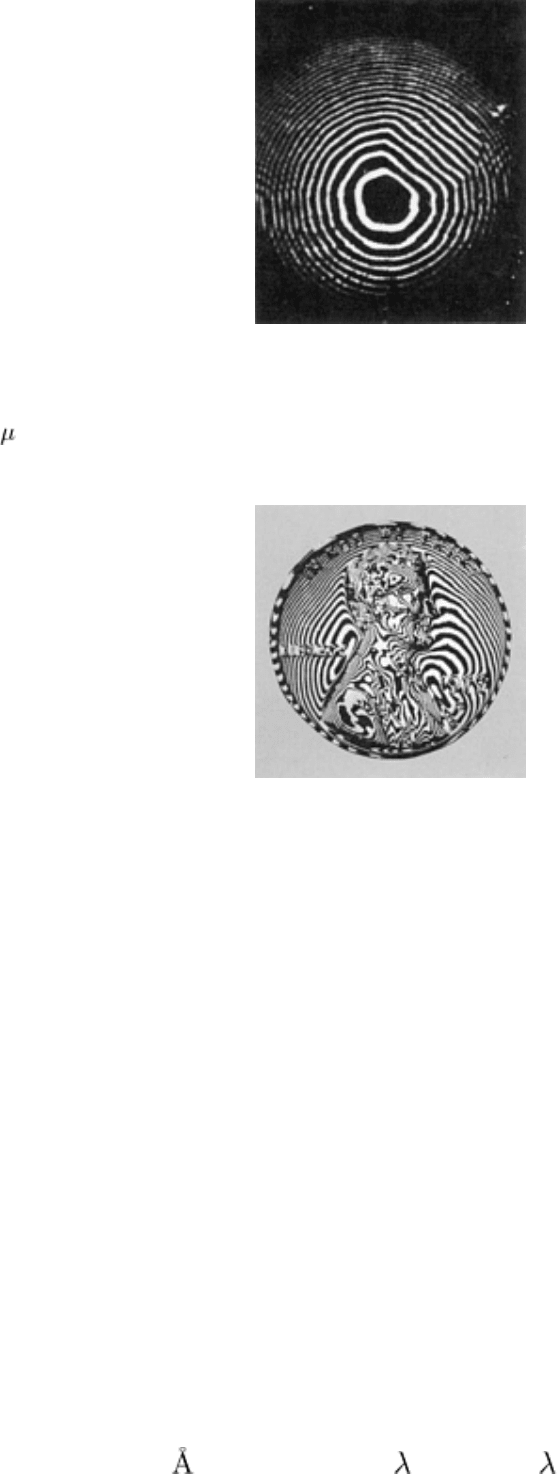
Fig. 15 Contour image of a
spherical surface with one flat circular region (above center at right). Image was
made at a frequency of 8 MHz using scanning acoustical holography. Each full fringe represents a change in
elevation of 95 m (0.00375 in.).
Fig. 16 Contour image of a Lincoln
U.S. penny, made at 50 MHz using scanning acoustical holography with the
coin slightly tilted with respect to the scanning plane
When a scanning acoustical holography system is used in the contouring mode, the transducer is focused on the surface to
be contoured, with the central ray approximately perpendicular to the surface. The arrangement is the same as that used in
forming acoustical holograms of regions lying deep within a solid material, except that a focused-image hologram is
formed; that is, the scan plane is made to lie coincident with the surface to be contoured. Gating is used to eliminate the
reflections from the back (far) surface of the object so that they will not interfere with the interpretation of the contours
formed over the image of the front (near) surface.
Inaccessible surfaces (far surfaces) of opaque materials can also be readily contoured by moving the focal point of the
transducer to the plane of the back (far) surface of the object to be contoured. In this case, the reflections from the front
(near) surface are gated out.
There is no distinction between the hologram and the image in this case, because the contour lines are the hologram
fringes. As in all ultrasonic inspection, a coupling medium must be used between the transducer and the surface to be
examined. The object to be contoured can be immersed in water along with the scanning transducer, but this is not
necessary. More often, the transducer is mounted in a water-filled cylinder that has a sliding seal in contact with the
surface. The surface need not be perfectly smooth. The relatively minor loss of liquid couplant in scanning over a rough
surface is replenished constantly by means of a water pump and reservoir.
A technique that has been used to achieve high resolution in optical (nonholographic) interferometry is multiple-beam
interferometry (Ref 5). With this technique, contours of very smooth surfaces have been determined optically to an
accuracy of better than 0.5 nm (5 ); that is, better than /1000, where is the wavelength of the light. A similar
technique can be applied to acoustical contouring by setting the reflection-signal gate to accept only the nth reflection,
where the integral value of n depends on the smoothness of the surface and the amount of energy reflected at the surface.
In ordinary contouring by acoustical holography, n = 1 and each fringe in the image represents a half-wavelength change
in elevation. At 5 MHz in water, a half wavelength is 150 m (0.006 in.). However, if the reflection-signal gate is set to
accept the tenth reflection, each fringe will represent wavelength, or about 15 m (600 in.).
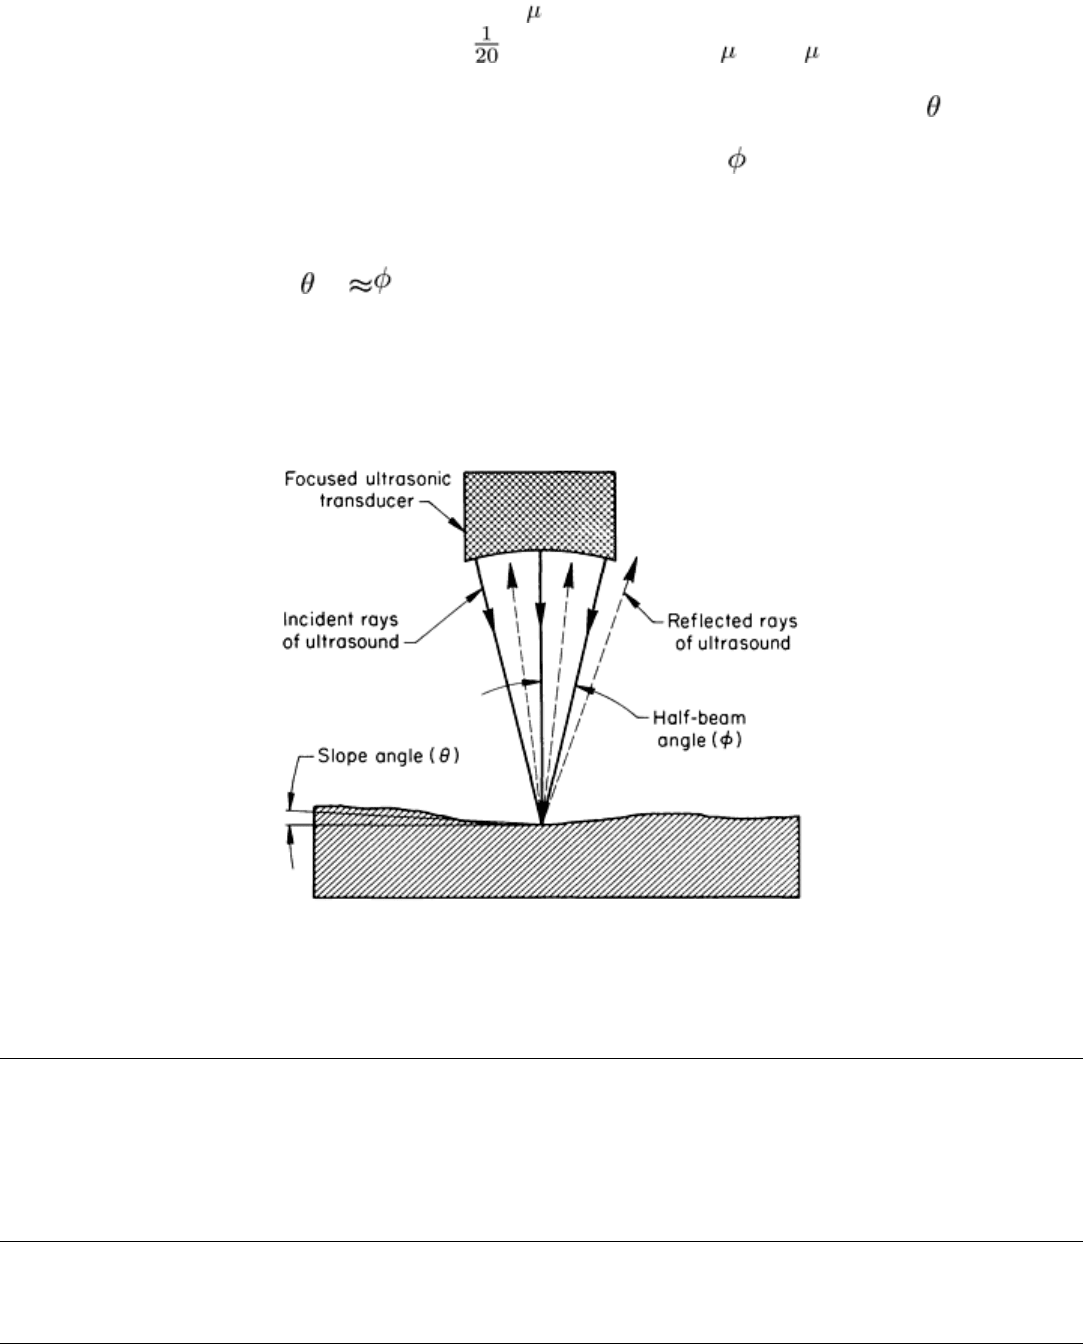
Figure 17 illustrates the reflection of an ultrasonic beam from a sloping surface. As the slope angle, , of the surface
increases in magnitude, less and less of the reflected beam is intercepted by the transducer. This limits the surface slope
that can be properly contoured. This limit depends partly on the half-beam angle, , of the transducer, which in currently
available systems is about 7°. A conservative rule for estimating the maximum slope angle that will be properly contoured
is:
max
/2n
(Eq 3)
Cylindrical and spherical surfaces can, in theory, be contoured to show deviations from the ideal surface by causing the
focal point of the transducer to follow a scan plane shaped to the ideal surface, with the central ray kept normal to the
surface.
Fig. 17 Schematic of the reflection of rays of ultrasound fr
om a surface being contoured by scanning acoustical
holography
References cited in this section
4.
D.E. MacDonald and E.K. Kietzman, "Comparative Evaluation of Acoustic Holography Systems," Report
NP-5130, Electric Power Research Institute, 1987
5.
S. Tolansky, Multiple-Beam Interferometry of Surfaces and Films, Clarendon Press, 1948
Acoustical Holography
Revised by B.P. Hildebrand, Failure Analysis Associates, Inc.
References

1. B.P. Hildebrand and B.B. Brenden, An Introduction to Acoustical Holography, Plenum Press, 1972
2.
B.P. Hildebrand, T.J. Davis, A.J. Boland, and R.L. Silta, A Portable Digital Ultrasonic Holography System
for Imaging Flaws in Heavy Section Materials, IEEE Trans., SV-31, No. 4, 1984, p 287-294
3. B.P. Hildebrand and H.D. Collin
s, Evaluation of Acoustical Holography for the Inspection of Pressure
Vessel Sections, Mater. Res. Stand., Vol 12 (No. 12), Dec 1972, p 23-32
4.
D.E. MacDonald and E.K. Kietzman, "Comparative Evaluation of Acoustic Holography Systems," Report
NP-5130, Electric Power Research Institute, 1987
5. S. Tolansky, Multiple-Beam Interferometry of Surfaces and Films, Clarendon Press, 1948
Strain Measurement for Stress Analysis
L.D. Lineback, Measurements Group, Inc.
Introduction
EXPERIMENTAL STRESS ANALYSIS TECHNIQUES, in one form or another, can be applied at all stages in the life
of load-bearing parts, members, and structures. They are used in new-product engineering, from preliminary design
evaluation to production design testing; in proof and overload testing; in failure analysis, from design defect detection to
redesign validation; and in materials and structural research.
Because stress is not directly measurable, the experimental analysis of engineering stresses must be based on strains,
which can be readily measured by a number of techniques. With measured values of strain and a knowledge of the
mechanical properties of the material from which the structure is fabricated, stresses can be calculated from the
appropriate stress-strain relationship of the material.
The usual objective of stress analysis is to locate and measure the most significant strains in a part, member, or structure.
These include not only the high-level strains located at stress concentrations where the product will most likely fail under
load but also the lowest ones in overdesigned regions where material can be safely removed to save on costs and improve
performance. Except for the simplest of designs, location of these significant strains will normally require a full-field
measurement technique such as photoelasticity or brittle coatings.
Once the areas of significant strains are identified, the stress analyst generally makes one or more measurements of strain
at a point to accurately determine the magnitude and direction of the principal strains. Depending on the nature of the
load, type of material, and mode of failure, it may also be necessary to measure the maximum shear strain. For making
these point measurements of strain, both electrical resistance strain gages and photoelastic coatings are widely used.
In addition to the kinds of strains to be measured, it is important to consider a number of other practical criteria when
selecting the appropriate strain measurement technique. These generally include:
• Location of test site (laboratory or field)
• Type of loading (static, dynamic, or a combination)
• Anticipated strain range
• Required resolution and accuracy of measurement
• Operating environment (temperature, medium, and so on)
• Duration of test (from microseconds to decades)
For specialized measurements, other parameters may also require consideration.
Strain Measurement for Stress Analysis
L.D. Lineback, Measurements Group, Inc.
Resistance Strain Gage Method
The bonded resistance strain gage is the most powerful and widely used strain measurement technique in the field of
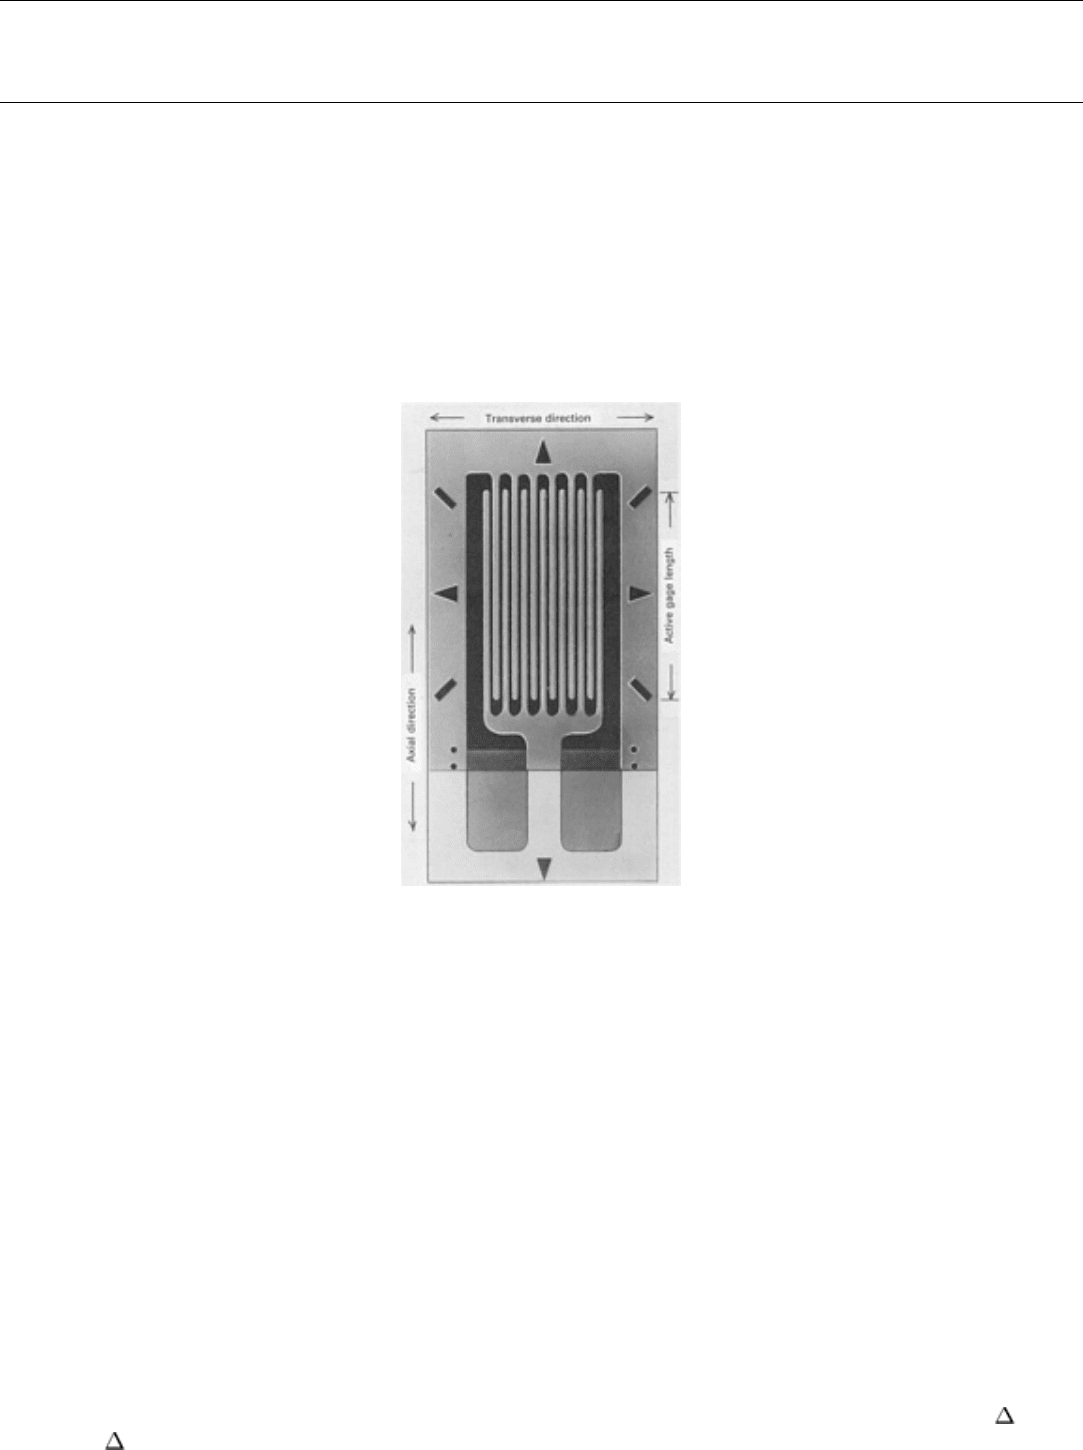
experimental stress analysis. Basically, the strain gage (Fig. 1) is an extremely thin, small, strain-sensitive electrical
resistor bonded to a flexible backing material that, when adhesively bonded to the structure or test part, transforms surface
strains into changes of electrical resistance. The resulting changes in resistance are then read out directly as strain, load,
pressure, torsion, and so forth, on the appropriate instrument.
Fig. 1 Modern foil strain gage with a polyimide backing and encapsulation. About 6× actual size
Early bondable strain gages were manufactured by forming small-diameter (0.025 mm, or 0.001 in.) constantan wire into
a suitable grid geometry and bonding the grid in place on a paper carrier. The active gage lengths were relatively large,
typically 6 mm (0.25 in.) or longer. Today, most precision strain gages are made by etching grids into thin metal foil held
in place by a compatible backing. The active gage lengths vary from 0.2 to 100 mm (0.008 to 4.000 in.). Typical gage
thickness for foil gages, including backing and grid, is 0.05 mm (0.002 in.) or less.
Gage Performance. Resistance strain gages are designed to measure strain in the axial direction of the grid (Fig. 1)
and to be as insensitive as possible to strains in the transverse direction. Because strain gage grids tend to yield an
integrated average of the strains under them, very short gages are generally used when the strain gradient is steep.
Measuring strain over as small an area as possible tends to minimize any undesirable strain integration. Longer gage
lengths are intended for applications in which the mean strain over a considerable length is more representative. For
example, gages with longer grids are commonly used on filament-wound composite structures to average out the strains
in these nonhomogeneous materials consisting of filaments and matrix. Very long gages are used in making
measurements on the surface of concrete structures having large-diameter aggregate in the cement matrix.
Gage sensitivity to strain is defined as the gage factor, GF, which is the ratio of unit change of resistance ( R/R) to
unit strain ( L/L):
