ASM Metals HandBook Vol. 17 - Nondestructive Evaluation and Quality Control
Подождите немного. Документ загружается.

Feature Weighting. In cases in which several image features must be measured to interpret an image, a simple factor
weighting method can be used to consider the relative contribution of each feature to the analysis. For example, the image
area alone may not be sufficient to ensure the positive identification of a particular valve stem in a group of valve stems
of various sizes. The measurement of height and the determination of the centroid of the image may add some additional
information. Each feature would be compared with a standard for a goodness-of-fit measurement. Features that are known
to be the most likely indicators of a match would be weighted more than others. A weighted total goodness-of-fit score
could then be determined to indicate the likelihood that the object has been correctly identified.
Template Matching. In this method, a mask is electronically generated to match a standard image of an object. When
the system inspects other objects in an attempt to recognize them, it aligns the image of each object with that of the
standard object. In the case of a perfect match, all pixels would align perfectly. If the objects are not precisely the same,
some pixels will fall outside of the standard image. The percentage of pixels is two images that match is a measure of the
goodness-of-fit. A threshold value can then be assigned to test for pass (positive match) or reject (no match) mode. A
probability factor, which presents the degree of confidence with which a correct interpretation has been made, is normally
calculated, along with the go/no-go conclusions.
Variations on these two approaches are used in most commercially available vision systems. Although
conceptually simple, they can yield powerful results in a variety of manufacturing applications requiring the identification
of two-dimensional parts with well-defined silhouettes.
With either method, a preliminary session is usually held before the machine is put into use. During this session, several
sample known parts are presented to the machine for analysis. The part features are stored and updated as each part is
presented, until the machine is familiar with the part. Then, the actual production parts are studied by comparison with
this stored model of a standard part.
Mathematical Modeling. Although model building, or programming, is generally accomplished by presenting a
known sample object to the machine for analysis, it is also possible to create a mathematical model describing the
expected image. This is generally applicable for objects that have well-defined shapes, such as rectangles or circles,
especially if the descriptive data already exist in an off-line data base for computer-aided design and manufacture
(CAD/CAM). For example, the geometry of a rectangular machined part with several circular holes of known diameters
and locations can be readily programmed. Because more complex shapes may be difficult to describe mathematically, it
may be easier to teach the machine by allowing it to analyze a sample part. Most commercial systems include standard
image-processing software for calculating basic image features and comparing with models. However, custom
programming for model generation can be designed either by the purchaser or by the vision system supplier. Off-line
programming is likely to become increasingly popular as CAD/CAM interface methods improve.
Although the techniques described above apply to many, if not most, of the machine vision systems that are commercially
available, there are still other approaches being used by some suppliers, particularly for special-purpose systems for such
applications as printed circuit board (PCB) inspection, weld seam tracking, robot guidance and control, and inspection of
microelectronic devices and tooling. These special-purpose systems often incorporate unique image analysis and
interpretation techniques that exploit the constraints inherent in the applications.
For example, some PCB inspection systems employ image analysis algorithms based on design rules rather than feature
weighting or template matching. In the design rule approach, the inspection process is based on known characteristics of a
good product. For PCBs, this would include minimum conductor width and spacing between conductors. Also, each
conductor should end with a solder pad if the board is correct. If these rules are not complied with, then the product is
rejected.
Interfacing
A machine vision system will rarely be used without some form of interaction with other factory equipment, such as
CAD/CAM devices, robots, or host computers. This interaction is the final element of the machine vision process, in
which conclusions about the image are translated into actions. In some cases, the final action may take the form of
cumulative storage of information in a host computer, such as counting the number of parts in various categories for
inventory control. In other situations, a final action may be a specific motion, such as the transfer of parts into different
conveyors, depending on their characteristics. Vision systems are being increasingly used for control purposes through the
combination of vision systems and robots. In this case, the vision system greatly expands the flexibility of the robot.

For most applications, interfacing a machine vision system with other equipment is a straightforward task. Most systems
are equipped with a number of input and output ports, including a standard RS232C interface. Connecting a vision system
to a robot, however, is much more complicated because of timing constraints, data formats, and the inability of most robot
controllers to handle vision system inputs. To overcome this problem, several robot and vision system manufacturers have
developed integrated system capabilities.
Reference cited in this section
1.
"Machine Vision Systems: A Summary and forecast," 2nd ed., Tech Tran Consultants, Inc., 1985
Machine Vision and Robotic Inspection Systems
John D. Meyer, Tech Tran Consultants, Inc.
Machine Vision Applications
Machine vision systems can be considered for use in most manufacturing applications in which human vision is currently
required. Human vision is required for applications in which noncontact feedback is used to provide information about a
production process or a part. For example, a human welder or machinist uses visual feedback to ensure that the correct
relationship is maintained between the tool and the workpiece. Human assemblers visually analyze the position of parts so
that other parts can be correctly aligned for insertion or some other form of mating. Quality control inspectors visually
check products or parts to ensure that there are no defects, such as missing parts, damage, or incorrect location of various
features.
As discussed previously, the primary strength of human vision is its ability to analyze qualitative aspects of an object or a
scene. However, humans are not particularly adept at measuring quantitative data. For example, although human vision
uses a sophisticated approach for depth perception that allows it to correctly determine the relative distances of objects, it
is not able to measure a specific distance to an object other than as a very rough estimate. In addition, human vision can
measure dimensions only approximately. Humans must rely on some standard frame of reference for judging an object. A
standard retained in the memory does not provide a very good frame of reference from which to make quantitative
measurements. It is not absolute, and it will vary from individual to individual. Because humans are also subject to
fatigue, the interpretation of a standard may change over time.
Machine vision systems are ideally suited to a number of applications in which their ability to interpret images
consistently over long periods of time makes them perform better than humans. Machine vision systems are also
beginning to be used in many new and unique applications that simply did not exist previously. This includes, for
example, on-line inspections that were not economically feasible before and the use of machine vision to increase
manufacturing flexibility and reduce dependence on expensive hard tooling. The net result is both improved product
quality and lower production costs.
In deciding whether or not machine vision will be effective in a particular application, the user must consider the
capabilities of machine vision versus the requirements of the application. Although many applications are suitable for
automated vision sensing, there are several complex applications in which the sophisticated recognition capability of
human vision is better, such as the inspection of certain complex three-dimensional objects.
In general, machine vision systems are suitable for use in three categories of manufacturing applications:
• Visual inspection of a variety of parts, subassemblies, and finished products to ensure
that certain
standards are met
• Identification of parts by sorting them into groups
• Guidance and control applications, such as controlling the motion of a robot manipulator

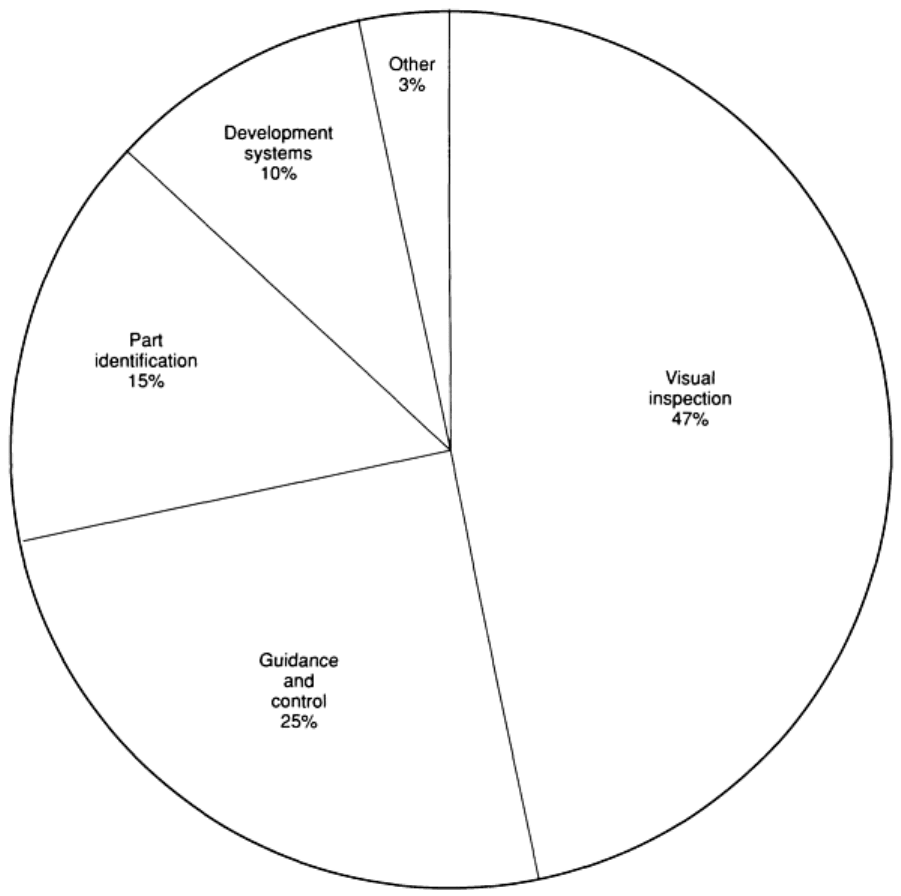
Examples of each of these three areas are listed in Table 4. Figure 9 shows the percentage breakdown of each of these
three categories, as well as miscellaneous applications, on the basis of the number of machine vision units purchased in
1984.
Table 4 Typical applications of machine vision systems
Area
Applications
Measurement of length, width, and area
Measurement of hole diameter and position
Inspection of part profile and contour
Crack detection
On-line inspection of assemblies
Verification of part features
Visual inspection
Inspection of surface finish
Optical character recognition
Identification of parts for spray painting
Conveyor belt part sorting
Bin picking
Part identification
Keyboard and display verification
Vision-assisted robot assembly
Vision-assisted robot material handling
Weld seam tracking
Part orientation and alignment systems
Determining part position and orientation
Guidance and control
Monitoring high-speed packaging equipment
Source: Ref 1 (Tech Tran Consultants, Inc.)
Fig. 9 Breakdown of machine vision systems applications based on a 1984 survey of 2500 installations.
Source:
Ref 1 (Tech Tran Consultants, Inc.)
Visual Inspection
The ability of an automated vision system to recognize well-defined patterns and to determine if these patterns match
those stored in the memory of the system makes it ideal for the inspection of parts, assemblies, containers, and labels.
Two types of inspection can be performed by vision systems: quantitative and qualitative. Quantitative inspection is the
verification that measurable quantities, such as dimensional measurements or numbers of holes, fall within desired ranges
of tolerance. Qualitative inspection is the verification that certain components or properties, such as defects, missing
parts, extraneous components, or misaligned parts, are present and located in a certain position. The output from a
machine vision inspection task is normally a pass/reject evaluation for the object being inspected, although actual
measurement data may also be an output for statistical process control and record-keeping purposes.
Visual inspection represents one of the last manufacturing areas in which automation techniques have been employed.
Most visual inspection is performed manually, either by simple observation or by using a measurement tool, such as an
optical comparator. One major advantage of using machine vision systems in place of human inspectors is that machine
vision systems can perform 100% on-line inspection of parts at high speeds, possibly in working environments that are
unpleasant for humans. Human workers are susceptible to fatigue and boredom and require periodic rest periods, while
machine vision systems can operate with consistent results over prolonged periods of time. As a result, while human
inspectors can anticipate only an 85 to 90% rate of accuracy in many situations, machine vision systems can achieve close
to a 100% accuracy rate.
The objects for which vision systems are being used or considered for use in inspection applications include raw
materials, machined parts (Fig. 10), assemblies, finished products, containers, labels, and markings. Vision systems have
been considered for use with parts or products that have very simple geometries as well as those with very complex
geometries, such as aerospace body frames or engine castings.
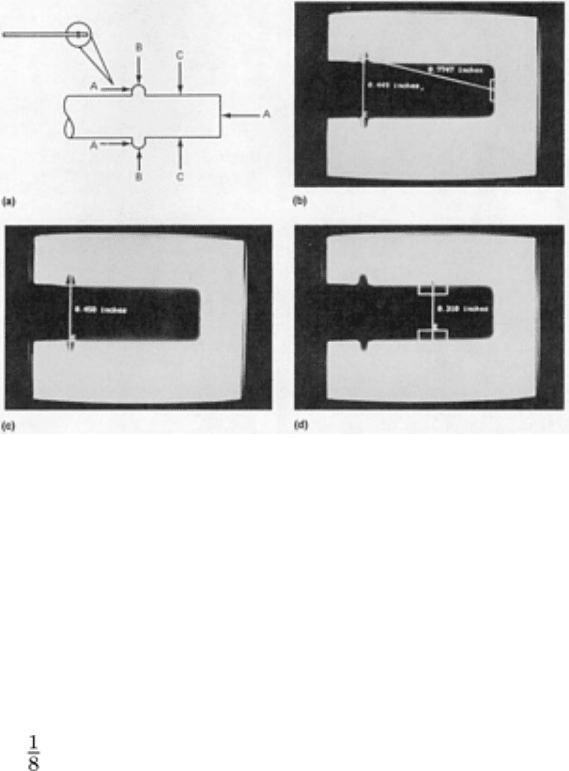
Fig. 10 Machine vision inspection of an automotive fuel
sender tube with a cycle time of 2 s per part. (a)
Schematic of one end of the fuel tube assembly showing the three critical dimensions in the workpiece. A-
A,
back of bead to front of tube; B-B, maximum bead diameter; C-C, microfinished end diameter. (b)
Screen
display of dimension A-A. (c) Monitor image of dimension B-B. (d) Screen display of dimension C-
C. Courtesy of
Industrial Systems Division, Ball Corporation.
One technique applicable to the inspection of simple geometries is polar coordinate vision (Fig. 11). This technique can
be used to read codes, inspect components, and measure angles in both circular and rectangular-shaped workpieces (Fig.
12). A polar coordinate vision system, can, for example, verify the existence and location of components such as rollers in
a bearing assembly in less than s as described in Fig. 13.
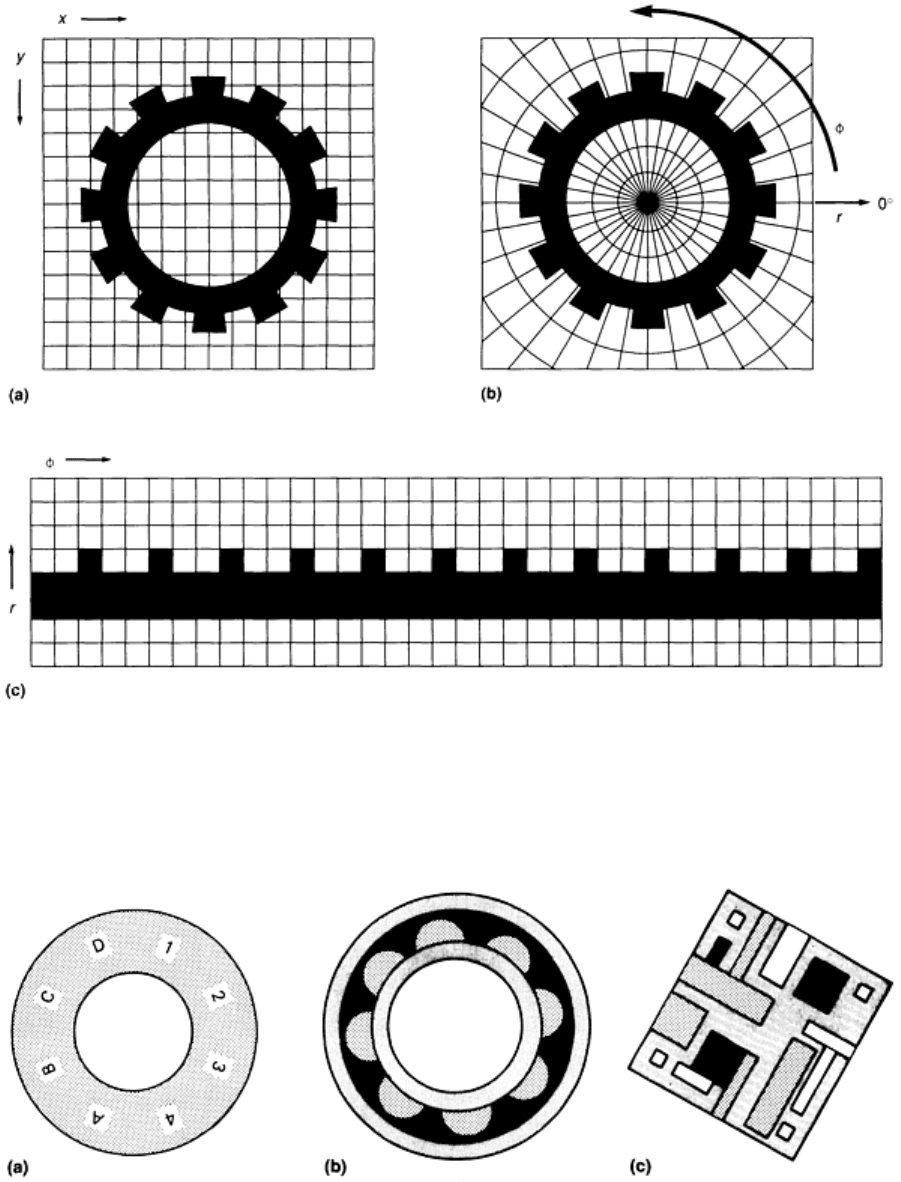
Fig. 11 Steps involved in a polar co
ordinate transformation. (a) Original system positioned in a Cartesian
coordinate system. (b) Same image in a polar coordinate system. (c) A polar transformed image, cut at 0° and
unwrapped. Courtesy of Cognex Corporation
Fig. 12
Typical applications of polar coordinate vision. (a) Reading codes printed around an arc. (b) Inspecting
circular objects like ball bearing assemblies.
(c) Measuring the angle of complex objects such as semiconductor
dies. Courtesy of Cognex Corporation
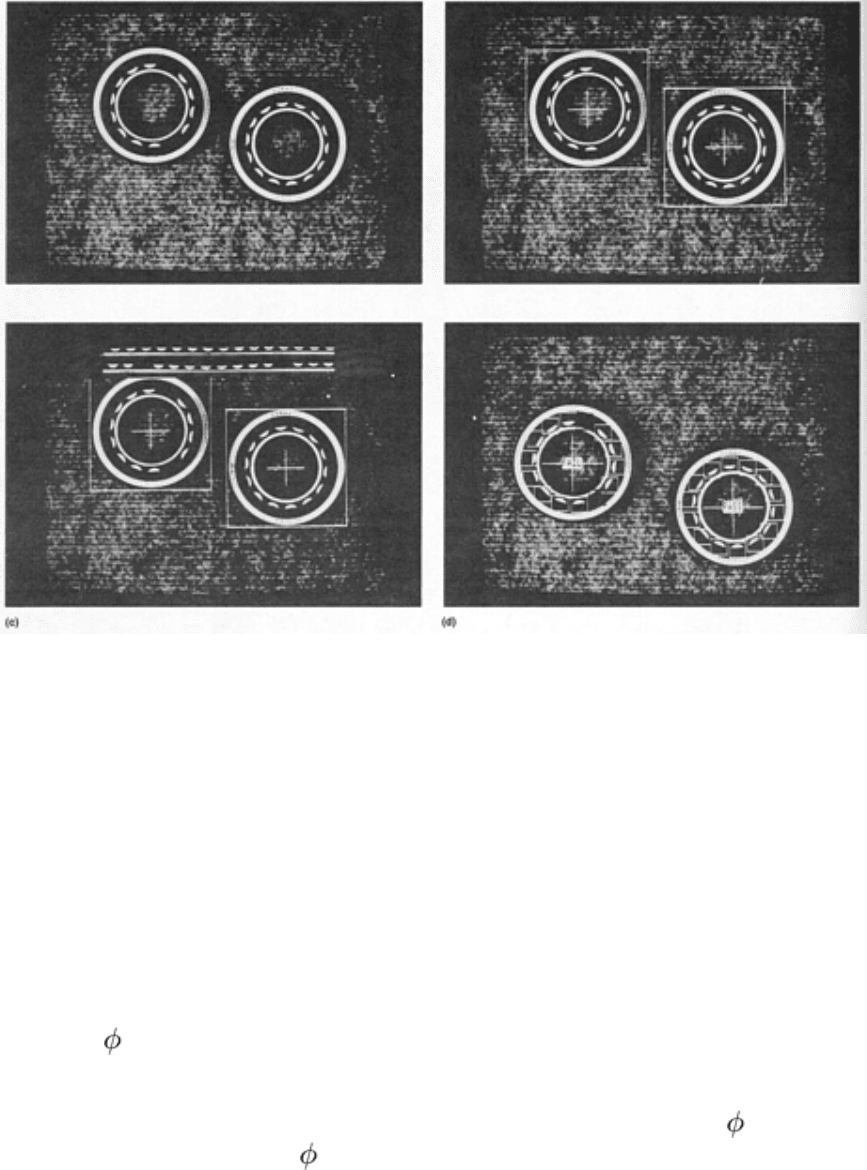
Fig. 13 Polar coordina
te vision used to inspect roller bearing assemblies by verification of roller placement. (a)
Actual machine vision monitor image of two bearing assemblies on a conveyor belt. (b) First step, requiring
<70 ms, is to locate bearing within the image as indicated by the crosshair and square that show x-y
position of
each assembly. (c) Polar coordinate transformation, requiring <50 ms, of the annulus containing the roller
yields the rectangular image shown at the top of the display to aid in the interpretation o
f the components. (d)
System displays complete inspection results by indicating the location of the missing rollers (enclosed in black
squares) as well as those rollers correctly positioned (enclosed in white squares) and also specifies which
assemblies ha
ve passed or failed inspection. Total processing time, which includes part location, image
transformation, and roller counting, is <125 ms. Courtesy of Cognex Corporation
Polar coordinate vision can be used in a variety of applications in which the features of interest are arranged radially, such
as ball bearings held in a circular assembly (Fig. 12 and 13). Polar coordinate vision consists of two major modules. The
first module transforms the Cartesian images described in (x,y) coordinates into polar images, that is, it expresses the
same information in (r, ) coordinates. When a transformed image is subsequently analyzed by other vision tools, these
tools treat the pixel data just as if it were expressed in (x,y) coordinates. The effect of treating a polar image as if it were a
Cartesian image can be visualized as cutting a ring and unwrapping it into a bar. The second module measures the angle
of the complex scene and searches for this polar model within the polar image to obtain the position that provides the
best model/image match and then reports this value as the object's angle.
Machine vision systems are also being used by almost every manufacturing industry inspecting a wide variety of parts
and assemblies, including glass containers and textiles, machine parts, microelectronics and PCBs, stampings (Fig. 14)
and forgings, fasteners and gears, and pharmaceuticals and food products.
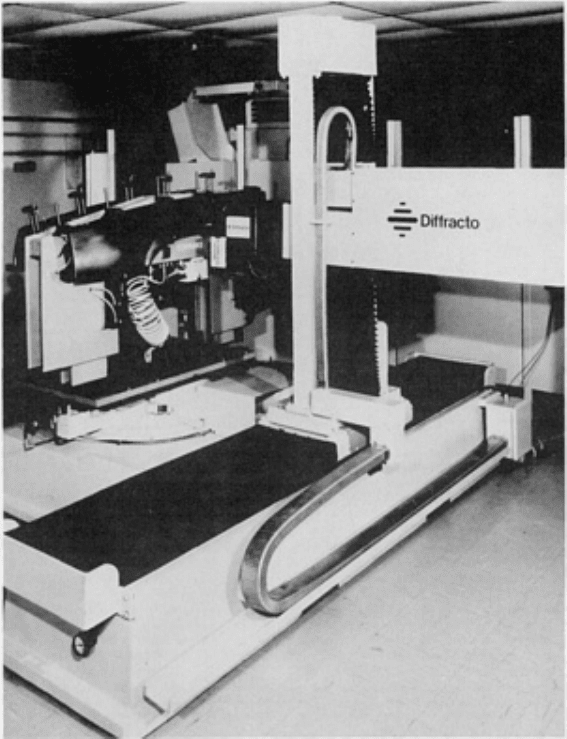
Fig. 14 Robot-
based noncontact measuring system shown gaging a sheet metal automotive fender held in a
fixture. Fit (gap and flushness) are measured by means of optical triangulation. Courtesy of Diffracto Limited
The advantage of using machine vision for low-volume, complex parts is that it is generally both faster and less error
prone than human inspection. A complex part may require hundreds of measurements, which must be performed in a
logical sequence to avoid missing any steps. The same qualities that make machine vision suitable for high-volume
production applications also make it suitable for parts with a large number of features to be inspected.
Inspection tasks are generally more concerned with verifying the presence of or measuring a workpiece than with the
actual recognition of objects. Therefore, the most useful vision system capabilities for inspection applications include the
ability to segment images by forming edges and the ability to measure the geometric features of these images and
segments. Two-dimensional images are generally used to perform these functions. Of the three performance criteria
considered here, the most important for visual inspection is the ability to perform the task at high speed.
Visual inspection of all types, including quantitative and qualitative inspection, has been estimated to account for about
10% of the total labor cost of all manufactured durable goods. This excessively high percentage can be significantly
reduced when machine vision is employed. Along with lower cost, the quality of the final product can also be increased.
Part Identification
The most fundamental use for a machine vision system is the recognition of an object from its image. Inspection deals
with the examination of object characteristics without necessarily requiring that the objects be identified. In part
recognition, however, it is necessary to make a positive identification of an object and then to make a decision based on
that knowledge. Generally, the decision involves some form of a categorization of the object into one of several groups.
This categorization can be in the form of information, such as categories of inventories to be monitored (Fig. 15, 16, and
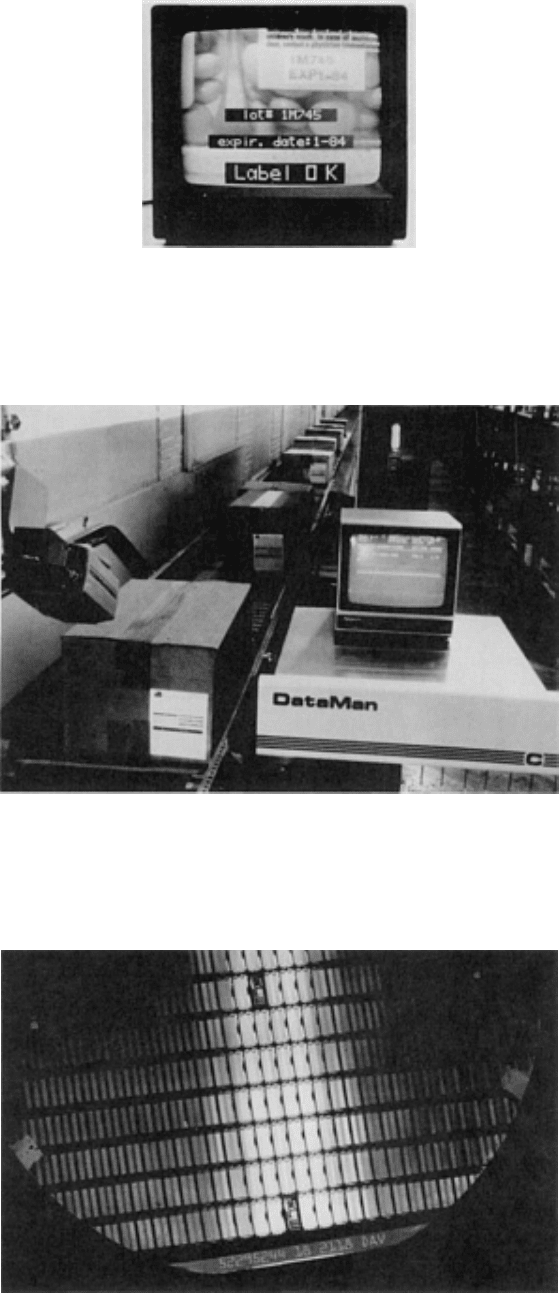
17), or it can be in a physical form, as in the placement of parts on different conveyor belts, depending on their
characteristics.
Fig. 15
Monitor screen of a machine vision inspection system verifying the expiration date and lot code on a
pharmaceutical bottle. Courtesy of Cognex Corporation
Fig. 16 Machine vision system reading box labels for sortation in a shipping facility.
Courtesy of Cognex
Corporation
Fig. 17
Machine vision used to read part numbers engraved on semiconductor wafers in order to expedite work
tracking of components. Courtesy of Cognex Corporation
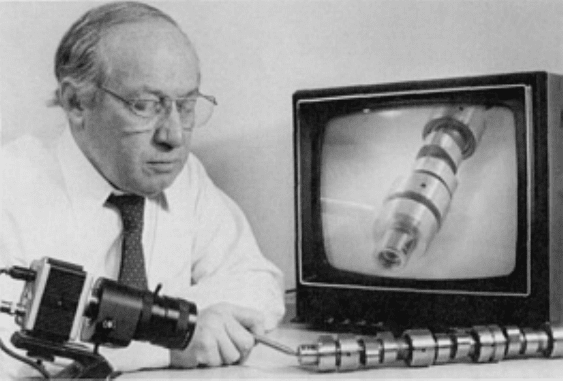
The process of part identification generally requires strong geometric feature interpretation capabilities because most
manufacturing applications allow part differentiation on the basis of differences in silhouette shapes (Fig. 18). As in the
inspection applications, processing speed is generally more important than resolution or discrimination ability.
Recognition applications often require an interface capability with some form of part-handling equipment, such as an
industrial robot.
Fig. 18 Machine vision system that controls a multiple-
programmed cam grinder being used to identify each
specific automotive camshaft to determine machine settings.
Courtesy of Industrial Automation Systems,
Gould, Inc.
Guidance and Control
One of the basic limitations of industrial robots in such applications as assembly, machining, welding, or other process-
oriented operations is that feedback capabilities are limited. In these applications, parts must be continuously monitored
and positioned relative to other parts with a high degree of precision. In some applications, such as bolt tightening, a force
feedback capability may be required to determine when the operation should cease. In many other applications, a vision
system can be a powerful tool for controlling production operations when combined with other forms of automated
equipment.
These guidance and control applications tend to require advanced machine vision system capabilities. Because of the need
to determine spatial relationships among objects, the ability to measure distance is often important (Fig. 19), along with
the ability to measure the orientation and geometric shape of an object (Fig. 20). In addition, an ideal vision system would
allow three-dimensional interpretation of images. Finally, the precise positioning requirements of these tasks means that a
high degree of image resolution is desirable.
