ASM Metals HandBook Vol. 17 - Nondestructive Evaluation and Quality Control
Подождите немного. Документ загружается.


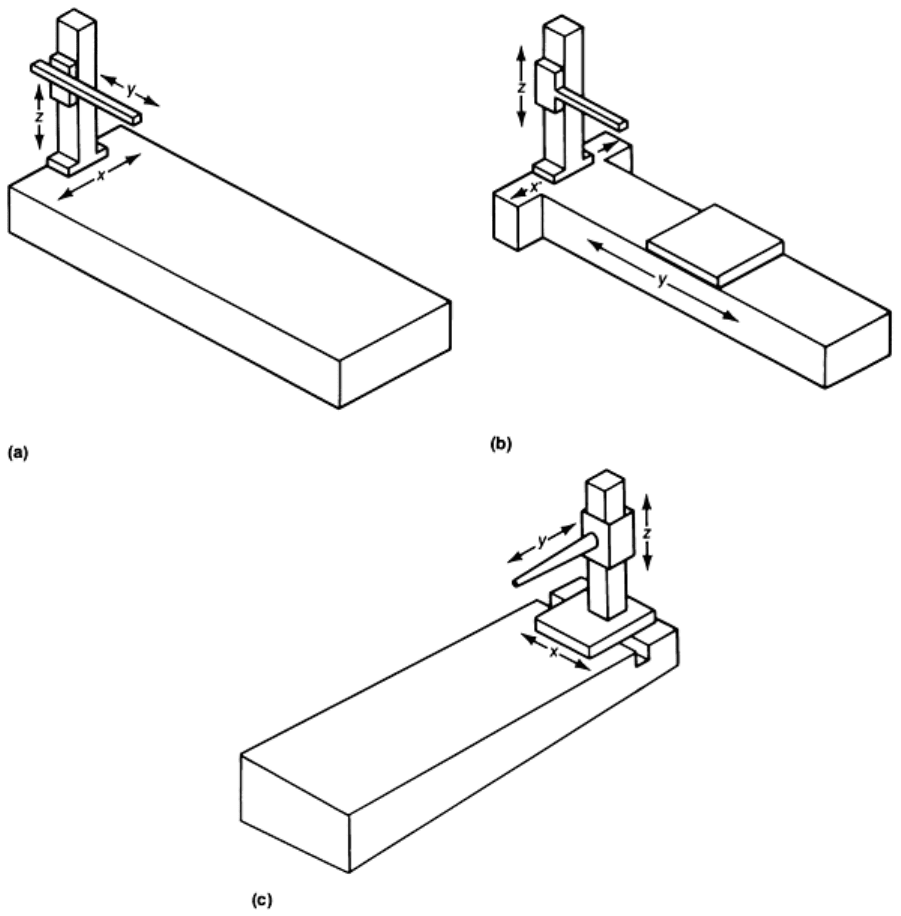
Fixed bridge
L-shaped bridge
Column
Gantry
In addition, the two types of machine can be characterized to some degree by the levels of accuracy they each achieve
(although there is a considerable degree of overlap based on the design of an individual machine), by the size of part they
can handle, and by application. The prospective buyer/user of a CMM cannot make an intelligent choice of the type of
machine that will best meet his needs, let alone the specific make and model of CMM, until he thoroughly evaluates and
plans both the specific intended application of the CMM and the overall manufacturing and quality context in which it
will operate. Table 1 provides a general comparison of CMM types, applications, and levels of measurement accuracy a
CMM user can expect.
Table 1 Typical CMM specifications
Minimum measurement Application CMM type Bearing type
mm in.
Laboratory quality
(a)
Laboratory grade Vertical, moving bridge Air bearings <0.003 <0.0001
Clean room Vertical, moving bridge Air bearings <0.003 <0.0001
Production machines
Open shop Vertical, moving bridge Air bearings <0.013-0.025
<0.0005-0.001
Sheet metal Horizontal (with fixed x-y axis) Recirculating bearing packs
<0.025-0.050
<0.001-0.002
Clean room and shop
Vertical, moving bridge; all horizontal
Air/roller bearings <0.050 <0.002
(a)
These CMMs have specific environments into which they must be installed to maintain their rated
accuracies.
Experience clearly shows that the user who simply buys a CMM and places it in use without considering the impact of the
unit on the manufacturing process will almost invariably fail. On the other hand, the user who determines the results
desired from the CMM, the resources required to achieve those results, and the effect of the CMM on the overall
manufacturing process will likely realize the maximum benefits a CMM can provide.
Evaluation and planning are further discussed in the section "CMM Implementation" in this article.
Vertical CMMs
Vertical CMMs, which have the probe or sensor mounted on the vertical z-axis, have the potential to be the most accurate
type. Vertical CMMs in general can be more massive and can be built with fewer moving parts than their horizontal
counterparts. They are therefore more rigid and more stable. Their limitation, however, is the size of part they can
conveniently handle, because the part to be measured must fit under the structural member from which the probe
descends.
In an attempt to overcome this limitation, various designs have been produced. As a result, within the overall category of
vertical CMM, there are designs utilizing moving or fixed bridges, cantilevers, gantries, and so on. Each design approach
is of course a compromise, because as the size of the work envelope of the machine and the travel distance along the axes
increase, so also do the problems of maintaining rigidity and accuracy. A gantry design has proved to be an effective
solution to the problem of increasing the capacity of a CMM while maintaining a high level of accuracy. A cantilever
design, on the other hand, presents some inherent problems associated with isolating the CMM from floor vibrations and
maintaining high precision due to the overhanging unsupported arm.
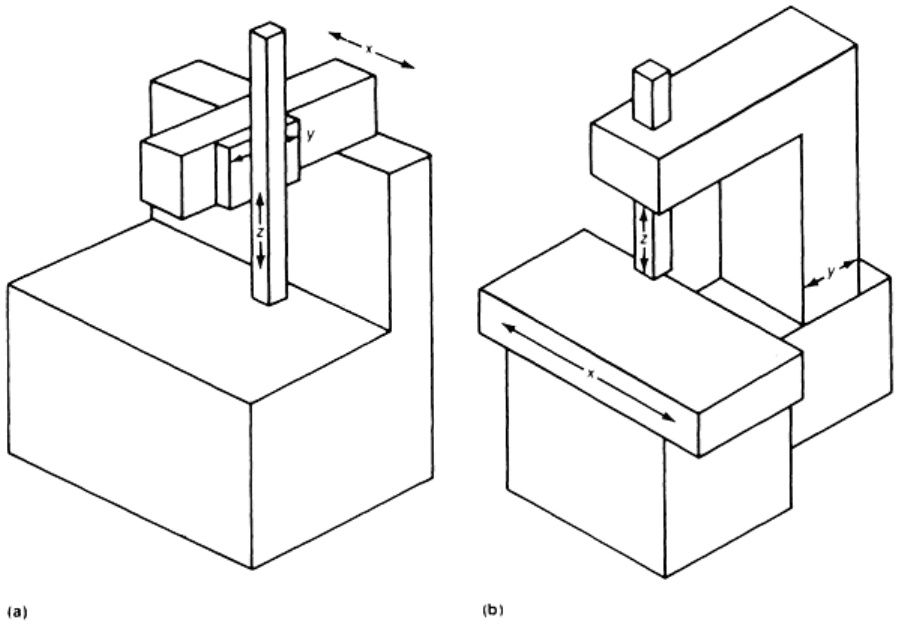
Cantilever-type CMMs employ three movable components moving along mutually perpendicular guideways. The
probe is attached to the first component, which moves vertically (z-direction) relative to the second. The second
component moves horizontally (y-direction) relative to the third. The third component is supported at one end only,
cantilever fashion, and moves horizontally (x-direction) relative to the machine base. The workpiece is supported on the
worktable. A typical machine of this configuration is shown in Fig. 2(a). A modification of the fixed-table cantilever
configuration is the moving-table cantilever CMM shown in Fig. 2(b).
Fig. 2 Motion of components in cantilever-type CMMs. (a) Fixed table. (b) Moving table
The cantilever design provides openness and accessibility from three sides, making it popular for small, manual CMMs.
Its cantilevered y-axis places a size limitation on this configuration. Because of the small y-z assembly, this configuration
is lightweight and provides fast measuring speeds in direct computer control (DCC) applications.

Bridge-type CMMs employ three movable components moving along mutually perpendicular guideways. The probe is
attached to the first component, which moves vertically (z-direction) relative to the second. The second component moves
horizontally (y-direction) relative to the third. The third component is supported on two legs that reach down to opposite
sides of the machine base, and it moves horizontally (x-direction) relative to the base. The workpiece is supported on the
base.
Moving Bridge. A typical moving-bridge CMM is shown schematically in Fig. 3(a). This configuration accounts for
90% of all CMM sales.
Fig. 3 Motion of components in bridge-type CMMs. (a) Moving bridge. (b) Fixed bridge. (c) L-shaped bridge
The moving-bridge design overcomes the size limitations inherent in the cantilever design by providing a second leg,
which allows for an extended y-axis. The second leg does, however, reduce access to the unit. The limitations of this
configuration usually occur because of walking problems associated with retaining drive through just one leg. Higher
speeds, achieved by increasing dynamic forces and reducing machine setting time, accentuate the problem. Vertical
moving-bridge CMMs can be controlled manually (Fig. 4) and with DCC hardware (Fig. 5).
Fig. 4 Vertical moving-bridge CMM inspecting a case-hardened cast steel automotive crank-shaft using a touch-
trigger probe. This manually operated unit has a granite table.
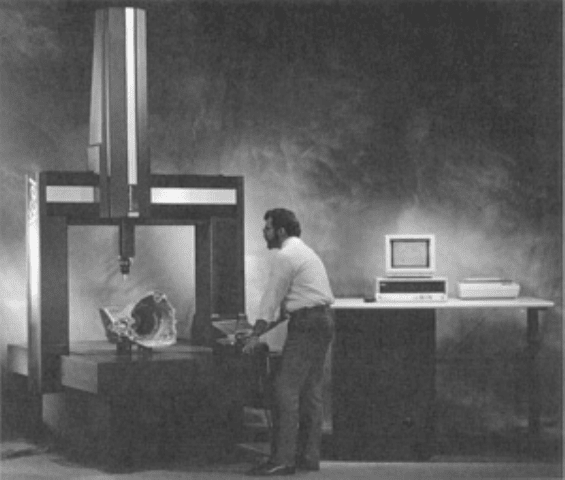
Fig. 5 Vertical moving-bridge CMM, which incorporates a granite base, inspecting a cast aluminum alloy four-
wheel-drive transaxle gear case. The DCC motor drive that controls
all of the axial movements is equipped with
a remote joystick controller.
The fixed-bridge configuration (Fig. 3b) provides a very rigid structure and allows a relatively light moving x-z
structure that can achieve fast x-z moves. The moving table in larger machines can become massive, with decreased
throughput capability. The influence of part weight on accuracy becomes a consideration for large parts.
L-Shaped Bridge. Another modification of the bridge configuration has two bridge-shaped components (Fig. 3c). One
of these bridges is fixed at each end to the machine base. The other bridge, which is an inverted L-shape, moves
horizontally (x-direction) on guideways in the fixed bridge and machine base.
The column CMM goes one step further than the fixed bridge in providing a very rigid z-axis configuration, and a two-
axis saddle that allows movement in the horizontal (x-y) directions (Fig. 6). High accuracy can be achieved with this
design. As in the fixed-bridge configuration, however, part mass and table considerations can restrict measuring volume
and speed.
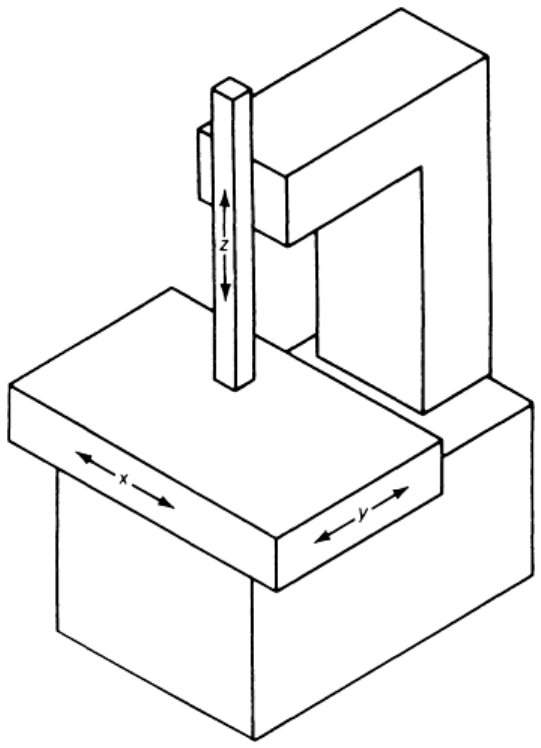
Fig. 6 Schematic of column CMM illustrating movement of probe, column, and table components
Column CMMs are often referred to as universal measuring machines rather than CMMs by manufacturers. Column units
are considered gage-room instruments rather than production-floor machines.
Gantry CMMs employ three movable components moving along mutually perpendicular guideways (Fig. 7). The probe
is attached to the probe quill, which moves vertically (z-direction) relative to a crossbeam. The probe quill is mounted in a
carriage that moves horizontally (y-direction) along the crossbeam. The crossbeam is supported and moves in the x-
direction along two elevated rails, which are supported by columns attached to the floor.
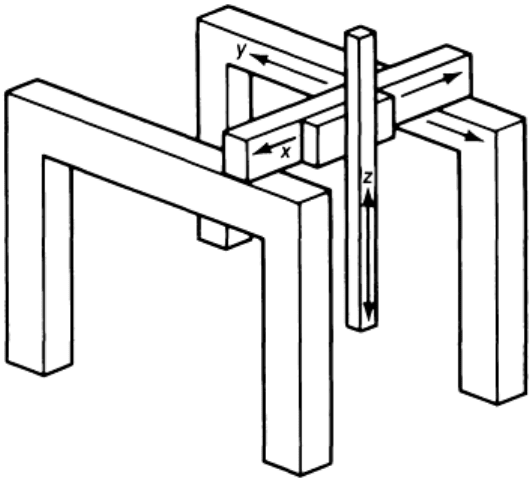
Fig. 7 Schematic of gantry CMM illustrating movement of probe, crossbeam, and elevated rails
The gantry design has relatively restricted part access unless utilized in very large machines. The machine is physically
large with respect to the size of the part. Large axis travels can be obtained, and heavy parts are not a problem, because
the weight of the part can be decoupled from the measurement system by proper design of the machine base (foundation
in a large machine). This is not as practical in smaller CMMs, and this configuration is most popular for large machines.
The gantry configuration was initially introduced in the early 1960s to inspect large parts, such as airplane fuselages,
automobile bodies, ship propellers, and diesel engine blocks. The open design permits the operator to remain close to the
part being inspected while minimizing the inertia of the moving machine parts and maintaining structural stiffness.
Horizontal CMMs
Horizontal CMMs, which have the probe mounted on the horizontal y-axis, are generally used in applications in which
large parts must be measured--for example, automobile bodies or airplane wings. Horizontal CMMs require no bridge
over the part because the part is approached from the side. Therefore, there is substantially less restriction on the sizes of
the parts that can be measured.
Most horizontal CMMs, however, do not measure to state-of-the-art levels of accuracy, because of the high cost of
achieving such accuracy in machines capable of handling large parts. In general, it is more cost effective to accept
accuracy in the 0.050 mm (0.002 in.) range when gaining the part-handling capabilities of large horizontal machines and
to use vertical designs when finer measurement is demanded.
In any CMM design, fewer moving parts and joints will result in higher potential levels of accuracy. This principle has
been applied to a class of horizontal CMM called process control robots. In these units, fixed members that move together
provide the flexibility and capacity of a horizontal CMM, along with the higher accuracy of a vertical design. The
horizontal direction of attack makes these CMMs the logical design for production applications in which horizontal
machine tools are used.
In choosing a CMM, the buyer must take into consideration not only the degree of accuracy required but also the location
of the unit and the measurements to be taken. In general, when dealing with smaller parts where measurements of very
high accuracy are required, the potential user is likely to to best served by a machine located in a clean room environment.
When on-line process control is desired, the appropriate shop-hardened CMM that can be located in the shop itself is the
best solution.
Horizontal-Arm CMMs. Several different types of horizontal-arm CMMs are available. As with all CMMs, the
horizontal-arm configuration employs three movable components moving along mutually perpendicular guideways.
Horizontal-arm CMMs are used to inspect the dimensional and geometric accuracy of a broad spectrum of machined or
fabricated workpieces. Utilizing an electronic probe, these machines check parts in a mode similar to the way they are
machined on horizontal machine tools. They are especially suited for measuring large gearcases and engine blocks, for
which high-precision bore alignment and geometry measurements are required. Four-axis capability can be obtained by
incorporating a rotary table.
Horizontal arms for large machines have a lower profile than vertical arms. For some applications, horizontal access is
desirable. For others, it is restrictive and a rotary table is usually required, thus increasing the cost.
Moving-Ram Type. In this design, the probe is attached to the horizontal arm, which moves in a horizontal y-direction
(Fig. 8a). The ram is encased in a carriage that moves in a vertical (z) direction and is supported on a column that moves
horizontally (x-direction) relative to the base.
Fig. 8 Schematic illustrating three types of horizontal-
arm CMMs. (a) Moving ram. (b) Moving table. (c) Fixed
table. Length of table/base is usually two to three times the width. Units with bases capable of accommodating
two to three interstate buses situated end-to-end have been built for major automotive manufacturers.
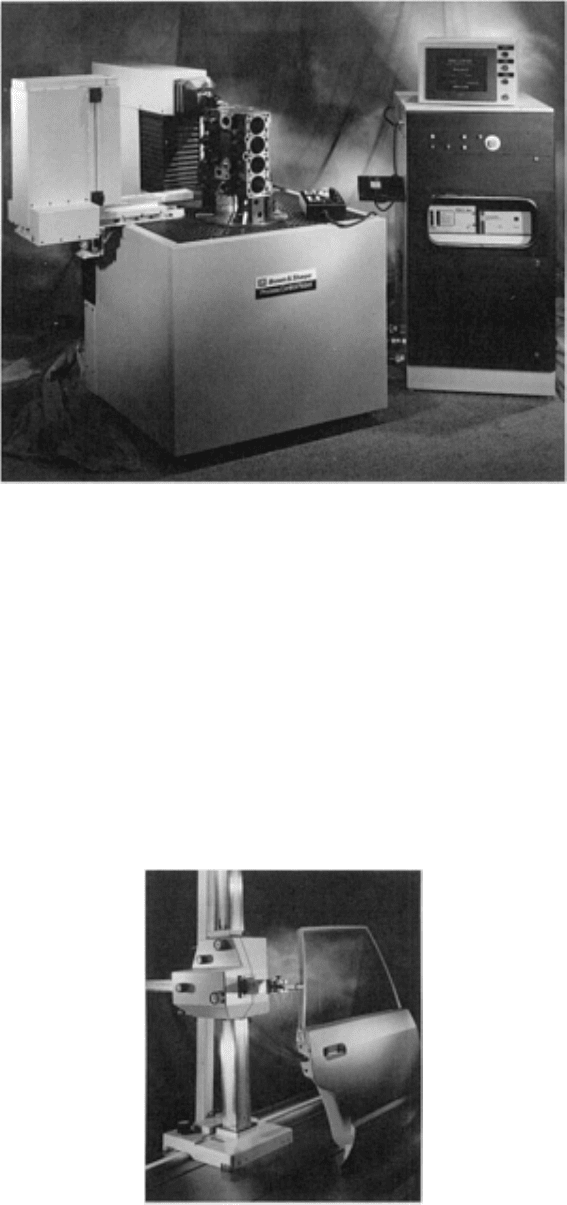
Moving-Table Type. In this configuration, the probe is attached to the horizontal arm, which is permanently attached at
one end only to a carriage that moves in a vertical (z) direction (Fig. 8b) on the column. The arm support and table move
horizontally (x- and y-directions) relative to the machine base. The moving-table horizontal-arm CMM unit shown in Fig.
9 is even more versatile because of the introduction of a rotary moving table.
Fig. 9 Horizontal-arm moving-
table CMM equipped for operation in hostile environments is shown inspecting a
cast iron automotive engine block. The unit incorporates a
rotary table, a motorized programmable probe, and
an environmentally protected automatic probe changer. With its process control robot, this CMM is designed for
easy integration and installation in manufacturing cells.
Fixed-Table Type. In the fixed-table version, the probe is attached to the horizontal arm, which is supported cantilever
style at the arm support and moves in a vertical (z) direction (Fig. 8c). The arm support moves horizontally (x- and y-
directions) relative to the machine base. Parts to be inspected are mounted on the machine base. The versatility of the
fixed-table horizontal-arm design is readily illustrated by its ability to inspect a relatively plane surface such as a door
(Fig. 10) as well as an array of cylindrical surfaces encountered in a valve assembly (Fig. 11).
Fig. 10 Horizontal-arm fixed-
table CMM using a metal scribing tool to inspect a steel sheet metal automotive
door taken from the production line. This manually operated unit has a cast iron table.
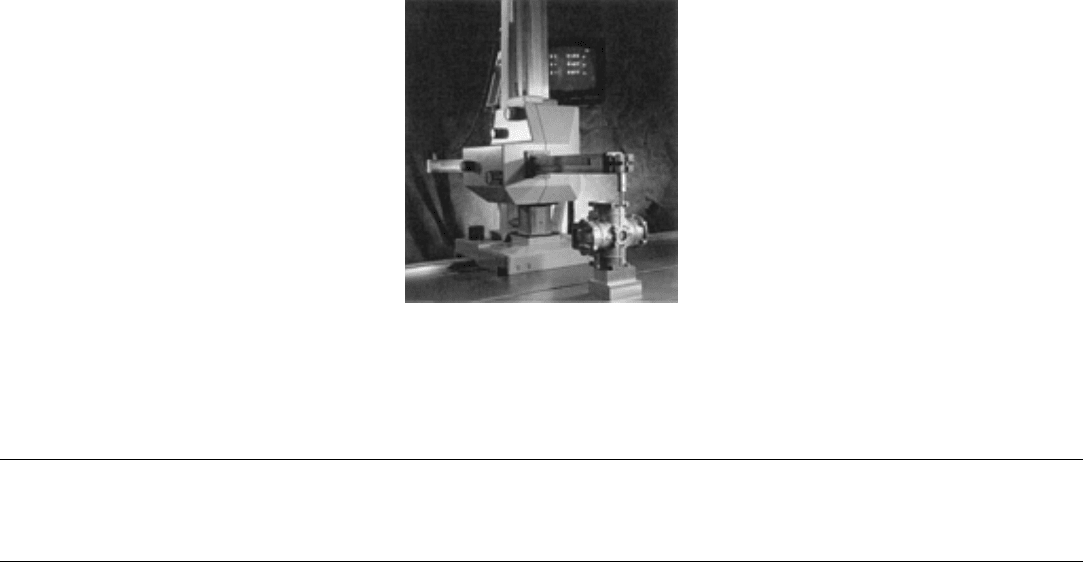
Fig. 11 Horizontal-arm fixed-table CMM using an edge-
finder probe to inspect a precision cast aluminum alloy
valve body. This manually operated unit incorporates a cast iron table.
Coordinate Measuring Machines
David H. Genest, Brown & Sharpe Manufacturing Company
Key CMM Components
As stated earlier, it is virtually impossible for the CMM buyer to select the appropriate unit without carefully evaluating
which functions are needed, where the unit will operate, under what conditions, who will operate it, and so on. Every
CMM offers trade-offs and its own cost-to-benefits ratio. The CMM that provides state-of-the-art measurement, for
example, may not be the best choice if the user cannot provide the correct operating environment. The best CMM is the
one that matches the application in terms of design, capacity, accuracy, protection, and so on. Once these factors have
been considered, the CMM buyer should assess the characteristics and capabilities of the following major components of
the CMM.
Base/Bed Construction. The first major component to examine is the overall construction of the machine. The CMM
must be rigidly built to minimize errors introduced by unintended movement between the machine members and in their
movement along the axes of travel. Some designs (such as the cantilever) require a more massive structure to provide the
same degree of rigidity than do others (such as the gantry type) that have more inherent rigidness. If the CMM is to
operate in the shop, the user should select a design having the same toughness and shielding as a machine tool. If the
CMM will be used in a laboratory, a less protected model can be selected.
Traditionally, all measuring machines had cast iron bases or beds, but today granite is also frequently used because of its
mass and thermal stability. In the past, it was essential that the bed of the measuring machine be perfectly flat, but with
the advent of computer-based error compensation, this characteristic has become far less vital.
Coordinate measuring machines designed for use in the laboratory or clean room are usually built with granite beds.
Horizontal-arm CMMs and any CMM intended for use on the factory floor are still built with a cast iron base because of
their larger size and the levels of accuracy required in these applications. Steel is also far easier than granite to fabricate
and use in integrated systems involving automated materials handling and similar functions.
Key elements of the structure (such as bearing ways and scales) may be of stainless steel, granite, aluminum, or more
exotic materials, such as ceramic. One principal factor, however, is that all these critical components must be of the same
material. This reduces the effects of expansion and contraction due to temperature changes. The buyer wants a machine
that is thermally stable, and the manufacturer can achieve this stability in several ways. A CMM whose key components
are of ceramic will be thermally stable because ceramic reacts very slowly to temperature changes. By the same token, a
CMM with aluminum components will provide thermal stability because these components react very quickly to
temperature changes. In both cases, the user knows with a high degree of certainty the thermal condition of the CMM.
Bearing Construction. Bearings have a direct impact on the accuracy of all CMMs because of their effect on every
motion of the machine along its axes. Bearing assemblies can be of the air or roller type or can consist of recirculating
bearing packs.
Air Bearings. For CMMs that will be used in a laboratory or clean room, where there is a minimum of dirt or dust, air
bearings are the best choice because they move without friction and are therefore the most accurate. Air bearings are not
suitable on CMMs located on the shop floor, because the bearings need constant cleaning and require costly air-activated
vibration isolation systems, which slow the measuring speed and decrease the accuracy of the CMM. The isolation system
also increases the potential for failure because of its complexity and generally fragile design.
Roller Bearings. For many shop applications, such as those for sheet metal grade CMMs, roller bearings are a good
choice. Although they provide somewhat lower levels of potential accuracy than air bearings, roller bearings are sturdier
and can function in an atmosphere containing some dirt and dust. They are not suitable for CMMs in hostile
environments.
Recirculating Bearing Packs. The durability of roller bearings and accuracy approaching that of air bearings are
available from recirculating bearing packs such as those typically used on grinding machines. Because these bearing
packs are completely sealed, they permit operation in harsh factory environments, and they can handle the weight of
larger, more rigid machines. Their inherent stiffness provides volumetric accuracies and repeatabilities equal to those of
air bearings at significantly higher accelerations, which shorten measurement cycle times.
Scales and Encoders. The scales of a CMM show where the probe is located on the x, y, and z axes within the work
envelope of the machine. Because CMMs measure to such a high degree of resolution, the scales used are machine
readable and cannot be read by the naked eye. The CMM encoder reads the scales and inputs this measurement data into
the computer for computation. A machine readout amplifies the same measurement data so that they are accessible to the
operator by the naked eye. The buyer should make sure that the readout on any CMM is both visible and decipherable.
There are many different kinds of scales--for example, rotary, wire, magnetic, linear metal, and glass. The most accurate
scales are glass because this material permits finer etching of measurement lines than steel or other commonly used
materials. The resolution of the finest scales is to the submicron level. The buyer should make sure that the scales of any
machine intended for shop use are thoroughly sealed and protected from the outside environment.
Sensors and Probes. Sensors and probes are the devices through which CMMs collect their measurement input. A
broad variety of probes are currently available, each with its own application, permitting users to obtain very accurate
measurements of virtually any type of part feature, contour, surface, and so on.
Hard or fixed probes have been in use since the mid-1970s. They were the original type used on CMMs. The CMM
operator manually brings a hard probe into contact with the object being measured and reads (via the machine) the
coordinates of the measurement from the machine scales. Hard probes are available in a variety of configurations (ball,
tapered plug, and edge) and continue to have broad application and utility, primarily on manual machines.
Of the various types of hard probes, ball probes are used to measure the distance from one point to another. Tapered-plug
probes are used for such measurements as the distance between the centerline of two holes. Edge probes are used to locate
edge points.
The shortcoming of all hard or fixed probes is that they depend on a subjective element in the performance of the machine
operator. Every operator has his own touch, a light or heavy hand in moving and bringing the probe in contact with the
part. Just as one operator will use more force than another to close a micrometer on a part and thus obtain a variation in
measurement, the CMM operator can unknowingly influence measurements taken with a hard probe.
Touch-trigger or electronic touch-trigger probes are the second major category of probe currently used. Touch-
trigger probes operate like an electronic switch that closes when the probe comes in contact with the workpiece measured.
The development of touch-trigger probes was a major break-through for CMM technology.
Not only do touch-trigger probes remove a major source of operator error, they greatly increase the flexibility of
measurements and facilitate direct computer-controlled CMMs. Because of their considerable advantages, touch-trigger
probes are replacing hard probes in many applications. Touch-trigger probes are also available in many configurations
and types, that is, with extensions, special mounts, multiaxis motorized heads, and so on.
