ASM Metals HandBook Vol. 17 - Nondestructive Evaluation and Quality Control
Подождите немного. Документ загружается.

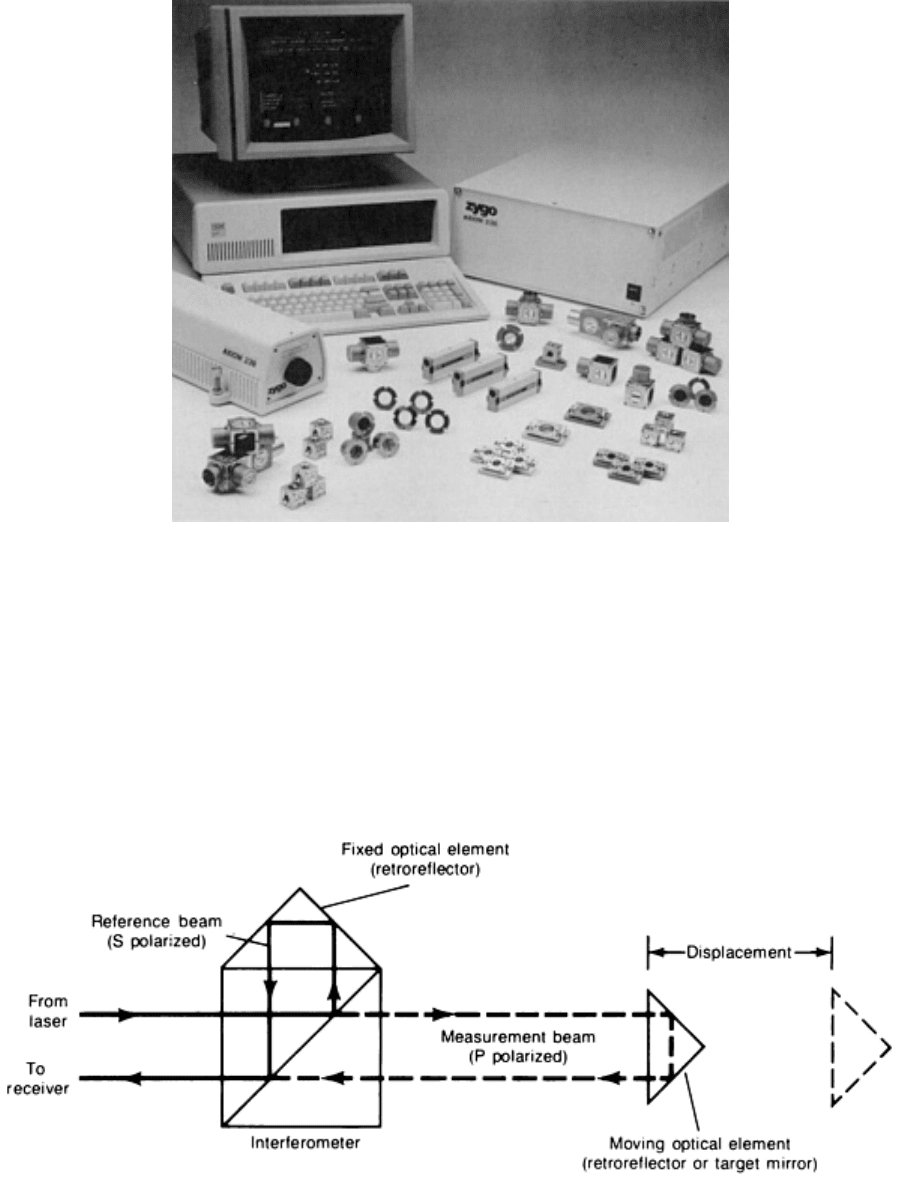
Fig. 6
Components of a laser interferometer. The components include a laser head, beam directing and
measuring optics, receivers, electronic couplers, and a computer system.
The most important element in the system is a two-frequency laser head that produces one frequency with a P polarization
and another frequency with an S polarization. The beam is projected from the laser head to a remote interferometer, where
the beam is split at the polarizing beam splitter into its two separate frequencies. The frequency with the P polarization
becomes the measurement beam, and the frequency with the S polarization becomes the reference beam (Fig. 7).
Fig. 7 Schematic of a two-frequency laser interferometer
The measurement beam is directed through the interferometer to reflect off a moving optical element, which may be a
target mirror or retroreflector attached to the item being measured. The reference beam is reflected from a stationary
optical element, which is usually a retroreflector. The measurement beam then returns to the interferometer, where it is
recombined with the reference beam and directed to the receiver.
Whenever the measurement target mirror or retroreflector moves, the accompanying Doppler effect induces a frequency
shift in the returning beam. Because of their orthogonal polarization, the frequencies do not interfere to form fringes until
the beam reaches the receiver. Consequently, the receiver can monitor the frequency shift associated with the Doppler
effect, which is compared to the reference frequency to yield precise measurement of displacement.
The principal advantage of the two-frequency system is that the distance information is sensed in terms of frequency.
Because a change in frequency is used as the basis for measuring displacement, a change in beam intensity cannot be
interpreted as motion. This provides greater measurement stability and far less sensitivity to noise (air turbulence,
electrical noise, and light noise). Because motion detection information is embedded in the frequency of the measurement
signal, only one photodetector per measurement axis is required; this decreases the sensitivity of optical alignment.
Another advantage of the two-frequency interferometer is that the laser head need not be mounted on the machine or
instrument being tested.
Typical applications include the calibration of length-measuring standards such as glass scales and the characterization of
positional, angular, and straightness errors in precision equipment, such as machine tools, coordinate measuring
machines, and X-Y stages. The linear resolution of a two-frequency displacement interferometer is 1 nm (0.05 μin.), the
angular resolution is 0.03 arc seconds, and the straightness resolution is 40 nm (1.6 μin.).
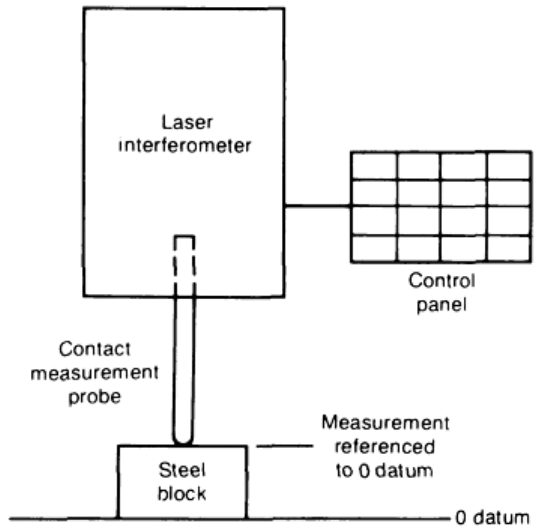
The laser interferometric micrometer uses interferometric technology and a laser beam to perform absolute length
measurements to a resolution of 0.01 μm (0.4 μin.) with an accuracy of ±0.08 mm (±0.003 in.). A contact probe interfaces
with an internal interferometer that measures changes in distance (Fig. 8). The part to be measured is placed under the
probe, and the interference effects are electronically analyzed and displayed in terms of the distance from the probe to the
datum (Fig. 8).
Based on user-entered information, the system can
automatically compensate for room temperature,
humidity, atmospheric pressure, the temperature of the
part, and the thermal expansion of the probe. The
instrument performs gage comparison, maximum and
minimum surface deviation, and total indicator reading
measurements. Simple statistical functions include mean
and one standard deviation reporting. Actual measurement
readings can be compared to user-entered tolerance limits
for automatic "go, no-go" testing.
Sorting. Parts can be sorted by dimension, prior to
automatic assembly, with an in-process inspection system.
A laser beam sorting system can provide accept-or-reject
measurements of length, height, diameter, width, thread
presence, and count. Each production run of a different
part requires a simple setup to accommodate the part to be
measured.
In operation, a collimated laser beam is optically
processed, focused, and directed onto the part. A
photodetector converts the light signals to electrical
signals for processing. For length inspection, the laser
beam is split into three beams. The center beam is
stationary and acts as a reference beam. Both of the other
two beams are adjusted independently by micrometer
dials to define the distance between an over- or undersize
measurement. The parts can then be gravity fed past the laser quantification system for accept-or-reject measurement. In
many applications, parts can be inspected at a rate of 100 to 700 parts per minute. A typical application for a laser-based
sorting system is the in-process, accept-or-reject measurement of bolts, nuts, rivets, bearings, tubes, rollers, and
stampings.
Holography is an important measurement technique in the three-dimensional contouring of large spatial areas.
Holography can determine small deviations (as small as 0.1 μm, or 4 μin.) in surface shape over large areas for all types
of surface microstructure. This is accomplished by illuminating both the object and the hologram of its original or desired
Fig. 8 Schematic of a laser interferometric micrometer

shape with the original reference wave (see the article "Optical Holography" in this Volume). If the object deviates from
its original or desired shape, interference fringes will appear during illumination with the reference wave.
The exactness of the holographic image makes it invaluable for detecting faults in such diverse items as automobile clutch
plates, brake drums, gas pipelines, and high-pressure tanks. The holographic image also depicts the vibration pattern of
mechanical components and structures such as turbine blades.
Laser Inspection
Carl Bixby, Zygo Corporation
Velocity Measurements
Velocity measurements from the Doppler effect on laser light have become a useful tool for measuring gas, liquid, and
solid-surface velocities. Many systems are intended for laboratory applications. However, instruments have also been
introduced for industrial process control. One application is in the primary metals industries and consists of measuring
length in a unidirectional flow process.
The laser Doppler velocity gage is a non-contact instrument that uses laser beams and microprocessors to measure the
speed and length of a moving surface. It can measure almost any type of continuously produced material without coming
into contact with it, whether it is hot, cold, soft, or delicate. It outputs various types of measurements, such as current
speed, average speed, current lengths, and total length.
The instrument consists of a sensor, the controller, and a computer. The sensor emits two laser beams that converge on the
surface of the product being measured. The light reflected from the product surface exhibits Doppler shifts because of the
movement. The frequency of the beam pointing toward the source of the product is shifted up, and the beam pointing
toward the destination is shifted down. The processor measures the frequency shift and uses this information to calculate
the speed and length of the product.
Laser Inspection
Carl Bixby, Zygo Corporation
Surface Inspection
Surface inspection includes the in-process detection of surface flaws and the measurement of surface defects and
roughness. Lasers are used in both of these functions.
One technique of in-process flaw detection is illustrated in Fig. 9. A rotating polygonal mirror scans the laser light across
the moving sheet, and a stationary photo-multiplier detects the scattered light. If there is a defect on the surface, the
intensity of the scattered light increases; if the defect is a crack, the intensity decreases. Similar arrangements can estimate
surface roughness by analyzing the envelope of scattered light.
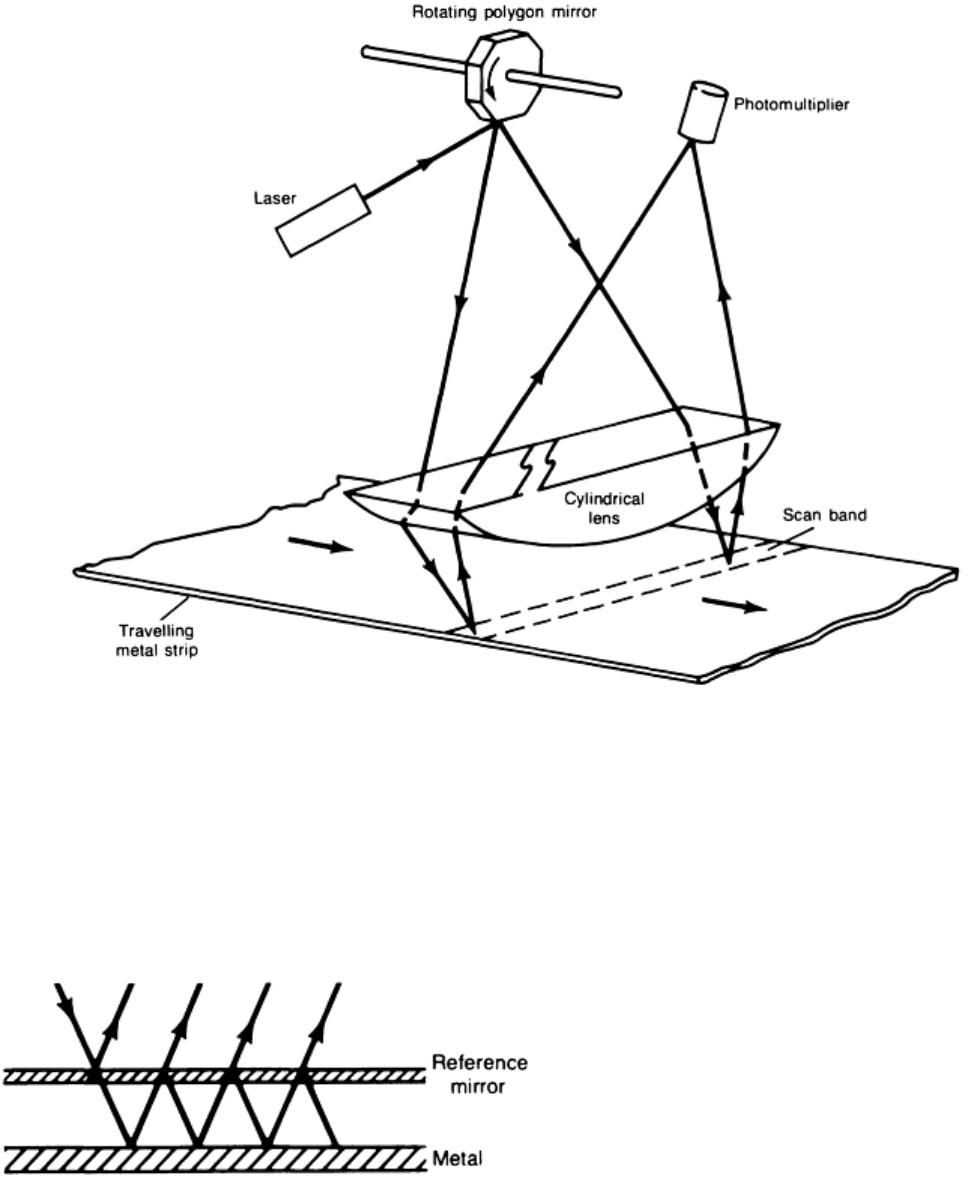
Fig. 9 System for the high-
speed scanning of steel sheets for surface defects. In one system, the scanner
acquired 10
4
data points per millisecond on a 3 mm
2
(0.005 in.
2
) sheet.
Interference microscopes are used to measure the microtopography of surfaces. The interference microscope divides
the light from a single point source into two or more waves. In multiple-beam interference microscopes, this is done by
placing a partially transmitting and partially reflecting reference mirror near the surface of the specimen (Fig. 10).
The multiple beams illustrated in Fig. 10 are
superimposed after traveling different lengths. This
produces interference patterns, which are magnified
by the microscope. The interference fringes having a
perfectly flat surface appear as straight, parallel lines
of equal width and spacing. Height variations cause
the fringes to appear curved or jagged, depending on
the unit used. With multiple-beam interferometers,
height differences as small as λ/200 can be measured,
where λ is the wavelength of the light source.
Lasers can provide a monochromatic light source,
which is required in interference microscopes. One
such system is shown in Fig. 11. This system involves
the use of photodetectors with displays of isometric plots, contour plots, and up to five qualitative parameters, such as
surface roughness, camber, crown, radius of curvature, cylindrical sag, and spherical sag.
Fig. 10 General principle of a multiple-beam interferometer
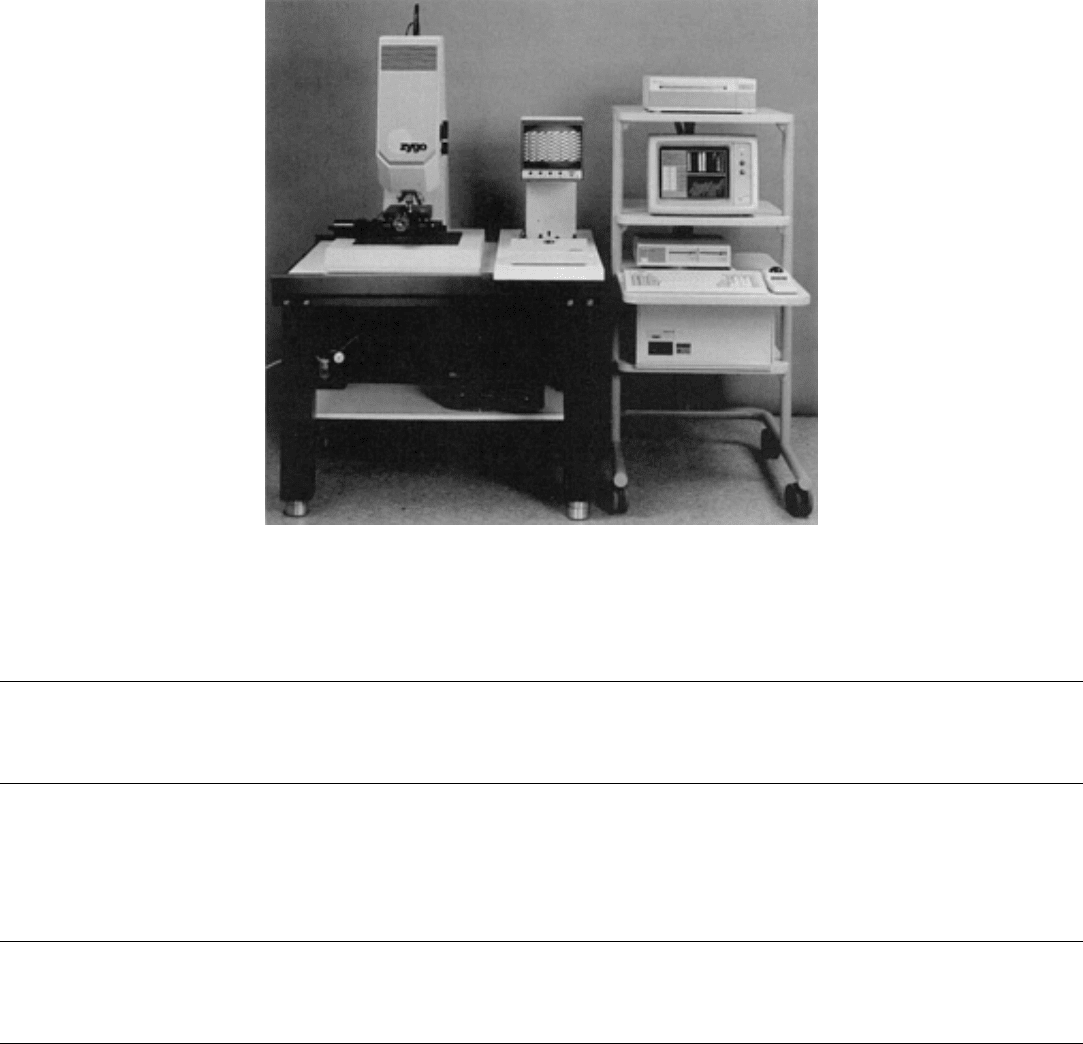
Fig. 11 Laser interference microscope with displays. Fizeau and Mirau interferometers are
mounted in the
turret.
Laser Inspection
Carl Bixby, Zygo Corporation
Selected References
• D. Belforte, Industrial Laser Annual Handbook, Vol 629, Pennwell, 1986
• R. Halmshaw, Nondestructive Testing, Edward Arnold, 1987
Coordinate Measuring Machines
David H. Genest, Brown & Sharpe Manufacturing Company
Introduction
THE COORDINATE MEASURING MACHINE (CMM) fulfills current demands on manufacturing facilities to provide
extremely accurate as well as flexible three-dimensional inspection of both in-process and finished parts on the assembly
line. Manufacturers are under tremendous financial pressure to increase production and to minimize waste. Part tolerances
once quoted in fractional figures are now quoted in thousandths of a millimeter, and manufacturers are under ever-
increasing pressure to meet ever more demanding specifications on a regular basis.
The CMM, which first appeared some 25 years ago, has developed rapidly in recent years as the state-of-the-art
measuring tool available to manufacturers. The capabilities, accuracy, and versatility of the CMM, as well as the roles it
will play in manufacturing, continue to increase and evolve almost daily.
Coordinate measuring machines are an object of intense interest and aggressive development because they offer
potentially viable solutions to a number of challenges facing manufacturers:

• The need to integrate quality management more closely into the manufacturing process
• The need to improve productivity and to reduce waste by eliminating the manufacture of out-of-
tolerance parts faster
• The realization that the measurement process itself needs to be monitored and verified
•
The objective to eliminate fixtures and fixed gages (and their inherent rebuild costs due to evolving
products), thus providing increased gaging flexibility
• The potential to incorporate existing technology into new and more efficient hybrid systems
Historically, traditional measuring devices and CMMs have been largely used to collect inspection data on which to make
the decision to accept or reject parts. Although CMMs continue to play this role, manufacturers are placing new emphasis
on using CMMs to capture data from many sources and bring them together centrally where they can be used to control
the manufacturing process more effectively and to prevent defective components from being produced. In addition,
CMMs are also being used in entirely new applications--for example, reverse engineering and computer-aided design and
manufacture (CAD/CAM) applications as well as innovative approaches to manufacturing, such as the flexible
manufacturing systems, manufacturing cells, machining centers, and flexible transfer lines.
Before purchasing a CMM, the user needs to understand and evaluate modern CMMs and the various roles they play in
manufacturing operations today and in the future. This article will:
• Define what a CMM is
• Examine various types of machines available
• Outline CMM capabilities
• Examine major CMM components and systems
• Examine various applications in which CMMs can be employed
• Provide guidelines for use in specifying and installing CMMs
Terminology germane to CMMs includes:
• Ball bar:
A gage consisting of two highly spherical tooling balls of the same diameter connected by a
rigid bar
• Gage: A mechanical artifact of high precision use
d either for checking a part or for checking the
accuracy of a machine; a measuring device with a proportional range and some form of indicator, either
analog or digital
• Pitch: The angular motion of a carriage, designed for linear motion, about an axis th
at is perpendicular
to the motion direction and perpendicular to the yaw axis
• Pixel: The smallest element into which an image is divided, such as the dots on a television screen
• Plane: A surface of a part that is defined by three points
• Repeatability: A
measure of the ability of an instrument to produce the same indication (or measured
value) when sequentially sensing the same quantity under similar conditions
• Roll: The angular motion of a carriage, designed for linear motion, about the linear motion axis
• Yaw:
The angular motion of a carriage, designed for linear motion, about a specified axis perpendicular
to the motion direction. In the case of a carriage with horizontal motion, the specified axis should be
vertical unless explicitly specified. For a
carriage that does not have horizontal motion, the axis must be
explicitly specified
Coordinate Measuring Machines
David H. Genest, Brown & Sharpe Manufacturing Company
CMM Operating Principles
Technically speaking, a CMM is a multi-axial device with two to six axes of travel or reference axes, each of which
provides a measurement output of position or displacement. Coordinate measuring machines are primarily characterized
by their flexibility, being able to make many measurements without adding or changing tools. As products evolve, the
same CMM can generally be used (depending on size and accuracy limitations) simply by altering software instead of
altering equipment mechanics or electronics.
Practically speaking, CMMs consist of the machine itself and its probes and moving arms for providing measurement
input, a computer for making rapid calculations and comparisons (to blueprint specifications, for example) based on the
measurement input, and the computer software that controls the entire system. In addition, the CMM has some means of
providing output to the user (printer, plotter CRT, and so on) and/or to other machines in a complete manufacturing
system. Coordinate measuring machines linked together in an overall inspection or manufacturing system are referred to
as coordinate measuring systems.
When CMMs were first introduced in the late 1950s, they were called universal measuring machines. Today, they are
sometimes referred to as flexible inspection systems or flexible gages. The most important feature of the CMM is that it
can rapidly and accurately measure objects of widely varying size and geometric configuration--for example, a particular
part and the tooling for that part. Coordinate measuring machines can also readily measure the many different features of
a part, such as holes, slots, studs, and weldnuts, without needing other tools. Therefore, CMMs can replace the numerous
hand tools used for measurement as well as the open-plate and surface-plate inspection tools and hard gages traditionally
used for part measurement and inspection.
Coordinate measuring machines do not always achieve the rates of throughput or levels of accuracy possible with fixed
automation-type measuring systems. However, if any changes must be made in a fixed system for any reason--for
example, a different measurement of the same part or measurement of a different part--making the change will be costly
and time consuming. This is not the case with a CMM. Changes in the measurement or inspection routine of a CMM are
made quickly and easily by simply editing the computer program that controls the machine. The greater or more frequent
the changes required, the greater the advantage of the CMM over traditional measuring devices. This flexibility, as well as
the resulting versatility, is the principal advantage of the CMM.
CMM Measurement Techniques
A CMM takes measurements of an object within its work envelope by moving a sensing device called a probe along the
various axes of travel until the probe contacts the object. The precise position of the contact is recorded and made
available as a measurement output of position or displacement (Fig. 1). The CMM is used to make numerous contacts, or
hits, with the probe; using all axes of travel, until an adequate data base of the surfaces of the object has been constructed.
Various features of an object require different quantities of hits to be accurately recorded. For example, a plane, surface,
or circular hole can be recorded with a minimum of three hits.
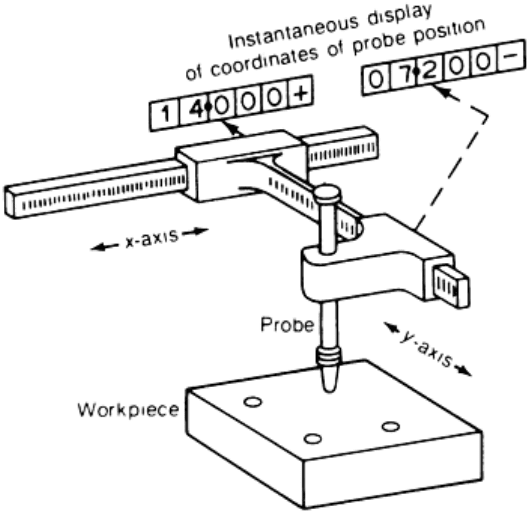
Fig. 1
Elements of a CMM showing typical digital position readout. The probe is positioned by brackets slid
along two arms. Coordinate distances from one point to another are measured in effect
by counting
electronically the lines in gratings ruled along each arm. Any point in each direction can be set to zero, and the
count is made in a plus or minus direction from there.
Once repeated hits or readings have been made and stored, they can be used in a variety of ways through the computer
and geometric measurement software of the CMM. The data can be used to create a master program, for example, of the
precise specifications for a part; they can also be compared (via the software) to stored part specification data or used to
inspect production parts for compliance with specifications. A variety of other sophisticated applications are also possible
using the same captured measurement data--for example, the reverse engineering of broken parts or the development of
part specifications from handmade models.
Coordinate Systems. The CMM registers the various measurements (or hits) it takes of an object by a system of
coordinates used to calibrate the axes of travel. There are several coordinate systems in use. The most commonly used
system is Cartesian, a three-dimensional, rectangular coordinate system the same as that found on a machine tool. In this
system, all axes of travel are square to one another. The system locates a position by assigning it values along the x, y, and
z axes of travel.
Another system used is the polar coordinate system. This system locates a point in space by its distance or radius from a
fixed origin point and the angle this radius makes with a fixed origin line. It is analogous to the coordinate system used on
a radial-arm saw or radial-arm drill.
Types of Measurements. As stated earlier, fundamentally, CMMs measure the size and shape of an object and its
contours by gathering raw data through sensors or probes. The data are then combined and organized through computer
software programs to form a coherent mathematical representation of the object being measured, after which a variety of
inspection reports can be generated. There are three general types of measurements for which CMMs are commonly used,
as follows.
Geometric measurement deals with the elements commonly encountered every day--points, lines, planes, circles,
cylinders, cones, and spheres. In practical terms, these two-dimensional and three-dimensional elements and their
numerous combinations translate into the size and shape of various features of the part being inspected.
A CMM can combine the measurements of these various elements into a coherent view of the part and can evaluate the
measurements. It can, for example, gage the straightness of a line, the flatness of a plane surface, the degree of parallelism
between two lines or two planes, the concentricity of a circle, the distance separating two features on a part, and so on.
Geometric measurement clearly has broad application to many parts and to a variety of industries.
Contour measurement deals with artistic, irregular, or computed shapes, such as automobile fenders or aircraft
wings. The measurements taken by a CMM can be easily plotted with an exaggerated display of deviation to simplify
evaluation. Although contour measurements are generally not as detailed as geometric measurements, presenting as they
do only the profile of an object with its vector deviation from the nominal or perfect shape, they too have broad
application.
Specialized surface measurement deals with particular, recurring shapes, such as those found on gear teeth or
turbine blades. In general, these shapes are highly complex, containing many contours and forms, and the part must be
manufactured very precisely. Tight tolerances are absolutely critical. Because manufacturing accuracy is critical,
measurement is also highly critical, and a specialty in measuring these forms has evolved. By its nature, specialized
surface measurement is applied to far fewer applications than the other two types.
CMM Capabilities
Coordinate measuring machines have the fundamental ability to collect a variety of different types of very precise
measurements and to do so quickly, with high levels of repeatability and great flexibility. In addition, they offer other
important capabilities based on computational functions.
Automatic Calculation of Measurement Data. The inclusion of a computer in the CMM allows the automatic
calculation of such workpiece features as hole size, boss size, the distance between points, incremental distances, feature
angles, and intersections. Prior to this stage of CMM development, an inspector had to write down the measurements he
obtained and manually compare them to the blueprint. Not only is such a process subject to error, but it is relatively time
consuming. While waiting for the results of the inspection, production decisions are delayed and parts (possibly not being
produced to specifications) are being manufactured.
Compensation for Misaligned Parts. Coordinate measuring machines no longer require that the parts being
measured be manually aligned to the coordinate system of the machine. The operator cannot casually place the part within
the CMM work envelope. Once the location of the appropriate reference surface or line has been determined through a
series of hits on the datum features of the part, the machine automatically references that position as its zero-zero starting
point, creates an x, y, z part coordinate system, and makes all subsequent measurements relative to that point. In addition,
the part does not have to be leveled within the work envelope. Just as the CMM will mathematically compensate if the
part is rotationally misaligned, it will also compensate for any tilt in the part.
Multiple Frames of Reference. The CMM can also create and store multiple frames of reference or coordinate
systems; this allows features to be measured on all surfaces of an object quickly and efficiently. The CMM automatically
switches to the appropriate new alignment system and zero point (origin) for each plane (face) of the part. The CMM can
also provide axis and plane rotation automatically.
Probe Calibration. The CMM automatically calibrates for the size and location of the probe tip (contact element) being
used. It also automatically calibrates each tip of a multiple-tip probe.
Part Program and Data Storage. The CMM stores the program for a given part so that the program and the machine
are ready to perform whenever this part comes up for inspection. The CMM can also store the results of all prior
inspections of a given part or parts so that a complete history of its production can be reconstructed. This same capability
also provides the groundwork for all statistical process control applications.
Part programs can also be easily edited, rather than completely rewritten, to account for design changes. When a
dimension or a feature of a part is changed, only that portion of the program involving the workpiece revision must be
edited to conform to part geometry.
Interface and Output. As mentioned earlier, CMMs can be linked together in an overall system or can be integrated
with other devices in a complete manufacturing system. The CMM can provide the operator with a series of prompts that
tell him what to do next and guide him through the complete measurement routine.

Output is equally flexible. The user can choose the type and format of the report to be generated. Data can be displayed in
a wide variety of charts and graphs. Inspection comments can be included in the hard copy report and/or stored in
memory for analysis of production runs.
CMM Applications
Coordinate measuring machines are most frequently used in two major roles: quality control and process control. In the
area of quality control, CMMs can generally perform traditional final part inspection more accurately, more rapidly, and
with greater repeatability than traditional surface-plate methods.
With regard to process control, CMMs are providing new capabilities. Because of the on-line, real-time analytical
capability of many CMM software packages, CMMs are increasingly used to monitor and identify evolving trends in
production before scrap or out-of-spec parts are fabricated in the first place. Thus, the emphasis has shifted from
inspecting parts and subsequently rejecting scrap parts at selected points along the production line to eliminating the
manufacture of scrap parts altogether and producing in-tolerance parts 100% of the time.
In addition to these uses, there is a trend toward integrating CMMs into systems for more complete and precise control of
production. Some shop-hardened CMMs, also known as process control robots, are being increasingly used in
sophisticated flexible manufacturing systems in the role of flexible gages.
Coordinate measuring machines can also be used as part of a CAD/CAM system. The CMM can measure a part, for
example, and feed that information to the CAD/CAM program, which can then create an electronic model of the part.
Going in the other direction, the model of the desired part in the CAD/CAM system can be used to create the part
program automatically.
Coordinate Measuring Machines
David H. Genest, Brown & Sharpe Manufacturing Company
Types of CMMs
The ANSI/ASME B89 standard formally classifies CMMs into ten different types based on design. All ten types employ
three axes of measurement along mutually perpendicular guideways. They differ in the arrangement of the three movable
components, the direction in which they move, and which one of them carries the probe, as well as where the workpiece
is attached or mounted. However, among the many different designs of CMMs, each with its own strengths, weaknesses,
and applications, there are only two fundamental types: vertical and horizontal. They are classified as such by the axis on
which the probe is mounted and moves. The ANSI/ASME B89 Performance Standard classifies coordinate measuring
machines as:
Vertical Horizontal
Fixed-table cantilever Moving ram, horizontal arm
Moving-table cantilever
Moving table, horizontal arm
Moving bridge Fixed table, horizontal arm
