ASM Metals HandBook Vol. 17 - Nondestructive Evaluation and Quality Control
Подождите немного. Документ загружается.

Noncontact trigger probes are used in a similar manner to the contact touch-trigger probes described above.
However, with noncontact probes, a beam of light (generally a diode) is used (operating as an optical switch) to probe the
workpiece rather than the physical contact of a probe tip. The probe is permanently set to a specific stand-off distance at
which the laser beam is triggered and measurements are taken. Because the probe never comes in contact with the part,
the likelihood of damage to the probe or part is greatly reduced, and the measurement speed is greatly improved with only
slight reduction in accuracy.
Touch Scanners. This type of probe, which produces analog readings instead of the digital measurements produced by
the probes mentioned above, is used for taking contour measurements. These probes remain in contact with the workpiece
as they move along its surface.
Laser probes primarily provide measurements of contoured surfaces, but do so without coming in contact with the
surface. Laser probes project a beam of laser light, called a footprint, onto the surface of the part, the position of which is
then read by triangulation through the lens in the probe receptor. This triangulation (much like surveying) in turn provides
the actual position and so on, of the feature on the part being measured.
Vision Probes. This type of sensor is the most recent and sophisticated addition to the sensor systems currently in use.
Vision is another form of noncontact sensing and is especially useful where very high speed inspection or measurement is
required. In this system, the part is not measured directly. Instead, an electronic representation of it is measured and
evaluated. The various features of this image of the workpiece (size, shape, location, and so on) are measured in
comparison to various electronic models of expected results by counting the pixels of the electronic image. From this, the
true nature of the part being inspected can be inferred and reported.
Probe Changers. Probe changers store alternative and/or backup probes, permitting the exchange or replacement of
various probes automatically. The measurement routine of a given part may call for the use of different probes or sensors
to measure particular features of the part. A deep bore may require the use of a probe with an elongated tip, for example,
while other features may require different specialized probes. The type of probe to be used for the measurement of every
feature of a part is written into the parts program (the software program that controls that particular CMM operation). By
utilizing a probe changer, which attaches to the CMM, the entire measurement routine can be carried out without stopping
for probe changes and without operator intervention.
Computer Hardware. The computer is the heart of the CMM system, giving it the capabilities and versatility that are
rapidly making CMMs essential to efficient manufacturing. The computer receives that measurement data gathered by the
CMM and, taking guidance from the software program, manipulates it into the forms required by the user. The computer
also performs the essential function of automatically aligning parts for measurement and automatically compensating for
errors within the structure of the machine. In DCC applications, the computer also operates the CMM.
Because of the vital role of the computer, there are several points the CMM buyer must be aware of. Primarily, the buyer
will want to be sure that the operating system is designed to run without assistance or information from the user. The
CMM user does not want to become involved in computer programming. The user needs a fast, efficient computer that
supports a state-of-the-art operating system (and peripherals, that is, printer, plotter, and so on) and has good, widespread
service support. The state-of-the-art permits the user to plug in the CMM and, after proper installation, testing, and
qualification, insert the software needed (available as off-the-shelf items) and then immediately begin measuring parts.
The user can communicate with and give instructions to the computer (via the software) in a number of convenient ways--
for example, with keyboards, function keys, light pens, touch-sensitive video screens, or a mouse. Most of these devices
are excellent for a laboratory or office, but in the shop, the simplest methods requiring the fewest parts, such as touch-
sensitive screens, tend to work best. No matter what method is used, however, the CMM operator does not need, nor
necessarily will he benefit from, specialized computer training.
Computer Software. Although the computer if the heart of the CMM, it is the software that enables the system to
fulfill its potential. Not many years ago, obtaining the appropriate application software to run measurement routines
necessitated writing a program in Fortran or Basic, but the situation has very nearly completely reversed itself today.
Software for the CMM has been refined to the extend that no computer programming knowledge or experience is needed
to run even the most sophisticated measurement programs available.
Virtually all CMM software consists of off-the-shelf, menu-driven (that is, the program asks the operator what he wants
to do and even prompts the most likely choice) programs that are very user-friendly, with comprehensive, solid help

screens available. The result is that the software (combined with the formidable power of the personal computer) for any
particular routine is very easy and flexible to use and can be customized to fit individual applications using plain English
rather than a specific programming language tied to a complicated operating system.
The range of available software is very wide. For example, programs are available for statistical process analysis and
control. Programs for sheet metal applications facilitate the location and measurement of parts containing bolts, weldnuts,
and similar features. Other contour programs permit the rapid and accurate alignment of complex, nongeometric shapes
without straight edges. There is also a family of software that allows the transfer of data between CMMs and CAD
systems, and other programs are available that facilitate the communication of data between CAD systems made by
different manufacturers. Development in this area has been so dynamic that standards for data formats have already been
developed and accepted by the industry, such as Dimensional Measurement Interface Specification for communication
from CMMs to CAD systems, and Initial Graphics Exchange Specification for CAD-to-CAD data exchange. Such
integration makes possible the use of CMMs in a variety of new applications, such as for reverse engineering, in which
specifications are derived from the measurement of a model or a broken part, and for the development of part programs
(measurement routines) directly from CAD data.
Coordinate Measuring Machines
David H. Genest, Brown & Sharpe Manufacturing Company
Factors Affecting CMM Performance
Because CMMs are highly sophisticated, precision machines, their performance and accuracy are affected by many
environmental, design, and operating factors. Most errors in CMMs are systematic (that is, stemming from machine setup
and operating conditions) rather than random. Therefore, to obtain a high level of performance, a user must first choose
the appropriate machine for the application. The CMM must then be located in a suitable environment, which can range
from the laboratory to the shop floor, and it must be installed with all the appropriate safeguards for proper, error-free
operation. This section of the article will outline the factors that affect performance and will provide suggestions for
ensuring the satisfactory performance of the CMM.
Volumetric Accuracy. Historically, measuring machines were evaluated in terms of linear scale accuracy but as they
began to be used to measure more complex parts, it soon became apparent that the linear accuracy of the machine was
insufficient to guarantee the level of measurement performance required. It became important, therefore, to evaluate
performance on the basis of the accuracy of the CMM at any point within its three-dimensional work envelope, that is,
volumetric accuracy.
Until quite recently, there was no recognized standard for gaging and evaluating the volumetric accuracy of a CMM.
Under the auspices of the American Society of Mechanical Engineers and the U.S. Bureau of Standards, CMM
manufacturers and users developed testing criteria and methods using laser, step gage, and ball bar tests that verify the
volumetric and linear accuracy of the CMM. In 1985, those tests were published as part of ANSI National Standard
B89.1.12.
There are 21 degrees of freedom or geometric inaccuracy (all of which can be sources of measurement error in a three-
axis CMM): roll, pitch, yaw, scale error, repeatability, two straightness error per axis, plus three squareness errors. To
ensure volumetric accuracy, every one of these 21 degrees of freedom must be tested. When testing, the supplier must test
the complete CMM system (the mechanics and electronics of the machine plus probe holder, probe, and its measurement
software) because it will be used to measure parts to ensure that the results will be accurate predictors of measurement
performance.
Historically, errors inherent in machine components were mechanically refined. A cast iron bed was planed, for example,
to eliminate irregularities, and granite components were lapped. Today, however, mechanical errors in the CMM are
refined with the CMM computer, which automatically compensates for geometric errors with powerful software
algorithms in real time as measurements are taken.
Probe Compensation. Every probe must be qualified to locate its position in relation to the x, y, and z axes of the
CMM and to compensate for any geometric error introduced into measurement by the difference between the actual
diameter of the probe (or footprint) and its diameter as perceived by the CMM in a given position within the work
envelope. This compensation must be made for every probe (probe holder, tip, or combination thereof, and so on) in every
position required during a measurement routine. When a probe is replaced because of wear, breakage, or substitution, the
new probe must again be qualified in every position in which it will be used. The results of this calibration are then
entered into the program guiding the CMM, and the inherent error is factored out in the final measurement data.
Environmental factors are critical to the satisfactory performance of any CMM. The user who fails to provide a
suitable environment will almost certainly be disappointed with the performance of the machine. Manufacturers will
provide potential buyers with environmental guidelines for the operation of the unit, and these guidelines may vary
somewhat from manufacturer to manufacturer. In no case will the manufacturer guarantee the performance of the CMM
unless the environmental criteria are met. According to the ANSI/ASME B89.1.12 standard for performance evaluation of
CMMs, the user has the clear responsibility of providing a suitable performance test environment (on which to base
acceptance of the machine from the supplier), either by meeting the guidelines of the supplier or by accepting reduced
performance. Among the environmental factors that can alter CMM performance are vibration, airborne particulates, and
temperature.
Vibration can greatly affect the measurement accuracy of any CMM. Motion from other machines, compressors and
similar equipment, lift trucks, and so on, can be transferred to the CMM through the floor, foundation, or support system
on which it stands. This motion, whether continuous vibration, intermittent shock, or combinations of both, will degrade
the accuracy and repeatability of measurements taken by the machine because of the relative motion among the probe, the
machine parts, and the workpiece. Extremes of motion may even damage the machine itself.
Therefore, the CMM user must use caution and good judgement in selecting a location for the unit. The area must be
examined and analyzed for sources of potential vibration and shock, and an appropriate support or isolation system must
be used to isolate the machine from the effects of vibration. The manufacturer will supply a statement of acceptable
vibration levels as part of the machine specification so that the user can make intelligent judgements about these
requirements before the purchase.
Air bearing equipped CMMs, because of their low, damped natural frequency, will require an air-activated vibration
isolation system. However, with CMMs that use roller bearing packs, a typical machine tool-like isolated foundation is all
that is required.
Airborne Particulates. Although there is no formal standard for acceptable levels of dirt and dust in the operating
environment of a CMM, dirt can be very damaging to the performance of any CMM, most especially to any machine that
has not been specifically designed and hardened for operation in a hostile environment. Therefore, the CMM user must
give careful consideration to dirt and dust in the environment when selecting a CMM, determining its location in the
facility, and estimating the resources required to install and operate it.
A CMM equipped with air bearings can operate without adverse effects on its performance in an environment containing
dry dust because the bearings themselves will expel air and eject the containment. Wet dirt, however, will tend to stick
and clog the machine and will probably introduce a source of significant error and possible damage to the machine.
A CMM operating in a clean room or laboratory must be dusted on a daily basis, paying particular attention to the bearing
ways, scales, encoder, and so on. Any CMM operating in a harsh or hostile environment must be massive and sturdy to
withstand the rigors of its environment, with the vital components mentioned above shielded from dirt, oil, grease, chips,
and so on. The performance of any CMM will benefit from a conscientious program of periodic and thorough preventive
maintenance.
Temperature exerts a significant influence on the accuracy of the measurements taken by a CMM. The temperature of
the various components of the machine and the workpiece should be as uniform and constant as is reasonably possible
within the working environment. Although specific operating temperature standards have not been established, various
factors that affect operating temperatures, changes in temperature, and CMM accuracy have been identified and must be
considered when choosing the location of a CMM unit and establishing the environment in which it will operate.
A CMM should not be exposed to direct sunlight or other powerful sources of radiant energy, such as fluorescent lighting.
The rate and speed of air flow around the machine should be limited, as should the amount and rate of temperature change
in the surrounding room.

As in the case of vibration and shock, the manufacturer will supply guidelines for an acceptable thermal environment for
operation of the CMM. Although adherence to these guidelines will not ensure accuracy, it will shift responsibility for
unsatisfactory performance of the machine from the user to the manufacturer.
Coordinate Measuring Machines
David H. Genest, Brown & Sharpe Manufacturing Company
CMM Implementation
Successful implementation of one or many CMMs depends on thorough, detailed planning and complete integration of
the unit into the manufacturing system as a whole. Selection of a CMM should be based on detailed knowledge of the
capabilities, strengths, and weakness of the manufacturing process. Knowledge of the statistical performance of the
process is very helpful and, if available, can be utilized to address many of the key questions that must be answered for
successful implementation. However, absolutely essential is a clear recognition of the prevailing philosophy of
measurement and a full understanding of the implications of that philosophy.
Quality Plan Objectives. Before any decisions or evaluation can be made regarding CMMs, the buyer will be best
served by developing a quality plan that outlines every aspect of the implementation of the CMM, its use, and the role it
will play in the manufacturing process. The buyer should consider the following questions and as many more as can be
formulated concerning the impact of the CMM on the overall manufacturing process:
• What is desired, and what must be accomplished relative to gaging?
• How will the CMM be integrated into the manufacturing process as a whole?
• What will be the relationship of the CMM to the process as a whole?
A laboratory-grade, vertical CMM can be used off-line, for example, as a master arbiter of part specifications, or a shop-
hardened, horizontal CMM can be used on-line for continuing workpiece measurement and real-time statistical process
control. Either approach, as well as many others, can be perfectly valid, but any approach must fit smoothly within the
overall system. Based on manufacturing capacity and historical records, the buyer must consider such questions as:
• To what degree of accuracy will parts be gaged?
• What parts are critical to manufacturing?
• What are the roles of the critical parts in the final product?
• Which of these parts will be measured?
• How frequently will they be measured?
The answers to such questions will begin to narrow the field of potential CMMs. If a manufacturing process requires
accuracy to less than 0.010 mm (0.0004 in.), for example, then production-grade, horizontal machines are eliminated. The
buyer knows that the machine must be housed in a clean room environment. The buyer should also be aware that a
particular measurement could be far removed from the production line, thus affecting the ability to react quickly to parts
that fall below specification.
The buyer must also identify the resources that will be needed for implementation and must realistically evaluate where
the resources will be obtained and at what expense. Relevant questions include the following:
• Where will the CMMs be located?
• How much space is required?
• Will the CMMs require a separate room or enclosure, or will they operate on the shop floor?
• Will they require isolation pads or special air bearings?

• Are compressed air, electrical service, and so on, of sufficient quality and readily available?
Environmental concerns must also be carefully analyzed. The following factors must be considered:
• What environment will best suit the CMM?
• Where are the sources of thermal energy that may interfere with CMM operation?
• What sources of vibration are present, and how can the CMM be shielded from them?
• Are dirt, oil, grit, and so on, present in the atmosphere, and how will the CMM be shielded from them?
Ongoing Operations. Answers to the above questions will provide insight and guidance regarding the obstacles that
must be overcome for successful implementation as well as the factors that will affect ongoing operations. For example, a
hostile environment may lead the user to consider enclosing the CMM in a separate room. However, this will also slow
the measuring process compared to a CMM located on the shop floor, because parts will have to soak until they reach
thermal equilibrium with the CMM.
In writing the parts programs that guide the measurement routines, the user must determine the information needed and
the best way to obtain it. The following question are relevant:
• What features of the part are critical?
• How many measurements must be taken?
• What probes will be required?
Training of CMM Personnel. Another essential area often overlooked at great expense to the success of CMM
utilization is training. This aspect of CMM implementation involves the following considerations:
• What personnel will be utilized to operate CMMs?
• How many will be trained?
• For how long?
• How, when, and where will they be trained?
Experience has shown that personnel with inspection backgrounds tend to make the best CMM operators. If they happen
to have an interest in computers, so much the better. It is often more difficult to teach inspection principles to individuals
with a computer background than vice versa. Regardless of the personnel selected, it is essential that operator training be
given full attention and made an integral part of the implementation plan.
Machine Vision and Robotic Inspection Systems
John D. Meyer, Tech Tran Consultants, Inc.
Introduction
MACHINE VISION emerged as an important new technique for industrial inspection and quality control in the early
1980s. When properly applied, machine vision can provide accurate and inexpensive 100% inspection of workpieces, thus
dramatically increasing product quality. Machine vision is also increasing in use as an in-process gaging tool for
controlling the process and correcting trends that could lead to the production of defective parts. Consequently,
manufacturers in a variety of industries have investigated this important new technology, regardless of the products being
manufactured. As shown in Fig. 1, the automotive and electronics industries combined have purchased nearly 60% of the
2500 machine vision systems installed in 1984.
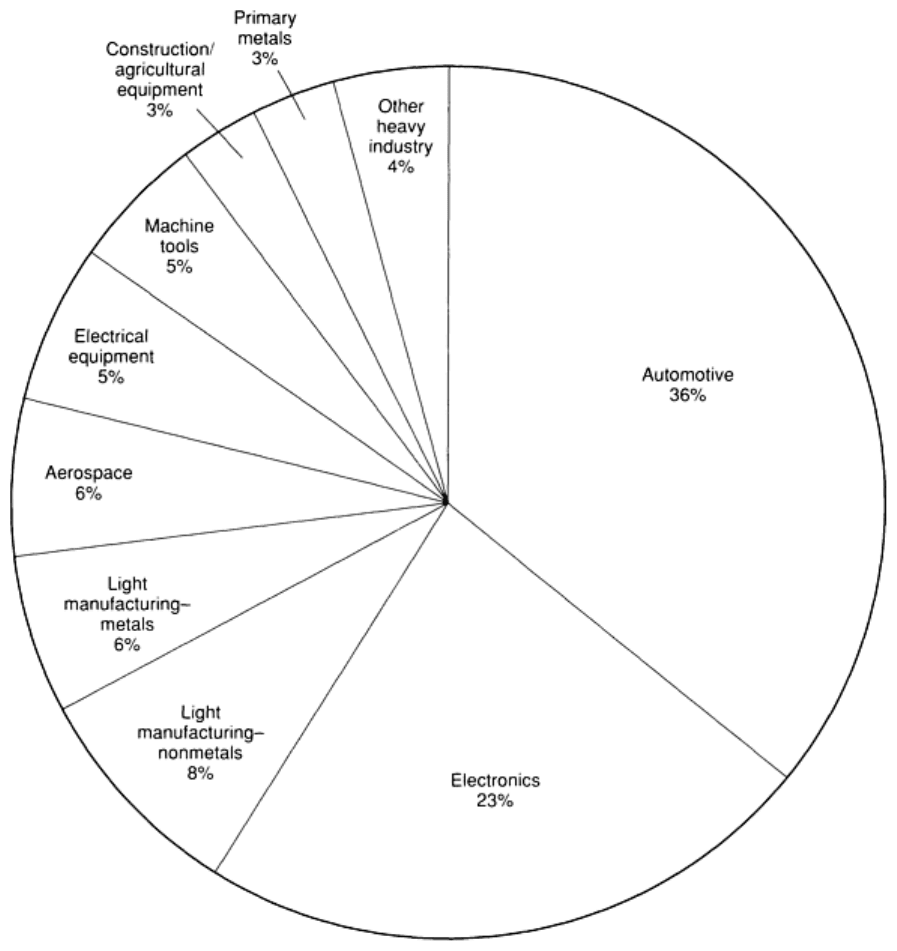
Fig. 1
Breakdown of machine vision systems market by industry in 1984. Based on annual sales at 2500 units.
Source: Ref 1 (Tech Tran Consultants, Inc.)
Machine vision, sometimes referred to as computer vision or intelligent vision, is a means of simulating the image
recognition and analysis capabilities of the human eye/brain system with electronic and electromechanical techniques. A
machine vision system senses information about an image and analyzes this information to make a useful decision about
its content; in much the same way, the eye acts as the body's image sensor, with the brain analyzing this information and
taking action based on the analysis.
Therefore, a machine vision system includes both visual-sensing and interpretive capabilities. An image-sensing device,
such as a vidicon camera or a charge-coupled device (CCD) image sensor, is nothing more than a visual sensor that
receives light through its lens and converts this light into electrical signals. When a data-processing device, such as a
microcomputer, is used, these electrical signals can be refined and analyzed to provide an interpretation of the scene that
generated the signals. This information can then be used as a basis for taking an appropriate course of action. The entire
process of image formation, analysis, and decision making is referred to as machine vision.

This ability to acquire an image, analyze it, and then make an appropriate decision is extremely useful in inspection and
quality control applications. It enables machine vision to be used for a variety of functions, including:
• Identification of shapes
• Measurement of distances and ranges
• Gaging of sizes and dimensions
• Determining orientation of parts
• Quantifying motion
• Detecting surface shading
These functional capabilities, in turn, allow users to employ machine vision systems for cost-effective and reliable 100%
inspection of workpieces.
The analogy of human eye/brain system is helpful in understanding machine vision, but the human eye/brain system is
extremely complex and operates in ways and at data rates much different from those of commercial machine vision
systems. Humans are more flexible and often faster than machine vision systems. On the other hand, machine vision
systems provide capabilities not achievable by humans, particularly with respect to consistency and reliability. Table 1
compares human and machine vision capabilities, and Table 2 evaluates the performance of each. In addition, machine
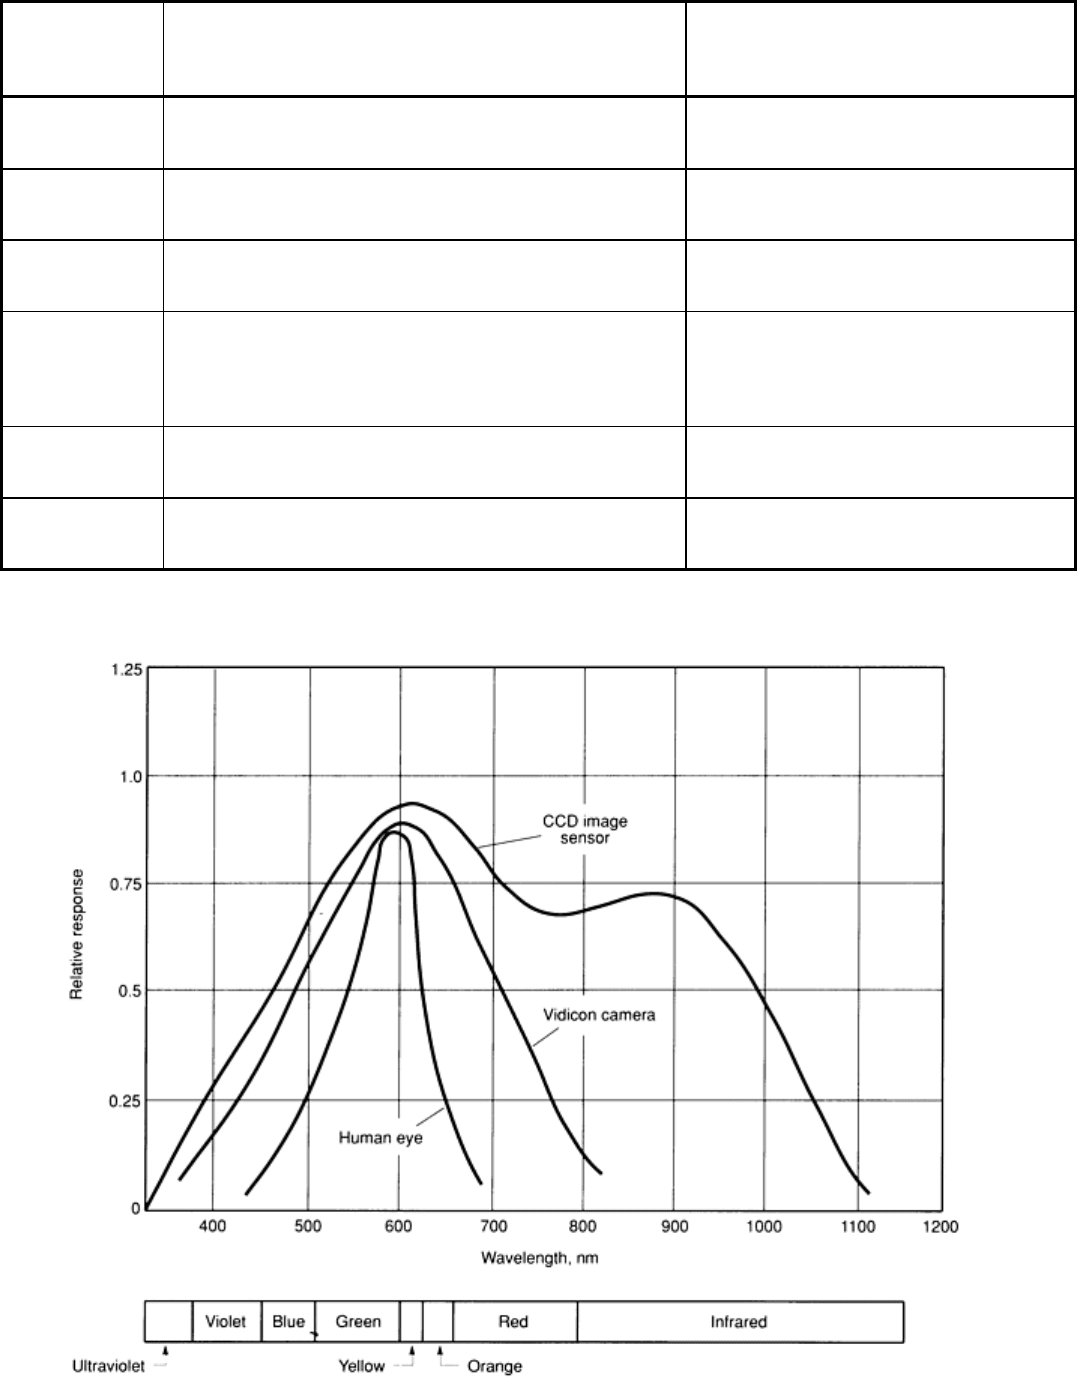
vision systems can detect wavelengths in the ultraviolet and infrared ranges, while the human eye is limited to
wavelengths in the visible range (Fig. 2).
Table 1 Comparison of machine and human vision capabilities
Capabilities Machine vision
Human vision
Distance Limited capabilities
Good qualitative capabilities
Orientation Good for two dimensions
Good qualitative capabilities
Motion Limited; sensitive to image blurring
Good qualitative capabilities
Edges/regions High-contrast image required
Highly developed
Image shapes Good quantitative measurements
Qualitative only
Image organization Special software needed; limited capability
Highly developed
Surface shading Limited capability with gray scale
Highly developed
Two-dimensional
interpretation
Excellent for well-defined features
Highly developed
Three-dimensional
interpretation
Very limited capabilities
Highly developed
Overall
Best for quantitative measurement of
structured scene
Best for qualitative interpretation of complex,
unstructured scene
Source: Ref 1 (Tech Tran Consultants, Inc.)
Table 2 Evaluation of machine and human vision capabilities
Performance
criteria
Machine vision
Human vision
Resolution Limited by pixel array size
High resolution capability
Processing speed Fraction of a second per image
Real-time processing
Discrimination Limited to high-contrast images
Very sensitive discrimination
Accuracy Accurate for part discrimination based on quantitative
differences; accuracy remains consistent at high production
volume.
Accurate at distinguishing qualitative
differences; may decrease at high volume
Operating cost High for low volume; lower than human vision at high volume
Lower than machine at low volume
Overall
Best at high production volume Best at low or moderate production volume
Source: Ref 1 (Tech Tran Consultants, Inc.)

Fig. 2 Spectral response of the human eye, vidicon camera, and CCD image sensor. Source: Ref 2
As indicated in Tables 1 and 2, neither machine vision nor human vision is clearly superior in all applications. Human
vision is better for the low-speed, qualitative interpretation of complex, unstructured scenes. An example in which human
vision is superior to machine vision is the inspection of automobile body surfaces for paint quality. Human vision can
easily and quickly detect major flaws, such as paint sagging, scratches, or unpainted areas, but this same task would be
much more difficult and time consuming with machine vision techniques.
Machine vision, on the other hand, is better suited to the high-speed measurement of quantitative attributes in a structured
environment. Thus, machine vision is very good at inspecting the masks used in the production of microelectronic devices
and at measuring basic dimensions for machined workpieces, for example. Machine vision can not only perform these
types of inspection better than humans but can do so reliably, without the fatigue and the errors that confront humans
doing these types of repeated inspection tasks.
Machine vision also has several additional important characteristics. First, it is a noncontacting measurement technique.
This is particularly important if the workpiece is fragile or distorts during contact or if the workpiece would be
contaminated or damaged if it were touched. Second, machine vision can be very accurate. Although accuracy is a
function of many variables, including camera resolution, lens quality, field of view, and workpiece size, machine vision
systems are often used to make measurements with an accuracy of ±3 m (±120 in.) or better. Third, machine vision
can perform these functions at relatively large standoff distances--up to 1 m (3 ft) or more in some applications. Finally,
these capabilities can be provided at relatively low cost. The price of a machine vision system may range from $5000 to
$500,000, depending on the specific application and the capabilities of the system, but the typical price is less than
$50,000. Collectively, these characteristics of machine vision provide the user with a capability that, for many
applications, cannot be matched by human vision or other sensor or inspection technologies.
References
1.
"Machine Vision Systems: A Summary and forecast," 2nd ed., Tech Tran Consultants, Inc., 1985
2.
P. Dunbar, Machine Vision, Byte, Jan 1986
Machine Vision and Robotic Inspection Systems
John D. Meyer, Tech Tran Consultants, Inc.
Machine Vision Process
To understand the capabilities and limitations of machine vision, it is useful to examine how a machine vision system
operates. Figure 3(a) shows the key components of a machine vision system, and Fig. 3(b) illustrates the process.
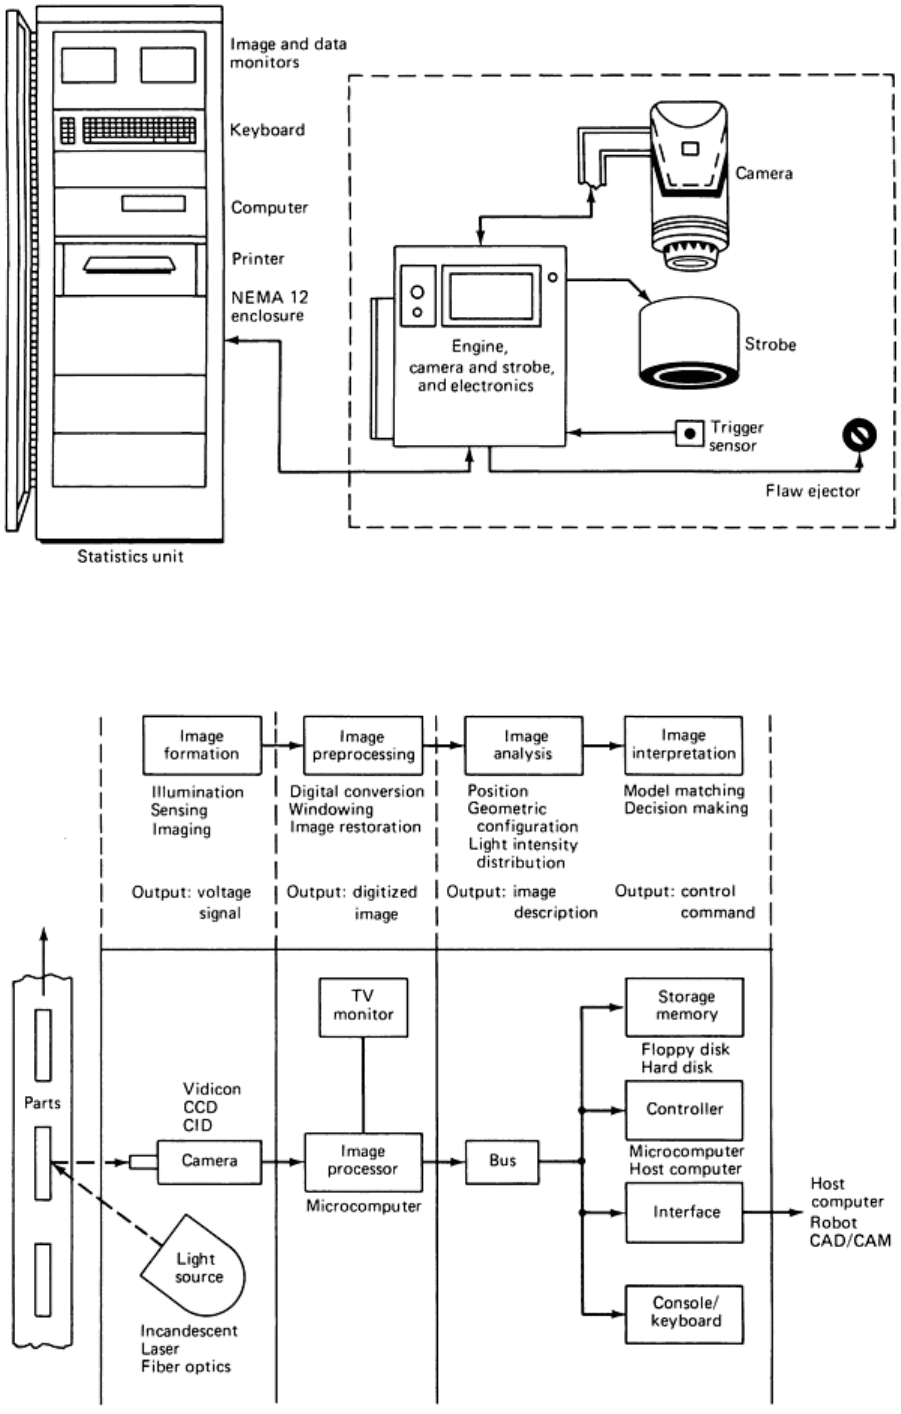
Fig. 3(a) Schematic illustrating the key components of a machine vision system.
