ASM Metals HandBook Vol. 17 - Nondestructive Evaluation and Quality Control
Подождите немного. Документ загружается.


Surface only but independent of size
Visual
Replica
Digital enhancement
Liquid penetrant
Shallow depth or thin object (thickness 1 mm, or 0.04 in.)
Magnetic particle
Magnetic field
Magabsorption
Eddy current
Increased thickness (thickness 3 mm, or 0.12 in.)
Microwave
Optical holography
Speckle metrology
Acoustic holography
Acoustic microscopy
Increased thickness (thickness 100 mm, or 4 in.)
X-ray computed tomography
Increased thickness (thickness 250 mm, or 10 in.)
Neutron radiography
(a)
X-ray radiography
Thickest (dimension 10 m, or 33 ft)
Ultrasonic
(a)
All NDE methods suitable for thick objects can be used on thin objects, except neutron radiography, which is not useful for most thin objects.
Table 5 Comparison of NDE techniques based on shape of object to be evaluated
Simplest shape
Optical holography
Acoustic holography
Acoustic microscopy
Thermography
Microwave
Eddy current
Magnetic particle
Magnetic field
Magabsorption
Neutron radiography
X-ray radiography
Ultrasonic
Liquid penetrant

Digital enhancement
Replica
Visual
X-ray computed tomography
Most complex shape
The characteristics of the material that may affect NDE method selection are highly dependent on the specific NDE
method under consideration. Table 6 lists a number of NDE methods and the characteristic of critical importance for each.
Table 6 NDE methods and their important material characteristics
Method Characteristic
Liquid penetrant Flaw must intercept surface.
Magnetic particle Material must be magnetic.
Eddy current Material must be electrically conductive or magnetic.
Microwave Microwave transmission
Radiography and x-ray computed tomography
Changes in thickness, density, and/or elemental composition
Neutron radiography Changes in thickness, density, and/or elemental composition
Optical holography Surface optical properties
The specific NDE method can be selected by applying all the previously discussed factors. Because each NDE method
has a specific behavior, it is often desirable to select several NDE methods having complementary detection capabilities.
For example, ultrasonic and radiographic methods can be used together to ensure the detection of both planar flaws (such
as cracks) and volumetric flaws (such as porosity).
Guide to Nondestructive Evaluation Techniques
John D. Wood, Lehigh University
Leak Detection and Evaluation
Because many objects must withstand pressure, the nondestructive determination of leakage is extremely important. The
NDE area known as leak detection utilizes many techniques, as described in the article "Leak Testing" in this Volume.
Each technique has a specific range of applications, and a particular leak detection technique should be selected only after
careful consideration of the factors discussed in the article "Leak Testing".
Guide to Nondestructive Evaluation Techniques
John D. Wood, Lehigh University

Metrology and Evaluation
The measurement of dimensions, referred to as metrology, is one of the most widely used NDE activities, although it is
often not considered with other conventional NDE activities, such as flaw detection. Although conventional metrology is
not specifically discussed in this Volume, modern high-technology metrology is covered in the articles "Laser
Inspection," "Coordinate Measuring Machines," and "Machine Vision and Robotic Evaluation."
The selection of a metrology system is highly dependent on the specific requirements of a given application. Standard
reference works on the topic should be consulted for conventional metrology, and the articles "Laser Inspection,"
"Coordinate Measuring Machines," and "Machine Vision and Robotic Evaluation." should be studied for selecting new
technology. In addition, other NDE methods, such as eddy current, ultrasonic, optical holography, and speckle metrology,
often find application in the field of metrology. Selection of these methods for metrology application can be assisted by
the information in the articles "Eddy Current Inspection," "Ultrasonic Inspection," "Optical Holography," and "Speckle
Metrology" in this Volume.
Guide to Nondestructive Evaluation Techniques
John D. Wood, Lehigh University
Location Determination and Evaluation
An occasional problem is whether an assembled unit (one that contains several parts) actually contains the necessary
components. This type of inspection has resulted in an NDE activity that can be termed location determination. The most
commonly employed NDE techniques for location determination are x-ray radiography, x-ray computed tomography, and
neutron radiography. These techniques and their selection are discussed in separate articles in this Volume.
Guide to Nondestructive Evaluation Techniques
John D. Wood, Lehigh University
Structure or Microstructure Characterization
Another interesting area of NDE is microstructural characterization, which can be done in situ without damaging the
object by using replication microscopy (discussed in the article "Replication Microscopy Techniques for NDE" in this
Volume) or by using conventional optical microscopy techniques with portable equipment, including polishing, etching,
and microscopic equipment. In addition, it is possible to characterize the microstructure through the correlation with some
type of NDE information. For example, the transmission of ultrasonic energy has been correlated with the microstructure
of gray cast iron.
Microstructure can often be characterized by determining physical or mechanical properties with NDE techniques
because there is usually a correlation among microstructure, properties, and NDE response. Characterizing microstructure
from NDE responses is a relatively recent area of NDE application, and new developments are occurring frequently.
Guide to Nondestructive Evaluation Techniques
John D. Wood, Lehigh University

Estimation of Mechanical and Physical Properties
As discussed previously, the prediction of mechanical and physical properties with NDE techniques is a relatively new
application of NDE. Eddy current, ultrasonic, x-ray and neutron radiography, computed tomography, thermography, and
acoustic microscopy phenomena are affected by microstructure, which can be related to some mechanical or physical
properties. In addition, microwave NDE can be related to the properties of plastic materials. Several technical meetings
are held each year to discuss advances in NDE, and these meetings often feature session on characterizing microstructure
and mechanical and physical properties with NDE techniques. Some of the meetings are listed below:
• Annual Review (every spring), Center for Nondestructive Evaluation, The Johns Hopkins University
•
Annual Review of Progress in Quantitative NDE (every summer), The Center for NDE, Iowa State
University
• Symposium on Nondestructive Evaluation (every other spring), Nondestructive Testing Inform
ation
Center, Southwest Research Institute
• Spring and Fall Meetings, American Society for Nondestructive Testing
Guide to Nondestructive Evaluation Techniques
John D. Wood, Lehigh University
Stress/Strain and Dynamic Response Determination
The local strain at a specific location in an object under a specific set of loading conditions can be determined by using
strain sensing methods such as photoelastic coatings, brittle coatings, or strain gages. These methods are discussed in the
article "Strain Measurement for Stress Analysis" in this Volume. If the stress-strain behavior of the material is known,
these strain values can be converted into stress values.
A number of methods have also been developed for measuring residual stresses in materials. These include x-ray
diffraction, ultrasonics, and electromagnetics. Surface residual stresses can be measured by x-rays as described in the
article "X-Ray Diffraction Residual Stress Techniques" in Materials Characterization, Volume 10 of ASM Handbook,
formerly 9th Edition Metals Handbook. Practical application of ultrasonic techniques for characterizing residual stresses
have not yet materialized. A number of electromagnetic techniques have, however, been successfully used as described in
the articles "Electromagnetic Techniques for Residual Stress Measurements" and "Magabsorption NDE" in this Volume.
Dynamic behavior of an object can be evaluated during real or simulated service by employing strain sensing technology
while the object is being dynamically loaded. In addition, accelerometers and acoustic transducers can be used to
determine the dynamic response of a structure while it is being loaded. This dynamic response is called a signature and
evaluation of this signature is called signature analysis. The nature of this signature can be correlated with many causes,
such as machine noise, vibrations, and structural instability (buckling or cracking).
Replication Microscopy Techniques for NDE
A.R. Marder, Energy Research Center, Lehigh University
Introduction
SURFACE REPLICATION is a well-developed electron microscopy sample preparation technique that can be used to
conduct in situ measurements of the microstructure of components. The in situ determination of microstructural
deterioration and damage of materials subjected to various environments is an objective of any nondestructive evaluation

(NDE) of structural components. The need to assess the condition of power plant and petrochemical metallic components
on a large scale recently led to the application of surface replication to the problem of determining remaining life. The
usual method of metallographic investigation, which may involve cutting large pieces from the component so that
laboratory preparation and examination can be performed, usually renders the component unfit for service or necessitates
a costly repair. As a result, metallographic investigations are avoided, and important microstructural information is not
available for evaluating the component for satisfactory performance. Therefore, an in situ or field microscopy
examination is needed to aid in the proper determination of component life.
The replica technique for the examination of surfaces has been extensively used for studying the structure of polished-
and-etched specimens and for electron fractographic examination (see the article "Transmission Electron Microscopy" in
Fractography, Volume 12 of ASM Handbook, formerly 9th Edition Metals Handbook for a discussion of replication
techniques in fractography). Surface replication was the predominant technique in electron microscopy prior to being
supplemented by thin-foil transmission and scanning electron microscopy. Recently, the replication microscopy technique
has become an important NDE method for microstructural analysis, and an American Society for Testing and Materials
specification has been written for its implementation (Ref 1).
Acknowledgements
The author would like to acknowledge the contributions of his colleagues A.O. Benscoter, S.D. Holt, and T.S. Hahn in the
preparation of this article.
Reference
1.
"Standard Practice for Production and Evaluation of Field Metallographic Replicas," E 512-87,
Annual Book
of ASTM Standards, American Society for Testing and Materials
Replication Microscopy Techniques for NDE
A.R. Marder, Energy Research Center, Lehigh University
Specimen Preparation
Mechanical Polishing Methods. Components in service usually have a well-developed corrosion or oxidation
product or a decarburized layer on the surface that must be removed before replication. Coarse-grinding equipment can be
used as long as the proper precautions are taken to prevent the introduction of artifacts into the structure due to
overheating or plastic deformation. Sandblasting, wire wheels, flap wheels, and abrasive disks have all been used. After
the initial preparation steps are completed, standard mechanical polishing techniques can be used. Field equipment is
commercially available to help the metallographer reproduce the preparation steps normally followed in the laboratory.
Depending on the material, various silicon carbide abrasive disks of different grit size, together with polishing cloth disks
with diamond paste or alumina of varying grit size, can be used to prepare for the etching step. Finally, any appropriate
etchant for the material being examined can be applied to develop the microstructure. For the proper identification of such
microstructural features as creep cavities, a maximum double or triple etch-polish-etch procedure should be used (Ref 2).
The etchants used for the various materials investigated by the replication technique are described in Metallography and
Microstructures, Volume 9 of ASM Handbook, formerly 9th Edition Metals Handbook and in Ref 3.
Electrolytic Preparation Technique. Although electrolytic polishing and etching techniques have often been
employed as the final mechanical polish step in sample preparation, inherent problems still exist in this process. The
electropolishing technique uses an electrolytic reaction to remove material to produce a scratch-free surface. This is done
by making the specimen the anode in an electrolytic cell. The cathode is connected to the anode through the electrolyte in
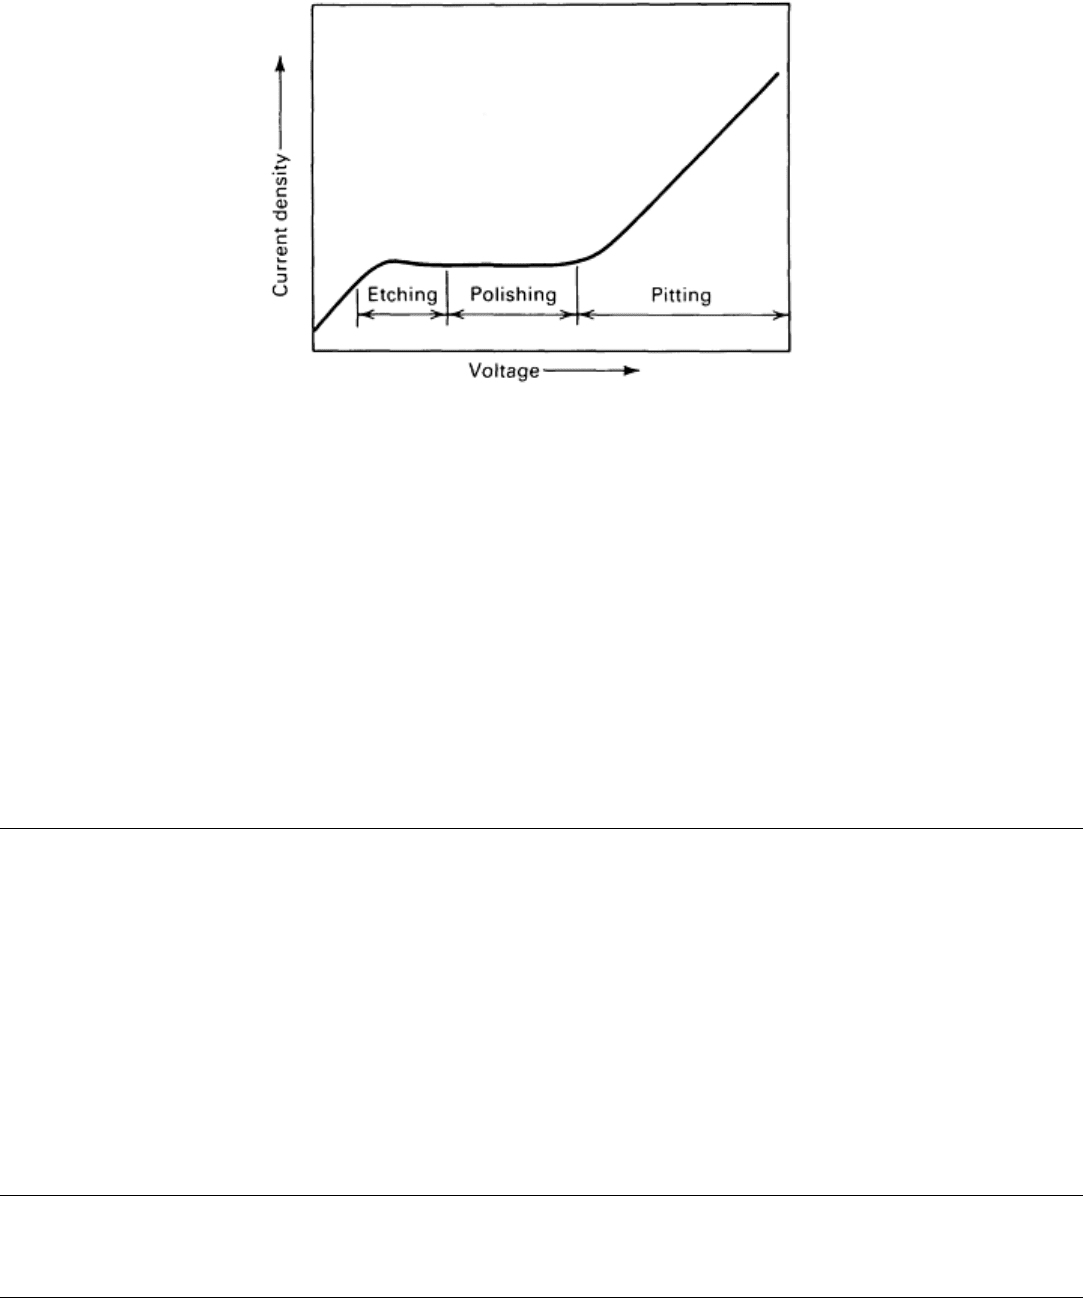
the cell. Specimens can be either polished or etched, depending on the applied voltage and current density, as seen in the
fundamental electropolishing curve in Fig. 1. However, the pitting region must be avoided so that artifacts are not
introduced into the microstructure. It is virtually impossible to prevent pitting without precise control of the polishing
variables, and pits can often be mistakenly identified as creep voids.

Fig. 1 Current density-voltage curve for electropolishing
Several portable electropolishing units are commercially available. The most important variables (time, bath temperature,
electrolyte composition, and the current density-voltage relationship) have been investigated for a selected group of
electrolytes (Ref 4). A direct comparison of electropolishing units and the precautions necessary for handling certain
electrolytes are given in Ref 5.
It should be noted that there are areas in both fossil and nuclear plants in which neither acid etches nor electropolishing
methods and materials are allowed because of the potential for intergranular stress-corrosion cracking. Stainless steel
piping in nuclear plants can be replicated to determine defects by manual polishing without etchants. Generator retaining
rings have been replicated by manual polishing to resolve NDE indications, because they are extremely sensitive to stress-
corrosion cracking and no acids or caustics are allowed to be used (Ref 6).
References cited in this section
2.
A.M. Bissel, B.J. Cane, and J.F. DeLong, "Remanent Life Assessment of Seam
Welded Pipework," Paper
presented at the ASME Pressure Vessel and Piping Conference, American Society of Mechanical Engineers,
June 1988
3.
G.F. Vander Voort, Metallography: Principles and Practice, McGraw-Hill, 1984
4.
T.S. Hahn and A.R. Marder, Effect of Electropolishing Variables on the Current Density--
Voltage
Relationship, Metallography, Vol 21, 1988, p 365
5.
M. Clark and A. Cervoni, "In Situ Metallographic Examination of Ferrous and Non-
Ferrous Components,"
Canadian Electrical Association, Nov 1985
6.
J.F. DeLong, private communication
Replication Microscopy Techniques for NDE
A.R. Marder, Energy Research Center, Lehigh University
Replication Techniques

Replication techniques can be classified as either surface replication or extraction replication. Surface replicas provided
an image of the surface topography of a specimen, while extraction replicas lift particles from the specimen. The
advantages and disadvantages of some typical replication techniques are given in Table 1.
Table 1 Comparison of replica techniques
Type Advantages
Disadvantages
Surface replicas
Acetate Excellent resolution
Coating required
Acrylic Direct viewing
Adhesion
Rubber Easy removal
Resolution
Extraction replicas
Direct stripped plastic
Easy preparation
Particle retention
Positive carbon Excellent particle retention with two-stage etching
Coating required
Direct carbon Excellent resolution Not applicable to in situ studies
Surface Replicas. Replication of a surface can involve either direct or indirect methods. In the direct, or single-stage,
method, a replica is made of the specimen surface and subsequently examined in the microscope, while in the indirect
method, the final replica is taken from an earlier primary replica of the specimen surface. Only the direct method will be
considered in this article because it lends itself more favorably to on-site preparation. The most extensively used direct
methods involve plastic, carbon, or oxide replica material. All direct methods except plastic methods are destructive and
therefore require further preparation of the specimen before making additional replicas.
Plastic replicas lend themselves to in-plant nondestructive examination because of their relative simplicity and short
preparation time. Plastic replicas can be examined with the light optical microscope, the scanning electron microscope,
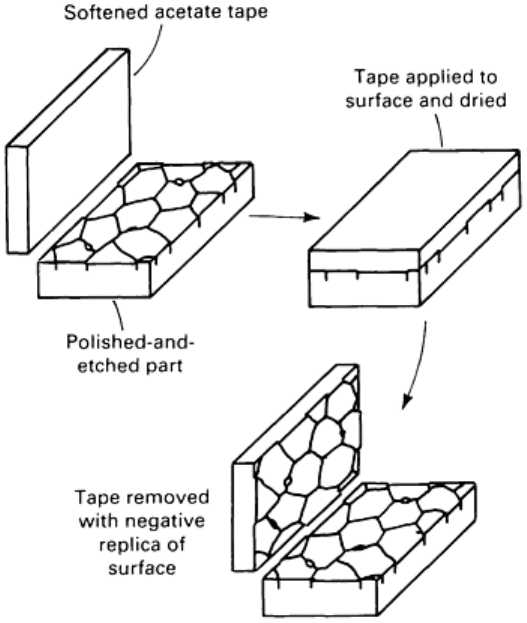
and the transmission electron microscope, depending on the resolution required. As illustrated in Fig. 2, the plastic replica
technique involves softening a plastic film in a solvent, applying it to the surface, and then allowing it to harden as the
solvent evaporates. After careful removal from the surface, the plastic film contains a negative image, or replica, of the
microstructure that can be directly examined in the light microscope or, after some preparation, in the electron
microscope. Double-faced tape is used to bond the replica to the glass slide in order to obtain large, flat, undistorted
replica surfaces.

Fig. 2 Schematic of the plastic replica technique
There are some significant advantages of the replica technique over the use of portable microscopes in the field (Ref 5):
• A permanent record of the specimen is obtained
• Better resolution and higher magnification can be used
• Contamination of the polished surface is minimized
• Time spent in an unpleasant or hazardous environment is minimized
• Scanning electron microscopy can be utilized
Several materials, including acetate, acrylic resin, and rubber, can be used in the surface replica technique (Ref 5). The
choice of material depends on the geometry of the component and the microstructural features to be examined.
In the acetate method, an acetate tape is wetted with acetone and applied to the surface; other less volatile solvents, such
as methyl acetate, can be used when large areas are replicated. For improved resolution, the back side of the replica can
be painted with any fast-drying black paint or ink prior to removal, or for the same effect, evaporated coatings of carbon,
aluminum, or gold can be applied at a shadow angle of 45° to the front side of the replica after removal.
In the acrylic casting resin method, dams are required because a powder is mixed with a liquid on the surface to be
replicated. After hardening, the replica can be examined directly in an optical microscope without further processing. If
adhesion is a problem, a composite replica can be made of an initial layer of Parlodian lacquer before the acrylic layer is
applied.
In the dental impression rubber method, uncured liquid rubber material (for example, GE RTV60 silicon rubber
compound) is poured onto the surface to be replicated and is contained by a dam. After removal, the replica can be
examined directly or can be coated for better resolution.

Extraction Replicas. Several different extraction replica techniques can be used to characterize small particles that are
embedded in a matrix, such as small second-phase particles in a steel (see the article "Analytical Transmission Electron
Microscopy" in Materials Characterization, Volume 10 of ASM Handbook, formerly 9th Edition Metals Handbook).
More detailed descriptions of the various extraction replica techniques can be found in Ref 7 and 8.
After careful preparation of the surface using normal polishing methods, the first step in producing an extraction replica is
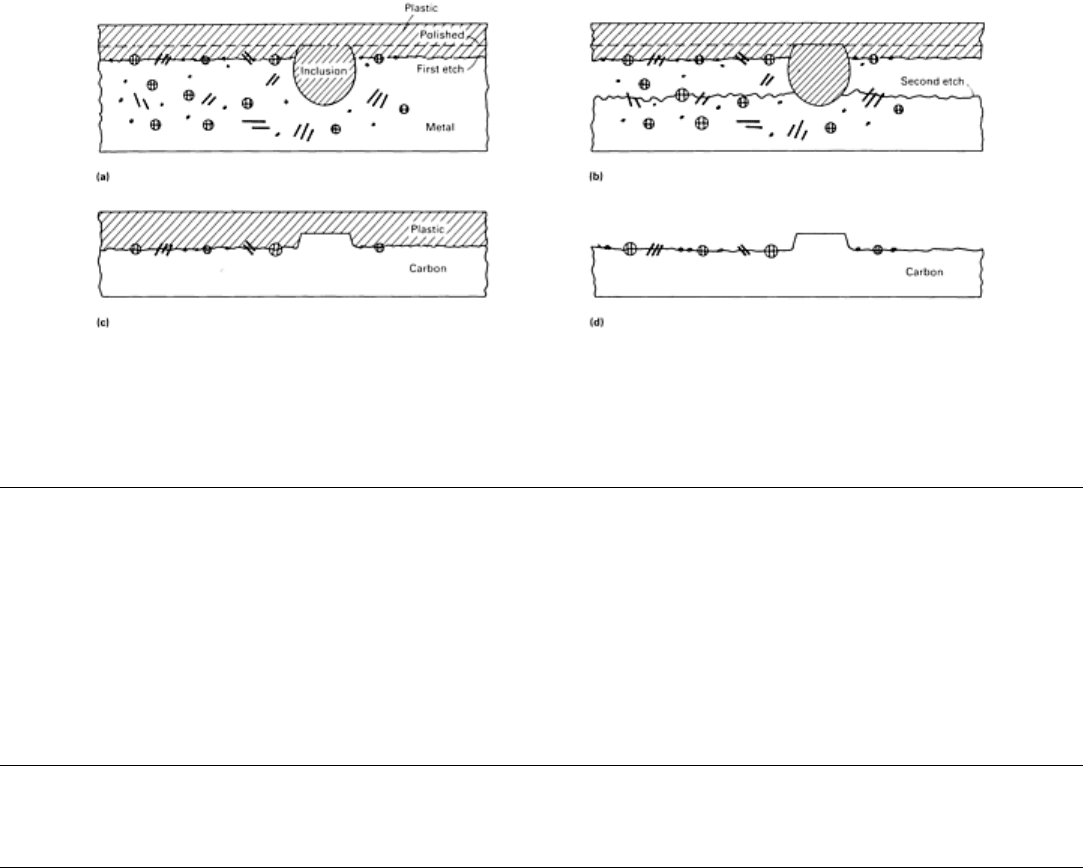
to etch the alloy heavily to leave the particles of interest in relief. In the positive carbon extraction replica, as shown in
Fig. 3, a piece of solvent-softened polymeric film (cellulose acetate tape) is pressed onto the surface exposed by this first
etch (Ref 5). Once the solvent has evaporated, one of two steps can be taken. The tape can be carefully pulled from the
specimen to produce a negative of the surface, or the specimen can undergo a second etch to free the particles exposed by
the first etch (Fig. 3). In the second etch, the specimen can be etched through the plastic; most plastics are quite
permeable to etching solutions, and the specimen etches almost as rapidly as without the plastic film (Ref 9). Carbon is
then evaporated in a vacuum onto the plastic replica. The carbon and plastic containing the particles now make up the
positive replica. The cellulose acetate is then dissolved, and the positive carbon replica is allowed to dry. It should be
noted that for the negative carbon extraction replica technique, vacuum deposition of carbon onto the surface of the
specimen is required, and therefore this replica method is not applicable to NDE.
Fig. 3 Positive carbon extraction replication steps. (a) Pl
acement of plastic after the first etch. (b) After the
second etch. (c) After the deposition of carbon. (d) The positive replica after the plastic is dissolved
References cited in this section
5.
M. Clark and A. Cervoni, "In Situ Metallographic Examination of Ferrous and Non-
Ferrous Components,"
Canadian Electrical Association, Nov 1985
7.
D. Kay, Ed., Techniques for Electron Microscopy, Blackwell Scientific Publications, 1965
8.
J.W. Edington, Practical Electron Microscopy in Materials Science, Van Nostrand Rheinhold, 1976
9.
G.N. Maniar and A. Szirmae, in Manual of Electron Metallography Techniques,
STP 547, American Society
for Testing and Materials, 1973
Replication Microscopy Techniques for NDE
A.R. Marder, Energy Research Center, Lehigh University
Microstructural Analysis
Crack determination is important to help establish the root cause of a potential failure in a component. After a
preliminary evaluation of the crack to assess crack shape and length by using magnetic flux or dye penetrant, the replica

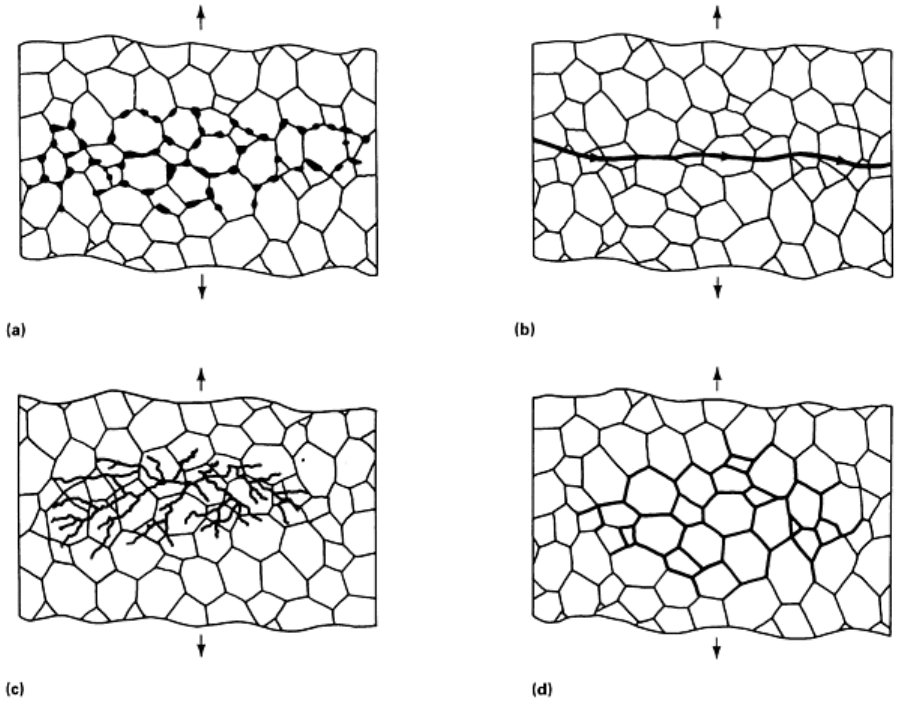
method is then used on unetched specimens to assist in the crack evaluation. Figure 4 schematically shows the
propagation of different types of cracks in a steel structure (Ref 10). Each crack has its own characteristics, and it is often
possible to make a correct determination of crack type. It is important to determine whether the crack is the original defect
or has been caused by service conditions or damage. Once the crack type is identified, the proper corrective action, such
as eliminating a corrosive environment or reducing stress levels, can be attempted. Figure 5 shows the replication of
surface cracks in a boiler tube.
Fig. 4 Propagation of different crack types. (a) Creep. (b) Fatigue. (c) Stress corrosion. (d
) Intergranular
corrosion
