ASM Metals HandBook Vol. 17 - Nondestructive Evaluation and Quality Control
Подождите немного. Документ загружается.

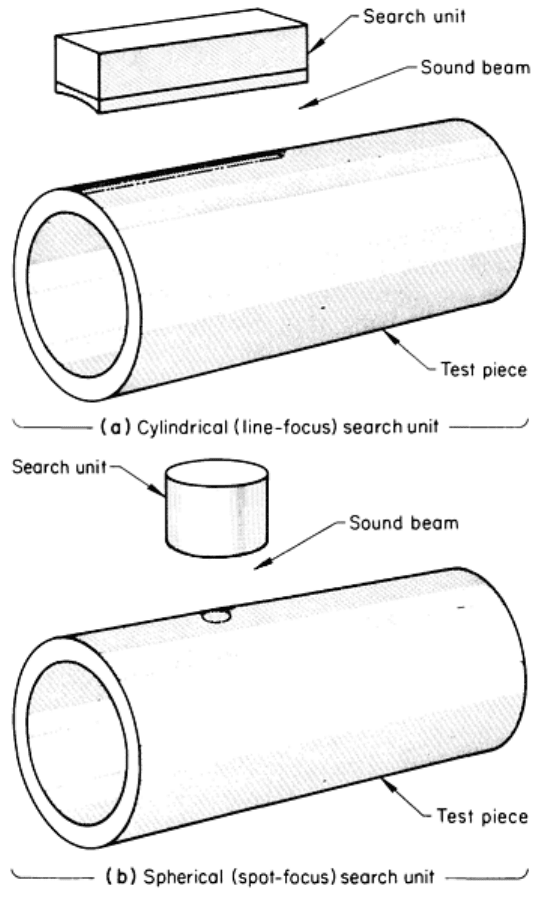
Fig. 39 Two types of focused search units, and the sound beam shapes produced
Focusing can also be achieved by shaping the transducer element. The front surface of a quartz crystal can be ground to a
cylindrical or spherical radius. Barium titanate can be formed into a curved shape before it is polarized. A small
piezoelectric element can be mounted on a curved backing member to achieve the same result.
Focal Length. Focused transducers are described by their focal length, that is, short, medium, long, or extralong. Short
focal lengths are best for the inspection of regions of the testpiece that are close to the front surface. The medium, long,
and extralong focal lengths are for increasingly deeper regions. Frequently, focused transducers are specially designed for
a specific application. The longer the focal length of the transducer, the deeper into the testpiece the point of high
sensitivity will be.
The focal length of a lens in water has little relation to its focal depth in metal, and changing the length of the water path
in immersion inspection produces little change in focal depth in a testpiece. The large differences in sonic velocity
between water and metals cause sound to bend at a sharp angle when entering a metal surface at any oblique angle.
Therefore, the metal surface acts as a second lens that is much more powerful than the acoustic lens at the transducer, as
shown in Fig. 40. This effect moves the focal spot very close to the front surface, as compared to the focal point of the
same sound beam in water. This effect also causes the transducer to act as a notably directional and distance-sensitive
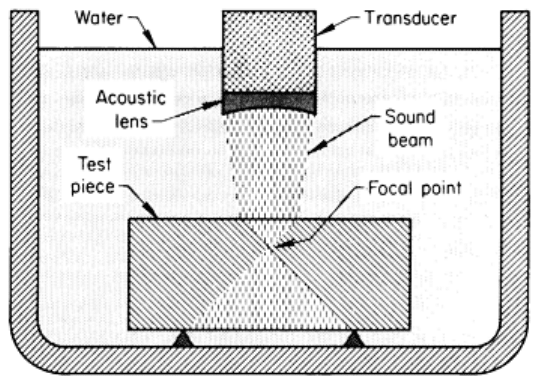
receiver, sharpens the beam, and increases sensitivity to small reflectors in the focal zone. Thus, flaws that produce very
low amplitude echoes can be examined in greater detail than is possible with standard search units.
Fig. 40 Effect of a metal surface on the convergence of a focused sound beam. See text for discussion.
Useful Range. The most useful portion of a sound beam starts at the point of maximum sound intensity (end of the near
field) and extends for a considerable distance beyond this point. Focusing the sound beam moves the maximum-intensity
point toward the transducer and shortens the usable range beyond.
The useful range of focused transducers extends from about 0.25 to approximately 250 mm (0.010 to 10 in.) below the
front surface. In materials 0.25 (0.010 in.) or less in thickness, resonance or antiresonance techniques can be used. These
techniques are based on changes in the duration of ringing of the echo, or the number of multiples of the back-surface
echo.
The advantages of focused search units are listed below; these advantages apply mainly to the useful thickness range
of 0.25 to 250 mm (0.010 to 10 in.) below the front surface:
• High sensitivity to small flaws
• High resolving power
• Low effects of surface roughness
• Low effects of front-surface contour
• Low metal noise (background)
The echo-masking effects of surface roughness and metal noise can be reduced by concentrating the energy into a smaller
beam. The side lobe energy produced by a flat transducer is reflected away by a smooth surface. When the surface is
rough, some of the side lobe energy returns to the transducer and widens the front reflection, causing loss of resolving
power and increasing the length of the dead zone. The use of a focusing lens on a transducer will reduce the side lobe
energy, thus reducing the effects of rough surfaces. The limitation of focused search units is the small region in the test
part in the area of sound focusing that can be effectively interrogated.
Noise. Material noise (background) consists of low-amplitude, random signals from numerous small reflectors
irregularly distributed throughout the testpiece. Some of the causes of metal noise are grain boundaries, microporosity,
and segregations. The larger the sound beam area, the greater the number of small reflectors encountered by the beam. If
echoes from several of these small reflectors have the same transit time, they may produce an indication amplitude that
exceeds the acceptance level. Focused beams reduce background by reducing the volume of metal inspected, which
reduces the probability that the sound beam will encounter several small reflectors at the same depth. Echoes from
discontinuities of unacceptable size are not affected and will rise well above the remaining background.
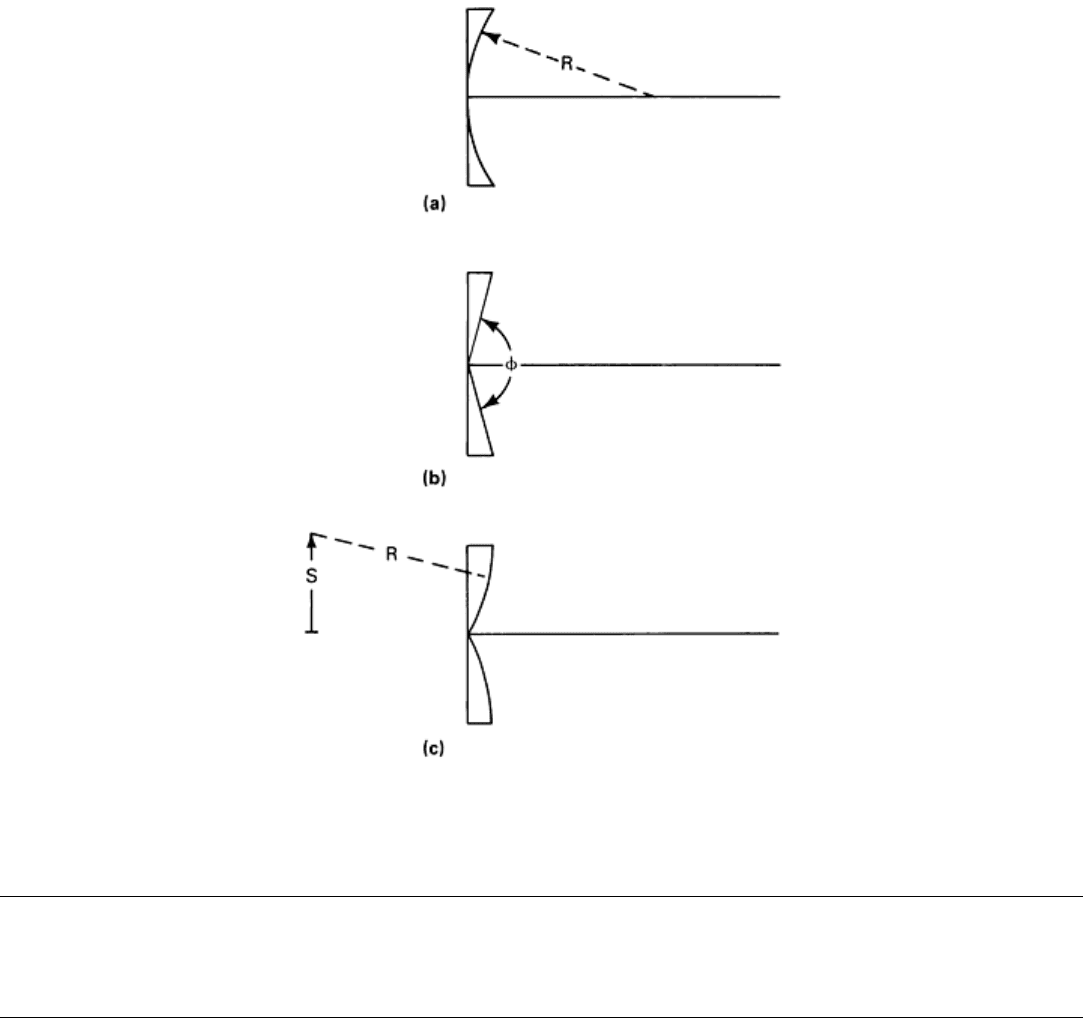
Focused search units allow the highest possible resolving power to be achieved with standard ultrasonic equipment. When
a focused search unit is used, the front surface of the testpiece is not in the focal zone, and concentration of sound beam
energy makes the echo amplitude from any flaw very large. The resolving power of any system can be greatly improved
by using a focused transducer designed specifically for the application and a defined region within the testpiece. Special
configurations consist of spherical, conical, and toroidal apertures (Fig. 41) with improvements in beam width and depth
of field.
Fig. 41 Aperture geometries for transducer focusing. (a) Spherical. (b) Conical. (c) Toroidal
Ultrasonic Inspection
Revised by Yoseph Bar-Cohen, Douglas Aircraft Company, McDonnell Douglas Corporation; Ajit K. Mal, University of California, Los
Angeles; and the ASM Committee on Ultrasonic Inspection
*
Scanning Equipment
Scanning of testpieces is accomplished by the use of a search unit connected to the ultrasonic instrument by a suitable
coaxial cable. During scanning, the search unit is continuously moved over the surface of the testpiece, often in a
predetermined search pattern.
Scanning can be done without immersion (contact inspection), provided there is a suitable couplant covering the entire
area to be scanned. For example, computerized C-scan systems can be built as a portable system with a hand-held
transducer. Although portable C-scan systems are still in their infancy, their impact on in-service inspection is increasing.
Some applications of portable ultrasonic imaging systems are discussed in Ref 8. For testpieces of appropriate size and
shape, immersion scanning is widely used. Tanks of various designs and shapes have been built for the immersion of
specific testpieces. In addition, standard units (often referred to as universal units or installations) and computerized
motion control are available. Computerized systems are capable of following contours at high speed and thus overcoming
one of the major limitations of ultrasonics, namely, the need to maintain normal incidence of the ultrasonic beam to
ensure the highest defect detection sensitivity.
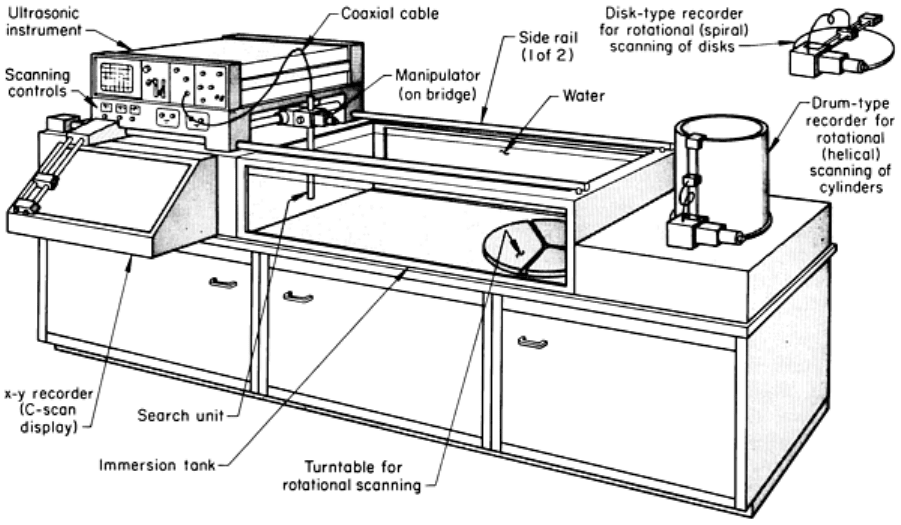
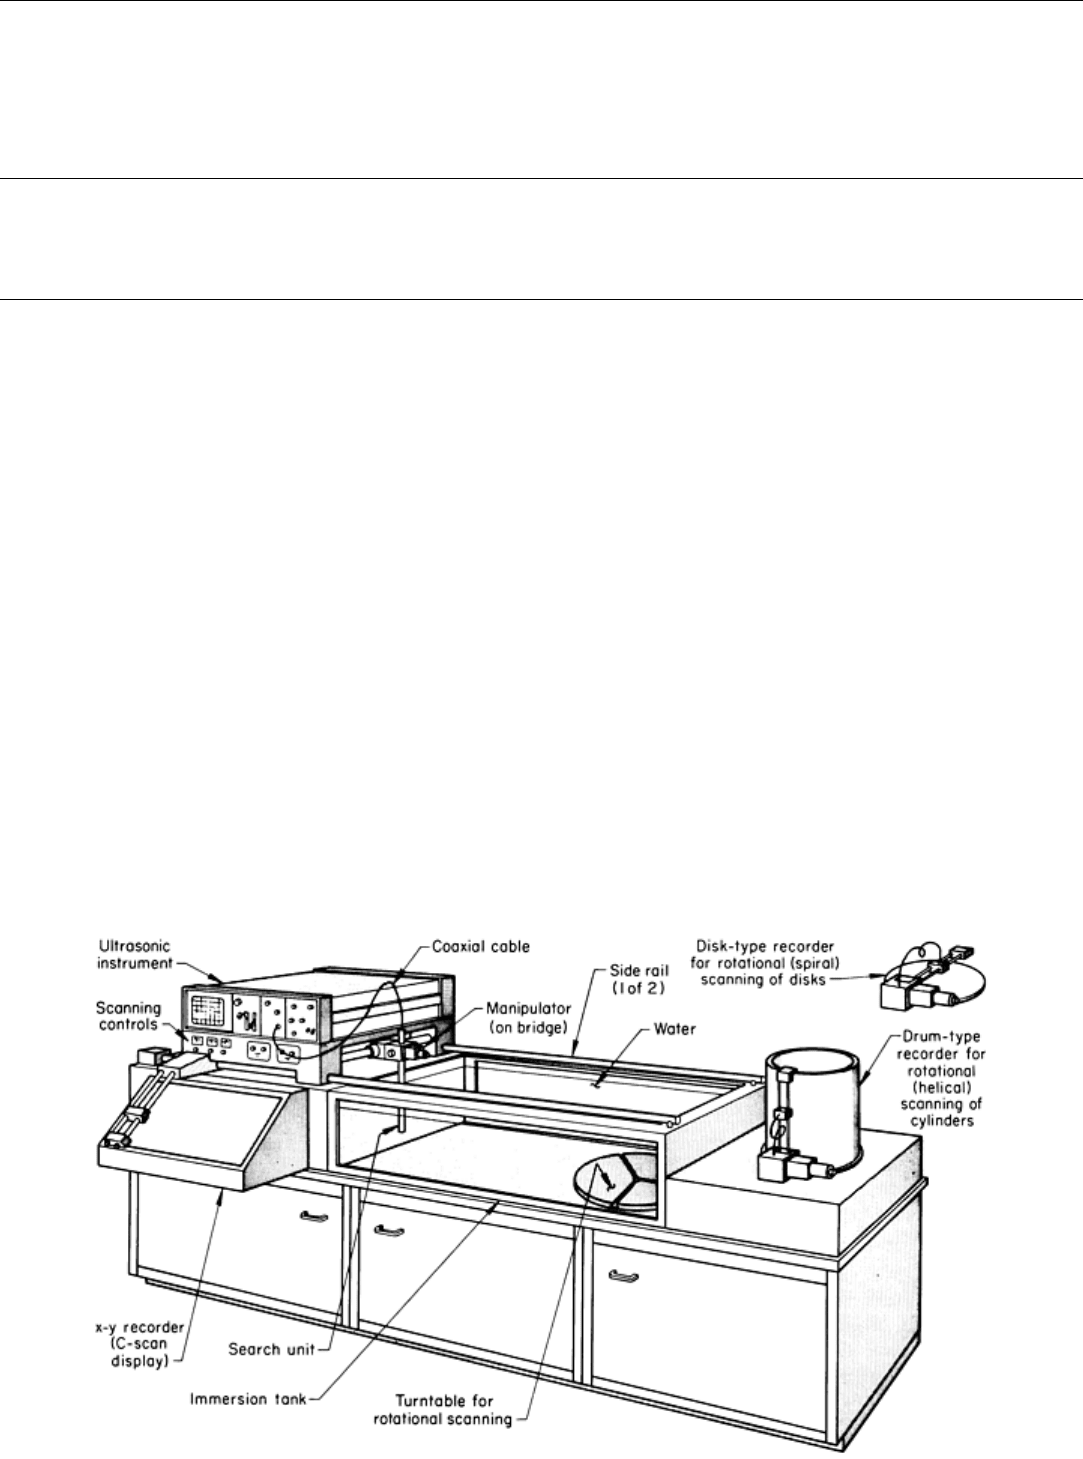
Most universal units consist of a bridge and manipulator that support and position a pulse-echo inspection system over a
large water tank, as shown in Fig. 42. Drive mechanisms move the bridge along the side rails of the tank while traversing
mechanisms move the manipulator from side to side along the bridge. Most of these units are automated, although some
early units were manually operated.
Fig. 42
Principal components of a universal unit for the immersion scanning of testpieces of various shapes and
sizes. See text for discussion.
Adjustable brackets and lazy-susan turntables can be provided on the tank bottom for support of testpieces. Clean,
deaerated water containing a wetting agent usually covers a testpiece by a foot or more, providing excellent coupling
between search unit and testpiece. For operator comfort, water temperature is usually kept at about 21 °C (70 °F), often
by automatic control.
The immersion-scanning unit shown in Fig. 42 represents a high degree of versatility in its capability to accommodate
testpieces of various sizes and shapes and to scan using various search patterns. The entire instrument cabinet and search
unit can be moved longitudinally on side rails along the length of the tank. Also, the search unit is suspended from a
manipulator mounted on a bridge, thus enabling it to be moved from side to side. These movements of the search unit are
most appropriate for scanning rectangular flat testpieces.
The universal unit illustrated in Fig. 42 can also be used for scanning testpieces of various circular shapes. For example, a
round disklike workpiece can be placed on the turntable (shown at right end of tank) and rotated while the search unit is
moved radially outward, thus producing a spiral scanning pattern. The spiral pattern is displayed on a disk-type recorder.
A cylindrical testpiece can be scanned in a helical pattern, with a drum-type recorder being used to display the data.
Accessory equipment is also available for scanning long cylinders in a horizontal position.
Reference cited in this section
8.
R.H. Grills and M.C. Tsao, Nondestructive Testing With Portable Ultrasonic Imaging System, in
Corrosion
Monitoring in Industrial Plants Using Nondestructive Testing and Electromechanical Methods,
STP 908,
American Society for Testing and Materials, 1987, p 89-101
Ultrasonic Inspection
Revised by Yoseph Bar-Cohen, Douglas Aircraft Company, McDonnell Douglas Corporation; Ajit K. Mal, University of California, Los
Angeles; and the ASM Committee on Ultrasonic Inspection
*
Scanning Equipment
Scanning of testpieces is accomplished by the use of a search unit connected to the ultrasonic instrument by a suitable
coaxial cable. During scanning, the search unit is continuously moved over the surface of the testpiece, often in a
predetermined search pattern.
Scanning can be done without immersion (contact inspection), provided there is a suitable couplant covering the entire
area to be scanned. For example, computerized C-scan systems can be built as a portable system with a hand-held
transducer. Although portable C-scan systems are still in their infancy, their impact on in-service inspection is increasing.
Some applications of portable ultrasonic imaging systems are discussed in Ref 8. For testpieces of appropriate size and
shape, immersion scanning is widely used. Tanks of various designs and shapes have been built for the immersion of
specific testpieces. In addition, standard units (often referred to as universal units or installations) and computerized
motion control are available. Computerized systems are capable of following contours at high speed and thus overcoming
one of the major limitations of ultrasonics, namely, the need to maintain normal incidence of the ultrasonic beam to
ensure the highest defect detection sensitivity.
Most universal units consist of a bridge and manipulator that support and position a pulse-echo inspection system over a
large water tank, as shown in Fig. 42. Drive mechanisms move the bridge along the side rails of the tank while traversing
mechanisms move the manipulator from side to side along the bridge. Most of these units are automated, although some
early units were manually operated.

Fig. 42
Principal components of a universal unit for the immersion scanning of testpieces of various shapes and
sizes. See text for discussion.
Adjustable brackets and lazy-susan turntables can be provided on the tank bottom for support of testpieces. Clean,
deaerated water containing a wetting agent usually covers a testpiece by a foot or more, providing excellent coupling
between search unit and testpiece. For operator comfort, water temperature is usually kept at about 21 °C (70 °F), often
by automatic control.
The immersion-scanning unit shown in Fig. 42 represents a high degree of versatility in its capability to accommodate
testpieces of various sizes and shapes and to scan using various search patterns. The entire instrument cabinet and search
unit can be moved longitudinally on side rails along the length of the tank. Also, the search unit is suspended from a
manipulator mounted on a bridge, thus enabling it to be moved from side to side. These movements of the search unit are
most appropriate for scanning rectangular flat testpieces.
The universal unit illustrated in Fig. 42 can also be used for scanning testpieces of various circular shapes. For example, a
round disklike workpiece can be placed on the turntable (shown at right end of tank) and rotated while the search unit is
moved radially outward, thus producing a spiral scanning pattern. The spiral pattern is displayed on a disk-type recorder.
A cylindrical testpiece can be scanned in a helical pattern, with a drum-type recorder being used to display the data.
Accessory equipment is also available for scanning long cylinders in a horizontal position.
Reference cited in this section
8.
R.H. Grills and M.C. Tsao, Nondestructive Testing With Portable Ultrasonic Imaging System, in
Corrosion
Monitoring in Industrial Plants Using Nondestructive Testing and Electromechanical Methods,
STP 908,
American Society for Testing and Materials, 1987, p 89-101
Ultrasonic Inspection
Revised by Yoseph Bar-Cohen, Douglas Aircraft Company, McDonnell Douglas Corporation; Ajit K. Mal, University of California, Los
Angeles; and the ASM Committee on Ultrasonic Inspection
*
Inspection Standards
The standardization of ultrasonic inspection allows the same test procedure to be conducted at various times and
locations, and by both customer and supplier, with reasonable assurance that consistent results will be obtained.
Standardization also provides a basis for estimating the sizes of any flaws that are found.
An ultrasonic inspection system includes several controls that can be adjusted to display as much information as is needed
on the oscilloscope screen or other display device. If the pulse length and sensitivity controls (or their equivalents) are
adjusted to a high setting, numerous indications may appear on an A-scan display between the front-surface and back-
surface indications. On the other hand, at a low setting, the trace between front-surface and back-surface indications may
show no indications even if flaws of prohibited size are present. Inspection or reference standards are used as a guide for
adjusting instrument controls to reveal the presence of flaws that may be considered harmful to the end use of the product
and for determining which indications come from flaws that are insignificant, so that needless reworking or scrapping of
satisfactory parts is avoided.
The inspection or reference standards for pulse-echo testing include test blocks containing natural flaws, test blocks
containing artificial flaws, and the technique of evaluating the percentage of back reflection. Inspection standards for
thickness testing can be plates of various known thicknesses or can be stepped or tapered wedges.
Test blocks containing natural flaws are metal sections similar to those parts being inspected. Sections known to
contain natural flaws can be selected for test blocks.
Test blocks containing natural flaws have only limited use as standards, for two principal reasons:
•
It is difficult to obtain several test blocks that give identical responses. Natural flaws vary in shape,
surface characteristics, and orientation, and echoes from natural flaws vary accordingly
•
It is often impossible to determine the exact nature of a natural flaw existing in the test block without
destructive sectioning
Test blocks containing artificial flaws consist of metal sections containing notches, slots, or drilled holes. These
test blocks are more widely accepted as standards than are test blocks that contain natural flaws.
Test blocks containing drilled holes are widely used for longitudinal wave, straight-beam inspection. The hole in the
block can be positioned so that ultrasonic energy from the search unit is reflected either from the side of the hole or from
the bottom of the hole. The flat-bottom hole is used most because the flat bottom of the hole offers an optimum reflecting
surface that is reproducible. A conical-bottom hole, such as is obtained with conventional drills, is undesirable, because a
large portion of the reflected energy may never reach the search unit. Differences of 50% or more can easily be
encountered between the energy reflected back to the search unit from flat-bottom holes and from conical-bottom holes of
the same diameter. The difference is a function of both transducer frequency and distance from search unit to hole bottom.
Figure 43(a) shows a typical design for a test block that contains a flat-bottom hole. In using such a block, high-frequency
sound is directed from the surface called "entry surface" toward the bottom of the hole, and the reflection from it is used
either as a standard to compare with signal responses from flaws or as a reference value for setting the controls of the
ultrasonic instrument.
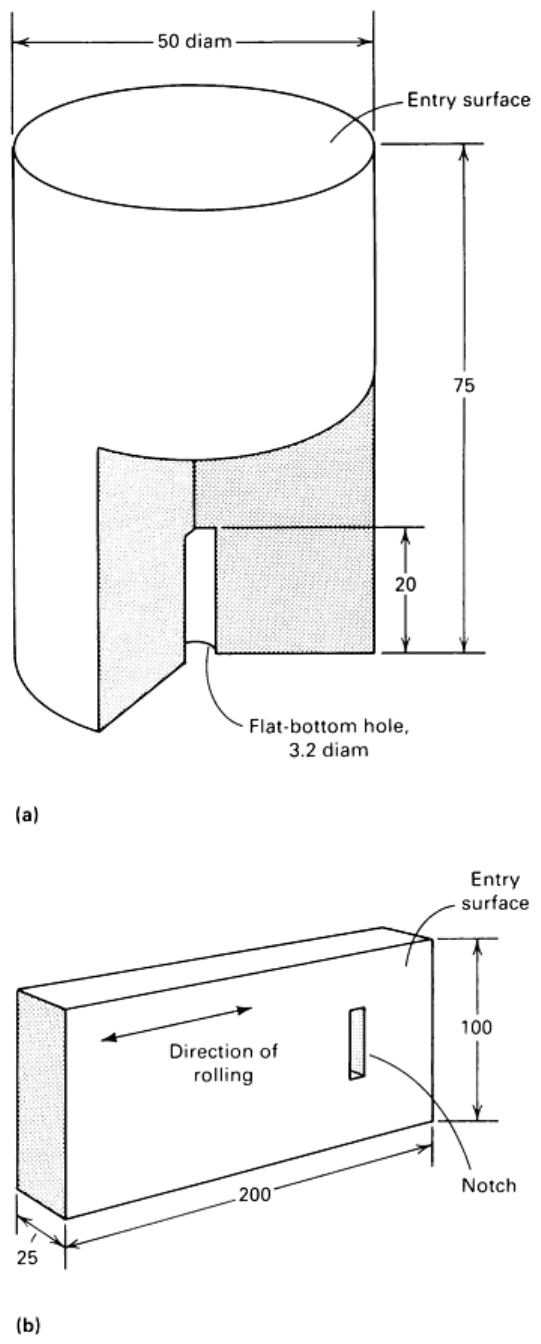
Fig. 43
Typical designs of test blocks that are used as reference standards in the detection of flaws by
ultrasonic inspection. (a) Test block for straight-beam inspection. (b) Test block for angle-
beam inspection.
Dimensions given in millimeters
In the inspection of sheet, strip, welds, tubing, and pipe, angle-beam inspection can be used. This type of inspection
generally requires a reference standard in the form of a block that has a notch (or more than one notch) machined into the
block. The sides of the notch can be straight and at right angles to the surface of the test block, or they can be at an angle
(for example, a 60° included angle). The width, length, and depth of the notch are usually defined by the applicable
specification. The depth is usually expressed as a percentage of testpiece thickness. Figure 43(b) shows a typical design
for a test block for the angle-beam inspection of plate.
In some cases, it may be necessary to make one of the parts under inspection into a test block by adding artificial
discontinuities, such as flat-bottom holes or notches. These artificial discontinuities can sometimes be placed so that they
will be removed by subsequent machining.
When used to determine the operating characteristics of the instruments and transducers or to establish reproducible test
conditions, a test block is called a calibration block. When used to compare the height or location of the echo from a
discontinuity in a part to that from an artificial discontinuity in the test block, the block is called a reference block. The
same physical block, or blocks, can be used for both purposes. Blocks whose dimensions have been established and
sanctioned by any of the various groups concerned with materials-testing standards are called standard reference blocks.
Reference blocks establish a standard of comparison so that echo intensities can be evaluated in terms of flaw size.
Numerous factors that affect the ultrasonic test can make exact quantitative determination of flaw size extremely difficult,
if not impossible. One factor is the nature of the reflecting surface. Although a flat-bottom hole in a reference block has
been chosen because it offers an optimum reflecting surface and is reproducible, natural flaws can be of diverse shape and
offer nonuniform reflecting surfaces. The origin of a flaw and the amount and type of working that the product has
received will influence the shape of the flaw. For example, a pore in an ingot might be spherical and therefore scatter
most of the sound away from the search unit, reflecting back only a small amount to produce a flaw echo. However, when
worked by forging or rolling, a pore usually becomes elongated and flat and therefore reflects more sound back to the
search unit.
On the screen, the height of the echo indication from a hole varies with the distance of the hole from the front (entry)
surface in a predictable manner based on near-field and far-field effects, depending on the test frequency and search-unit
size, as long as the grain size of the material is not large. Where grain size is large, this normal variation can be altered.
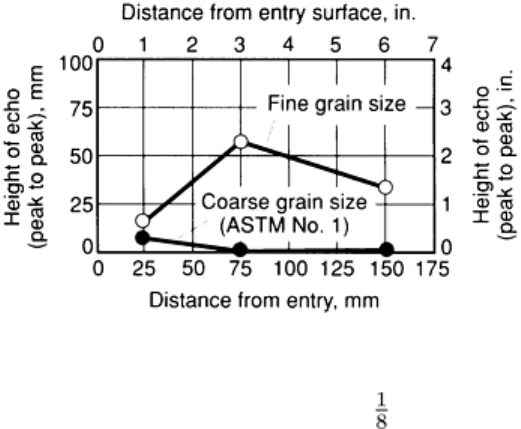
Figure 44 shows the differences in ultrasonic transmissibility that can be encountered in reference blocks of a material
with two different grain sizes. It can be seen in Fig. 44 that for the austenitic stainless steel inspected, increasing the grain
size affected the curve of indication height versus distance from the entry surface so that the normal increase in height
with distance in the near field did not occur. This was caused by rapid attenuation of ultrasound in the large-grain
stainless steel. In some cases where the grain size is quite large, it may not even be possible to obtain a back reflection at
normal test frequencies.
Fig. 44 Distance-
amplitude curves for type 304 stainless steel showing effect of grain size on ultrasonic
transmissibility. Tests were conducted at 5 MHz with a 30 mm (1
in.) diam search unit on three reference
blocks having various metal distances to 20 mm ( in.) deep, 3 mm ( in.) diam, flat-bottom holes.
In the inspection of aluminum, a single set of reference blocks can be used for most parts regardless of alloy or wrought
mill product. This is considered acceptable practice because ultrasonic transmissibility is about the same for all aluminum
alloy compositions. For ferrous alloys, however, ultrasonic transmissibility can vary considerably with composition.
Consequently, a single set of reference blocks cannot be used when inspecting various products made of carbon steels,
stainless steels, tool steels, low-alloy steels, and high-temperature alloys. For example, if a reference block prepared from
fine-grain steel were used to set the level of test sensitivity and the material being inspected were coarse grained, flaws
could be quite large before they would yield an indication equal to that obtained from the bottom of the hole in the
reference block. Conversely, if a reference block prepared from coarse-grain steel were used when inspecting fine-grain
steel, the instrument could be so sensitive that minor discontinuities would appear to be major flaws. Thermal treatment
can also have an appreciable effect on the ultrasonic transmissibility of steel. For this reason, the stage in the fabrication
process at which the ultrasonic inspection is performed may be important. In some cases, it may determine whether or not
a satisfactory ultrasonic inspection can be performed.
Reference blocks are generally used to adjust the controls of the ultrasonic instrument to a level that will detect flaws
having amplitudes above a certain predetermined level. It is usual practice to set instrument controls to display a certain
amplitude of indication from the bottom of the hole or from the notch in a reference block and to record and evaluate for
accept/reject indications exceeding that amplitude, depending on the codes or applicable standards. The diameter of the
reference hole and the number of flaw indications permitted are generally related to performance requirements for the part
and are specified in the applicable codes or specifications.
The following should be considered when setting controls for inspection:
• The larger the section or testpiece, the greater the likelihood of encountering flaws of a particular size
•
Flaws of a damaging size may be permitted if found to be in an area that will be subsequently removed
by machining or that is not critical
•
It is generally recognized that the size of the flaw whose echo exceeds the rejection level usually is not
the same as the diameter of the reference hole. In a reference block, sound is reflected from a nearly
perfect flat surfa
ce represented by the bottom of the hole. In contrast, natural flaws are usually neither
flat nor perfectly reflecting
•
The material being inspected may conduct sound differently from the material of the reference block.
Normally, a reference block will be made from material of the same general type as that being inspected
•
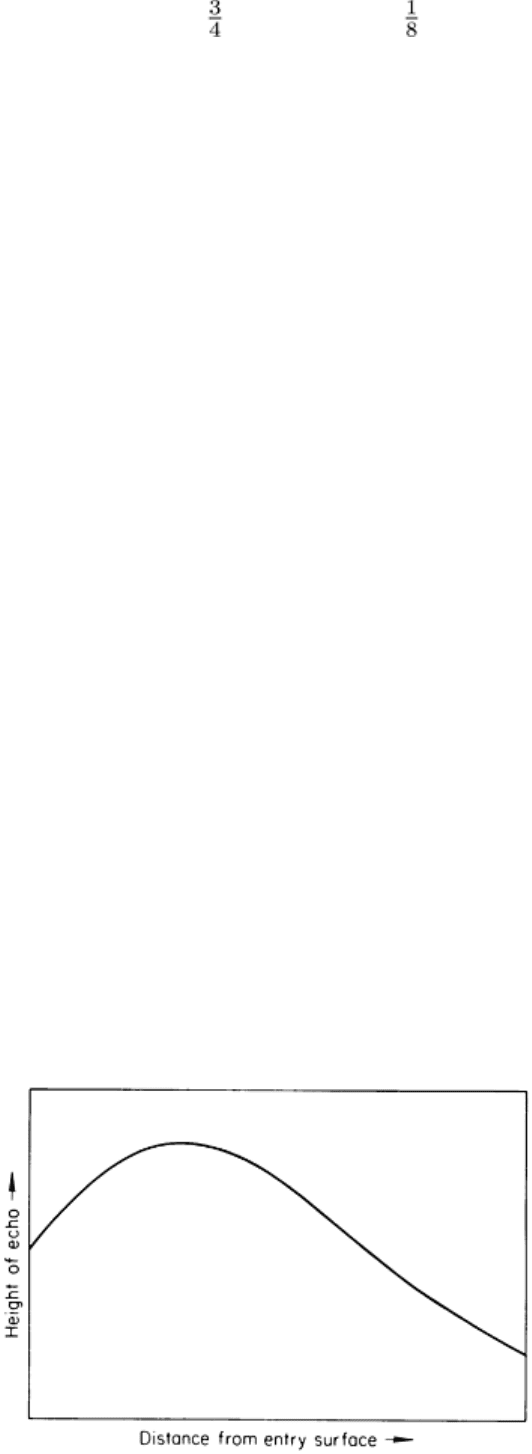
The depth of a flaw from the entry surface will influence the height of its echo that is displayed on the
oscilloscope screen. Figure 45
shows the manner in which echo height normally varies with flaw depth.
Test blocks of several lengths are used to establish a reference curve for the distance-amplitud
e
correction of inspection data
