ASM Metals HandBook Vol. 17 - Nondestructive Evaluation and Quality Control
Подождите немного. Документ загружается.


Fig. 45 Effect of distance (depth) of flaws of equal size from the entry surface of a testpi
ece on the echo height
of ultrasonic indications
Percentage of Back Reflection. As an alternative to reference blocks, an internal standard can be used. In this
technique, the search unit is placed over an indication-free area of the part being inspected, the instrument controls are
adjusted to obtain a predetermined height of the first back reflection, and the part is evaluated on the basis of the presence
or absence of indications that equal or exceed a certain percentage of this predetermined amplitude. This technique,
known as the percentage of back reflection technique, is most useful when lot-to-lot variations in ultrasonic
transmissibility are large or unpredictable--a condition often encountered in the inspection of steels.
The size of a flaw that produces a rejectable indication will depend on grain size, depth of the flaw below the entry
surface, and test frequency. When acceptance or rejection is based on indications that equal or exceed a specified
percentage of the back reflection, rejectable indications may be caused by smaller flaws in coarse-grain steel than in fine-
grain steel. This effect becomes less pronounced, or is reversed, as the transducer frequency and corresponding sensitivity
necessary to obtain a predetermined height of back reflection are lowered. Flaw evaluation may be difficult when the
testpiece grain size is large or mixed.
Generally, metallurgical structure such as grain size has an effect on ultrasonic transmissibility for all metals. The
significantly large effect shown in Fig. 44 for type 304 stainless steel is also encountered in other materials. The
magnitude of the effect is frequency dependent, that is, the higher the test frequency, the greater the attenuation of
ultrasound. In any event, when the grain size approaches ASTM No. 1, the effect is significant regardless of alloy
composition or test frequency.
Other techniques are used besides the reference block technique and the percentage of back reflection technique. For
example, in the inspection of stainless steel plate, a procedure can be used in which the search unit is moved over the
rolled surface, and the display on the screen is observed to determine whether or not an area of defined size is
encountered where complete loss of back reflection occurs with or without the presence of a discrete flaw indication. If
such an area is encountered, the plate is rejected unless the loss of back reflection can be attributed to surface condition or
large grain size.
Another technique that does not rely on test blocks is to thoroughly inspect one or more randomly chosen sample parts for
natural flaws by the method to be used on production material. The size and location of any flaws that are detected by
ultrasonic testing are confirmed by sectioning the part. The combined results of ultrasonic and destructive studies are used
to develop standards for instrument calibration and to define the acceptance level for production material.
Thickness Blocks. Stepped or tapered test blocks are used to calibrate ultrasonic equipment for thickness measurement.
These blocks are carefully ground from material similar to that being inspected, and the exact thickness at various
positions is marked on the block. Either type of block can be used as a reference standard for resonance inspection; the
stepped block can also be used for transit-time inspection.
Ultrasonic Inspection
Revised by Yoseph Bar-Cohen, Douglas Aircraft Company, McDonnell Douglas Corporation; Ajit K. Mal, University of California, Los
Angeles; and the ASM Committee on Ultrasonic Inspection
*
Standard Reference Blocks
Many of the standards and specifications for ultrasonic inspection require the use of standard reference blocks, which can
be prepared from various alloys, may contain holes, slots, or notches of several sizes, and may be of different sizes or
shapes. The characteristics of an ultrasonic beam in a testpiece are affected by the following variables, which should be
considered when selecting standard reference blocks:
• Nature of the testpiece
• Alloy type
• Grain size
• Effects of thermal or mechanical processing
• Distance-amplitude effects (attenuation)
• Flaw size
• Direction of the ultrasonic beam
Information regarding standard reference blocks is available in ASTM E 127 (see also the "Selected References" at the
end of this article). Three types of standard blocks are ordinarily used for calibration or reference: area-amplitude blocks,
distance-amplitude blocks, and blocks of the type sanctioned by the International Institute of Welding (IIW). These
blocks must be prepared from material having the same or similar alloy content, heat treatment, and amount of hot or cold
working as the material to be inspected to ensure equal sonic velocity, attenuation, and acoustic impedance in both the
reference standard and the testpiece. If blocks of identical material are not available, the difference between the material
in the testpiece and the material used in the standard reference blocks must be determined experimentally.
Area-amplitude blocks provide artificial flaws of different sizes at the same depth. Eight blocks made from the same
50 mm (2 in.) diam round stock, each 95 mm (3 in.) high, constitute a set of area-amplitude blocks. The block material
must have the same acoustic properties as the testpiece material. Each block has a 20 mm ( in.) deep flat-bottom hole
drilled in the center of the bottom surface (Fig. 46); the hole diameters vary from 0.4 to 3.2 mm ( to in.). The
blocks are numbered to correspond with the diameter of the holes; that is, block No. 1 has a 0.4 mm ( in.) diam hole,
No. 2 has a 0.8 mm ( in.) diam hole, and so on, up to No. 8, which has a 3.2 mm ( in.) diam hole. Similar area-
amplitude blocks made from 49 mm (1 in.) square stock are sometimes known as Series-A blocks.
Fig. 46 Standard reference blocks for use in straight-beam ultrasonic inspection. (a) Area-
amplitude block. (b)
Distance-amplitude block. Dimensions given in inches
The amplitude of the echo from a flat-bottom hole in the far field of a straight-beam search unit is proportional to the area
of the bottom of the hole. Therefore, these blocks can be used to check the linearity of a pulse-echo inspection system and
to relate signal amplitude to the area (or, in other words, the size) of the flaw. Because a flat-bottom hole is an ideal
reflector and most natural flaws are less than ideal in reflective properties, an area-amplitude block defines a lower limit
for the size of a flaw that yields a given height of indication on the oscilloscope screen; that is, if the amplitude of the
indication from a flaw in a testpiece is six scale units high and this is also the amplitude of the indication from a 2.0 mm
( in.) diam flat-bottom hole at the same depth as the flaw, it is certain that the flaw is no smaller in area than the 2.0
mm ( in.) diam hole. Unfortunately, with ultrasonic inspection methods, it is not possible to determine how much
larger than the reference hole the flaw actually is.
Distance-amplitude blocks provide artificial flaws of a given size at various depths. From ultrasonic wave theory, it
is known that the decrease in echo amplitude from a flat-bottom hole using a circular search unit is inversely proportional
to the square of the distance to the hole bottom. Distance-amplitude blocks (also known as Series-B or Hitt blocks) can be
used to check actual variations of amplitude with distance for straight-beam inspection in a given material. They also
serve as a reference for setting or standardizing the sensitivity (gain) of the inspection system so that readable indications
will be displayed on the oscilloscope screen for flaws of a given size and larger, but the screen will not be flooded with
indications of smaller discontinuities that are of no interest. On instruments so equipped, these blocks are used to set the
sensitivity-time control or distance-amplitude correction so that a flaw of a given size will produce an indication on the
oscilloscope screen that is of a predetermined height regardless of distance from the entry surface.
There are 19 blocks in a Series-B set. All are 50 mm (2 in.) diam blocks of the same material as that being inspected, and
all have a 20 mm ( in.) deep flat-bottom hole drilled in the center of the bottom surface (Fig. 46). The hole diameter is
the same in all the blocks of a set; sets can be made with hole diameters of 1.2, 2.0, and 3.2 mm ( , , and in.).
The blocks vary in length to provide metal distances of 1.6 to 145 mm ( to 5 in.) from the top (entry) surface to the
hole bottom. Metal distances are:
• 1.6 mm ( in.)
• 3.2 mm through 25 mm ( in. through 1 in.) in increments of 3.2 mm ( in.)
• 32 mm through 150 mm (1 in. through 5 in.) in increments of 13 mm ( in.)
Each Series-B block is identified by a code number consisting of a digit, a dash, and four more digits. The first digit is the
diameter of the hole in one sixty-fourths of an inch. The four other digits are the metal distance from the top (entry)
surface to the hole bottom in one hundredths of an inch. For example, a block marked 3-0075 has a 1.2 mm ( in.) diam
hole and a 20 mm ( in.) metal distance.
ASTM blocks can be combined into various sets of area-amplitude and distance-amplitude blocks. The ASTM basic set
consists of ten 50 mm (2 in.) diam blocks, each with a 20 mm ( in.) deep flat-bottom hole drilled in the center of the
bottom surface. One block has a 1.2 mm ( in.) diam hole at a 75 mm (3 in.) metal distance. Seven blocks have 20 mm
( in.) diam holes at metal distances of 3.2, 6.4, 13, 20, 40, 75, and 150 mm ( , , , , 1 , 3 and 6 in.). The
remaining blocks have 3.2 mm ( in.) diam holes at 75 and 150 mm (3 and 6 in.) metal distances. The three blocks with
a 75 mm (3 in.) metal distance and hole diameter of 1.2, 2.0, and 3.2 mm ( , , and in.) form an area-amplitude
set, and the set with the 2.0 mm ( in.) diam holes provides a distance-amplitude set. In addition to the basic set, ASTM
lists five more area-amplitude standard reference blocks and 80 more distance-amplitude blocks.
Each ASTM block is identified by a code number, using the same system as that used for the Series-B set. The
dimensions of all ASTM blocks are given in ASTM E 127, which also presents the recommended practice for fabricating
and checking aluminum alloy standard reference blocks. The recommended practice for fabricating and control of steel
standard reference blocks is found in ASTM E 428.
IIW blocks are mainly used to calibrate instruments prior to contact inspection using an angle-beam search unit; these
blocks are also useful for:
• Checking the performance of both angle-beam and straight-beam search units
• Determining the sound beam exit point of an angle-beam search unit
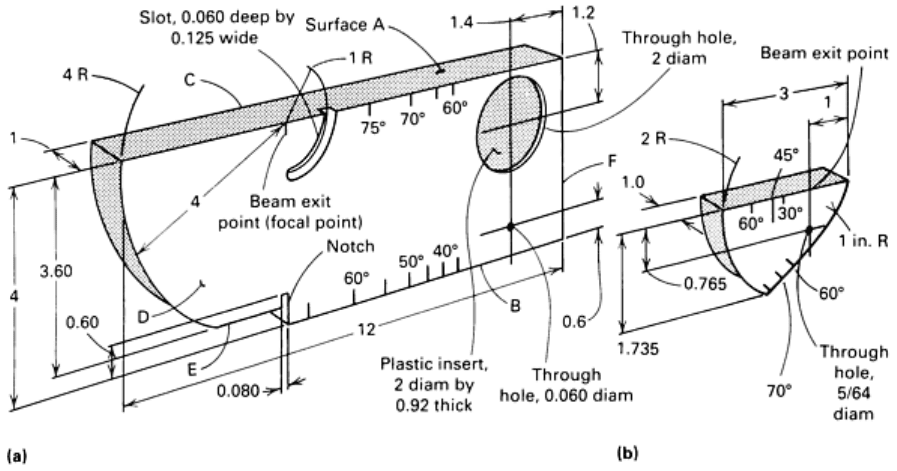
• Determining refracted angle produced
• Calibrating sound path distance
• Evaluating instrument performance
The material from which a block is prepared is specified by the IIW as killed, open hearth or electric furnace, low-carbon
steel in the normalized condition and with a grain size of McQuaid-Ehn No. 8. All IIW standard reference blocks are of
the same size and shape; official IIW blocks are dimensioned in the metric system of units. One of the standard English-
unit designs is shown in Fig. 47(a).
Fig. 47 Two standard reference blocks used in ultrasonic inspection. (a) IIW, type 1, block. (b) Miniature angle-
beam block. Dimensions given in inches
The miniature angle-beam block is based on the same design concepts as the IIW block, but is smaller and lighter.
The miniature angle-beam block is primarily used in the field for checking the characteristics of angle-beam search units
and for calibrating the time base of ultrasonic instruments. One of several alternative English-unit designs is shown in
Fig. 47(b). With the miniature block, beam angle and index point can be checked for an angle-beam search unit, and
metal-distance calibration can be made for either angle-beam or straight-beam search units.
The ASTM reference plate (Fig. 48) is another type of standard reference block that can be used for both straight-
beam and angle-beam inspection. This block has limited usefulness, however, because:
• The thinness of the plate leads to many false reflections when the block is used for straight-
beam
calibration or reference purposes
• When the block is used for angle-beam inspection, th
ere is little correlation between hole depth and
echo amplitude
The use of the ASTM reference plate for inspecting steel is described in ASTM A 503.
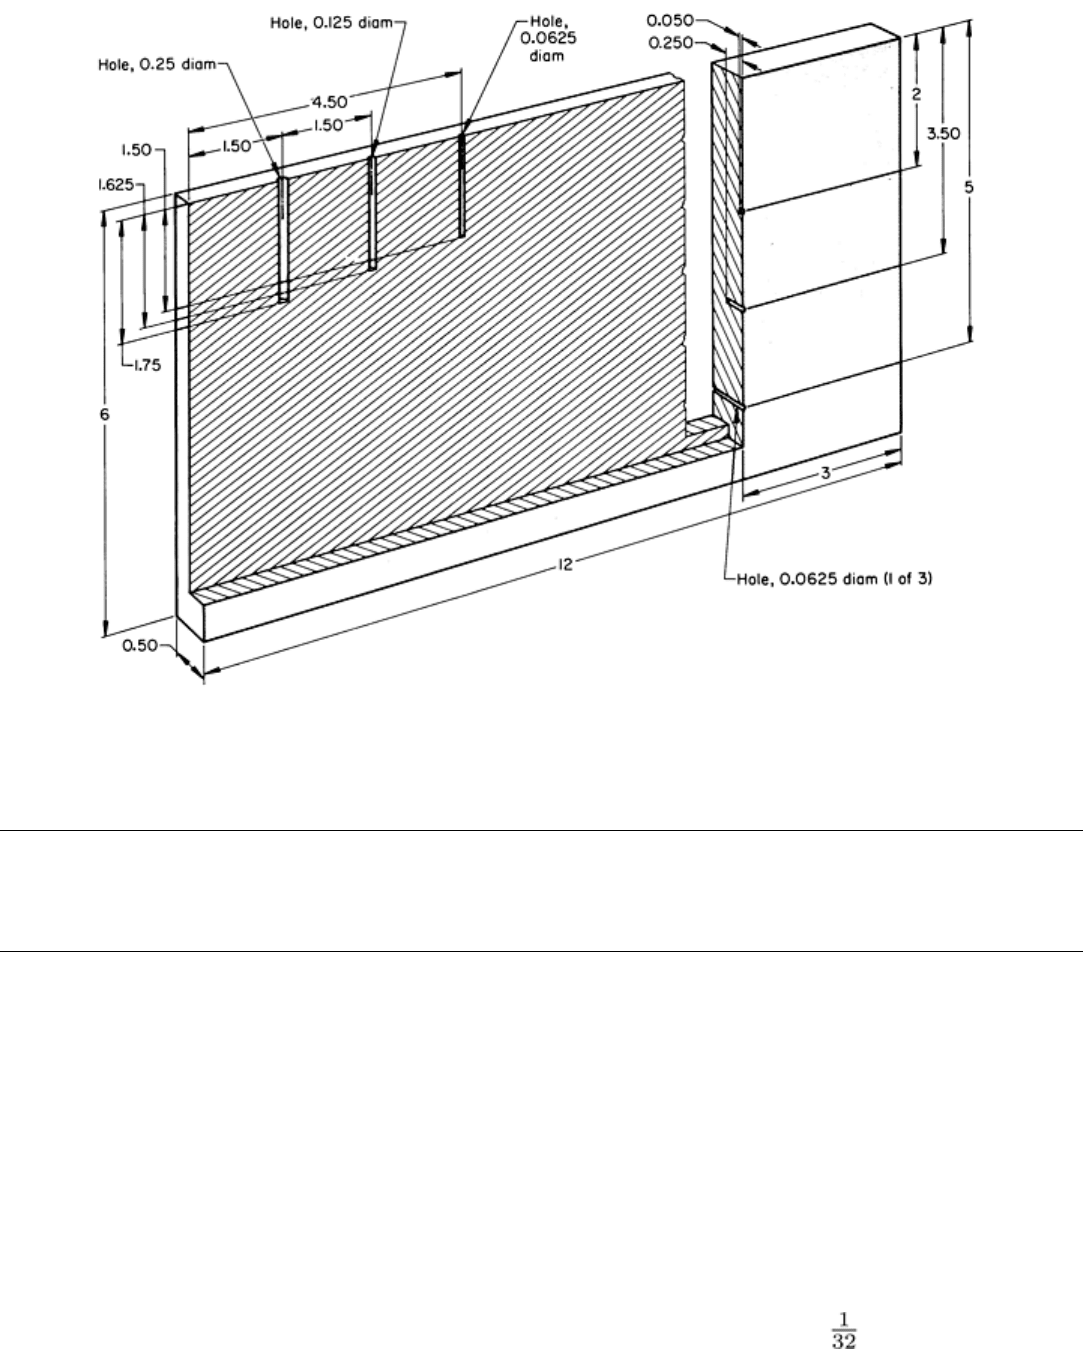
Fig. 48 ASTM standard reference plate for use in angle-beam ultrasonic inspection. Dimensions given in inches
Ultrasonic Inspection
Revised by Yoseph Bar-Cohen, Douglas Aircraft Company, McDonnell Douglas Corporation; Ajit K. Mal, University of California, Los
Angeles; and the ASM Committee on Ultrasonic Inspection
*
Determination of Area-Amplitude and Distance-Amplitude Curves
Determination of the area-amplitude and distance-amplitude responses of a straight-beam pulse-echo ultrasonic inspection
system for flaw detection requires a series of test blocks containing flat-bottom holes. Any of the standard reference
blocks of this type can be used. Listed below are typical procedures using ASTM blocks.
Area-amplitude curves are determined by the procedure in the list that follows:
1. Select a No. 5 block
2. Position the search unit on the top (entry) surfa
ce of the block when using the contact technique, or over
the block and at a distance to give a water path of 75 mm (3 in.) when using the immersion technique. If
the immersion technique is used, adjust the water path to within ±0.8 mm (±
in.) using a gage, and
position the ultrasonic beam perpendicular to the top surface of the block by tilting (angulating) the
search unit slightly until the front-reflection indication on the oscilloscope screen is maximum
3. Move the search unit horizontally until the hole-bottom indication is maximum
4. Adjust the gain control on the ultrasonic instrument so that the height of the hole-
bottom indication is
about one-third the maximum indication height obtainable on the screen
5. Replace the No. 5 block with the other area-amplitude blocks in the set, each in turn
6. With each replacement block, repeat steps 2 and 3. Keep the water path constant for all immersion tests
7. Read the heights of the hole-bottom indications, without changing the gain-
control setting that was
established with the No. 5 block
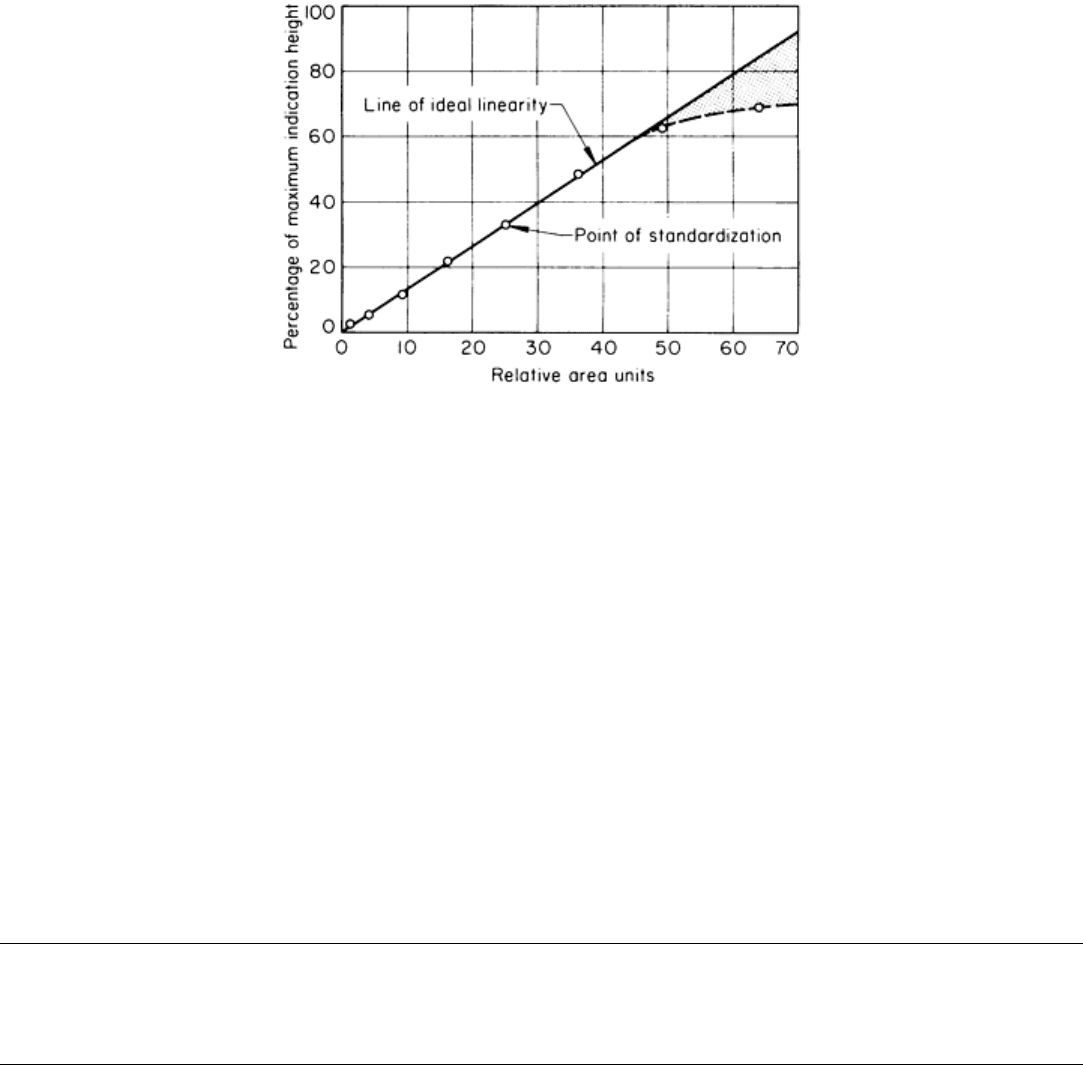
8. Plot the heights of each hole-
bottom indication against the square of the block number for that
indication, as shown in Fig. 49
. The square of the block number is proportional to the area of the hole
bottom
9. Draw a straight line through the
indication height for the No. 5 block and the origin. Significant
deviations from this line of ideal linearity are noted (shaded region, Fig. 49
) and used as corrections to
the indications from actual flaws
Fig. 49 Typical area-amplitude response curve from ultrasonic test blocks having flat-bottom holes
Distance-amplitude curves are determined by the following procedure:
1. Select a No. 5-0300 block
2. Position the search unit as in step 2 for area-amplitude calibration
3. Move the search unit as in step 3 for area-amplitude calibration
4. Adjust the gain control to give a hole-bottom indication height about one-
fourth of the maximum
obtainable
5. Replace block No. 5-0300 with the other distance-amplitude blocks in the set, each in turn
6. With each replacement block, repeat steps 2 and 3 as for area-amplitude calibration
7. Read the indication height as for area-amplitude calibration
8. Plot the heights of each hole-
bottom indication against the metal distance for that indication. The
resulting curve is similar to that in Fig. 45
, with indication height increasing as metal distance in the
near-field region is increased, and decreasing with metal distance in the farfield region
Ultrasonic Inspection
Revised by Yoseph Bar-Cohen, Douglas Aircraft Company, McDonnell Douglas Corporation; Ajit K. Mal, University of California, Los
Angeles; and the ASM Committee on Ultrasonic Inspection
*
Calibration
In many cases, the determination of area-amplitude and distance-amplitude curves constitutes the calibration of a straight-
beam pulse-echo system for the detection of flaws. Calibration of an angle-beam pulse-echo ultrasonic test system for
flaw detection can be accomplished using an IIW standard calibration block such as the one shown in Fig. 47(a). The
large (100 mm, or 4 in., radius) curved surface at one end of the block is used to determine the index point of angle-beam
search units (the point where the beam leaves the unit). The mark labeled "beam exit point" in Fig. 47(a) is at the center of
this 100 mm (4 in.) radius. Regardless of the angle of the search unit, a maximum echo is received from the curved
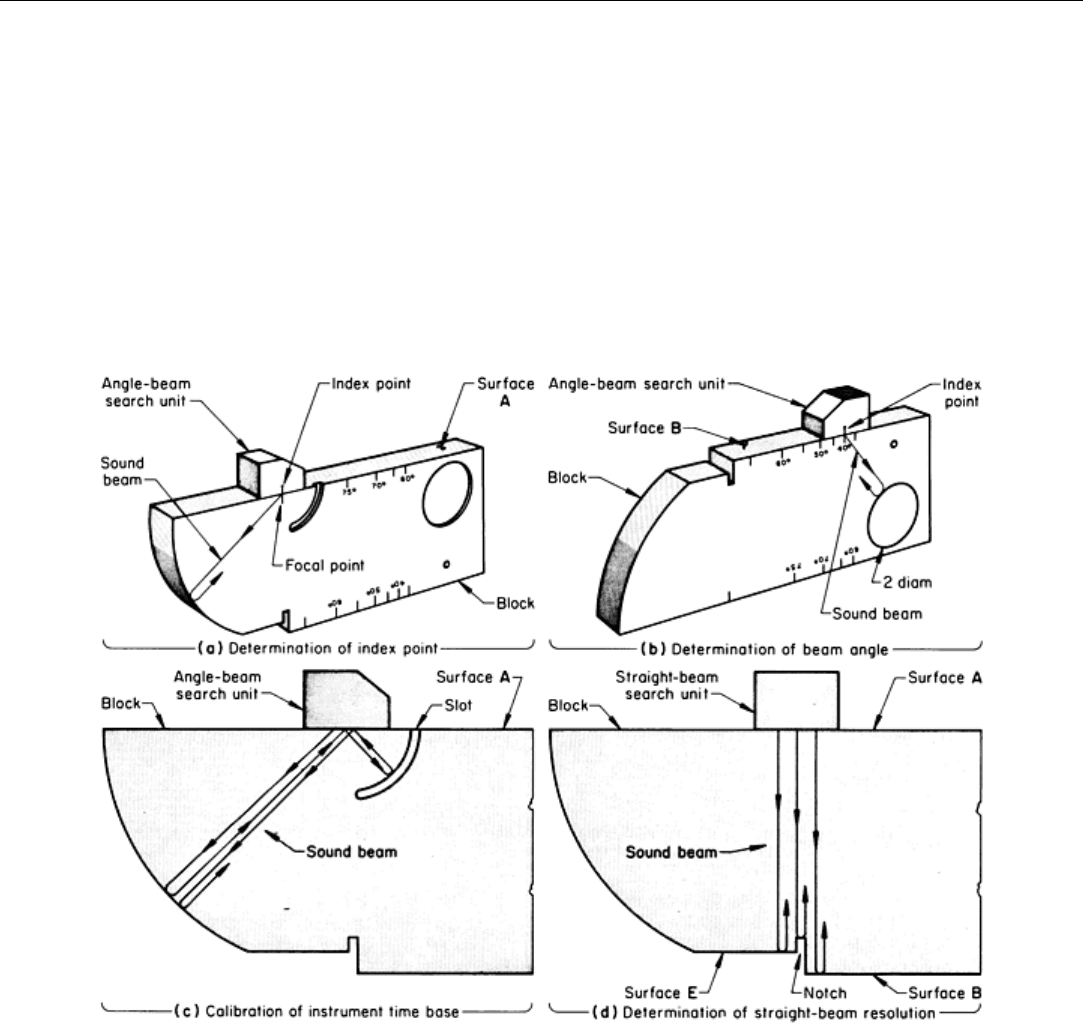
surface when the index point of the search unit is at the "beam exit point." To determine the index point of an angle-beam
search unit, the search unit is placed on surface A in the position shown in Fig. 50(a) and is moved along the surface of
the block until the echo is at maximum amplitude. The point on the search unit that is directly over the beam exit point of
the block can then be marked as the index point of the search unit.
Fig. 50 Positioning of angle-beam and straight-
beam search units for calibration using the IIW standard
reference block shown in Fig. 47(a). See text for explanation. Dimensions given in inches
Beam Angle. Once the index point of the search unit is marked, the 50 mm (2 in.) diam hole is used to determine the
angle of the beam in the low-carbon steel from which the block is prepared. The search unit is placed on surface A or
surface B and is aimed toward the 50 mm (2 in.) diam hole. Then, the search unit is moved along the surface until a
maximum-amplitude echo is received. At this position, the index point on the search unit indicates the beam angle, which
is read from one of the degree scales marked along the sides of the block at the edges of surfaces A and B (Fig. 50b).
Beam spread can be determined by moving the search unit in one direction (toward either higher or lower beam angles)
from the point of maximum-amplitude echo until the echo disappears and noting the beam angle at the index point. The
search unit is then moved in the opposite direction, past the point of maximum-amplitude echo to the point where the
echo again disappears. The beam spread is the difference between the angles indicated by the index point at these two
extreme positions.
Time Base. The 25 mm (1 in.) radius curved slot (Fig. 47a) is used in conjunction with the 100 mm (4 in.) radius
surface for calibrating the time base of the ultrasonic instrument being used with the angle-beam search unit. A direct
reflection from the 100 mm (4 in.) radius surface represents a metal distance of 200 mm (8 in.). Similarly, a beam
traveling from the beam exit point to the 100 mm (4 in.) radius, then reflecting in turn to surface A, then to the 25 mm (1
in.) radius, back to surface A, once again to the 100 mm (4 in.) radius, and finally back to the search unit, as shown in Fig.
50(c), will give an echo indication at 460 mm (18 in.) metal distance. The time base and marker spacing can be adjusted
until the echoes corresponding to 200, 250, 450, 500, 700 mm (8, 10, 18, 20, 28 in.) and so on are aligned with
appropriate grid lines on the screen or with a convenient number of marker signals. Upon completion of these
adjustments, the instrument time base is calibrated in terms of metal distance in steel. Metal distance can be converted to
depth from the entry surface by dividing by 2 and multiplying by the cosine of the beam angle when using a full "vee"
path.
The calibration for steel can be converted to a calibration for another material by multiplying metal distance by the ratio
of sound velocity in the other material to the corresponding sound velocity in steel (Table 1); transverse wave velocities
are ordinarily used because most angle-beam inspection is done with this type of ultrasonic wave. Depth in another
material is determined from metal distance as described in the preceding paragraph, but values of metal distance and
beam angle for the new material are used instead of the values for steel.
Linearity. Calibration in terms of metal distance or reflector depth assumes a linear oscilloscope sweep for the
instrument, which can be checked using a straight-beam search unit. The search unit is placed on either surface C or D to
obtain multiple echoes from the 25 mm (1 in.) thickness. These echo indications will be aligned with evenly spaced grid
lines or scale marks if the time base is linear. Linearity within ±1% (or less) of the full-scale value of thickness is usually
obtainable.
Resolution. A straight-beam search unit, as well as the instrument, can be checked for back-surface resolution by
placing the search unit on surface A and reflecting the beam from the bottom of the 2 mm (0.080 in.) wide notch and from
surfaces B and E on either side of it, as shown in Fig. 50(d). With proper resolution, the indications from these three
surfaces should be clearly separated and not overlapped so as to appear as one broad, jagged indication. Because
resolution is affected by test conditions and by characteristics of the search unit and instrument amplifier, this degree of
resolution sometimes may not be obtainable.
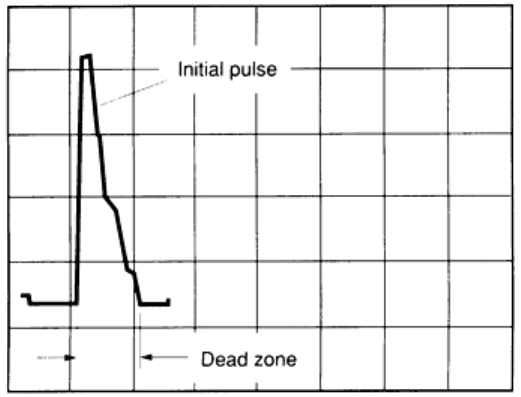
The dead zone is the depth below the entry surface that cannot be inspected because the initial pulse interferes with
echo signals. An indication of the length of the dead zone of a straight-beam search unit can be obtained by placing the
search unit on surface A or F in line with the 50 mm (2 in.) diam hole (Fig. 47a). When the search unit is placed on
surface A, a discernible echo from the 50 mm (2 in.) diam hole indicates a dead zone of less than 5 mm (0.2 in.).
Similarly, when the search unit is placed on surface F, a discernible echo from the 50 mm (2 in.) diam hole indicates a
dead zone of less than 10 mm (0.4 in.). Alternatively, the length of the dead zone can be measured by calibrating the time
base of the instrument, then measuring the width of the initial-pulse indication at the base of the signal, as illustrated
schematically in Fig. 51.

Fig. 51
Schematic showing how dead zone is measured against vertical reference lines. The vertical reference
lines represent a unit of vertical thickness.
Sensitivity. The relative sensitivity of an angle-beam search unit in combination with a given instrument can be defined
by placing the unit on either surface A or B and reflecting the beam from the side of the 1.5 mm (0.060 in.) diam hole
(Fig. 47a). The position of the search unit is adjusted until the echo from the hole is maximum, then the gain of the
instrument is adjusted to give the desired indication height.
When no back reflection is expected, the sensitivity of a straight-beam system is defined by placing the search unit on
either surface B or F in line with the 1.5 mm (0.060 in.) diam hole. The position of the search unit is adjusted until the
echo from the side of the hole is maximum, then the gain of the instrument is adjusted to give the desired indication
height.
When a back reflection is expected, a plastic insert can be used in the 50 mm (2 in.) diam hole to gage the sensitivity of a
straight-beam system. The plastic material and insert thickness are specified to have the absorption characteristics of 50
mm (2 in.) of steel. With this calibration, the search unit is placed on the side of the insert facing surface C, and the
number of echoes and the height of the last echo indication are noted.
Range Setting. The range for a search-unit and instrument system for straight-beam inspection can be set for various
distances by use of the IIW block. From surface F to the 2.0 mm (0.080 in.) wide notch is 200 mm (8 in.), from surface A
to surface B is 100 mm (4 in.), from surface E to surface A is 91.4 mm (3.60 in.), and from surface C to surface D is 25
mm (1 in.).
Miniature-Block Application. The miniature angle-beam block shown in Fig. 47(b) is used in a somewhat similar
manner as the larger IIW block. Both the 25 and 50 mm (1 and 2 in.) radius surfaces provide ways for checking the
location of the index mark of a search unit and for calibrating the time base of the instrument in terms of metal distance.
The small hole provides a reflector for checking beam angle and for setting the instrument gain.
Reference Plate Application. The use of the ASTM reference plate (Fig. 48) for calibrating ultrasonic equipment is
described in ASTM A 503.
Ultrasonic Inspection
Revised by Yoseph Bar-Cohen, Douglas Aircraft Company, McDonnell Douglas Corporation; Ajit K. Mal, University of California, Los
Angeles; and the ASM Committee on Ultrasonic Inspection
*
Detection of Flaws
Ultrasonic inspection has been successfully used to detect flaws in cast and wrought metal parts and in welded, brazed,
and bonded joints during research and development, production, and service. Contact inspection is more widely used than
immersion inspection, not only because it involves equipment that is portable (allowing field inspection) but also because
it is versatile and applicable to a wide range of situations. In contact inspection, however, a substance such as oil, grease,
or paste is spread on the surface of the part to act as a couplant; this substance is sometimes difficult to remove after
inspection. By contrast, the water used as a couplant in immersion inspection provides good acoustic coupling (even to
irregular, rough surfaces such as might occur on unfinished sand castings), but presents no removal problem. Immersion
inspection is also especially adaptable to mechanized, production line applications.
The following sections discuss the application of both contact and immersion types of ultrasonic inspection for the
detection of flaws in various types of products. In many cases, the inspection procedures used for these products are
covered in standards and specifications prepared by various governmental agencies, technical and trade societies, and
manufacturers. These standards and specifications usually contain the following three basic elements:
•
A description of the inspection method, including details on such variables as ultrasonic frequency, type
and diameter of search unit, and type of couplant
• Type and use of calibration and reference standards
• A criterion for rejection, usually expressed as maximum allowable flaw-indication amplitude
Ultrasonic Inspection
Revised by Yoseph Bar-Cohen, Douglas Aircraft Company, McDonnell Douglas Corporation; Ajit K. Mal, University of California, Los
Angeles; and the ASM Committee on Ultrasonic Inspection
*
Inspection of Castings
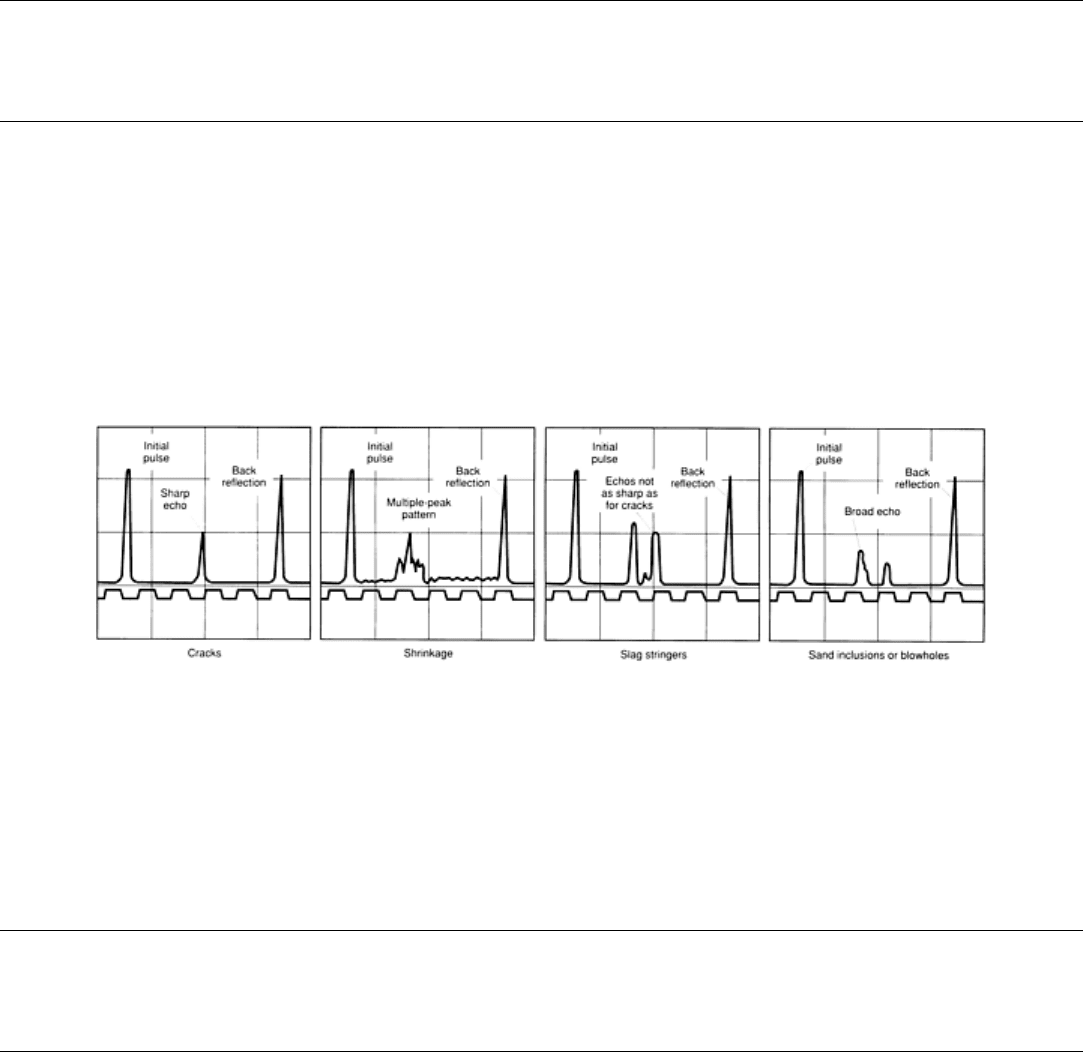
Both contact inspection and immersion inspection are used to detect in castings such flaws as porosity, tears and cracks,
shrinkage, voids, and inclusions. Figure 52 illustrates typical ultrasonic indications from four types of flaws found in
castings. Although immersion inspection is preferred for castings having rough and irregular surfaces, any one of the
inspection techniques previously described can be used. The choice of technique in a specific instance will depend mainly
on casting size and shape.
Fig. 52 Ultrasonic indications from four types of flaws found in castings
Because many castings are coarse grained, low-frequency ultrasound may have to be used. Castings of some materials are
so coarse grained that extensive scattering makes ultrasonic inspection impractical. These materials include some brasses,
stainless steels, titanium alloys, and cast irons. A more extensive discussion is provided in the article "Castings" in this
Volume.
Ultrasonic Inspection
Revised by Yoseph Bar-Cohen, Douglas Aircraft Company, McDonnell Douglas Corporation; Ajit K. Mal, University of California, Los
Angeles; and the ASM Committee on Ultrasonic Inspection
*
Inspection of Primary-Mill Products
Ultrasonic inspection is the most reliable method of detecting internal flaws in forging, rolling, or extrusion billets, in
rolling blooms or slabs, and in bar stock. It is capable of detecting relatively small flaws deep within a testpiece. By
contrast, eddy current and magnetic particle inspection become less sensitive to internal flaws as the depth of the flaw
below the surface increases; detection of internal flaws with these methods is limited to relatively shallow surface layers.
Radiography is the only other volumetric method available for inspecting these primary-mill products, but it is slower,
more costly, and generally less reliable than ultrasonic inspection for these specifications.
