ASM Metals HandBook Vol. 17 - Nondestructive Evaluation and Quality Control
Подождите немного. Документ загружается.

Ultrasonic inspection is used to detect and locate porosity, pipe, internal ruptures, flakes, and nonmetallic inclusions in
billets, blooms, slabs, and bar stock of various sizes up to 1.2 m (4 ft) thick in such metals as aluminum, magnesium,
titanium, zirconium, carbon steel, stainless steel, high-temperature alloys, and uranium. These products are usually
inspected with a straight-beam contact-type search unit, which is often hand held; immersion inspection is also used. One
technique for inspecting these product forms is to transmit a sound beam the length of the product; if a strong back
reflection is obtained, it is unlikely that there is serious pipe present. However, complete inspection requires testing with
the beam transverse to the longitudinal axis. Because complete inspection is relatively slow and tedious, it is sometimes
performed only on top cuts, where pipe is most likely to occur. For a higher degree of quality assurance, mechanized
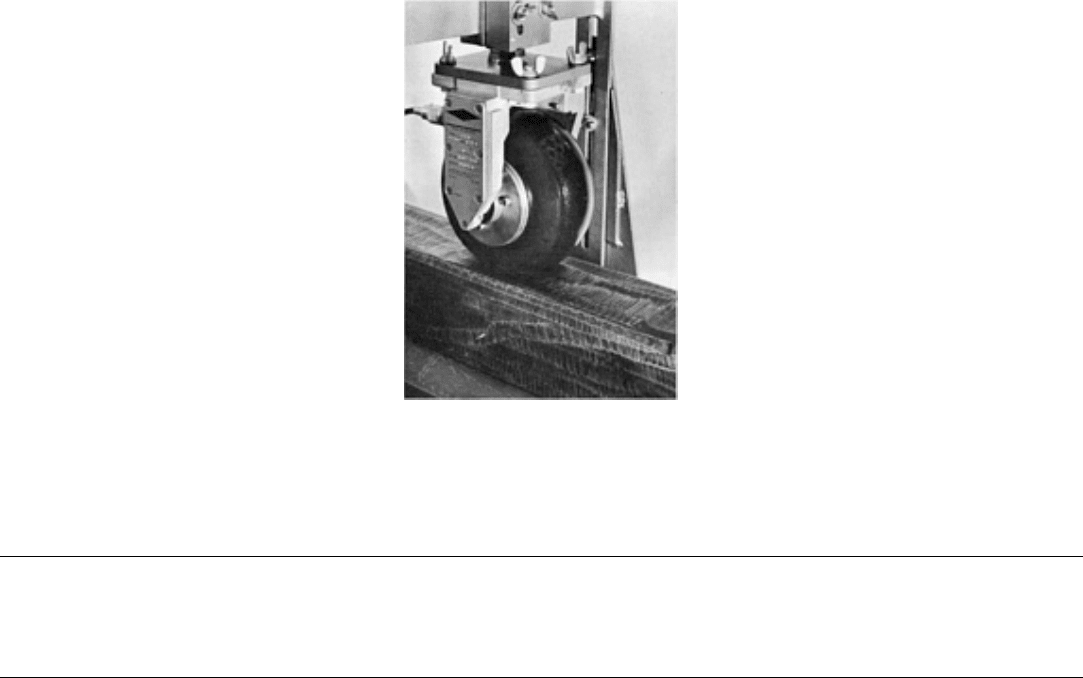
contact inspection of an entire lot can be done. Figure 53 shows a typical mechanized setup that uses a wheel-type search
unit for the pulse-echo inspection of steel billets. A similar setup uses a water-column search unit instead of the wheel
units. Setups for through transmission inspection use a pair of wheel or water-column units.
Fig. 53 Mechanized setup for the pulse-
echo ultrasonic inspection of steel billets using a 250 mm (10 in.) diam
wheel-type search unit and a longitudinal wave straight beam at 0° angle of incidence
Ultrasonic Inspection
Revised by Yoseph Bar-Cohen, Douglas Aircraft Company, McDonnell Douglas Corporation; Ajit K. Mal, University of California, Los
Angeles; and the ASM Committee on Ultrasonic Inspection
*
Inspection of Forgings
Forgings can be ultrasonically inspected for internal flaws such as pipe, internal ruptures, flakes, and nonmetallic
inclusions. Inspection is usually done with frequencies of 1 to 5 MHz, with the beam normal to both the surface of the
forging and the direction of maximum working; this orientation is best for detecting most flaws in forgings. Angle-beam
inspection employing shear waves is sometimes used for rings or hollow forgings.
Contact inspection is performed on most forgings that have fairly uniform dimensions. Because of the difficulty in
complete contact inspection of irregularly shaped forgings, immersion inspection may be preferred. Alternatively, contact
inspection can be performed at an earlier stage of production before the shape becomes too irregular; however a rough
machining of the forging surface is recommended.
Contact inspection is also used for inspecting forgings in service. For example, railroad freight-car-axle journals can be
inspected using the special hand-held search unit shown in Fig. 54, which was developed for this purpose. The unit fits on
the end of the axle being inspected. Surrounding a centering pin are six straight-beam transducers. The widening sound
beams from these transducers give complete coverage of the journal portion of the axle.
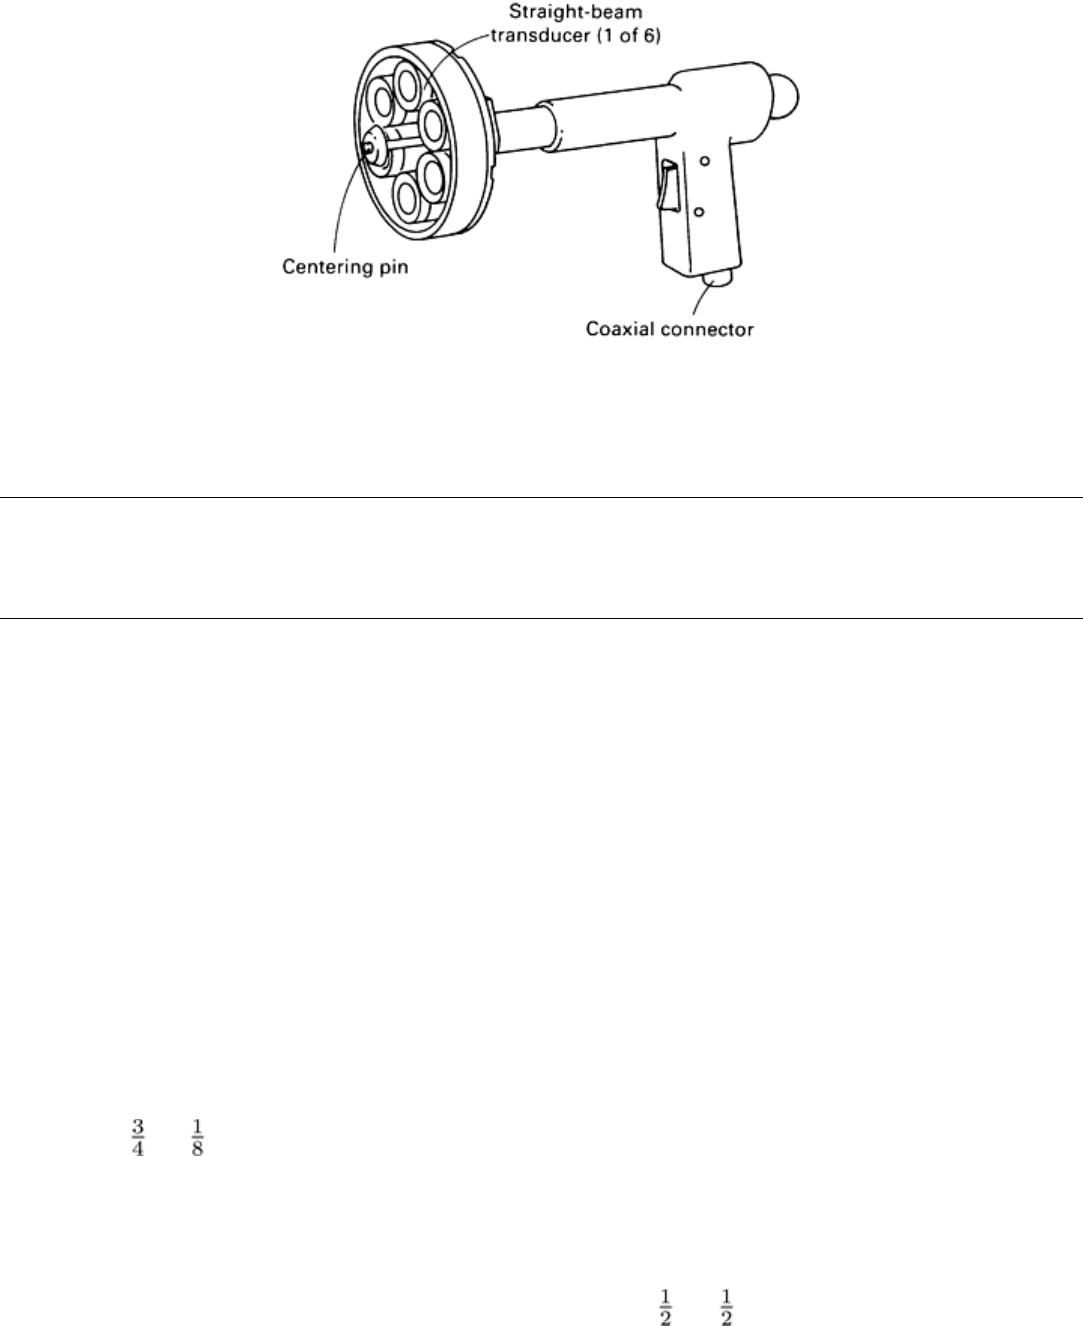
Fig. 54 Hand-held straight-beam contact-type search unit for the in-
service ultrasonic inspection of railroad
freight-car-axle journals
Ultrasonic Inspection
Revised by Yoseph Bar-Cohen, Douglas Aircraft Company, McDonnell Douglas Corporation; Ajit K. Mal, University of California, Los
Angeles; and the ASM Committee on Ultrasonic Inspection
*
Inspection of Flat-Rolled Products
Rolled strip, sheet, and plate can be ultrasonically inspected by using either straight-beam or angle-beam pulse-echo
techniques for contact or immersion inspection; contact inspection is more widely used. With straight-beam inspection
from the top surface of a testpiece, planar discontinuities to which flat-rolled products are susceptible are readily detected,
and their locations and limits are easily and accurately determined. However, straight beams cannot be used on strip or
sheet too thin to allow resolution of the first back reflection from the initial pulse. Therefore, the inspection of thin
products is usually performed with a Lamb wave angle-beam technique.
Straight-beam top inspection of rolled plate is used to detect laminations, excessive stringers of nonmetallic
inclusions, and similar flaws. Laminations are particularly detrimental when pieces cut from the plate are to be
subsequently welded to form large structural assemblies. Laminations usually occur centered in the thickness of the plate
and are usually centered in the as-rolled width of the plate. Laminations do not extend to the surface except at sheared or
flame-cut edges and may be difficult to detect visually unless the lamination is gross. For these reasons, ultrasonic
inspection is the only reliable way to inspect a plate for laminations.
The straight-beam top inspection of steel plate is usually performed at a beam frequency of 2.25 MHz with search units
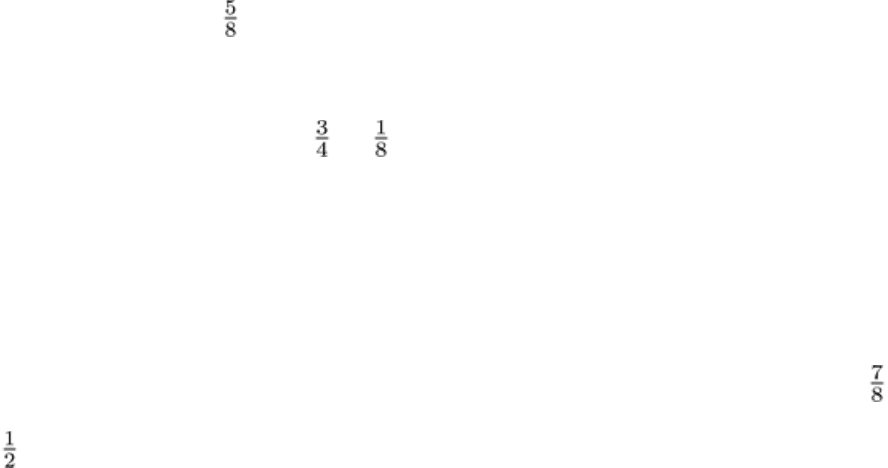
20 to 30 mm ( to 1 in.) in diameter. Higher or lower frequencies may be necessitated by grain size, microstructure, or
thickness of the material being inspected. The surface of the plate should be clean and free of loose scale that could hinder
acoustic transmission. Couplants used for contact inspection include oil, glycerin, or water containing a wetting agent and
a rust inhibitor. These are usually applied in a thin layer with a brush.
The contact top inspection of aluminum and other nonferrous plate is usually done with a technique similar to that used
for ferrous plate. Frequencies of 1 to 5 MHz, search units 13 to 40 mm ( to 1 in.) in diameter, and oil couplants are
most often used for nonferrous plate.
Prior to inspecting production material, the controls of the ultrasonic instrument are adjusted to obtain a level of
sensitivity that will ensure detection of less severe flaws than would be cause for rejection. How this is established is
determined by the specific calibration procedure that applies. Those used in plate inspection include test blocks,
percentage of back reflection, and loss of back reflection. Test blocks are usually made of a section of plate that is the

same thickness, type, and condition (for example, annealed, pickled, or ground) as the plate to be inspected. The test
block will generally contain one or more drilled holes, which are usually flat bottomed. If more than one reference hole is
contained in the test block, they will normally be at different depths. The most commonly used depth is midthickness.
Instrument controls are adjusted to obtain from the hole a readable echo on the oscilloscope screen. Rejection of material
is generally based on the presence of indications exceeding that from the reference hole in the test block. If there are
several holes at different depths in the test block, they are used to correct for the effect of metal distance. The depth at
which a flaw lies below the entry surface affects the response from the flaw. The test block hole with a depth closest to
the depth of the flaw in the plate is used to estimate flaw size. Holes ranging from 3 to 13 mm ( to in.) in diameter
can be used for reference, depending on desired sensitivity and specified maximum allowable flaw size.
When the percentage of back reflection technique is employed, the search unit is placed over a sound (indication-free)
region of the plate, and the instrument controls are adjusted to obtain a readable indication of the first back reflection. For
accuracy in determining flaw size, the first back reflection indication displayed on the screen of the ultrasonic instrument
is usually kept at less than full screen height and in the linear portion of oscilloscope response. The plate is then scanned
by moving the search unit in a uniform manner over the surface of the plate. The plate to be used for nuclear power
purposes generally requires a 100% coverage with a small percentage of overlap (for example, 10% of the search-unit
diameter) between successive scans. Some specifications call for inspection along grid lines. Rejection is based on the
presence of indications that exceed a predetermined percentage of the reference back reflection indication. The percentage
of back reflection technique can be used if test blocks are not available or where extreme variation in ultrasonic
transmissibility from one lot of material to another exists and it is not feasible to make a test block from each.
The loss of back reflection technique is the technique most often used for the inspection of plate for planar discontinuities,
especially laminations. This technique is similar to the percentage of back reflection technique except that rejection is
based on complete or partial loss of the back reflection indication. The system is calibrated by placing the search unit over
a sound (lamination-free) region of the plate to be inspected. The pattern on the oscilloscope screen is then a series of
multiple back reflection indications from the bottom surface of the plate, as shown for the top inspection of 28.4 mm
(1.12 in.) thick steel plate in Fig. 55(a). The instrument controls are adjusted to produce a first back reflection height of
about 75 to 100% of full screen height. General scanning of the plate is done at this sensitivity level. Minor sensitivity
adjustments can be made to accommodate surface roughness, provided no laminations or other flaws are encountered.
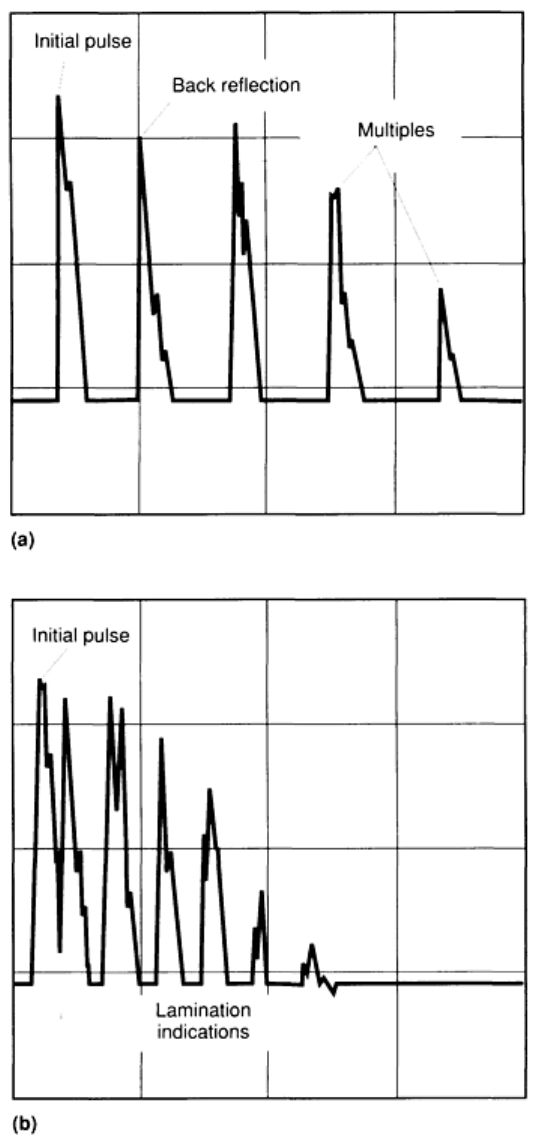
Fig. 55 Displays of multiple patterns produced during ultrasonic top inspection of steel plate using straight-
beam pulse-echo techniques. (a) CRT pattern of back reflection indications from a lamination-
free region of a
25 mm (1 in.) thick steel plate. (b) Pattern of indications from a lamination at one-
half the plate thickness in an
imperfect region of the plate
As the search unit passes over the edge of a lamination during scanning, additional indications appear on the oscilloscope
screen approximately midway between the initial pulse and the first back reflection and between the multiple back
reflection indications. As the search unit is moved farther over the laminated region, indications of the laminations
become stronger until finally the original pattern is replaced by a series of multiple lamination indications spaced at
approximately half the thickness of the plate (Fig. 55b). If the lamination is gross, the number of multiple indications will
decrease.
When a flaw indication is observed during general scanning, the gain (sensitivity) of the instrument is adjusted to produce
a first back reflection in an adjoining indication-free area of the plate that is 80 ±5% of full screen height. Then the
indication is scanned in all directions to determine the extent of the flawed region. All flaw indications are evaluated on
the basis of maximum obtainable response.
The size of a lamination can be determined by moving the search unit back and forth across the flawed region and, when
lamination indications drop to 40% of full screen height, marking the plate at a location corresponding to the center of the
search unit. The specification will usually describe acceptance in terms of the maximum size of the region over which
complete loss of back reflection can occur. Partial loss of back reflection generally must exceed a certain percentage of
the normal back reflection, and this loss usually must be accompanied by the presence of lamination indications.
Specifications may require a search unit of minimum diameter for the inspection (for example, a minimum diameter of 25
mm, or 1 in., is often specified for steel). The loss of back reflection technique described above has been used on steel
plate from 15 to 75 mm ( to 3 in.) thick. With modifications, this technique can be applied to both thinner and thicker
material. Further information on the straight-beam top inspection of steel plates is contained in ASTM A 435 and A 578.
Straight-beam edge inspection can be used when large quantities of steel plate with widths of 1.2 to 2.1 m (4 to 7
ft) and thicknesses of 20 to 30 mm ( to 1 in.) are to be inspected. Preliminary screening by inspecting each plate from
the edge can reduce the amount of top inspection described above by as much as 80%. Edge inspection can be done while
the plate is stacked for storage and requires no handling of individual plates for the inspection. This inspection is rapid
and will reveal those plates that are suspect and should be top inspected. Plates that pass the edge inspection need not
necessarily be further inspected unless required by specifications.
In edge inspection, an ultrasonic beam is directed from one edge only through the plate perpendicular to the direction of
rolling. This technique directs the sound beam at the narrowest dimension of laminations, yet when laminations or other
flaws are present there is a partial loss of normal back reflection (often to less than 50% of the back reflection from
lamination-free plate). The search unit usually recommended for inspecting steel plate is 22 mm ( in.) in diameter and
has a plastic wear face. On thin steel plates, where making contact with the edge of the plate is more difficult, a 13 mm
( in.) diam search unit can be used. Poor edge condition frequently makes it difficult to obtain good coupling. In most
cases, grease will provide sufficient coupling. If the edge is too concave to be filled in with grease, a plastic shoe may
help. If none of these techniques brings the back reflection to an acceptable level, the plate should be set aside for top
inspection. Even if it takes extra time to make good edge contact, this technique is still more rapid than top inspection.
The screen pattern produced by edge inspection shows a cluster of indications near the search unit that resulted from the
high power needed to penetrate the plates; the back reflection will appear as a group of multiple signals that result from
partial mode conversion from longitudinal waves to shear waves, as shown in Fig. 56(a) for the edge inspection of 1.5 m
(5 ft) wide steel plate. When the back reflection falls below 50% of full screen height, the plate is marked for top
inspection. When a lamination is especially severe, it will produce echoes at a point between the back reflection and
initial-pulse indications, as shown in Fig. 56(b). On a steel plate 2.4 m (8 ft) long, four checks at equal intervals along one
edge are usually sufficient.
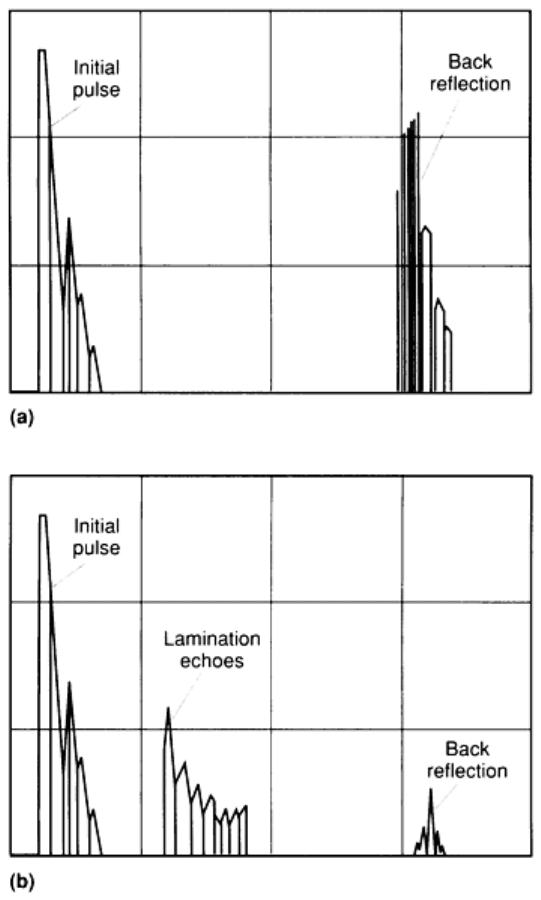
Fig. 56
Displays of multiple patterns produced during the ultrasonic edge inspection of steel plate using
straight-beam pulse-echo techniques. (a) Pattern from a lamination-
free region in a 1500 mm (60 in.) wide
steel plate. (b) Pattern of indications from a lamination in the plate. The presence of a lamination has reduced
the back reflection indication to less than 50% of full screen height.
Angle-beam inspection can be used to inspect rolled plates. With angle-beam inspection, it is possible to inspect the
entire width of the plate merely by moving the search unit along one edge of the plate. However, some specifications
require that for total coverage of the plate the search unit be placed on the top surface, directed toward an edge, and
moved away from the edge until the opposite edge is reached. Similar scans are repeated with overlapping (for example,
10% of the search-unit diameter) for successive scans. This procedure is continued until the entire plate has been covered.
Some specifications call for a second angle-beam inspection in a direction 90° from the first.
The search unit used for the angle-beam inspection of plate is usually one that provides 45 to 60° shear waves in the
material being inspected. As with straight-beam inspection, the plate surface should be clean and free of loose scale, and a
suitable couplant should be used. Prior to angle-beam inspection of plate, the instrument controls are adjusted to obtain a
readable response on the oscilloscope screen from a square notch or V-notch in a test plate. The test plate is generally
similar to the plate to be inspected with respect to type, thickness, surface finish, and microstructure. The notch is usually
3 or 5% of the plate thickness in depth, 25 mm (1 in.) long or longer, and approximately twice as wide as it is deep.

The search unit is oriented to a position on the test surface so as to receive the maximum reflected energy from the notch;
instrument sensitivity is adjusted to display the notch indication at 50 to 75% of full screen height. Often, a distance-
amplitude curve is established by repositioning the search unit at several distances from the notch (for example, at , 1,
and 1 skip distances, depending on thickness of the plate) and the various responses noted. This curve is the 100%
reference line for reporting flaw-echo amplitudes. When evaluating a flaw to determine whether or not the plate is
rejectable, it is important to check at a metal distance comparable to that used in initial calibration using the notch in the
test plate.
Angle-beam inspection can detect laps and inclusions and possibly laminations not parallel to the plate surface. However,
it is difficult to detect laminations parallel to the plate surface. It is hard to distinguish between a signal from the top of
the plate, for example, and a lamination of this type near the top. Therefore, it may be desirable to make a rapid sampling
of the plate condition using straight-beam longitudinal waves. If laminations of the type just mentioned are found to be
absent, angle-beam shear waves can be used to inspect the entire plate. Of course, if it is necessary to check the plate for
cracks on or just beneath the surface, surface waves may be used.
Because straight-beam inspection cannot be used on strip or sheet too thin to allow the back reflection to be resolved from
the initial pulse, inspection of these products is accomplished by angle-beam (Lamb wave) inspection. The procedure is
much the same as for the angle-beam inspection of plate. The search unit is usually mounted in a fixed position at one
edge of the strip or sheet. The sound beam is directed across the width to the far edge while the strip or sheet moves past
the search unit. Coupling is maintained by continuously feeding a suitable liquid (alcohol can be used for steel products)
ahead of the search unit. The location of a flaw is determined by noting the position of the flaw echo between the initial
pulse and edge reflection echo on the oscilloscope screen. An alarm gate is often used to signal the presence of a flaw,
thus eliminating the need for constant observation of the screen by an operator.
The mechanized inspection of flat-rolled products has been accomplished by several methods; for example, wheel-
type search units have been used for mechanized angle-beam inspection, and water-column search units have been used in
transmitting and receiving parts to make printed plan views of the responses from a plate as it travels between the pairs.
The immersion inspection of plate is highly adaptable to mechanization; some setups are designed for simultaneous
thickness gaging and flaw detection.
Ultrasonic Inspection
Revised by Yoseph Bar-Cohen, Douglas Aircraft Company, McDonnell Douglas Corporation; Ajit K. Mal, University of California, Los
Angeles; and the ASM Committee on Ultrasonic Inspection
*
Inspection of Extrusions and Rolled Shapes
Flaws in extrusions and in rolled shapes are usually longitudinally oriented, that is, parallel to the direction of working.
Both contact and immersion inspection are used to inspect for these flaws, usually employing their longitudinal-beam or
angle-beam techniques. In some cases, surface waves are used to detect surface cracks or similar flaws.
Aluminum extrusions may be immersion inspected with C-scan water-tank equipment using the straight-beam pulse-
echo technique. The usual types of flaws encountered in this test are laps and seams, but linear porosity may also be found
in some products. If a second inspection of a region where flaws are suspected is desired, it is often done by straight-beam
contact inspection using water or oil as the couplant.
Cold-extruded steel parts are subject to internal bursts called chevrons. This type of flaw is easily detected either by
straight-beam (longitudinal wave) inspection with the search unit contacting the end of the extrusion or by angle-beam
(shear wave) inspection with the search unit contacting the side of the extrusion.
In one procedure used to inspect cold extruded automobile-axle shafts for chevrons, a variable-angle water-column search
unit was used. The axle shaft being inspected was held horizontally by a fixture in the portable inspection unit shown in
Fig. 57(a). The variable-angle water-column search unit that was used produced a sound beam at 1.6 to 2.25 MHz and
was adjusted so that the beam entered the shaft at 45° to the shaft axis. This allowed the beam to travel the length of the
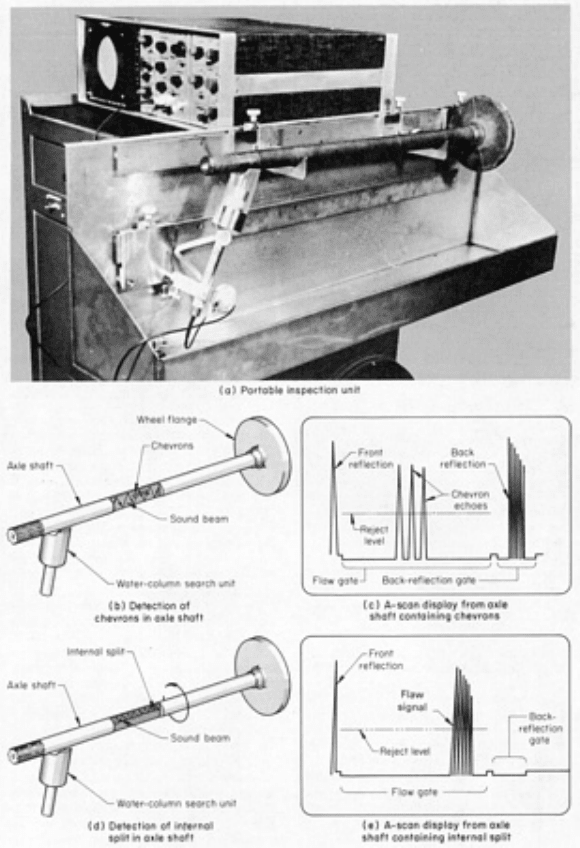
shaft (Fig. 57b) and be reflected from the wheel flange. A dual-gated instrument was employed to allow a fail-safe system
and to ensure proper inspection of each shaft.
Fig. 57 Ultrasonic inspection of a cold extruded steel automobile-
axle shaft for chevrons and internal splits
using a portable inspection unit
As the shaft was transferred to the inspection fixture, it closed a limit switch that started the testing sequence. A 5-s time
delay after the water column was activated allowed the exclusion of air bubbles and ensured effective coupling of the
search unit to the shaft. The instrument then "looked" for the back reflection from the flange in the back reflection gate. If
no signal was present, the instrument indicated a no-test condition, and the operator repositioned the shaft and started the
sequence a second time. When a back reflection signal was present in the back reflection gate and no signal above a
preset amplitude was present in the flaw gate, the instrument indicated an acceptable part. When a signal above the preset
amplitude occurred in the flaw gate, as shown in Fig. 57(c), the instrument indicated the presence of damaging chevrons,
and the part was automatically marked with paint for rejection.
Another type of internal flaw, a longitudinal split of the core material, was occasionally introduced into axle shaft by an
induction-hardening process. The inspection procedure used to detect this type of flaw was the same as for chevrons
except that the shaft was rotated during the inspection portion of the testing sequence (Fig. 57d). As the shaft was rotated
and the plane of the split assumed a horizontal orientation, the length of the sound beam path was so shortened that the
signal moved over into the flaw gate, where it appeared as a flaw indication (Fig. 57e).
Steel bars and pipe are usually contact inspected for internal flaws, using either the straight-beam or the angle-beam
technique, or both techniques simultaneously. One method of inspecting round bar is to scan along the bar with a straight-
beam search unit having a curved plastic shoe to achieve good contact with the bar. Because the surface of the bar is
curved, the sound beam enters the bar at various angles. This may produce both longitudinal and shear waves in the bar
and provides for inspection of the entire cross section of the bar.
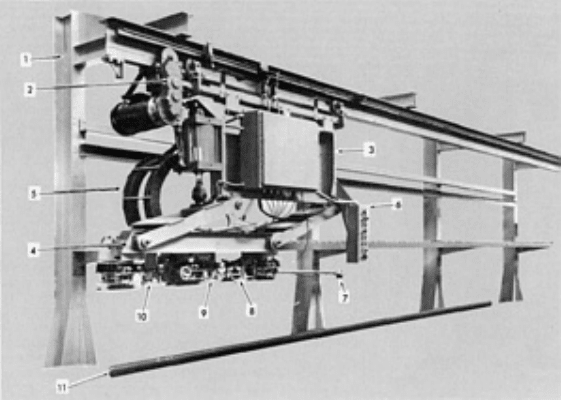
Another method of inspecting round bar can also be used on pipe. In this method, the bar or pipe is rotated to provide
inspection of the entire cross section. Mechanized equipment that uses this method (Fig. 58) is designed to provide
inspection simultaneously by both ultrasonic and eddy current techniques. This equipment can inspect bars and pipes
from 75 to 300 mm (3 to 12 in.) in diameter and from 3 to 17 m (10 to 56 ft) in length.
Fig. 58
Mechanized equipment for simultaneous ultrasonic and eddy current inspection of round bar or pipe. 1,
support frame; 2, drive trolley; 3, carriage; 4, sad
dle; 5, cable track; 6, manual controls; 7, sensor for
signaling end of bar or pipe; 8, eddy current probe; 9, straight-beam ultrasonic search unit; 10, 45° angle-
beam ultrasonic search unit; 11, test bar
The equipment consists of a free-standing support frame to which is mounted a motor-driven trolley (on a monorail track
that runs the entire length of the support structure, about 21 m, or 70 ft). The trolley, in turn, supports and propels a
carriage-and-saddle assembly. The saddle, suspended beneath the carriage, carries three flaw sensors--two ultrasonic
search units and one eddy current probe--and is self-aligning when in contact with a pipe or bar during testing. Also
mounted on the carriage are a manual control station and an air cylinder that lowers and raises the saddle. A flexible cable
track follows the movement of the carriage and saddle assembly. Instrumentation is enclosed in two separate cabinets, and
a control console houses all the controls and relays associated with the system. Operation of the equipment is described
below.
The bar or pipe to be inspected is placed on a rotator (not shown in Fig. 58) that turns at an adjustable speed. The operator
then initiates the test cycle, and the control system activates an air cylinder that lowers the saddle into contact with the
rotating part and starts the flow of the water couplant. The trolley and carriage then move the saddle along the rotating
test bar or pipe at a speed (also adjustable) that ensures complete inspection of the part.
Ultrasonic inspection is accomplished by two independent water-column search units employing the pulse-echo
technique; one unit uses a straight beam and the other an angle beam. Eddy current inspection is performed by a special
parallel-rods proximity probe covering approximately a 75 mm (3 in.) scan path. The eddy current instrument has two
adjustable inspecting alarm thresholds to provide a capability for inspecting the ends of a part at higher sensitivity than
the middle. A chart recorder is also provided to record the magnitude of any flaw signal. If a flaw is detected by any of
these sensors, the control system lowers an associated marking device to produce a permanent mark (unique for each
sensor) in the region of the flaw. When the end of the bar or pipe is reached, a sensor signals the control system, and the
saddle is raised and returned, at higher speed, to the start position.

Steel rails for railroads can be contact inspected in service with special equipment that detects cracks--either transverse
cracks emanating from the edges of the railhead or from hydrogen flakes in the center of the railhead, or cracks emanating
from fishplate boltholes. Most larger rail-testing equipment employs the pulse-echo method. Often this equipment is
mounted on special railroad cars. Most inspection with this equipment is done by angle-beam techniques, but straight-
beam inspection is also used. With some equipment, coupling is through an oil film; in other equipment, wheel-type
search units are used.
Seamless tubes and pipes can be contact tested on the mechanized equipment shown in Fig. 58, but immersion
inspection is used more often. Usually, the tube or pipe is rotated and driven past the immersed search units, which are
positioned to produce an angle beam in the wall of the testpiece. The immersion tank has glands on either side through
which the part passes during inspection. Further information on the ultrasonic inspection of seamless tubes and pipe is
available in the articles "Tubular Products" and "Boilers and Pressure Vessels" in this Volume.
Ultrasonic Inspection
Revised by Yoseph Bar-Cohen, Douglas Aircraft Company, McDonnell Douglas Corporation; Ajit K. Mal, University of California, Los
Angeles; and the ASM Committee on Ultrasonic Inspection
*
Inspection of Welded Joints
Welded joints can be ultrasonically inspected using either the straight-beam or the angle-beam technique. Angle-beam
inspection is used most often, one reason being that the transducer does not have to be placed on the weld surface, but is
typically placed on the relatively smooth base metal surface adjacent to the weld. With angle-beam inspection, the wedge
angle is usually selected to produce shear waves in the part being inspected at an optimum angle to detect serious flaws.
The types of flaws usually encountered in welds are porosity, entrapped slag, incomplete penetration, incomplete fusion,
and cracks. Serious flaws, such as cracks and incomplete fusion, usually extend longitudinally along the weld and give
especially clear signals when the sound beam strikes them at right angles. Spherical porosity will produce a small-
amplitude echo, even when the sound beam strikes at an angle to the joint. Slag inclusions may produce stepped
indications, which are maximum at right angles to the orientation of the slag. A large inclusion may produce multiple
signals as different portions of the inclusion are scanned. The ultrasonic inspection of welds is discussed in the articles
"Weldments, Brazed Assemblies, and Soldered Joints" and "Tubular Products" in this Volume.
Ultrasonic Inspection
Revised by Yoseph Bar-Cohen, Douglas Aircraft Company, McDonnell Douglas Corporation; Ajit K. Mal, University of California, Los
Angeles; and the ASM Committee on Ultrasonic Inspection
*
Inspection of Bonded Joints
If the shape of a joint is favorable, ultrasonic inspection can be used to determine the soundness of joints bonded either
adhesively or by any of the various metallurgical methods, including brazing and soldering. Both pulse-echo and
resonance techniques have been used to evaluate bond quality in brazed joints.
A babbitted sleeve bearing is a typical part having a metallurgical bond that is ultrasonically inspected for flaws. The
bond between babbitt and backing shell is inspected with a straight-beam pulse-echo technique, using a contact-type
search unit applied to the outside of the steel shell. A small-diameter search unit is used to ensure adequate contact with
the shell through the couplant. Before inspection, the outside of the steel shell and the inside of the cast babbitt liner are
machined to a maximum surface roughness of 3.20 m (125 in.) (but the liner is not machined to final thickness).
During inspection, the oscilloscope screen normally shows three indications: the initial pulse, a small echo from the bond
line (due to differences in acoustical impedance of steel and babbitt), and the back reflection from the inside surface of the
liner. Regions where the bond line indication is minimum are assumed to have an acceptable bond. Where the bond line
