ASM Metals HandBook Vol. 17 - Nondestructive Evaluation and Quality Control
Подождите немного. Документ загружается.

Basic Inspection Methods
The two major methods of ultrasonic inspection are the transmission method and the pulse-echo method. The primary
difference between these two methods is that the transmission method involves only the measurement of signal
attenuation, while the pulse-echo method can be used to measure both transit time and signal attenuation.
The pulse-echo method, which is the most widely used ultrasonic method, involves the detection of echoes produced
when an ultrasonic pulse is reflected from a discontinuity or an interface of a testpiece. This method is used in flaw
location and thickness measurements. Flaw depth is determined from the time-of-flight between the initial pulse and the
echo produced by a flaw. Flaw depth might also be determined by the relative transit time between the echo produced by
a flaw and the echo from the back surface. Flaw sizes are estimated by comparing the signal amplitudes of reflected sound
from an interface (either within the testpiece or at the back surface) with the amplitude of sound reflected from a
reference reflector of known size or from the back surface of a testpiece having no flaws.
The transmission method, which may include either reflection or through transmission, involves only the measurement of
signal attenuation. This method is also used in flaw detection. In the pulse-echo method, it is necessary that an internal
flaw reflect at least part of the sound energy onto a receiving transducer. However, echoes from flaws are not essential to
their detection. Merely the fact that the amplitude of the back reflection from a testpiece is lower than that from an
identical workpiece known to be free of flaws implies that the testpiece contains one or more flaws. The technique of
detecting the presence of flaws by sound attenuation is used in transmission methods as well as in the pulse-echo method.
The main disadvantage of attenuation methods is that flaw depth cannot be measured.
The principles of each of these two inspection methods are discussed in the following sections, along with corresponding
forms of data presentation, interpretation of data, and effects of operating variables. Subsequent sections describe various
components and systems for ultrasonic inspection, reference standards, and inspection procedures and applications. In
addition, the article "Boilers and Pressure Vessels" in this Volume contains information on advanced ultrasonic
techniques.
The application of ultrasonic techniques also involves other methods, such as acoustical holography, acoustical
microscopy, the frequency modulation technique, spectral analysis, and sound conduction. The first two of these methods
are discussed in the articles "Acoustical Holography" and "Acoustic Microscopy" in this Volume. The other three
methods are briefly summarized below.
The frequency modulation (FM) method, which was the precursor of the pulse-echo method, is another flaw
detection technique. In the FM method, the ultrasonic pulses are transmitted in wave packets whose frequency varies
linearly with time. The frequency variation is repeated in successive wave packets so that a plot of frequency versus time
has a sawtooth pattern. There is a time delay between successive packets. Returning echoes are displayed on the readout
device only if they have certain characteristics as determined by the electronic circuitry in the instrument. Although not as
widely used as the pulse-echo method, the FM method has a lower signal-to-noise ratio and therefore somewhat greater
resolving power.
Spectral analysis, which can be used in the through transmission or pulse-echo methods, involves determination of the
frequency spectrum of an ultrasonic wave after it has propagated through a testpiece. The frequency spectrum can be
determined either by transmitting a pulse and using a fast Fourier transform to obtain the frequency spectrum of the
received signal or by sweeping the transmission frequency in real time and acquiring the response at each frequency. The
increasing use of the pulse method is attributed to improvements in the speed of digital fast Fourier transform devices.
Spectral analysis is used in transducer evaluations and may be useful in defect characterization. However, because the
spectral signatures of defects are influenced by several other factors (such as the spectrum of the input pulse, coupling
details, and signal attenuation), defect characterization primarily involves the qualitative interpretation of echoes in the
time domain (see the section "Interpretation of Pulse-Echo Data" in this article).
Spectral analysis can also be used to measure the thickness of thin-wall specimens. A short pulse of ultrasound is a form
of coherent radiation; in a thin-wall specimen that produces front and back wall echoes, the two reflected pulses show
phase differences and can interfere coherently. If the pulse contains a wide band of frequencies, interference maxima and
minima can occur at particular frequencies, and these can be related to the specimen thickness.

Sound conduction is utilized in flaw detection by monitoring the intensity of arbitrary waveforms at a given point on
the testpiece. These waveforms transmit ultrasonic energy, which is fed into the testpiece at some other point without the
existence of a well-defined beam path between the two points. This method is of relatively minor importance and is not
discussed in this article.
Ultrasonic Inspection
Revised by Yoseph Bar-Cohen, Douglas Aircraft Company, McDonnell Douglas Corporation; Ajit K. Mal, University of California, Los
Angeles; and the ASM Committee on Ultrasonic Inspection
*
Pulse-Echo Methods
In pulse-echo inspection, short bursts of ultrasonic energy (pulses) are introduced into a testpiece at regular intervals of
time. If the pulses encounter a reflecting surface, some or all of the energy is reflected. The proportion of energy that is
reflected is highly dependent on the size of the reflecting surface in relation to the size of the incident ultrasonic beam.
The direction of the reflected beam (echo) depends on the orientation of the reflecting surface with respect to the incident
beam. Reflected energy is monitored; both the amount of energy reflected in a specific direction and the time delay
between transmission of the initial pulse and receipt of the echo are measured.
Principles of Pulse-Echo Methods
Most pulse-echo systems consist of:
• An electronic clock
• An electronic signal generator, or pulser
• A sending transducer
• A receiving transducer
• An echo-signal amplifier
• A display device
In the most widely used version of pulse-echo systems, a single transducer acts alternately as a sending and receiving
transducer. The clock and signal generator are usually combined in a single electronic unit. Frequently, circuits that
amplify and demodulate echo signals from the transducer are housed in the same unit. Specific characteristics of
transducers and other equipment are discussed in subsequent sections of this article.
A pulse-echo system with a single transducer operates as follows. At regular intervals, the electronic clock triggers the
signal generator, which imposes a short interval of high-frequency alternating voltage or a unipolar (negative) spike on
the transducer. Simultaneously, the clock activates a time-measuring circuit connected to the display device. The operator
can preselect a constant interval between pulses by means of a pulse-repetition rate control on the instrument; pulses are
usually repeated 60 to 2000 times per second. In most commercially available flaw detectors, the pulse-repetition rate is
controlled automatically except for some larger systems. Also, most systems are broadband when they transmit, but may
be tuned or filtered for reception. The operator can also preselect the output frequency of the signal generator. For best
results, the frequency (and sometimes the pulse-repetition rate) should be tuned to achieve the maximum response of the
transducer (resonance in the vibrating element) and maximum signal-to-noise ratio (lowest amount of electronic noise) in
the electronic equipment.
The transducer then converts the pulse of voltage into a pulse of mechanical vibration having essentially the same
frequency as the imposed alternating voltage. The mechanical vibration (ultrasound) is introduced into a testpiece through
a couplant and travels by wave motion through the testpiece at the velocity of sound, which depends on the material.
When the pulse of ultrasound encounters a reflecting surface that is perpendicular to the direction of travel, ultrasonic
energy is reflected and returns to the transducer. The returning pulse travels along the same path and at the same speed as
the transmitted pulse, but in the opposite direction. Upon reaching the transducer through the couplant, the returning pulse
causes the transducer element to vibrate, which induces an alternating electrical voltage across the transducer. The
induced voltage is instantaneously amplified (and sometimes demodulated), then fed into the display device. This process
of alternately sending and receiving pulses of ultrasonic energy is repeated for each successive pulse, with the display
device recording any echoes each time.
Theoretically, the maximum depth of inspection is controlled by the pulse-repetition rate. For example, if a 10 MHz pulse
is transmitted at a pulse-repetition rate of 500 pulses per second, a longitudinal wave pulse can travel almost 12 m (40 ft)
in steel or aluminum before the next pulse is triggered. This means one pulse can travel to a depth of 6 m (20 ft) and
return before the next pulse is initiated.
Practically, however, inspection can be performed only to a depth that is considerably less than the theoretical maximum.
Sound attenuation in a testpiece can limit the path length. The practical limit varies with the type and condition of the test
material, test frequency, and system sensitivity. Furthermore, it is highly desirable for all ultrasonic vibrations (including
successively re-reflected echoes of the first reflected pulse) to die out in the testpiece before the next initial pulse is
introduced. As a rule, the pulse-repetition rate should be set so that one pulse can traverse the testpiece enough times to
dissipate the sonic energy to a nondisplayable level before the next pulse is triggered. Both sound attenuation and pulse
reverberation are of little consequence except when inspecting large parts (for example, in the axial inspection of long
shafts).
Pulse-echo inspection can be accomplished with longitudinal, shear, surface, or Lamb waves. Straight-beam or angle-
beam techniques can be used, depending on testpiece shape and inspection objectives. Data can be analyzed in terms of
type, size, location, and orientation of flaws, or any combination of these factors. It should be noted, however, that some
forms of data presentation are inherently unable to pin-point the location of flaws unless the flaws are favorably oriented
with respect to the transmitted sonic beam. Similarly, type, location, and orientation of flaws often influence the
procedures and techniques used to estimate flaw size.
Sometimes it is advantageous to use separate sending and receiving transducers for pulse-echo inspection. (Separate
transducers are always used for through transmission inspection.) Depending mainly on geometric considerations, as
discussed later in this article, these separate transducers can be housed in a single search unit or in two separate search
units. The term pitch-catch is often used in connection with separate sending and receiving transducers, regardless of
whether reflection methods or transmission methods are involved.
Presentation of Pulse-Echo Data
Information from pulse-echo inspection can be displayed in different forms. The basic data formats include:
• A-scans: This format provides a quantitative display of signal amplitudes and time-of-
flight data
obtained at a single point on the surface of the testpiece. The A-
scan display, which is the most widely
used format, can be used to analyze the type, size, and location (chiefly depth) of flaws
• B-scans: This format provides a quantitative display of time-of-
flight data obtained along a line of the
testpiece. The B-
scan display shows the relative depth of reflectors and is used mainly to determine size
(length in one direction), location (both position and depth), and to a certain degree the shape and
orientation of large flaws
• C-scans: This format provides a se
miquantitative or quantitative display of signal amplitudes obtained
over an area of the testpiece surface. This information can be used to map out the position of flaws on a
plan view of the testpiece. A C-scan format also records time-of-flight data, whi
ch can be converted and
displayed by image-processing equipment to provide an indication of flaw depth
A-scan and B-scan data are usually presented on an oscilloscope screen; C-scan data are recorded by an x-y plotter or
displayed on a computer monitor. With computerized data acquisition and image processing, the display formats can be
combined or processed into more complex displays.
A-scan display is basically a plot of amplitude versus time, in which a horizontal baseline on an oscilloscope screen
indicates elapsed time while the vertical deflections (called indications or signals) represent echoes (Fig. 9). Flaw size can
be estimated by comparing the amplitude of a discontinuity signal with that of a signal from a discontinuity of known size
and shape; the discontinuity signal also must be corrected for distance losses.
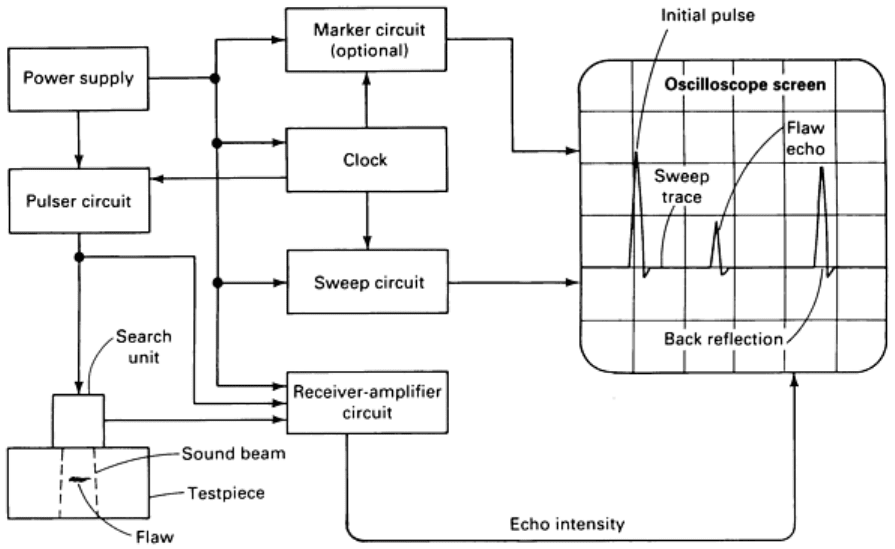
Fig. 9 Typical block diagram of an analog A-scan setup, including video-mode display, for basic pulse-
echo
ultrasonic inspection
Flaw location (depth) is determined from the position of the flaw echo on the oscilloscope screen. With a calibrated time
base (the horizontal sweep of the oscilloscope), flaw location can be measured from the position of its echo on the
horizontal scale calibrated to represent sound travel within the test object. The zero point on this scale represents the entry
surface of the testpiece.
Display Modes. A-scan data can be displayed in either of two modes--radio frequency (RF) mode, in which the
individual cycles comprising each pulse are visible in the trace; or video mode, in which only a rectified voltage
corresponding to the envelope of the RF wave packet is displayed. The video mode is usually suitable for ordinary
ultrasonic inspection, but certain applications demand use of the RF mode for optimum characterization of flaws.
System Setup. A typical A-scan setup that illustrates the essential elements in a basic system for pulse-echo inspection
is shown in Fig. 9. These elements include:
• Power supply, which may run on alternating current or batteries
• Electronic clock, or timing circuit, to trigger pulser and display circuits
• Pulser circuit, or rate generator, to control frequency, amplitude, and pulse-
repetition rate of the voltage
pulses that excite the search unit
• Receiver-
amplifier circuit to convert output signals from the search unit into a form suitable for
oscilloscope display
• Sweep circuit to control (a) time delay between search-
unit excitation and start of oscilloscope trace and
(b) rate at which oscilloscope trace travels horizontally across the screen
• Oscilloscope screen, including separate controls for trace brightness, trace focus, and illuminated
measuring grid
The search unit and the coaxial cable, although not strictly part of the electronic circuitry, must be matched to the
electronics. Otherwise, the response of the transducer element to excitation voltages and the output voltage corresponding
to echo vibrations can exhibit excessive ringing or an apparently low sensitivity.
Signal Display. The oscilloscope screen in Fig. 9 illustrates a typical video-mode A-scan display for a straight-beam
test (as defined earlier in this section). The trace exhibits a large signal corresponding to the initial pulse, shown at left on
the screen, and a somewhat smaller signal corresponding to the back reflection, at right on the screen. Between these two
signals are indications of echoes from any interfaces within the testpiece; one small signal corresponding to the flaw
shown in the testpiece, also illustrated in Fig. 9, appears between the initial pulse and the back reflection on the screen.
The depth of the flaw can be quickly estimated by visual comparison of its position on the main trace relative to the
positions of the initial pulse and back reflection. Its depth can be more accurately measured by counting the number of
vertical reference lines from either the initial pulse or the back reflection of the flaw signal location on the screen in Fig.
9.
Applications. The A-scan display is not limited to the detection and characterization of flaws; it can also be used for
measuring thickness, sound velocities in materials of known thickness, attenuation characteristics of specific materials,
and beam spread of ultrasonic beams. Commercial instruments are usually adequate for these purposes, as well as for
detecting the small cracks, porosity, and inclusions that are within the limits of resolution for the particular instrument and
inspection technique. In addition to conventional single-transducer pulse-echo inspection, A-scan display can be used
with transmission or reflection techniques that involve separate sending and receiving transducers.
B-scan display is a plot of time versus distance, in which one orthogonal axis on the display corresponds to elapsed
time, while the other axis represents the position of the transducer along a line on the surface of the testpiece relative to
the position of the transducer at the start of the inspection. Echo intensity is not measured directly as it is in A-scan
inspection, but is often indicated semiquantitatively by the relative brightness of echo indications on an oscilloscope
screen. A B-scan display can be likened to an imaginary cross section through the testpiece where both front and back
surfaces are shown in profile. Indications from reflecting interfaces within the testpiece are also shown in profile, and the
position, orientation, and depth of such interfaces along the imaginary cutting plane are revealed.
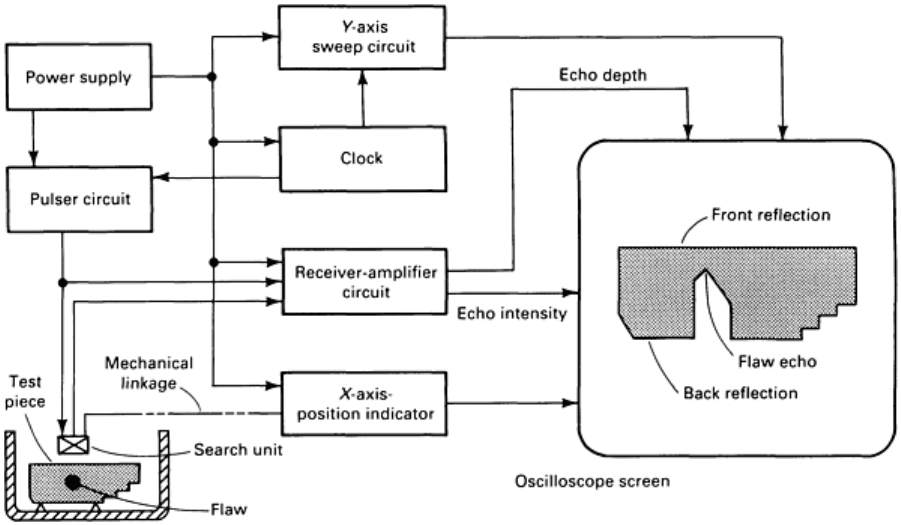
System Setup. A typical B-scan system is shown in Fig. 10. The system functions are identical to the A-scan system
except for the following differences.
Fig. 10 Typical B-scan setup, including video-mode display, for basic pulse-echo ultrasonic inspection
First, the display is generated on an oscilloscope screen that is composed of a long-persistence phosphor, that is, a
phosphor that continues to fluoresce long after the means of excitation ceases to fall on the fluorescing area of the screen.
This characteristic of the oscilloscope in a B-scan system allows the imaginary cross section to be viewed as a whole
without having to resort to permanent imaging methods, such as photographs. (Photographic equipment, facsimile
recorders, or x-y plotters can be used to record B-scan data, especially when a permanent record is desired for later
reference.)
Second, the oscilloscope input for one axis of the display is provided by an electromechanical device that generates an
electrical voltage or digital signals proportional to the position of the transducer relative to a reference point on the
surface of the testpiece. Most B-scans are generated by scanning the search unit in a straight line across the surface of the
testpiece at a uniform rate. One axis of the display, usually the horizontal axis, represents the distance traveled along this
line.
Third, echoes are indicated by bright spots on the screen rather than by deflections of the time trace. The position of a
bright spot along the axis orthogonal to the search-unit position axis, usually measured top to bottom on the screen,
indicates the depth of the echo within the testpiece.
Finally, to ensure that echoes are recorded as bright spots, the echo-intensity signal from the receiver-amplifier is
connected to the trace-brightness control on the oscilloscope. In some systems, the brightnesses corresponding to different
values of echo intensity may exhibit enough contrast to enable semiquantitative appraisal of echo intensity, which is
related to flaw size and shape.
Signal Display. The oscilloscope screen in Fig. 10 illustrates the type of video-mode display that is generated by B-
scan equipment. On this screen, the internal flaw in the testpiece shown at left in Fig. 10 is shown only as a profile view
of its top reflecting surface. Portions of the testpiece that are behind this large reflecting surface are in shadow. The flaw
length in the direction of search-unit travel is recorded, but the width (in a direction mutually perpendicular to the sound
beam and the direction of search-unit travel) is not recorded except as it affects echo intensity and therefore echo-image
brightness. Because the sound beam is slightly conical rather than truly cylindrical, flaws near the back surface of the
testpiece appear longer than those near the front surface.
Applications. The chief value of B-scan presentations is their ability to reveal the distribution of flaws in a part on a
cross section of that part. Although B-scan techniques have been more widely used in medical applications than in
industrial applications, B-scans can be used for the rapid screening of parts and for the selection of certain parts, or
portions of certain parts, for more thorough inspection with A-scan techniques. Optimum results from B-scan techniques
are generally obtained with small transducers and high frequencies.
C-scan display records echoes from the internal portions of testpieces as a function of the position of each reflecting
interface within an area. Flaws are shown on a readout, superimposed on a plan view of the testpiece, and both flaw size
(flaw area) and position within the plan view are recorded. Flaw depth normally is not recorded, although it can be
measured semiquantitatively by restricting the range of depths within the testpiece that is covered in a given scan. With an
increasing number of C-scan systems designed with on-board computers, other options in image processing and
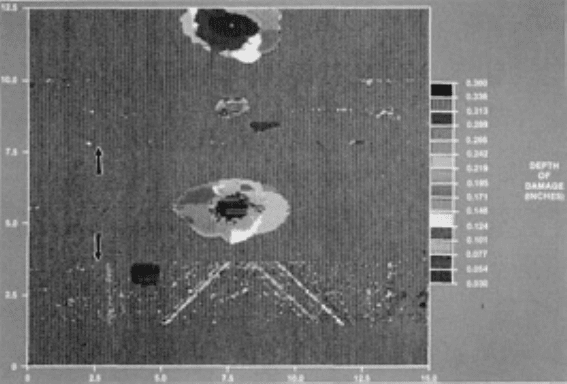
enhancement have become widely used in the presentation of flaw depth and the characterization of flaws. An example of
a computer-processed C-scan image is shown in Fig. 11, in which a graphite-epoxy sample with impact damage was
examined using time-of-flight data. The depth of damage is displayed with a color scale in the original photograph.
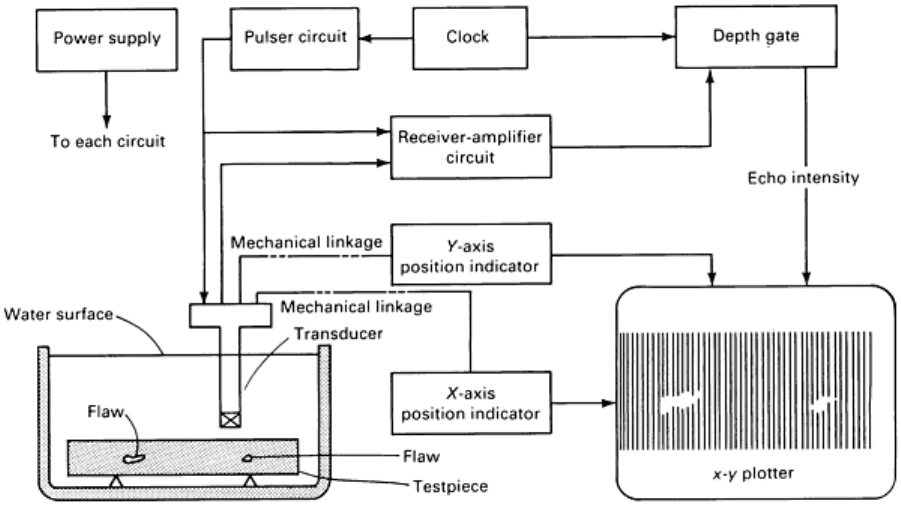
Fig. 11 Time-of-flight C-scan image of impact damage in graphite-
epoxy laminate supported by two beams
(arrows)
System Setup. In a basic C-scan system, shown schematically in Fig. 12, the search unit is moved over the surface of
the testpiece in a search pattern. The search pattern may take many forms; for example, a series of closely spaced parallel
lines, a fine rastor pattern, or a spiral pattern (polar scan). Mechanical linkage connects the search unit to x-axis and y-axis
position indicators, which in turn feed position data to the x-y plotter or facsimile device. Echorecording systems vary;
some produce a shaded-line scan with echo intensity recorded as a variation in line shading, while others indicate flaws
by an absence of shading so that each flaw shows up as a blank space on the display (Fig. 12).
Fig. 12 Typical C-scan setup, including display, for basic pulse-echo ultrasonic immersion inspection
Gating. An electronic depth gate is another essential element in C-scan systems. A depth gate is an electronic circuit that
allows only those echo signals that are received within a limited range of delay times following the initial pulse or
interface echo to be admitted to the receiver-amplifier circuit. Usually, the depth gate is set so that front reflections and
back reflections are just barely excluded from the display. Thus, only echoes from within the testpiece are recorded,
except for echoes from thin layers adjacent to both surfaces of the testpiece. Depth gates are adjustable. By setting a depth
gate for a narrow range of delay times, echo signals from a thin slice of the testpiece parallel to the scanned surface can be
recorded, with signals from other portions being excluded from the display.
Some C-scan systems, particularly automatic units, incorporate additional electronic gating circuits for marking, alarming,
or charting. These gates can record or indicate information such as flaw depth or loss of back reflection, while the main
display records an overall picture of flaw distribution.
Interpretation of Pulse-Echo Data
The interpretation of pulse-echo data is relatively straightforward for B-scan and C-scan presentations. The B-scan always
records the front reflection, while internal echoes or loss of back reflection, or both, are interpreted as flaw indications.
Flaw depth is measured as the distance from the front reflection to a flaw echo, with the latter representing the front
surface of the flaw. The length of a flaw can be measured as a proportion of the scan length or can be estimated visually
in relation to total scan length or to the size of a known feature of the testpiece. The position of a flaw can be determined
by measuring its position along the scan with respect to either a predetermined reference point or a known feature of the
testpiece. C-scan presentations are interpreted mainly by comparing the x and y coordinates of any flaw indication with
the x and y coordinates of either a predetermined reference point or a known feature of the testpiece. The size of a flaw is
estimated as a percentage of the scanned area. If a known feature is the size or position reference for the interpretation of
either B-scan or C-scan data, it is presumed that this feature produces an appropriate echo image on the display.
In contrast to normal B-scan and C-scan displays, A-scan displays are sometimes quite complex. They may contain
electronic noise, spurious echoes, or extra echoes resulting from scattering or mode conversion of the transmitted or
interrogating pulse, all of which must be disregarded in order to focus attention on any flaw echoes that may be present.
Furthermore, flaw echoes may exhibit widely varying shapes and amplitudes. Accurate interpretation of an A-scan
display depends on the ability of the operator to:
• Recognize the type of flaw based on echo shape or echo-intensity effects
• Determine flaw location by accurately measuring echo position on the time trace
• Estimate flaw size,
mainly from echo amplitudes with or without simultaneously manipulating the
search unit
• Assess the quality of the testpiece by evaluating the A-
scan data in terms of appropriate specifications or
reference standards
Basic A-scan displays are of the type shown in Fig. 13 for the immersion inspection of a plate containing a flaw. The
test material was 25 mm (1 in.) thick aluminum alloy 1100 plate containing a purely reflecting planar flaw. The flaw
depth was 45% of plate thickness (11.25 mm, or 0.44 in.), exactly parallel to the plate surfaces, and had an area equal to
one-third the cross section of the sound beam. Straight-beam immersion testing was done in a water-filled tank. There
were negligible attenuation losses within the test plate, only transmission losses across front and back surfaces.
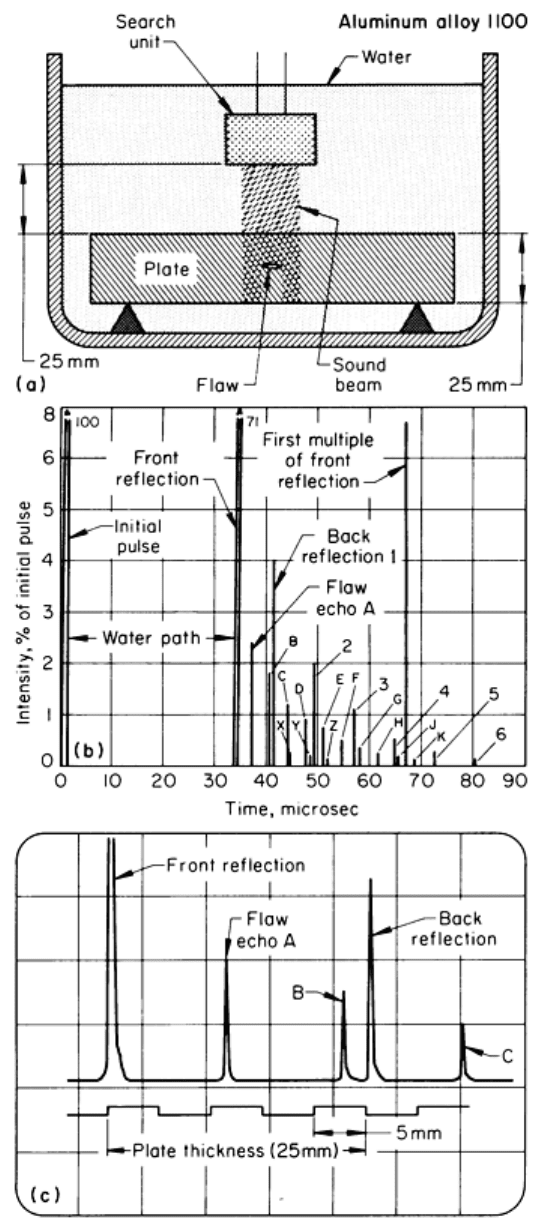
Fig. 13 Schematic of straight-
beam immersion inspection of a 25 mm (1 in.) thick aluminum alloy 1100 plate
containing a planar discontinuity showing (a) inspection setup, (b) complete video-mode A-scan
display, and
(c) normal oscilloscope display
Figures 13(a), 13(b), and 13(c), respectively, illustrate the inspection setup, the complete video-mode A-scan display, and
the normal video-mode display as seen on the oscilloscope screen. The normal display (Fig. 13c) represents only a portion
of the complete display (Fig. 13b). The normal display is obtained by adjusting two of the oscilloscope controls
(horizontal position and horizontal sweep) to display only the portion of the trace corresponding to the transit time (time
of flight) required for a single pulse of ultrasound to traverse the testpiece from front surface to back surface and return.
Also, the gain in the receiver-amplifier is adjusted so that the height of the first back reflection equals some arbitrary
vertical distance on the screen, usually a convenient number of grid lines.
As illustrated in Fig. 13(b), there is a tendency for echoes to reverberate, that is, to bounce back and forth between
reflecting surfaces. Each time an echo is reflected from the front surface, a portion of the sound wave energy escapes
through the boundary to impinge on the transducer and produce an indication on the display. In Fig. 13(b), the indications
labeled 1 through 6 are reverberations of the back reflection, those labeled A through K are reverberations of the primary
flaw echo, and those labeled X through Z are reverberations of a subordinate flaw echo induced by re-reflection of the
first back reflection.
Only a few types of flaws will produce the types of indications described above. Most flaws are not exactly parallel to the
surface of the testpiece, not truly planar but have rough or curved interfaces, not ideal reflectors, and of unknown size.
These factors, together with the specific sound-attenuating characteristics of the bulk material, affect the size and shape of
the echo signals. The following sections describe how specific material conditions produce and modify A-scan
indications.
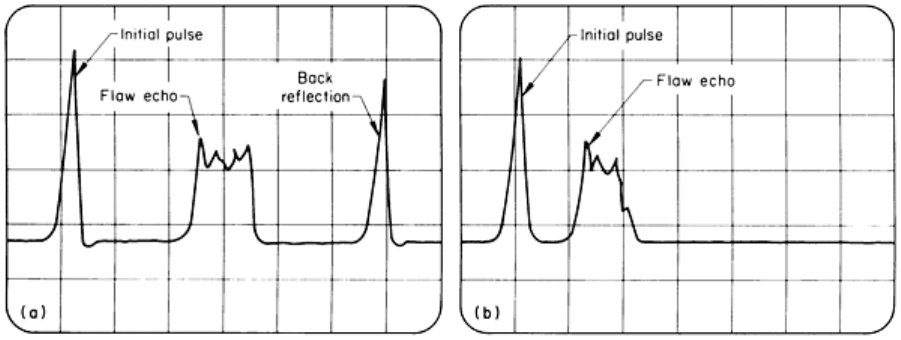
Echo shape is primarily affected by the shape, orientation, and sound-reflecting characteristics of an interface. Metal/air
interfaces produce sharp indications if the interfaces are relatively smooth and essentially parallel to the front surface. If
an interface is curved (such as the surface of a large pore) or rough (such as a crack, seam, or lamination) or if it is not
ideally reflecting (such as the surface of a metallic inclusion or a slag inclusion), the interface will produce a broadened
echo indication, as shown in Fig. 14. If the interface is smaller in area than the cross section of the ultrasonic beam or if
ultrasonic waves are transmitted through the interface, a back-surface echo (back reflection) will appear to the right of the
flaw echo on the oscilloscope screen, as shown in Fig. 14(a). However, if the flaw is larger than the ultrasonic beam or if
the back surface is not normal to the direction of wave travel, no back reflection will appear on the screen, as shown in
Fig. 14(b). Often, the amplitude of a broad indication will decrease with increasing depth, as in Fig. 14(b), especially
when the echo is from a crack, seam, or lamination rather than an inclusion. Sometimes, especially if the echo is from a
spherical flaw or from an interface that is not at right angles to the sound beam, the echo amplitude will increase with
depth.
Fig. 14 A-scan displays of broadened-
echo indications from curved rough or scattering interfaces showing (a)
indications with back reflection and (b) indications without back reflection. See text for discussion.
Echo amplitude, which is a measure of the intensity of a reflected sound beam, is a direct function of the area of the
reflecting interface for flat parallel reflectors. If the interface is round or curved or is not perpendicular to the sound beam,
echo amplitude will be reduced. The effects of roughness, shape, and orientation of the interface on echo amplitude must
be understood because these factors introduce errors in estimates of flaw size.
