ASM Metals HandBook Vol. 17 - Nondestructive Evaluation and Quality Control
Подождите немного. Документ загружается.


The flaws used are straight artificial grooves, cutting the samples across their entire length. The parameter investigated is
the frequency of the resonance peak. The results for aluminum and stainless steel are comparable. The differences
between scalar analysis of the aluminum and the Armco iron were significant.
The lift-off effect is basically different for the aluminum and the Armco iron but the same for the aluminum and the
stainless steel. For a lift-off, h, of more than 300 m (0.012 in.), the frequency remains stable for aluminum, while
from 300 to 100 m (0.012 to 0.004 in.), the frequency increases from 4014 to 4024 MHz. For Armco iron, the frequency
increases almost exponentially from 3800 MHz at 600 m (0.024 in.) lift-off to 4300 MHz at 100 m (0.004 in.). The
frequency variation in iron is due to the variation of the space between the magnetic and the metal. In the nonmagnetic
metals, the frequency variation is due to the eddy currents in the metal.
In the configurations illustrated in Fig. 39 and 40, the sensitivity of the frequency measurement is 100 kHz, mostly
limited by instabilities. The graph of frequency shift caused by a 100 × 100 m (0.004 × 0.004 in.) flaw in each of the
three metals with a lift-off of 100 m (0.004 in.) is smallest for aluminum, medium for the stainless steel, and largest for
the Armco iron. The values of frequency shift are 4 MHz for aluminum, 12 MHz for stainless steel, and 27 MHz for
Armco iron. Flaws of 10 × 5 m (400 × 200 in.) were lost in the background for all three materials.
The experiments confirmed that FMR probes have better sensitivity to flaws for ferromagnetic materials than for
nonmagnetic metals. On nonmagnetic metals, the frequency shift is due to eddy currents, while in ferromagnetic metals,
the frequency shift is caused by a modification of the bias field by the flaw. Because a frequency shift of 0.1 MHz can be
measured, a field variation of 0.05% can be detected.
References cited in this section
34.
B.A. Auld, F. Muennemann, and D.K. Winslow, "Observation of Fatigue-
Crack Closure Effects with the
Ferromagnetic-
Resonance Probes," G.L. Report 3233, E.L. Ginzton Laboratory, Stanford University, March
1981
35.
B.A. Auld, et al., Surface Flaw Detection With Ferromagnetic Resonance Probes, in Proceedings o
f
DARPA/AFML Review of Progress in Quantitative NDE
(La Jolla, CA), Defense Advanced Research
Projects Agency, July 1980
36.
B.A. Auld, New Methods of Detection and Characterization of Surface Flaws, in
Proceedings of
DARPA/AFML Review of Progress in Quantitative NDE
(Cornell University), Defense Advanced Research
Projects Agency, June 1977
37.
B.A. Auld, et al., Surface Flaw Detection With Ferromagnetic Resonance Probes, in
Proceedings of
DARPA/AFML Review of Progress in Quantitative NDE (La Jolla, CA),
Defense Advanced Research
Projects Agency, July 1978
38.
B.A. Auld, et al., Surface Flaw Detection With Ferromagnetic Resonance Probes, in
Proceedings of
DARPA/AFML Review of Progress in Quantitative NDE
(La Jolla, CA), Defense Advanced Research
Projects Agency, July 1979
39.
B.A. Auld and D.K. Winslow, Microwave Eddy Current Experiments With Ferromagnetic Probes, in
Eddy
Current Characterization of Material and Structures,
STP 722, G. Birnbaum and G. Free, Ed., American
Society for Testing and Materials, 1981, p 348-366
40.
A.F. Harvey, Properties and Applications of Gyromagnetic Media, in Microwave Engineering,
Academic
Press, 1963, p 352-358
41.
S. Segaline, et al.,
Application of Ferromagnetic Resonance Probes to the Characterization of Flaws in
Metals, J. Nondestr. Eval., Vol 4 (No. 2), 1984, p 51-58
Microwave Inspection
William L. Rollwitz, Southwest Research Institute

Eddy Currents for Holes and Areas of Small Radii
To make microwave eddy current measurements in holes and in areas of small radii of curvature, a slow-wave structure
has been used at Southwest Research Institute. This slow-wave structure is similar to a helical antenna or a helix TWT
except that the last turn of the helix is shorted. This shorting forms a shorted spiral transmission line without a shield. In
the test unit, the length and diameter will be adjusted so that when this helix is placed within the hole, it forms a helical
resonator when the last turn is not shorted or a spiral delay line when the helix is shorted. When the helical antenna is
used with the system shown in Fig. 32, the amplitude and phase signals will measure the surface impedance, which can be
related to its corrosion susceptibility. Multiple helical probes could be constructed so that a number of hole sizes could be
measured.
For an area with a small radius of curvature, the slow-wave helix could be made flexible so as to conform to the definite
configuration of the part, or it could be scanned over the surface. By calibration, then, the surface impedance could be
related to the corrosion susceptibility of the surface under inspection.
In any case, the microwave signal is carried either by a wire of the helix so that it has sensitivity both inside and outside
of the helix or by a hollow pipe of circular or rectangular cross section that can be made sensitive for surface impedance
measurements through slots or holes in the pipe. Therefore, a multitude of configurations are possible to meet the needs
for surface impedance measurements on the different shapes of aircraft components.
Microwave Inspection
William L. Rollwitz, Southwest Research Institute
Microwave Holography Practice
A hologram is a recording of an interference pattern formed by superimposing a reference electromagnetic wave on the
object-scattered electromagnetic wave (Ref 42). Because the interference depends on the relative amplitudes and phases
of the incident and scattered waves, highly coherent waves (same frequency and same phase) must be used to keep the
phase relationship constant during the generation of the microwave hologram.
The reference wave is called E
1
, and it is assumed to be a plane wave (same frequency, same phase). The object-scattered
wave is E
2
, and any point on the interference pattern in the x-y plane will be described by an intensity (I(x,y)) variation:
I(x,y) = (E
1
+ E
2
)(E
1
+ E
2
)*
= |E
1
|
2
+ |E
2
|
2
+ E
1
E*
2
+ E*
1
E
2
(Eq 13)
where the asterisk indicates the complex conjugate. In the photographic record, the last two terms, E
1
E*
2
and E*
1
E
2
, are
the only contributors because they are the relative signal-bearing terms. The |E
1
|
2
and |E
2
|
2
terms are the zero-order
diffracted terms upon reconstruction. When the interference pattern is illuminated with a third plane wave, E
3
, a
modulated wave, E
4
, is generated, which is given by:
E
4
= E
3
E
1
E*
2
+ E
3
E*
1
E
2
(Eq 14)
Because both E
1
and E
3
are plane waves, E
1
= E*
1
and the product terms E
3
E
1
and E
3
E*
1
are constants. Equation 14
states that the object-scattered wave E
2
and its conjugate E*
2
are reconstructed so that virtual and real object images are
reconstructed.
Zone Plates. A hologram can be looked upon as a microwave interference pattern consisting of many coherently
superimposed zone plates. Then, holography, whether at microwave or light frequencies, becomes a relatively simple
diffraction process that is fully understandable without concern for phase, modulation, coding, or some of the other
concepts often mentioned as means to assist the understanding of holograms. Rogers was the first to note the similarity of
holograms and zone plates (Ref 43). Later, he used holograms to generate microwave radar zones plates. A zone plate is
defined as a diffracting screen so constructed that it obstructs alternate Fresnel zones of a wave front.
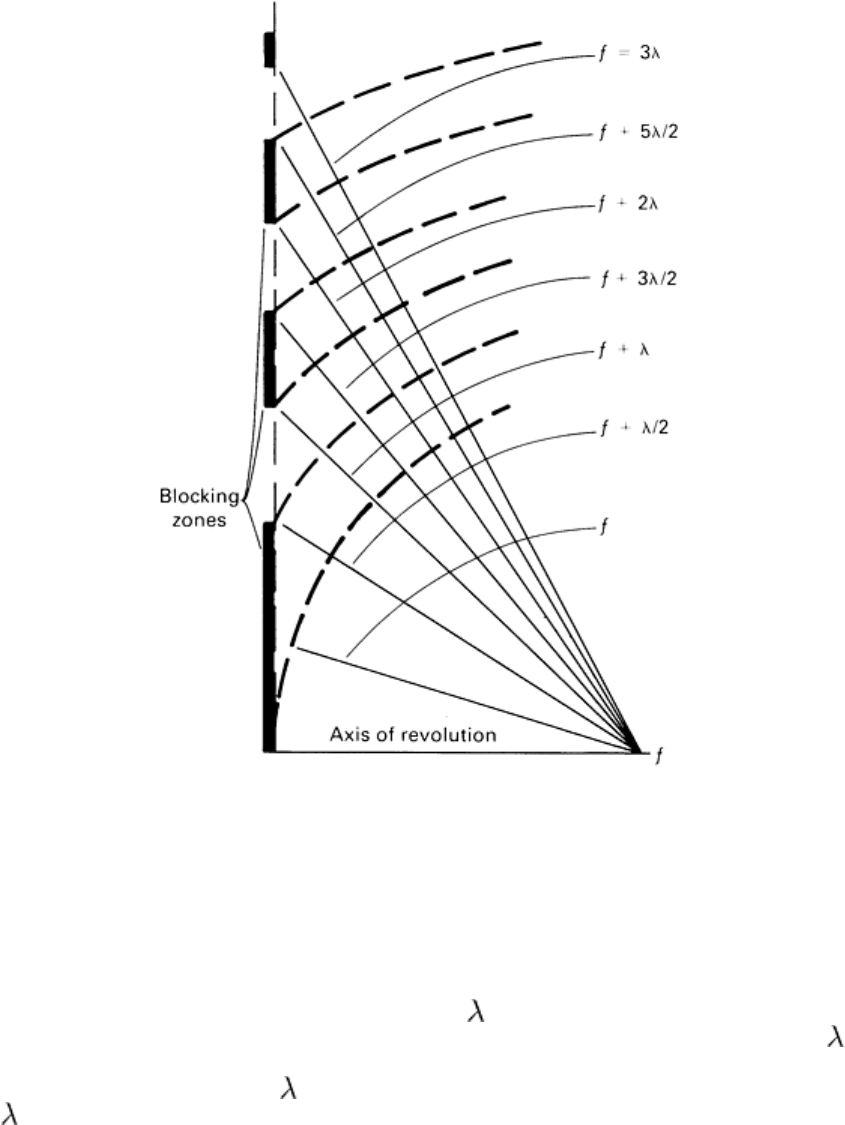
Figure 41 illustrates a zone plate with an opaque disk at its center element. The open spaces permit the passage of energy
that will add at the focal point, f. The opaque rings prevent the passage of energy that would interfere at the focal point.
The opaque or blocking zones can be replaced with open spaces, and the zone plate will function the same as the one
shown in Fig. 41. The zone plate also generates a set of diverging waves, which is very important to the hologram. It is
the diverging waves that give the three-dimensional view to the object obtained from the hologram.
Fig. 41
A zone plate having an opaque disk as its center element. The open spaces permit the passage of
energy that will add at the focal point, and the opaque rings prevent the pass
age of energy that would interfere
at that point. Source: Ref 43
The design procedure for zone plates is indicated in Fig. 41. Circles are drawn with centers at the desired focal point and
with radii differing by one-half the design wavelength. The radii of these circles intercept the plane of the zone plate. The
first circle has a radius of f. The radius of the second circle is (f + /2). Where the second circle intersects the zone plate,
the first transparent ring starts. The end of the first transparent ring is where the third circle of radius (f + 3 /2) intersects
the zone plate. The third circle is also the start of the first opaque or blocking zone. This process continues with the radius
of each successive circle being increased by /2 over the radius of the previous circle. The intersection of the first circle
of radius (f + /2) with the zone plate marks the end of the first or central blocking zone.
Optical Holography. The way a hologram of a point source of light might be made is shown in Fig. 42. In the
developed photographic zone plate shown in Fig. 42(a), the open spaces pass only the energy that will add constructively
at a desired focal point. The opaque rings prevent the passage of energy that would interfere destructively at the desired
focal length. Where laser light illuminates the hologram in the reconstruction process, shown in Fig. 42(b), diffraction
causes converging waves to create a real image of the spot of light at the focal point F. Diffraction at the zone plate also
generates diverging waves that create, for a viewer, the illusion that there is a point of light also located at the conjugate
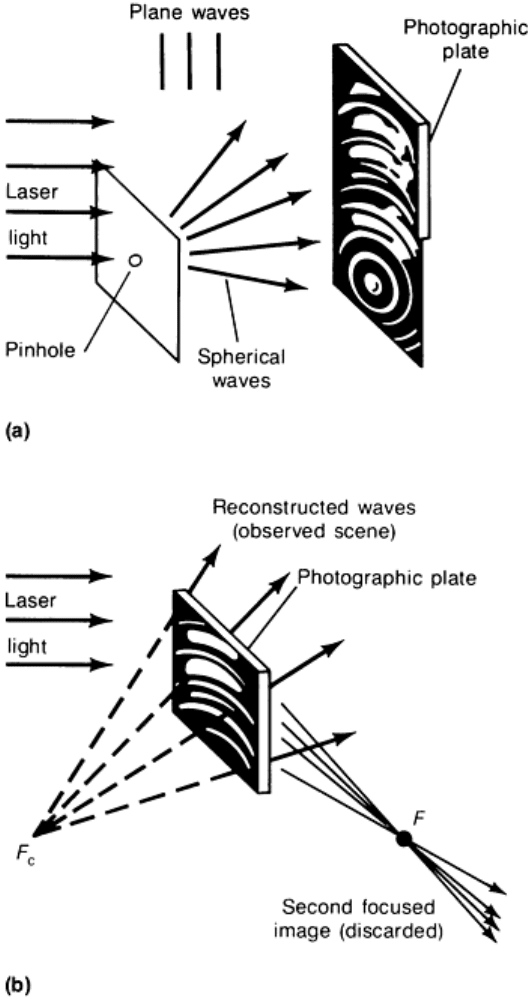
focal point F
c
in Fig. 42(b). The diverging light is indistinguishable from the light from the pin hole, and the viewer
imagines he sees the second source of light located in the space behind the illuminated zone plate (hologram). Detailed
information is available in the article "Optical Holography" in this Volume.
Fig. 42 Schematic o
f the Gabor holographic. Construction (a) and reconstruction (b) when recording a point
source of light (pinhole in an opaque screen). The interference pattern generated corresponds to the pattern of
a two-dimensional zone plate. Source: Ref 43
Microwave Holography. Microwaves in microwave holography are analogous to laser light in optical holography. A
microwave hologram can be defined as the photographically recorded interference pattern between a set of coherent (at
the same frequency and phase) microwaves of interest and a coherent reference wave generated by the same source. This
method is still used today.
The equipment for making a microwave hologram is illustrated in Fig. 43. The interference patterns were made visible by
photographic scanning. In making the pattern, two wave sets are required. The first is the incident wave from the feed
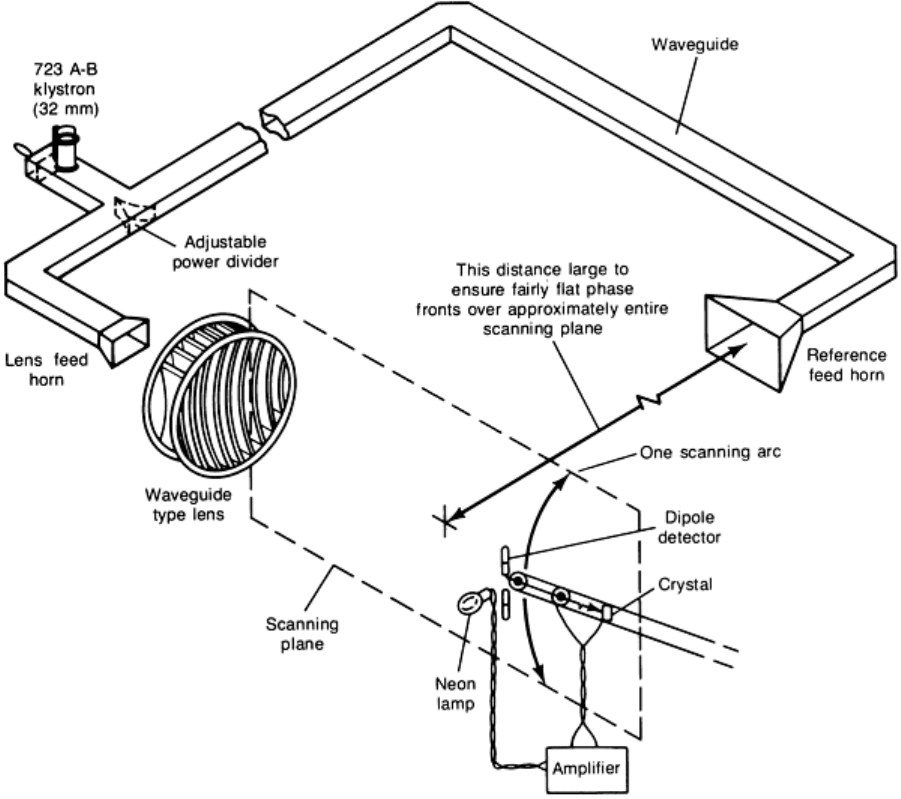
horn that is passed through a type of waveguide lens, and the second is the reference wave. These two wave sets cause an
interference pattern over the scanning plane where the incident wave and the reference wave are combined. A small
dipole probe antenna, with a small neon lamp attached, scanned the interference plate. The signal picked up by the small
dipole is peak detected, and the peak-detected signal is amplified and applied to the neon lamp, causing its brightness to
vary. A camera set at time exposure recorded the neon lamp brightness as a function of the position of the dipole detector.
The resulting photograph is the microwave interference pattern (a microwave hologram).
Fig. 43 Procedure for making a microwave hologram by photographic scanning. Source: Ref 44, 45
Two observations need to be made. First, photographic plates sensitive to microwaves have been studied for many years
without success. Second, microwave interference patterns can be made by two methods. The first method is photographs
of the interference pattern recorded on a microwave liquid crystal display. The second method is through the use of the
thermograph. Both of these techniques are discussed in the section "Instrumentation" in this article.
A third observation must also be made. In Fig. 43, the hologram is made photographically by converting the interference
pattern, point-by-point, from a microwave intensity to light intensity and then photographing the light intensity point-by-
point. Also in Fig. 43, the reference is an electromagnetic wave that is added to the electromagnetic waves reflected or
refracted by the object. There is another way to achieve the same result. At microwave frequencies over the complete
band of interest (300 to 300,000 MHz) it is possible to produce an interference pattern without producing a radiated
reference electromagnetic plane wave or a reference spherical wave. This can be done by adding, before detection, a
locally produced reference signal to the signal detected from the object, as shown in Fig. 9.

To simulate a plane wave, using a reference wave, R, added to the object signal, S, the phase of the locally produced
signal must vary linearly with the displacement of the probe in Fig. 9 in its direction of travel (Fig. 9). This linear
variation in phase is most readily achieved by linking the motion of the probe to the rotations of the phase shifter (Ref
46).
The simulation of a spherical wave is more complicated. Within the Fresnel approximation, the phase can be made to vary
quadratically (in-phase and quadrature-phase) with position, and this will suffice (Ref 46). This method of using a local
reference signal, R, with a programmable phase leads to more possibilities (Ref 46). For example, it is possible to
simulate a slow wave in which the dielectric constant is larger than that of free space so that the wave travels slower than
in free space. Because the phase is rotated in synchronism with the probe motion, the phase shifter can be rotated at any
desired rate to simulate an arbitrarily large wave vector. This makes it possible to shift the spectrum of the object, even
when it occupies a wide band, enough to avoid overlap with the image spectrum. This separates real and virtual images in
the reconstruction.
Another possibility is the simulation of a noiselike reference wave in which the phase is made to vary in some arbitrary
manner, such as (x,y), as a function of position. In this case, for the purpose of reconstruction, the function (x,y) must
be stored for use during reconstruction (Ref 47). Further, the phase can be varied so that a simulation of the use of a
diffuse reference wave is obtained. The same diffuse reference wave must be used for reconstruction. The advantages of
using a programmable reference wave are (Ref 47):
• Easier instrumentation even in the case of a plane wave reference
• More flexibility
• The possibility of readily simulating complex modulation schemes
A further possibility is shown in Fig. 44(a), in which a product detector is used instead of the intensity-measuring device
or a square-law detector, which is composed of a multiplier and a low-pass filter. It is also called a correlator and is
widely used in interferometry and radio astronomy.
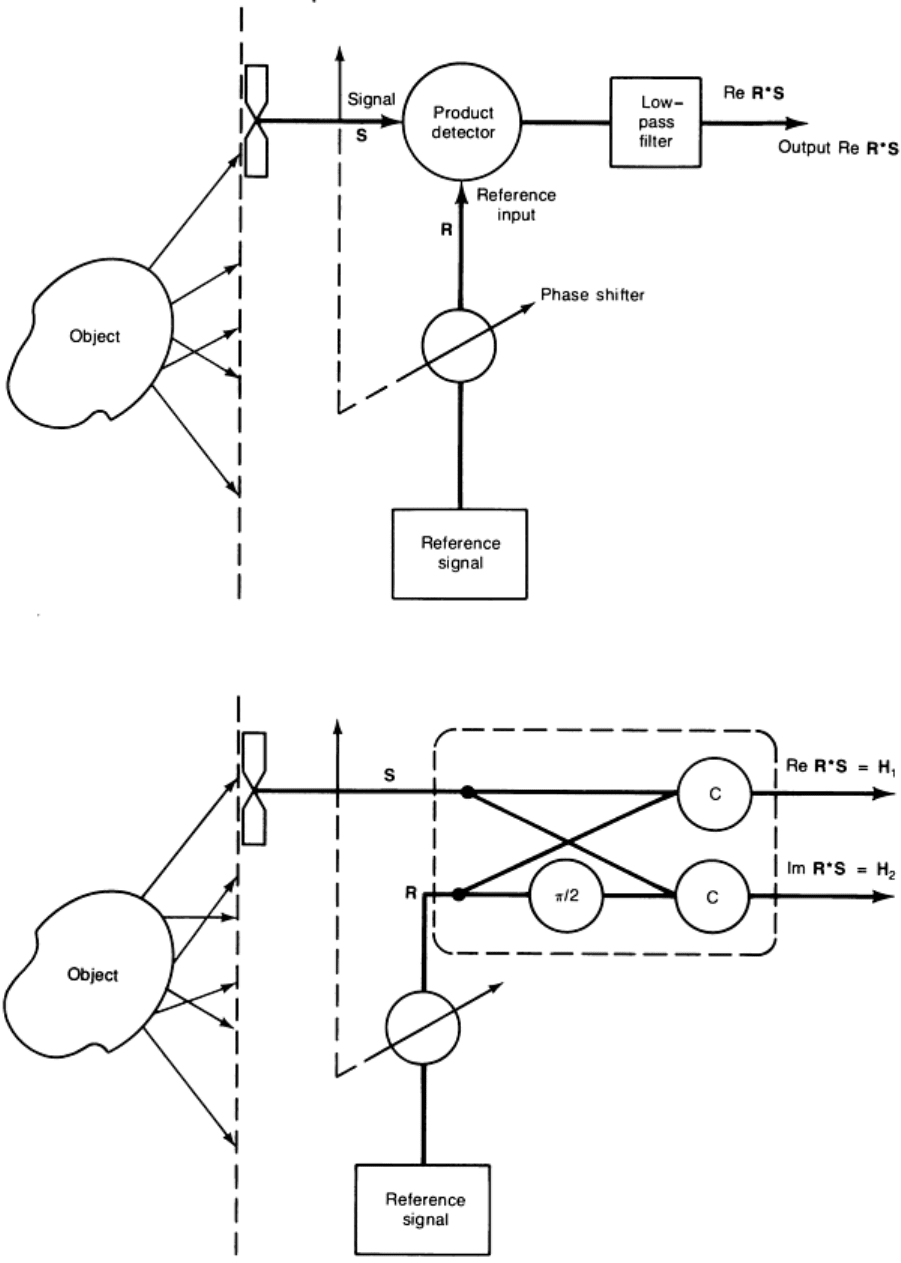
Fig. 44 Recording of (a) microwave product hologram and (b) microwave complex hologram H
1
+ jH
2
.
C,
product detector. Source: Ref 47
If R (reference) and S (signal) are the two inputs to the product detector and if S is from the object and R is from the
locally produced reference, the output of the product detector is Re R*S (the asterisk means a complex conjugate and Re

means the real part of the product of R* and S). The output recorded as a function of the probe position (f(x,y), Fig. 44a)
is called a product hologram. It can be transcribed to a photographic plate and used exactly as the intensity hologram in
the reconstruction. The only difference is that the product hologram does not contain the unwanted terms |R|
2
and |S|
2
because these have been filtered out. In some cases of intensity holography, the spectrum of |S|
2
could overlap R*S and
RS*, resulting in distortions. Because the product hologram is not always positive, it must be transcribed with its sign.
At microwave frequencies, it is relatively easy to record both phase and amplitude of the field instead of just the intensity.
This can be done with two product detectors. One product detector correlates R and S and the other jR and S, where jR is
R shifted by 90°. The two outputs are the real and imaginary parts of R*S. Recorded as two functions, H
1
(x,y) and
H
2
(x,y), they form the complex hologram.
For the complex hologram, the shifting of the phase of the reference is dispensed with. The function of phase shift was
only to make it possible to recover the phase after recording only one intensity pattern. This phase recovery can be
understood by a comparison with the complex hologram. If the phase of the reference wave, R, varies very rapidly
compared to the signal, S, that is, if the signal S does not change appreciably as R goes through a complete phase rotation,
two intensity measurements taken at points where the phase of R differs by 90° will be equivalent to a measurement of
R*S. The complex hologram consists of two maps, H
1
(x,y) = Re R*S and H
2
(x,y) = Im R*S, as functions of position in
the plane of the record. If it is desired to reproduce S at some point, then multiplying signal R by H
1
and jR by H
2
and
adding the results will accomplish it. If k|R|
2
is taken as unity, then the output is precisely S.
It is interesting that in contrast to the intensity hologram, only one image, the virtual image, is produced. If the real image
is desired, all that needs to be done is to change the +90° phase shift to -90°.
Microwave and millimeter wave holography has several advantages over optical holography (Ref 47):
•
More favorable propagation through the atmosphere so that images of reflecting objects can be made
through fog, haze, and other optically opaque dielectric barriers
• The availability of well-
established and more flexible detection and electronic processing methods so
that image separation and enhancement can be achieved
• The information content is considerably lower than optical holograms, which permits real-
time
operation
Microwave holography has been used to aid airport security through the detection and identification of concealed
weapons and to provide close-range visualization of airport runways in inclimate weather.
Example 1: Use of Microwave Holography to Detect Concealed Weapons Aboard
Aircraft Baggage.
A holographic imaging experiment was conducted to produce a visible image of guns at 70 GHz. The simplified block
diagram of the system used is shown in Fig. 45(a). The weapon was irradiated with 70 GHz ( = 4.3 mm, or 0.17 in.) in a
CW mode. The output of the klystron used was 750 mW, and it was fed to a parabolic antenna that produced uniform
irradiance of 0.2 mW/cm
2
(1.3 mW/in.
2
). The phase distribution of the wave field scattered by the weapon was mapped by
a spiral scanning pyramidal horn that had a 10 × 7.7 mm (0.39 × 0.30 in.) receiving aperture. The output of the receiver
phase detection system is a value proportional to the phase of the field of the detected object. The display on an
oscilloscope was photographed to produce a phasigram from which the image was retrieved by the method shown in Fig.
45(b). The reconstructed image of a gun showed that its general outline was that of the gun used. The edges of the gun
were emphasized, as expected. The linear resolution at a range of 1 m (3.3 ft) from the antennas is about 10 mm (0.4 in.).
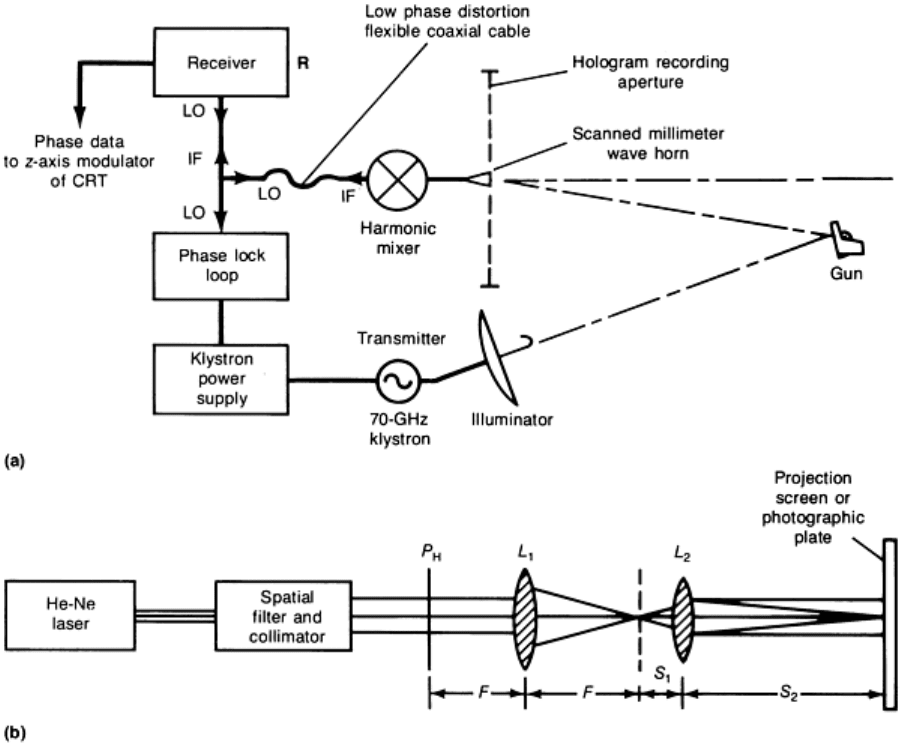
Fig. 45
Recording and reconstruction configurations for the detection of concealed weapons. (a) Simplified
block diagram of recording system. (b) Image retrieval arrangement.
IF, intermediate frequency; LO, local
oscillator. Source: Ref 47
Example 2: Use of Microwave Holography to Provide Close-Range Visualization
of Airport Runways.
The microwave holographic system was used for the close-range detection of a landing strip that was marked at regular
intervals with retroflectors (Ref 47). The microwave system was constructed to visualize holographically the distribution
of the retroreflectors on the runway. The landing aircraft would illuminate the marked runway with two microwave
beams. Because the one intended for imaging lies in the millimeter range, its wavelength is short enough so that it can
easily resolve the target (the runway). The longer-wavelength radiation is used to realize a target-derived reference beam.
This gives the advantages of reducing the required number of receiver elements in the airborne hologram recording array
and relaxes the accuracy with which the position of the receiver elements in the array must be known. The imaging
wavelength of 3 mm (0.12 in.) and a retroreflector separation of 6 in (20 ft) made the hologram recording array length, to
resolve two adjacent retroreflectors, 1.5 m (4.9 ft) at a maximum operational range of 3 km (9800 ft) (Ref 47).
Incoherent-to-Coherent Image Converters. Three incoherent-to-coherent image converters are listed in Table 4.
Although these devices were primarily developed for large-screen images, they are also potentially useful in real-time
analog imaging reconstruction from incoherent light pattern displays of hologram intensity or phase information. The
basic common property of these devices is their ability to transform an intensity pattern into a spatial amplitude or phase
modulation of a visible wave front; this is accomplished by the reflection or transmission of an interrogating beam
through them.
Table 4 Characteristics of incoherent-to-coherent image converters
Device Threshold
of
sensitivity,
mJ/cm
2
Contrast
ratio
Resolution,
lines/mm
Read in
time, s
Erasure
time,
s
Operational
mode
FERPIC (Ref 48) 10 mW/cm
2
40:1 50 1 PVK
0.01 CdS
Same as
read in
Storage
-Ruticon (Ref 49)
3 × 10
-2
. . . 80 TV frame
rates
0.01 (80%)
Real time
Photoconductor liquid crystal
sandwich (Ref 50, 51)
5 × 10
-3
30:1 10-20 (Ref 50,
51)
0.001 (Ref
52)
0.0001 (Ref
51)
3 × 10
-3
Real time or
storage
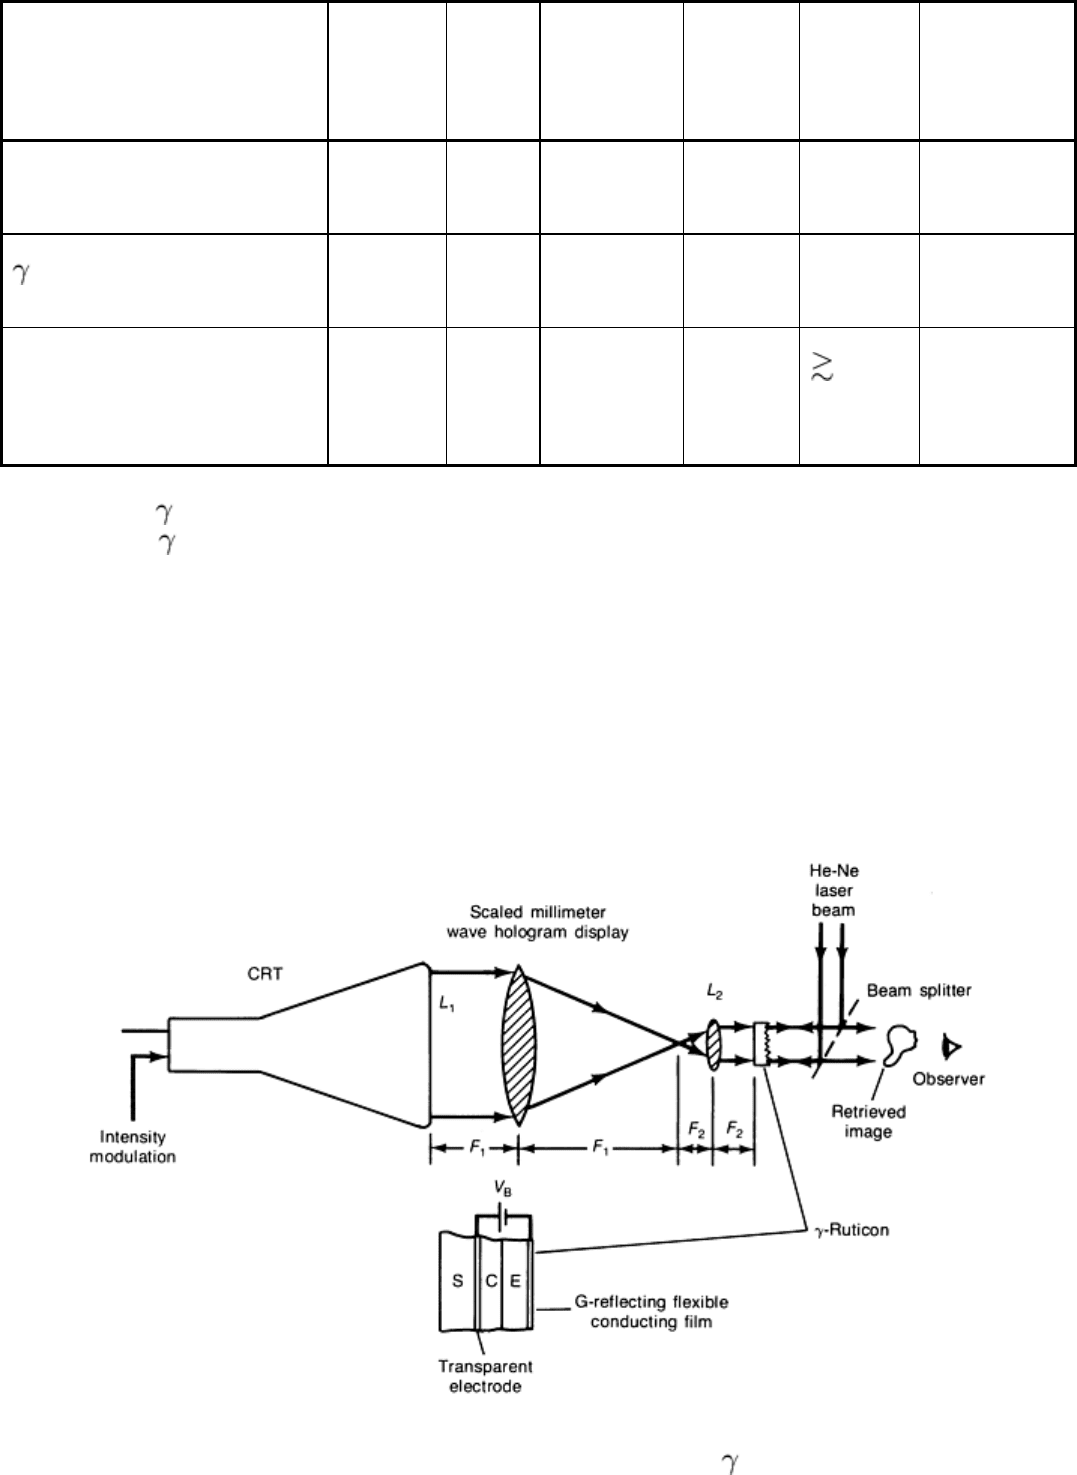
For example, the -Ruticon can be used to reconstruct millimeter or microwave holograms using the arrangement shown
in Fig. 46. The -Ruticon consists of a layered structure made of a conductive transparent substrate (S), a thin
photoconductive layer (C), an elastomer (E), and a thin flexible reflective gold electrode (G). A bias voltage, V
B
, is
applied between the conducting layers, as shown in the detail in Fig. 46. The device is capable of converting the hologram
intensity or phase distribution data displayed on the CRT face plate into a demagnified relief pattern of the flexible gold
surface. This surface behaves as a phase-modulated hologram from which the image can be retrieved with the aid of a
helium-neon laser beam (Ref 47). The device has the advantage of being:
• Repeatedly usable
• Compatible with the CRT display
• Capable of a fast enough response time that allows TV frame rates and therefore real-time operation
Fig. 46 Real-time millimeter wave hologram reconstruction utilizing a -Ruticon.
See text for discussion.
