ASM Metals HandBook Vol. 17 - Nondestructive Evaluation and Quality Control
Подождите немного. Документ загружается.

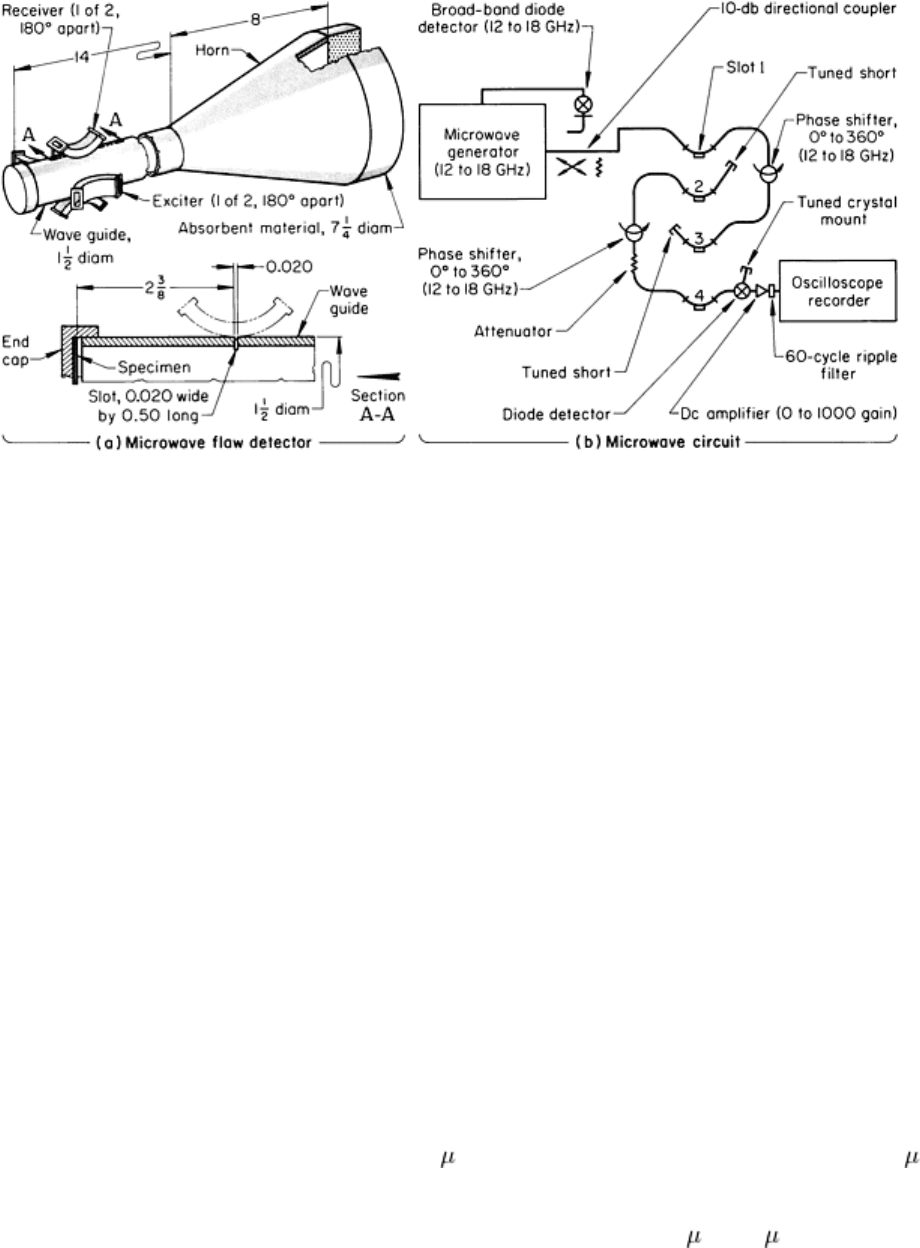
Fig. 26 "Nonresonant" standing-wave system that can be used for detecting cracks in metal parts.
Dimensions
given in inches. Source: Ref 19
In the system described above and shown in Fig. 26, the test surface acts as a short for one end of the waveguide section.
In order that the only waves present in the waveguide section are those incident on and reflected from the test specimen,
the opposite end of the waveguide section is made nonreflective by using a matching horn and absorbing material. The
exciter slots are so arranged that the cylindrical transverse electric (TE
1,1
) standing wave is set up by the reflections from a
flat (crack-free) specimen.
The goal of the design is to have none of the transverse magnetic (TM
1,1
or TM
2,1
) modes excited when the test specimen
is crack free. The presence of a crack in the surface of the test specimen disturbs the flow of current in the end required by
the transverse electric mode so that the higher-order transverse magnetic modes will be excited. Because the higher
modes are specifically caused by the currents due to the crack in the end plate, when the end plate is rotated these modes
will also rotate past the receiver slots. With the TM
1,1
mode, a receiver output shows two peaks for a 360° rotation; with
the TM
2,1
mode, four peaks are obtained from a full rotation. A crack at the exact center of the test surface does not
produce a signal.
A suitable operating frequency was found by sweeping the frequency while the specimen, with a groove 20.3 mm (0.8 in.)
long and 0.76 mm (0.030 in.) deep, was being rotated. The correct value is indicated by a zero-dc level and a signal
response to rotation of the groove that established the reference signal level. The microwave circuits were then tuned to
this frequency. For the groove that was 20.3 mm (0.8 in.) long and 0.25 mm (0.010 in.) deep, a frequency of 15.965 GHz
was used.
The influence of burrs was studied with a burr 0.0089 mm (0.00035 in.) high on a groove 0.08 mm (0.003 in.) deep. The
average signal with the burr had a peak-to-peak value of 15 V, while the average signal without the burr was 6 V.
Variations of signal outputs from fatigue cracks are shown in Fig. 27. The fatigue cracks were much smaller than the
notches used for calibration, being approximately 3.2 mm (0.125 in.) long and 1.25 m (50 in.) wide. The fourfold
variation shown in Fig. 27(a) was caused by the asymmetry of the interfaces between the sample holder and the sample.
The presence of one crack gave the results shown in Fig. 27(b). When a second crack was added, the results in Fig. 27(c)
show that the two outside variations were increased in value. The peaks shown in Fig. 27(c) were probably caused by a
mixture of the two TM modes rather than higher transverse magnetic modes.
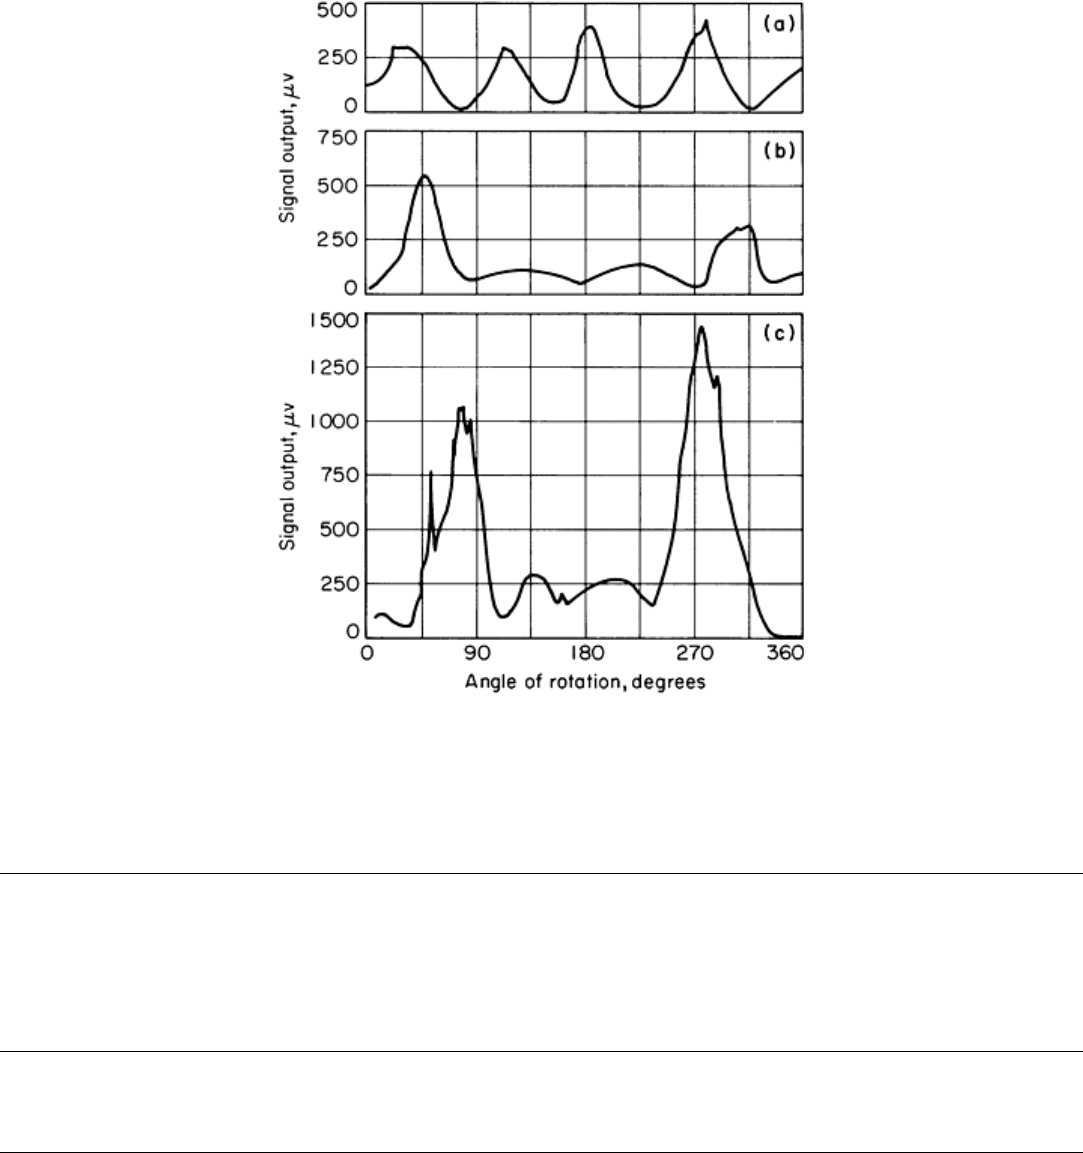
Fig. 27 Signal outputs from the standing wave crack detection system in Fig. 26 for side-
notched specimens.
(a) Crack-
free specimen. (b) Fatigue crack in one specimen. (c) Fatigue crack in two specimens. The rotating
specimen holder was designed so that two specimens could be inspected at the same time.
Reference cited in this section
19.
L. Feinstein and R.J. Hruby, Surface-Crack Detection by Microwave Methods, in
Proceedings of the Sixth
Symposium on Nondestructive Evaluation of Aerospace and Weapons Systems Components and Materials,
Western Periodicals Co., 1967, p 92-106
Microwave Inspection
William L. Rollwitz, Southwest Research Institute
Chemical Composition of Dielectric Materials
In many cases, chemical changes in dielectric materials, such as plastics, can be detected or even continuously monitored
by microwaves, and the results of chemical changes can be measured. The criterion is that the chemical change must
affect the dielectric properties (dielectric constant and/or loss tangent) of the material for electromagnetic frequencies in
the microwave region. Some of the chemical or molecular-level applications that have been successfully investigated
include polymerization, degree of cure, oxidation, esterification, distillation, vulcanization, evaporation, and titration (end
points).

Microwave techniques have been used to measure specific gravity, homogeneity during blending, and vibration (or
displacement). Several investigators have measured the glass-to-resin ratio of some aerospace composites (Ref 17).
Studies such as these can be made with either a through transmission system or a reflectometer because the changes in
chemical composition cause a change in the velocity of propagation. The changes in propagation velocity change the
amount and angle of the reflected and transmitted energy.
Reference cited in this section
17.
M.W. Standart, A.D. Lucian, T.E. Eckert, and B.L. Lamb, "Development of Microwave NDT I
nspection
Techniques for Large Solid Propellant Rocket Motors," NAS7-544, Final Report 1117, Aerojet-
General
Corporation, June 1969
Microwave Inspection
William L. Rollwitz, Southwest Research Institute
Moisture Analysis Using Microwaves
The free (unbound) moisture content of many dielectric materials can be accurately measured with microwave techniques.
Microwaves are strongly absorbed and scattered by water molecules because water exhibits a broadband rotational
relaxation in the microwave region. Because many completely dry host materials are transparent in the same frequency
range, a moisture-measuring technique is possible. This technique has found widespread use on both a continuous-process
and laboratory-sample basis, especially for plastic and ceramic materials. Moisture measurement of polyethylene powder
using microwaves has been done by through-transmission techniques at a frequency of 9.4 GHz (Ref 16). Measurements
similar to those for the plastic powders can also be obtained for solid shapes, slurries, and liquids. The technique (as
described here) is not applicable for gases.
Because water is a polar molecule, its dielectric properties are a function of temperature. Therefore, if substantial material
temperature changes occur, compensation is necessary in the instrument calibration. For example, a decrease in
temperature of 12 °C (22 °F) will normally cause an error of ±0.2% in the moisture readout. The effect is more
pronounced in materials having a high moisture content. Fortunately, the product temperature of most plastic-process
lines is kept reasonably constant at a given location. The temperature effect is even less of a problem with plastics
because they are relatively dry at the point of measurement.
Reference cited in this section
16.
R.J. Botsco, Nondestructive Testing of Plastic With Microwaves, Parts 1 and 2, Plast. Des. Process.,
Nov
and Dec 1968
Microwave Inspection
William L. Rollwitz, Southwest Research Institute
Microwave Measurement of Material Anisotropy
The directionally dependent properties of some materials can be measured by the use of linearly polarized microwaves.
Measurements of anisotropy, on both the molecular scale and macroscopic scale, are made by rotating the sensing head
relative to the material under test and observing the signal as a function of polar angle. Certain linearly oriented polymers
can be used as examples of molecular-level measurements; wood and fiberglass-resin structures are examples of the

macroscopic level. The direction of glass fibers can be readily determined. The direction of the fibers in paper can also be
detected with linearly polarized microwaves and antenna rotation.
Fiber-matrix composites have also been measured for directionality. One instance was a multiple-ply composite having a
fiberglass-resin matrix and unidirectional boron filaments. The boron filaments, approximately 0.13 mm (0.005 in.) in
diameter, contained a tungsten-fiber center (0.013 mm, or 0.0005 in., in diameter) onto which the boron had been
deposited. Being electrically conductive, the overall composite acted on the microwaves very much like a diffraction
grating. Alignment shifts of only a few degrees were detected easily by monitoring either the reflected or the transmitted
microwave component. When the boron filaments were perpendicular with respect to the polarization of the microwave
beam (electric field vector), a maximum amount of energy was transmitted (or a minimum amount of energy reflected).
When the boron filaments and the polarization were parallel, the reverse was true. By continuously rotating the sample, a
sinusoidal pattern of filament direction versus signal amplitude was obtained.
Microwave Inspection
William L. Rollwitz, Southwest Research Institute
Stress-Corrosion Microwave Measurements
Materials such as aluminum, magnesium, and titanium are subject to stress-corrosion cracking or fatigue when they are
under stress in a corrosion-producing environment. Cracks and fatigue can appear at stress values much less than the
normal yield in a corroded material. Early fatigue may occur at less than rated load in a structure that has corroded
materials. For reliable structures that may be constructed from corroded materials or from materials corroded after
construction, it is necessary to have a method for detecting corrosion-prone and corroded areas of materials.
Several mechanisms have been suggested to explain stress-corrosion cracking and fatigue (Ref 20). Three of them are
electromechanical, mechanical, and surface energy. Similarities among these mechanisms suggest an approach to the
detection of corroded or corrosion-prone areas of the above materials.
All of these theories suggest that corrosion and the subsequent cracking begin at crystal lattice imperfections. The
imperfections considered are dislocations, vacancies, and impurities. It was assumed that if the existence of these
imperfections could be detected by a nondestructive method, then that method could be used to evaluate the stress-
corrosion susceptibility of materials and structures so as to eliminate corrosion-prone or corroded materials.
The correlation between electrical resistivity and dislocation density has been discussed by many authors (Ref 21, 22, 23,
24). It has also been found that the concentration of impurities varies the electrical resistivity of a material. It is further
mentioned that there is a difference in the surface resistivity between dislocations caused by vacancies and impurities.
Surface resistivity can be measured with high-frequency electromagnetic waves because they penetrate to a depth of only
10 to 0.1 m (400 to 4 in.) or less into the surface and because the wave reflected from the surface has its phase
changed from that of the incident wave by the action of the surface impedance, which includes the resistance of the
material. Any protective coating such as paint or oxides on the surface of the metal will allow most of the energy in the
electromagnetic wave to pass through them and to be reflected from the conductive surface, if the frequency used is in the
microwave region or below. However, the higher the frequency, the greater will be the magnitude of the change in the
surface impedance caused by imperfections. Therefore, although frequencies from microwaves through the ultraviolet can
be used, less interferences from surface coatings coupled with a relatively high sensitivity will be found in the microwave
region from 1 to 100 GHz.
Therefore, a measurement of the microwave surface impedance by means of a comparison of the reflected wave with the
incident wave should yield a measure of the imperfection density. A microwave system for measuring the surface
impedance of a metal can be adapted and calibrated for the determination of the corrosion-prone areas in materials.
Measurements of resistivity have been made on many metals and alloys, including aluminum, showing the resistivity to
be dependent on the dislocation density (Ref 21, 22, 23, 24). Also, a difference in resistivity of dislocations related to
vacancies and impurities has been measured (Ref 21, 22, 23, 24). The imperfection densities have been determined with
an electron microscope, and good agreement has been obtained between the experimental and theoretical values for the
resistivity of dislocations (Ref 21, 22, 23, 24). For aluminum, the average dislocation resistance was found to be 7 × 10
-19
D · · cm
3
, where D is the dislocation density of D · cm
-2
(Ref 21, 22, 23, 24). The vacancy resistivity was also found to
be 1.4 × 10
-6
· cm per atomic percent vacancies (Ref 21, 22, 23, 24). Investigators have made measurements on surface
properties of metals, such as surface impedance, skin depth, and conductivity (Ref 25). Most of these investigations have
been conducted to determine the electrical properties of metals rather than to measure the density of their imperfections.
One investigation was made using microwaves to study the development of early surface damage during the fatigue of
high-strength aluminum alloys (Ref 25). The microwave measurements were related to the fatigue period for the test
parameters rather than to the material parameters, such as the density of imperfections.
A vector network analyzer can be used to obtain magnitude and phase information of the reflected wave. The interval
processing capabilities of present-day vector network analyzers provide the data in a variety of formats.
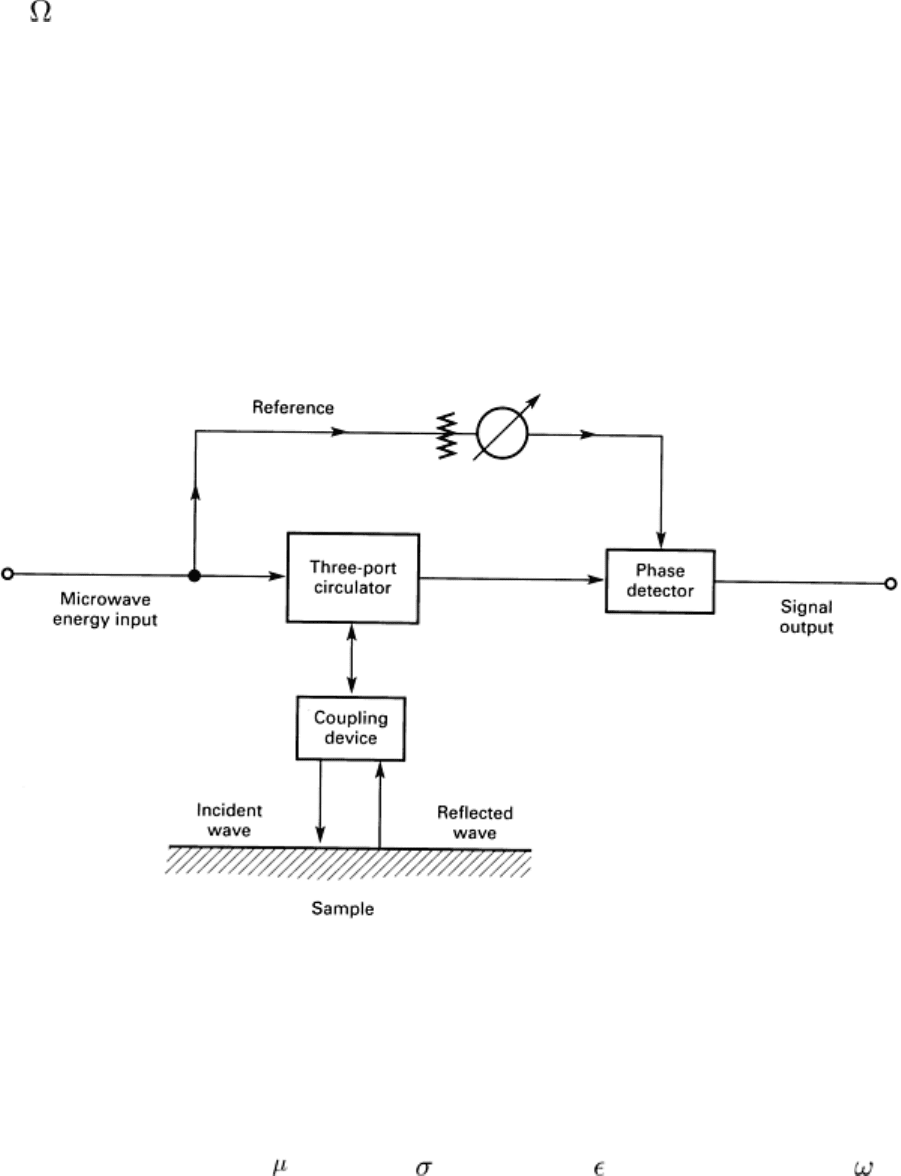
The basic concepts of the microwave method of measuring surface impedance are shown in Fig. 28. The output from a
microwave generator is fed through a circulator and through a coupling device such as an antenna to provide an
electromagnetic wave incident upon the surface whose impedance is to be determined.
Fig. 28 Basic microwave surface impedance measurement technique
A small part of the incident wave is transmitted into the surface of the material, and the remainder is reflected. Therefore,
the reflected wave contains the information about the impedance of the surface. If the reflected wave is compared in both
amplitude and phase with a reference signal taken directly from the microwave generator, the output of this amplitude-
sensitive phase detector will be information about the surface impedance of the material. The surface impedance of a
material having a complex permeability , conductivity , and permittivity is, at the angular frequency , given in Eq
1 (Ref 2). Because all three terms can be complex at microwave frequencies, the impedance is complex, having both real
and imaginary parts.
A highly sensitive but slowly scanning method for measuring surface impedance is shown in Fig. 29. The microwave
energy delivered to the system is generated by the source. Frequency control is provided by a dc voltage, giving a
convenient method of sweeping the frequency. The precise frequency is then determined by a frequency counter or
wavemeter, and a calibrated attenuator is used to control the amount of power passing down the waveguide to the cavity.
Isolation between the system and the source can be obtained by the use of a ferrite isolator, which allows power to pass
through the isolator in one direction only. A ferrite three-port circulator is an ideal device for this type of measurement. It
is a wide absorption cavity and provides isolation between the detector and the klystron.
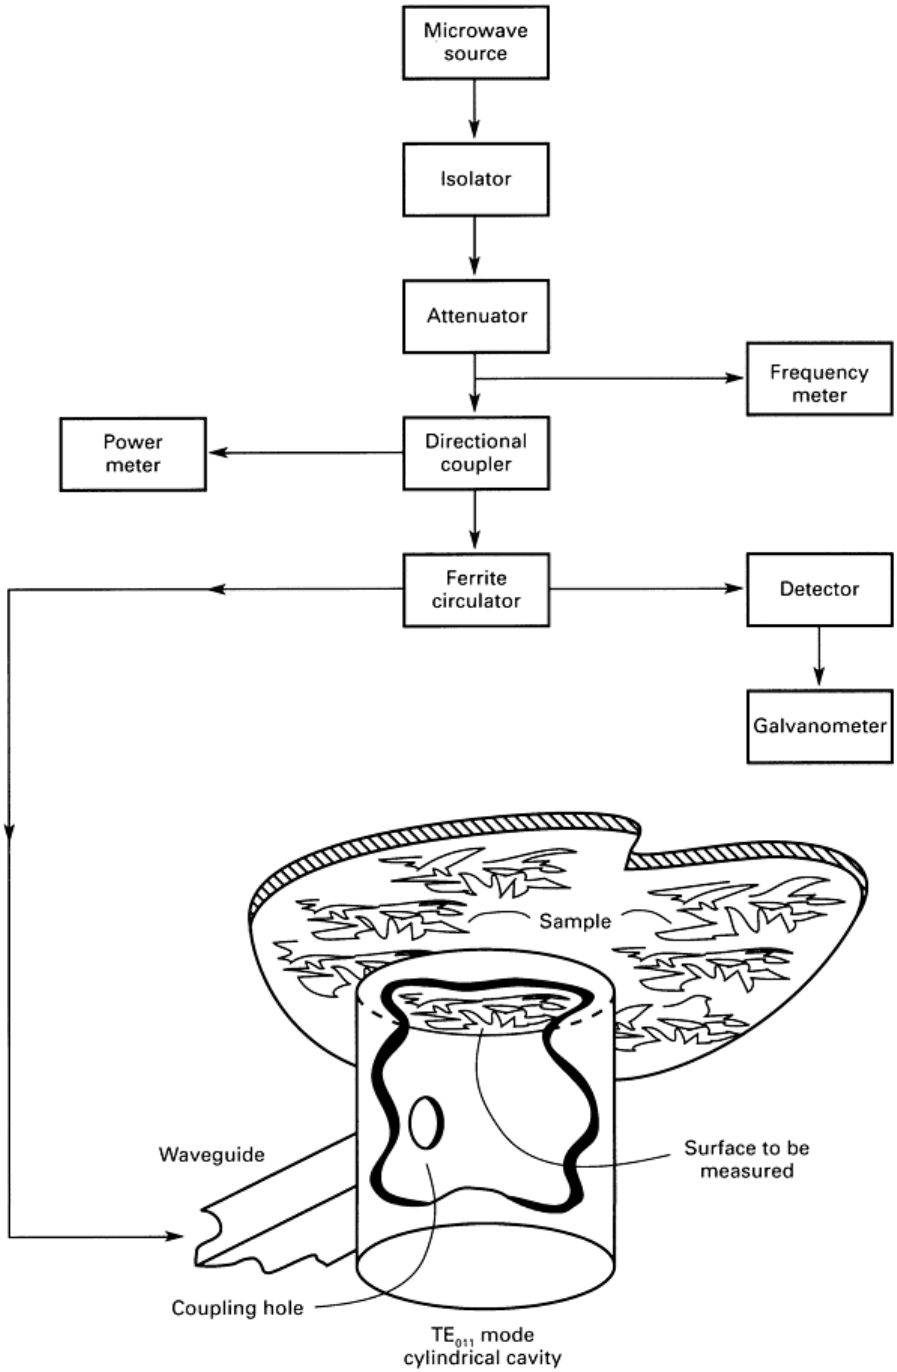
Fig. 29 Typical microwave measurement circuit
The cavity shown in the simplified circuit in Fig. 29 is an absorption-type cavity. Its distinguishing feature is that only
one port is provided for coupling energy into and out of the cavity. Another type of cavity that has obtained prominence is
the transmission cavity, in which there are two coupling ports. Energy is transmitted through the transmission cavity.
When using the absorption cavity, one end or a side, depending on whether the cavity is circular or rectangular, is
replaced by a sample to be measured. In this manner, the difference in skin depth or depth of penetration of the
electromagnetic energy of the sample and a standard sample can be measured in terms of a change in quality factor. The
frequency can be swept through the center frequency of the cavity and the detected output recorded on a chart recorder or
other recording instrument. A curve identical to a parallel resonant-circuit frequency-response curve will be measured
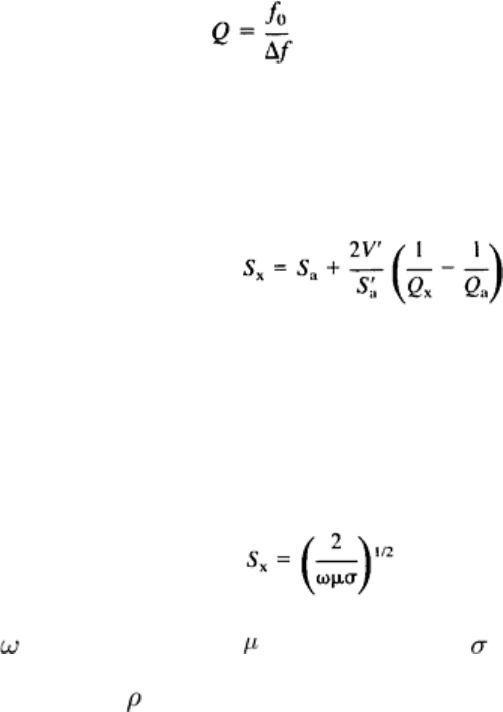
directly. The quality factor Q is defined as (Ref 25):
(Eq 6)
where f
0
is the resonant frequency and Δf is the frequency difference between half-power frequencies or bandwidth.
A relation for the skin depth of an unknown sample in terms of the skin depth of a standard sample and the difference in
their quality factors for a circular cavity has been derived (Ref 1):
(Eq 7)
where S
x
is the skin depth of the unknown sample, S
a
is the skin depth of the standard sample, Q
x
is the quality factor of
the unknown sample, Q
a
is the quality factor of the known standard, and 2V '/S '
a
is the constant depending on cavity and
frequency.
The skin depth, S
x
, for a good conductor has been derived in terms of the frequency, permeability, and conductivity (Ref
25):
(Eq 8)
where is the angular frequency, is the permeability, and is the conductivity (=1/resistivity).
Because resistivity, , and conductivity are reciprocal, the preceding has shown that the resistivity, and therefore a
measure of the imperfection density, can be obtained from microwave measurements. It should be stressed that only the
resistivity at or near the surface can be measured for a good conductor and that this is the region where stress-corrosion
fatigue begins.
As shown in Fig. 28 and 29, the phase detection required to obtain the amplitude and phase of the surface impedance is
accomplished at microwave frequencies. This will improve the signal-to-noise ratio, but the two output voltages, one
proportional to the magnitude and one proportional to the phase, are expected to be of very low level and essentially
direct current. Additional gain at direct current will be required, which can cause drift in the output. A much preferred
situation would be one in which ac amplification is used.
To use ac amplification, the signal must be either amplitude, frequency, or phase modulated. Such modulation can be
provided in two ways:
• Modulate the microwave source
• Modulate the effect being measured (in this case, the surface impedance)
Modulation of the microwave source is readily accomplished. If the modulation frequency is made high enough, the
signal-to-noise ratio will be improved because the noise output of the phase detector diodes is lower at higher modulation

frequencies than it is at direct current. Additional signal-to-noise improvement will be obtained if the demodulated output
is again phase detected with the original modulation as the reference.
Modulation of the surface impedance can be accomplished with the electroreflectance effect in nonferromagnetic
materials (Ref 26). When this is done, the modulation will be proportional only to the surface impedance. Therefore, the
component of the reflected signal that is proportional to the surface impedance can be readily separated from the other
effects. Additional signal-to-noise improvement can be obtained when phase detection is used at the modulation
frequency.
The electroreflectance effect is understood to be caused by a change in the energy bands in the surface of the material,
which in turn is caused by an electric field also in the surface (Ref 26). In metals, it is very difficult to use externally
applied high electric fields to accomplish this modulation. However, when an electrolyte is used, it is possible to obtain
large fields at the surface of the sample with small applied voltages because a dipole layer is formed in the electrolyte at
the interface between the electrolyte and the sample.
In experiments in which light has been used to measure the reflectance, the metal sample was placed in a fused-quartz cell
(Ref 26). A 35-Hz modulating voltage of only 2-V peak was applied between the sample and a platinum electrode, which
are immersed in the KCl-H
2
O electrolyte. The reflected light was detected by photomultiplier tubes. The output of the
photomultiplier tubes was a 35-Hz voltage proportional to the change in reflectance. After this 35-Hz signal was phase
detected, using the original modulation as a reference, a dc voltage was obtained that is also proportional to the change in
reflectance caused by the modulating electric field. No information was found on the phase angle of the 35-Hz signal
relative to the modulation.
Experiments need to be conducted to show that the changes in the reflectance are caused by changes in the optical and
microwave constants of the materials and that the electrolyte may act as a sensitive probe for the reflectivity of the metal.
Therefore, by moving the probe while the whole surface is illuminated by microwave electromagnetic waves, the whole
surface can be scanned. The larger problem is the manner in which the electroreflectance can be used in practical systems.
To modulate the surface impedance of a ferromagnetic material, the technique of magabsorption can be used (see the
article "Magabsorption NDE" in this Volume). For magabsorption, a magnetomotive force is applied to the surface of the
material by means of a low-frequency, many-turn coil. The microwave signal, reflected from the surface of the material
inside of the magabsorption coil, will be amplitude modulated at a fundamental frequency twice the modulation
frequency. The Lissajous figure obtained by applying the detected reflected microwave signal (the magabsorption signal)
can be used to determine the surface impedance of the material. Changes will indicate the areas that are stress-corrosion
prone or already corroded or fatigued.
References cited in this section
1. Electromagnetic Testing, Vol 4, 2nd ed., Nondestructive Testing Handbook,
American Society for
Nondestructive Testing, 1986
2. H.E. Bussey, Standards and Measurements of Microwave
Surface Impedance, Skin Depth, Conductivity,
and Q, IRE Trans. Instrum., Vol 1-9, Sept 1960, p 171-175
20.
F.H. Haynie, D.A. Vaughan, P.D. Frost, and W.K. Boyd, "A Fundamental Investigation of the Nature of
Stress-Corrosion Cracking in Aluminum Alloys," AFML-TR-65-
258, Air Force Materials Laboratory, Oct
1965
21.
R.M.J. Cotterill, An Experimental Determination of the Electrical Resistivity of Dislocations in Aluminum,
Philos. Mag., Vol 8, Nov 1963, p 1937-1944
22.
D. Nobili and L. Passari, Electrical Resistivity in Quenched Aluminum--Alumina Alloys, J. Nucl. Mater.,
Vol 16, 1965, p 344-346
23.
Z.S. Basinski, J.S. Dugdale, and A. Howie, The Electrical Resistivity of Dislocations, Philos. Mag.,
Vol 8,
1963, p 1989
24.
L.M. Clarebrough, M.E. Hargreaves, an
d M.H. Loretts, Stored Energy and Electrical Resistivity in
Deformed Metals, Philos. Mag., Vol 6, 1961, p 807
25.
E.C. Jordan, Electromagnetic Waves and Radiating Systems, Prentice-Hall, 1950, p 237
26.
J. Feinleib, Electroreflectance in Metals, Phys. Rev. Lett., Vol 16 (No. 26), June 1966, p 1200-1202
Microwave Inspection
William L. Rollwitz, Southwest Research Institute
Microwave Eddy Current Testing
Microwave crack detection can be thought of as detection by microwave eddy currents (Ref 27). The use of microwave
frequencies produces some distinct differences between microwave and conventional eddy current testing (Ref 27) (see
the articles "Eddy Current Inspection" and "Remote-Field Eddy Current Inspection" in this Volume). Three of the major
differences are as follows:
•
Because the skin depth at microwave frequencies is very small (typically a few micrometers), a crack
must break through the surface of the metal in order to be detected
• Radiating and nonradiating probes can be used at microwave frequencies
•
If the crack is open, energy storage within the crack begins to dominate the crack response as the
frequency is increased. This means that a microwave crack detection system is very se
nsitive to crack
opening. Eventually, if the frequency is increased enough, a wave can propagate within the crack, and
the crack response also becomes very sensitive to crack depth
In eddy current testing at lower frequencies there are two distinct approaches. The first is the single-coil system in which
the induced eddy currents change the impedance of the coil by a factor of Z. The second approach is the introduction of
a second sensor (an induction coil or a Hall-effect device) that senses both the applied field and the secondary field
arising from induced eddy currents. Numerous variations of these two basic schemes have been explored at low
frequencies and at microwave frequencies. The microwave version of the low-frequency single-coil system will be
considered first.
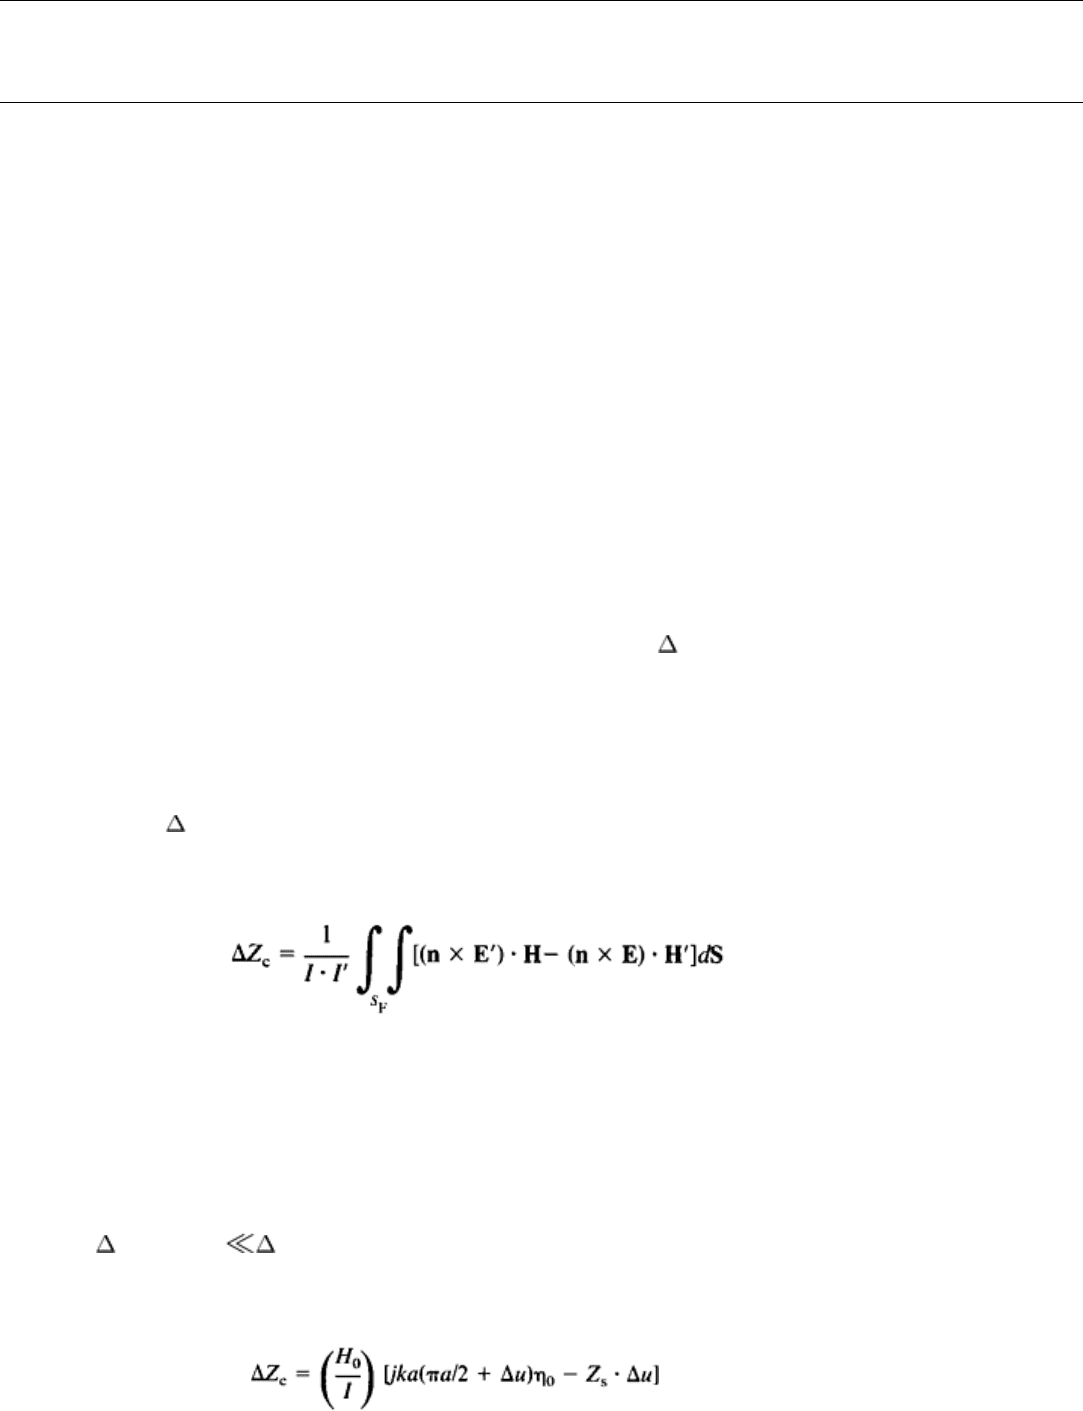
One method that has been applied to the analysis of microwave eddy current sensors for calculating the change in the
probe impedance, Z
c
, caused by a crack is based on the Lorentz reciprocity theorem (Ref 28). Basically, the reciprocity
theorem relates the change in impedance produced by the flaw to an integral of certain magnetic fields on the surface of a
volume that encloses the flaw (Ref 27). The basic equation used for analysis of microwave eddy currents is (Ref 27):
(Eq 9)
where I is the probe current without a flaw, I ' is the probe current with a flaw, S
F
is the surface including the flaw, H is
the magnetic field without a flaw, H' is the magnetic field with a flaw, E is the electric field without a flaw, E' is the
electric field with a flaw, and n is the unit vector normal to the surface S
F
. Equation 9 shows that the change in probe
impedance is not influenced by the electromagnetic fields that are perpendicular to the surface S
F
(Ref 27).
Equation 9 can be simplified by making realistic assumptions. First, the radiation fields can be neglected as long as the
probe and the flow are much smaller than a wavelength. It should be assumed that the flow is rectangular with depth a
and width u and that a u.
If the ratio of flaw depth to skin depth is much larger than unity, as is typical at microwave frequencies, then:
(Eq 10)
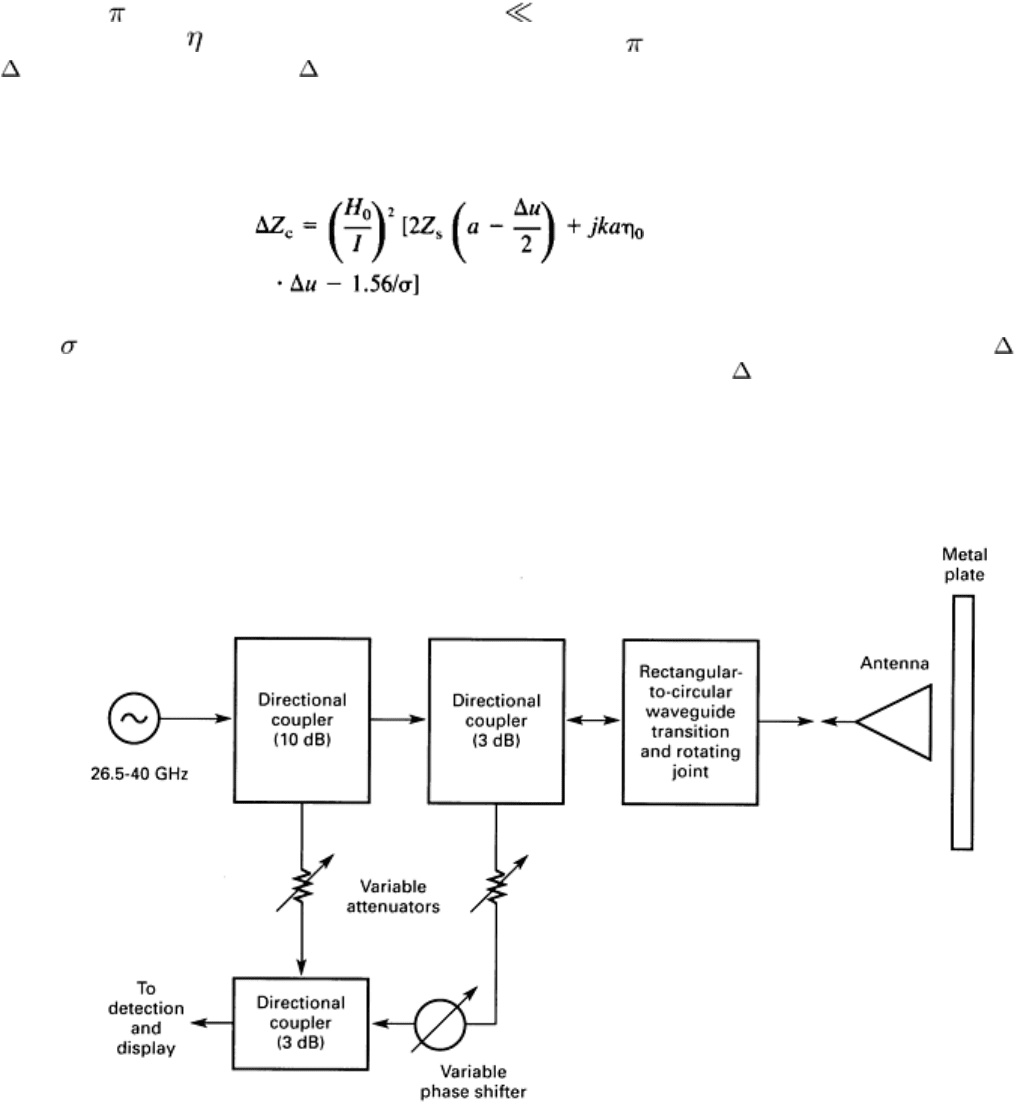
where k is 2 divided by the free-space wavelength (ka 1), H
0
is the complex amplitude of the magnetic field tangent
to the metal surface,
0
is the intrinsic impedance of free space or 120 , and Z
s
is the surface impedance. From Eq 10, if
u is small and H
0
/I is real, then Z
c
is essentially inductive.
If the frequency is high enough so that the flaw depth divided by the skin depth is much greater than unity, the change in
impedance is:
(Eq 11)
where is the conductivity of the surface. Equation 11 shows that if the slot width is small and H
0
/I is real, then Z
c
, will
have both resistive and inductive components. If the slot width is not small, then Z
c
becomes predominantly inductive
at high frequencies.
Research on microwave crack detection has been ongoing since the late 1960s (Ref 19, 29, 30, and 31). The block
diagrams of three microwave crack detection systems are given in Fig. 30, 31, and 32.
Fig. 30 Microwave crack-detection system. Source: Ref 29
