ASM Metals HandBook Vol. 17 - Nondestructive Evaluation and Quality Control
Подождите немного. Документ загружается.


5 13.86 0.25
6 13.62 0.24
7 13.66 0.04
8 13.85 0.19
9 13.67 0.18
10 13.80 0.13
11 13.84 0.04
12 13.98 0.14
13 13.40 0.58
14 13.60 0.20
15 13.80 0.20
16 13.66 0.14
17 13.93 0.27
18 13.45 0.48
19 13.90 0.45
20 13.83 0.07
21 13.64 0.19
22 13.62 0.02
23 13.97 0.35
24 13.80 0.17
25 13.70 0.10
26 13.71 0.01
27 13.67 0.04
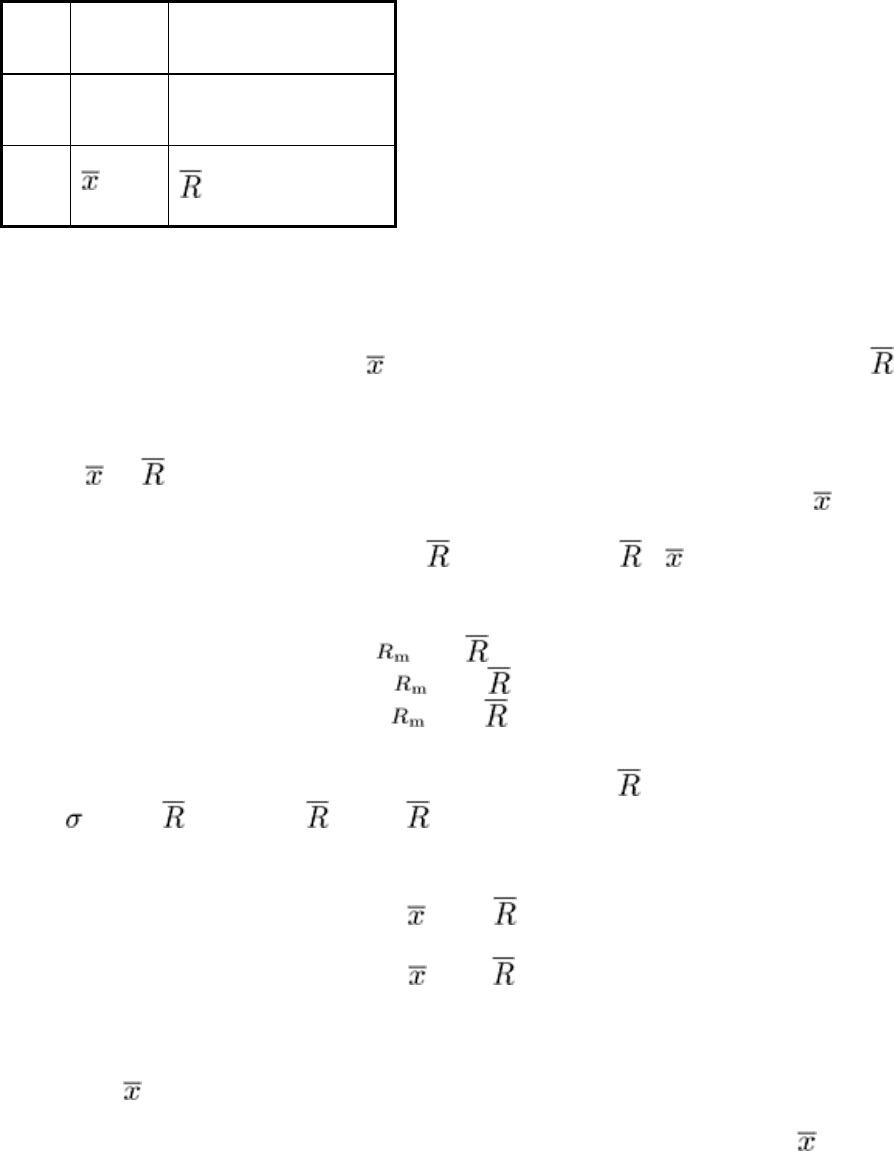
= 13.77
m
= 0.19
(a)
Calculated, n = 2
In the calculation of averages in Table 3, is an average of all 27 individual measurements, while
m
is an average of 27
- 1 = 26 R
m
values because there are only 26 moving ranges for n = 2. If the artificial samples were of size n = 3, there
would be only 27 - 2 = 25 moving averages.
Once the and
m
values are calculated, they are used as centerline values of x and R
m
control charts, respectively. The
calculation of upper and lower control limits for the R
m
control chart is also the same as in , R control charts, using the
artificial sample size n to determine D
3
and D
4
values. However, the upper and lower control limits for the x chart should
always be based on a sample size of one, using
m
the same way as in control charts. These calculations are shown
below for the example data. For the R
m
-chart, for n = 2, D
3
= 0, and D
4
= 3.27:
CL =
m
= 4.99/26 = 0.192
UCL = D
4
m
= (3.27)(0.19) = 0.62
LCL = D
3
m
= 0
For the x-chart, an estimate of the standard deviation of x is equal to
m
/d
2
, where d
2
= 1.128 from Table 1 using n = 2.
Thus, 3 = (3/d
2
)
m
= (3/1.128)
m
= 2.66
m
:
CL
x
= 13.77
UCL
x
= + 2.66
m
= 13.77 + (2.66)(0.19)
= 14.28
LCL
x
= - 2.66
m
= 13.77 - (2.66)(0.19)
= 13.26
When the individual x values follow a normal distribution, the patterns on the x-chart are analyzed in the same manner as
the Shewhart -charts. A sample x is circled as a signal of out-of-control values if it falls outside a control limit, if it is
the end point of a sequence that violates any of the zone rules, or if it simply indicates a nonrandom sequence. However,
tests for unnatural patterns should be used with more caution on an x-chart than on an -chart because the individual
chart is sensitive to the actual shape of the distribution of the individuals, which may depart considerably from a true
normal distribution. Figures 26 and 27 show the x and R
m
control charts for the example data.
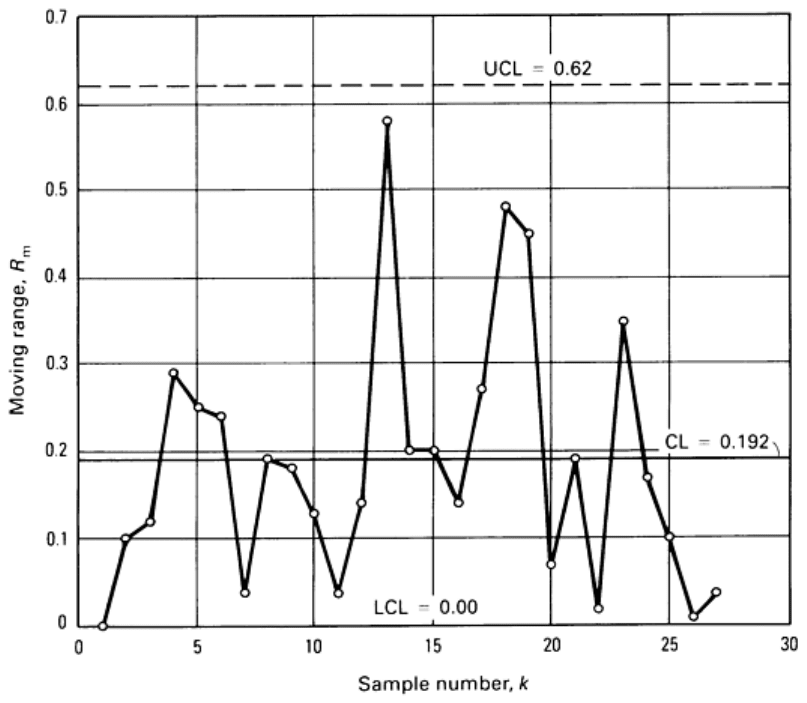
Fig. 26 R
m
control chart obtained for white millbase data in Table 3. Data are for k = 27, n = 2.
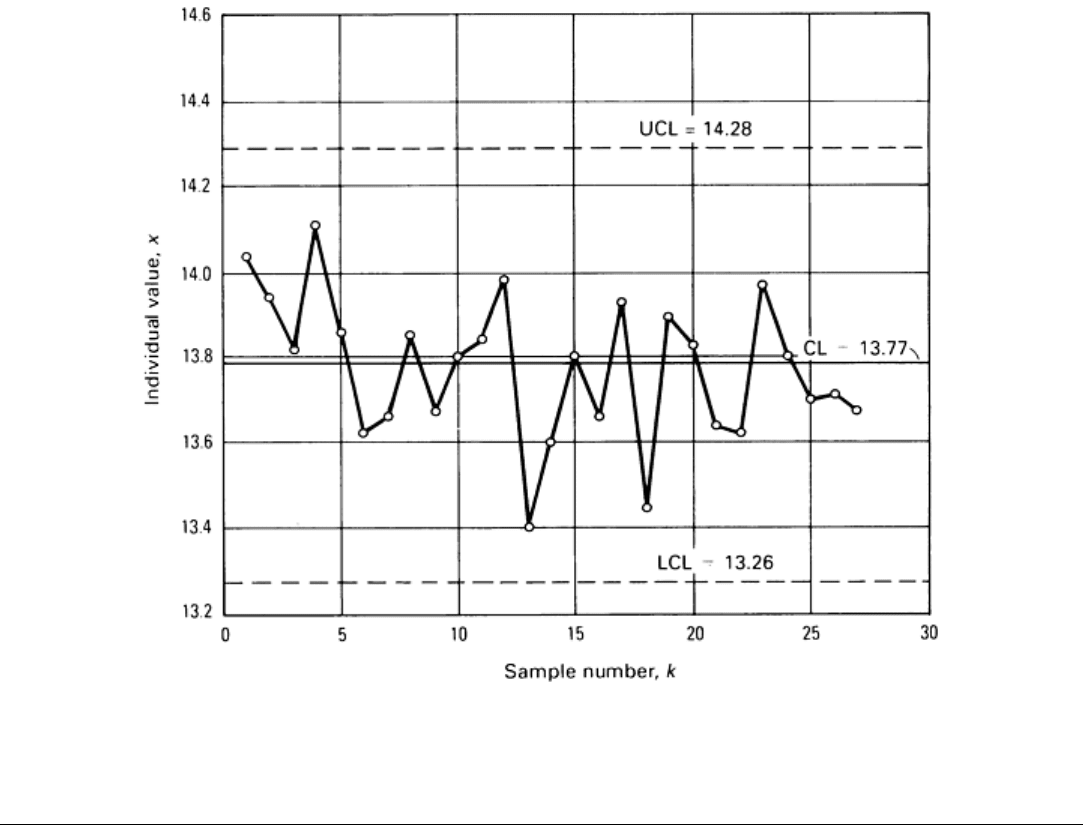
Fig. 27 x control chart obtained for white millbase data in Table 3. Data are for k = 27, n = 2.
References cited in this section
13.
S.W. Roberts, Control Charts Based on Geometric Moving Averages, Technometrics, Vol 1, 1959, p 234-
250
14.
A.L. Sweet, Control Charts Using Coupled Exponentially Weighted Moving Averages, Trans. IIE,
Vol 18
(No. 1), 1986, p 26-33
15.
A.W. Wortham and G.F. Heinrich, Control Charts Using Exponential Smoothing Techniques, Trans. ASQC,
Vol 26, 1972, p 451-458
16.
A.W. Wortham, The Use of Exponentially Smoothed Data in Continuous Process Control,
Int. J. Prod.
Res., Vol 10 (No. 4), 1972, p 393-400
17.
A.F. Bissell, An Introduction to CuSum Charts, The Institute of Statisticians, 1984
18.
"Guide To Data Analysis and Quality Control Using CuSum Techniques," BS5703 (4 parts), British
Standards Institution, 1980-1982
19.
J.M. Lucas, The Design and Use of V-Mask Control Scheme, J. Qual. Technol., Vol 8 (No. 1), 1976, p 1-12
20.
J. Murdoch, Control Charts, Macmillan, 1979
21.
J.S. Oakland, Statistical Process Control, William Heinemann, 1986

Statistical Quality Design and Control
Richard E. DeVor, University of Illinois, Urbana-Champaign; Tsong-how Chang, University of Wisconsin, Milwaukee
Shewhart Control Charts for Attribute Data
Many quality assessment criteria for manufactured goods are not of the variable measurement type. Rather, some quality
characteristics are more logically defined in a presence-of or absence-of sense. Such situations might include surface
flaws on a sheet metal panel; cracks in drawn wire; color inconsistencies on a painted surface; voids, flash, or spray on an
injection-molded part; or wrinkles on a sheet of vinyl.
Such nonconformities or defects are often observed visually or according to some sensory criteria and cause a part to be
defined simply as a defective part. In these cases, quality assessment is referred to as being made by attributes.
Many quality characteristics that could be made by measurements (variables) are often not done as such in the interest of
economy. A go/no-go gage can be used to determine whether or not a variable characteristic falls within the part
specification. Parts that fail such a test are simply labeled defective. Attribute measurements can be used to identify the
presence of problems, which can then be attacked by the use of and R control charts. The following definitions are
required in working with attribute data:
• Defect:
A fault that causes an article or an item to fail to meet specification requirements. Each instance
of the lack of conformity of an article to specification is a defect or nonconformity
• Defective: An item or article with one or more defects is a defective item
• Number of defects: In a sample of n items, c
is the number of defects in the sample. An item may be
subject to many different types of defects, each of which may occur several times
• Number of defectives: In a sample of n items, d is the number of defective items in the sample
• Fractional defective: The fractional defective, p
, of a sample is the ratio of the number of defectives in a
sample to the total number of items in the sample. Therefore, p = d/n
Operational Definitions
The most difficult aspect of quality characterization by attributes is the precise determination of what constitutes the
presence of a particular defect. This is so because many attribute defects are visual in nature and therefore require a
certain degree of judgment and because of the failure to discard the product control mentality. For example, a scratch that
is barely observable by the naked eye may not be considered a defect, but one that is readily seen is. Furthermore, human
variation is generally considerably larger in attribute characterization (for example, three different caliper readings of a
workpiece dimension by three inspectors and visual inspection of a part by these same individuals yield anywhere from
zero to ten defects). It is therefore important that precise and quantitative operational definitions be laid down for all to
observe uniformly when attribute quality characterization is being used. The length or depth of a scratch, the diameter of a
surface blemish, or the length of a flow line on a molded part can be specified.
The issue of the product control versus process control way of thinking about defects is a crucial one. From a product
control point of view, scratches on an automobile grille should be counted as defects only if they appear on visual
surfaces, which would directly influence part function. From a process control point of view, however, scratches on an
automobile grille should be counted as defects regardless of where they appear because the mechanism creating these
scratches does not differentiate between visual and concealed surfaces. By counting all scratches, the sensitivity of the
statistical charting instrument used to identify the presence of defects and to lead to their diagnosis will be considerably
increased.
A major problem with the product control way of thinking about part inspection is that when attribute quality
characterization is being used not all defects are observed and noted. The first occurrence of a defect that is detected
immediately causes the part to be scrapped. Often, such data are recorded in scrap logs, which then present a biased view
of what the problem may really be. One inspector may concentrate on scratch defects on a molded part and will therefore
tend to see these first. Another may think splay is more critical, so his data tend to reflect this type of defect more
frequently. The net result is that often such data may then mislead those who may be using it for process control purposes.
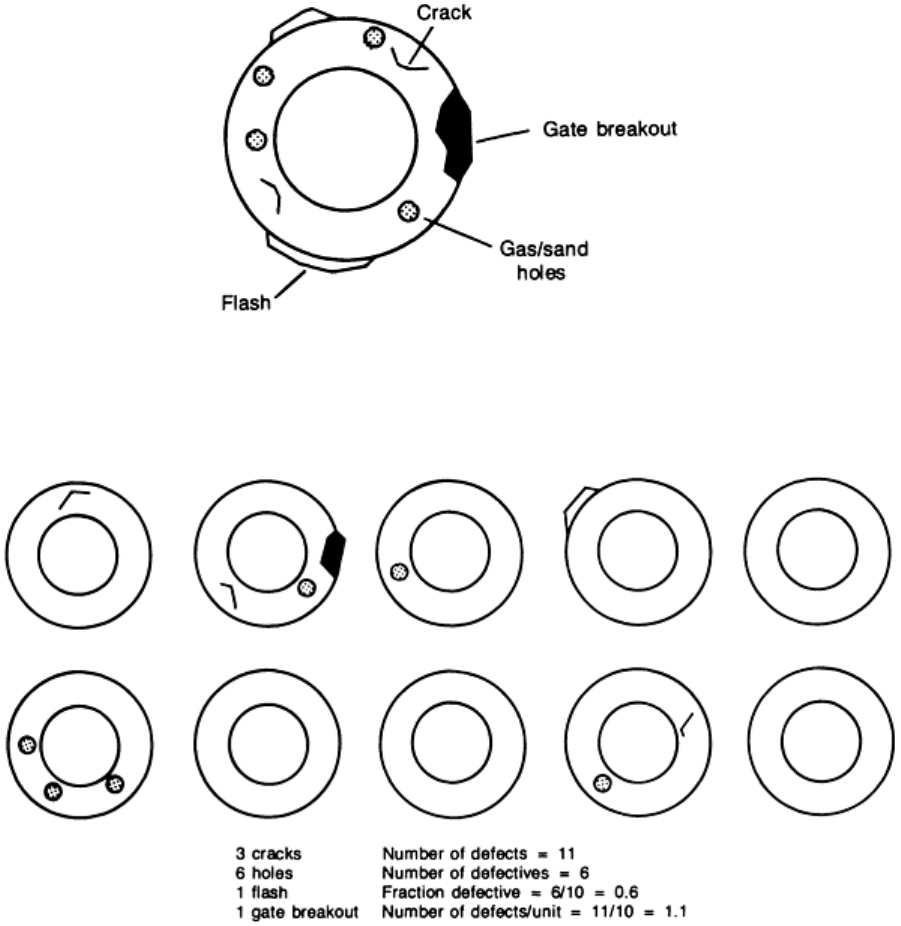
Figure 28 shows an example of the occurrence of multiple defects on a part. It is essential from a process control
standpoint to carefully observe and note each occurrence of each type of defect. Figure 29 shows a typical sample result
and the careful observation of each occurrence of each type of defect. In Fig. 29, the four basic measures used in attribute
quality characterization are defined for the sample in question.
Fig. 28 Typical multiple defects present on an en
gine valve seat blank to illustrate defect identification in an
attribute quality characterization situation
Fig. 29 Analysis
of four basic measures of attribute quality characterization used to illustrate the typical defects
present in the engine valve seat blank shown in Fig. 28
. Out of ten samples tested, four had no defects, three
had single defects, and three had multiple defects.
p-Chart: A Control Chart for Fraction Defective
Consider an injection-molding machine producing a molded part at a steady pace. Suppose the measure of quality
conformance of interest is the occurrence of flash and splay on the molded part. If a part has so much as one occurrence
of either flash or splay, it is considered to be nonconforming, that is, a defective part.
To establish the control chart, rational samples of size n = 50 parts are drawn from production periodically (perhaps, each
shift), and the sampled parts are inspected and classified as either defective (from either or both possible defects) or
nondefective. The number of defectives, d, is recorded for each sample. The process characteristic of interest is the true
process fraction defective p'. Each sample result is converted to a fraction defective:
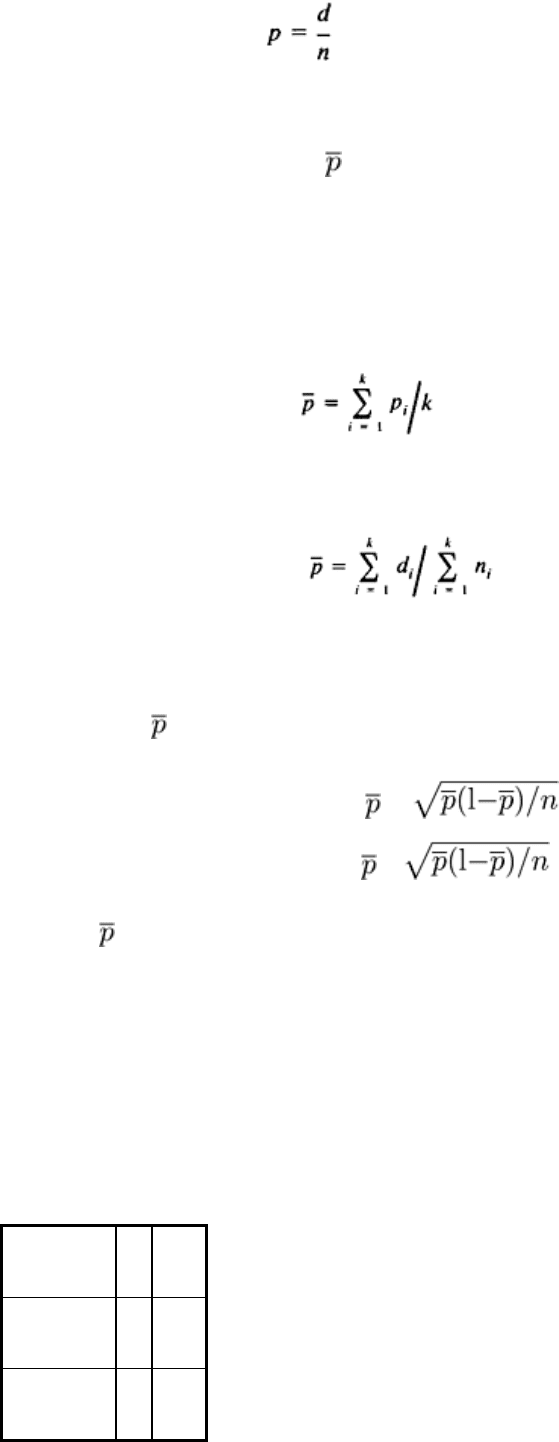
(Eq 1)
The data (fraction defective p) are plotted for at least 25 successive samples of size n = 50. The individual values for the
sample fraction defective, p, vary considerably, and it is difficult to determine from the plot at this point if the variation
about the average fraction defective, , is solely due to the forces of common causes or special causes.
Control Limits for the p-Chart. It can be shown that for random sampling, under certain assumptions, the occurrence
of the number of defectives, d, in the sample of size n is explained probabilistically by the binominal distribution.
Because the sample fraction defective, p, is simply the number of defectives, d, divided by the sample size, n, the
occurrence of values for p also follows the binominal distribution. Given k rational samples of size n, the true fraction
defective, p', can be estimated by:
(Eq 2)
or
(Eq 3)
Equation 3 is more general because it is valid whether or not the sample size is the same for all samples. Equation 2
should be used only if the sample size, n, is the same for all k samples.
Therefore, given , the control limits for the p-chart are then given by:
UCL
p
= + 3
(Eq 4a)
LCP
p
= - 3
(Eq 4b)
Thus, only has to be calculated for at least 25 samples of size n to set up a p-chart. The binomial distribution is generally
not symmetric in quality control applications and has a lower bound of p = 0. Sometimes the calculation for the lower
control limit may yield a value of less than 0. In this case, a lower control limit of 0 is used.
Example 3: A p-Chart Applied to Evaluation of a Carburetor Assembly (Ref 22).
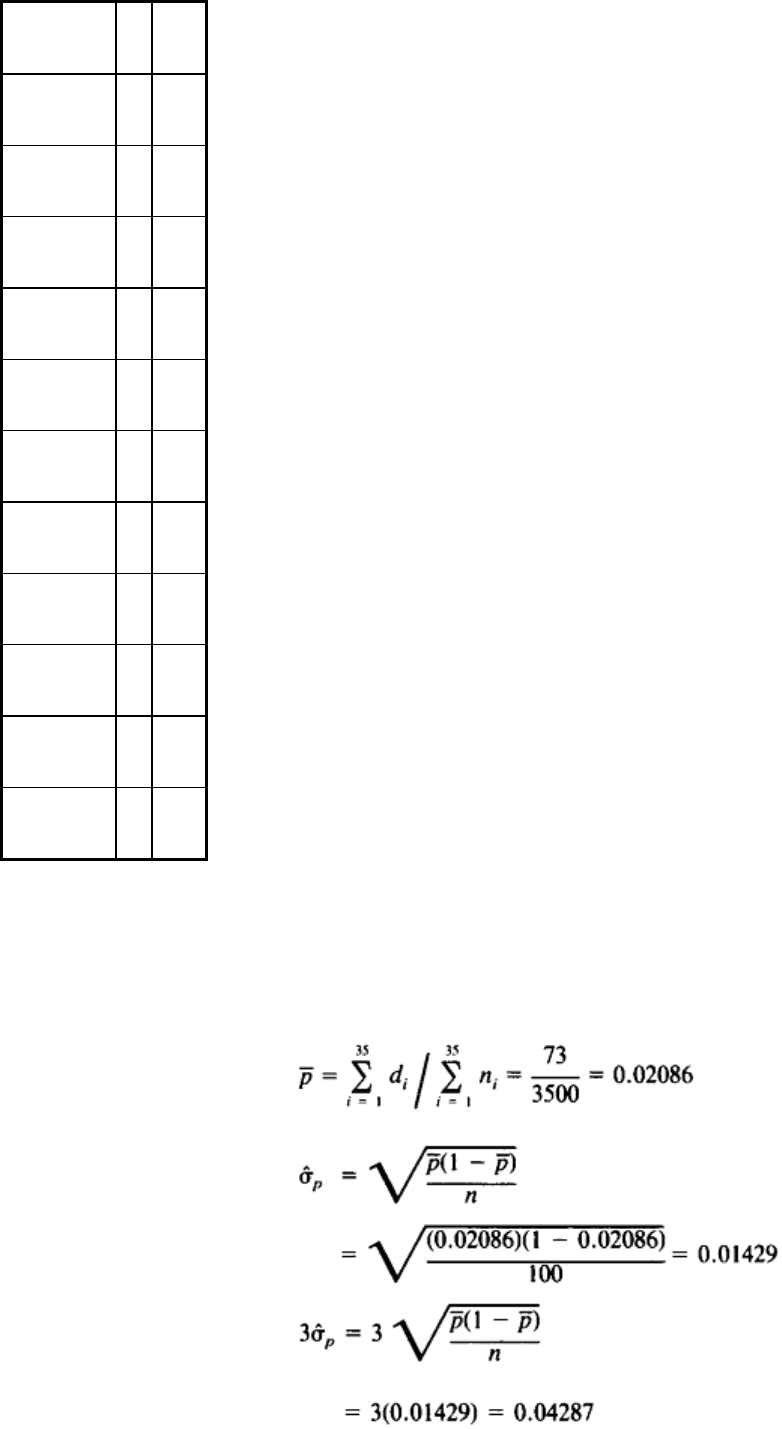
This example illustrates the construction of a p-chart. The data in Table 4 are inspection results on a type of carburetor at
the end of assembly; all types of defects except leaks were noted, and n = 100 for all samples. Samples taken numbered k
= 35.
Table 4 p-chart data for carburetor assembly of Example 3
Sample, k
(a)
d p
1 4 0.04
2 5 0.05

3 1 0.01
4 0
0.00
5 3 0.03
6 2 0.02
7 1 0.01
8 6 0.06
9 0
0.00
10 6 0.06
11 2 0.02
12 0
0.00
13 2 0.02
14 3 0.03
15 4 0.04
16 1 0.01
17 3 0.03
18 2 0.02
19 4 0.04
20 2 0.02
21 1 0.01
22 2 0.02
23 0
0.00
24 2 0.02
25 3 0.03
26 4 0.04
27 1 0.01
28 0
0.00
29 0
0.00
30 0
0.00
31 0
0.00
32 1 0.01
33 2 0.02
34 3 0.03
35 3 0.03
(a)
n = 100
Using this sample data to establish the p-chart:
Therefore:
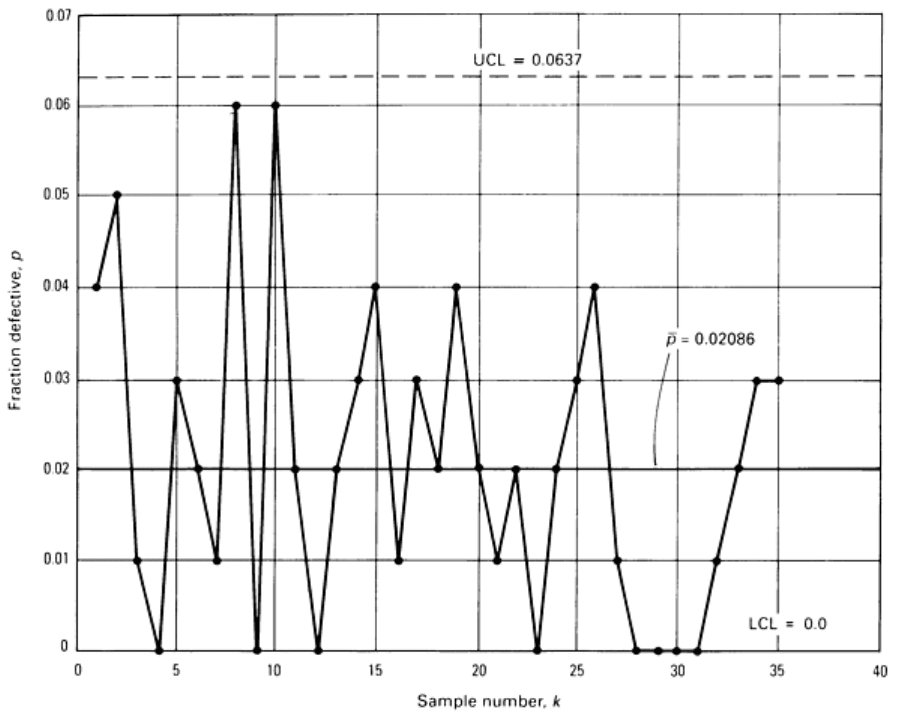
UCL
p
= 0.02086 + 0.04287 = 0.06373
LCL
p
= 0.02086 - 0.04287 = -0.02201
That is:
LCL
p
= 0
The plot of the data on the corresponding p-chart is shown in Fig. 30. The process appears to be in statistical control,
although eight points lie on the lower control limit. In this case, results of p = 0 that fall on the lower control limit should
not be interpreted as signaling the presence of a special cause. For a sample size of n = 100 and a fraction defective p' =
0.02, the binomial distribution gives the probability of d = 0 defectives in a sample of 100 to be 0.133. Therefore, a
sample with zero defectives would be expected about one out of seven times.
Fig. 30 p control chart obtained for the evaluation of the carburetor assembly data in Table 4. Data are for k
=
35, n = 100.
In summary, the p-chart in this example seems to indicate good statistical control, having no extreme points (outside the
control limits), no significant trends or cycles, and no runs of sizable length above or below the centerline. At least over
this period of data collection, the process appears to be operating only under a common cause system of variation.
However, Fig. 30 shows that the process is consistently operating at a 2% defective rate.
Variable Sample Size Considerations for the p-Chart. It is often the case that the sample size may vary from
one time to another as data for the construction of a p-chart are obtained. This may be the case if the data have been
collected for other reasons (for example, acceptance sampling) or if a sample constitutes a day's production (essentially
