ASM Metals HandBook Vol. 17 - Nondestructive Evaluation and Quality Control
Подождите немного. Документ загружается.


•
The identification of those areas in the critical structural components experiencing the highest stresses
defined
• The estimation of the maximum size of a rogue
defect in these areas that could exist without growing to
failure in twice the estimated design life
The maximum acceptable size of a rogue defect was established as 6.4 mm (0.250 in.) long by 3.2 mm (0.125 in.) deep
for a surface flaw, or 1.3 × 1.3 mm (0.050 × 0.050 in.) for a corner crack in a bolt hole or a structural edge. For an
embedded flaw, the size was a 6.4 mm (0.250 in.) diam circle. These sizes were selected because experience had shown
that they were large enough to be readily detected during production inspection. If the crack sizes that the designer
selected for his structure were to be smaller, the capability of the production NDE facility to find the smaller cracks
reliably would have to be demonstrated. For the B-1, the crack sizes for many of the critical structural members was
smaller than those suggested. Redesign of the components to tolerate the larger, suggested flaws would have resulted in
unacceptable weight penalties; consequently, the B-1 production NDE facility was subjected to the first quantitative NDE
capability evaluation.
A conservative approach was taken in the design of the NDE reliability demonstration program. Fatigue cracks were
selected to represent manufacturing defects for surface and corner flaws, and voids created by diffusion bonding were to
serve as embedded defects. Flat panels were the geometries selected, either single panels for surface defect areas or panel
stackups for fastener hole areas, and rectangular blocks housed the embedded defects. The materials were aluminum,
titanium, and steel. The surface finish for the specimens was the same as for production parts. The methods to be
demonstrated were penetrant inspection for all materials with surface flaws, magnetic particle for steel panels with surface
flaws, eddy current for all materials with bolt holes, and ultrasonic for titanium and steel embedded flaws. The surface
and corner flaws were divided into four groups based on size (Table 1). Because of the difficulty of manufacturing
embedded flaws, only two sizes were selected: 1.3 mm (0.050 in.) diam circle and a 1.3 × 2.5 mm (0.050 × 0.100 in.)
ellipse.
Table 1 Groups of manufactured flaws used to demonstrate the reliability of NDE methods in the B-
1
program
Length range
Depth range
Group
mm in. mm
in.
Surface flaws
1 0.75-1.91
0.03-0.075 0.25-0.90
0.01-0.035
2 1.92-2.55
0.076-0.100
0.50-1.25
0.020-0.050
3 2.56-3.81
0.101-0.150
0.50-1.80
0.020-0.070
4 3.83-6.35
0.151-0.250
0.50-3.0 0.020-0.12
Bore length range
Radial depth range
Group
mm in. mm
in.
Corner flaws

1 0.75-1.53
0.03-0.060 0.25-0.76
0.01-0.030
2 1.54-2.55
0.061-0.100
0.78-1.27
0.031-0.050
3 2.56-3.56
0.101-0.140
1.29-1.78
0.051-0.070
4 3.58-5.0 0.141-0.20 1.80-2.5 0.071-0.10
For every flawed specimen presented to an inspector, at least two unflawed specimens would also be included. Sizing of
the defects was not required, and no penalties were assessed if the inspector identified a flaw that did not exist. In
addition, if the desired reliability was achieved for a given size range, it also had to be met at the next higher range. The
reliability criterion was established to be a 90% probability of detection at the 95% confidence level (CL). This would be
considered to be met for the largest flaw size in the given ranges if the following detection requirements were met:
Number of observations
Misses
29
0
46
1
61
2
75
3
89
4
103 5
A variety of lessons were learned during the demonstration program. The production inspection processes used at the time
were unable to meet the design requirements of 1.3 mm (0.050 in.) depth for corner cracks. The processes were refined
and the documentation was completely rewritten before the requirements were met. Second, not all inspection personnel
were capable of achieving the required reliability, even with the refined procedures and documentation. As a result, the
demonstration program also became a qualification requirement for personnel that would inspect fracture-critical
components. Etching was also required before the penetrant inspection could meet the requirements for any of the
materials. Embedded flaws could only be produced for titanium. Table 2 summarizes the results demonstrated for the B-1
production NDE facilities at the reliability criterion of a 90% POD at 95% CL.
Table 2 Results of production NDE facilities in the B-1 program
Method Material Flaw type
Flaw depth

mm
in.
Aluminum
Surface 0.90
0.035
Titanium Surface 0.90
0.035
Penetrant
Steel Surface 1.0
0.040
Magnetic particle Steel Surface 1.25
0.050
Titanium Embedded
0.9
0.035
Ultrasonic, shear
Steel Embedded
1.25
0.050
Ultrasonic, longitudinal
Titanium Embedded
1.17
0.046
Eddy current All Corner 0.75
0.030
Fracture control, with the resultant quantitative NDE requirement, has been incorporated into the design of every Air
Force aircraft since the B-1. In addition, designs already in existence at the time have been analyzed to determine which
inspections would be required in service to ensure attainment of the design life of a particular system. Generally, where
the suggested flaw sizes mentioned above could not be tolerated, the assumed design flaw for new designs has been a
0.75 mm (0.030 in.) corner crack and a surface flaw with a depth of 1.25 mm (0.050 in.) and a length of 2.5 mm (0.100
in.). The analysis of existing designs, however, has required the assumption of even smaller design flaws. These instances
of having to detect smaller flaws in service have been few, and fortunately, identification of the requirement has occurred
in sufficient time to allow adequate NDE engineering to address the problems and explore various noninspection options.
Gas Turbine Engines. Following the successful application of damage tolerance concepts and designs to Air Force
aircraft structures, attention began to focus on aircraft gas turbine engines. The reason is that the failure of a high-energy
(rotating) component in an aircraft gas turbine engine usually results in catastrophic consequences for that engine.
Although most engines are designed to contain failure of the blades, the fracture of a disk or spacer will result in
destruction of the engine and can cause significant damage to adjacent structures, such as fuel tanks, major structural
members, or other engines. Even the contained failure of a blade can cause immediate engine shutdown, which can also
have catastrophic consequences for a high-performance, single-engine fighter. Therefore, the integrity of many high-
performance components in gas turbine engines is critical to aircraft safety.
As part of an effort to increase the reliability and reduce the costs of operating and maintaining gas turbine engines for the
U.S. Air Force, a program known as the Engine Structural Integrity Program (ENSIP) has evolved over the last few years.
Its objective is to establish an approach to defining the structural performance, design, development, verification, and life
management requirements for new engines for Air Force aircraft. Military standard MIL-STD-1783 defines ENSIP and is
currently being applied to the development of all new engines for the Air Force (Ref 2). The document is written in a
generic format so that it can be tailored for use by specific System Program Offices to define an engine that will satisfy
their own needs. An accompanying handbook is attached as an appendix to provide specific guidance on the rationale,
background criteria, lessons learned, and instructions necessary to tailor specific sections of the standard for application.
The technical approach is similar to the Aircraft Structural Integrity Program (ASIP), which is defined in MIL-STD-1530
and which has been successfully used for several years in the design of airframes for Air Force systems (Ref 3).
One of the most significant differences between ENSIP and the traditional approaches used in designing engine structures
is the requirement to apply damage tolerance and durability criteria to critical components. This requires the designer to
assume that flaws exist in the engine structure as manufactured and then to design the critical parts so that the flaws
cannot grow to the size that will cause failure in the lifetime of the part or at least within some predetermined inspection
interval. It also establishes life management requirements and procedures to ensure that the necessary inspections capable
of finding flaws in the size range used in design are conducted and that the engine parts are sufficiently durable so that the
economic life of the engine is acceptable.
The impact of this approach on the inspection community is very significant. Based on the estimated capability of state-
of-the-art inspection methods and procedures, many improvements have had to be made both in manufacturing and depot
practice to satisfy the intent of ENSIP. Furthermore, to allow the full implementation of this approach, the problem of
defining available inspection capability in quantitative terms must continue to receive attention. Acceptable procedures
are being established so that it is possible to define exactly how sensitive the inspection methods are on a statistical basis.
The first application of this technology by the Air Force was made to an already designed and operational aircraft gas
turbine engine. The F-100 engine, designed and built by Pratt & Whitney, was already widely used in the dual-engine F-
15 and the single-engine F-16 aircraft when, in 1978, a durability and damage tolerance assessment effort was initiated.
This engine was selected because it was to be purchased in large numbers for Air Force applications for many years to
come and because it was a high-performance machine that was very demanding of materials and designs. The costs of
owning and operating this system could quickly become untenable if problems developed that significantly limited the
life of critical parts or caused significant down-time for repairs. Following the pattern that had been established for
applying ASIP to airframes, a joint Air Force/Pratt & Whitney team was formed to work on-site at the facilities of the
contractor to complete the analysis and to provide a viable Force Structural Maintenance Plan that could be implemented
at the San Antonio Air Logistics Center, where maintenance responsibility for the engines resided.
After the team was in place and the necessary analytical studies were started, it was recognized early in the program that a
quantitative understanding of the inspection procedures used in the manufacture of the engine was lacking and that a
reliable definition of the largest flaw that could escape detection during manufacture had never been determined.
Qualitative statements were made expressing confidence in the inspection methods used, based on the good performance
of the engines to that time. It was acknowledged, however, that the fleet was still young and that a quantitative definition
of the inspection process was urgently needed.
To fill that need, a joint Air Force Materials Laboratory/Pratt & Whitney effort was established to prepare specimens with
known flaws in selected size ranges that would allow quantitative determination of the capability of the inspection
methods to be established. The specimens were designed to contain flawed areas in geometrical features that simulated
the real areas in the actual hardware. These included holes, the edges of holes, radii, and flat surfaces. Small flaws were
generated by damaging the surface, initiating and growing a fatigue crack, and then removing the damaged area until only
the desired depth of the flaw that remained was used to produce the specimens. During 1979, some 39 sets of specimens
with the desired geometries were fabricated from nickel- and titanium-base alloys for the program. Target crack depths of
0.13, 0.25, and 0.50 mm (0.005, 0.010, and 0.020 in.) with a nominal 3:1 aspect ratio were prepared. Similar specimens
with no flaws were also included in each set. The specimens were to be used not only to determine the capability of the
manufacturing inspection methods but also to provide guidance concerning the establishment of inspection methods to be
used in the depot during maintenance. Fluorescent penetrant inspection and eddy current procedures were evaluated using
these specimens. The specimen sets were evaluated by both laboratory and production inspectors.
Because this was the first documented attempt to fabricate flawed specimens of this complexity, a great deal of
experience was gained, not only in specimen preparation but also in evaluating the effectiveness of the inspection
methods. Fluorescent penetrant inspection was included because, at the time, it was the most extensively applied
inspection method used in both manufacturing and depot maintenance. Eddy current methods were included because they
had the best potential for finding the very small surface-connected flaws of concern. Based on the work done in this
program, the following conclusions were reached:
• The capability of fluorescent penetrant inspection to find small flaws with confidence w
as affected by
many variables, including surface condition, nature of the flaw, the process used and the extent to which
it was controlled, and the skills and abilities of the inspectors. The process did not have the necessary
reliability to detect very small flaws in many of the critical areas that had been defined
•
Eddy current methods appeared to have the best potential for detecting small flaws with the confidence
level required
• Eddy current technology and procedures developed in the program could also
be adequately automated
to make this method viable for use in the depot inspection environment.
They could also be adapted for
manufacturing
As a result of this study, the decision was made to implement semiautomated eddy current inspection methods at the San
Antonio Air Logistics Center to provide reliable inspection of defined areas in selected critical parts. A facility was
established at the depot to allow the inspection of critical components as they were cycled through the depot. The eddy
current equipment designed by Pratt & Whitney and incorporated into the facility has been demonstrated to have the
capability of finding 0.13 mm (0.005 in.) deep flaws with a reliability of 90% POD at 95% CL.
The second application of damage tolerance analysis involved the TF-34 engine, which powers the A-10 ground-support
attack aircraft and the S-3A antisubmarine aircraft. In this case, an Air Force/General Electric team was formed at the
General Electric Aircraft Engine Business Group facility in May 1981. Once again, a critical part of the assessment
activity was to establish the level of quality built into the parts during the years the engines were manufactured. This was
needed to provide an indication of the largest flaw that could have been missed by the inspection methods being used at
the time. Because production of the engine was essentially completed by the time the assessment started, the only impact
that establishing improved NDE procedure could have was on the methods being used at the maintenance and overhaul
depot.
In the case of the TF-34 engine, depot responsibility had been assigned to the Navy and was conducted at the Naval Air
Newark Facility in Alameda, CA. Once again, the assessment determined that to achieve acceptable inspection intervals
for certain critical rotating components, inspection methods more sensitive and reliable than fluorescent penetrant
inspection would be required. A special clean room containing eddy current equipment was established at Alameda to
allow inspection of the engine disks and spacers that were considered to be the most critical. The equipment selected for
this room was the Eddy Current II system developed under an Air Force Materials Laboratory manufacturing technology
contract by the General Electric Company. In addition, the fluorescent penetrant inspection facility at Alameda was
upgraded to make it more reproducible and reliable. Inspections have been conducted with these systems since 1984.
Other applications of this technology by the U.S. Air Force have been made to all new gas turbine engines now being
used. This includes the F-101 engine in the B-1B and the F-110 engine in the F-16. New engines now being designed for
Air Force applications will also incorporate ENSIP technology and will therefore have quantitative inspection capabilities
as an integral part of their development. Additional information on ENSIP is available in the article "Fracture Control
Philosophy" in this Volume.
Space Shuttle Program. Design requirements for the space shuttle program of the National Aeronautics and Space
Administration included the use of fatigue and fracture mechanics principles in all systems designs. The implementation
of fatigue and fracture mechanics requires knowledge of the quantitative performance capabilities of the materials,
components, and systems acceptance methods. For this application, Rummel et al. introduced the concepts of statistical
assessments of NDE process performance capabilities (Ref 4). Fatigue cracks in 2219-T87 aluminum alloy were selected
as the test specimens for the assessment of various NDE methods. Test specimens were prepared by inducing fatigue
cracks of varying size in aluminum alloy sheet specimens (fatigue crack growth from electrodischarge machined starter
notches), by machining the specimen surfaces to produce a surface that was representative of production conditions, and
by passing the specimens through various NDE procedures and measuring the success in crack detection for the various
procedures and operating conditions. The concept of probability of detection as a function of flaw size was introduced,
and the performance level of the various NDE procedures was quantified as summarized below.
The experimental test sequence for data gathering, including nondestructive testing (NDT), is shown in Fig. 5. The test
specimens were given a precrack (starter notches) that enabled the growth of fatigue cracks of varying size and aspect
ratio. A total of 328 cracks were grown in 118 specimens, with flaw length ranging from 0.3 to 18 mm (0.012 to 0.700
in.). The specimens were subjected to x-ray radiographic, liquid penetrant, ultrasonic, and eddy current procedures in the
as-machined, after-etch, and after-proof-test conditions. The resulting POD curves for machined and etched surfaces are
also shown in Fig. 6.
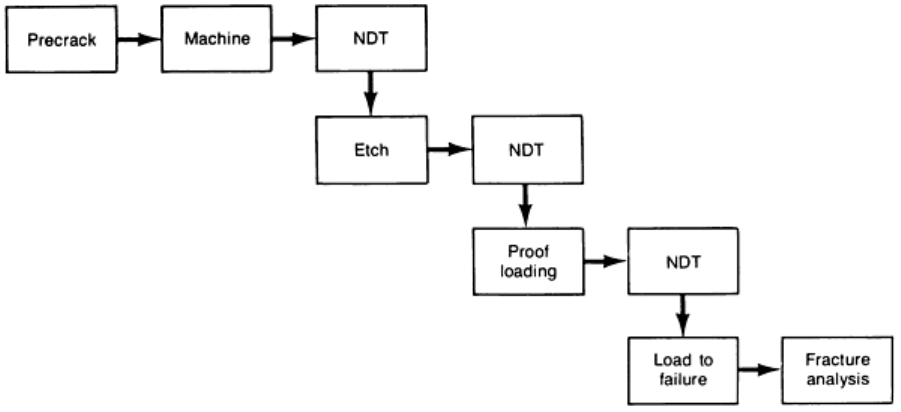
Fig. 5 Experimental test analysis sequence
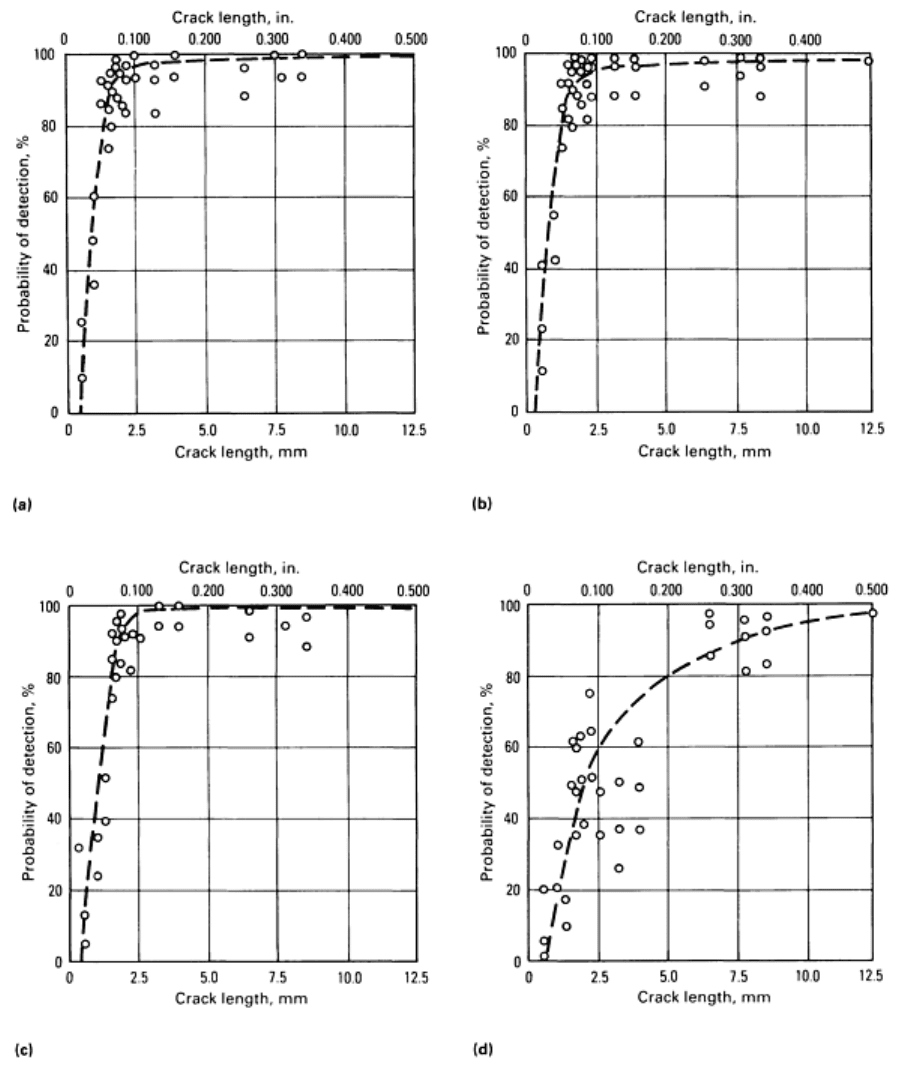
Fig. 6
POD plots for four different NDE methods on the same set of specimens. (a) Penetrant inspection. (b)
Ultrasonic inspection. (c) Eddy current inspection. (d) X-ray inspection
The precision in crack sizing was also measured, and the results are shown in Fig. 7. The composite threshold detection
results were reduced to a plot, as shown in Fig. 8. These data were further simplified to produce the design limits, as
shown in Fig. 9. Figure 9 contains design limits for standard NDE and special NDE. The use of special NDE to meet
difficult design constraints requires actual demonstration of the performance capabilities of the proposed NDE procedures
and a system of controls to ensure that the performance conditions are maintained. These design limits, set by actual NDE
performance demonstration, were used as the basis for design and risk management for all space shuttle system
components. Assessments and NDE performance capability demonstrations have been continued with space shuttle
contractors for all systems production and revalidation.
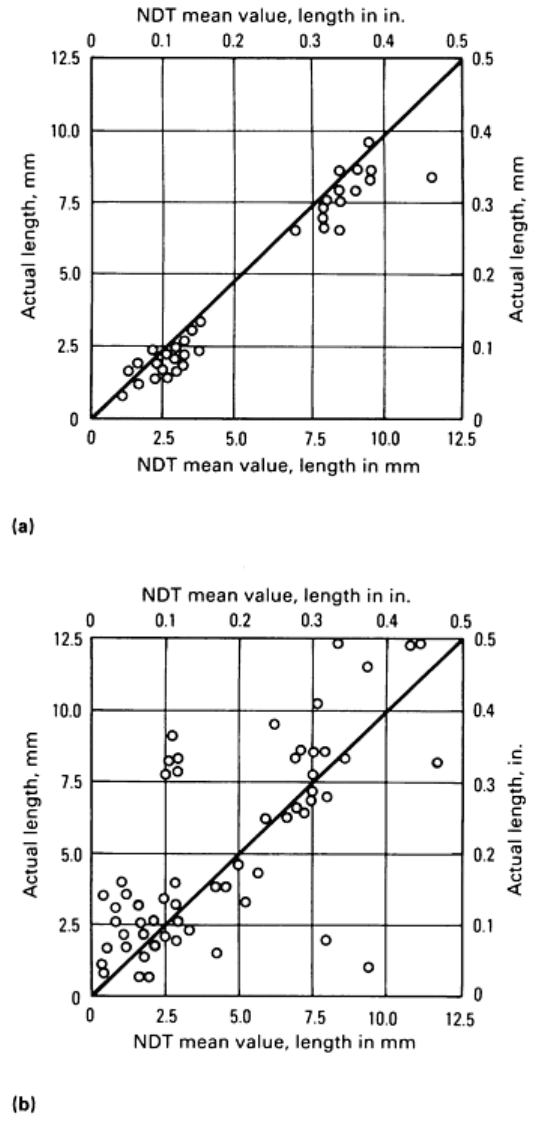
Fig. 7 Actual versus NDE estimated crack length for etched specimens. (a) Penetrant inspection. (b) X-
ray
inspection
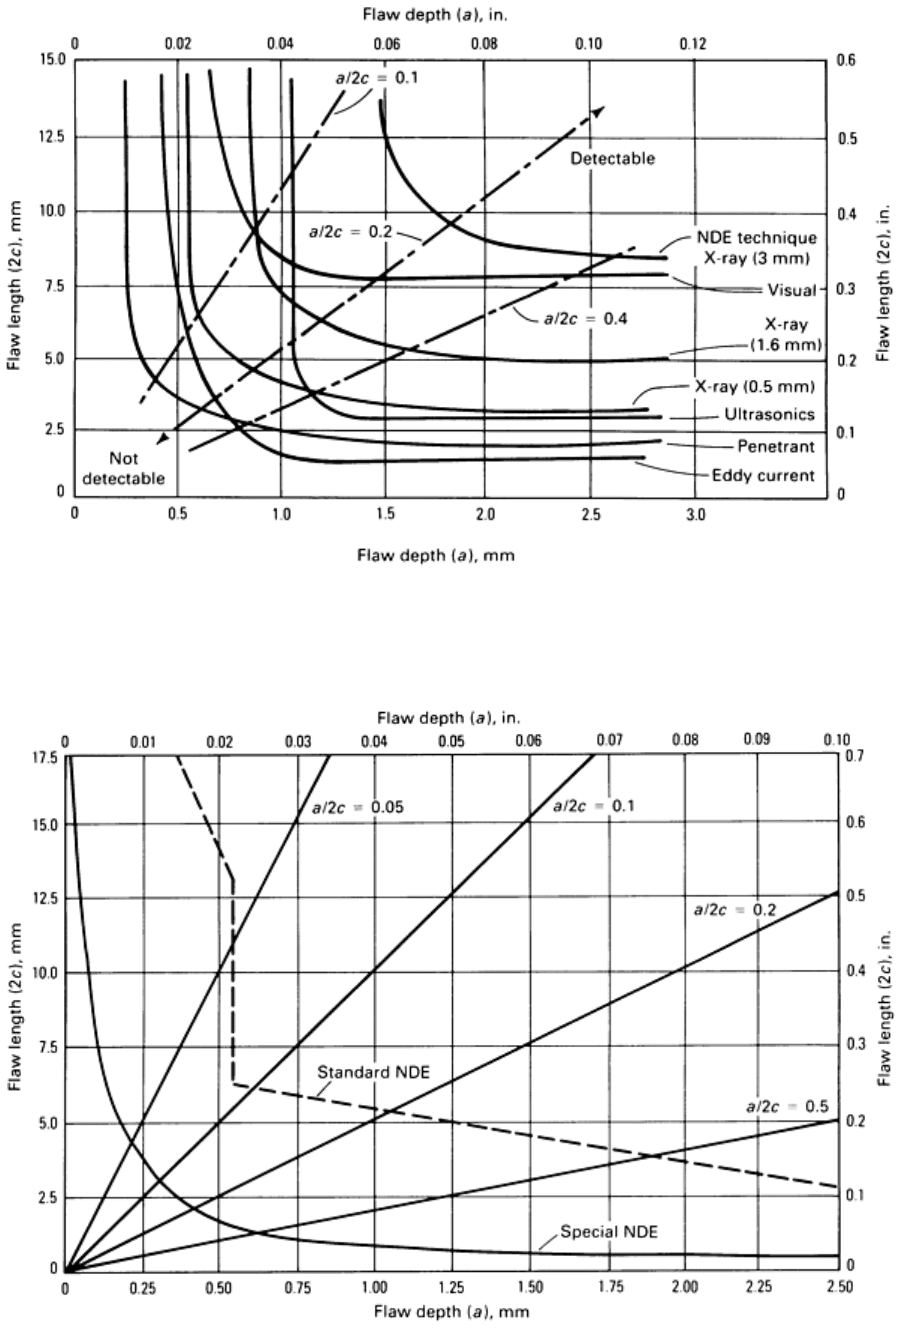
Fig. 8 Combined threshold detection results
Fig. 9 Plot of design limits
Special Inspection Systems. As a result of the evolution of damage tolerance requirements, special equipment has
been developed in the last few years for increasing the reliability of inspection operations by automating the process and
by incorporating computerized data generation and control. This has significantly reduced the dependence on human
operators, thus eliminating one of the major sources of error in the process. Most of these automation efforts have been
directed toward the inspection of critical aircraft gas turbine engine hardware, primarily in the maintenance depot
environment. The systems could be used equally effectively in manufacturing operations. The following are examples of
the systems that have been developed over recent years.
Structural Assessment Testing Applications. The NDE performance requirements for overhaul and revalidation
of the structural integrity of aircraft engine components (United States Air Force facilities) required the use of special,
controlled methods to meet meantime between overhaul and life cycle performance requirements. Special equipment,
fixturing, procedures, and personnel training are implemented at the San Antonio Air Logistics Center at Kelly Air Force
Base to approach the imposed design constraints. Assessment, demonstration, and validation of the system performance
capabilities and reliabilities were necessary to ensure that design requirements were being met.
The special NDE methods were successful in meeting design requirements, and new levels of understanding and
performance were gained by the implementation of advanced NDE methods and controls in this special facility. The most
significant output from the assessment of these processes was the demonstration of the need for excellence in NDE
engineering in validating NDE procedures and in setting acceptance limits. The performance capability of an eddy current
method with an acceptance threshold limit set at 3.0 mV is shown in Fig. 10(a). The performance level of the same
procedure (same data) with an acceptance limit set at 0.5 mV is shown in Fig. 10(b). This example clearly illustrates the
importance of fully characterizing the NDE procedure and managing the NDE procedure within achievable acceptance
limits.
