ASM Metals HandBook Vol. 17 - Nondestructive Evaluation and Quality Control
Подождите немного. Документ загружается.


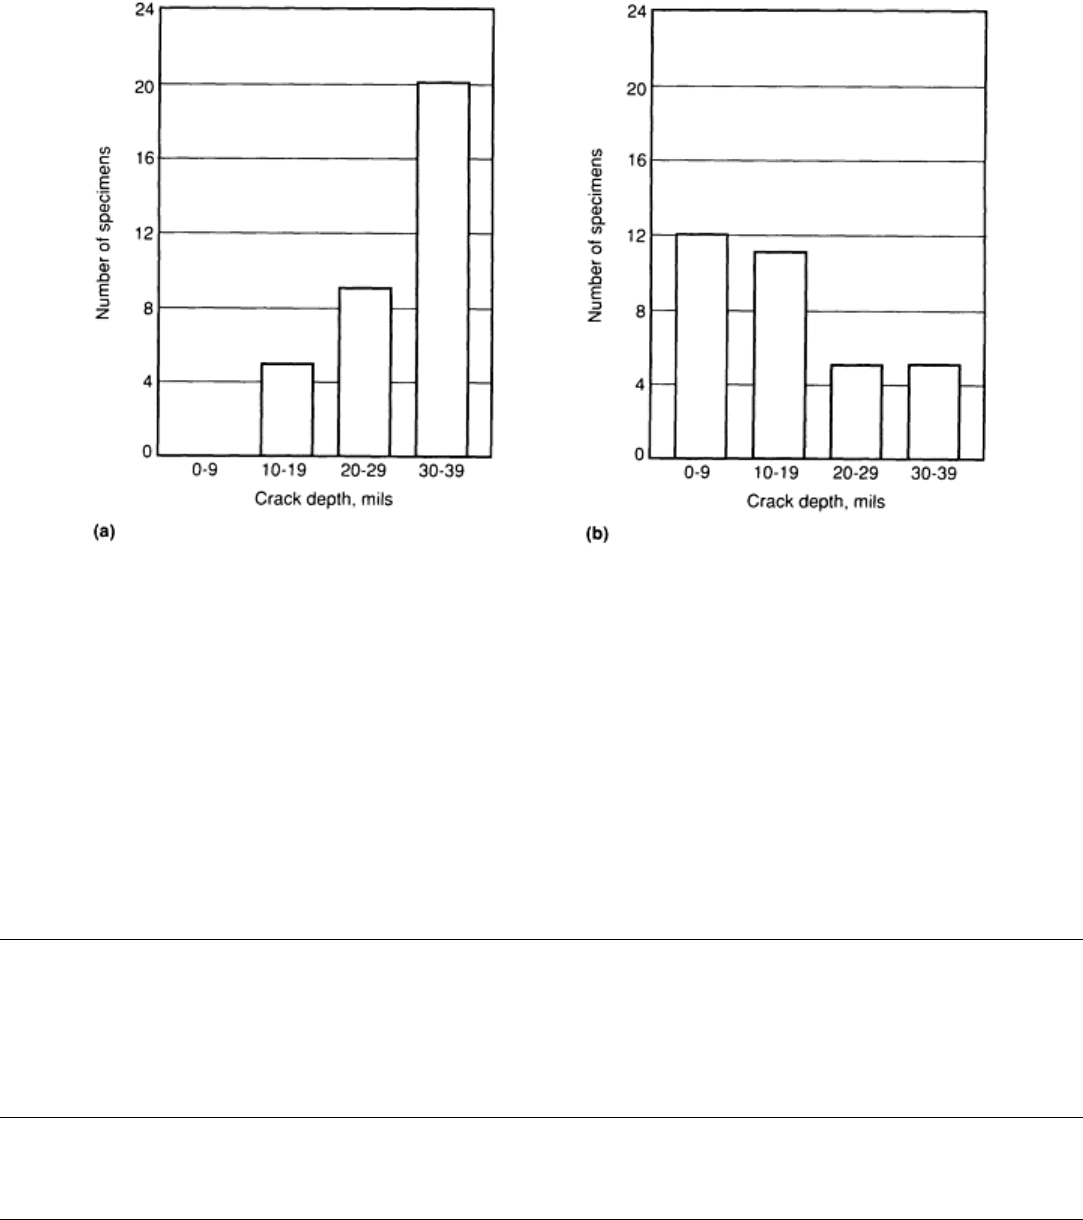
Fig. 4 Specimen crack depth distribution for two case studies. (a) Case study No. 1. (b) Case study No. 2
This case study, which demonstrates the criticality of planning the reliability demonstration program, showed only the
importance of specimen flaw size to the final outcome of the reliability study.
In the following articles in this Section, fracture control philosophy is discussed, reliability demonstrations that have been
completed are reviewed, and the analysis of NDE data is examined. The final article in this Section, "Models for
Predicting NDE Reliability," provides information on advanced modeling studies for predicting reliability for the
inspection of a particular component. The objective of this Section is to provide the necessary information and resources
to conduct an effective NDE reliability program.
Reference cited in this section
7.
A.P. Berens and P.W. Hovey, "Flaw Detection Reliability Criteria Volume I--
Methods and Results, Final
Report," Report AFWAL-TR-84-4022 Volume I, United States Air Force Material Laboratory, Wright-
Patterson Air Force Base, 1984
Introduction to Quantitative Nondestructive Evaluation
Vicki E. Panhuise, Allied-Signal Aerospace Company, Garrett Engine Division
References
1. "Ultrasonic Inspection of Product over 0.5 in. (13 mm) Thick," Aerospace Material Sp
ecification
2630A, Society of Automotive Engineers, 1980 (original release 1960)
2.
"Standard Practice for Fabricating and Checking Aluminum Alloy Ultrasonic Standard Reference
Blocks," E 127, Annual Book of ASTM Standards, American Society for Testing and Materials

3.
"Standard Recommended Practice for Fabrication and Control of Steel Reference Blocks Used in
Ultrasonic Inspection," E 428, Annual Book of ASTM Standards,
American Society for Testing and
Materials
4. "Recommended Practice, Personnel Qualification and Certification in NDT," SNT-TC-
IA, American
Society for Nondestructive Testing
5.
W. Rummel, Recommended Practice for a Demonstration of Nondestructive Evaluation (NDE)
Reliability on Aircraft Production Parts, Mater. Eval.,Vol 40 (No. 9), Aug 1982, p 922
6. W.H. Lewis, et al., "Reliability of Nondestructive Inspections--Final Report," Report SA-
ALC/MME
76-6-38-1, United States Air Force, Air Logistics Center, Kelly Air Force Base, 1978
7. A.P. Berens and P.W. Hovey, "Flaw Detection Reliability Criteria Volume I--
Methods and Results,
Final Report," Report AFWAL-TR-84-
4022 Volume I, United States Air Force Material Laboratory,
Wright-Patterson Air Force Base, 1984
Fracture Control Philosophy
William D. Cowie, United States Air Force, Aeronautical System Division, Propulsion Directorate
Introduction
FRACTURE CONTROL PHILOSOPHIES are being used in the design, development, and life management of United
States Air Force (USAF) turbine engine and airframe components. This article describes the fracture control program for
turbine engine components. The section "Applications (Case Studies)" of the article "Applications of NDE Reliability to
Systems" in this Volume provides an overview of fracture control programs for both airframe and turbine engine
components.
The establishment of a fracture control philosophy and the implementation of a fracture control program have been
integral components of the USAF turbine engine development process since 1978. They have been applied to new engine
programs as part of the USAF Engine Structural Integrity Program (ENSIP) described in military standard MIL-STD-
1783 (issued formally in 1984). This military standard was reviewed and approved by the Aerospace Industries
Association of America in 1982.
Fracture control philosophy has also been applied to existing inventory USAF engines through structural durability and
damage tolerance assessments. In all, fracture control programs have been applied or are being applied to the F-100, TF-
34, F100-PW-220, F100-PW-229, F110-GE-100, F110-GE-129, F101-GE-102, F109-GA-100, F-119, F120, and T406
engines and have resulted in the implementation of enhanced nondestructive evaluation (NDE) methods (for example,
eddy current inspection) at manufacturing and at field/depot. These inspections have been successful in detecting early
cracking and in accelerating corrective actions. Several developmental efforts in the last 5 years have identified
fluorescent penetrant inspection process improvements that must be implemented within industry and Air Force depots to
improve flaw detection reliability. The need to quantify detection reliability for imbedded defects is also identified.
The engine development process has been evolutionary in terms of the application of upgraded requirements. The new
process of fracture control, sometimes referred to as damage tolerance, is contained in ENSIP, and it involves material
selection as well as design and life management. Recent experience clearly demonstrates that the damage tolerance
requirement is cost effective when assessed on a life cycle basis.
Fracture Control Philosophy
William D. Cowie, United States Air Force, Aeronautical System Division, Propulsion Directorate
Overview of ENSIP

In the past 16 years, a large number of structural problems have occurred in USAF gas turbine engines. Many of these
were safety problems that resulted in loss of aircraft, and an even greater number affected durability, causing a high level
of maintenance and modification costs. All of these problems have adversely affected fleet readiness. The Engine
Structural Integrity Program was intended to reduce these problems substantially and was developed based on the
following specific lessons:
• It is unrealistic (and can be dangerous) to assume defect-free structure in safety-of-flight components
• Critical parts (and part details) and potential failure modes must
be identified early and appropriate
control measures implemented
• Internal thermal and vibratory environments must be identified early in the engine development
• Predicted analytical stresses must be verified by test for complex components
• Materials and processes must be adequately characterized (particularly, the fracture properties)
• Design stress spectra, component test spectra, and full-
scale engine test spectra must be based on the
anticipated service usage of the engine, that is, accelerated mission-related testing
• Potential engine/airframe structural interactions must be defined and accounted for
•
Management procedures (such as individual engine tracking procedures and realistic inspection and
maintenance requirements) must be defined and enforced
The Engine Structural Integrity Program was established by the Air Force to provide an organized and disciplined
approach to the structural design, analysis, development, production, and life management of gas turbine engines, with the
goal of ensuring engine structural safety, increased service readiness, and reduced life cycle costs. The five major tasks
associated with ENSIP are the development of design information; design analysis and component and material
characterization; component and core engine testing; ground and flight engine testing; and production quality control and
engine life management. Each major task is subdivided into a number of subtasks (Table 1) that guide the development
process.
Table 1 Tasks of the engine structural integrity program
Task I: Design information
Development plans
ENSIP master
Durability and damage control
Material and process characterization
Corrosion prevention and control
Inspection and diagnostics
Operational requirements
Design service life and usage requirements
Design criteria
Task II: Design analysis and material characterization and development tests
Design duty cycle
Material characterization
Design development tests
Structural/thermal analysis
Installed engine inspectability
Manufacturing and quality control

Task III: Component and core engine tests
Component tests
Strength
Vibration
Damage tolerance
Durability
Core engine tests
Thermal survey
Vibration strain and flutter boundary survey
Task IV: Ground and flight engine tests
Ground engine tests
Strength
Damage tolerance
Accelerated mission test
Thermal survey
Vibration strain and flutter boundary survey
Flight engine tests
Fan strain survey
Thermal survey
Installed vibration
Deterioration
Task V: Engine life management
Updated analyses
Structural maintenance plan
Operational usage survey
Individual engine tracking
Durability and damage tolerance control actions (production)
The Engine Structural Maintenance Plan represents the output of the ENSIP program. This plan identifies and
defines individual part life limits, the necessary inspection periods for each fracture-critical part, and the inspection
procedure. The basic components of the Engine Structural Maintenance Plan are as follows:
•
Structural safety is obtained in ENSIP by requiring a structure with a damage tolerance that is capable
of accommodating flaws induced either in manufacture or service
•
Durability design requirements stipulate that the economic life of the engine must exceed the specified
design service life of the aircraft when flown to the design usage spectra
• Maintainability criteria
require that old parts fit and function with new parts, that repair life be defined,

and that inspectability and structural diagnostics be designed into the engine and its components
• A materials and process characterization plan controls materials develo
pment through key engine
development points
• Environmental definition requirements specify the thermal, dynamic, and steady-
state stress; the stress
spectra; and the component sensitivities
• A comprehensive ground test policy is utilized to ensure complian
ce with safety, durability, and
maintainability requirements
• A usage and tracking policy is used to form the basis of an engine life management program
Fracture Control Philosophy
William D. Cowie, United States Air Force, Aeronautical System Division, Propulsion Directorate
Overview of ENSIP
In the past 16 years, a large number of structural problems have occurred in USAF gas turbine engines. Many of these
were safety problems that resulted in loss of aircraft, and an even greater number affected durability, causing a high level
of maintenance and modification costs. All of these problems have adversely affected fleet readiness. The Engine
Structural Integrity Program was intended to reduce these problems substantially and was developed based on the
following specific lessons:
• It is unrealistic (and can be dangerous) to assume defect-free structure in safety-of-flight components
•
Critical parts (and part details) and potential failure modes must be identified early and appropriate
control measures implemented
• Internal thermal and vibratory environments must be identified early in the engine development
• Predicted analytical stresses must be verified by test for complex components
• Materials and processes must be adequately characterized (particularly, the fracture properties)
• Design stress spectra, component test spectra, and full-
scale engine test spectra must be based on the
anticipated service usage of the engine, that is, accelerated mission-related testing
• Potential engine/airframe structural interactions must be defined and accounted for
•
Management procedures (such as individual engine tracking procedures and realistic inspection and
maintenance requirements) must be defined and enforced
The Engine Structural Integrity Program was established by the Air Force to provide an organized and disciplined
approach to the structural design, analysis, development, production, and life management of gas turbine engines, with the
goal of ensuring engine structural safety, increased service readiness, and reduced life cycle costs. The five major tasks
associated with ENSIP are the development of design information; design analysis and component and material
characterization; component and core engine testing; ground and flight engine testing; and production quality control and
engine life management. Each major task is subdivided into a number of subtasks (Table 1) that guide the development
process.
Table 1 Tasks of the engine structural integrity program
Task I: Design information
Development plans
ENSIP master
Durability and damage control
Material and process characterization
Corrosion prevention and control

Inspection and diagnostics
Operational requirements
Design service life and usage requirements
Design criteria
Task II: Design analysis and material characterization and development tests
Design duty cycle
Material characterization
Design development tests
Structural/thermal analysis
Installed engine inspectability
Manufacturing and quality control
Task III: Component and core engine tests
Component tests
Strength
Vibration
Damage tolerance
Durability
Core engine tests
Thermal survey
Vibration strain and flutter boundary survey
Task IV: Ground and flight engine tests
Ground engine tests
Strength
Damage tolerance
Accelerated mission test
Thermal survey
Vibration strain and flutter boundary survey
Flight engine tests
Fan strain survey
Thermal survey
Installed vibration

Task V: Engine life management
Updated analyses
Structural maintenance plan
Operational usage survey
Individual engine tracking
Durability and damage tolerance control actions (production)
The Engine Structural Maintenance Plan represents the output of the ENSIP program. This plan identifies and
defines individual part life limits, the necessary inspection periods for each fracture-critical part, and the inspection
procedure. The basic components of the Engine Structural Maintenance Plan are as follows:
•
Structural safety is obtained in ENSIP by requiring a structure with a damage tolerance that is capable
of accommodating flaws induced either in manufacture or service
• Durabi
lity design requirements stipulate that the economic life of the engine must exceed the specified
design service life of the aircraft when flown to the design usage spectra
• Maintainability criteria require that old parts fit and function with new parts, t
hat repair life be defined,
and that inspectability and structural diagnostics be designed into the engine and its components
•
A materials and process characterization plan controls materials development through key engine
development points
• Environmental definition requirements specify the thermal, dynamic, and steady-
state stress; the stress
spectra; and the component sensitivities
•
A comprehensive ground test policy is utilized to ensure compliance with safety, durability, and
maintainability requirements
• A usage and tracking policy is used to form the basis of an engine life management program
Fracture Control Philosophy
William D. Cowie, United States Air Force, Aeronautical System Division, Propulsion Directorate
ENSIP and Fracture Control Philosophy Policy
Damage tolerance is defined as the ability of the engine to resist failure due to the presence of flaws, cracks, or other
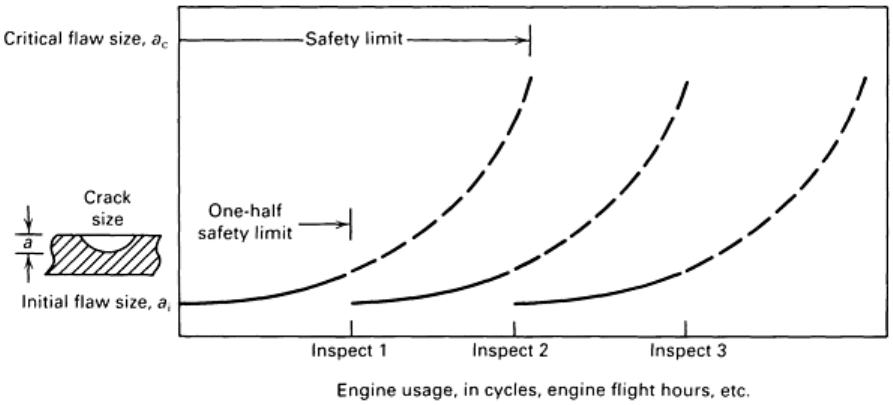
damage for a specified period of usage. The damage tolerance or fracture control philosophy used in ENSIP is shown in
Fig. 4. Components are designed for crack growth so that the safety limit exceeds two times the required inspection
interval. The safety limit or residual life is the time for assumed initial flaws to grow and cause failure. Because the
requirement is to inspect at one-half the safety limit, the design goal for the safety limit is two times the required design
life (that is, no inspections). The minimum design requirement for the safety limit is two times the planned depot visit
interval. An important aspect of the damage tolerance requirement is that it applies only to fracture-critical components.

Fig. 4 Damage tolerance approach to life management of cyclic-
limited engine components. The safety limit or
residual life is the time for the initial flaw to grow and cause failure. The size of the initial flaw, a
i
, is based on
the inspection method or material defect distribution (for imbedded defects).
Fracture-critical components are defined as those components whose failure will result in probable loss of the
aircraft due to noncontainment or, for single-engine aircraft, power loss that presents sustained flight because of direct
part failure or by causing other progressive part failures. Damage tolerance requirements are applied only to fracture-
critical components (that is, components that must maintain their integrity during flight) and not, in general, to durability-
critical components (that is, components that affect maintenance schedules). As expected, component classification is
affected by aircraft engine configuration (single engine or multiengine). Component classification is established early and
is identified in the contract.
Initial Flaw Size. Initial flaws are assumed to exist in fracture-critical components. Experience has shown that
premature cracking (that is, crack initiation prior to the LCF limit) occurs at high-stress areas and where components
initially contained both material- and manufacturing-related quality variations (voids, inclusions, machining marks,
scratches, sharp cracks, and so on). The fracture control or damage tolerance requirement assumes a sharp crack as the
initial flaw when characterizing these abnormal initial conditions. The assumed initial imbedded flaw sizes are based on
the intrinsic material defect distribution or the NDE methods to be used during manufacture. The assumed surface flaw
size also depends on the NDE capability. An inspection reliability of 90% probability of detection (POD) at the lower-
bound 95% confidence level (CL) is required for the assumed initial flaw sizes.
The assumed initial flaw size to account for intrinsic material defect distribution should encompass 99.99% of the defect
population if a scatter factor of two is used to establish the inspection interval, or 99.9% if a scatter factor of one is used.
If embedded defects cannot be inspected in service, the 99.99 percentile (or the 99.9 percentile) is used to satisfy the
design life requirement.
An initial flaw size not less than 0.75 mm (0.030 in.) in length (for surface flaws) or 0.4 × 0.4 mm (0.015 × 0.015 in.) in
size (corner cracks) for nonconcentrated stress areas (bores, webs, and so on) is required. Initial flaw sizes for other
surface locations (holes, fillets, scallops, and so on) will be consistent with the demonstrated capability (90% POD/95%
CL) of the inspection systems proposed for use. It is recommended that the initial design and sizing of components be
based on 0.75 mm (0.030 in.) long surface flaws or 0.4 × 0.4 mm (0.015 × 0.015 in.) corner cracks at all locations. This
design recommendation is based on the initial flaw size that can be detected with fluorescent penetrant inspection. This
includes fully automated fluorescent penetrant inspection systems that are being developed to meet the 0.75 mm (0.030
in.) and 0.4 × 0.4 mm (0.015 × 0.015 in.) inspection criteria.
These flaw sizes are intended to represent the maximum size of the damage that can be present in a critical location after
manufacture and/or inspection. The specification of these flaw sizes is based on the demonstrated flaw detection
capability of the nondestructive inspection (NDI) method. During design of the components, the assumed initial flaw size
that is appropriate for various NDI methods is:

• 0.75 mm (0.030 in.) surface length where the NDI method is fluorescent penetrant inspection
• 0.25 mm (0.010 in.) surface length where the NDI method is eddy current or ultrasonic inspection
• 1.3 mm
2
(0.002 in.
2
) area for imbedded defects utilizing ultrasonic inspection
• 5 mm (0.200 in.) surface length and imbedded sphere = 0.2 × thickness for weldments
•
When initial flaw sizes are based on material defect distribution, selected size shall encompass 99.99%
of the distribution
• Demonstration that assumed flaw sizes can be reliably detected with a 90% POD and a 95% CL
The capabilities of the NDI method must be demonstrated by the contractor. The design of NDE reliability experiments is
discussed in the article "NDE Reliability Data Analysis" in this Volume.
Residual strength is defined as the load-carrying capability of a component at any time during the service exposure
period, considering the presence of damage and accounting for the growth of damage as a function of exposure time. The
requirement is to provide limit load residual strength capability throughout the service life of the component. In other
words, the minimum residual strength for each component (and location) must be equal to the maximum stress that occurs
within the applicable stress spectra based on the design duty cycle. Normal or expected overspeed due to control system
tolerance and engine deterioration is included in the residual strength requirement, but fail-safe conditions, such as burst
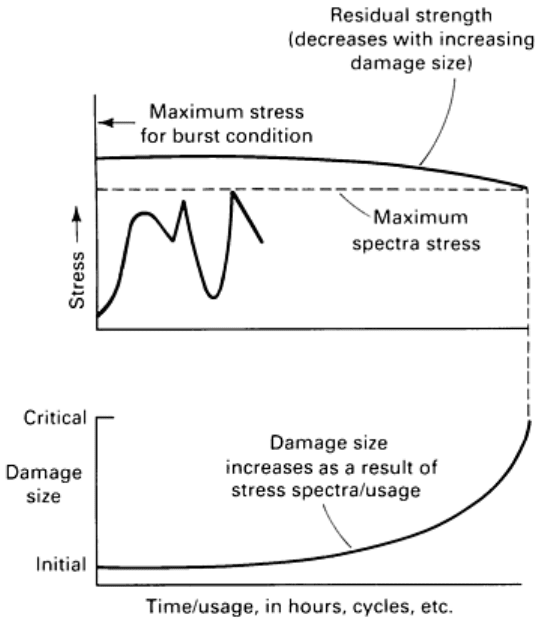
margin, are excluded. The residual strength requirement is illustrated in Fig. 5.
Inspection Intervals. It is highly desirable to have no
damage tolerance inspections required during the design
lifetime of the engine. This in-service noninspectable
classification requires that components be designed such
that the residual life or safety limit be twice the design life.
Designing components as in-service noninspectable is a
requirement for those components or locations that cannot
be inspected during the depot maintenance cycle.
However, the weight penalty incurred to achieve a safety
limit/residual life/damage growth interval twice the design
life may be prohibitive on some components/locations.
Therefore, in-service inspections will be allowed on some
components subject to justification. The basis for the
justification is characterization of the costs as a function of
the requirements as established by trade studies. Cost is
usually expressed in terms of weight or life cycle cost, and
the requirement in terms of safety limit/residual
life/damage growth interval.
The depot or base-level inspection interval for damage
tolerance considerations should be compatible with the
overall engine maintenance plan. Once again, it is highly
desirable that the inspection interval be equal to the design
service life of the parts in the hot gas path (that is, the hot-
part design service life, which is equal to one-half the
design lifetime of the engine) because this is the expected
minimum depot or maintenance interval for the engine or
module. It is required that the minimum damage tolerance
inspection interval be contained in the contract
specification.
Flaw Growth. It is required that the assumed initial flaw sizes will not grow to critical size and cause failure of a
component due to the application of the required residual strength load in two times the inspection interval. The flaw
growth interval is set equal to two times the inspection interval to provide a margin for a variability that exists in the total
process (that is, inspection reliability, material properties, usage, stress predictions, and so on). Factors other than two
should be used when individual assessments of the variables that affect crack growth can be made (for example, to
account for observed scatter in crack growth during testing).
Fig. 5 Diagram of the residual strength requirement

It is important that the effects of vibratory stress on unstable crack growth be accounted for in establishing the safety
limit. Experience shows that the threshold crack size can be significantly less than the critical crack size associated with
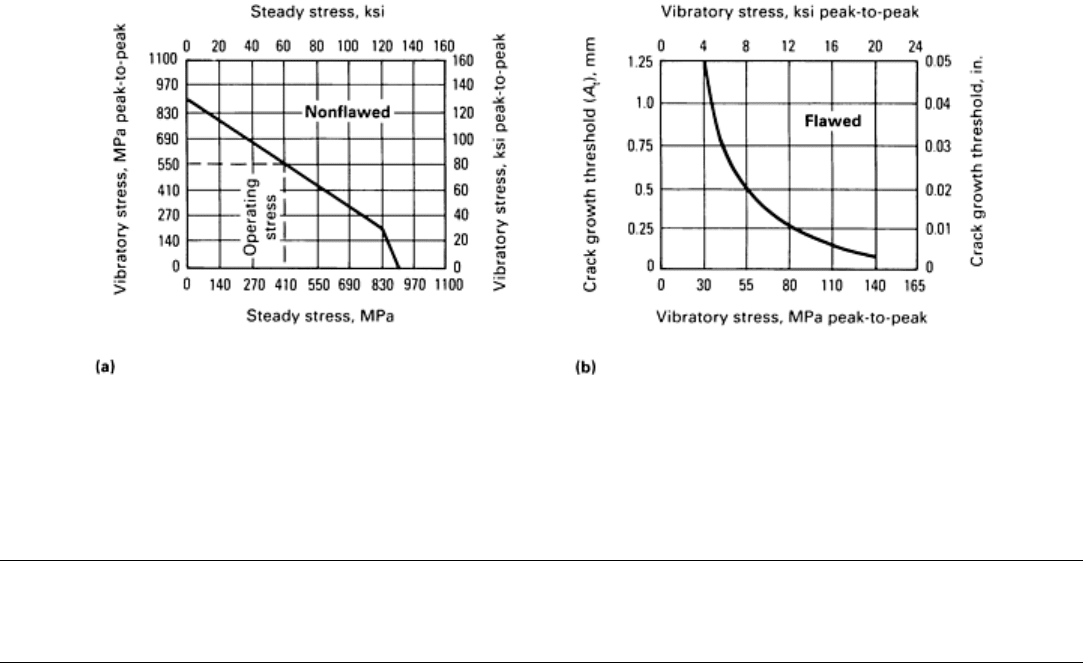
the material fracture toughness, depending on the material, the major stress cycle, and the vibration stress. As shown in
Fig. 6, the conventional Goodman diagram may not disclose the true sensitivity of initial defects to vibratory stresses. The
threshold crack size must be established at each individual sustained-power condition (idle, cruise, intermediate) using the
appropriate values of steady stress and vibratory stress. The smallest threshold crack size will be used as a limiting value
in calculating the safety limit if it is less than the critical crack size associated with the material fracture toughness.
Fig. 6 Interac
tion of vibratory stress and initial flaws. (a) Large vibratory stress required to initiate crack. (b)
Low vibratory stress will propagate cracks. The crack growth threshold, A
t
, represents the threshold of vibratory
motion that will cause the growth of a given crack size.
Fracture Control Philosophy
William D. Cowie, United States Air Force, Aeronautical System Division, Propulsion Directorate
Fracture Control Verification
Verification that the fracture control policy is met is accomplished by the development and implementation of a Damage
Tolerance Control Plan, by analysis and test, and by the implementation of reliable inspection methods during
manufacture and field/depot maintenance.
A Damage Tolerance Control Plan is prepared that identifies and schedules each of the tasks and interfaces in the
functional areas of design, materials selection, tests, manufacturing control, and inspection. Specific tasks that are
addressed in the Damage Tolerance Control Plan are:
• Trade studies for design concepts/material/weight/performance/cost
• Analysis
• Development and qualification tests
• Fracture-critical parts list
• Zoning of drawings
• Basic materials fracture data
• Material properties controls
• Traceability
• NDI requirements
