Alciatore D.G., Histand M.B. Introduction to Mechatronics and Measurement Systems
Подождите немного. Документ загружается.

Confirming Pages
■ CLASS DISCUSSION ITEM 8.5
Bipolar 4-Bit D/A Converter
If V
s
⫽ 10 V and the ground reference is replaced by a ⫺ 10 V reference, what out-
put voltage would correspond to each possible binary input applied to a 4-bit D/A
R -2 R ladder network?
THREADED DESIGN EXAMPLE
DC motor power-op-amp speed controller—D/A converter interface A.5
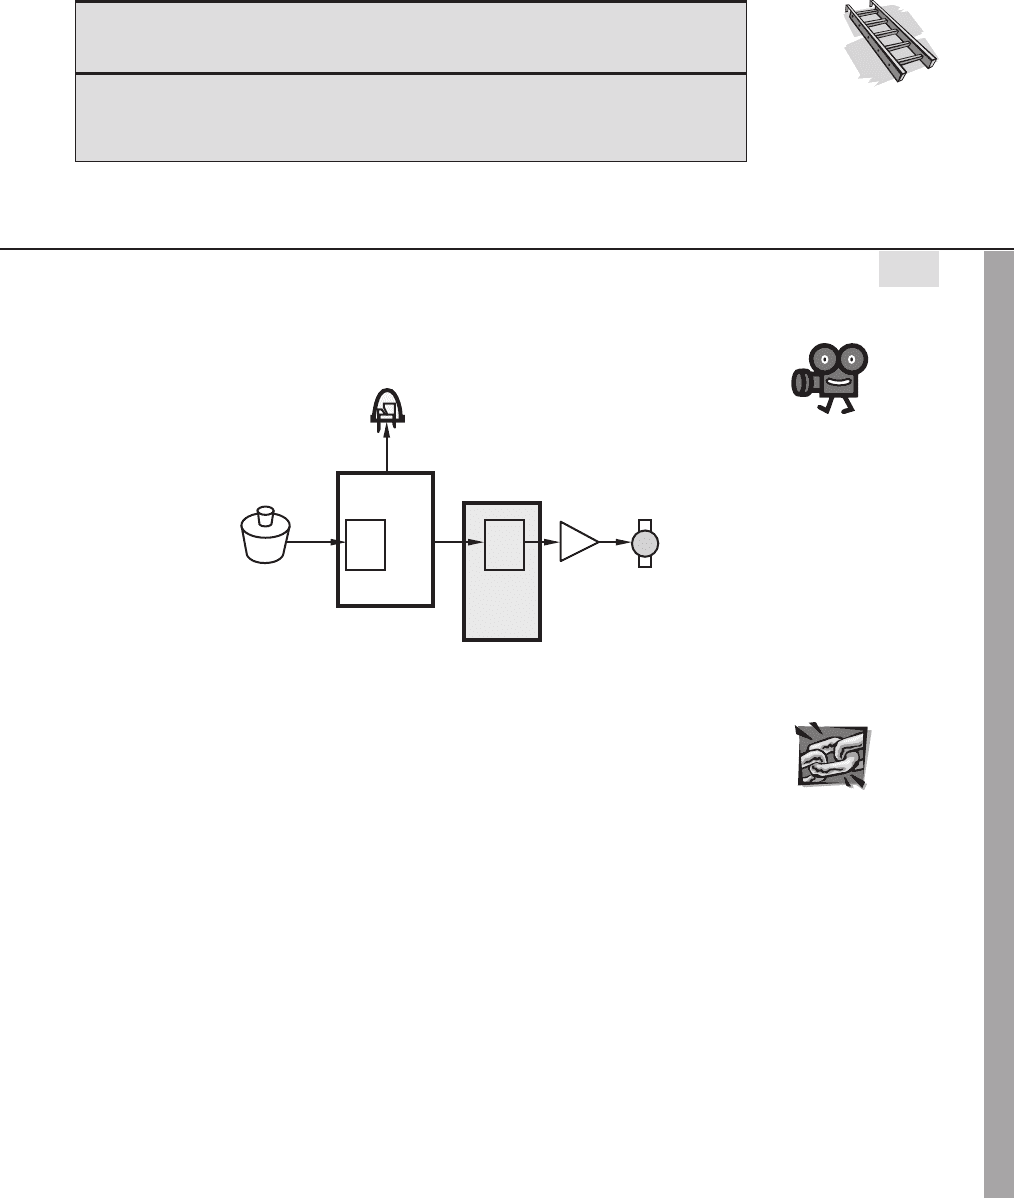
The figure below shows the functional diagram for Threaded Design Example A (see
Section 1.3 and Video Demo 1.6), with the portion described here highlighted.
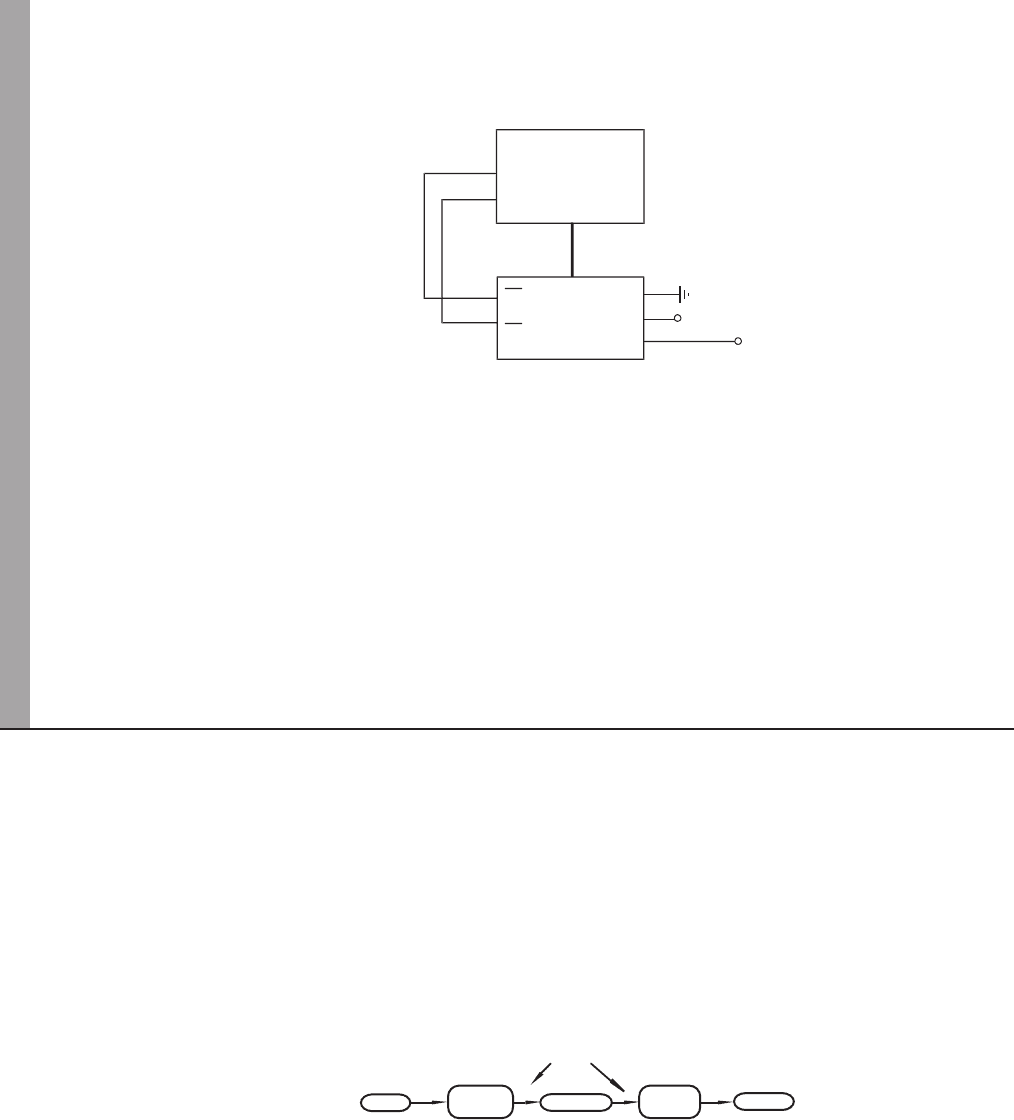
The D/A used in this design is an external 8-bit TLC7524 converter. Detailed information
about the device can be found in the data sheet at Internet Link 7.15. As shown in the figure
on the next page, the PIC interfaces to the D/A converter via two control lines and 8 data lines
(the entire PORTB register). One control line is the chip select pin that is used to activate the
D/A converter. The other is a write line that signals the D/A when to perform the conversion
and update the output voltage. Both lines are “active low.”
The code required to initialize the PIC outputs and to activate the D/A converter follows:
da_cs Var PORTA.3 ' external D/A converter chip select
(low:activate)
da_wr Var PORTA.4 ' external D/A converter write (low:
write)
TRISB ⫽ 0 ' initialize PORTB pins as outputs
High da_wr ' initialize the A/D converter write line
Low da_cs ' activate the external D/A converter
1.6
DC motor
power-op-amp
speed controller
Video Demo
7.15 TLC7524
D/A converter
Internet Lin
k
potentiometer
PIC microcontroller
with analog-to-digital
converter
power
amp
DC
motor
A/D D/A
light-
emitting
diode
digital-to-
analog
converter
(continued )
8.4 Digital-to-Analog Conversion 361
alc80237_ch08_346-374.indd 361alc80237_ch08_346-374.indd 361 11/01/11 4:05 PM11/01/11 4:05 PM
Confirming Pages
362 CHAPTER 8 Data Acquisition
Figure 8.14 illustrates the roles that A/D and D/A converters play in a mecha-
tronic control system. An analog voltage signal from a sensor (e.g., a thermocouple)
is converted to a digital value, the computer uses this value in a control algorithm,
and the computer outputs an analog signal to an actuator (e.g., an electric motor) to
cause some change in the system being controlled. This topic is explored more in the
next section and in Chapter 11. Sensors and actuators are the topics of the next two
chapters.
The code required to update the voltage output from the D/A converter follows. The
voltage is stored as a scaled value in the PIC in a byte variable ( ad_byte ). The value ranges
from 0 (corresponding to 0 V) to 255 (corresponding to 5 V). The entire byte (all 8 bits)
is transmitted in parallel to the D/A converter through PORTB. Note the small pause
after the write command to ensure that the conversion has completed before the write is
disabled.
' Send the potentiometer byte to the external D/A
PORTB ⫽ ad_byte
Low da_wr
Pauseus 1 ' wait 1 microsec for D/A to settle
High da_wr
PIC16F88
2
3
RA3
RA4
PORTB
TLC7524C
D/A converter
CS
WR
DB
4–11
13–6
2, 3
12
13
5 V
1, 14
REF
15
voltage
output
A/D
converter
D/A
converter
digital
signals
analog
signal
analog
signal
sensor
computer
actuator
Figure 8.14 Computer control hardware.
(continued )
alc80237_ch08_346-374.indd 362alc80237_ch08_346-374.indd 362 11/01/11 4:05 PM11/01/11 4:05 PM
Confirming Pages
8.5 VIRTUAL INSTRUMENTATION, DATA
ACQUISITION, AND CONTROL
A virtual instrument consists of a personal computer equipped with data acqui-
sition hardware and software to perform the functions of traditional instruments.
Stand-alone traditional instruments such as oscilloscopes and waveform genera-
tors are very powerful, but they can be very expensive and sometimes limiting. The
user generally cannot extend or customize the instrument’s functionality. The knobs
and buttons on the instrument, the built-in circuitry, and the functions available
to the user are all specific to the instrument. Virtual instrumentation provides an
alternative.
Software is the most important component of a virtual instrument. It can be used
to create custom applications by designing and integrating the routines that a particu-
lar process requires. The software also allows one to create an appropriate user inter-
face that best suits the purpose of the application and the users who will interact with
it. The LabVIEW software from National Instruments (see Internet Link 8.4) is an
example of an easy-to-use application development environment designed specifi-
cally for creating virtual instruments. LabVIEW offers powerful features that make
connecting to a wide variety of hardware and other software easy.
One of the most powerful features of LabVIEW is its graphical programming
environment. Custom graphical user interfaces can be designed to allow a user to
■ CLASS DISCUSSION ITEM 8.6
Audio CD Technology
A compact disk (CD) stores music (an analog signal) in a digital format. How is this
done? How is the digital data reconverted to the music you hear? Given that audible
frequencies range from 20 Hz to 20 kHz, what is an appropriate sampling frequency?
For this sampling rate, how many bits must be stored on a CD to produce 45 minutes
of listening pleasure, assuming the music is stored uncompressed (e.g., as a WAV file
and not as an MP3 file)? Assume just the raw data is stored, without the sophisticated
error correction and compensation schemes described in Internet Link 8.5.
■ CLASS DISCUSSION ITEM 8.7
Digital Guitar
A digital guitar is a standard electric guitar equipped with additional components that
send MIDI signals to a digital synthesizer. MIDI stands for musical instrument digi-
tal interface, and a MIDI signal consists of digital bytes containing amplitude and
frequency codes for musical notes. What system components are required to do this?
In
te
rn
et
Lin
k
8.5Audio
CD format
information
In
te
rn
et
Lin
k
8.4 National
Instruments’
LabVIEW
software
8.5 Virtual Instrumentation, Data Acquisition, and Control 363
alc80237_ch08_346-374.indd 363alc80237_ch08_346-374.indd 363 11/01/11 4:05 PM11/01/11 4:05 PM
Confirming Pages
364 CHAPTER 8 Data Acquisition
operate the instrumentation program, control selected hardware, analyze acquired
data, and display results graphically, all on the PC screen. One can customize virtual
front panels with knobs, buttons, dials, and graphs to emulate control panels of tra-
ditional instruments, create custom test panels, or visually represent the control and
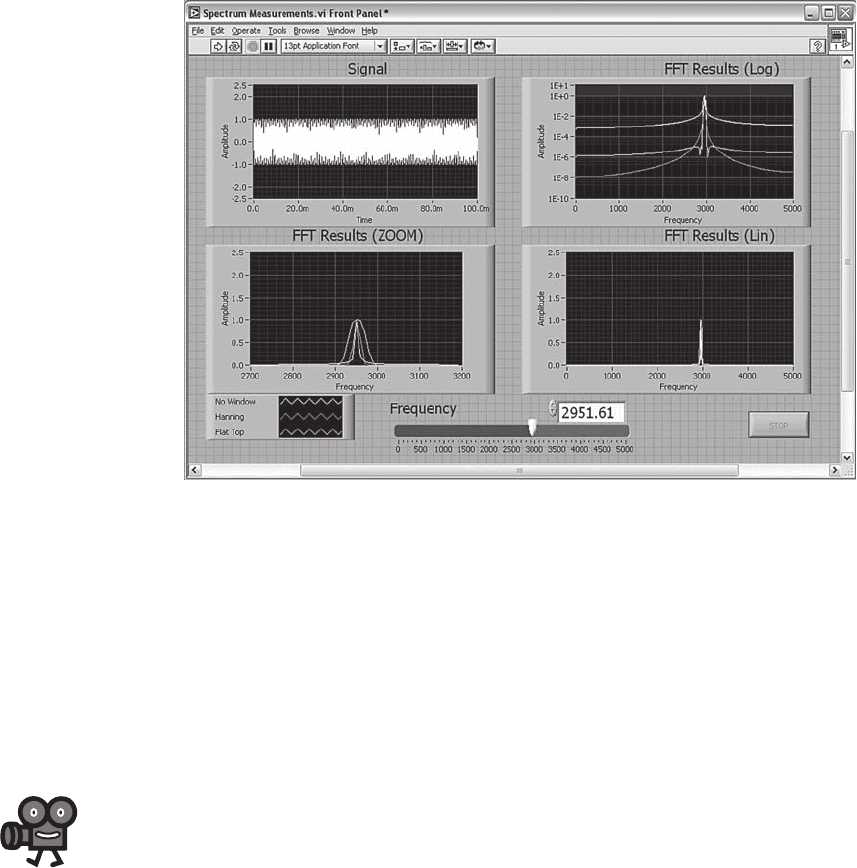
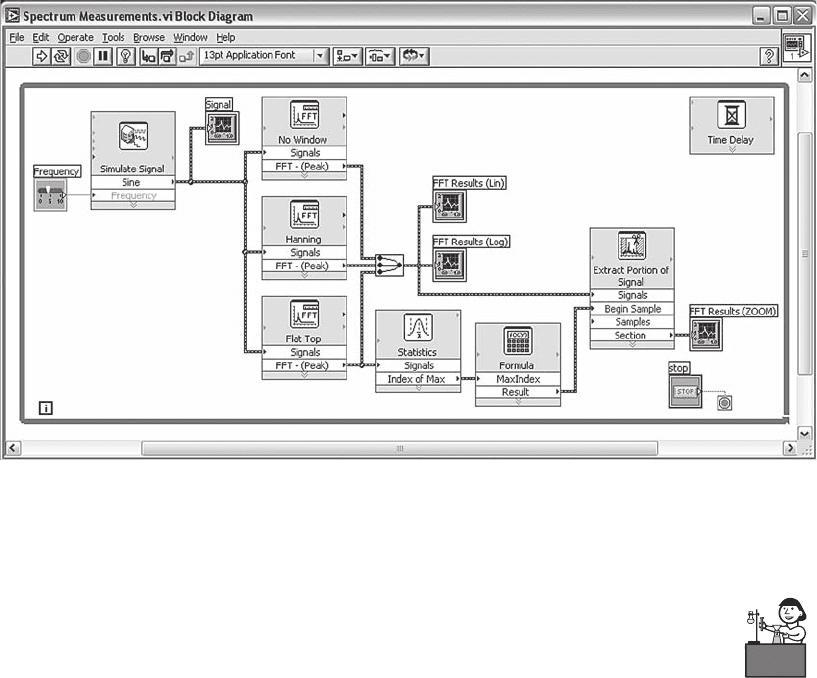
operation of processes. Figure 8.15 shows an example graphical user interface that
can easily be created. Figure 8.16 shows the block diagram used to create the user
interface and to perform the acquisition, analysis, and display functions. LabVIEW
is known as a visual programming environment, because to create a custom appli-
cation and user interface, you simply drag, drop, and connect icons on the screen.
Computer programming skills are not required.
LabVIEW, in addition to its virtual instrumentation and data acquisition capa-
bilities, provides many tools for model-based control system design. Tools are
available for characterizing (modeling) a system through data acquisition of test
data (a process called system identification ), designing a controller for a system,
simulating how the system will respond to various control inputs, and embedding
the controller into hardware to perform real-time control. Video Demo 8.8 shows
a demonstration of how these tools can be used to develop a speed controller for a
simple DC motor system. LabVIEW is used to send a command signal to the DC
motor and to monitor the resulting motion by acquiring a feedback signal from a
tachometer. Video Demo 8.9 provides much more background and detailed demon-
strations of the individual steps in the process. Also, the basics of control theory are
presented in Section 11.3.
Figure 8.15 Example custom graphical user interface created with LabVIEW.
8.8 National
Instruments DC
motor demo
8.9 National
Instruments
LabVIEW DC
motor controller
design
Video Demo
alc80237_ch08_346-374.indd 364alc80237_ch08_346-374.indd 364 11/01/11 4:05 PM11/01/11 4:05 PM
Confirming Pages
Lab Exercise
Lab 12Data
Acquisition
8.6 PRACTICAL CONSIDERATIONS
This section introduces detailed procedures required to use the LabVIEW software
and a USB data acquisition card to sample and display analog signals. Specific tools
for sampling, displaying, and replaying audio signals are also presented. Detailed
instructions are provided for the National Instruments USB 6009, a specific USB data
acquisition module, to show how the software is used in practice. Lab Exercise 12
provides even more detail and explores the effects of sampling rate.
8.6.1 Introduction to LabVIEW Programming
LabVIEW is a user-friendly graphical programming environment. It has many built-
in features for data acquisition and works well with many commercial DAC cards. A
brief description of the basics of LabVIEW is presented below.
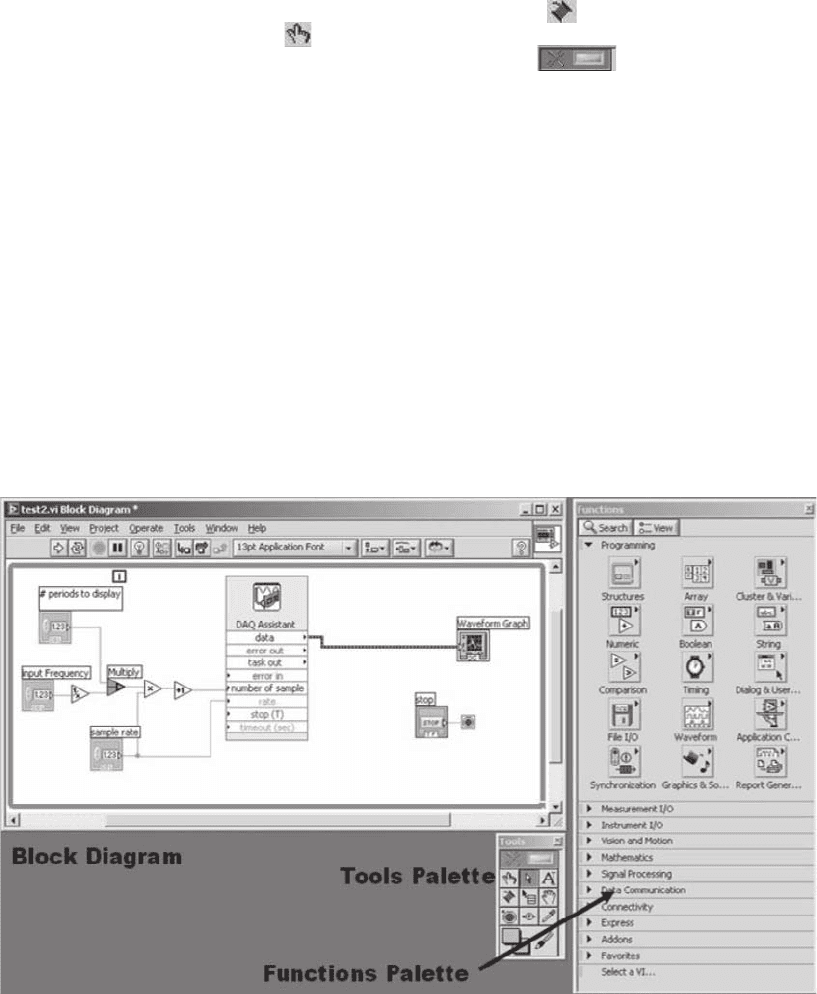
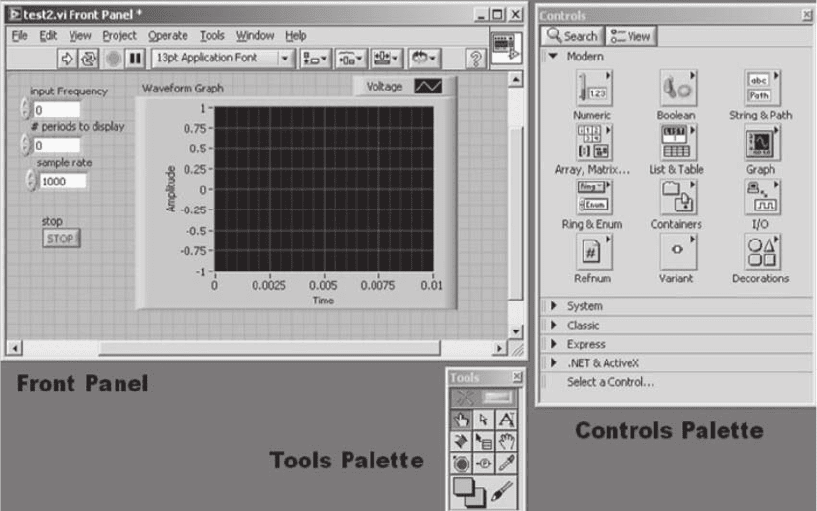
There are two primary windows in LabVIEW, the Block Diagram and Front
Panel window (see Figures 8.17 and 8.18 ). The Block Diagram window contains
the graphical program that you create, and the Front Panel window contains the user
interface. The user interface is used to input control parameters, run the program,
and visualize the results (e.g. the plot of a waveform).
Additional windows called palettes contain the libraries of built-in LabVIEW
functions. The Functions palette is a library of blocks that can be used in the Block
Diagram window (it is only available when the Block Diagram window is active).
The Controls palette is a library of the functions available for the front panel
Figure 8.16 Example LabVIEW block diagram.
8.6 Practical Considerations 365
alc80237_ch08_346-374.indd 365alc80237_ch08_346-374.indd 365 11/01/11 4:06 PM11/01/11 4:06 PM
Confirming Pages
366 CHAPTER 8 Data Acquisition
(it is available only when the Front Panel window is active). The Tools palette is
used to modify the function of the cursor. Different tools are used to perform dif-
ferent functions. For example, connect wire is used to connect blocks, and
operate value
is used to used to change the value of a control (described below).
Alternatively, the automatic tool selection will automatically change
which tool you are using depending on the location of the cursor.
A LabVIEW VI (pronounced “vee eye”) file is made up of objects (or blocks)
with connections between the objects. There are two types of objects: nodes and
terminals. The nodes perform functions such as acquiring a digital signal from a
data acquisition card, multiplication, and signal processing. Terminals are the con-
nections between the block diagram and the front panel. Everything in the front panel
appears as a terminal on the block diagram. Every object has inputs, outputs, and
parameters that determine its function. For example, an analog-to-digital conversion
block will have an analog signal as its input (hardware input), a digital-value signal
as its output, and parameters such as sampling rate. The output of an A/D conversion
block can be an input to a block that graphically displays the waveform (terminal).
The parameters of a block can be set in different ways. One way is to open the prop-
erties window for the block (by right-clicking and selecting properties) and enter the
values for the parameters. Some of the parameters cannot be changed independently
of other parameters (e.g., parameters that define the configuration or mode of the
block) and can be set only within the properties window. The parameters that can be
Figure 8.17 Example block diagram.
alc80237_ch08_346-374.indd 366alc80237_ch08_346-374.indd 366 11/01/11 4:06 PM11/01/11 4:06 PM
Confirming Pages
set independently of the others (such as sample rate and number of samples for an
A/D converter block) may be set using inputs. This can be done using constant or
control terminals. A constant is set in the block diagram, and a control is set in the
front panel. Figure 8.17 contains control blocks on the left labeled # periods to dis-
play, input frequency, and sample rate. Figure 8.18 shows the corresponding controls
in the front panel. These figures define the VI file to perform A/D conversion using
the National Instruments USB 6009 DAC card.
8.6.2 The USB 6009 Data Acquisition Card
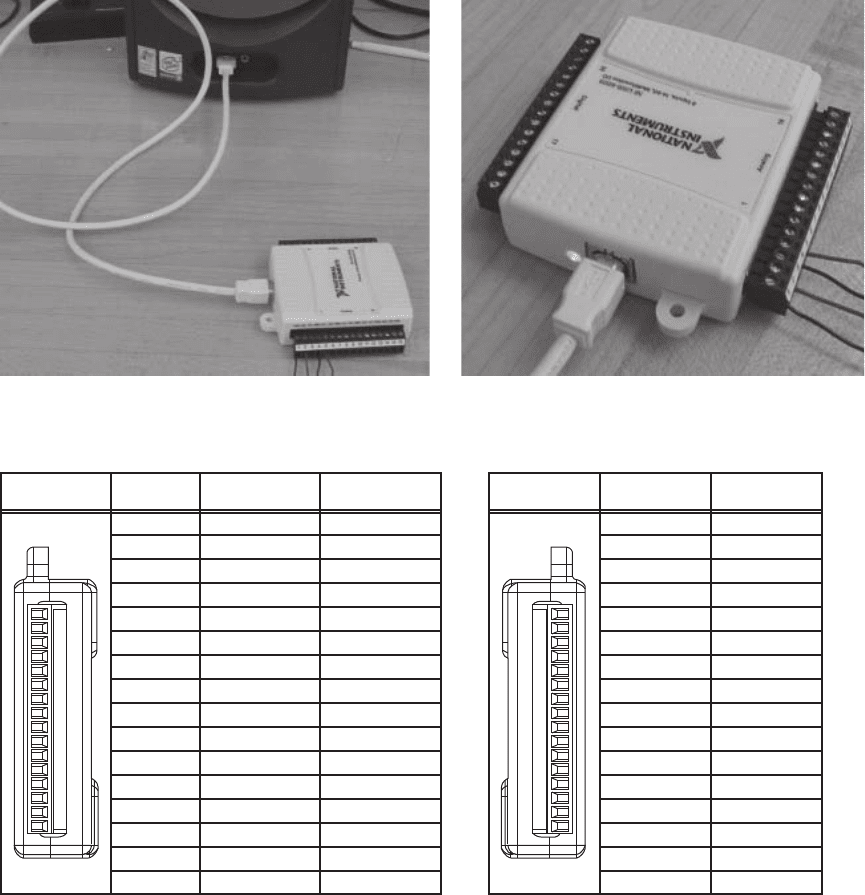
The National Instruments USB 6009 is a typical small external data acquisition
card that is connected to a computer through a USB port. The device is pictured in
Figure 8.19 . It has A/D conversion capabilities as well as D/A conversion, digital
I/O, and counters/timers. The I/O lines are connected with wire (16-28 AWG) to the
detachable screw terminals.
As shown in Tables 8.2 and 8.3 , screw terminals 1–16 are used for analog I/O,
and terminals 17–32 are used for digital I/O and counter/timer functions. Notice
that the analog terminals are different depending on which mode the device is in,
single-ended mode (also known as RSE) or differential mode. In single-ended mode
the positive voltage signal is connected to an AI terminal and the negative voltage
or ground signal is connected to a GND terminal. This mode uses two terminals,
Figure 8.18 Example front panel.
8.6 Practical Considerations 367
alc80237_ch08_346-374.indd 367alc80237_ch08_346-374.indd 367 11/01/11 4:06 PM11/01/11 4:06 PM
Confirming Pages
368 CHAPTER 8 Data Acquisition
meaning there are eight analog inputs available (AI0–AI7). The maximum voltage
range in this mode is –10V to 10V. Differential mode can be used to get a larger volt-
age range. This mode measures the difference between two signals, AI ⫹ and AI ⫺ ,
each referenced to GND. A voltage range of ⫺ 20V to 20V can be achieved, but the
maximum voltage on one pin (AI ⫹ or AI ⫺ ) referenced to ground is ⫾ 10V. Differ-
ential mode uses one more wire than single-ended mode, so only four analog inputs
are available in this mode.
Figure 8.19 The USB 6009 connected to the computer with the screw terminals attached.
123456789
10 11 12 13 14 15 16
17181920212223242526272829303132
1
Module Terminal
Signal,
Single-Ended Mode
Signal,
Differential Mode
GND
AI 0 AI 0+
AI 1+
AI 2+
AI 3+AI 3
AI 2
AI 6
AI 5
AI 4
AI 1
AI 7 AI 3−
AO 0
AO 1
AI 2−
AI 1−
AI 0−
GND
GNDGND
GNDGND
GNDGND
GNDGND
GND
AO 0
AO 1
GND
2
3
4
5
6
7
8
9
10
11
12
13
14
15
16
17
Module Terminal Signal
P0.0
P0.1
P0.7
P1.0
P1.1
P1.2
P1.3
PFI 0
+2.5 V
+5 V
P0.5
P0.2
P0.4
P0.3
P0.6
GND
18
19
20
21
22
23
24
25
26
27
28
29
30
31
32
Table 8.2 Analog (1–16) and Digital (17–32) pin assignments of the USB 2009
alc80237_ch08_346-374.indd 368alc80237_ch08_346-374.indd 368 11/01/11 4:06 PM11/01/11 4:06 PM
Confirming Pages
Table 8.3 Signal descriptions for the USB 6009
Signal Name Reference Direction Description
GND — — Ground—The reference point for the single-ended AI measurements,
bias current return point for differential mode measurements, AO
voltages, digital signals at the I/O connector, ⫹5 VDC supply, and the
⫹2.5 VDC reference.
AI <0..7 > Varies Input Analog Input Channels 0 to 7—For single-ended measurements, each
signal is an analog input voltage channel. For differential measurements,
AI 0 and AI 4 are the positive and negative inputs of differential analog
input channel 0. The following signal pairs also form differential input
channels: <AI 1, AI 5 > , <AI 2, AI 6> , and <AI 3, AI 7> .
AO 0 GND Output Analog Channel 0 Output—Supplies the voltage output of AO
channel 0.
AO 1 GND Output Analog Channel 1 Output—Supplies the voltage output of AO
channel 1.
P1.<0..3>
P0.<0..7>
GND Input or
Output
Digital I/O Signals—You can individually configure each signal as an
input or output.
⫹2.5 V GND Output ⫹2.5 V External Reference—Provides a reference for wrap-back
testing.
⫹5 V GND Output ⴙ5 V Power Source—Provides ⫹5 V power up to 200 mA.
PFI 0 GND Input PFI 0—This pin is configurable as either a digital trigger or an event
counter input.
8.6 Practical Considerations 369
Another difference between differential and single-ended mode is the resolution
of the analog inputs. Differential mode has a resolution of 14 bits whereas single-
ended mode has a resolution of 13 bits.
The analog input converter type is successive approximation, and the maximum
sampling rate is 48 thousand samples per second (kS/s). The device contains one
analog-to-digital converter that is multiplexed to each input.
8.6.3 Creating a VI and Sampling Music
This example is based on LabVIEW version 8.0, but should be fairly compatible
with previous or later versions. The procedure also assumes that the USB 6009 is
already set up to interface with the computer according to the instructions that come
with the device.
Opening a blank VI fi le
1 . Start LabVIEW with Start > Programs > National Instruments > LabVIEW 8.0 >
LabVIEW.
2 . Click Blank VI to start a new project. The Block Diagram window and the
Front Panel window should appear. If only one is open, then under the Win-
dows menu click Show Block Diagram or Show Front Panel. Some other small
windows may also be open.
alc80237_ch08_346-374.indd 369alc80237_ch08_346-374.indd 369 11/01/11 4:06 PM11/01/11 4:06 PM
Confirming Pages
370 CHAPTER 8 Data Acquisition
3 . Open the Functions palette if it is not open. From the Block Diagram window,
under the View menu, click Functions palette to open the Functions palette.
Creating node blocks
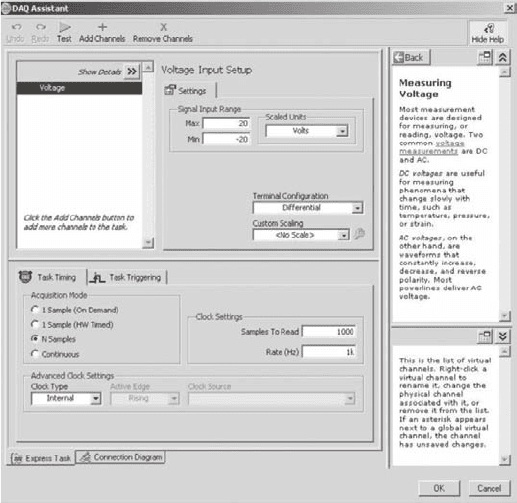
1 . From the Functions palette, select Measurement I / O > NI - DAQmx. Drag the
DAQ Assist icon onto the Block Diagram. A DAQ Assistant window should
appear.
2 . Connect the USB 6009 device to the computer. The green light should start
blinking. From the DAQ Assistant window, select Analog Input > Volt-
age > ai 0 > Finish. If the ai0 does not appear, then press the plus next to “Dev1
(USB-6009)” to display the available analog input channels.
3 . A new window will open displaying the properties of the DAQ Assistant block
(see below).
a .
4 . Under Settings, set the maximum and minimum values for the Signal Input
Range based on the amplitude of the input and the desired quantization size.
5 . Under Settings, set the Terminal Configuration to RSE (single-ended mode) .
6 . Under the Task Timing tab, set the acquisition mode to N samples. The wiring
diagram can be view by selecting the Connection Diagram tab towards the
bottom of the window, assuming an appropriate range was selected (max ⱕ 10
and min ⱖ ⫺ 10).
7 . Select Ok to close the DAQ Assistant properties window. This may be opened
later by right-clicking on the DAQ Assistant block.
alc80237_ch08_346-374.indd 370alc80237_ch08_346-374.indd 370 11/01/11 4:06 PM11/01/11 4:06 PM
