Klocke F. Manufacturing Processes 1: Cutting
Подождите немного. Документ загружается.

2.4 Surface Inspection 21
Measuring
nozzle
∅d
m
h
Annulus
p
a
p
a
p
s
Work piece surface
Measuring
nozzle
Test sample
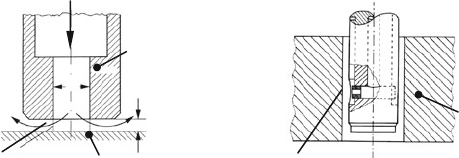
Fig. 2.23 Functional principles and examples for pneumatic measurement
work within the linear range of the characteristic diagram, then an exact centring in
the hole is unnecessary, since the air currents of the two nozzles are added and the
sum represent the measure for the total gap width. Since the type of hole measure-
ment described is a two-point measurement, deviations from hole roundness and
diameter can be determined by turning the rod or the workpiece.
The measuring rods are often specially adjusted to the measurement of a spe-
cific workpiece. Therefore, for economical reasons, pneumatic measurement is used
predominately in serial production, especially if a 100% test is required.
The advantages of contactless pneumatic measurement lie in the self-cleansing
effect of the measuring device (i.e. the workpieces do not generally have to be
cleansed of oil, dirt or micro-chips) and in the quickness of the measuring process.
2.3.3.5 Electronic Measuring Instruments
These devices work with photoelectric sensors, by which light-dark fields of a gauge
are converted into electric signals. The material measure is realised through the
light-dark fields. Impulse gauges and code gauges are preferably used as path mea-
surement systems. To be precise, it is a mechanical guidance system whose positions
are detected and indicated optoelectronically. This path measurement system is also
executed with callipers, dial gauges and dial comparators. It is also realized in
coordinate measuring devices and machine tools. To control measuring axes and
to evaluate data, an exact control system and effective software are required which
can influence the quality of the measuring result and the applicability of the data
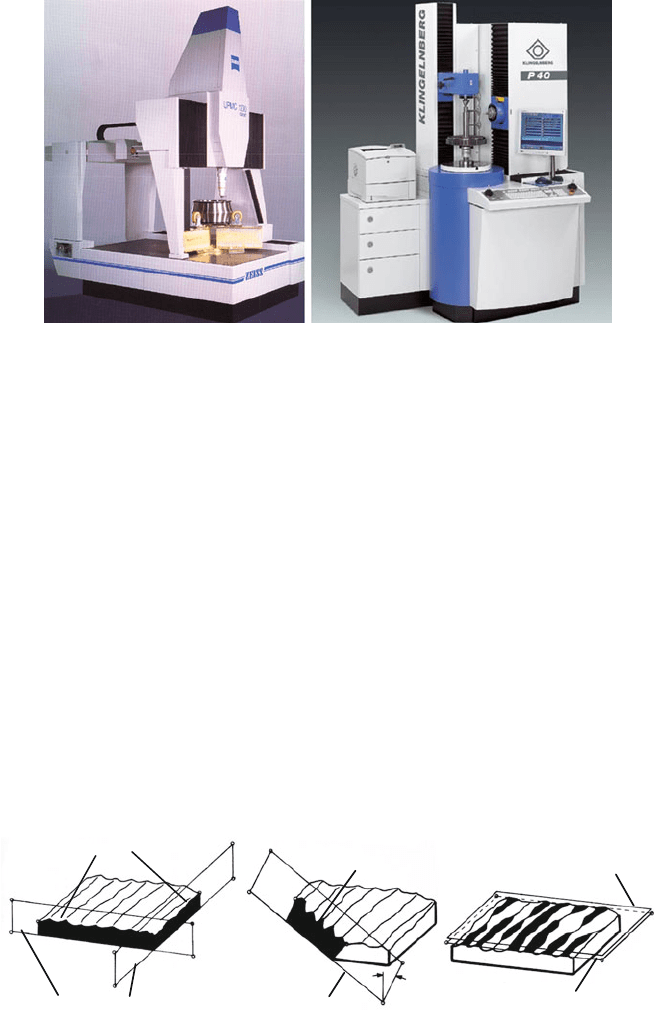
[Pfei01]. The measurement of freeform surfaces and tooth-flank topographies on
spur gears and bevel gears with coordinate measuring devices is currently state of
the art (Fig. 2.24).
2.4 Surface Inspection
The task of characterizing a technical surface consists in attaining a complete
topological record of its three-dimensional geometry and describing it. Often, in
order to simplify the measuring process, only parameters for surface roughness
along a single measured length are registered (one-dimensional parameters). This
22 2 Metrology and Workpiece Quality
Fig. 2.24 3-D coordinate measuring machines
procedure is frequently followed in practice and is sufficient in many cases. For cer-
tain applications, e.g. in optics or for characterizing grinding wheel surfaces, more
comprehensive, multi-dimensional surface descriptions must be used. However, the
following will exclusively treat one-dimensional parameters.
2.4.1 Surface Parameters
In most of the procedures used in industrial surface inspection technology, only
structural deviations of the second or higher orders are analyzed and measured on
surface sections. These sections must be statistically representative for the entire
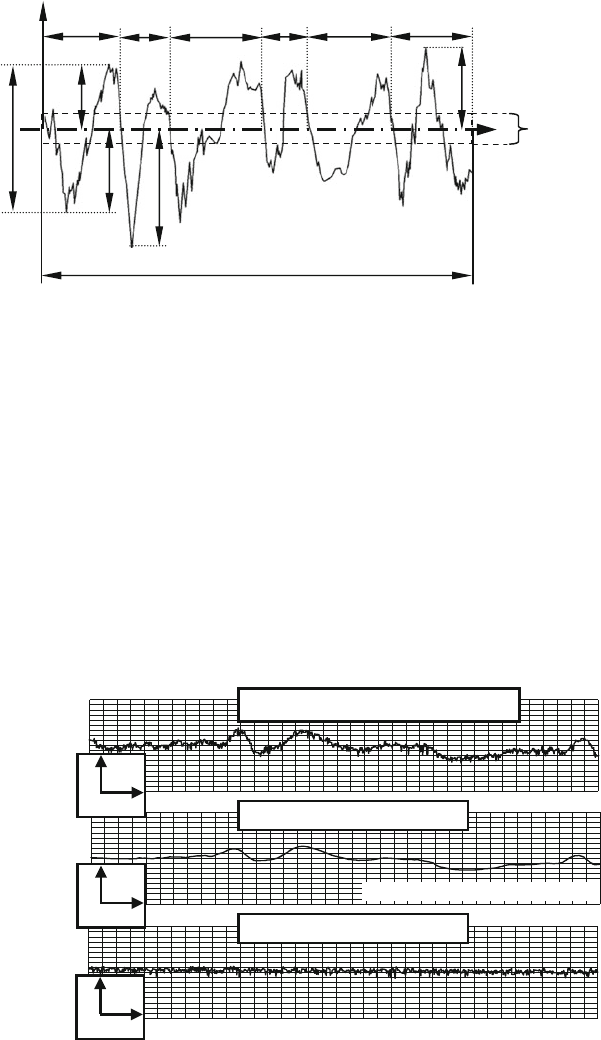
surface [DIN2257]. The surface can be detected by means of surface sections or
the bearing surface (Fig. 2.25)[DIN4760]. Profile sections are sections which are
oriented to the surface normally, tangentially or at other angles.
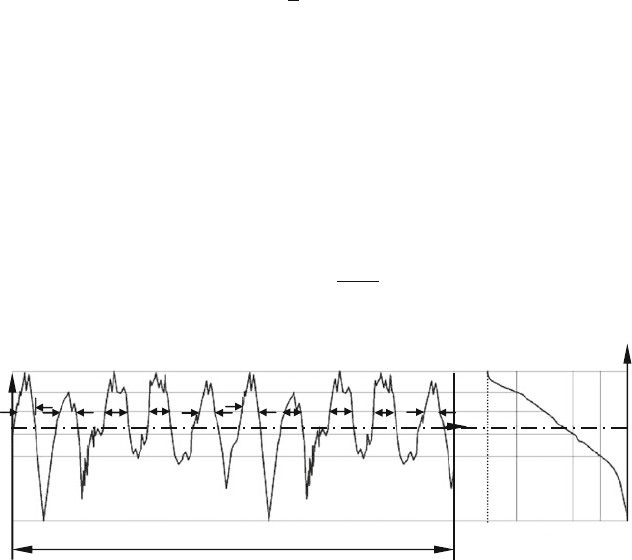
First, a profile section will be used to illustrate some of the basic terms of surface
inspection technology (Fig. 2.26). With respect to a profile, the distinction is made
between the test length L
t
of the surface section being metrologically detected and
Tangential cross section
Profile
α
Profile
Cross section parallel to
the tangential cross section
Diagonal cross
section
Vertical cross sections
Fig. 2.25 Registration of structural deviations by surface cuts
2.4 Surface Inspection 23
R
a
Z (x)
Measured length L
Zt
1
L
1
L
2
L
3
L
4
L
5
L
6
Zp
1
Zv
1
Zv
2
Zp
6
x
Fig. 2.26 Fundamental terms of surface inspection technology
the measured length L, which is used for evaluation (L < L
t
)[Grot05]. The detected
profile (actual profile) of a surface depends on the measuring procedure and the filter
used, thus it only represents an approximate image of the actual surface. The refer-
ence profile shifted within the measured length perpendicularly to the geometrically
ideal profile is defined as the middle profile. This is oriented in such a way that the
surface areas above and below the middle profile line are equally large (Fig. 2.26).
By using different measuring procedures and depending on which filter is used,
different profiles can be determined [DIN EN ISO 4287]. These are the P-Profile
(primary profile), the R-Profile (roughness profile) and the W-Profile (waviness
profile) (Fig. 2.27).
Grenzwellenlänge:
λ
= 0,75 mm
1 µm
250 µm
1 µm
250 µm
1 µm
250 µm
W-Profil
(Welligkeit)
R-Profil
(Rauheit)
Without wave filter
High-pass filter
Low-pass filter
W-Profile (waviness)
R-Profile (roughness)
Cutoff wavelength: λ = 0,75 mm
250 µm
1 µm
250 µm
1 µm
250 µm
1 µm
P-Profile (waviness and roughness)
Manufacturing technology: Short-stroke honing
Average roughness: Ra = 0.75
Scanning system: HAT 25/6
Scanning path: 10 mm
Fig. 2.27 Separation of waviness and roughness by wave filter
24 2 Metrology and Workpiece Quality
The examples given below refer to the R-Profile (roughness) (Fig. 2.26).
According to DIN EN ISO 4287, the following roughness parameters can be
distinguished:
• The height of the highest profile point R
p
: value of the y-coordinate Z(x)ofthe
highest profile point of the middle profile line within the sampling length L
i
.
• The depth of the deepest profile valley R
v
: value of the y-coordinate Z(x)of
the deepest point of the profile of the middle profile line within the sampling
length L
i
.
• The total height of the profile R
t
: the sum of the highest profile point and the
depth of the deepest profile valley within the measured length L.
• The greatest height of the profile R
z
: the sum of the height of the highest pro-
file point R
p
and the depth of the deepest profile valley R
v
within a sampling
length L
i
.
• The mean roughness value R
a
: the arithmetic mean of the values of the
y-coordinates Z(x) within a sampling length L
i
.
R
a
=
1
L
L
0
|
Z(x)
|
dx (2.1)
Horizontal parameters (distance parameters) are also designated as bearing
lengths. They are determined by means of tangential sections. Forming a ratio
of of the summed single bearing lengths and dividing by the measured length
yields the relative bearing length (material ratio) in a specified section depth c.
By creating sections at different depths c, the bearing ratio curve – also called the
A
BBOTT-FIRESTONE curve – can be determined (Fig. 2.28).
The bearing ratio of the roughness profile R
m
r(c) is calculated as follows:
R
m
r(c) =
Xi
L
(2.2)
Measuring length L
c
10060200
Rmr (c
) / %
x
1
x
2
x
3
x
4
x
5
x
6
x
7
x
8
x
9
x
10
x
Z(
x
)
Fig. 2.28 Bearing ratio curve of the profile, acc. to DIN EN ISO 4287
2.4 Surface Inspection 25
The bearing ratio can be calculated on the basis of the primary profile (P
m
), the
roughness profile (R
m
) and the waviness profile (W
m
).
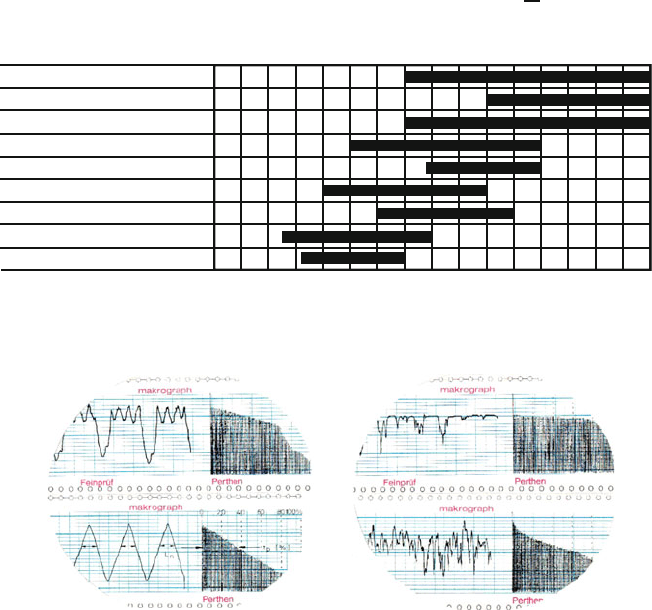
Using the average roughness, Table 2.2 provides an overview of the surface
roughness values which can be achieved with different manufacturing processes.
With respect to general specifications on achievable surface values, one must
consider the fact that it is not necessarily possible to deduce the manufacturing pro-
cess when using one-dimensional parameters for describing the surface [Abou76].
Due to the characteristic engagement conditions between the workpiece and the tool
one would also have to specify, for each surface parameter, which manufacturing
process is to be used to create that parameter. This problem is somewhat alleviated
if multiple one-dimensional surface parameters are used instead of just one when
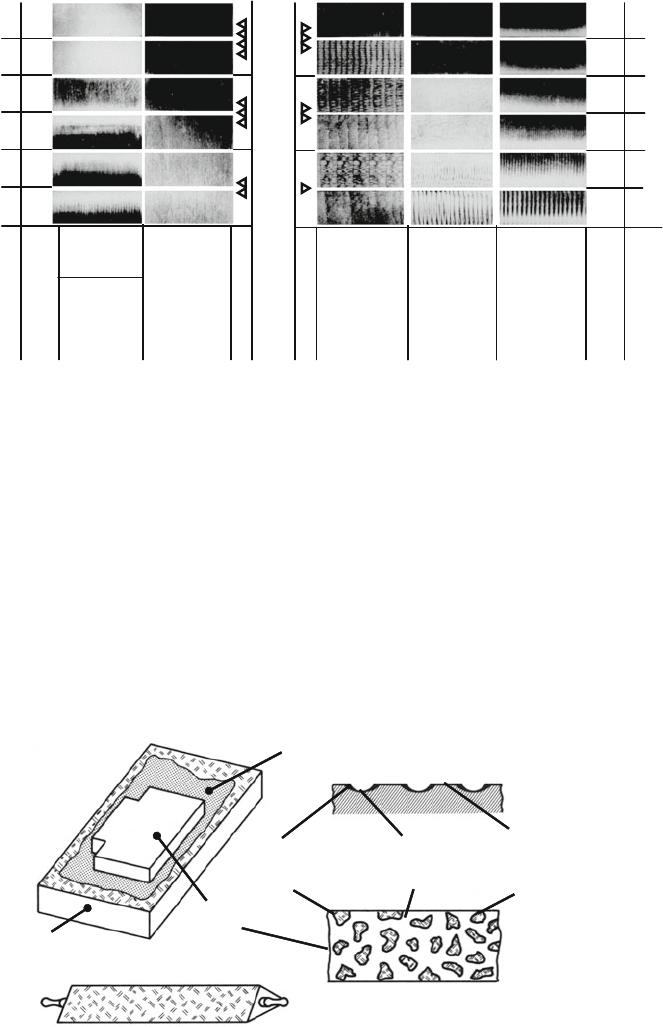
describing the manufactured surface or if surface reference standards are available
(Figs. 2.29 and 2.30).
Table 2.2 Achievable average roughness
1000
Primary shaping
0.1
0.25
0.4
1
2.5
4
16
10
25
400
250
Achievable average roughness Rz / µm
0.04
160
300
630
Die forming
Extrusion
Turning
Drilling
Reaming
Milling
Milling
Grinding
Erosion
Rough and finish turned
Planed
Honed
Grinded
Fig. 2.29 Surface quality for several manufacturing operations
26 2 Metrology and Workpiece Quality
Flat
lapping
Reaming
Flat
grinding
Horizontal
milling
Face
milling
Cylindrical
turning
Roughness Rt (µm)
Arithm. average
roughness Ra (µm)
10 3.0 0.55
0.05
0.10.20.4
0.8
1.6
2.58.0 4.0163250
N7 N6 N5
N4 N3 N2
N10
N9 N8
N7 N6 N5
Roughness markl
ISO R 1302–1971
Surface mark
DIN 140
Arithm. average
roughness Ra (µm)
12.5
6.3
3.2
0.8
0.4
Roughness Rt (µm)
6,0 1.01.6
1.6
Fig. 2.30 Surface reference standard (Source: Rupert)
2.4.2 Subjective Surface Inspection
In some cases, a visual inspection can determine whether the processed surface
meets the specified requirements. A testing device frequently used in the work-
shop is the straight edge, which is used to check the evenness of a surface using
the light-slit method. In workshop operations, spotting straight edges or spotting
plates are used to detect form deviations or contact patterns on the workpiece surface
(Fig. 2.31).
Impression methods using lacquers have been developed for surfaces which are
difficult to access (e.g. drill holes, internal surfaces). The lacquer is applied onto the
Spotting straight edge
Spotting medium
Work piece
Grey gleaming
areas
(bearing points)
Light areas
(lowest points)
Black areas
(spotting medium)
Spotting plate
Fig. 2.31 Surface inspection by spotting

2.4 Surface Inspection 27
test surface and pulled off after drying. The contact patterns attained on the lacquer
film thus attained can then be evaluated.
A frequent use of spotting is detecting contact patterns in quality testing and in
the assembly of gear teeth (especially bevel gear teeth). Applying spotting paste
and then rolling the teeth under light strain causes the bearing points on the tooth
flanks to become visible. These bearing points can then be compared to the reference
contact pattern. Nowadays in individual cases machine-tool guiding elements also
become scraped, therefore, spotting is used to judge the surface.
2.4.3 Surface Measurement
All the physical principles mentioned in the context of length measurement technol-
ogy are also fundamentally applicable to surface measurements. Since mechanical
and optical measuring methods have proven to be the most effective in this field, the
following discussion will limit itself to these methods.
2.4.3.1 Mechanical Measuring Methods
Devices for surface measurement which function on the basis of a mechanical
functional principle are generally referred to as stylus instruments. Mechanical mea-
suring methods are classified as either scanning methods or sensing methods. In the
scanning method, a contact stylus descends upon the surface to be tested at a speci-
fied frequency. The surface is guided under the needle with a constant feed rate. The
path of the contact stylus can be visualized mechanically, optically, electrically or
electronically. The contact stylus can either be raised to a fixed level (the W
OX E N
principle) or raised by a fixed amount from the respective point of impact to the
surface (differential tactile procedure) (Fig. 2.32).
In the differential tactile procedure, the impact energy of the contact stylus is
lower in comparison to the W
OX E N principle and exhibits marginal dispersion. As a
result, the penetration depth of the needle remains constant, the measuring accuracy
being thus higher than in the case of the W
OX E N principle. In the case of instruments
functioning according to the sensing method, the contact stylus is guided continu-
ously over the surface. The needle rises and falls in line with the profile pattern
Scanning method
Sensing method
Woxen principle Differential tactile procedure
Differential tactile procedure
Fig. 2.32 Mechanical measuring methods

28 2 Metrology and Workpiece Quality
Caliper
Caliper slide
Table
Plane of reference
system
Caliper slide
Caliper
Skid
Oscillating scanning
system
Caliper
Scanning
arm
Skid
Semi-rigid
System
Fig. 2.33 Different surface scanning systems
(Fig. 2.32). The lifting motion is indicated relative to a reference point defined in the
device or to a reference level. Here too, mechanical, electric, optical and electronic
converters are used.
Sensing profile methods are the most widespread in practice. Independently of
the design type of the contact stylus instruments used, three system designs are
distinguished (Fig. 2.33).
Plane of Reference System
In this system, the scanning unit is guided on a reference surface (plane, cylinder)
which corresponds to the ideally geometrical surface of the test sample and is ori-
ented along the surface to be measured (Fig. 2.33). Aside from errors arising due to
the calliper geometry, this scanning system provides a faithful transmission of the
roughness and waviness values of the test sample. When measuring small or very
large surfaces, however, the handling of this scanning system can frequently become
unwieldy. An alternative is the reference surface contact system. Here, the work-
piece is conveyed on very precisely guided slides in a horizontal direction beneath
the firmly anchored scanning system. Besides roughness, the macrostructure of a
surface can also be detected in certain areas.
Semi-Rigid System
In semi-rigid systems, the scanning unit, which contains the contact stylus, is guided
on the skid gliding on the surface to be measured (Fig. 2.33). This system has the
advantage that it requires little space and is thus suitable for measuring small or
hard-to-access surfaces. A disadvantage is that the system requires an orientation to
the surface to be measured which can cause parts of the profile to be transmitted in
a distorted manner.
Oscillating Scanning System
Two glide skids guide the scanning unit of the oscillating scanning system
(Fig. 2.33). The latter is oriented towards the surface to be measured and is thus
2.4 Surface Inspection 29
comfortable to operate. However, it requires more space than the single skid system
and can therefore not be used for small or hard-to-access surfaces. The distortions
caused by long-wave profile sections are smaller than those in half-rigid systems,
because the skids are flat and farther apart. Nevertheless the waviness must be
filtered out in many cases [Henz68].
Usually, the magnification gauges for x- and y-coordinates are selected in a highly
varying way in profile records. This is necessary because the measuring lengths
(abscissa) lie in the mm region and roughness parameters are represented on the
ordinate which lie in the μm region. The optical impression of the profile record i s
thus strongly distorted in comparison to reality. The contact styluses used in con-
tact stylus instruments often have an apex radius of 2 μm. They function with a
bearing strength of 0.5 N, which can result in considerable surface pressures (up
to 6000 N/mm
2
), which possibly cause alteration of the test surface. On the other
hand, excessively large contact stylus radii distort the result; they act like mechan-
ical filters. Thus the optimal conditions must be determined on the basis of the
material of the test sample and documented in their entirety in the measurement
report.
2.4.3.2 Optical Measuring Methods
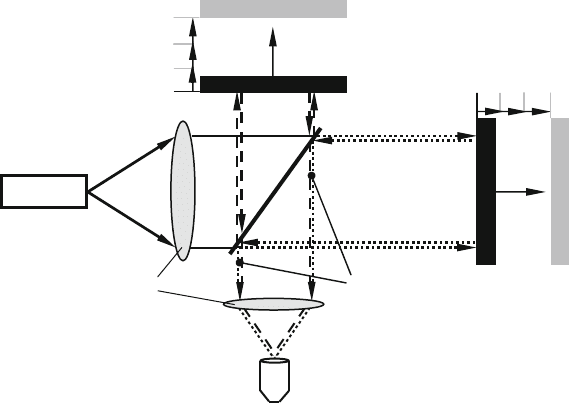
White-Light Interferometer
This technology differs from length measuring technology both in that it employs
white light, i.e. light with the entire wavelength spectrum, and in that it does not just
use one beam, as with laser interferometers, but rather an entire bundle. A reflected-
light microscope is used to display an image of a section of the test object on a
detector (e.g. CCD camera). By using different interference lenses, a beam splitter
can be used to superimpose a highly accurate reference surface with the image of
the test object on the same scale. The interferences which are then created can be
detected and evaluated (Fig. 2.34).
The topography of the test object creates a spatial modulation of the light
intensity in the interference image. Depending on the surface to be measured,
two different measuring modes are used: one to characterize very flat surfaces
with an average roughness value R
a
< 1 nm and one for all other surfaces. Steps
and roughnesses of up to several millimetres high can be displayed using this
technology.
Fringe Projection
The fringe projection method functions according to the triangulation procedure, in
which equidistant stripe patterns are observed and evaluated at a certain angle, i.e.
the triangulation angle. The stripe patterns on the test object are detected and evalu-
ated from a certain position, with the projected stripes following the arbitrary form
of the test surface. These stripes appear from the observer’s standpoint to be “inter-
ferences”, though they only appear this way because the location of the projection
30 2 Metrology and Workpiece Quality
Lenses
Light
Detector
Displacement
Interference of
measuring and reference
beam
Test object
z
x
Reference mirror
Displacement
Fig. 2.34 Principle of a white-light interferometer (two-beam interferometer)
surface points varies in relation to that of the projector. The stripe patterns then are
evaluated interferometrically on the basis of fluctuations in light intensity. The most
important geometrical values on which this method is based are:
• the real distance of the projected stripes
• the stripe distance registered from the position of observation
• the triangulation angle
Fringe projection is used, for example, to judge surfaces bent over a large area,
such as those found in deep-drawing tools and on deep-drawn parts. The advantages
of this method are a high measurement speed and a spatial or laminar scanning.
A disadvantage is that the test objects may not be transparent or reflective.
2.5 Inspection of the Workpiece Rim
The functional behaviour and applicability of a component depend not only on its
macrogeometry and surface roughness, but also from the physical properties of the
material both on the interior and near the surface. While the inspection of material
properties properly belongs to the field of materials science and materials testing
and thus cannot be treated here in further detail, the following will discuss some
of the properties of technical surfaces and of layers near the surface (i.e. the rim
zone) and methods used to measure rim zone properties. Technical surfaces can be
categorized according to types of load into the following groups:
