Klocke F. Manufacturing Processes 1: Cutting
Подождите немного. Документ загружается.

2.2 Measuring and Testing 11
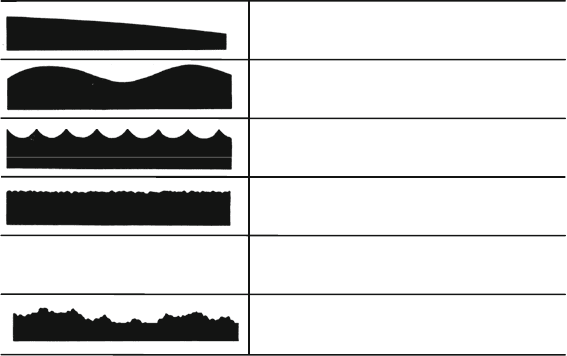
Superposition of structural deviations
1
st
up to 4
th
Order
5
th
Order: textural structure
6
th
Order: lattice structures of the material
4
th
Order: scores, scales (roughness)
3
rd
Order: grooves (roughness)
2
nd
Order: waviness
1
st
Order: form deviations
Structural deviations
(in superelevated representation)
Not easily representable
Fig. 2.9 Structural deviations, acc. to DIN 4760
and forms the basis of tolerances. In Fig. 2.9 six orders of structural deviations are
defined on the basis of these observations.
Structural deviations of the 1
st
order (see also the following sections) are fre-
quently the result of systematic errors. With regards to waviness, i.e. the structural
deviations of the 2
nd
order, one cannot clearly define whether they are caused by
systematic or random influences. The unbalance of a rotating tool and any peri-
odical oscillations caused by it are forced, while sudden rattling oscillations are
self-starting. In general, fundamentally different actions must be implemented in
order to exclude any systematic or random causes of error. Structural deviations
of the 3
rd
order also occur regularly. They are to be attributed to the penetration
between tool and workpiece and are often determined by means of penetration
calculations. Examples of these are kinematic roughness associated with turning,
surface marks created in peripheral milling and generated cut deviations created
in hobbing. In such cases, the structural deviations can be influenced in a targeted
way by means of generation kinematics and tool design. The higher orders of struc-
tural deviation are primarily random in their occurrence. Examples of structural
deviations of the 4
th
order include chip formation processes and removal processes.
Roughness of the 5
th
order is rendered visible by structural properties on the surface.
This can play a significant role in the high-precision machining of metallic optical
mirrors. Thus in high-precision turning of multicrystalline metals, grain boundaries
may become visible because the individual crystals exhibit varying orientations and
therefore varying stiffnesses. In this case, anisotropism of the grains becomes visible
on the surface.
12 2 Metrology and Workpiece Quality
In general, all the structural deviations on a real surface are superposed. Filters
are employed to separate roughness and waviness in a measurement process [DIN
EN ISO 4287]. The following sections will treat macrogeometrical deviations of
structure, form and position, as well as the corresponding measurement technology.
Section 2.4 and the following sections describe the metrological recording of higher-
order structural deviations.
2.2.2.2 Form Deviations
Form deviations refer to deviations from a specified ideal geometrical property,
such as straightness, evenness, roundness or cylindric form [DIN EN ISO1101,
VDI2601].
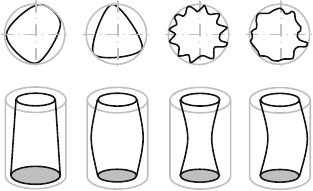
The following will introduce some examples of form errors and their causes
(Fig. 2.10).
• A cause for deviations from the cylindric form of a workpiece can be the incorrect
alignment of the workpiece on the machine tool with respect to the tool.
• Another cause for form deviations is the continuous alteration over time of the
tool geometry caused by wear.
• Thermal displacements of the workpieces, tools and machine tools can also lead
to form deviations.
• Deviations from cylinder form can also arise when the workpiece deflects
because of a radial strain. This can happen, for example, e.g. when turning long,
slender parts when the workpiece is not supported.
• Roundness errors can develop through the incorrect clamping of the workpieces
on the machine tool.
2.2.2.3 Position Deviations
Position deviations are deviations of the position of a geometrical element with
respect to a reference, such as an edge, circulation line or axis of the predetermined
position. In general, the position of two surfaces or axes in relation to each other is
indicated by simple length or angle specifications.
Fig. 2.10 Deviations from
circularity and cylinder form
2.3 Length Testing Devices 13
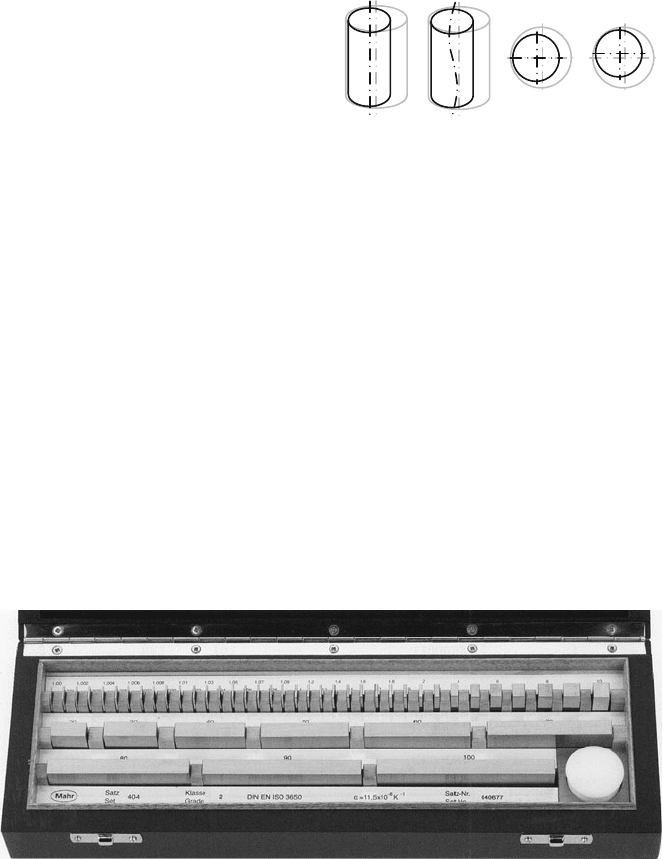
Fig. 2.11 Deviations from
concentricity, straightness
and parallelism
Position deviations as shown in Fig. 2.11 may arise, for example, through
incorrect clamping or defective clamping devices.
2.3 Length Testing Devices
2.3.1 Material Measures
A material measure in length measurement technology represents lengths or angles
by means of fixed distances or angles between surfaces or lines. Setting standards
are material measures. The material measures used most frequently are gauges.
The most important and most precise material measures in length measurement
technology are parallel gauge blocks. They consist of two plane-parallel measuring
surfaces made of hardened steel or cemented carbide. Parallel gauge blocks are used
in prismatic and cylindric forms. Gauge blocks are composed of grades. A standard
set contains 5 grades each containing 9 blocks, from which almost any dimensions
can be assembled (see Fig. 2.12). The measuring surfaces are superfinished and even
enough to allow, after careful cleaning of the measuring surfaces, individual gauge
blocks to be joined together so that they adhere.
Fig. 2.12 Gauge blocks (Source: Mahr)
2.3.2 Gauges
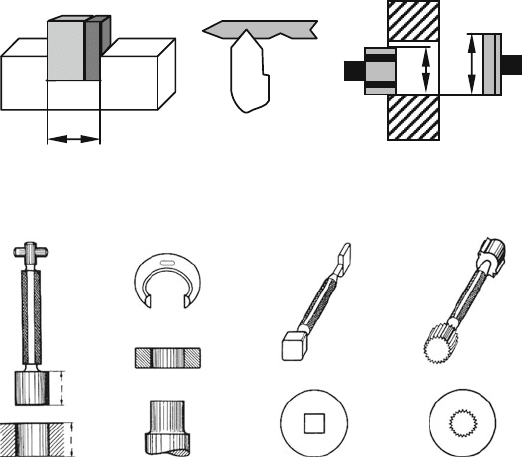
A gauge measures dimensions or forms generally according to limit dimensions
[DIN2257]. It can be distinguished between inspection gauges, limit gauges and
form gauges (Fig. 2.13).
14 2 Metrology and Workpiece Quality
21,5
G
o
G
u
Fig. 2.13 Types of gauges: inspection gauges, form gauges, limit gauges
Square profile
Go side
Not go side
Multitooth profile
Go side
Not go side
Go side
Not go side
Shaft
Go
side
Not go side
Drill hole
Fig. 2.14 Different types of limit gauges
Inspection gauges are parts of a gauge set for which the measure is assembled
from the combination of gauges. Examples are the combination of parallel gauge
blocks and the setting of feeler gauges.
Form gauges allow for the testing of profiles using the light-slit method. They
include angles, radius gauges and thread gauges.
Limit gauges function according to Taylor’s principle: The go gauge must be
designed in such a way that the dimension and form of the workpiece can be
inspected when combined with the gauge. Not-go gauges are only used to inspect
single dimensions.
Limit gauges used most frequently are calliper gauges, limit plug gauges, gaug-
ing rings and thread gauges (Fig. 2.14). Gauges are the simplest testing equipment
used in industrial manufacturing.
2.3.3 Indicating Measuring Instruments
Indicating measuring instruments consist of a material measure and a display mech-
anism. The indicating range is the range of measured values that can be displayed
on a measuring instrument. The measuring range is the part of the indicating range
for which display deviations lie within specified or agreed limits. The suppression
range of a measuring instrument is the range which must be exceeded in order that
2.3 Length Testing Devices 15
the instrument can begin to display values. The hysteresis of a measuring instrument
equals the difference of the display values determined by measuring from different
directions. The hysteresis of a measuring instrument is often not constant, which
means that only a certain lower limit is indicated. The reversal error is principally
a systematic error. It can be compensated. The sensitivity of a measuring instru-
ment is the ratio of an observable change on the measuring instrument display to the
causative parameter. Using length measuring instruments, the sensitivity is defined
as the ratio of the range of the indicating element (e.g. the indicator) and the range
of the measuring element (e.g. the spindle or measuring arm). Conversion between
the measurement range and the display may be based on different physical prin-
ciples. The most frequently used conversion elements are mechanical, electrical,
pneumatic, optical and electronic conversion elements.
2.3.3.1 Instruments with Mechanical Converters
Instruments with mechanical converters utilize mechanical or optical indicating
elements. In length measurement technology, the most often used measuring instru-
ments function on the basis of mechanical converters, e.g. threads, racks, gearwheels
and blade segments (Fig. 2.15).
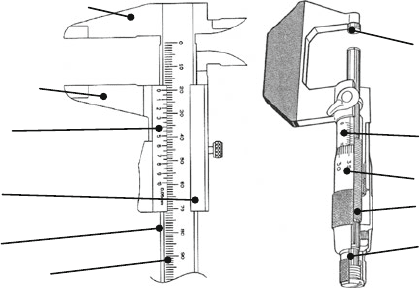
With mechanical callipers with sliding glideways as the conversion element, the
material measure is mounted on the bar on which the display, i.e. the slider, is
moved. Mechanical callipers have two different scales which can be read off against
each other by the observer. The scale on the slider is called a vernier ( Fig. 2.15).
In the case of micrometers, highly precise threads are used as converters and as
a material measure. The system comprises a measuring spindle running in a sleeve,
whose forward face is designed as the measuring surface and whose back end car-
ries a ground thread as material measure. Typical thread pitches are 0.5 and 1 mm.
As seen with callipers, two different scales are read off against each other. One scale
is mounted on the sleeve, the other on the scale drum. In order to avoid influencing
Fixed measuring jaw
Moveable
measuring jaw
Clamp
Bar
Vernier
Linear scale
Measuring
ambos
Measuring
spindle
Scale sleeve
Thimble
Coupler
Fig. 2.15 Setup of callipers and micrometers
16 2 Metrology and Workpiece Quality
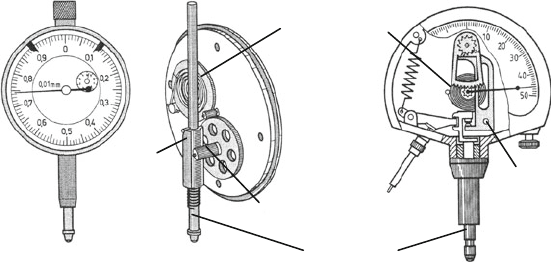
Arm with
blade
segment
Rack
Pinion
Prestressed
spring
Plug gauge
Fig. 2.16 Setup of dial gauges and dial comparator
the measurements through large fluctuations in the measuring force, the latter is lim-
ited to 5–10 N by means of a coupler (ratchet coupling). Micrometers are designed
both as outside micrometers for external dimensions and as inside micrometers for
internal dimensions (Fig. 2.15).
Dial gauges are length measuring instruments equipped with racks and gear-
wheels as conversion elements which allow a larger view of the path of the plug
gauge. The material measure lies in the gear mechanism, the conversion element
which leads to measurement reversal errors due to anisotropic friction and potential
tolerance. Needle positions greater than 360
◦
are possible (Fig. 2.16).
Dial comparators are the most precise mechanical length measuring instruments.
They are equipped, unlike dial gauges, with a gear mechanism as lever arm system,
gear segment and pinion as conversion elements. Thereby, the movement of the plug
gauge is transmitted to the needle. The design only allows needle positions smaller
than 360
◦
(Fig. 2.16).
In principle, all the instruments with mechanical conversion elements described
here can be equipped with frictionless optical indicator elements in order to improve
precision. Given constant conversion behaviour, the more precise indications the
measuring instrument should display, the longer the indicator must be. However,
since there is only a limited amount of space in the instruments and, above all,
since the inertia of the indicator can lead to distorted measurement results when the
measurement range is small, optical indicator elements are used. The principle is
basically this: a beam of light is directed to the material measure and, according to
the position of the material measure, this beam is reflected in a different direction.
The optical indicator then displays the measurement range of the material measure
without friction and inertia.
Further potential for increasing precision can be exploited by means of a fine
graduation of the scale which can no longer be observed with the naked eye, thus
necessitating optical magnifying aids in the form of microscopes. By means of the
microscope, a mechanism consisting of an objective and an ocular, a magnifica-
tion of a real image by the objective can be viewed with the ocular. I n this way, a
remagnified virtual image of the object is created. The total magnification through
2.3 Length Testing Devices 17
a microscope is the product of the objective and ocular magnifications. The scale
graduation can be applied in the ocular directly or by means of an ocular plate.
Microscopes including measuring oculars are called measuring microscopes.
2.3.3.2 Instruments with Electrical Converters
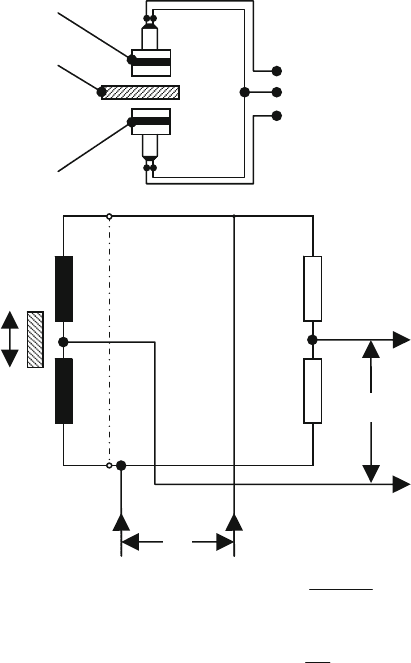
These instruments are used to determine changes in the measurand caused by alter-
ations of electrical properties, such as resistance, inductance and capacity. The turns
of a coil, the distance between plates of a condensator and the resistance of an
electrical conductor can all serve as material measure. Inductance, for example, is
altered by changing the immersion depth of an iron core; the capacity of a plate
capacitor is a function of the plate distance (Fig. 2.17).
C
˙
s
U
B
U
A
=
U
A
= Bridge-output voltage
U
B
= Bridge-supply voltage
C = Capacity
s = Measurement range
o
= Electric constant
r
= Dielectric constant
A = Surface area
d = Distance
Position encoder
Sensor
Position encoder
Output to
measuring
amplifier
L
1
L
2
s
R
4
U
A
U
B
R
3
d
C=
r
˙
A
o
˙
ε
ε
εε
Fig. 2.17 Capacitive and inductive measuring principles
18 2 Metrology and Workpiece Quality
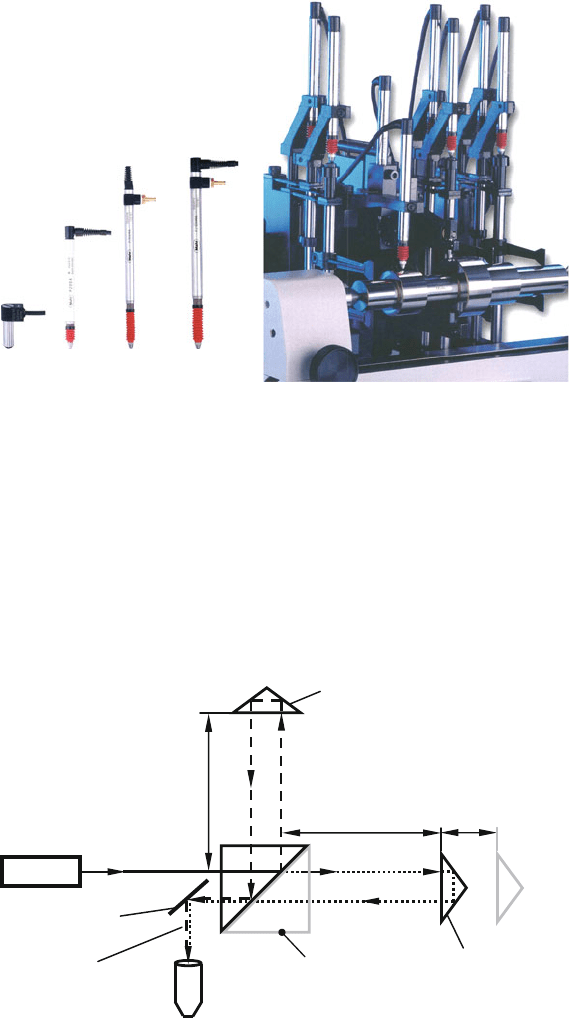
Inductive position encoder
Fig. 2.18 Inductive working sensor in real execution
An alteration of the ohmic resistance can be effected by changing the conductor
length and/or by a cross-sectional variation [Hoff 04, Grot05]. Figure 2.18 shows a
real execution for multi-point measuring with inductive working sensors.
2.3.3.3 Instruments with Optical Converters
These length measuring instruments exploit the wave property of light. The wave-
length of light is used as the material measure. Figure 2.19 shows the functional
principle of a laser interferometer.
Mirror
Laser
Detector
Wedge prism of
the measuring
beam
Measuring path
Polarizing
beam splitter
Displacement
Wedge prism
of the reference beam
Reference path
Interference of
measuring und
reference beam
Fig. 2.19 Longimetry with laser interferometer
2.3 Length Testing Devices 19
ϕ
2
ϕ
3
λ
3
λ
1
λ
2
Time
Ampl.
l
Ampl.
Time
Ampl.
Time
Time
Ampl.
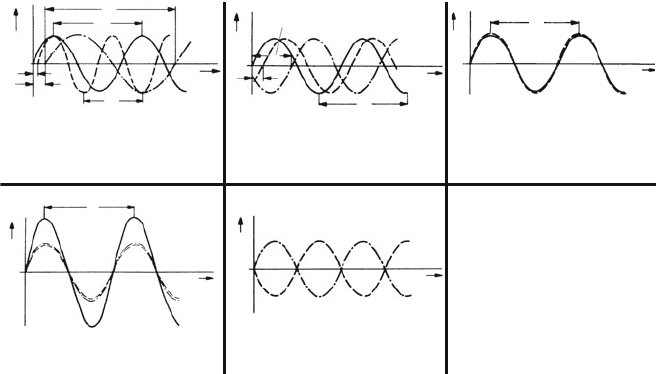
Interference of two coherent
light waves out of phase
(destructive interference)
Monochromatic light
Ampl.
Time
Interference of two coherent
light waves with the same
phase length
(Addition of illuminance)
λ
: Wavelength
ϕ
: Phase difference
Light mixture of different
wavelengths
Monochromatic and
coherent light
λ
≠ const.
ϕ
≠ 0
λ
= const.
λ
= const.ϕ ≠ 0
ϕ
=0
ϕ
2
ϕ
3
λ
λ
Fig. 2.20 Optical measuring principle, interference
A light source emits coherent, monochromatic light whose beam is split into a
reference beam and a measuring beam at a polarizing beam splitter. These beams are
reflected on a respective wedge prism and combined again through superposition.
Finally, the combined beam is detected and evaluated. If the wedge prism of the
measuring beam is shifted, interferences occur because of the difference of the opti-
cal paths of the two partial beams after combining them. These are fluctuations in
light intensity via eliminating and amplifying light. Integral multiples of the wave-
lengths lead to an amplification, phase differences of 180 degrees to an elimination
of light (Fig. 2.20).
The number of interference lines is directly related to the path being measured.
Since the wavelength of the light is a function of temperature and also air pressure
and humidity, these influences are compensated within the device. The advantages
of such systems lie in their large measuring range and especially in their contactless
measurements.
2.3.3.4 Instruments with Pneumatic Converters
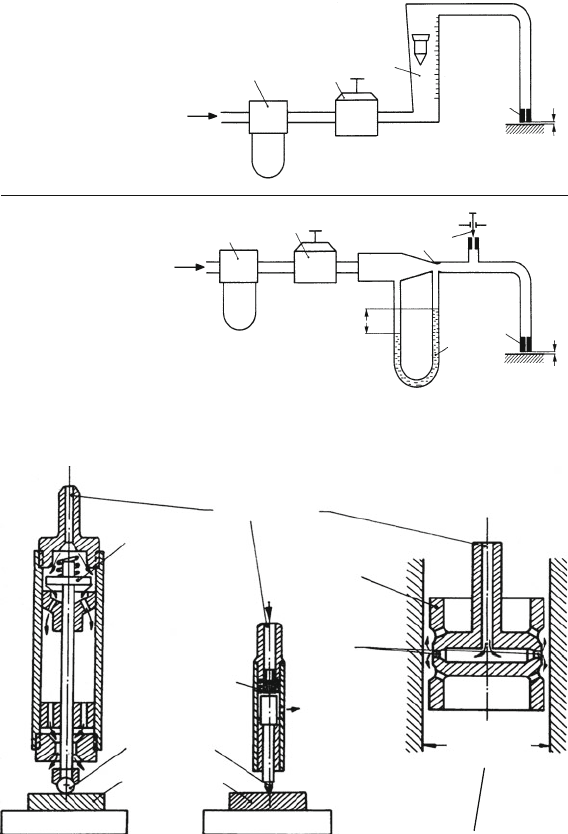
These instruments use pressure and flow rates as material measures (Figs. 2.21
and 2.22).
This measuring principle can be used for both tactile and contactless measure-
ment (Fig. 2.22).
There are two types of such measuring instruments: high-pressure and low-
pressure instruments. High-pressure instruments work with an operating pressure
greater than 0.5 bar, low-pressure instruments with an operating pressure lower than
20 2 Metrology and Workpiece Quality
1
2
3
4
s
Volume measuring
method
1. Air filter
2. Pressure control
3. Flowmeter
4. Measuring nozzle
1
2
h
6
3
4
5
s
Velocity measuring
method
1. Air filter
2. Pressure control
3. Venturi-nozzle
4. Flow of valve
5. Measuring nozzle
6. Differential pressure
manometer
Fig. 2.21 Measuring principle of pneumatic distance measurement
Air inlet
Valve
Follower
Work piece
Guide body
Measuring
nozzles
Drill hole
Tactile measurement Contactless measurement
Fig. 2.22 Pneumatic sensor
0.1 bar. The pressure range between 0.1 and 0.5 bar is outside the operating range
of the instrument [DIN2271a].
Figure 2.23 shows the functional principle of contactless pneumatic measure-
ment. The left side shows an external measurement, the right side an internal
measurement. If the measuring rod is designed in a way that both measuring nozzles
