ASME Section VIII div 2 2010. ASME Boiler and Pressure Vessel Code. Alternative Rules
Подождите немного. Документ загружается.

2010 SECTION VIII, DIVISION 2
6-33
and tested at the shop of the vessel Manufacturer.
6.7.10.3 Check of Heat Treatment and Postweld Heat Treatment
The Inspector shall check the provisions made for heat treatment to ensure that the heat treatment is carried
out in accordance with the provisions of paragraph 6.7.6. The Inspector shall also ensure that postweld heat
treatment is done after repair welding when required under the rules of paragraph 6.7.8.3.b.
6.7.10.4 Inspection of Test Specimens and Witnessing Tests
a) Test Specimens – When test specimens are to be taken under the applicable material specifications, the
Inspector may witness the selection, identifying stamping, and testing of these specimens.
b) Tests and Retests – Tests and retests shall be made in accordance with the requirements of the material
specification.
6.7.11 Stamping and Reports for Forged Vessels
6.7.11.1 Stamping Requirements
The rules of Part 2 shall apply to forged vessels as far as practicable. Vessels constructed of liquid
quenched and tempered material, other than austenitic steels, shall be stamped on the thickened head, using
low stress stamps as commercially available unless a nameplate is used.
6.7.11.2 Information Required on Data Reports for Integrally Forged Vessels
Data reports for integrally forged vessels shall include the heat number or numbers of the metal in the ingot
from which the vessel was forged and the test results obtained for the forging.
6.7.12 Pressure Relief Devices
The provisions for pressure relief devices of Part 9 shall apply without supplement.
6.8 Special Fabrication Requirements for Layered Vessels
6.8.1 General
The rules in the following paragraphs apply specifically to layered shells, layered heads, and layered
transition sections and shall be used to supplement, or be used in lieu of, the applicable requirements given in
paragraphs 6.1 through 6.6. Where requirements differ from those of paragraphs 6.2, 6.4, and 6.6, they are
specifically delineated.
6.8.2 General Fabrication Requirements
Requirements shall be in accordance with paragraph 6.1. For layered vessels, the minimum thickness
permitted for layers is 3 mm (1/8 in.).
6.8.3 Welding Fabrication Requirements
The welding fabrication shall be in accordance with paragraph 6.2, except that the welding procedure
qualification requirements are modified for layered construction as given in paragraph 6.8. Also the specified
requirements are modified for welded joints in paragraph 4.13 and for nondestructive examination in
paragraph 6.8.6.
6.8.4 Welding Qualification and Records
6.8.4.1 Requirements for welding qualification and records shall be in accordance with paragraph 6.2.2,
except that the layered test plate welding procedure qualification of Section IX in paragraphs 6.2.2.1 and
6.2.2.4 shall be as modified in paragraph 6.8.4.2.
2010 SECTION VIII, DIVISION 2
6-34
6.8.4.2 Welding Procedure Qualification
a) The minimum and maximum thicknesses qualified by procedure qualification test plates shall be as
shown in Table QW-451 of Section IX, except that:
1) For the longitudinal joints of the layer section of the shell, the qualification shall be based upon the
thickness of the thickest individual layer exclusive of the inner shell or inner head.
2) For circumferential joint procedure qualification, the thickness of the layered test plate need not
exceed 75 mm (3 in.), shall consist of at least 2 layers, but shall not be less than 50 mm (2 in.) in
thickness.
3) For circumferential weld joints made individually for single layers and spaced at least one layer
thickness apart, the procedure qualification for the longitudinal joint applies.
b) The longitudinal weld joint of the inner shell or inner head and the longitudinal weld joint of the layer shell
or layer head shall be qualified separately except if of the same P-Number material. The weld gap of
the longitudinal layer weld joint shall be the minimum width used in the procedure qualification for layers
22 mm (7/8 in.) and less in thickness.
c) The circumferential weld joint of the layer to layer shell or to layer head shall be qualified with a
simulated layer test plate as shown in Figure 6.4 for layer thicknesses 22 mm (7/8 in.) and under. A
special type of joint tensile specimen shall be made from the layer test coupon as shown in Figure 6.5.
Face and root bend specimens shall be made of both the inner and outer weld to the thickness of the
layer by cutting the weld to the layer thickness.
d) The circumferential weld joint of the layer shell for layer thicknesses 22 mm (7/8 in.) and under to the
solid head, flange, or end closure shall be qualified with a simulated layer test coupon as shown in
Figure 6.4, wherein one side of the test coupon is solid throughout its entire thickness. A special type of
joint tensile specimen shall be made from the test coupon as shown in Figure 6.5. Face and root bend
specimens shall be made of both the inner and outer weld to the thickness of the layer by slicing the
weld and solid portion to the layer thickness.
6.8.4.3 Welding Performance Qualification
Welding shall be performed only by welders and welding operators who have been qualified in accordance
with Section IX. The minimum and maximum thicknesses qualified by any welder test plate shall be as
shown in Table QW-452 of Section IX.
6.8.5 Specific Requirements for Welded Joints
6.8.5.1 The rules of the following paragraphs shall be used in lieu of paragraphs 6.2.4 and 6.2.6.
6.8.5.2 Welding of Joints
Paragraph 4.13.6 covers the types of joints permitted, according to location, in layered vessels and their
components. Paragraph 4.13.7 covers rules for attaching nozzles and other pressure connections by welding.
Paragraph 4.2.5.6 and paragraph 4.13.10 provide rules for attaching nonpressure parts and stiffeners.
Examination requirements are summarized in Table 7.4.
6.8.5.3 Type No.1 Butt Joints
a) Type No. 1 butt joints are defined in paragraph 4.2.3 and Table 4.2.2.
b) Type No. 1 butt joints shall have complete joint penetration and full fusion and shall be free from
undercuts, overlaps, or abrupt ridges or valleys (See Table 7.6, No. 6). To assure that the weld grooves
are completely filled so that the surface of the weld metal at any point does not fall below the surface of
the adjoining plate, weld metal may be built up as reinforcement on both sides of the plate. The
thickness of the reinforcement on each side of the plate shall not exceed the limits specified in paragraph
6.2.4.1.d.
标准分享网 www.bzfxw.com 免费下载
2010 SECTION VIII, DIVISION 2
6-35
6.8.5.4 Type No.2 Butt Joints
a) Type No.2 butt joints are defined in paragraph 4.2.3 and Table 4.2.2.
b) When Type No.2 butt joints are used, the components to be joined shall be aligned and separated so
that there will be complete penetration and fusion at the bottom of the joints for their full length.
However, for assuring complete filling of the weld grooves, weld reinforcement need be supplied only on
the side opposite the backing strip. Weld reinforcement need not be provided on welds which are
subsequently ground flush.
c) Backing strips shall be continuous and any splices shall be butt welded. Circumferential single-welded
butt joints with one plate offset to form a backing strip are prohibited.
6.8.5.5 Fillet Welded Joints
a) Fillet welded joints are defined in paragraph 4.2.5.1.d and Table 4.2.2.
b) The surface of fillet welds shall be free from coarse ripples or grooves, undercuts, overlaps, and abrupt
ridges or valleys, and shall merge smoothly with the surfaces joined.
6.8.5.6 Welds Attaching Nonpressure Parts and Stiffeners
The rules governing the types of welds which may be used to join supports, lugs, brackets, stiffeners, and
other attachments to the vessel wall are set forth in paragraph 4.2.5.6.
6.8.5.7 Surface Weld Metal Buildup
a) Construction in which deposits of weld metal are applied to the surface of base metal for the purpose of
restoring the thickness of the base metal for strength consideration or modifying the configuration of weld
joints in order to provide the tapered transition requirements of paragraph 4.2 or paragraph 6.1.6.2 in
solid wall sections shall be performed in accordance with the requirements of paragraphs 6.2.4.9.
Details for using layers as transitions are covered in paragraph 4.13.
b) A butt welding procedure qualification in accordance with the provisions of Section IX shall be per-
formed for the thickness of weld metal deposited, prior to production welding.
6.8.6 Nondestructive Examination of Welded Joints
Nondestructive examination requirements for layered vessels are located in paragraph 7.4.11.
6.8.7 Welded Joint Efficiency
If the nondestructive examination outlined in paragraph 6.8.6 is complied with, the weld joint efficiency for
design purposes shall be 100%.
6.8.8 Contact between Layers
6.8.8.1 Requirements for contact between layers are covered in paragraph 4.13.12.1.
6.8.8.2 Alternative to Measuring Contact between Layers during Construction
An alternative to measuring the contact between layers during construction is provided in paragraph
4.13.12.2.
6.8.8.3 Rules for Calculating Maximum Permissible Gaps
Rules for computing permissible gaps are provided in paragraph 4.13.12.3.
6.8.9 Vent Holes
Vent holes shall be provided to detect leakage of the inner shell and to prevent buildup of pressure within the
layers as follows.
a) In each shell course or head segment, a layer may be made up of one or more plates. Each layer plate
shall have at least two vent holes 6 mm (1/4 in.) minimum diameter. The vents holes may be drilled
radially through the multiple layers or may be staggered in individual layer plates.

2010 SECTION VIII, DIVISION 2
6-36
b) For continuous coil wrapped layers, each layered section shall have at least four vent holes 6 mm (1/4
in.) minimum diameter. Two of these vent holes shall be located near each end of the section and
spaced approximately 180° apart.
c) The minimum requirement for spirally wound strip layered construction shall be 6 mm (1/4 in.) minimum
diameter vent holes drilled near both edges of the strip. These vent holes shall be spaced for the full
length of the strip and shall be located a distance of approximately
tan
m
R
π
θ
. If a strip weld covers a
vent hole, partially or totally, an additional vent hole shall be drilled on each side of the obstructed hole.
In addition to the above, holes may be drilled radially through the multiple layers.
d) Vent holes shall not be obstructed. If a monitoring system is used, it shall be designed to prevent buildup
of pressure within the layers.
6.8.10 Heat Treatment of Weldments
a) When required, pressure parts shall be postweld heat treated in accordance with paragraph 6.4 and
paragraph 6.6; however, the completed layered vessels or layered vessel sections need not be postweld
heat treated provided the requirements of paragraph 6.8.10.b are satisfied.
b) Unless required by paragraph 6.4.2, completed layered vessels or layered vessel sections need not be
postweld heat treated when welded joints connect a layered section to a layered section, or a layered
section to a solid wall, provided all of the following conditions are met.
1) The thickness referred to in paragraph 6.4.2.7 or paragraph 6.6.6 is the thickness of one layer.
Should more than one layer be used, the thickness of the thickest layer shall govern.
2) The finished joint preparation of a solid section or solid nozzle that is required to be postweld heat
treated under the provisions of paragraph 6.4.2.6 or paragraph 6.6.6 shall be provided with a
buttered layer (i.e. built-up overlay welding) of at least 3 mm (1/8 in.) thick of weld not requiring
postweld heat treatment. Solid sections constructed of P-No. 1 materials need not have this
buttered layer. Postweld heat treatment of the buttered solid section shall then be performed prior to
attaching to the layered sections. Postweld heat treatment following attachment to the layered
section is not required unless the layered section is required to be postweld heat treated.
3) The multipass welding technique is used and the weld layer thickness is limited to 10 mm (3/8 in.)
maximum. When quenched and tempered materials are used (see Table 3.A.4), the last pass shall
be completed using a temper bead welding technique, except for 5%, 8%, and 9% nickel steels.
The temper bead welding treatment is done when the final beads of welding are made over-flush,
deposited only on previous beads of welding for tempering purposes without making contact with
the base metal, and then removing these final beads.
c) The postweld heat treating rules in paragraph 6.8.10 shall apply to all weld repairs.
标准分享网 www.bzfxw.com 免费下载
2010 SECTION VIII, DIVISION 2
6-37
6.9 Nomenclature
d original inside diameter.
f
d final inside diameter.
p
d peaking dimension.
D inside diameter.
f
D final outside diameter.
b
D diameter of the blank plate or the diameter of the intermediate product.
o
D original outside diameter.
1
D maximum inside diameter.
2
D minimum inside diameter.
y
E modulus of elasticity at the service temperature, see Annex 3.D.
f
ε
calculated forming strain.
L
ε
longitudinal contraction.
T
ε
tangential contraction.
g depth of blend grind
L initial length.
f
L final length.
P design pressure.
*
P reduced operating pressure due to out-of-roundness.
r
nominal outside radius of pipe or tube or blend grind radius.
a
R
average radius to middle of the shell wall at critical section.
o
R
original mean radius, equal to infinity for a flat plate.
f
R
final mean radius.
o
R
original mean radius, equal to infinity for a flat plate.
1
R
Average inside radius at critical section.
S Allowable stress from Annex 3.A evaluated at the design temperature.
b
S bending stress at the service temperature due to out-of-roundness.
t nominal thickness of the plate, pipe, or tube before forming.
A
t measured average wall thickness of pipe or tube
B
t measured minimum wall thickness of the extrados of the bend.
f
t final thickness after forming.
θ
acute angle of the spiral wrap measured from the longitudinal centerline.

2010 SECTION VIII, DIVISION 2
6-38
6.10 Tables
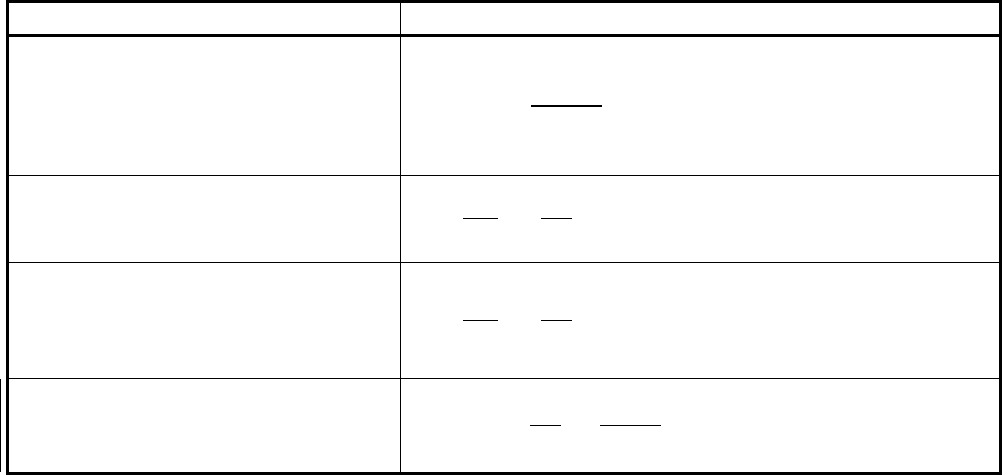
Table 6.1 – Equations For Calculating Forming Strains
Type Of Part Being Formed Forming Strain
For all one piece double curved
circumferential products, formed by any
process that includes dishing or cold
spinning (for example, dished heads or
cold spun heads),
0
=100ln
2
b
f
D
Dt
ε
⎛⎞
⎜⎟
−
⎝⎠
Cylinders formed from plate:
50
1
f
f
fo
R
t
R
R
ε
⎛⎞
=−
⎜⎟
⎝⎠
For heads that are assembled from
formed segments (for example, spherical
dished shell plates or dished segments of
elliptical or torispherical heads),
75
1
f
f
fo
R
t
R
R
ε
⎛⎞
=−
⎜⎟
⎝⎠
Tube and pipe bends:
max , 100
AB
f
fA
tt
r
Rt
ε
⎡⎤
⎛⎞
⎛⎞
−
=
⋅
⎢⎥
⎜⎟
⎜⎟
⎜⎟
⎢⎥
⎝⎠
⎝⎠
⎣⎦
标准分享网 www.bzfxw.com 免费下载

2010 SECTION VIII, DIVISION 2
6-39
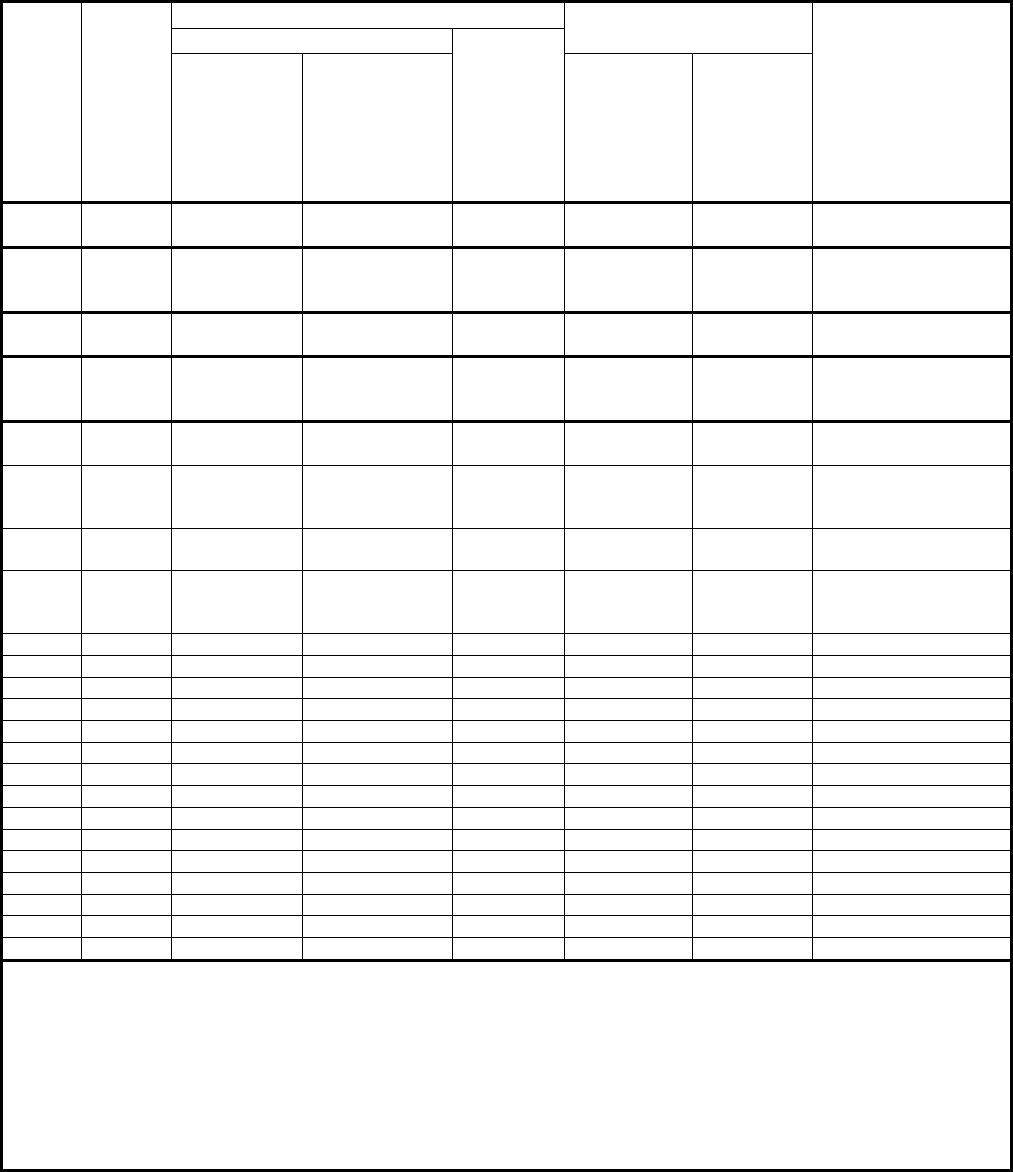
Table 6.2 – Post Fabrication Strain Limits And Required Heat Treatment For High Alloy Materials
(Note 1 )
Grade
UNS
Number
Limitations In Lower Temperature Range
Limitations in Higher
Temperature range
Minimum Heat
Treatment
Temperature When
Design Temperature
Limits and Forming
Strain Limits are
Exceeded
(Notes 3 and 4)
°C (°F)
For Design Temperature °C (°F)
And
Forming
Strains
Exceeding
%
Exceeding
And less than or
Equal to
For Design
Temperature
Exceeding
°C (°F)
A
nd Forming
Strains
Exceeding
%
201-1
S20100
Heads
All All All All All 1065 (1950)
201-1
S20100
All
Other
All All 4 All 4 1065 (1950)
201-2
S20100
Heads
All All All All All 1065 (1950)
201-2
S20100
All
Other
All All 4 All 4 1065 (1950)
201LN
S20153
Heads
All All All All All 1065 (1950)
201LN
S20153
All
Other
All All 4 All 4 1065 (1950)
204
S20400
Heads
All All All All All 1065 (1950)
204
S20400
All
Other
All All 4 All 4 1065 (1950)
304 S30400 580 (1075) 675 (1250) 20 675 (1250) 10 1040 (1900)
304H S30409 580 (1075) 675 (1250) 20 675 (1250) 10 1040 (1900)
304N S30451 580 (1075) 675 (1250) 15 675 (1250) 10 1040 (1900)
309S S30908 580 (1075) 675 (1250) 20 675 (1250) 10 1095 (2000)
310H S31009 580 (1075) 675 (1250) 20 675 (1250) 10 1095 (2000)
310S S31008 580 (1075) 675 (1250) 20 675 (1250) 10 1095 (2000)
316 S31600 580 (1075) 675 (1250) 20 675 (1250) 10 1040 (1900)
316H S31609 580 (1075) 675 (1250) 20 675 (1250) 10 1040 (1900)
316N S31651 580 (1075) 675 (1250) 15 675 (1250) 10 1040 (1900)
321 S32100 595 (1100) 675 (1250) 15 (note 5) 675 (1250) 10 1040 (1900)
321H S32109 595 (1100) 675 (1250) 15 (note 5) 675 (1250) 10 1040 (2000)
347 S34700 595 (1100) 675 (1250) 15 675 (1250) 10 1040 (1900)
347H S34709 595 (1100) 675 (1250) 15 675 (1250) 10 1095 (2000)
348 S34800 595 (1100) 675 (1250) 15 675 (1250) 10 1040 (1900)
348H S34809 595 (1100) 675 (1250) 15 675 (1250) 10 1095 (2000)
Notes:
1. The limits shown are for cylinders formed from plates, spherical or dished heads formed from plate, and
tube and pipe bends.
2. (Currently Not Used)
3. The rate of cooling from heat-treatment temperature is not subject to specific control limits.
4. While minimum heat-treatment temperatures are specified, it is recommended that the heat-treatment
temperature range be limited to 85°C (150°F) above that minimum. The range can be extended to 140°C
(250°F) above the maximum temperature range for 347, 347H, 348, and 348H).
5. For simple bends of tubes or pipes whose outside diameter is less than 90 mm (3 1/2 in.), this limit is 20%.

2010 SECTION VIII, DIVISION 2
6-40
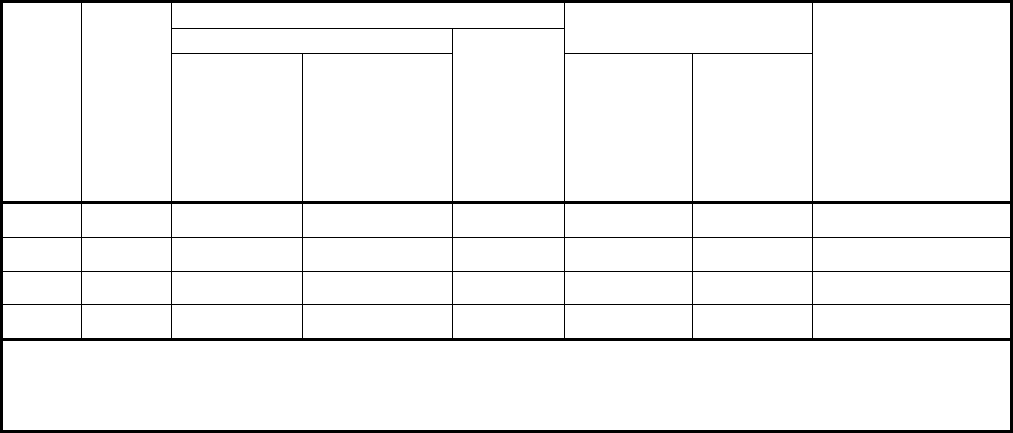
Table 6.3 – Post Fabrication Strain Limits And Required Heat Treatment For Nonferrous Materials
(Note 1)
Grade
UNS
Number
Limitations In Lower Temperature Range
Limitations in Higher
Temperature range
Minimum Heat
Treatment
Temperature When
Design Temperature
Limits and Forming
Strain Limits are
Exceeded
(Note2)
°C (°F)
For Design Temperature °C (°F)
And
Forming
Strains
Exceeding
%
Exceeding
And less than or
Equal to
For Design
Temperature
Exceeding
°C (°F)
A
nd Forming
Strains
Exceeding
%
617 N06617 540(1000) 675 (1250) 15 675 (1250) 10 1150 (2100)
800 N08800 595 (1100) 675 (1250) 15 675 (1250) 10 985 (1800)
800H N08810 595 (1100) 675 (1250) 15 675 (1250) 10 1120 (2050)
800HT N08811 595 (1100) 675 (1250) 15 675 (1250) 10 1120 (2050)
Notes:
1. The limits shown are for cylinders formed from plates, spherical or dished heads formed from plate, and tube and pipe
bends.
2. The rate of cooling from heat-treatment temperature is not subject to specific control limits.
标准分享网 www.bzfxw.com 免费下载

2010 SECTION VIII, DIVISION 2
6-41
Table 6.4 – Maximum Allowable Offset In Welded Joints
Section Thickness Category A Joints Category B, C, D Joints
≤13 mm (1/ 2 in) t
t/4 t/4
<≤13 mm (1/ 2 in) t 19 mm (3 / 4 in) 3mm(1/8in)
t/4
<≤ −19 mm (3 / 4 in) t 38 mm (1 1/ 2 in) 3mm(1/8in) 5mm(3/16in)
−<≤38 mm (1 1/ 2 in) t 50 mm (2 in) 3mm(1/8in)
t/8
>t50mm(2in)
[
]
max t 16, 10mm (3/ 8 in)
[
]
max t /8, 19mm (3/ 4 in)
Notes: t is the nominal thickness of the thinner section at the weld joint.

2010 SECTION VIII, DIVISION 2
6-42
Table 6.5 – Acceptable Welding Process And Limitations
Welding Process Application/Limitation Special Heat Treatment Requirement
• Gas metal arc
• Gas tungsten arc
• Plasma arc
• Laser Beam
All material
None
• Electron beam
All material
Exception for post weld heat treatment as
provided in paragraph 6.4.2 are not permitted
when welding of ferritic materials greater than 3
mm (1/8 in.) in thickness.
• Shielded metal arc
• Submerged arc
• Explosive welding
• Induction
All material except Titanium None
• Electrogas
• Electroslag
Butt weld only in ferritic steel and the
following austenitic steels:
• SA-240 – TP304, TP304L, TP316,
TP316L
• SA-182 – F304, F304L, TP316, TP316L,
• SA-351 – CF3,CF3A, CF3M, CF8, CF8A ,
CF8M
For electro slag welding in ferritic materials over
38 mm (1 1/2 in.) in thickness at the joint or
electrogas welding with a single pass greater than
38 mm (1 1/2 in.), the joint shall be given a grain
refining (austenitizing) heat treatment.
• Inertia
• Continuous drive
friction
• Materials assigned a P-Number in Section
IX excluding rimmed, semi-killed steel, or
Titanium
Exceptions for post weld heat treatment as
provided in paragraph 6.4.2 are not permitted
when welding P-.No. 3, 4, 5A, 5B, 5C, 6, 7
(except TP405 and TP410S) and P.No.10
• Arc stud
• Resistance stud
• Non-pressure parts having a load- or
non-load-carrying function except for
Quenched and Tempered High Strength
Steels (see Table 3.A.4), provided that, in
the case of ferrous materials, heat
treatment requirements of paragraph 6.4.1
and 6.4.2 for the materials used in the
vessel are met.
• Stud shall be limited to 25 mm (1 in.)
diameter for round studs and an
equivalent cross section area for studs
with other shapes.
In case of ferrous material, heat treatment
requirements of paragraphs 6.4.3.6 and 6.6.6.3
for the materials used in the vessel shall be met.
标准分享网 www.bzfxw.com 免费下载
