ASM Metals HandBook Vol. 8 - Mechanical Testing and Evaluation
Подождите немного. Документ загружается.

but also on the amount of friction and the L/D ratios of the specimen, as described in the section “Compression
Testing for Ductile Fracture” in this article.
In compression of a brittle or low-ductility material, however, fracture occurs catastrophically by shear. The
failure either occurs along one large shear plane, leading to complete separation, or at several sites around the
specimen, leading to crushing of the material. In either case, the load-carrying capacity of the material comes to
an abrupt halt, and the fracture strength of the material is easily defined as the load at that point divided by the
cross-sectional area.
The ultimate strength of a material in tension is easily defined as the maximum load-bearing capacity. In a
ductile material, this occurs at the initiation of necking. In a brittle material, it occurs at fracture. Because
necking does not occur in compression testing, there is no ultimate compressive strength in ductile materials,
and in brittle materials the ultimate compressive strength occurs at fracture. The only exception to this is in
materials that exhibit severe work softening, in which case, plastic instability (Fig. 1f) leads to an upper limit in
load-carrying capacity, which defines the ultimate strength of the material, as described in the section
"Instability in Compression" in this article.
Uniaxial Compression Testing
Howard A. Kuhn, Concurrent Technologies Corporation
Plasticity Mechanics
Further understanding of the axial compression test can be obtained by examining the interactions between the
plastic flow and forces acting during the test. The essential features of this interaction can be developed by
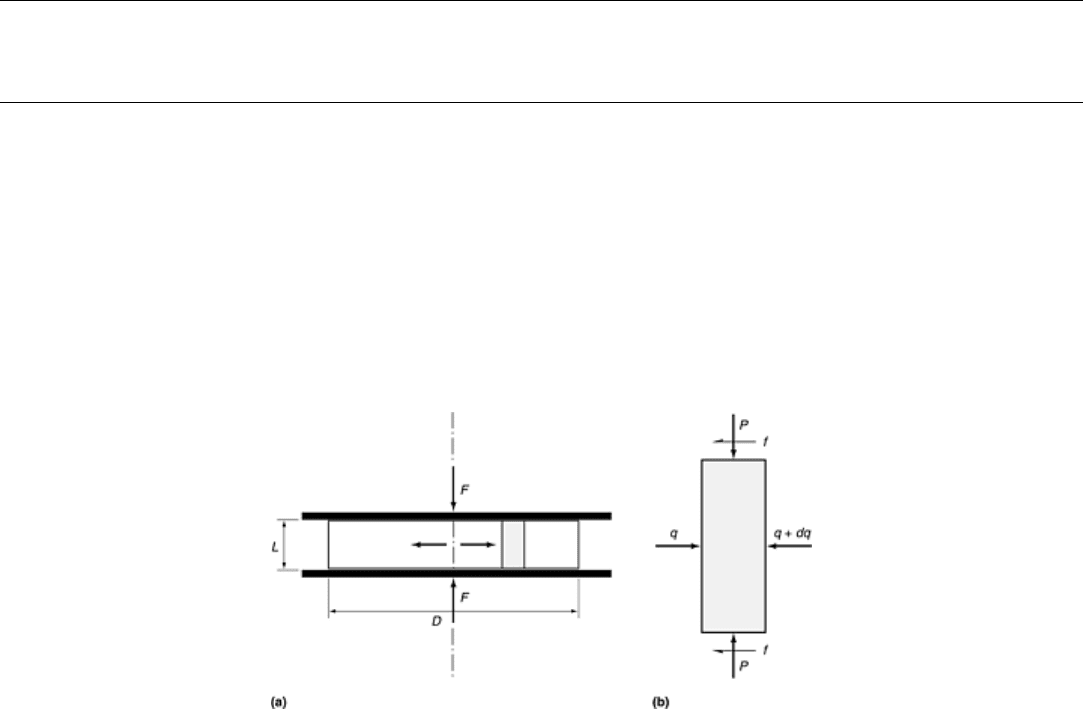
considering a thin, vertical slab of material in a compression-test specimen (Fig. 2a). Pressure, P, from the
compression platens acts on the top and bottom of the slab. Because this slab is to the right of the centerline, the
slab moves to the right as the compression test progresses. Motion of the slab to the right, coupled with the
pressure from the platens, causes friction, f, on the top and bottom surfaces of the slab. The direction of friction
on the slab is to the left, opposing the motion of the slab.
Fig. 2 Interactions between plastic flow and forces acting during compression testing. (a)
Schematic of a compression test showing applied force F, radial expansion away from the
centerline, and a slab element of material in a compression test. (b) Forces acting on the
slab. P, pressure from the compression platens; f, friction at the contract surfaces, acting
opposite to motion of the slab; q, internal radial pressure in the test specimen
Extracting the slab from the compression test, shown in Fig. 2(b), it is clear that the friction forces on the top
and bottom of the slab cause an imbalance of forces in the horizontal direction. This implies that there must be
internal horizontal forces acting on the vertical faces of the slab to maintain force equilibrium (forces due to
acceleration are negligible). As shown in Fig. 2(b), the resulting horizontal pressure, q, acting on opposite sides
of the slab must differ by some amount, dq, to achieve equilibrium.
Applying the principle of equilibrium to the slab in the horizontal direction gives a simple differential equation
for the horizontal pressure q:
dq/dr = –2f/L
(Eq 1)
where L is the thickness of the compression-test specimen. At the outside edge of the test specimen (r = D/2),
the horizontal pressure must be zero (free surface); therefore, Eq 1 shows that q increases from zero at the edge
to positive values inside the test specimen. Furthermore, Eq 1 shows that the rate of increase of q toward the
centerline is larger for high values of friction and low values of specimen thickness. If f is constant, the internal
pressure distribution is:
q = f (D/L)(1 - 2r/D)
(Eq 2)
which has a peak value at r = 0.
Finally, the vertical pressure, P, is related to the internal pressure, q, by the yield criterion for plastic
deformation:
P = q + σ
0
(Eq 3)
where σ
0
is the yield strength of the material. Therefore, P has the same distribution as the radial stress, q, plus
the material yield strength. Integrating this pressure distribution over the contact area gives the total force, F.
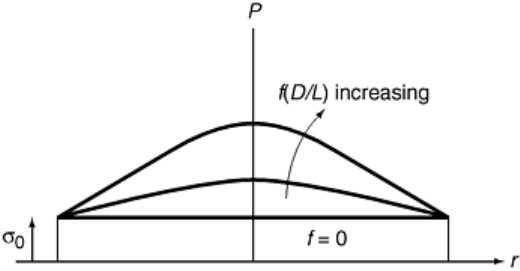
Schematic plots of the pressure distribution, P, in axial compression are given in Fig. 3. Note that even though
the deformation is uniform at every point, the compressive stress is not uniform, but reaches peak values at the
centerline. The values of this peak pressure increase as friction increases and as the test specimen aspect ratio,
L/D, decreases. More importantly, if friction is zero, Eq 2 shows that internal pressure, q, is zero throughout the
test specimen. Then, from Eq 3, P is uniform and equal to σ
0
. Frictionless conditions, therefore, must be used to
measure the plastic deformation response of a material, as described in the next section. More detailed analysis
of the plasticity mechanics of axial compression are given in Ref 5.
Fig. 3 Schematic of pressure distributions, P, in a compression test. When friction is zero,
P is uniform and equal to the material flow stress, σ
0
, but increasing friction and
decreasingL/D with friction lead to increasingly nonuniform pressure distributions with
peak values at the centerline.
The analysis given above is strictly valid only for specimens having very low aspect ratios. However, the
essential roles of friction and geometry are valid qualitatively for test specimens having large aspect ratios; for
these test specimens, the deformation patterns are very complex and vary in the thickness direction, as well as
in the lateral direction. A macrograph of a compression test cross section, shown in Fig. 4(a), reveals the
nonuniformity of internal deformation patterns due to friction at the contact surfaces. In general, the internal
deformation depicted in Fig. 4(b) can be described as three zones (Ref 6): (a) nearly undeformed wedges at the
top and bottom (referred to as dead-metal zones), (b) crisscrossing regions of intense shear deformation, and (c)
moderately deformed regions near the barrel surfaces. The severity of barreling and the differences in degree of
deformation between the three regions increase as friction at the contact surfaces increases.
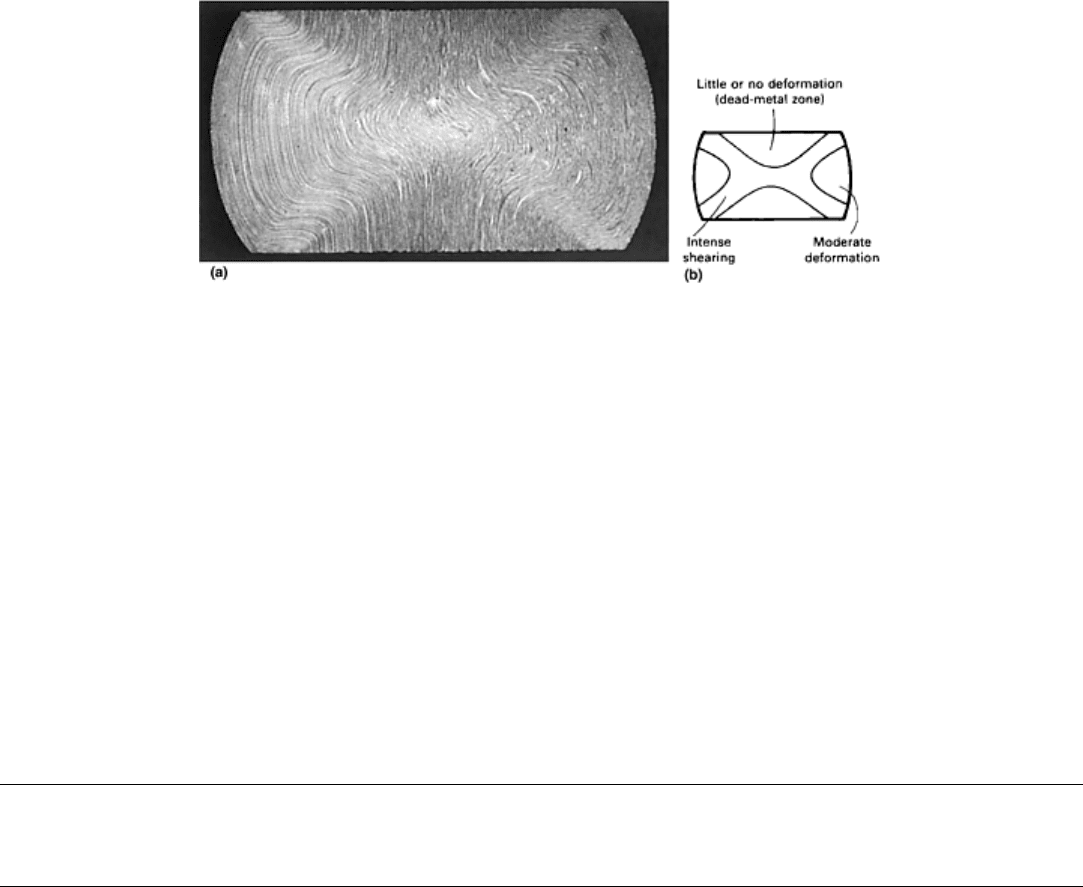
Fig. 4 Internal deformation in compression testing. (a) Macrograph of the internal
deformation in a compression-test specimen with high-contact surface friction. Source:
Ref 5. (b) Schematic representation of the internal deformation into three zones. I, nearly
undeformed wedges at the contact surfaces (dead-metal zones); II, criss-crossing regions
of intense shear deformation; III, moderately deformed regions near the bulge surface.
Source: Ref 6
References cited in this section
5. G.E. Dieter, Mechanical Metallurgy, 2nd ed., McGraw-Hill, 1976, p 561–565
6. G.E. Dieter, Evaluation of Workability: Introduction, Forming and Forging, Vol 14, ASM Handbook,
ASM International, 1988, p 365
Uniaxial Compression Testing
Howard A. Kuhn, Concurrent Technologies Corporation
Homogenous Compression for Plastic Deformation Behavior
Under homogenous-compression conditions (frictionless compression), height reduction and the resulting radial
and circumferential expansion are uniform throughout the test specimen. Furthermore, under these conditions,
radial and circumferential stresses are zero, and the only stress acting is the uniform compressive stress in the
axial direction, as described in the previous section.
Homogenous compression is accomplished by eliminating friction at the contact surfaces, which obviously
requires the use of lubricants. Polishing the ends of the compression-test specimens as well as the die platens
provides smooth surfaces, and lubricants applied to the contact surfaces form a low-friction layer between these
surfaces. However, during compression of high-strength materials, the interface pressure between the test
specimen and die platens becomes extremely high, and the lubricant squeezes out, leaving metal-on-metal
contact, resulting in high friction.
One approach to retaining lubricants at the contact surface involves machining concentric circular grooves into
the end faces of the test specimen (Fig. 5a) (Ref 7). Another approach was pioneered by Rastegaev and refined
by Herbertz and Wiegels (Ref 8), in which the entire end face is machined away except for a small rim, as
shown in Fig. 5(b). This traps a small volume of lubricant in the cavity, forming a hydrostatic cushion with
nearly zero friction. This approach was modified by machining a tapered recess, as shown in Fig. 5(c), which
reduces the amount of material removed and diminishes the strain measurement error. Furthermore this
lubricant recess provides greater lubrication at the rim where material movement is greatest. During
compression testing, radial displacement of the test material is zero at the center and increases linearly to the
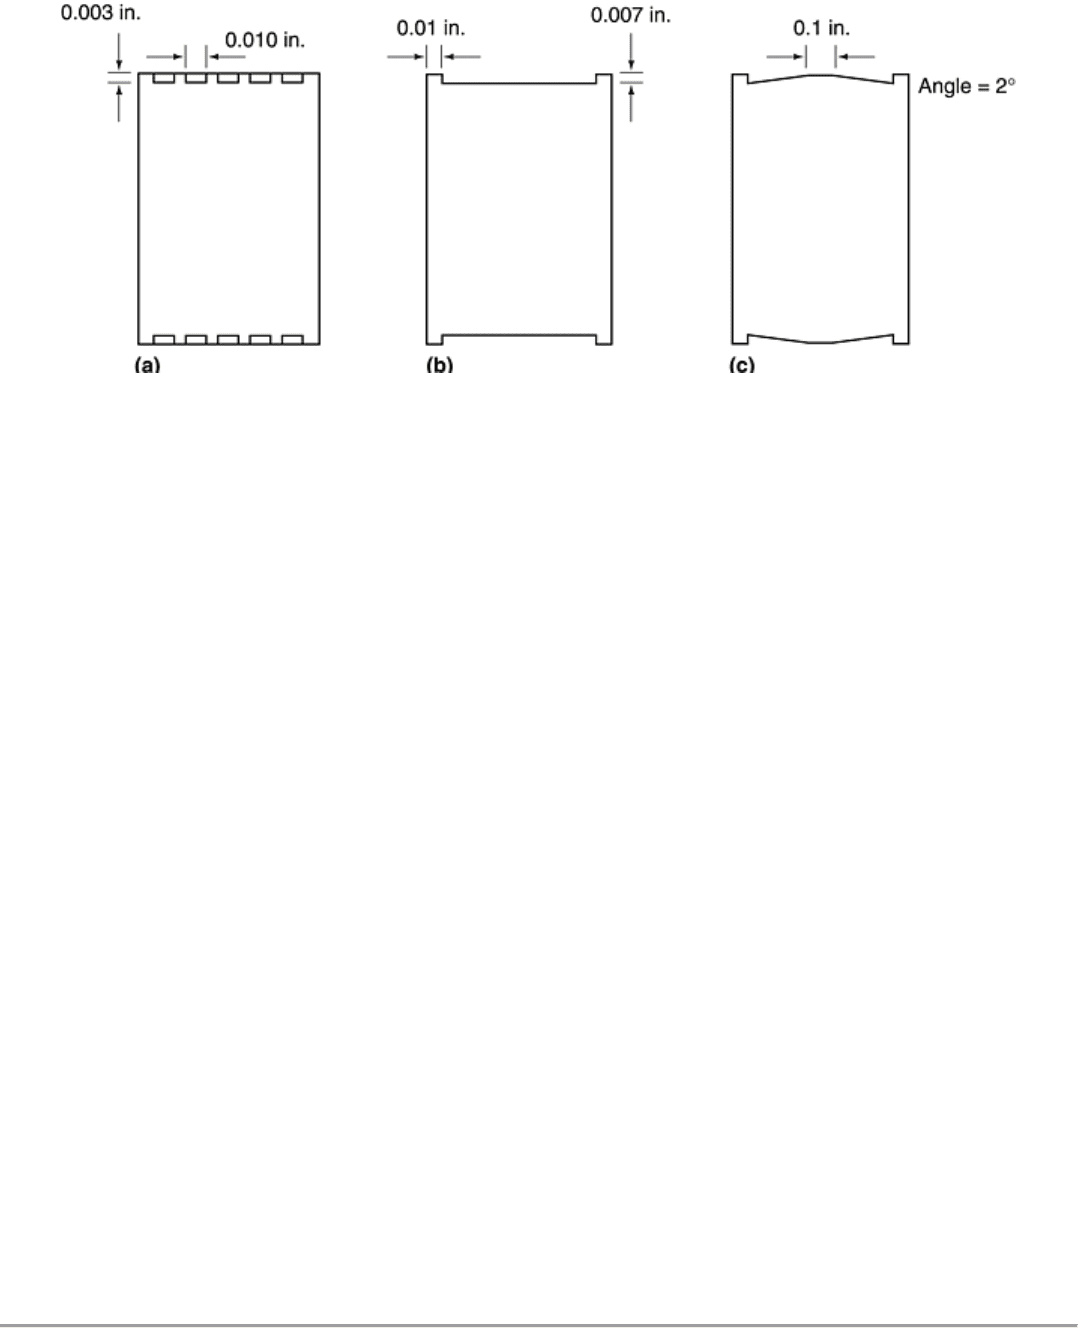
outer rim. Evaluations of lubrication practice for high- temperature testing have shown that the tapered
lubricant reservoir shown in Fig. 5(c) leads to the greatest reproducibility (Ref 9).
Fig. 5 Compression-test end profiles for lubricant entrapment. (a) Concentric grooves.
Source: Ref 7. (b) Rastegaev reservoir. Source: Ref 8. (c) Modified Rastegaev reservoir.
Source: Ref 9
Several high-pressure lubricants are available for room-temperature compression tests, including mineral oil,
palm oil, stearates, and molybdenum disulfide. Teflon (E.I. DuPont de Nemours & Co., Inc., Wilmington, DE)
in the form of spray or sheet is also widely used at room temperature and can be used at temperatures up to 500
°C (930 °F). For high-temperature testing of steels, titanium, and superalloys, one can use emulsions of
graphite, molybdenum disulfide, and various glasses. It is important to match the grade of glass and resulting
viscosity with the test temperature.
In homogenous compression tests, the plastic stress-strain curve can be easily calculated by measurement of the
load, cross-sectional area, and height of the specimen throughout the test. The test can be conducted
incrementally at room temperature wherein the specimen height and lateral dimensions are measured after each
increment of deformation. For high-temperature deformation or continuous testing, the test-equipment load cell
and crosshead displacement can be used to determine the load and dimensional changes of the specimen. In the
latter measurement, it is necessary to remove systematic errors by first carrying out the compression test with
no test specimen in place. This provides a load-stroke curve for the test-machine load train and measures the
compliance of the various elements in the loaded column. Subtracting this compliance from the measured
crosshead stroke during a compression test then provides a more accurate measurement of the specimen
deformation. In any event, if constancy of volume can be assumed for the material being tested, then the cross-
sectional area can be readily calculated from the specimen height at any point throughout the test.
References cited in this section
7. J.E. Hockett, The Cam Plastometer, in Mechanical Testing, Vol 8, ASM Handbook, ASM International,
1985, p 197
8. R. Herbertz and H. Wiegels, Ein Verfahren Zur Verwirklichurg des Reibungsfreien Zylinderstanch
versuchs für die Ermittlung von Fliesscurven, Stahl Eisen, Vol 101, 1981, p 89–92
9. K. Lintermanns Fander, “The Flow and Fracture of Al-High Mg-Mn Alloys at High Temperatures and
Strain Rates,” Ph.D. dissertation, University of Pittsburgh, 1984, p 258
Uniaxial Compression Testing
Howard A. Kuhn, Concurrent Technologies Corporation
Compression Testing for Ductile Fracture
When friction exists at the die contact surfaces, material at the contact surfaces is retarded from moving
outward while the material at the midplane is not constrained. As a result, barreling occurs, as shown in Fig.
1(c) and 1(d). Under these conditions, for a given axial compressive strain, the bulge profile provides
circumferential strain at the equator that is greater than the strain that occurs during homogenous compression.
At the same time, due to the bulge profile, the local compressive strain at the equator is less than the strain that
would have occurred during homogenous compression for the same overall height strain. These surface strain
deviations from homogenous compression increase as bulging increases; the severity of the bulge, in turn, is
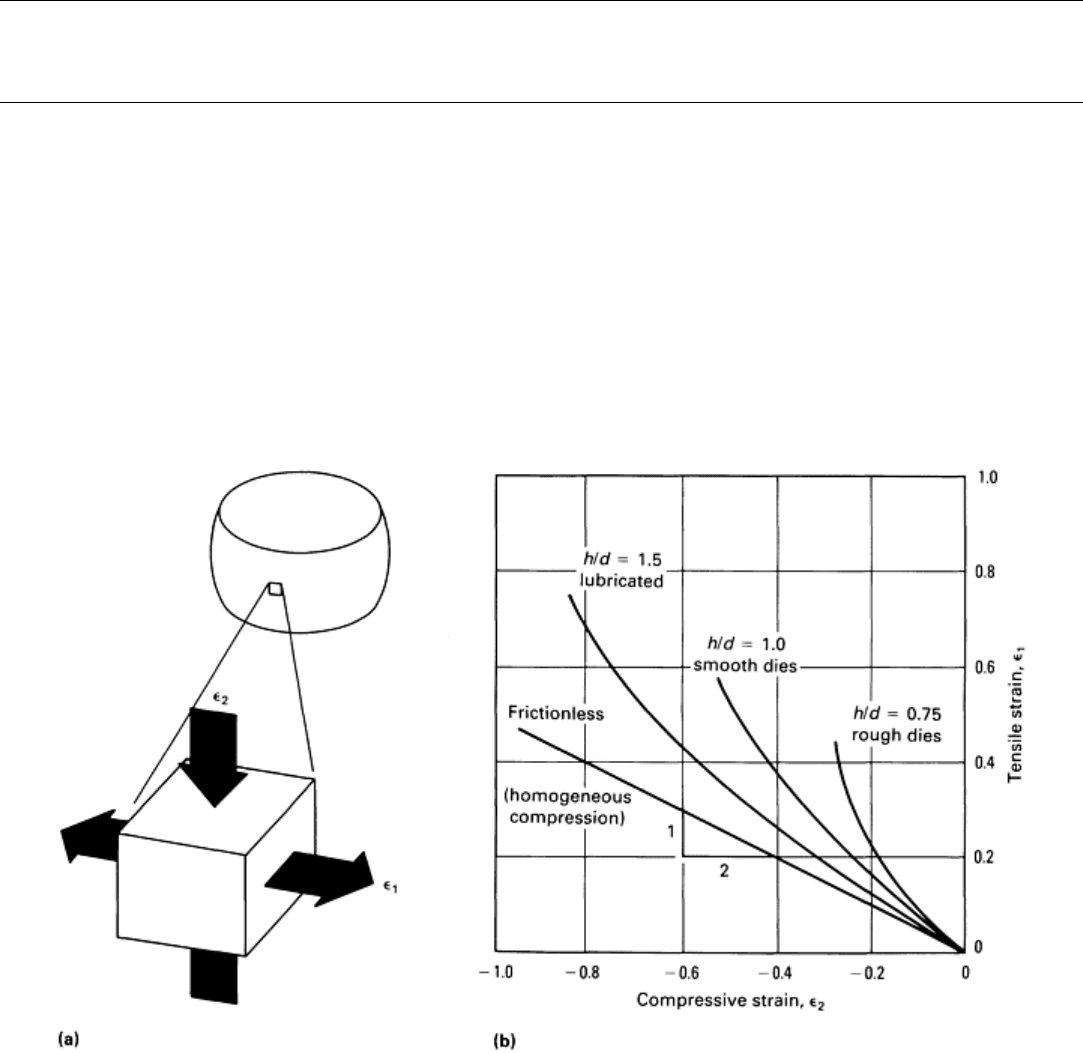
controlled by the magnitude of friction and the L/D ratio of the specimen. Figure 6 illustrates the progressive
change in strain at the bulge surface for different lubrication and L/D ratios (Ref 10).
Fig. 6 Progressive change in strain at the bulge surface in compression testing. (a) Strains
at the bulge surface of a compression test. (b) Variation of the strains during a
compression test without friction (homogenous compression) and with progressively
higher levels of friction and decreasing aspect ratio L/D (shown as h/d)
These strain combinations lead to tensile stress around the circumference and reduced compressive stress at the
bulge equator. Therefore, compression tests with friction, and consequent bulging, can be used as tests for
fracture. Figure 7 shows compression-test specimens with and without friction. Note that the compression test
with the bulge surface, that is, with friction at the contact surfaces, has a crack caused by the tensile stress in the
circumferential direction at the bulge surface. The homogenous compression specimen, even after greater
height compression, has not bulged; therefore, there is no tensile stress in the circumferential direction, and the
specimen has not cracked.
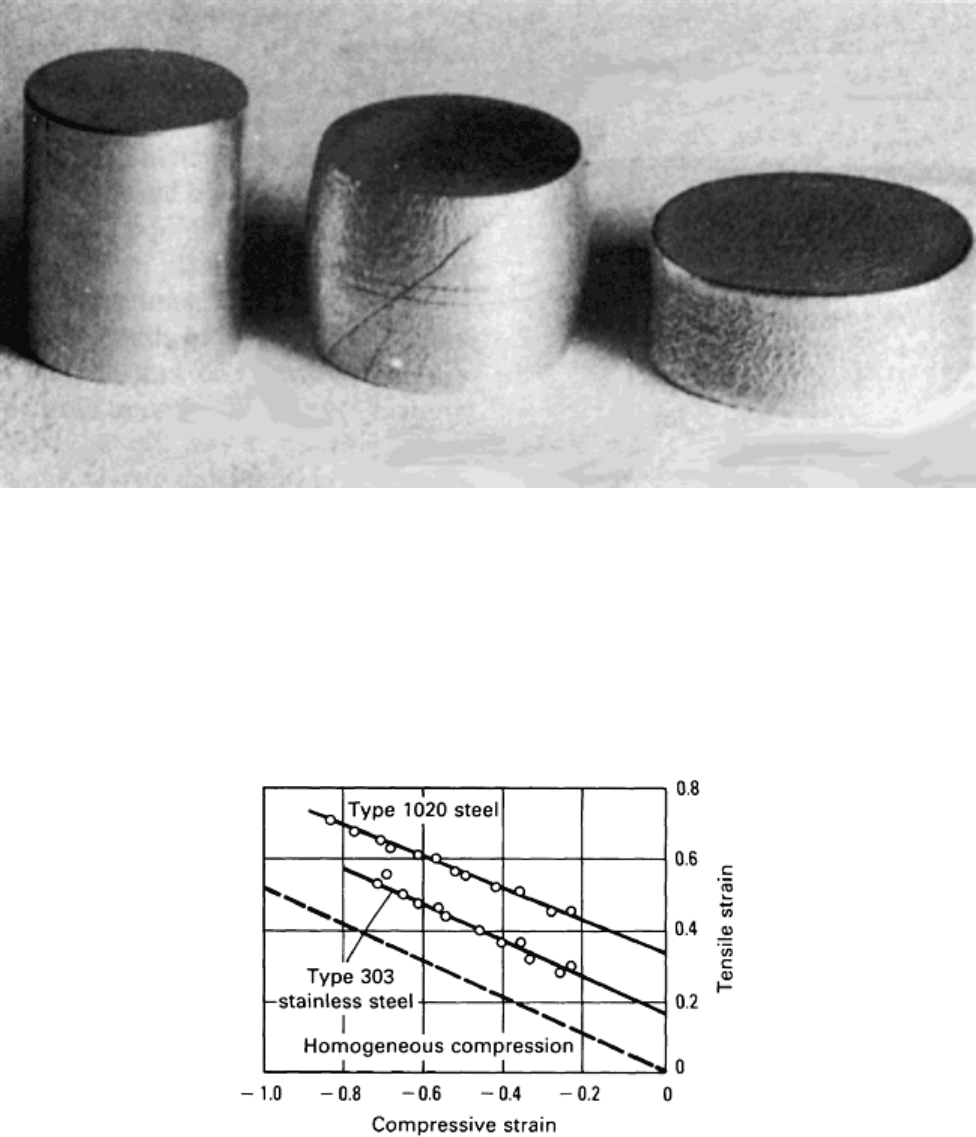
Fig. 7 Compression tests on 2024-T35 aluminum alloy. Left, undeformed specimen;
center, compression with friction (cracked); right, compression without friction (no
cracks)
The stress and strain environment at the bulge surface of upset cylinders suggests that axial compression tests
can be used for workability measurements by carrying out the tests under a variety of conditions regarding
interface friction and L/D ratios. By plotting the surface strains at fracture for each condition, a fracture strain
locus can be generated representing the workability of the material. Figure 8 illustrates such a fracture locus.
Modifications of the cylindrical compression-test specimen geometry have been used to enhance the range of
strains over which fracture can be measured (Ref 11).
Fig. 8 Locus of fracture strains (workability) determined from compression test with
friction. Source: Ref 10
References cited in this section
10. H.A. Kuhn, P.W. Lee, and T. Erturk, A Fracture Criterion for Cold Forging, J. Eng. Mater. Technol.
(Trans. ASME), Vol 95, 1973, p 213–218
11. H.A. Kuhn, Workability Theory and Application in Bulk Forming Processes, Forming and Forging, Vol
14, ASM Handbook, ASM International, 1988, p 389–391

Uniaxial Compression Testing
Howard A. Kuhn, Concurrent Technologies Corporation
Instability in Compression
In tension testing, the onset of necking indicates unstable flow, characterized by a rapid decrease in diameter
localized to the neck region. Up to this point, as the test specimen elongates, work hardening of the material
compensates for the decrease in cross-sectional area; therefore, the material is able to carry an increasing load.
However, as the work-hardening rate decreases, the flow stress acting across the decreasing cross-sectional area
is no longer able to support the applied axial load. At this point, necking begins and the rate of decrease of
cross-sectional area exceeds the rate of increase of work hardening, leading to instability and a rapidly falling
tensile load as the neck progresses toward fracture.
In compression testing, a similar phenomenon occurs when work softening is prevalent (Ref 12). That is, during
compression, the cross-sectional area of the specimen increases, which increases the load-carrying capability of
the material. However, if work softening occurs, its load-carrying capability is decreased. When the rate of
decrease in strength of the material due to work softening exceeds the rate of increase in the area of the
specimen, an unstable mode of deformation occurs in which the material rapidly spreads in a localized region,
as shown in Fig. 1(f).
Instability in tension and compression can be described through the Considére construction. Instability occurs
when the slope of the load-elongation curve becomes zero, that is:
dF = d(σA) = σdA + Adσ = 0
or
dσ/σ = -dA/A = dε = de/(1 + e)
and
dσ/de = σ/(1 + e)
(Eq 4)
where σ is true stress, ε is true strain, e is engineering strain, F is force, and A is area.
Equation 4 indicates that instability occurs when the slope of the true stress-engineering strain curve equals the
ratio of true stress to one plus the engineering strain. This leads to the Considére construction for instability
(Fig. 9). The upper part of Fig. 9 shows the Considére construction for a tension test. When the work hardening
stress-strain curve reaches point C, necking begins and unstable deformation continues through to complete
separation or fracture. This defines the ultimate strength of the material in tension. In the lower part of Fig. 9,
the Considére construction for the compression test shows that, for a work softening material, unstable flow
commences at point C′, leading to a configuration as shown in Fig. 1(f). Thus, the ultimate strength of the
material in compression in this case can be defined as the stress at this point.
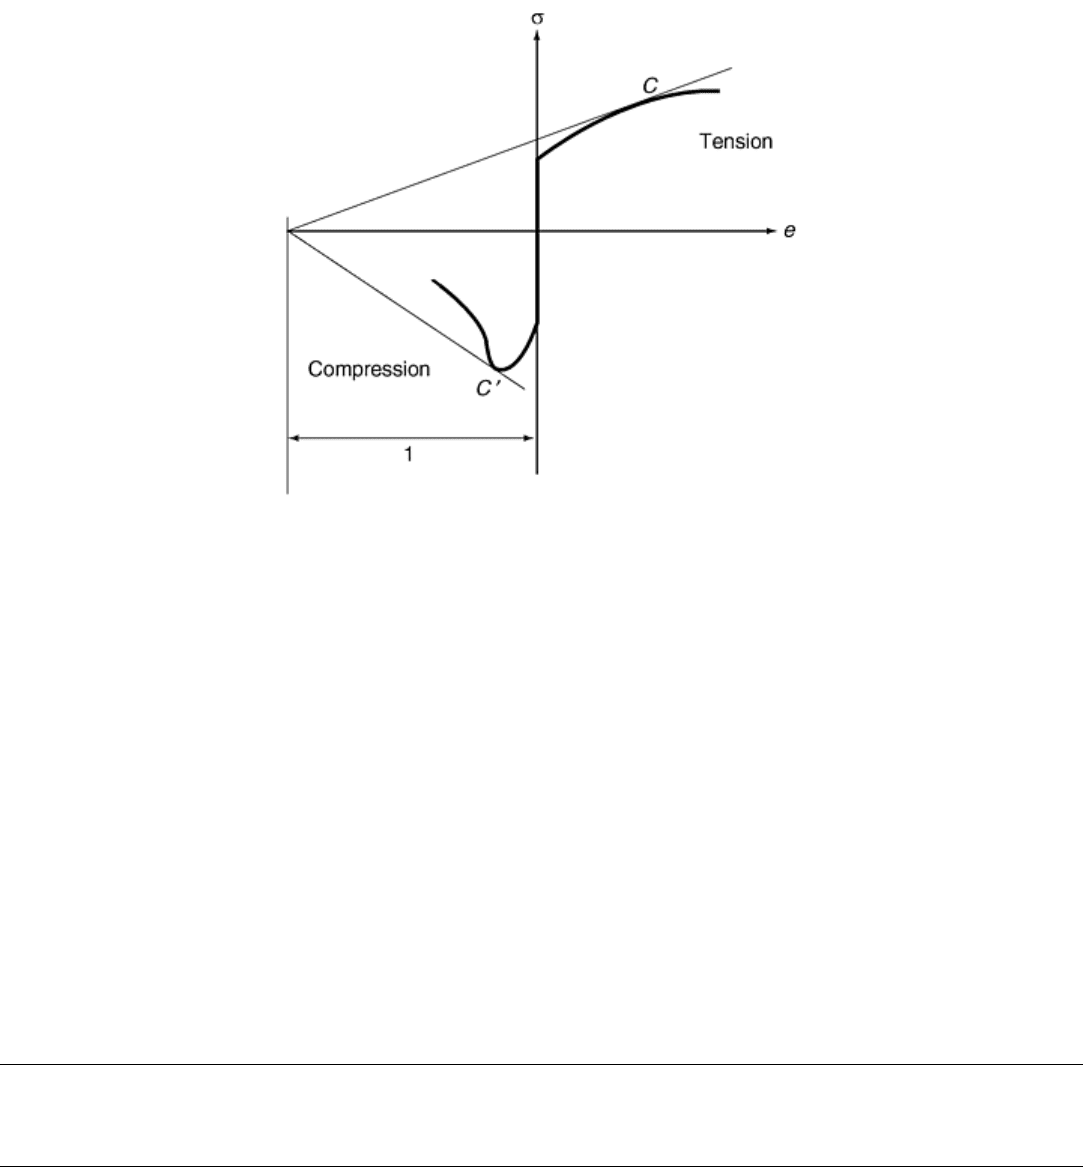
Fig. 9 Considére construction showing instability conditions in tension testing (due to
decreasing work-hardening rate) and in compression testing (due to work softening)
Materials that undergo severe work softening are prone to compressive instabilities. While useful in itself, this
precludes measurement of the bulk plastic deformation behavior of the material, just as the necking instability
in tension testing prevents measurement of plastic deformation behavior at large strains. Several metallurgical
conditions can lead to such work softening. These include dynamic recovery and dynamic recrystallization
where substructure rearrangements and dislocation reductions lead to a rapid decrease in flow stress.
Morphological changes in second phases, such as the rapid spheroidization of pearlite at elevated temperatures,
the coarsening of small spherical precipitates, and the coarsening of martensitic substructures, are another
source of work softening. Further examples of work softening include incipient melting of eutectic phases and
localized shear-band formation, seen commonly in titanium alloys.
Reference cited in this section
12. J.J. Jonas and M.J. Luton, Flow Softening at Elevated Temperatures, Advances in Deformation
Processing, J.J. Burke and V. Weiss, Ed., Plenum, 1978, p 238
Uniaxial Compression Testing
Howard A. Kuhn, Concurrent Technologies Corporation
Test Methods
Axial compression testing is a useful procedure for measuring the plastic flow behavior and ductile fracture
limits of a material. Measuring the plastic flow behavior requires frictionless (homogenous compression) test
conditions, while measuring ductile fracture limits takes advantage of the barrel formation and controlled stress
and strain conditions at the equator of the barreled surface when compression is carried out with friction. Axial
compression testing is also useful for measurement of elastic and compressive fracture properties of brittle
materials or low-ductility materials. In any case, the use of specimens having large L/D ratios should be
avoided to prevent buckling and shearing modes of deformation.
Axial compression tests for determining the stress-strain behavior of metallic materials are conducted by
techniques described in test standards, such as:
• ASTM E 9, “Compression Testing of Metallic Materials at Room Temperature”
• DIN 50106, “Compression Test, Testing of Metallic Materials”
• ASTM E 209, “Compression Tests of Metallic Materials at Elevated Temperatures with Conventional or
Rapid Heating Rates and Strain Rates”
This section briefly reviews the factors that influence the generation of valid test data for tests conducted in
accordance with ASTM E 9 and the capabilities of conventional universal testing machines (UTMs) for
compression testing.
Specimen Buckling
As previously noted, errors in compressive stress-strain data can occur by the nonuniform stress and strain
distributions from specimen buckling and barreling. Buckling can be prevented by avoiding the use of
specimens with large length-to-diameter ratios, L/D. In addition, the risk of specimen buckling can be reduced
by careful attention to alignment of the loading train and by careful manufacture of the specimen according to
the specifications of flatness, parallelism, and perpendicularity given in ASTM E 9. However, even with well-
made specimens tested in a carefully aligned loading train, buckling may still occur. Conditions that typically
induce buckling are discussed in the following sections.
Alignment. The loading train, including the loading faces, must maintain initial alignment throughout the entire
loading process. Alignment, parallelism, and perpendicularity tests should be conducted at maximum load
conditions of the testing apparatus.
Specimen Tolerances. The tolerances given in ASTM E 9 for specimen end-flatness, end-parallelism, and end-
perpendicularity should be considered as upper limits. This is also true for concentricity of outer surfaces in
cylindrical specimens and uniformity of dimensions in rectangular sheet specimens. If tolerances are reduced
from these values, the risk of premature buckling is also reduced.
Inelastic Buckling. Only elastic buckling is discussed in ASTM E 9. This may be somewhat unrealistic, because
for the most slender specimen recommended, the calculated elastic buckling stresses are higher than can be
achieved in a test. This specimen has a length-to-diameter ratio of 10. An approximate calculation using the
elastic Euler equation for a steel specimen with flat ends on a flat surface (assumed value of end-fixity
coefficient is 3.5) yields a buckling stress in excess of 4100 MPa (600 ksi); the comparable value for an
aluminum specimen would be 1380 MPa (200 ksi). These values, however, are not realistic.
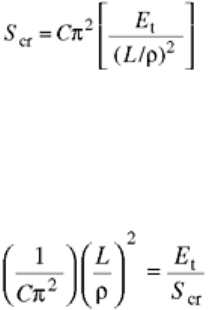
Buckling stress in the above example should not be calculated by an elastic formula but by an inelastic buckling
relation. In terms of inelastic buckling it has been concluded that the following relation appropriately calculates
inelastic buckling stresses (Ref 13):
(Eq 5)
where S
cr
is the buckling stress in MPa (ksi); C is the end-fixity coefficient; E
t
is the tangent modulus of the
stress-strain curve in MPa (ksi); L is the specimen length in mm (in.); and r is the radius of gyration of
specimen cross section in mm (in.). Equation 1 reduces to the Euler equation if E, the modulus of elasticity, is
substituted for E
t
.
Rearranging Eq 5 to combine the stress-related factors results in:
(Eq 6)
Note that the value of the right side of Eq 6 decreases as stress increases in a stress-strain curve. In a material
with an elastic-pure-plastic response, the right side of Eq 6 vanishes, because E
t
becomes zero, and buckling
will always occur at the yield stress. When the material exhibits strain hardening, calculations using Eq 6 will
yield the appropriate specimen dimensions to resist buckling for given values of stress.
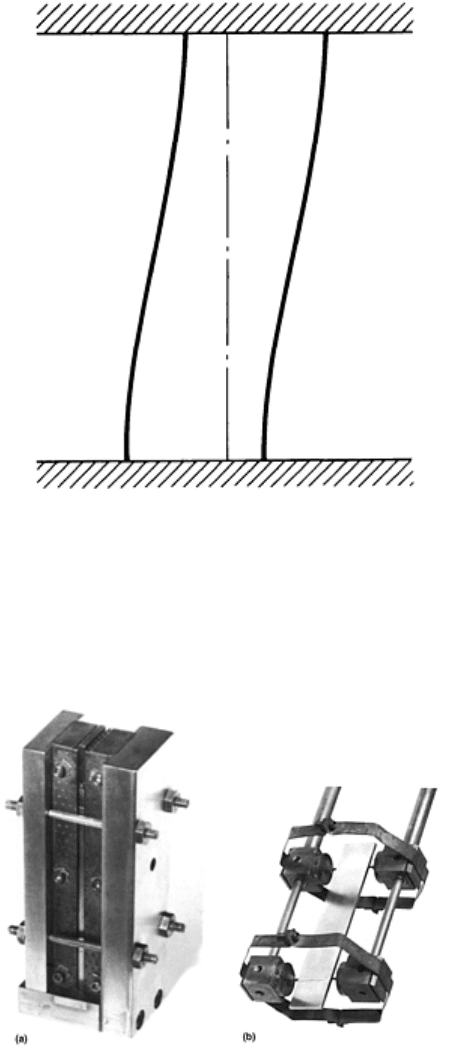
Side Slip. Figure 10 illustrates one form of buckling of cylindrical specimens that can result from misalignment
of the loading train under load or from loose tolerances on specimen dimensions. The ends of the specimen
undergo sideslip, resulting in a sigmoidal central axis. This form of buckling could be described by Eq 5 and 6,
provided an appropriate value of the end-fixity coefficient can be assigned.
Fig. 10 Schematic diagram of side-slip buckling. The original position of the specimen
centerline is indicated by the dashed line.
Thin-Sheet Specimens. In testing thin sheet in a compression jig, approximately 2% of the specimen length
protrudes from the jig. Buckling of this unsupported length can occur if there is misalignment of the loading
train such that it does not remain coaxial with the specimen throughout the test (Ref 14). A typical compression
jig and contact-point compressometer are shown in Fig. 11(a) and (b) respectively.
Fig. 11 Compression testing of thin-sheet specimens. (a) Sheet compression jig suitable
for room-temperature or elevated-temperature testing. (b) Contact-point compressometer
installed on specimen removed from jig. Contact points fit in predrilled shallow holes in
the edge of the specimen.
Barreling of Cylindrical Specimens
When a cylindrical specimen is compressed, Poisson expansion occurs. If this expansion is restrained by
friction at the loading faces of the specimen, nonuniform states of stress and strain occur as the specimen
acquires a barreled shape (Fig. 12). The effect on the stress and strain distributions is of consequence only when
the deformations are on the order of 10% or more.
