ASM Metals HandBook Vol. 8 - Mechanical Testing and Evaluation
Подождите немного. Документ загружается.

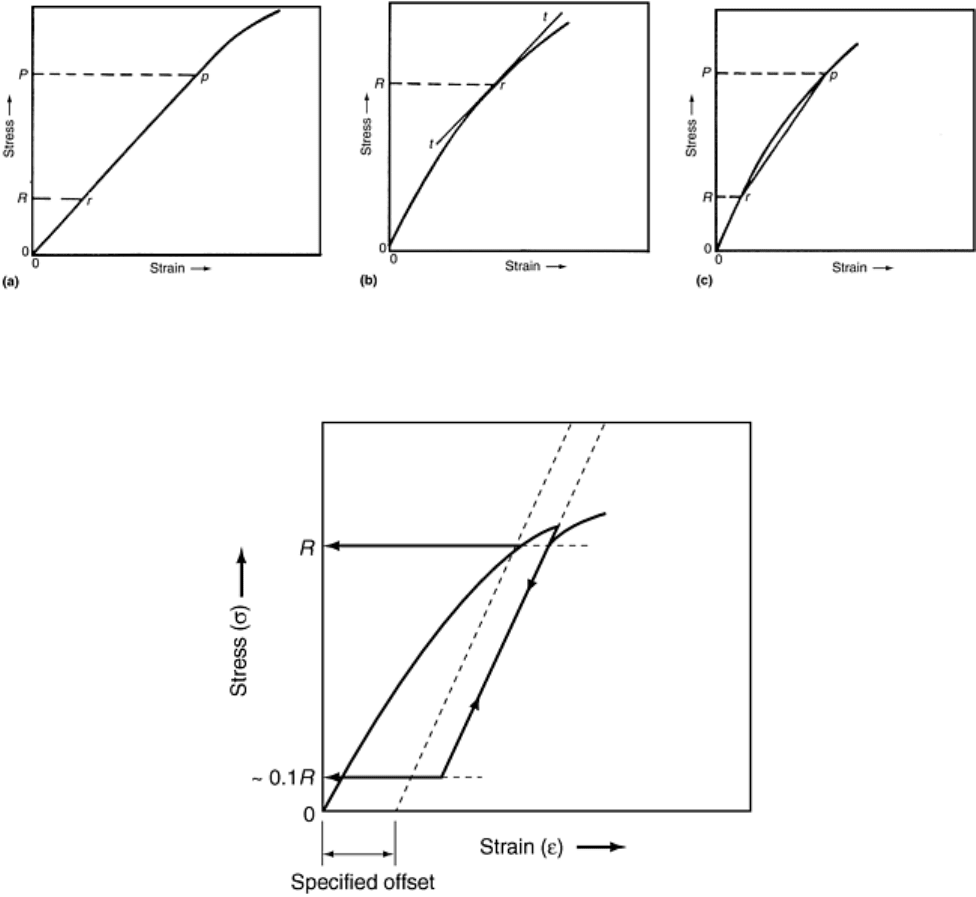
Fig. 10 Examples of stress-strain curves requiring foot correction. Point D is the point
where the extension of the straight (elastic) part diverges from the stress-strain curve.
Source: Ref 5
Tangent or Chord Moduli. For materials that do not have a linear relationship between stress and strain, even at
very low stresses, the offset yield is meaningless without defining how to determine the modulus of elasticity.
Often, a chord modulus or a tangent modulus is specified. A chord modulus is the slope of a chord between any
two specified points on the stress-strain curve, usually below the elastic limit. A tangent modulus is the slope of
the stress-strain curve at a specified value of stress or of strain. Chord and tangent moduli are illustrated in Fig.
11. Another technique that has been used is sketched in Fig. 12. The test piece is stressed to approximately the
yield strength, unloaded to about 10% of this value, and reloaded. As previously discussed, the unloading line
will be parallel to what would have been the initial modulus line, and the reloading line will coincide with the
unloading line (assuming no hysteresis in any of the system components). The slope of this line is transferred to
the initial loading line, and the offset is determined as before. The stress or strain at which the test piece is
unloaded usually is not important. This technique is specified in the ISO standard for the tension test of metallic
materials, ISO 6892.
Fig. 11 Stress-strain curves showing straight lines corresponding to (a) Young's modulus
between stress, P, below proportional limit and R, or preload; (b) tangent modulus at any
stress, R; and (c) chord modulus between any two stresses, P and R. Source: Ref 6
Fig. 12 Alternate technique for establishing Young's modulus for a material without an
initial linear portion
Yield-strength-property values generally depend on the definition being used. As shown in Fig. 4(a) for the
USS Con-Pac steel, the EUL yield is greater than the offset yield, but for the USS T-1 steel (Fig. 4a), the
opposite is true. The amount of the difference between the two values is dependent upon the slope of the stress-
strain curve between the two intersections. When the stress-strain data pairs are sampled by a computer, and a
yield spike or peak of the type shown in Fig. 7(a) occurs, the EUL and the offset yield strength will probably be
less than the upper yield point and will probably differ because the m-n lines of Fig. 8 and 9 will intersect at
different points in the region of discontinuous yielding.
Ductility
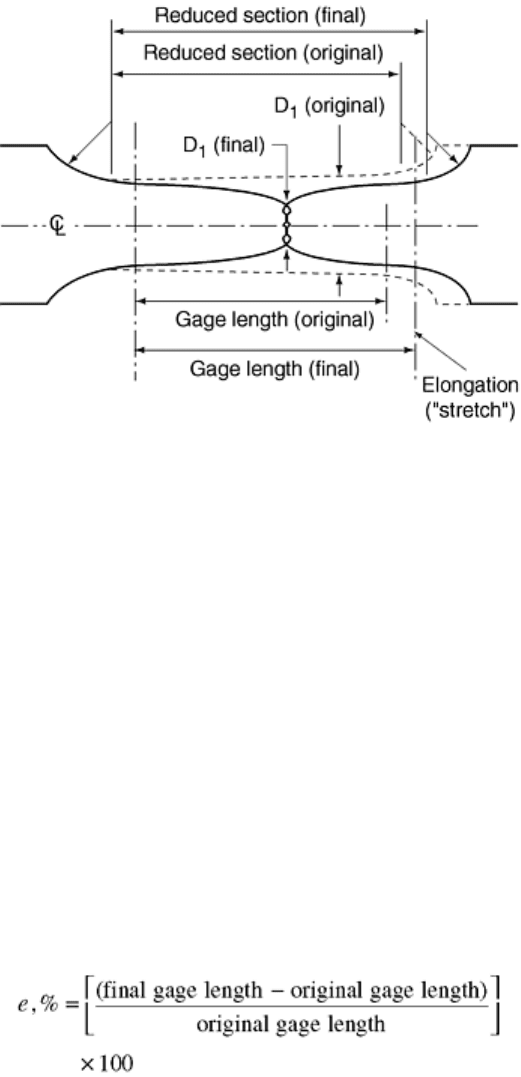
Ductility is the ability of a material to deform plastically without fracturing. Figure 13 is a sketch of a test piece
with a circular cross section that has been pulled to fracture. As indicated in this sketch, the test piece elongates
during the tension test and correspondingly reduces in cross-sectional area. The two measures of the ductility of
a material are the amount of elongation and reduction in area that occurs during a tension test.
Fig. 13 Sketch of fractured, round tension test piece. Dashed lines show original shape.
Strain = elongation/gage length
Elongation , as previously noted, is defined in ASTM E 6 as the increase in the gage length of a test piece
subjected to a tension force, divided by the original gage length on the test piece. Elongation usually is
expressed as a percentage of the original gage length. ASTM E 6 further indicates the following:
• The increase in gage length may be determined either at or after fracture, as specified for the material
under test.
• The gage length shall be stated when reporting values of elongation.
• Elongation is affected by test-piece geometry (gage length, width, and thickness of the gage section and
of adjacent regions) and test procedure variables, such as alignment and speed of pulling.
The manual measurement of elongation on a tension test piece can be done with the aid of gage marks applied
to the unstrained reduced section. After the test, the amount of stretch between gage marks is measured with an
appropriate device. The use of the term elongation in this instance refers to the total amount of stretch or
extension. Elongation, in the sense of nominal engineering strain, e, is the value of gage extension divided by
the original distance between the gage marks. Strain elongation is usually expressed as a percentage, where the
nominal engineering strain is multiplied by 100 to obtain a percent value; that is:
The final gage length at the completion of the test may be determined in two ways. Historically, it was
determined manually by carefully fitting the two ends of the fractured test piece together (Fig. 13) and
measuring the distance between the gage marks. However, some modern computer-controlled testing systems
obtain data from an extensometer that is left on the test piece through fracture. In this case, the computer may
be programmed to report the elongation as the last strain value obtained prior to some event, perhaps the point
at which the applied force drops to 90% of the maximum value recorded. There has been no general agreement
about what event should be the trigger, and users and machine manufacturers find that different events may be
appropriate for different materials (although some consensus has been reached, see ASTM E 8-99). The
elongation values determined by these two methods are not the same; in general, the result obtained by the
manual method is a couple of percent larger and is more variable because the test-piece ends do not fit together
perfectly. It is strongly recommended that when disagreements arise about elongation results, agreement should
be reached on which method will be used prior to any further testing.
Test methods often specify special conditions that must be followed when a product specification specifies
elongation values that are small, or when the expected elongation values are small. For example, ASTM E 8
defines small as 3% or less.
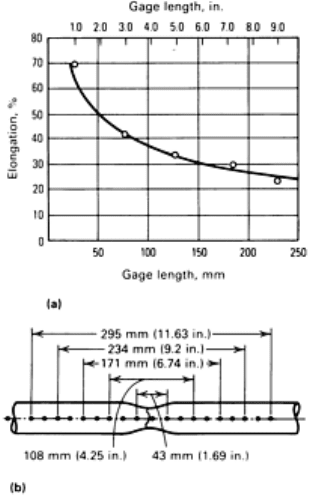
Effect of Gage Length and Necking. Figure 14 (Ref 7) shows the effect of gage length on elongation values.
Gage length is very important; however, as the gage length becomes quite large, the elongation tends to be
independent of the gage length. The gage length must be specified prior to the test, and it must be shown in the
data record for the test.
Fig. 14 Effect of gage length on the percent elongation. (a) Elongation, %, as a function of
gage length for a fractured tension test piece. (b) Distribution of elongation along a
fractured tension test piece. Original spacing between gage marks, 12.5 mm (0.5 in.).
Source: Ref 7
Figures 13 and 14 also illustrate considerable localized deformation in the vicinity of the fracture. This region
of local deformation is often called a neck, and the occurrence of this deformation is termed necking. Necking
occurs as the force begins to drop after the maximum force has been reached on the stress-strain curve. Up to
the point at which the maximum force occurs, the strain is uniform along the gage length; that is, the strain is
independent of the gage length. However, once necking begins, the gage length becomes very important. When
the gage length is short, this localized deformation becomes the principal portion of measured elongation. For
long gage lengths, the localized deformation is a much smaller portion of the total. For this reason, when
elongation values are reported, the gage length must also be reported, for example, elongation = 25% (50 mm,
or 2.00 in., gage length).
Effect of Test-Piece Dimensions. Test-piece dimensions also have a significant effect on elongation
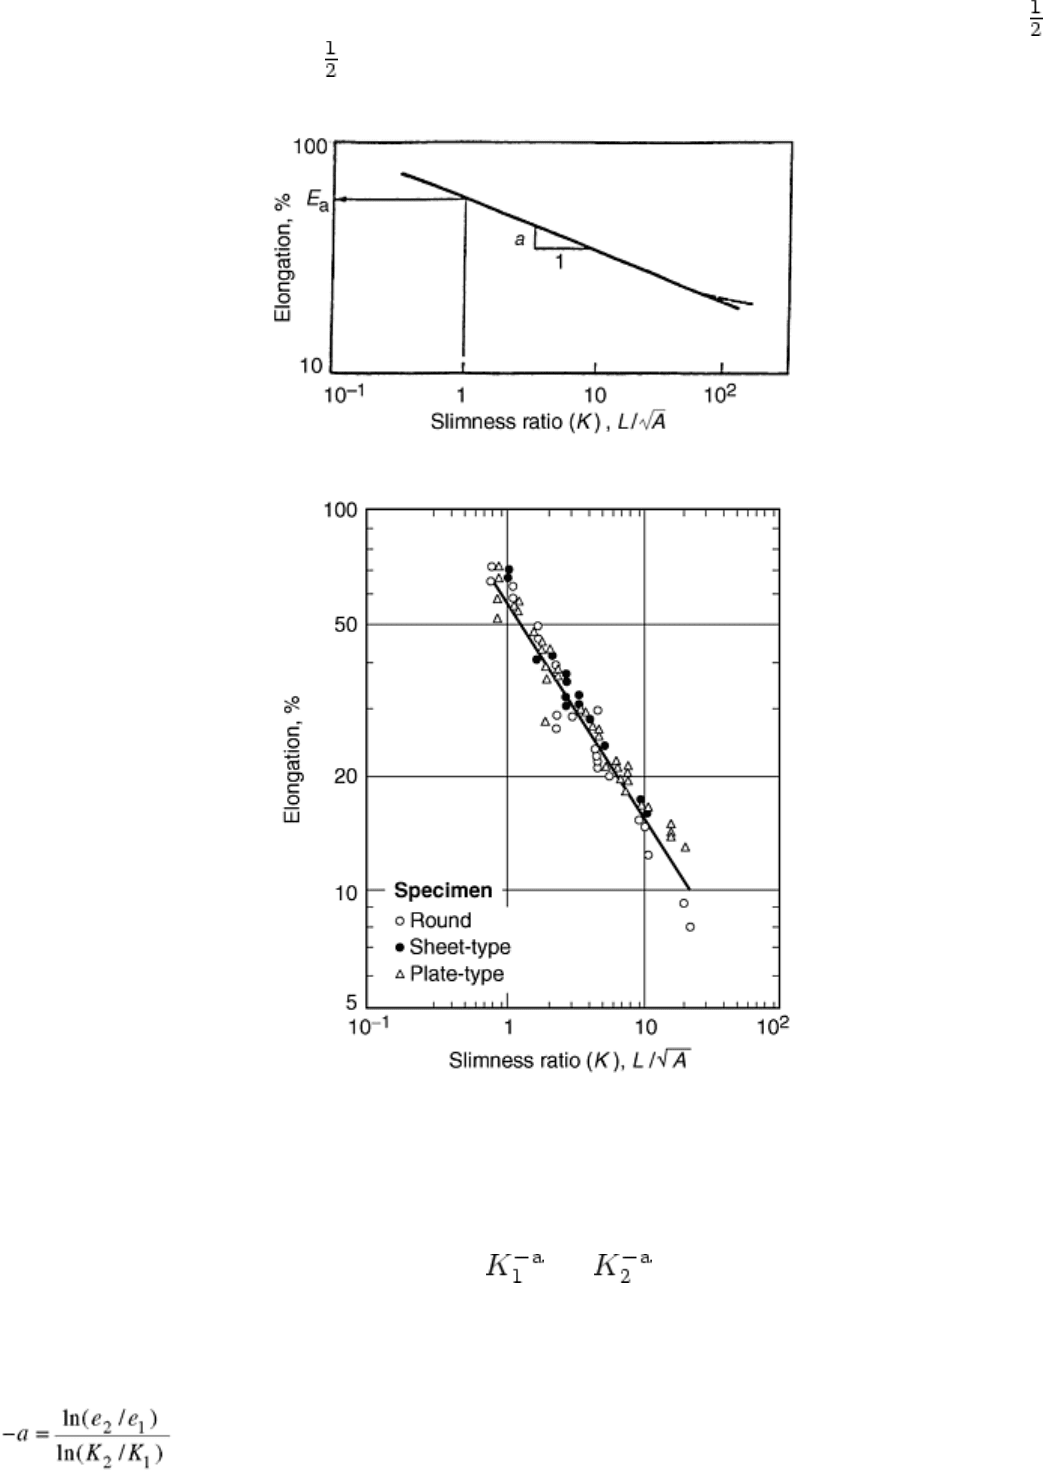
measurements. Experimental work has verified the general applicability of the following equation:
e = e
0
(L/A
1/2
)
-a
where e
0
is the specific elongation constant; L/A
1/2
the slimness ratio, K, of gage length, L, and cross-sectional
areas, A; and a is another material constant. This equation is known as the Bertella-Oliver equation, and it may
be transformed into logarithmic form and plotted as shown in Fig. 15. In one study, quadruplet sets of machined
circular test pieces (four different diameters ranging from 0.125 to 0.750 in.) and rectangular test pieces ( in.
wide with three thicknesses and 1 in. wide with three thicknesses) were machined from a single plate. Multiple
gage lengths were scribed on each test piece to produce a total of 40 slimness ratios. The results of this study,
for one of the grades of steel tested, are shown in Fig. 16.
Fig. 15 Graphical form of the Bertella-Oliver equation.
Fig. 16 Graphical form of the Bertella-Oliver equation showing actual data
In order to compare elongation values of test pieces with different slimness ratios, it is necessary only to
determine the value of the material constant, a. This calculation can be made by testing the same material with
two different geometries (or the same geometry with different gage lengths) with different slimness ratios, K
1
and K
2
, where
e
0
= e
1
/ = e
2
/
solving for a, then:
(K
2
/K
1
)
-a
= e
2
/e
1
or:
(Eq 1)
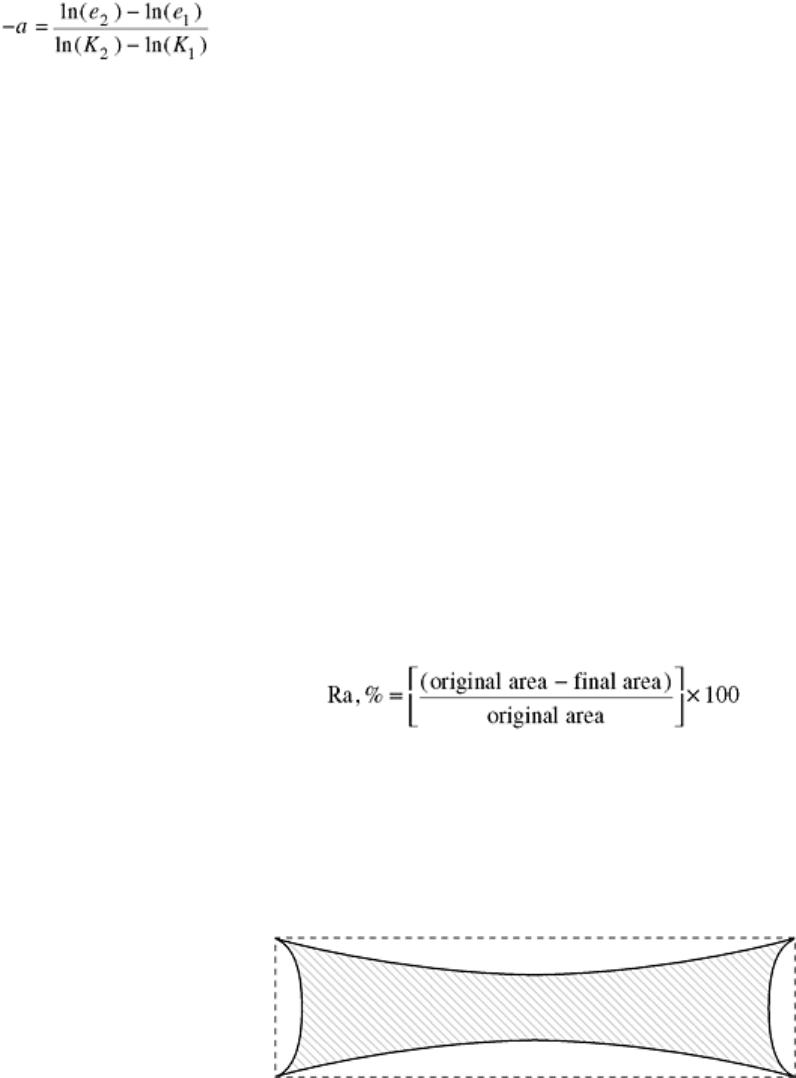
(Eq 2)
The values of the e
0
and a parameters depend on the material composition, the strength, and the material
condition and are determined empirically with a best-fit line plot around data points. Reference 8 specifies
“value a = 0.4 for carbon, carbon-manganese, molybdenum, and chromium-molybdenum steels within the
tensile strength range of 275 to 585 MPa (40 to 85 ksi) and in the hot-rolled, in the hot-rolled and normalized,
or in the annealed condition, with or without tempering. Materials that have been cold reduced require the use
of a different value for a, and an appropriate value is not suggested.” Reference 8 uses a value of a = 0.127 for
annealed, austenitic stainless steels. However, Ref 8 states that “these conversions shall not be used where the
width-to-thickness ratio, w/t, of the test piece exceeds 20.” ISO 2566/1 (Ref 9) contains similar statements. In
addition to the limit of (w/t) < 20, Ref 9 also specifies that the slimness ratio shall be less than 25.
Some tension-test specifications do not contain standard test-piece geometries but require that the slimness ratio
be either 5.65 or 11.3. For a round test piece, a slimness ratio of 5.65 produces a 5-to-1 relation between the
diameter and the gage length, and a slimness ratio of 4.51 produces a 4-to-1 relation between the diameter and
gage length (which is that of the test piece in ASTM E 8).
Reduction of area is another measure of the ductility of metal. As a test piece is stretched, the cross-sectional
area decreases, and as long as the stretch is uniform, the reduction of area is proportional to the amount of
stretch or extension. However, once necking begins to occur, proportionality is no longer valid.
According to ASTM E 6, reduction of area is defined as “the difference between the original cross-sectional
area of a tension test piece and the area of its smallest cross section.” Reduction of area is usually expressed as
a percentage of the original cross-sectional area of the test piece. The smallest final cross section may be
measured at or after fracture as specified for the material under test. The reduction of area (RA) is almost
always expressed as a percentage:
Reduction of area is customarily measured only on test pieces with an initial circular cross section because the
shape of the reduced area remains circular or nearly circular throughout the test for such test pieces. With
rectangular test pieces, in contrast, the corners prevent uniform flow from occurring, and consequently, after
fracture, the shape of the reduced area is not rectangular (Fig. 17). Although a number of expressions have been
used in an attempt to describe the way to determine the reduced area, none has received general agreement.
Thus, if a test specification requires the measurement of the reduction of area of a test piece that is not circular,
the method of determining the reduced area should be agreed to prior to performing the test.
Fig. 17 Sketch of end view of rectangular test piece after fracture showing constraint at
corners indicating the difficulty of determining reduced area
References cited in this section
5. P.M. Mumford, Test Methodology and Data Analysis, Tensile Testing, P. Han, Ed., ASM International,
1992, p 55
6. “Standard Test Method for Young's Modulus, Tangent Modulus, and Chord Modulus,” E 111, ASTM
7. Making, Shaping, and Treating of Steel, 10th ed., U.S. Steel, 1985, Fig. 50-12 and 50-13
8. “Standard Test Methods and Definitions for Mechanical Testing of Steel Products,” A 370, Annex 6,
Annual Book of ASTM Standards, ASTM, Vol 1.03

9. “Conversion of Elongation Values, Part 1: Carbon and Low-Alloy Steels,” 2566/1, International
Organization for Standardization, revised 1984
Uniaxial Tension Testing
John M. (Tim) Holt, Alpha Consultants and Engineering
General Procedures
Numerous groups have developed standard methods for conducting the tension test. In the United States,
standards published by ASTM are commonly used to define tension-test procedures and parameters. Of the
various ASTM standards related to tension tests (for example, those listed in “Selected References" at the end
of this article), the most common method for tension testing of metallic materials is ASTM E 8 “Standard Test
Methods for Tension Testing of Metallic Materials” (or the version using metric units, ASTM E 8M). Standard
methods for conducting the tension test are also available from other standards organizations, such as the
Japanese Industrial Standards (JIS), the Deutsche Institut für Normung (DIN), and the International
Organization for Standardization (ISO). Other domestic technical groups in the United States have developed
standards, but in general, these are based on ASTM E 8.
With the increasing internationalization of trade, methods developed by other national standards organizations
(such as JIS, DIN, or ISO standards) are increasingly being used in the United States. Although most tension-
test standards address the same concerns, they differ in the values assigned to variables. Thus, a tension test
performed in accordance with ASTM E 8 will not necessarily have been conducted in accordance with ISO
6892 or JIS Z2241, and so on, and vice versa. Therefore, it is necessary to specify the applicable testing
standard for any test results or mechanical property data.
Unless specifically indicated otherwise, the values of all variables discussed hereafter are those related to
ASTM E 8 “Standard Test Methods for Tension Testing of Metallic Materials.” A flow diagram of the steps
involved when a tension test is conducted in accordance with ASTM E 8 is shown in Fig. 18. The test consists
of three distinct parts:
• Test-piece preparation, geometry, and material condition
• Test setup and equipment
• Test
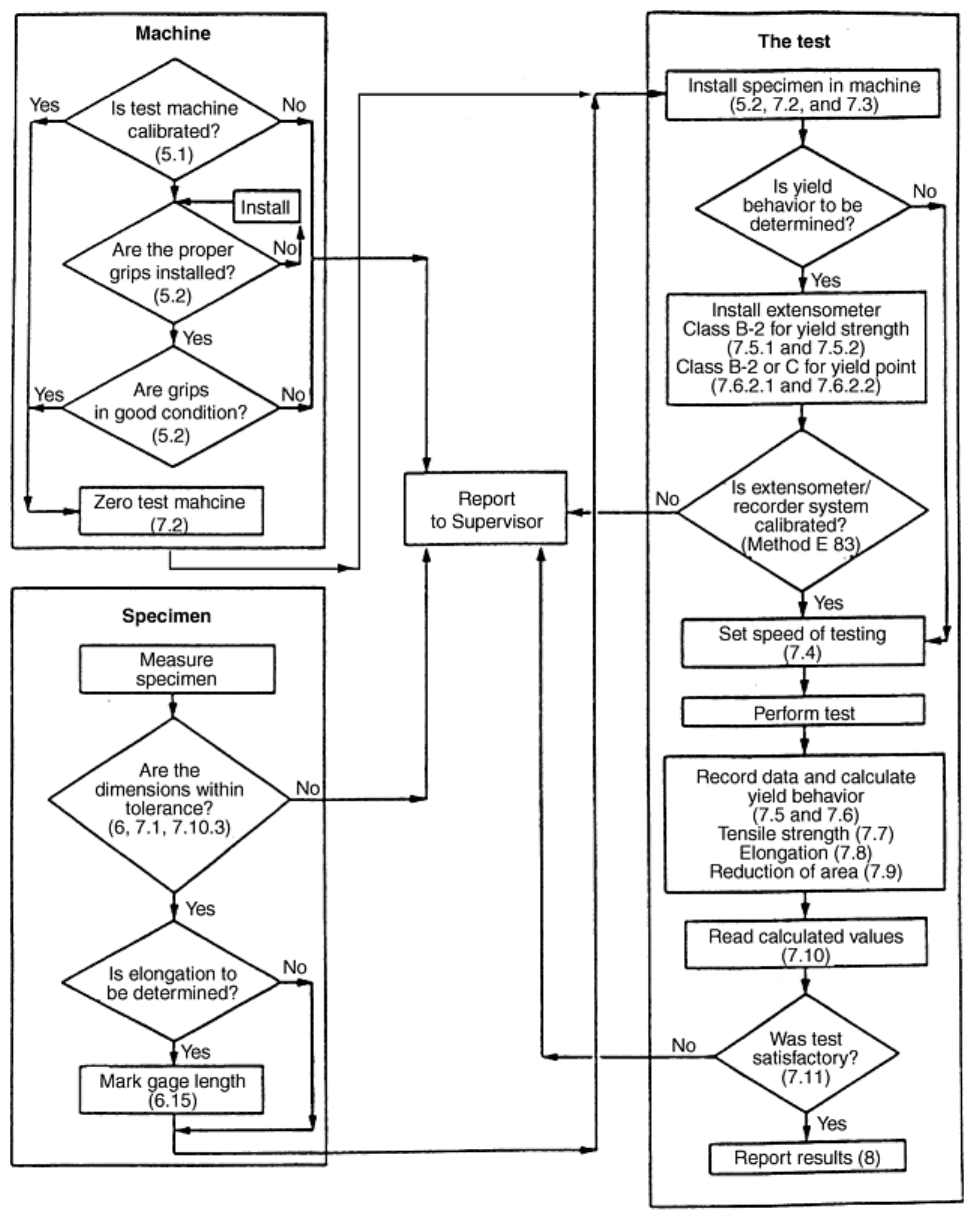
Fig. 18 General flow chart of the tension test per procedures in ASTM E 8. Relevant
paragraph numbers from ASTM E 8 are shown in parentheses.
Uniaxial Tension Testing
John M. (Tim) Holt, Alpha Consultants and Engineering
The Test Piece
The test piece is one of two basic types. Either it is a full cross section of the product form, or it is a small
portion that has been machined to specific dimensions. Full-section test pieces consist of a part of the test unit
as it is fabricated. Examples of full-section test pieces include bars, wires, and hot-rolled or extruded angles cut
to a suitable length and then gripped at the ends and tested. In contrast, a machined test piece is a representative
sample, such as one of the following:
• Test piece machined from a rough specimen taken from a coil or plate
• Test piece machined from a bar with dimensions that preclude testing a full-section test piece because a
full-section test piece exceeds the capacity of the grips or the force capacity of the available testing
machine or both
• Test piece machined from material of great monetary or technical value
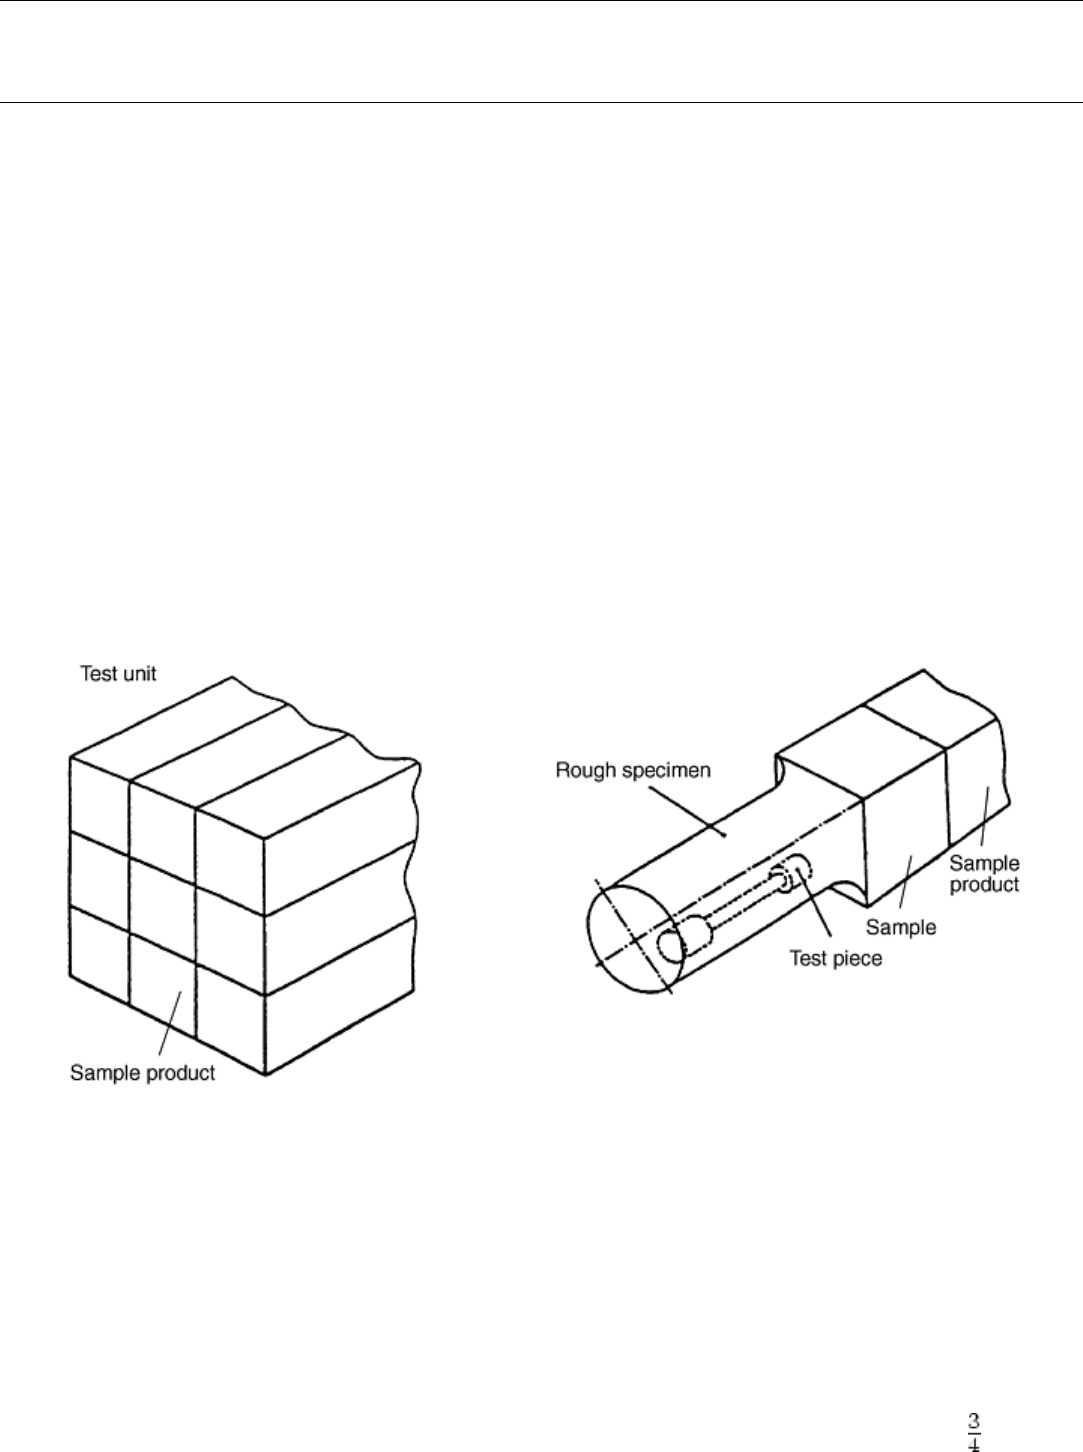
In these cases, representative samples of the material must be obtained for testing. The descriptions of the
tension test in this article proceed from the point that a rough specimen (Fig. 19) has been obtained. That is, the
rough specimen has been selected based on some criteria, usually a material specification or a test order issued
for a specific reason.
Fig. 19 Illustration of ISO terminology used to differentiate between sample, specimen,
and test piece (see text for definitions of test unit, sample product, sample, rough
specimen, and test piece). As an example, a test unit may be a 250-ton heat of steel that
has been rolled into a single thickness of plate. The sample product is thus one plate from
which a single test piece is obtained.
In this article, the term test piece is used for what is often called a specimen. This terminology is based on the
convention established by ISO Technical Committee 17, Steel in ISO 377-1, “Selection and Preparation of
Samples and Test Pieces of Wrought Steel,” where terms for a test unit, a sample product, sample, rough
specimen, and test piece are defined as follows:
• Test unit: The quantity specified in an order that requires testing (for example, 10 tons of in. bars in
random lengths)
• Sample product: Item (in the previous example, a single bar) selected from a test unit for the purpose of
obtaining the test pieces
• Sample: A sufficient quantity of material taken from the sample product for the purpose of producing
one or more test pieces. In some cases, the sample may be the sample product itself (i.e., a 2 ft length of
the sample product.
• Rough specimen: Part of the sample having undergone mechanical treatment, followed by heat treatment
where appropriate, for the purpose of producing test pieces; in the example, the sample is the rough
specimen.
• Test piece: Part of the sample or rough specimen, with specified dimensions, machined or unmachined,
brought to the required condition for submission to a given test. If a testing machine with sufficient
force capacity is available, the test piece may be the rough specimen; if sufficient capacity is not
available, or for another reason, the test piece may be machined from the rough specimen to dimensions
specified by a standard.
These terms are shown graphically in Fig. 19. As can be seen, the test piece, or what is commonly called a
specimen, is a very small part of the entire test unit.
Description of Test Material
Test-Piece Orientation . Orientation and location of a test material from a product can influence measured
tensile properties. Although modern metal-working practices, such as cross rolling, have tended to reduce the
magnitude of the variations in the tensile properties, it must not be neglected when locating the test piece within
the specimen or the sample.
Because most materials are not isotropic, test-piece orientation is defined with respect to a set of axes as shown
in Fig. 20. These terms for the orientation of the test-piece axes in Fig. 20 are based on the convention used by
ASTM E 8 “Fatigue and Fracture.” This scheme is identical to that used by the ISO Technical Committee 164
“Mechanical Testing,” although the L, T, and S axes are referred to as the X, Y, and Z axes, respectively, in the
ISO documents.
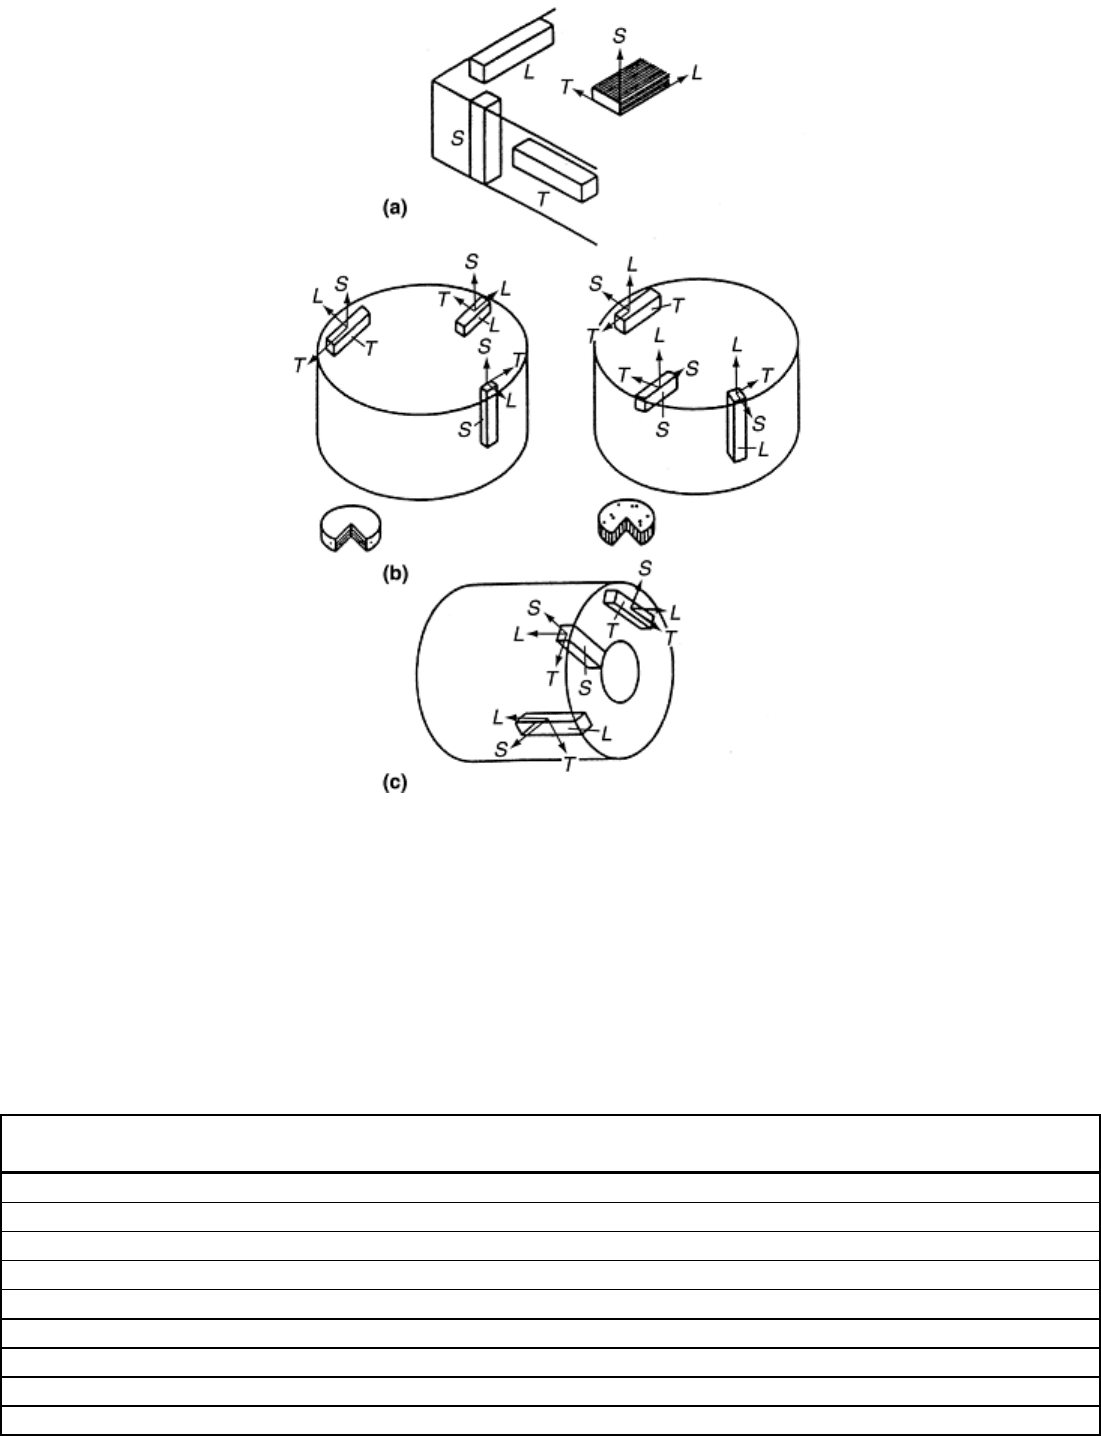
Fig. 20 System for identifying the axes of test-piece orientation in various product forms.
(a) Flat-rolled products. (b) Cylindrical sections. (c) Tubular products
When a test is being performed to determine conformance to a product standard, the product standard must state
the proper orientation of the test piece with regard to the axis of prior working, (e.g., the rolling direction of a
flat product). Because alloy systems behave differently, no general rule of thumb can be stated on how prior
working may affect the directionality of properties. As can be seen in Table 1, the longitudinal strengths of steel
are generally somewhat less than the transverse strength. However, for aluminum alloys, the opposite is
generally true.
Table 1 Effect of test-piece orientation on tensile properties
Orientation Yield strength, ksi Tensile strength, ksi Elongation in
50 mm (2 in.), %
Reduction of area, %
ASTM A 572, Grade 50 (¾in. thick plate, low sulfur level)
Longitudinal
58.8 84.0 27.0 70.2
Transverse
59.8 85.2 28.0 69.0
ASTM A 656, Grade 80 (¾in. thick plate, low sulfur level + controlled rolled)
Longitudinal
81.0 102.3 25.8 71.2
Transverse
86.9 107.9 24.5 67.1
ASTM A 5414 (¾in. thick plate, low sulfur level)
Longitudinal
114.6 121.1 19.8 70.6
Transverse
116.3 122.2 19.5 69.9
Source: Courtesy of Francis J. Marsh
