ASM Metals HandBook Vol. 8 - Mechanical Testing and Evaluation
Подождите немного. Документ загружается.

As will be highlighted throughout the discussion below, mechanical properties are highly dependent on
microstructure (e.g., grain size, phase distribution, second phase content), crystal structure type (i.e., the
arrangement of atoms), and elemental composition (e.g., alloying element content, impurity level). A common
illustration of the relationship between micro-structure and mechanical performance is the often observed
increase in yield stress with a decrease in grain size. Relationships like these between metal structure and
performance make mechanical property determination important for a wide variety of structural applications in
metal working, in failure analysis and prevention, and in materials development for advanced applications.
The following discussions are designed to briefly introduce typical relationships between metallurgical features
(such as crystal structures and microstructures) and the mechanical behavior of metals. Using basic examples,
deformation and fracture mechanisms are introduced. Typical properties measured during mechanical testing
are then related to these deformation mechanisms and the microstructures of metals.
Introduction to the Mechanical Behavior of Metals
Todd M. Osman, U.S. Steel Research; Joseph D. Rigney, General Electric Aircraft Engines
Structure of Metals
At the most basic level, metallic materials (as well as many nonmetallic ones) are typically crystalline solids,
although it is possible to produce amorphous metals (i.e., those with random atomic arrangement) in limited
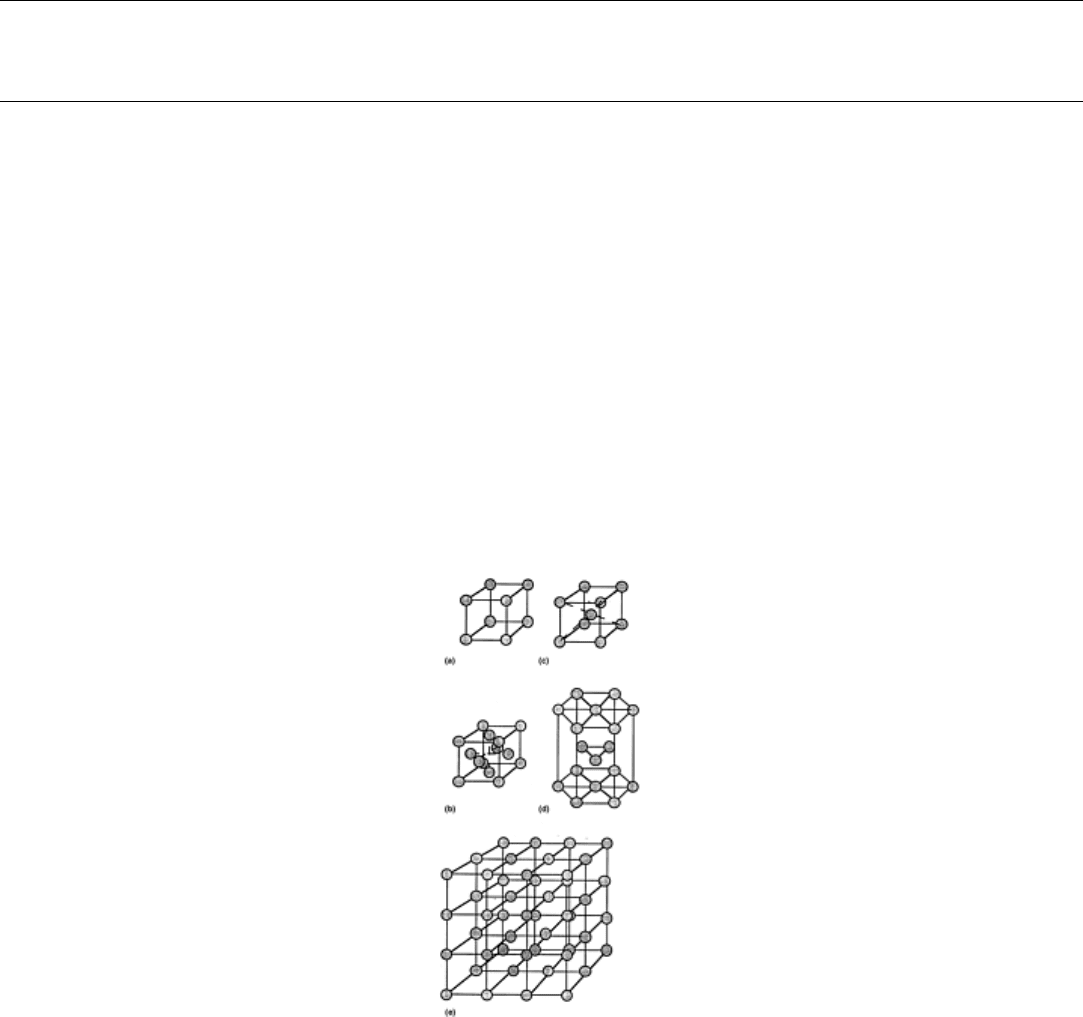
quantities. The basic building block of the crystal lattice is the unit cell, some examples of which are shown in
Fig. 2(a) through (d). By repeating this arrangement in three dimensions, a crystal lattice is formed (see Fig 2.).
Although the arrangement of atoms in space can be of fourteen different types (or Bravais lattices), most metals
have face-centered cubic (fcc) (e.g., nickel, aluminum, copper, lead), body-centered cubic (bcc) (e.g., iron,
niobium, tungsten, molybdenum), or hexagonal close-packed (hcp) (e.g., titanium, magnesium, zinc) structures
as the unit cell structure. In very specific applications, materials can be used as single crystals where an entire
component is fabricated with one spatial orientation repeating throughout. More often than not, however,
engineering materials usually contain many crystals, or grains, as shown in Fig. 3. Depending on the
composition and thermomechanical processing, these grains are typically approximately 1 to 1000 μm in size
(although finer grain sizes can be produced via other techniques). While the crystal lattice within a grain is
consistent, the crystalline orientations vary from one grain to another.
Fig. 2 Examples of crystal structures. Unit cells: (a) simple cubic, (b) face-centered cubic, (c) body-
centered cubic, and (d) hexagonal close-packed. A crystal lattice: (e) three-dimensional simple cubic
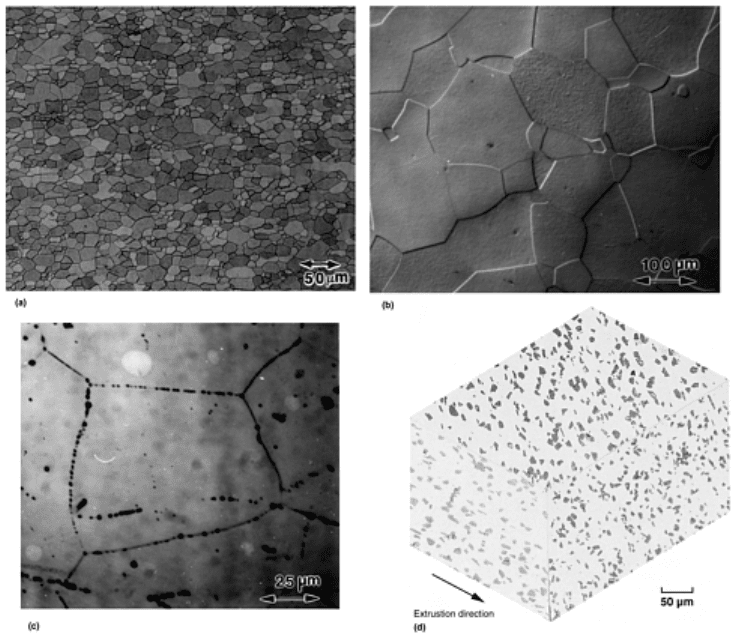
Fig. 3 Examples of metallic microstructures: (a) Grains in an ultralow-carbon steel. Courtesy of U.S.
Steel. (b) Grains in pure niobium. (c) Precipitates at grain boundaries in niobium. (d) Discontinuously
reinforced metal matrix composite (silicon carbide particles in an aluminum matrix). Source:Ref 1. Note:
the grains in a–c are highlighted through the use of a chemical etchant.
Although some nonstructural applications may require pure metals because of certain physical property
advantages, additions of alloying elements are usually made for purposes of enhancing the mechanical
properties or other material characteristics (e.g., corrosion resistance). Metal alloys may consist of over ten
different elements in specific concentrations with the purpose to optimize a variety of properties. Minor
alloying additions typically do not alter the basic crystal structure as long as the elements remain in solid
solution. At sufficiently high concentrations, other phases (either with the same or different crystallographic
forms) may precipitate within the base metal (at grain boundaries or in the grain interior) as shown in Fig. 3.
Phase diagrams are used by metallurgists and materials engineers to understand equilibrium solubility limits in
engineering alloys and predict the phases which may form during thermomechanical processing (Ref 2). As will
be discussed later, solid solution elements and precipitates/particles are often used during alloy design to
improve the strength of a metal.
Metal matrix composites can also be fabricated in which dissimilar constituents (e.g., ceramics and
intermetallics) are incorporated into the metallic microstructure in order to enhance mechanical properties. The
example microstructure in Fig. 3 shows the reinforcement material to be dispersed throughout a continuous
metallic matrix with the metal representing 50% or greater of the total volume. Although the example shows
particles as the reinforcement, these materials can be designed with whiskers, short fibers, or long fibers (e.g.,
rods or filaments). Processing of these composites typically entails thGe incorporation of the reinforcement
material into the metal using ingot metallurgy or powder metallurgy techniques (Ref 3).
To the structural engineer, or in the macroscopic view (1×), most metals appear to be continuous,
homogeneous, and isotropic. Continuity assumes that structures do not contain voids; homogeneity assumes
that the microstructure (in views at ~100–1000×) and properties will be identical in all locations; isotropic
behavior assumes that the properties are identical in all orientations. While these assumptions have been used in
continuum mechanics to study the strength of materials and structures under load, engineering materials are
often inhomogeneous and anisotropic. While it is desirable to minimize such inhomogeneities, it is often
impossible to completely eliminate them. As discussed above, microstructural evaluation typically shows that

materials are comprised of an aggregate of grains of unique crystal structure and usually have second phases
(with different properties) dispersed throughout the parent structure. Typically, materials will have variations in
grain size, second phase size and distribution, and chemical composition, especially in binary and higher-order
alloys. Fabrication route may also play a key role in affecting the preferred crystallographic orientation (or
texture) of the grains, further contributing to the inhomogeneity and anisotropy of the microstructure. As will be
shown later, all of these microstructural features can greatly influence the properties measured during
mechanical testing.
When metals are subject to an external force, the response will depend on a number of factors. The type of
loading (e.g., tension, compression, shear, or combinations thereof) is one key factor. The strain rate,
temperature, nature of loading (monotonic versus alternating fatigue stresses), and presence of notches will also
affect the deformation response of the metal. Chemical influences, such as those associated with stress-
corrosion cracking (SCC) and hydrogen embrittlement, as well as physical alterations, such as those resulting
from radiation damage, may affect the deformation behavior. Finally, the specimen size and surface preparation
can influence the response observed during mechanical testing.
All of these factors are important and will be covered in various articles contained within this Volume. For
simplicity, the remainder of this section focuses on basic examples to illustrate the relationship between the
structure of a metal and the properties measured during mechanical testing.
References cited in this section
1. T.M. Osman, J.J. Lewandowski, and W.H. Hunt, Jr., Fabrication of Particulates Reinforced Metal
Composites, ASM International, 1990, p 209
2. Alloy Phase Diagrams, Vol 3, ASM Handbook, ASM International, 1992
3. D. Hull, An Introduction to Composite Materials, Cambridge University Press, 1975
Introduction to the Mechanical Behavior of Metals
Todd M. Osman, U.S. Steel Research; Joseph D. Rigney, General Electric Aircraft Engines
Deformation of Metals
The basic principles of deformation and fracture can be described through the use of a uniaxial tension (or
tensile) test. A detailed review of tension testing is presented later in this Volume; therefore, only a brief
description is presented for the purpose of introducing deformation and fracture mechanisms in metals. In
general, tensile tests are performed on cylindrical specimens (e.g., rods) or parallel-piped specimens (e.g., sheet
and plate) as shown in Fig. 1(a). The samples are loaded uniaxially, along the length of the specimen. The
applied load and extension (or change in length) of the sample are simultaneously measured.
The load and displacement are used to calculate engineering stress (s) and engineering strain (e) using Eq 1 and
Eq 2 :
S =P/A
0
(Eq 1)
e = ΔL/L
0
= (L
i
- L
0
)/L
0
(Eq 2)
where P is the applied load, L
0
is the initial gage length, L
i
is the instantaneous gage length, A
0
is the initial gage
cross-sectional area, and ΔL is the change in length. This analysis facilitates the comparison of results obtained
when testing samples that differ in thickness or geometry. (For validity, the samples need to conform to certain
design specifications as detailed later in this Volume.) Although these engineering values are adequate, the best
measures of the response of a material to loading are the true stress (σ) and true strain (ε) determined by the
instantaneous dimensions of the tensile specimen in Eq 3and Eq 4:
σ = P/A
i
= S(1 + e)
(Eq 3)
ε = ln (L
i
/L
0
) = (1 + e)
(Eq 4)
Because the instantaneous dimensions of the specimen are not typically measured, the true stress and true strain
may be estimated using the engineering stress and engineering strain (see Eq 1and Eq 2). It is noted that these
estimations are only valid during uniform elongation (see Fig. 4) and are not applicable throughout the entire
deformation range.
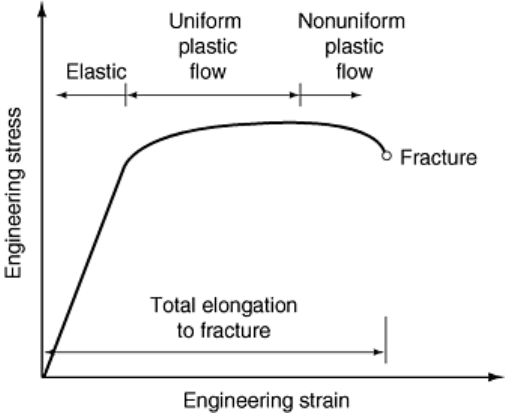
Fig. 4 Typical engineering stress-versus-engineering strain curve
Figure 4 depicts a typical engineering stress-versus-engineering strain curve produced in a uniaxial tension test.
In the initial stages of deformation, generally stress varies linearly with the strain. In this region, all deformation
is considered to be elastic because the sample will return to its original shape (i.e., dimensions) when the
applied stress is removed. If, however, the sample is not unloaded and deformation continues, the stress-versus-
strain curve becomes nonlinear. At this point, plastic deformation begins, causing a permanent elongation that
will not be recovered after unloading of the specimen. The stress at which a permanent deformation occurs is
called the elastic (or proportional) limit; however, an offset yield strength (e.g., 0.2% offset) is typically used to
quantify the onset of plastic deformation due to the ease and standardization of measurement. The tensile yield
strength of most alloys is on the order of 10
2
to 10
3
MPa:
• 135 to 480 MPa (20–70 ksi) for low-carbon steels
• 200 to 480 MPa (30–70 ksi) for aluminum alloys
• 1200 to 1650 MPa (175–240 ksi) for high-strength steels
To understand the different deformation modes, the structure of a metal must be considered. Elastic
deformation can be conceptualized by considering the bonds between individual atoms to be springs. As
mentioned above, a metal will stretch under the application of a load, but will return to its original shape after
the removal of that load if only elastic deformation occurs. Just as a spring constant relates the force to the
applied displacement (i.e., F = kx), the elastic modulus (E) relates the tensile stress to the applied tensile strain
(i.e., σ = Eε) and is simply the slope of the linear portion of the tensile stress-versus-tensile strain curve
produced in the tension test. Differences in the measured elastic moduli for different metals can therefore be
rationalized in part by the differences in the atomic bonds between the individual atoms within the crystal
lattice.
Plastic deformation results in a permanent change of shape, meaning that after the load is removed, the metal
will not return to its original dimensions. This implies a permanent displacement of atoms within the crystal
lattice. If a perfect crystal is assumed, this deformation could only occur by breaking all of the bonds at once
between two planes of atoms and then sliding one row (or plane) of atoms over another. Based on calculations
using the theoretical bond strengths, this process would result in yield strengths on the order of 10
4
to 10
5
MPa.
These strengths are much greater than those typically observed in actual metals (10
2
MPa); therefore,
deformation must occur via a different method.
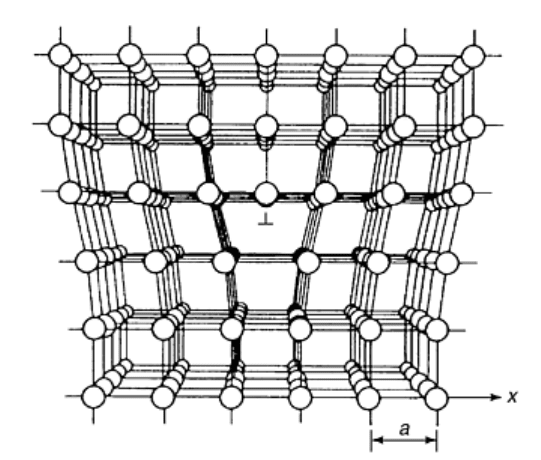
Even under the most ideal crystal growth conditions, metals are not crystallographically perfect, as shown in
Fig. 2. Instead, the lattice may contain many imperfections. One such imperfection is an edge dislocation,
which, for simple cubic structures, can be considered to be the extra half plane of atoms shown schematically in
Fig. 5. Regions surrounding the dislocation may be a perfect array of atoms; however, the core of the
dislocation is shown as a localized distortion of the crystal lattice. While it may appear that this structure is
unfavorable, dislocations are necessary in metals. For example, at grain boundaries, dislocations are
“geometrically necessary” to allow the individual grains of different orientations to match.
Fig. 5 Schematic of an edge dislocation
The nature and quantity of the dislocations become an integral aspect of plastic deformation. There are two
generic types of dislocations, edge and screw, which are primarily differentiated by the manner in which each
may traverse through the metallic crystal (Ref 4). It is noted that dislocations of mixed character (i.e., partially
edge and partially screw) are most commonly observed. In general, both types of dislocations entail the
stepwise movement of the dislocation across the crystal lattice as opposed to the displacement of an entire plane
over another. This means that only one set of bonds is broken at a time as opposed to an entire plane. Motion
now occurs on a distinct set of slip systems, which are combinations of planes—denoted as {uvw} or (uvw)—
and directions—denoted as 〈hkl〉 or [hkl]—based on the closest packing of atoms within the crystal structure
(see Fig. 6 for an example of crystallographic planes and directions) (Ref 5). For example, motion will
predominantly occur on {111}〈110〉 slip systems in fcc metals and on {110}〈111〉, {112}〈111〉, or
{123}〈111〉 slip systems in bcc metals. As a result, differences in the plastic behavior of a given type of
metal (e.g., aluminum-killed versus fully stabilized steels) can in part be rationalized by which slip systems are
active during deformation. Likewise, differences in the properties between different metal types (e.g., bcc iron
versus fcc aluminum versus hcp titanium) can be related to the active slip systems in each metal and the relative
ease with which dislocations can move within the slip systems.
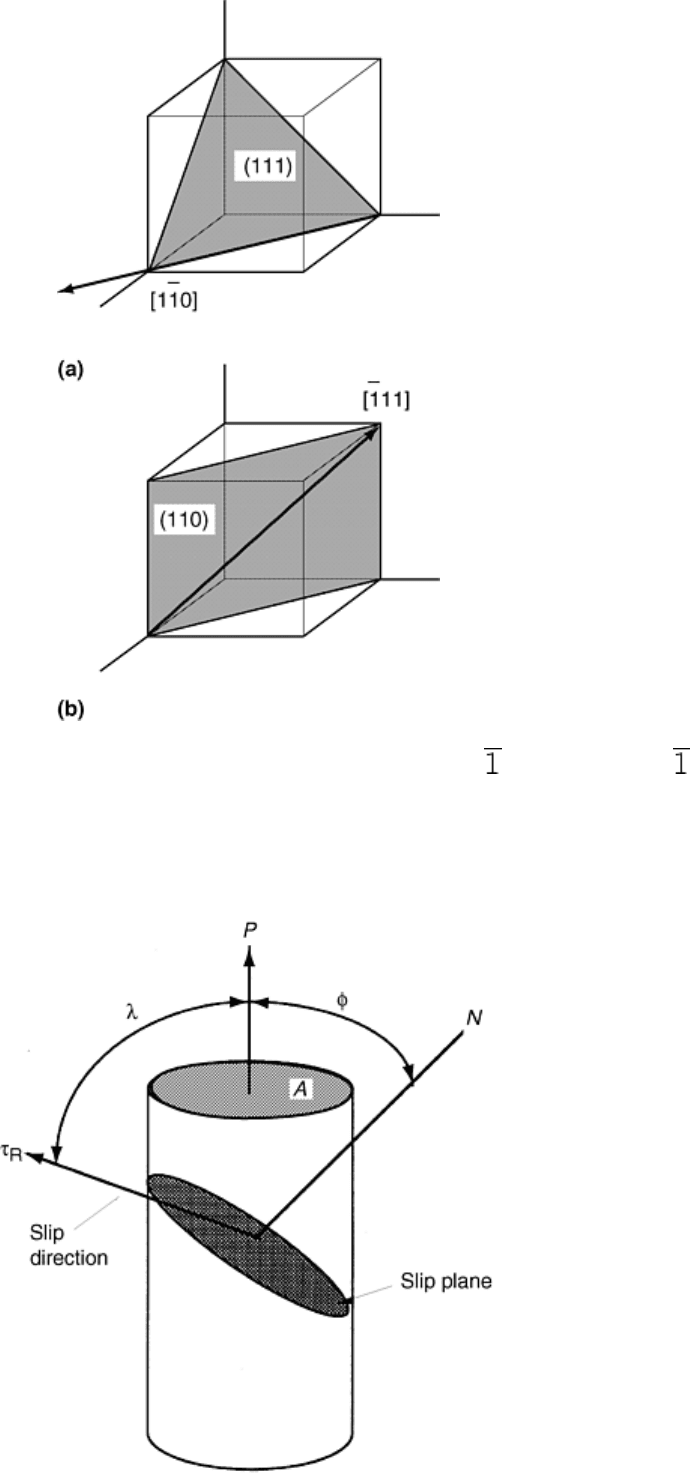
Fig. 6 Examples of crystallographic planes and directions. (a) (111)[1 0] and (b) (110) ( 11)
Motion within a slip system is governed by the critical resolved shear strength (τ
CRSS
). As shown schematically
in Fig. 7 for a single crystal, the attainment of τ
CRSS
on a given slip system is related to the geometric
relationship between the applied load and the slip system. This relationship is described mathematically by
Schmid's law.
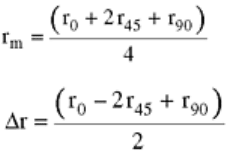
Fig. 7 Schmid's law. τ
R
= (P/A) COS φ COS λ. Note: plastic flow on a given slip system will initiate when
τ
R
> τ
CRSS
In polycrystalline metals, plastic flow typically does not occur at a constant stress. In contrast, an increased
stress must be applied to produce additional deformation, as shown in Fig 4. This trend can be rationalized by
considering the motion, interaction, and multiplication of dislocations. As plastic flow continues, the number of
dislocations increases, typically in a parabolic fashion (Ref 6). These dislocations begin to interact with each
other and with interfaces such as grain boundaries. When a dislocation encounters a grain boundary, motion is
usually halted. Although direct transmission to the neighboring grain may occur (Ref 7, 8, 9), more typically
dislocations start to build up at the grain boundary and dislocation tangles may be created. As this buildup
continues, a back stress develops that opposes the motion of additional dislocations, giving rise to work
hardening (i.e., the increase in strength with straining shown in Fig. 4) (Ref 7).
Typically, the work hardening of a metal is calculated by assuming a parabolic fit to the true stress-versus-true
strain data as suggested by Eq 5:
σ = Kε
n
(Eq 5)
where K is the strength coefficient and n is the strain-hardening exponent. The true stress and true strain
measured (or calculated from Eq 1Eq 2Eq 3 Eq 4) can be used to determine the strain-hardening exponent (n-
value). This exponent is simply the slope calculated after plotting the logarithm of true stress versus the
logarithm of true strain:
log σ = n log ε + log K
(Eq 6)
As will be discussed later in this Volume, the value of the strain-hardening exponent becomes important when
predicting the response of metals to straining during primary metalworking as well as forming operations for
final components.
As shown in Fig. 4, there is a point in the stress-versus-strain curve where the work hardening can no longer
compensate for the increase in local stress arising from the reduced cross-sectional area. At this point,
nonuniform plastic flow occurs in which deformation is concentrated in one region, called a neck. Necking in
the tensile specimen usually coincides with the maximum stress (i.e., the ultimate tensile strength) in an
engineering stress-versus-engineering strain curve.
Figure 7 introduces the influence of crystallographic orientation on the deformation of single crystals. Although
this relationship becomes more complex in polycrystalline metals, the deformation will still depend on the
orientation of the load with respect to the active slip systems. For example, the tensile properties of a highly
oriented (i.e., textured anisotropic) metallic sheet product will be different when measured parallel
(longitudinal), normal (transverse), or at 45° (diagonal) to the rolling direction. The variation in plastic
deformation in different orientations can be defined in terms of Lankford values (Ref 10). The individual
Lankford values in Eq 7are calculated using strains measured in a tensile test:
r = ε
w
/ε
t
= -ε
w
/(ε
l
+ ε
w
)
(Eq 7)
where ε
w
, ε
t
, and ε
l
are width, thickness, and longitudinal true strains measured from a parallel-sided tensile
specimen, respectively. The mean plastic anisotropy (r
m
) and normal plastic anisotropy (Δr) can be calculated
using Eq 8and Eq 9, respectively:
(Eq 8)
(Eq 9)
where r
0
, r
45
, and r
90
are the r-values calculated from sheet tensile specimens oriented at 0° (parallel), 45°
(diagonal), and 90° (normal) to the rolling direction, respectively. As may be expected, Lankford values depend
on the crystal structure. Figure 8 relates the calculated Lankford values with crystallographic texture for a low-
carbon steel as measured using X-ray diffraction techniques, further highlighting the influence of metallic
structure on mechanical behavior.
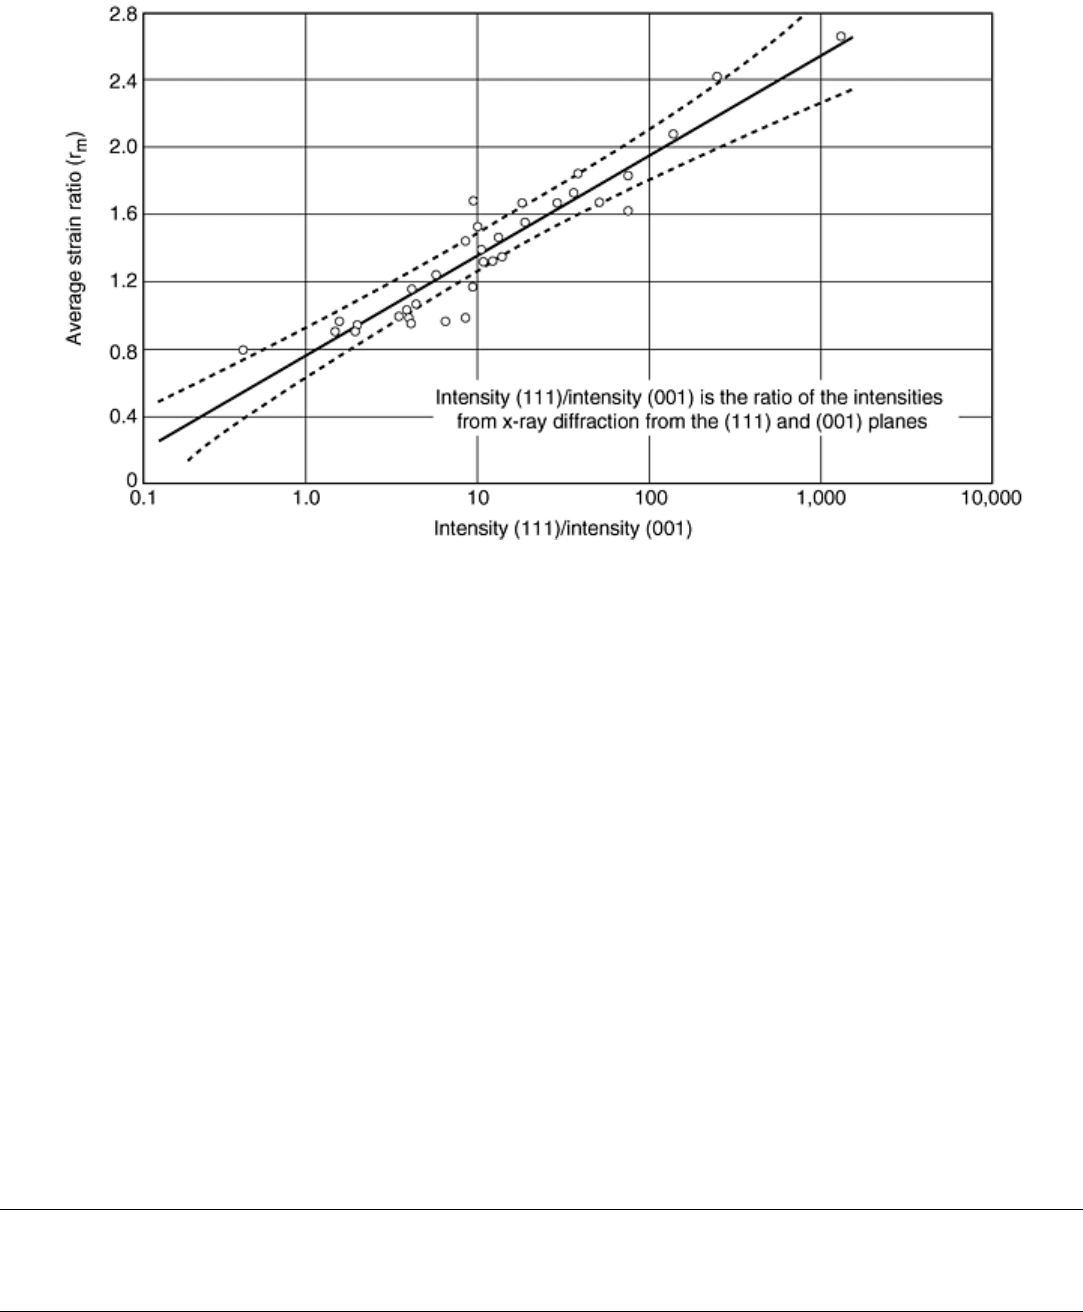
Fig. 8 Relationship between average (mean) plastic strain ratio (r
m
) and crystallographic texture.
Source: Ref 11
References cited in this section
4. R.W.K. Honeycombe, The Plastic Deformation of Metals, 2nd ed., Edward Arnold, London, 1984
5. D. Hull and D.J. Bacon, Introduction to Dislocations, Pergamon Press, London, 1984
6. A.S. Keh, Direct Observations of Imperfections in Crystals, J.B. Newbrick and J.H. Wernick, Ed.,
Interscience Publishers, New York, 1962, p 213–238
7. A.N. Stroh, Proc. R. Soc. (London), Vol 223, 1954, p 404
8. Z. Shen, R.H. Wagoner, and W.A.T. Clark, Acta Metall., Vol 36, 1988, p 3231
9. T.C. Lee, I.M. Robertson, and H.K. Birnbaum, Metall. Trans. A, Vol 21, 1990, p 2437
10. W.T. Lankford, S.C. Snyder, and J.A. Bauscher, Trans. ASM, Vol 42, 1950, p 1197–1228
11. J.F. Held, Proc. Mechanical Working and Steel Processing Conference, Vol 4, AIME, New York, 1965,
p 3
Introduction to the Mechanical Behavior of Metals
Todd M. Osman, U.S. Steel Research; Joseph D. Rigney, General Electric Aircraft Engines
Strength of Metals
Thus far, the mechanical properties of crystalline metals have been discussed only in relationship to the crystal
lattice. Because most metals are comprised of many grains (see Fig. 2), properties such as yield strength and
ductility (i.e., elongation to fracture) are also highly dependent on the microstructure. Once again, the influence
of both of these factors can be rationalized by considering the motion of dislocations. The strength of a metal is
related to the ease, or conversely the difficulty, of dislocation motion. If dislocation motion is uninhibited (i.e.,
motion is initiated easily and continues without hindrance), the strength will be low and relatively little work
hardening will occur. In contrast, the presence of obstacles, or barriers, within the microstructure slow
dislocation motion, resulting in an increase in strength.
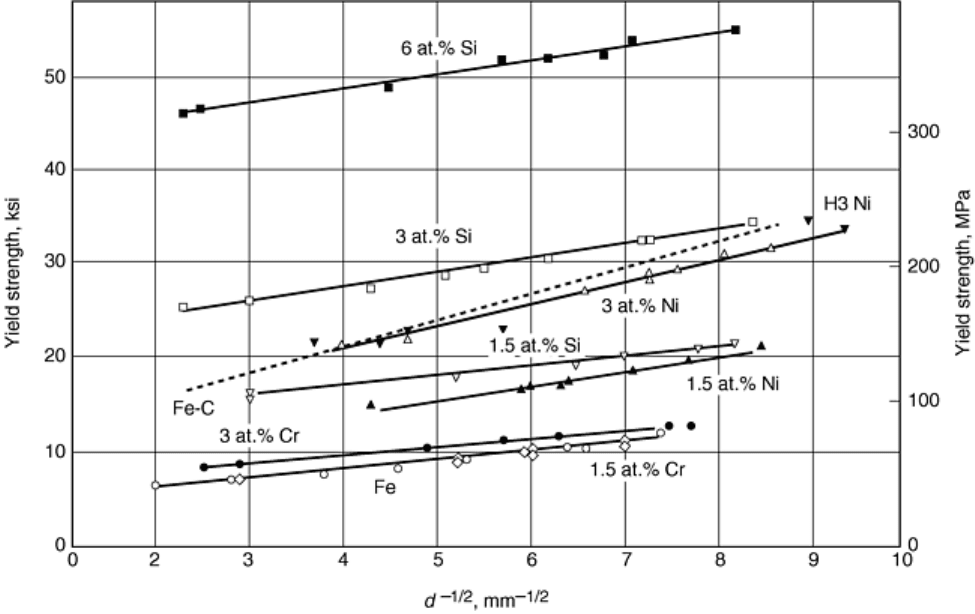
Grain boundaries provide an obstacle to dislocation motion. As the grain size is decreased, the strength (σ) of
the metal typically increases according to the Hall-Petch relationship given in Eq 10 and illustrated in Fig. 9
(Ref 12, 13):
σ = σ
0
+ kd
-1/2
(Eq 10)
where σ
0
is the intrinsic strength of the metal, k is a coefficient, and d is the grain diameter. At small grain sizes,
there is a larger probability of dislocation-dislocation interactions (e.g., dislocation “pile-up” at the grain
boundaries), leading to a larger resistance to dislocation motion. As the grain size increases, the opposition to
dislocation motion, due to back stresses associated with dislocation tangles at grain boundaries, lessens due to
the larger distances between grain boundaries. Therefore, the lower strength of a large-grained metal when
compared to a small-grained metal can be rationalized by a decrease in the resistance to dislocation motion.
Fig. 9 Influence of grain size diameter (d) on yield strength for α-iron alloys. Source: Ref 12
The strength of a metal will also be related to the impurity content. Sometimes elements are intentionally added
to metals, such as adding nickel to copper or phosphorus to steel. Other times, the presence of impurities, such
as inclusions (e.g., oxides) in copper or solute carbon in steel, may be undesired. In order to rationalize these
statements, the effect of each on plastic flow in metals needs to be considered. Figure 10 schematically
illustrates two scenarios for incorporating atoms into a metallic matrix. Substitutional atoms (see Fig. 10a) take
the place of matrix atoms. Because of the mismatch in atomic size between the substitutional atom and the
matrix atom, the lattice may become locally strained. This lattice strain may impede dislocation motion and is
conventionally considered to be the source of solid solution strengthening in metals. In general, the
strengthening increment varies proportionally with the mismatch in atomic size and properties (specifically
modulus) between the solute and solvent atoms, as shown in Fig. 11 (Ref 14).
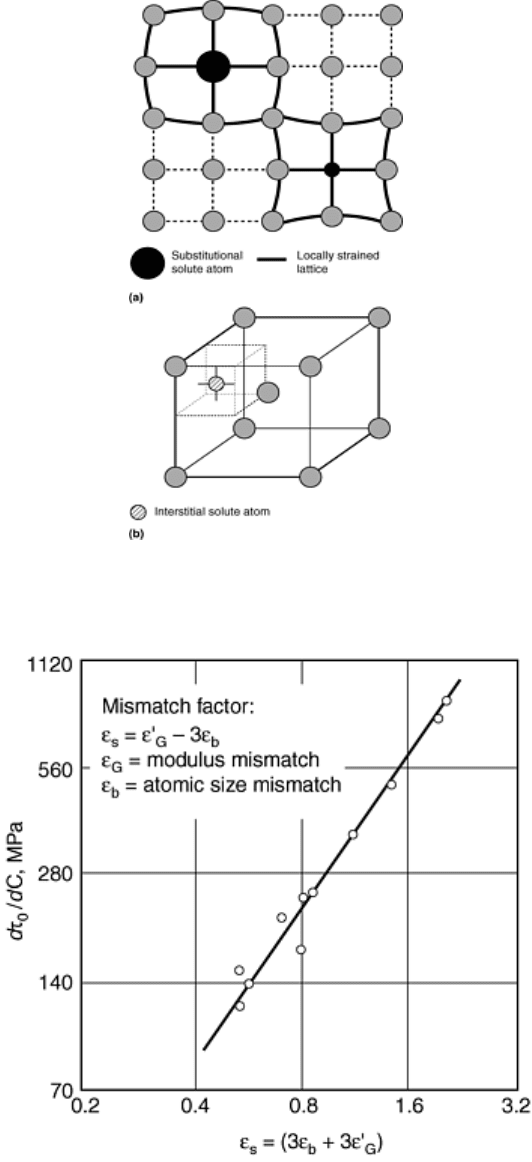
Fig. 10 Two scenarios of incorporating atoms into a metal matrix. (a) Substitutional atoms and (b) an
interstitial atom in a body-centered cubic unit cell
Fig. 11 Relationship between mismatch factor and strengthening increment (Δτ
0
/ΔC) for solute atoms in
copper alloys. Source: Ref 14
Interstitial atoms can also be present within the metal (see Fig. 10b). In this case, the atom is much smaller than
the matrix atoms and is located in the gaps (or interstices) in the crystal lattice. Most often, interstitial atoms
can diffuse to the dislocation core (see Fig. 5) due to the more open structure and the local tensile stresses in
this region of the crystal lattice. The presence of the interstitial can inhibit dislocation motion, leading to
dislocation “locking.” This locking necessitates larger applied stresses to produce dislocation motion and
further plastic deformation (Ref 15). In the classic example of carbon in iron, such a mechanism can result in
discontinuous yielding as shown in Fig. 12. Deformation is not continuous, and a sharp upper yield point is
typically observed followed by yielding at a constant stress. The serrations in the stress-versus-strain curve in
