ASM Metals HandBook Vol. 8 - Mechanical Testing and Evaluation
Подождите немного. Документ загружается.

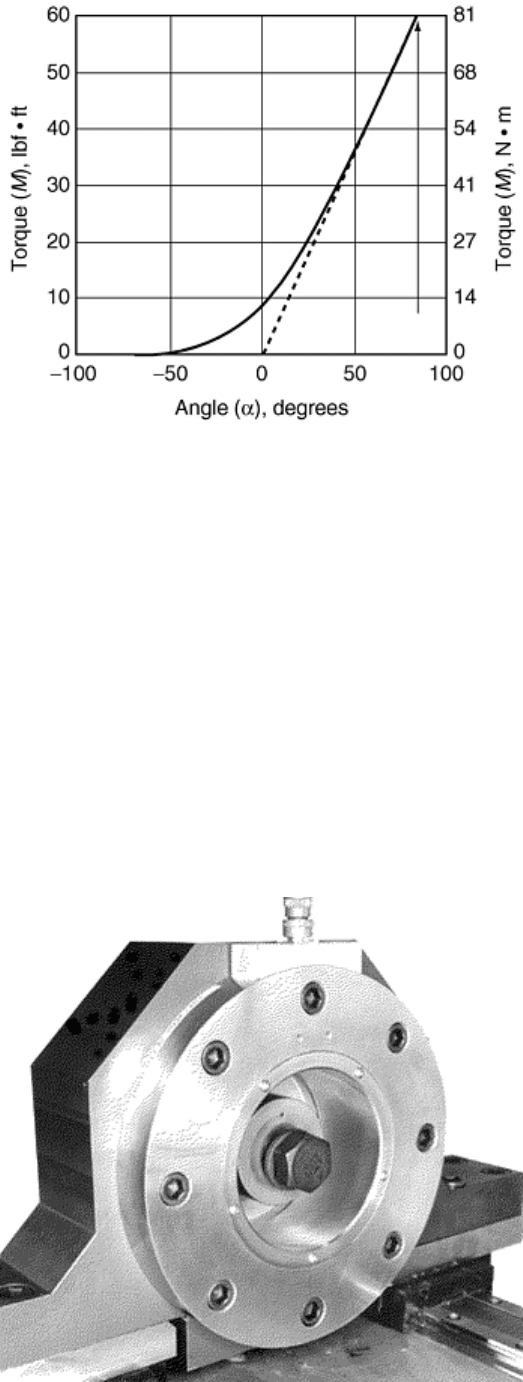
Fig. 3 Location of elastic origin using torque vs. angle signature
Thread and Underhead Friction Measurements
Whereas fastener engineering analysis of threaded fasteners must consider material strength, surface finishes,
plating, and coatings to ensure reliable performance, for predictable and repeatable assemblies it is also
necessary to understand, measure, and control the frictional characteristics in both the thread and underhead
regions. This is particularly true when developing fastener-locking devices such as locknuts, serrated
underheads, special thread forms, and thread-locking adhesives and friction patches. Achieving a specific clamp
force during installation is always the desired result, and the roles of thread friction and underhead friction must
be analyzed and understood to ensure joint integrity.
To determine both thread friction and underhead friction, measurements are taken using a torque-tension
research head, as shown in Fig. 4. This device is a special load cell designed to simultaneously measure both
thread torque and clamp load. When used with torque sensors that measure the input torque, it is possible to
determine the underhead friction torque and the thread friction torque. With this measurement equipment, the
fastener can then be tested to establish and maintain standards for friction performance.
Fig. 4 Torque-tension research head, 800 kN capacity
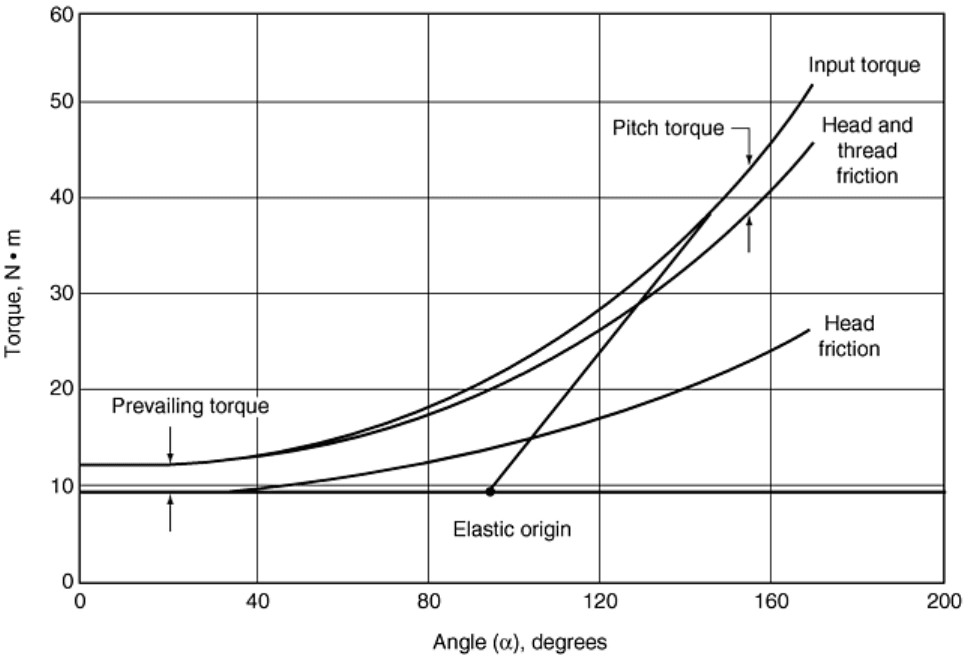
For example, in the test plot illustrated in Fig. 5, a locknut is initially driven onto a bolt. The thread friction
torque is equal to the input torque until contact with the underhead-bearing surface is made. Once contact is
made with the underhead area, the underhead friction torque is measured as the difference between the total
input torque and the thread torque. As clamp force is developed, the pitch torque is calculated and subtracted
from the thread torque to compute the thread-friction torque. Note that for prevailing torque locknuts, the elastic
origin is located at the prevailing torque level as shown in Fig. 5, not at the zero torque level used for fasteners
without prevailing torque characteristics.
Fig. 5 Determining friction forces for prevailing torque locknut
Considerations in Testing
There are a number of factors that can affect the tension created in a bolt when torque is applied. Depending on
the fastener and joint configuration, direct measurement of tension is not always practical or even possible by
any means. Fortunately, torque and angle measurements can be taken for most bolted joints and then analyzed
to assist in determination of important characteristics and properties related to strength and reliability.
When tightening a threaded fastener, it is almost always important to know both how much torque is applied
and how far the fastener is turned. Similarly, it is always important to fully understand how friction affects the
relationship of torque, angle, and tension.
To ensure that critical joints are tightened properly, it must be kept in mind that it is the control of tension that
is most important, not the control of torque. This fact must always be considered when choosing and setting up
tools, when monitoring production, and when performing quality control audits. The fastener-tightening process
is dependent upon the energy transfer from the tightening tool into the fastener and bolted joint. The integrated
area under the torque-angle signature curve is a measure of the energy absorbed by the assembly.
The purpose of this chapter is to review basic methods and fundamental principles for mechanical testing of
threaded fasteners and bolted joints. All fastener engineering applications must start with the assumption of the
magnitude of the service loads to which a fastener or assembly will be subjected. Where the service load
information is incomplete, the engineer responsible for the design or testing should always at least document
assumed loading conditions for analysis and testing. Such assumptions can often be used to great advantage
when, in the future, more precise service load information is obtained.

Mechanical Testing of Threaded Fasteners and Bolted Joints
Ralph S. Shoberg, RS Technologies, Ltd.
Standard Test Methods for Determining Materials Properties of Fasteners
The materials properties of the fastener must be known before a more detailed analysis of the bolted joint is
possible. Many standards exist for the testing of fasteners. ASTM F 606M, a specification developed through
the procedures of ASTM for metric fasteners, is considered to be one of the most complete. The corresponding
standard for English threaded fasteners is ASTM F606. More complete descriptions of the methods can be
found in the standard. The text following in this section is a summary of the basic test methods according to
ASTM F 606M.
The test methods described in ASTM F 606M establish procedures for conducting mechanical tests to
determine the materials properties of externally and internally threaded fasteners. For externally threaded
fasteners, the following test methods are described:
• Product hardness
• Proof load by length measurement, yield strength, or uniform hardness
• Axial tension testing of full-sized products
• Wedge tension testing of full-sized products
• Tension testing of machined test specimens
• Total extension at fracture testing
For internally threaded fasteners, the following test methods are described:
• Product hardness
• Proof load
• Cone proof-load test
Test methods are also provided in the standard for washers and rivets. This article concentrates on the portions
applicable to threaded fasteners.
Test Methods for Externally Threaded Fasteners
Product Hardness. The hardness of fasteners and studs can be determined on the ends, wrench flats, or
unthreaded shanks after removal of any oxide, decarburization, plating, or other coating material. Rockwell or
Vickers hardness standards may be used at the option of the manufacturer. Hardness is determined at midradius
of a transverse section of the product taken at a distance of one diameter from the point end of the product. The
reported hardness is the average of four hardness readings located at 90° to one another. Acceptable alternative
methods of determining hardness for bolts are either at midradius, one diameter from the end, or on the side of
the head of a hex-head or square-head product of all property classes after adequate preparation to remove any
decarburization.
Tension Tests. Fasteners and studs should be tested at full-size and to a minimum ultimate load in kilonewtons
(kN) or stress in megapascals (MPa). Such testing includes proof-load tests (by length measurement, yield
strength, or uniform hardness), axial tension tests, wedge tension tests, and total extension-at-fracture tests.
Proof-Load Tests. The basic proof-load test consists of stressing the product with a specified load that the
product must withstand without any measurable permanent set and evaluating the fastener in terms of any
change in length. Alternative tests to determine the ability of a fastener to pass the proof-load test are the yield-
strength test and the uniform hardness test. Although any of the alternative test methods described may be used,
the proof-load test is the arbitration method used in case of any dispute.
Method 1, Length Measurement. The overall length of the specimen is measured at its true centerline with an
instrument capable of measuring changes in length of 0.0025 mm with an accuracy of 0.0025 mm in any 0.025
mm range. Measuring the length between conical centers on the centerline of the fastener or stud with mating
centers on the measuring anvils is preferred. The head or body of the fastener or stud should be marked so that
it can be placed in the same position for all measurements.
The product is assembled in the fixture of the tension-testing machine so that six complete threads are exposed
between the grips. Tests for heavy hex structural bolts are based on four threads. This is obtained by freely
running the nut or fixture to the thread runout of the specimen and then unscrewing the specimen six full turns.
For continuous threaded fasteners, at least six full threads should be exposed. The fastener should be loaded
axially to the proof load specified in the product specification. The speed of testing, as determined with a free-
running cross head, should not exceed 3 mm/min, and the proof load should be maintained for a period of 10 s
before releasing the load. Upon release of this load, the length of the fastener or stud should be measured again
to determine permanent elongation. A tolerance (for measurement error only) of ±0.013 mm is allowed between
the measurements made before loading and that made after loading.
Variables, such as straightness, thread alignment, or measurement error, could result in apparent elongation of
the product when the specified proof load is initially applied. In such cases, the product may be retested using a
3% greater load and is considered acceptable if there is no difference in the length measurement after this
loading within a 0.013 mm measurement tolerance as outlined.
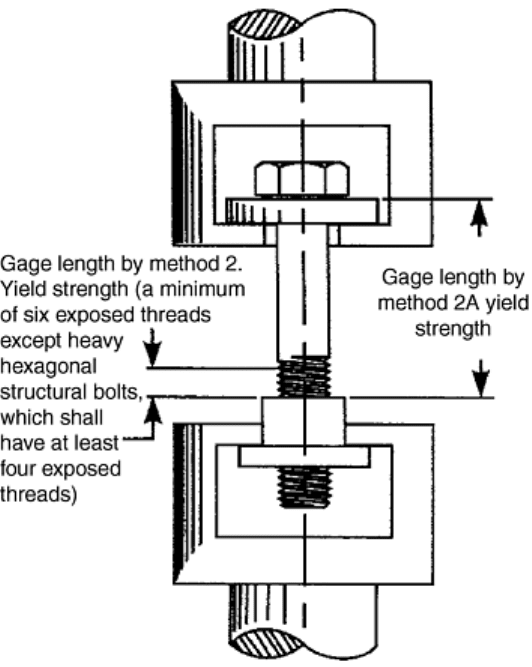
Method 2, Yield Strength. The product is assembled in the testing equipment as described for method 1. As the
load is applied, the total elongation of the product or any part of it that includes the exposed threads should be
measured and recorded to produce a load-elongation diagram. The load or stress at an offset equal to 0.2% of
the length of fastener occupied by six full threads is determined, as shown in Fig. 6.
Fig. 6 Tension testing of full-size fastener (typical set-up). Source: Ref 1
Method 2A, Yield Strength for Austenitic Stainless Steel and Nonferrous Materials. The product is assembled
in the testing equipment as described in method 1. As the load is applied, the total elongation of the product
should be measured and recorded in order to produce a load-elongation diagram. The load or stress at an offset
equal to 0.2% strain should be determined based on the length of the bolt between the holders as shown in Fig.
6, which will be subject to elongation under load by using the yield-strength method described in the section
“Tension Testing of Machined Test Specimens.”
Method 3, Uniform Hardness. The fasteners are tested for hardness as described previously, and in addition, the
hardness is determined in the core. The difference between the midradius and core hardness should be not more
than three points on a Rockwell C scale, and both readings must be within product specification.
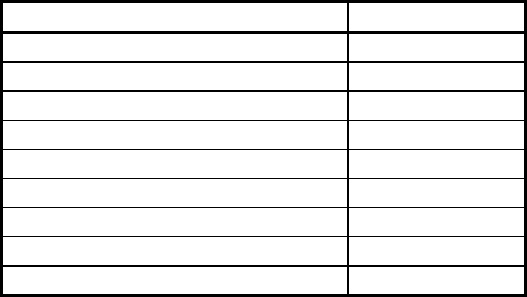
Short Fasteners and Studs. Fasteners with lengths less than those shown in Table 1, or that do not have
sufficient threads for proper engagement, are deemed too short for tension testing. Acceptance is then based on
a hardness test. If tests other than product hardness are required, their requirements are referenced in the
product specification.
Table 1 Required minimum length of fasteners for tension testing
Nominal product diam (D), mm
Min length, mm
5
12
6
14
8
20
10
25
12
30
14
35
16
40
20
45
Over 20 3D
Source: Ref 1
Axial Tension Testing of Full-Sized Products. Fasteners are tested in a holder with a load axially applied
between the head and a nut or in a suitable fixture as shown in Fig. 6. Sufficient thread engagement must exist
to develop the full strength of the product. The nut or fixture should be assembled on the product, leaving six
complete fastener threads exposed between the grips. Studs are tested by assembling one end of the threaded
fixture to the thread runout. If the stud has unlike threads, the end with the finer pitch thread, or with the larger
minor diameter, is used. The other end of the stud is assembled in the threaded fixture, leaving six complete
threads exposed between the grips. For continuous studs, at least six complete threads are exposed between the
fixture ends.
The maximum speed of the free-running cross head should not exceed 25 mm/min. When reporting the tensile
strength of the product, the thread stress area is calculated as follows:
A
s
= 0.7854(D - 0.9382P)
2
(Eq 1)
where A
s
is the thread stress area, mm
2
; D is the nominal diameter of the fasteners or stud, mm; and P is thread
pitch, mm.
The product should support a load prior to fracture not less than the minimum tensile strength specified in the
product specification for its size, property class, and thread series. In addition, failure should occur in the body
or in the threaded section with no fracture at the juncture of the body and head.
Wedge Tension Testing. The wedge tensile strength of a hex or square-head fastener, socket-head cap screw, or
stud is the tensile load that the product is capable of sustaining when stressed with a wedge under the head. The
purpose of this test is to obtain the tensile strength and to demonstrate the head quality and ductility of the
product.
Wedge Tension Testing of Fasteners. The ultimate load of the fastener is determined as described previously
under “Axial Tension Testing of Full-Sized Products,” except to place a wedge under the fastener head. When
both wedge and proof-load testing are required by the product specification, the proof-load-tested fastener for
wedge testing should be used. The wedge must have a minimum hardness of 45 HRC for fasteners having an
ultimate tensile strength of 1035 MPa or less, and a minimum of 55 HRC for fasteners having a tensile strength
in excess of 1035 MPa. Additionally, the wedge should have the following:
• A thickness of one-half the nominal fastener diameter (measured at the thin side of the hole as shown in
Fig. 7)
• A minimum outside dimension such that at no time during the test will any corner loading of the head of
the product occur adjacent to the wedge
• An included angle as shown in Table 2 for the product type being tested
The hole in the wedge should have a clearance over the nominal size of the fastener and have its edges top and
bottom rounded as specified in Table 3.
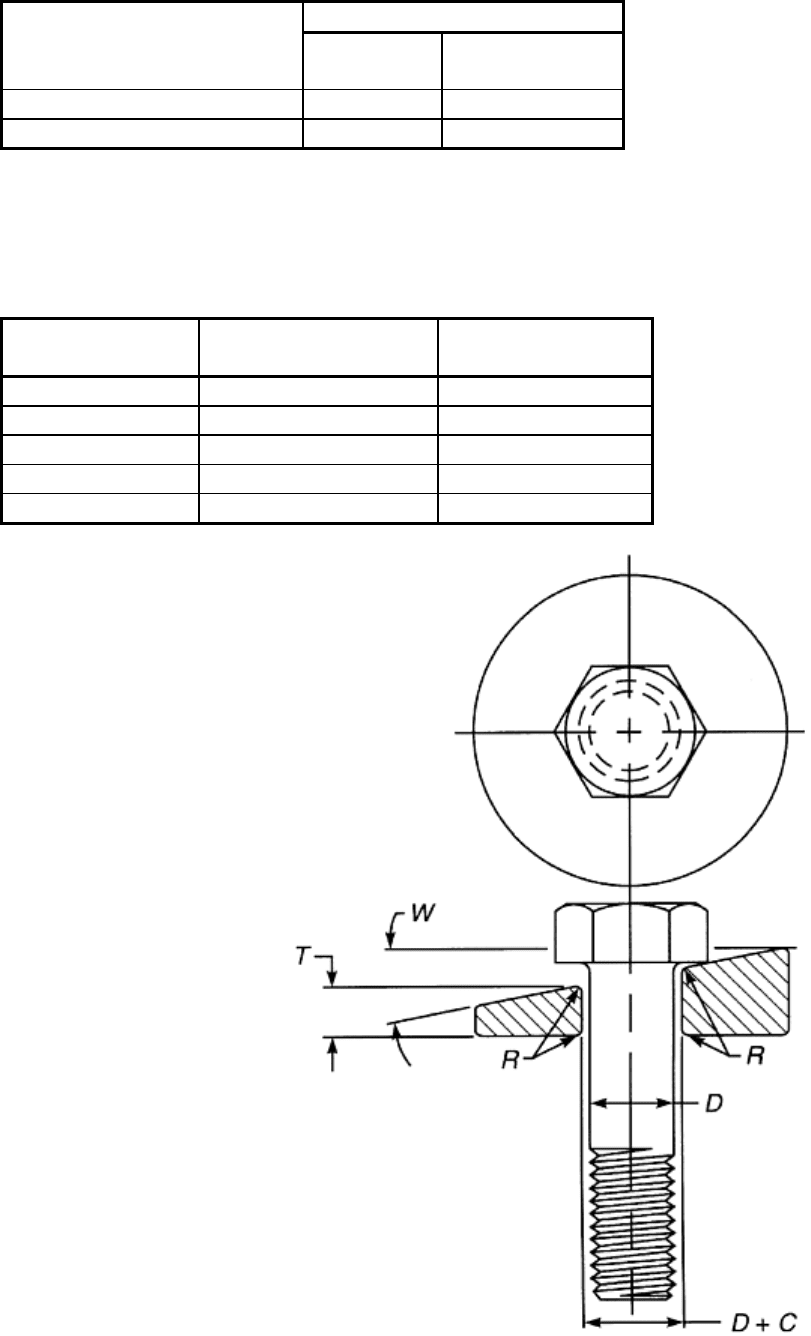
Table 2 Wedge angles for tension testing of fasteners
Degrees
Nominal productdiam, mm
Fasteners
(a)
Studs and flange
fasteners
5–24 10
6
Over 24 6 4
(a) For heat-treated fasteners that are threaded one diam or closer to the underside of the head, a wedge angle of
6° for sizes 5 to 24 mm and 4° for sizes over 24 mm should be used.
Source: ASTM F 606M
Table 3 Requirements for wedge-hole clearance and radius for tension testing of fasteners
Nominal product
diam, mm
Nominal clearance in
hole, mm
Nominal radius on
corners of hole, mm
To 6 0.50
0.70
Over 6–12 0.80
0.80
Over 12–20 1.60
1.30
Over 20–36 3.20
1.60
Over 36 3.20 3.20
Source: ASTM F 606M
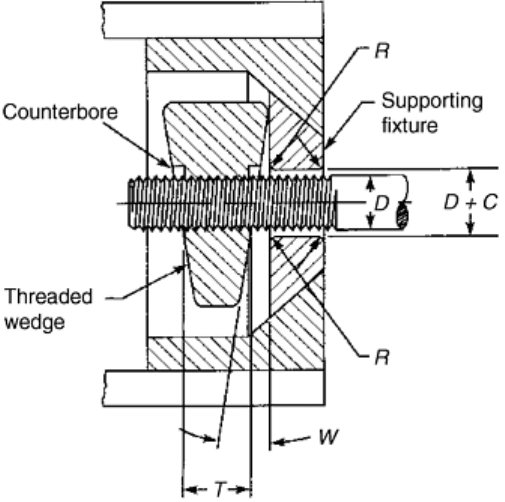
Fig. 7 Wedge-test details for fasteners. D, diameter of bolt; C, clearance of wedge hole; R, radius; T,
thickness of wedge at short side hole; W, wedge angle
The fastener is then tension tested to failure. The fastener must support a load prior to fracture not less than the
minimum tensile strength specified in the product specification for the applicable size, property class, and
thread series. In addition, the fracture should occur in the body or threaded portion with no fractures at the
junction of the head and the shank.
Wedge-Tension Testing of Studs. When both wedge-tension and proof-load testing are required, one end of the
same stud previously used for proof-load testing is assembled in a threaded fixture to the thread runout. For
studs having unlike threads, the end with the finer-pitch thread or with the larger minor diameter is used. The
other end of the stud should be assembled in a threaded wedge to the runout and then unscrewed six full turns,
leaving six complete threads exposed between the grips as shown in Fig. 8. For continuous threaded studs, at
least six full threads are exposed between the fixture ends. The angle of the wedge for the stud size and
property class is as specified in Table 2.
Fig. 8 Wedge-test details for studs. D, diameter of stud; C, clearance of wedge hole; R, radius; T,
thickness of wedge at short side hole; W, wedge angle
The stud should be assembled in the testing machine and tension tested to failure, as described previously under
“Axial Tension Testing of Full-Sized Products.” The minimum hardness of the threaded wedge is 45 HRC for
products having an ultimate tensile strength of less than 1035 MPa and 55 HRC for product lines having an
ultimate tensile strength in excess of 1035 MPa. The length of the threaded section of the wedge must be equal
to at least the diameter of the stud. To facilitate removal of the broken stud, the wedge can be counterbored.
The thickness of the wedge at the thin side of the hole is equal to the diameter of the stud plus the depth of the
counterbore. The thread in the wedge should have class 4H6H tolerance, except when testing studs having an
interference fit thread, in which case the wedge will have to be threaded to provide a finger-free fit. The
supporting fixture should have a hole clearance over the nominal size of the stud, and the top and bottom edges
should be rounded or chamfered to the same limits specified for the hardened wedge in Table 3.
The stud must support a load prior to fracture of not less than the minimum tensile strength specified in the
product specification or its size, property class, and thread series.
Tension Testing of Machined Test Specimens. Where fasteners and studs cannot be tested at full-size, tests are
conducted using test specimens machined from the fastener or stud. Fasteners and studs should have their
shanks machined to the dimensions shown in Fig. 9. The reduction of the shank diameter of heat-treated
fasteners and studs with nominal diameters larger than 16 mm should not exceed 25% of the original diameter
of the product. Alternatively, fasteners 16 mm in diameter or larger may have their shanks machined to a test
specimen with the axis of the specimen located midway between the axis and outside surface of the fastener as
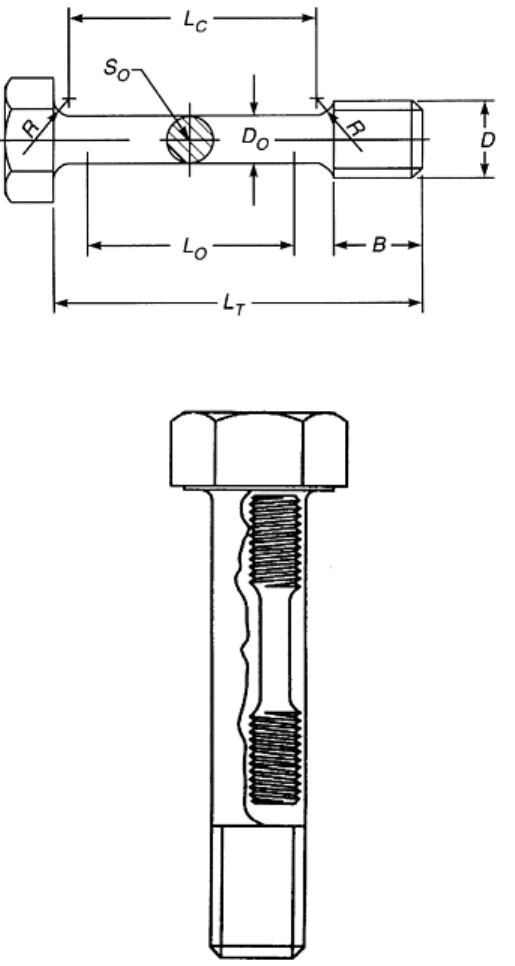
shown in Fig. 10. In either case, machined test specimens should exhibit tensile strength, yield strength (or
yield point), elongation, and reduction of area equal to or greater than the values of these properties specified
for the product size in the applicable product specification when tested in accordance with this section.
Fig. 9 Tension-test specimen with turned-down shank. Source: Ref 1
Fig. 10 Location of standard tension-test specimen when turned from large sized fastener. Source: Ref 1
Tensile Properties: Yield Point. Yield point is the first stress in a material, less than the maximum obtainable
stress, at which an increase in strain occurs without an increase in stress. Yield point is intended for application
only for materials that may exhibit the unique characteristic of showing an increase in strain without an increase
in stress. A sharp knee or discontinuity characterizes the stress-strain diagram. The yield point can be
determined by one of the following methods:
• Drop-of-the-beam or halt-of-the-pointer method: In this method, an increasing load is applied to the
specimen at a uniform rate. When a lever and poise machine is used, the beam is kept in balance by
running out the poise at an approximately steady rate. When the yield point of the material is reached,
the increase of the load will stop, but the poise should be run a small amount beyond the balance
position, and the beam of the machine will drop for a brief interval of time. When a machine equipped
with a load-indicating dial is used, there is a halt or hesitation of the load-indicating pointer, which
corresponds to the drop of the beam. The load is recorded at the drop of the beam or the halt of the
pointer. This point is the yield point of the fastener or stud.
• Autographic diagram method: When a sharp-kneed stress-strain diagram is obtained by an autographic
device, the yield point is taken as either the stress corresponding to the top of the knee, as shown in Fig.
11, or as the stress at which the curve drops, as shown in Fig. 12.
• Total extension-under-load method: When testing material for yield point, the test specimens may not
exhibit the well-defined disproportionate deformation that characterizes a yield point as measured by the
previous methods. In these cases, the following method can be used to determine a value equivalent to
the yield point in its practical significance that may be recorded as the yield point. A class C or better
extensometer is attached to the specimen. When the load producing a specified extension is reached, the
stress corresponding to the load as the yield point is recorded and the extensometer removed (Fig. 13).
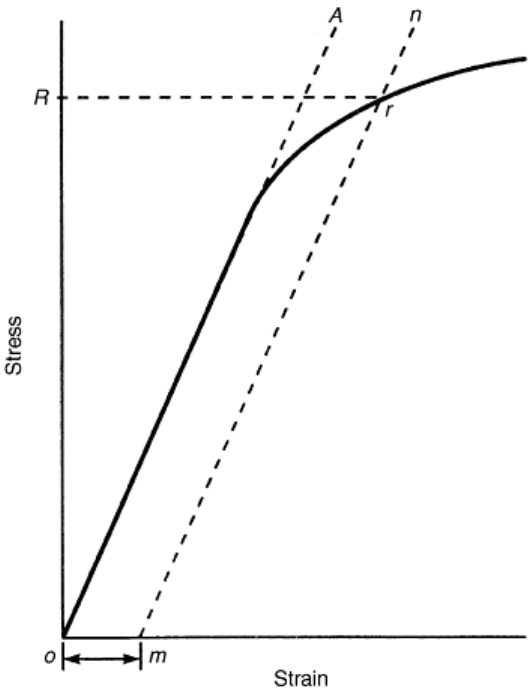
Fig. 11 Stress-strain diagram for determination of yield strength by the offset method. o-m is the
specified offset. To determine offset yield strength, draw line m-n parallel to the line o-A. From the
intersection point r, draw a horizontal line to determine the offset yield strength, R.
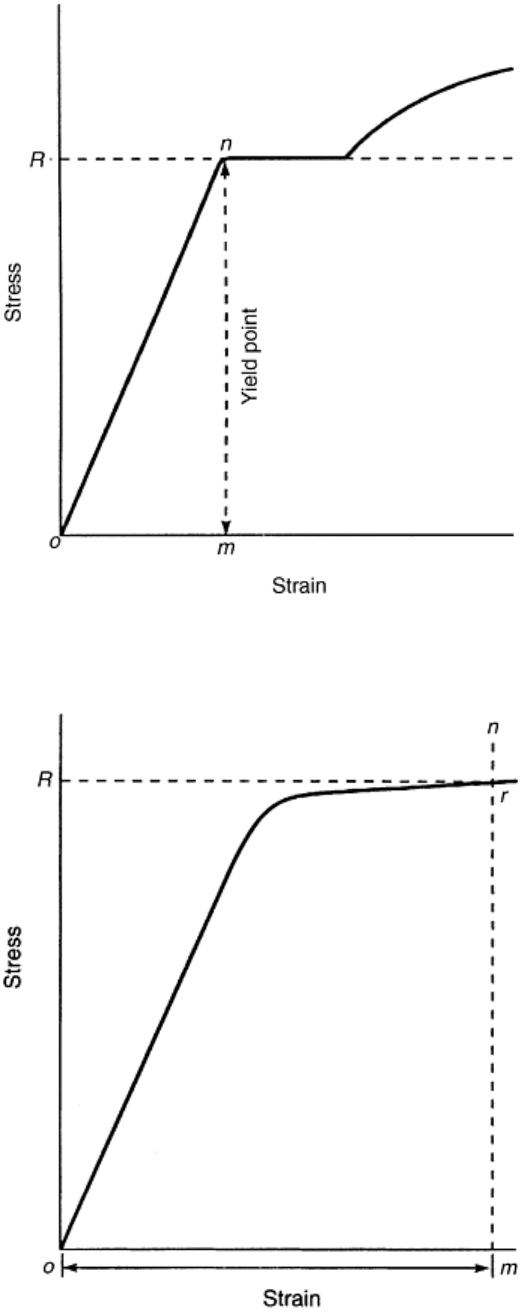
Fig. 12 Stress-strain diagram showing yield point corresponding with top of knee. o-m, offset to yield
point. Source: Ref 1
Fig. 13 Stress-strain diagram showing yield point or yield strength by extension-under-load method. o-
m, specified extension under load. Line m-n is vertical, and the intersection point, r, determines yield
strength value, R. Source: Ref 1
Yield Strength. Yield strength is the stress at which a material exhibits a specified limiting deviation from the
proportionality of stress to strain. The deviation is expressed in terms of strain, percentage of offset, total
