ASM Metals HandBook Vol. 8 - Mechanical Testing and Evaluation
Подождите немного. Документ загружается.

where r and θ are cylindrical position coordinates, r = 0 at the crack tip, and θ = 0 in the crack plane. K is a
function of the applied stress, σ, a is the crack length, and Y(a) is a factor dependent on structural geometry:
K = Y(a)σ(πa)
1/2
(Eq 10)
The strain-energy release rate and stress-intensity approaches are related:
K
2
= E′G
(Eq 11)
where for plane stress, E′ = E, the elastic modulus; for plane strain, E
-1
= E/(1 - ν
2
), where ν is Poisson's ratio.
Thus, it is equivalent to attribute the driving force for fracture to the crack-tip stress field, which is proportional
to K or to the elastic strain-energy release rate, G. The stress intensity, K, is used more commonly than G,
because K can be computed for different structural geometries using stress-analysis techniques.
Fracture occurs when the crack-tip stress field reaches a critical magnitude, that is, when K reaches K
c
, the
fracture toughness of the material. K
c
is a mechanical property that is a function of temperature, loading rate,
and microstructure, much the same as yield strength is; K
c
is also a function of the extent of plastic strain at the
crack tip relative to the other specimen or structure dimensions. If the plastic zone is small compared with the
specimen dimensions and the crack size, then K
c
approaches a constant minimum value defined as the plane-
strain fracture toughness, K
Ic
.
Crack Tip Plasticity. Applicability of the linear-elastic analysis has been extended to conditions approaching
net section yielding by correcting for the zone of plasticity that exists at the crack tip (Ref 9). The assumption is
that the plastic material at the crack tip strains without carrying the incremental load; therefore, the crack
behaves as if it were a slightly longer crack in a linear-elastic material. The adjustment is made by adding the
radius of the plastic zone, r
y
, to the crack length, a, such that the expression for the stress-intensity factor
becomes:
K = Y(a + r
y
) σ[π(a + r
y
)]
1/2
(Eq 12)
where
r
y
= ½π (K/σ
y
)
2
(Eq 13)
where σ
y
is the yield strength at the crack tip. The r
y
correction modifies the crack-tip stress field to account for
the elastic stress redistribution that is due to the localized plasticity.
Size Effect. A two-dimensional stress state is assumed in a bulk material when one of the dimensions of the
body is small relative to the others. A two-dimensional stress state called plane strain develops when plastic
deformation at the crack tip is severely limited. This is promoted by thick sections, high strength and limited
ductility. In contrast, a two-dimensional stress state called plane stress develops when much more plastic
deformation occurs around the crack tip. This is promoted by low-strength ductile materials and very thin
sections of high-strength materials. The difference between plane strain and plane stress is based on the
presence or absence, respectively, of transverse constraint in material deformation in the vicinity of the crack
tip.
As specimen thickness, B, increases, σ
y
increases from σ
ys
(the engineering yield stress of the material at 0.2%
strain) to (3σ
ys
)
1/2
because of a geometric constraint to plastic deformation associated with a transition from
plane-stress to plane-strain conditions. The maximum value of σ
y
is reached when the plastic zone size is
limited to about 5% of the thickness. Thus, in a given material, the plastic zone size as computed by Eq 13 may
vary with thickness by a factor of 3, leading to a strong dependence of K
c
on thickness, as shown in Fig. 10.
The inflection point of the curve in Fig. 10 occurs at approximately (K
Ic
/σ
ys
)
2
. Therefore, for maximum
toughness:
B < (K
Ic
/σ
ys
)
2
or K
Ic
> σ
ys
(B)
1/2
(Eq 14)
Equation 14 is useful in material selection.
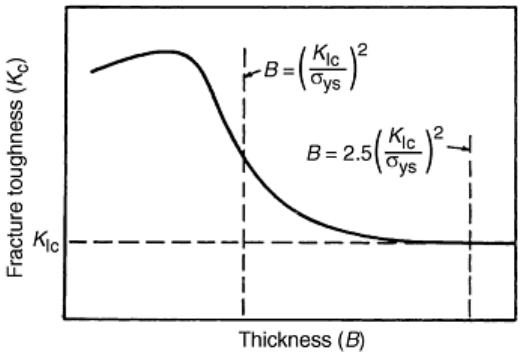
Fig. 10 Fracture toughness transition in structural alloys
Of great importance is the fact that the curve in Fig. 10 approaches an asymptote at a thickness of B ≥ 2.5
(K
Ic
/σ
ys
)
2
. At this point the fracture toughness value, K
Ic
, is a material constant, independent of further increase
of thickness.
Elastic-Plastic Fracture Mechanics
High-toughness structural materials undergo extensive plastic deformation prior to fracture. Therefore, the
concepts of linear-elastic fracture mechanics need to account for elastic-plastic behavior. The general concepts
of EPFM, as they relate to metallic materials and ceramic composites, are described in more detail in the article
“Feature Toughness of Ceramics and Ceramic Matrix Composites” in this Volume.
Three basic methods of EPFM include the crack-tip opening displacement (CTOD), the J-integral, and the R-
curve methods. These tests are intended to provide specialized measurements of fracture properties as follows:
• CTOD: full range of fracture toughness; for slow loading rates
• J-integral: elastic-plastic fracture toughness; for slow loading rates
• R-curve: resistance to fracture extension; for elastic-plastic fracture and slow loading rates
Crack-Tip Opening Displacement. The concept of the CTOD and crack-mouth opening displacement (CMOD)
is shown schematically in Fig. 11, which shows a sample specimen before and after (hidden lines) deformation
(Ref 10). Note that the CMOD is evaluated at the load line (centerline of the loading) and the CTOD is
evaluated at the crack tip. Some test methods used for evaluating the CTOD are British Standard 7448, Part 1
and ASTM E 1290 (Ref 11, 12).
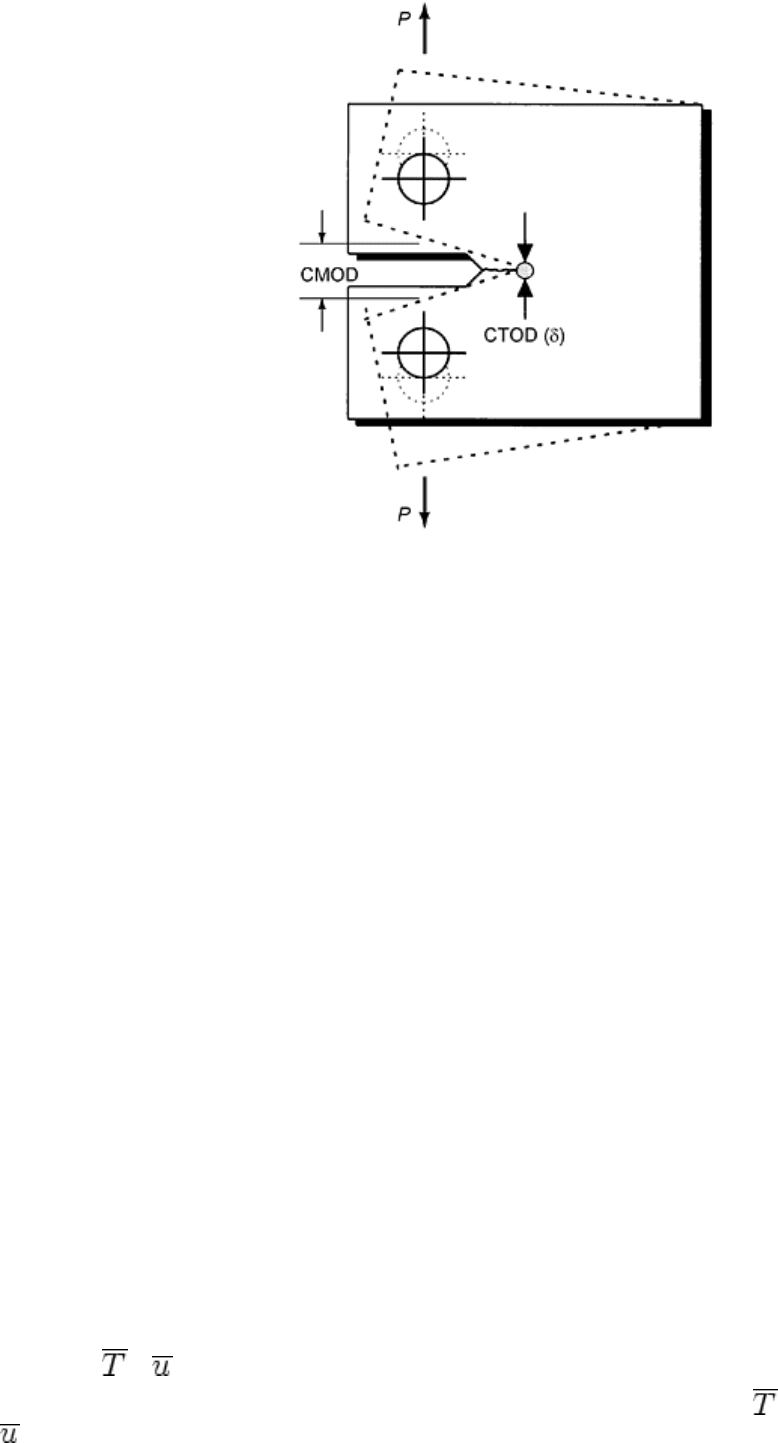
Fig. 11 Sample specimen showing the definition of crack-mouth opening displacement (CMOD) and
crack-tip opening displacement (CTOD). CTOD is the diameter of the circular arc at the blunted crack
tip and should not be confused with the plastic zone. Source: Ref 10
The CTOD concept is a crack tip strain criterion for fracture. For a crack in an elastic body, the crack-opening
displacement, ν, at a distance r from the crack tip is given by the displacement equation:
ν = 2K/πE′ (2πr)
1/2
(Eq 15)
Under conditions of small-scale yielding, the displacement at the crack tip, δ, can be calculated by assuming the
effective crack tip (a
eff
= a + r
y
) is at a distance, r
y
, from the actual crack tip:
δ = 2ν = 4K/πE′ (2πr
y
)
1/2
= 4K
2
/πE′ σ
y
(Eq 16)
Theoretically, fracture occurs when δ = δ
c
, the critical CTOD. In practice, a characteristic value for δ exists only
for the crack initiation event; significantly more scatter exists for δ measured at maximum load or final fracture.
The CTOD approach is limited by the analytical and experimental uncertainties of the crack-tip region.
Analytically, δ is defined as the CTOD at the interface of the elastic-plastic boundary and the crack surface.
Experimentally, δ is calculated from displacement measurements taken remotely from the crack tip because
direct physical measurements are not precise. Further uncertainty is introduced by the term σ
y
in Eq 16, which
may vary by 75%, depending on the degree of elastic constraint—a crack-tip characteristic that cannot be
measured directly.
The CTOD approach offers a significant improvement over linear-elastic methods in the plastic range. An
empirical correlation, known as a design curve, relates CTOD, crack size, and applied strain for a wide range of
structural and material combinations.
For many years, only the CTOD test measured toughness for a brittle, unstable fracture event using a nonlinear-
fracture parameter. In addition, the method allows the measurement of toughness after a “pop-in,” which is
described as a discontinuity in the load-versus-displacement record usually caused by a sudden, unstable
advance of the crack that is subsequently arrested.
The J-integral (Ref 13) characterizes the elastic-plastic field in the vicinity of the crack tip. J is defined as the
line integral:
J = ∫
Γ
[wdy - (∂ / ∂x)ds]
(Eq 17)
where Γ is any contour surrounding the crack tip, w is the strain-energy density, is the force vector normal to
Γ, is the displacement vector, and s is the arc length along Γ The J-integral is path independent for linear and
nonlinear elastic materials and nearly so for most structural materials (elastic-plastic) under monotonic loading
conditions (Ref 14). Thus, J can be computed using numerical methods by analyzing loads and displacements
along a contour away from the crack tip, that is, in a region where the analysis methods are quite accurate. This
eliminates the uncertainties of the crack-tip region—a problem that seriously limits the usefulness of the CTOD
method.
An equivalent interpretation is that J is equal to the change of the pseudopotential energy (the area under the
load-displacement curve), U, upon an increment of crack extension of unit area, A;
J = dU/dA
(Eq 18)
For the linear-elastic case, the potential energy equals the strain energy (U = V), and therefore, Eq 18 is the
same as Eq 8 and J = G. Thus, J appears to be a logical extension of LEFM into the elastic-plastic range.
Because of the irreversibility of plastic deformation, the energy interpretation of the J-integral does not apply to
the process of crack extension, and J is not equal to the energy available for crack extension in elastic-plastic
materials as G is for elastic materials. J is simply an analytically convenient, measurable parameter that is a
characteristic of the elastic-plastic field at the crack tip.
Crack initiation under elastic-plastic conditions occurs at a characteristic value of J, called J
Ic
; J
Ic
is related to
the linear-elastic plane-strain toughness, K
Ic
, in the same way G is related to K in Eq 11. Thus, J-integral
methods can be used to determine K
Ic
in specimens significantly smaller than the size requirements for linear-
elastic response.
The J-integral concept is not only applicable to crack initiation, but also is applicable to crack propagation. For
most materials that fail in the elastic-plastic range, significant fracture resistance exists after crack initiation.
Therefore, in some cases the J-integral may be unduly conservative as a fracture criterion.
J -integral analysis must properly account for the stress-strain characteristics of the material. Thus, for a given
structural configuration, J-integral solutions are required for each distinct material instead of the single solution
needed for K analyses.
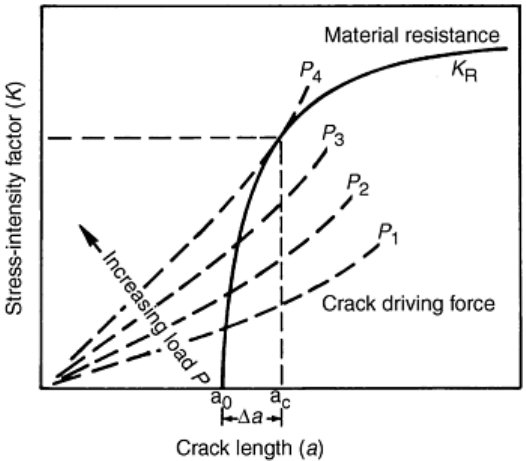
The R-curve concept, introduced by Krafft, Sullivan, and Boyle (Ref 15), is a characterization of the increase in
fracture resistance accompanying the slow crack extension that precedes unstable fracture. ASTM E 561 covers
the standard practice for R-curve determination. The R-curve is constructed by plotting crack extension, Δa, as
a function of the driving force for fracture expressed in terms of G, K, J, or δ. The level of driving force
required to extend the crack is defined as the resistance, R, of the material. An R-curve is shown in Fig. 12,
where R is expressed in terms of K and is denoted by K
R
. The R-curve may be used as a fracture criterion when
crack-driving-force curves expressed in terms of K versus a at constant load in Fig. 12 are shown on the same
plot. Fracture is predicted when the following conditions are met:
K = K
R
and ∂K/∂a = ∂K
R
/∂a
(Eq 19)
Fig. 12 Crack growth resistance curve and crack driving force curves in R-curve format. Source: Ref 16
K
R
and K are computed for the test specimen and structure, respectively, using the appropriate value of Y(a +
r
y
) in Eq 12.
In applying the R-curve concept as a fracture criterion, it is assumed that the R-curve is a property of the
material for a given thickness and temperature, and the influence of planar geometry on the predicted instability
point is considered in the calculation of K for the driving-force curves.
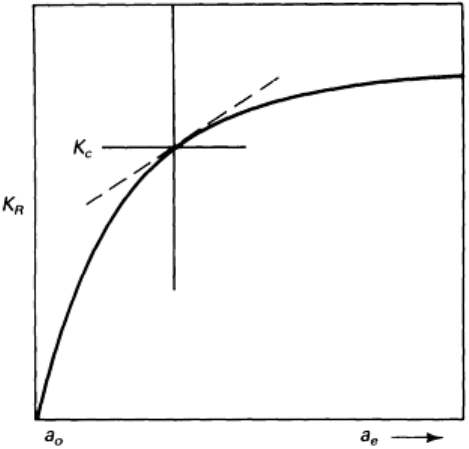
The conditions for tearing instability are shown in Fig. 13. The dashed line segment, tangent to the R-curve,
shows the magnitude and slope of K versus a, calculated for a structural application at a loading condition
where the application values of K and dK/da match the values of K
R
and dK
R
/da. As with R-curve K-values, an
r
Y
-type plastic zone adjustment is used for calculation of application K values. The values of K
R
and of dK
R
/da
must be calculated for the applications crack using r
Y
-corrected estimates of K
R
.
Fig. 13 Schematic R-curve. Dashed line shows a segment of the driving K-value, for which dK/da and K
match the slope of the K-value of the R curve.
There is a close relationship between basic concepts used in R-curve testing and in J-R testing. However, with
R-curve testing, the main emphasis is on the crack front conditions of plane stress; with J-R testing, emphasis is
on crack front conditions of plane strain.
The R-curve approach is used as a measure of fracture toughness for plate thicknesses where valid K
Ic
data
cannot be obtained because of the size requirements for linear elasticity. For example, nickel steels have been
evaluated at temperatures down to 76 K using the R-curve approach (Ref 17). The results can be misleading if
one compares materials on the basis of fracture toughness; that is, an initiation criterion, such as K
Ic
, indicates a
substantially lower toughness than an instability criterion, such as the R-curve.
Fracture Toughness Testing
Fracture toughness is a single-parameter characterization of the fracture resistance of a material containing a
crack. The single parameter depends on the fracture criterion chosen and varies as a function of temperature,
loading rate, and microstructure. In this section, K
Ic
is used as the linear-elastic fracture criterion and J
Ic
is used
as the fracture criterion for the elastic-plastic and fully plastic cases. Load-displacement records representing
the three fracture cases are shown in Fig. 14.
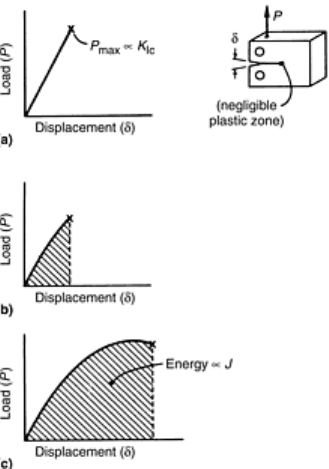
Fig. 14 Load-displacement behavior observed in fracture toughness tests. (a) Linear-elastic. (b) Elastic-
plastic (failure before limit load). (c) Fully plastic (exhibits a limit load). (a) shows brittle behavior (K
Ic
is
measured). (b) and (c) show ductile behavior (J
Ic
is measured).
Although the J
Ic
value can be used to obtain an estimate of K
Ic
, denoted K
Ic
(J), it should be understood that K
Ic
and K
Ic
(J) may represent significantly different fracture behavior. K
Ic
is the critical K level for the linear-elastic
case, at which significant measurable extension of the crack occurs, often triggering unstable fracture. For valid
measurements of K
Ic
, the critical K level must be reached prior to significant plastic deformation; that is, the
plastic zone size is negligible, less than 2% of the crack length and the thickness. In contrast, K
Ic
(J) for elastic-
plastic or fully plastic fracture indicates an estimate K
Ic
calculated from J
Ic
, the J-integral value at which the
first measurable extension of the crack occurs. Since plastic deformation prior to the onset of cracking does not
invalidate the J
Ic
measurement, smaller specimens can be used. Either: (a) significant amount of stable crack
extension under rising load is displayed before final fracture occurs or (b) the elastic-plastic behavior
culminates in plastic instability (Ref 18). The differences in K
Ic
and K
Ic
(J) may be clarified by consideration of
their test methods.
Linear-Elastic Fracture Toughness. Standard test method ASTM E 399 (Ref 5) is used to measure plane-strain
fracture toughness, K
Ic
. The standard is designed to ensure that linear-elastic conditions prevail throughout the
test. This is achieved by requiring a sufficiently large specimen for the particular toughness and yield strength
of the material being tested. Planar dimensions are sized to ensure elastic response of the specimen, and the
thickness is sized to ensure sufficient through-thickness constraint. The dimensional criteria in ASTM E 399
are:
B, a ≥ 2.5(K
Ic
/σ
ys
)
2
(Eq 20)
where B and a are defined in Fig. 15 for the compact specimen.
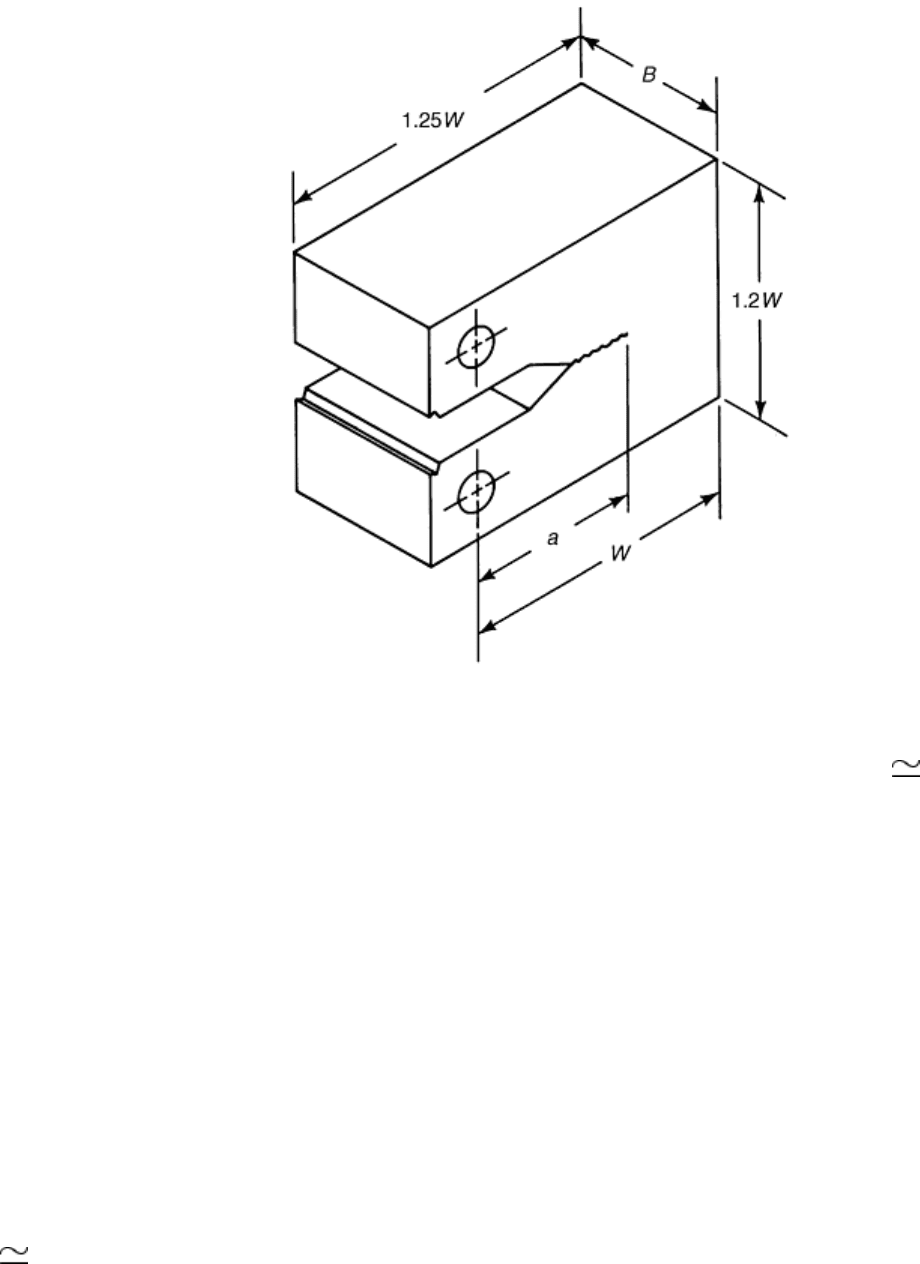
Fig. 15 ASTM E 399 compact specimen for fracture toughness testing
The specimens are precracked by fatigue cycling to an initial relative crack length of a/W 0.5. Precracking
loads are limited to low values to keep the plastic zone size at the crack tip small; the fatigue loads must be such
that the maximum K level during fatigue is less than 0.6 K
Ic
. (Changes in yield strength must be taken into
account if precracking is performed at room temperature and testing at cryogenic temperatures.) Subsequently,
the specimens are monotonically loaded to failure. During loading, load, P, and displacement, Δ, are measured
and a P-Δ curve is recorded. The critical load, P
Q
, as defined in ASTM E 399, is either the maximum load or
the load at a 5% secant offset from the linear part of the P-Δ test record. If the maximum load in the test
exceeds 1.10 P
Q
, the test is invalid. A trial value of fracture toughness, K
Q
, is calculated from the critical load,
the measured crack length, the specimen dimensions, and the specimen calibration function Y(a/W), as follows:
K
Q
= P
Q
Y(a/W)/BW
1/2
(Eq 21)
If all the conditions of ASTM E 399 are met, such as precracking procedures, load-displacement record, and
specimen dimensions, then K
Q
= K
Ic.
The K
Ic
test method was standardized by ASTM in 1970. Uncertainties in K
Ic
measurements obtained by this
method lie between 4 and 10% (Ref 19). Three tests per material per temperature are considered sufficient to
demonstrate reproducibility.
J-integral fracture toughness. J
Ic
measurement is based largely on the method proposed in 1974 (Ref 20, 21), as
shown schematically in Fig. 16. Typically, a series of deeply notched compact specimens are precracked to a/W
0.6, and each specimen is loaded to a J-level in the region where crack extension is anticipated. The load-
displacement curve is recorded on an X-Y recorder, with displacement being measured at the load line. Then the
specimen is unloaded and heated to tint the region of crack extension. The specimen is fractured, and the crack
extension, Δa, is measured from the exposed fracture surface. J is calculated from the load-displacement record
and specimen dimensions using:
J = (A/Bb)f(a
0
/W)
(Eq 22)
where A is the area under the load-displacement curve, b = (W - a) is the uncracked ligament, and f(a
0
/W) is a
function of crack length.
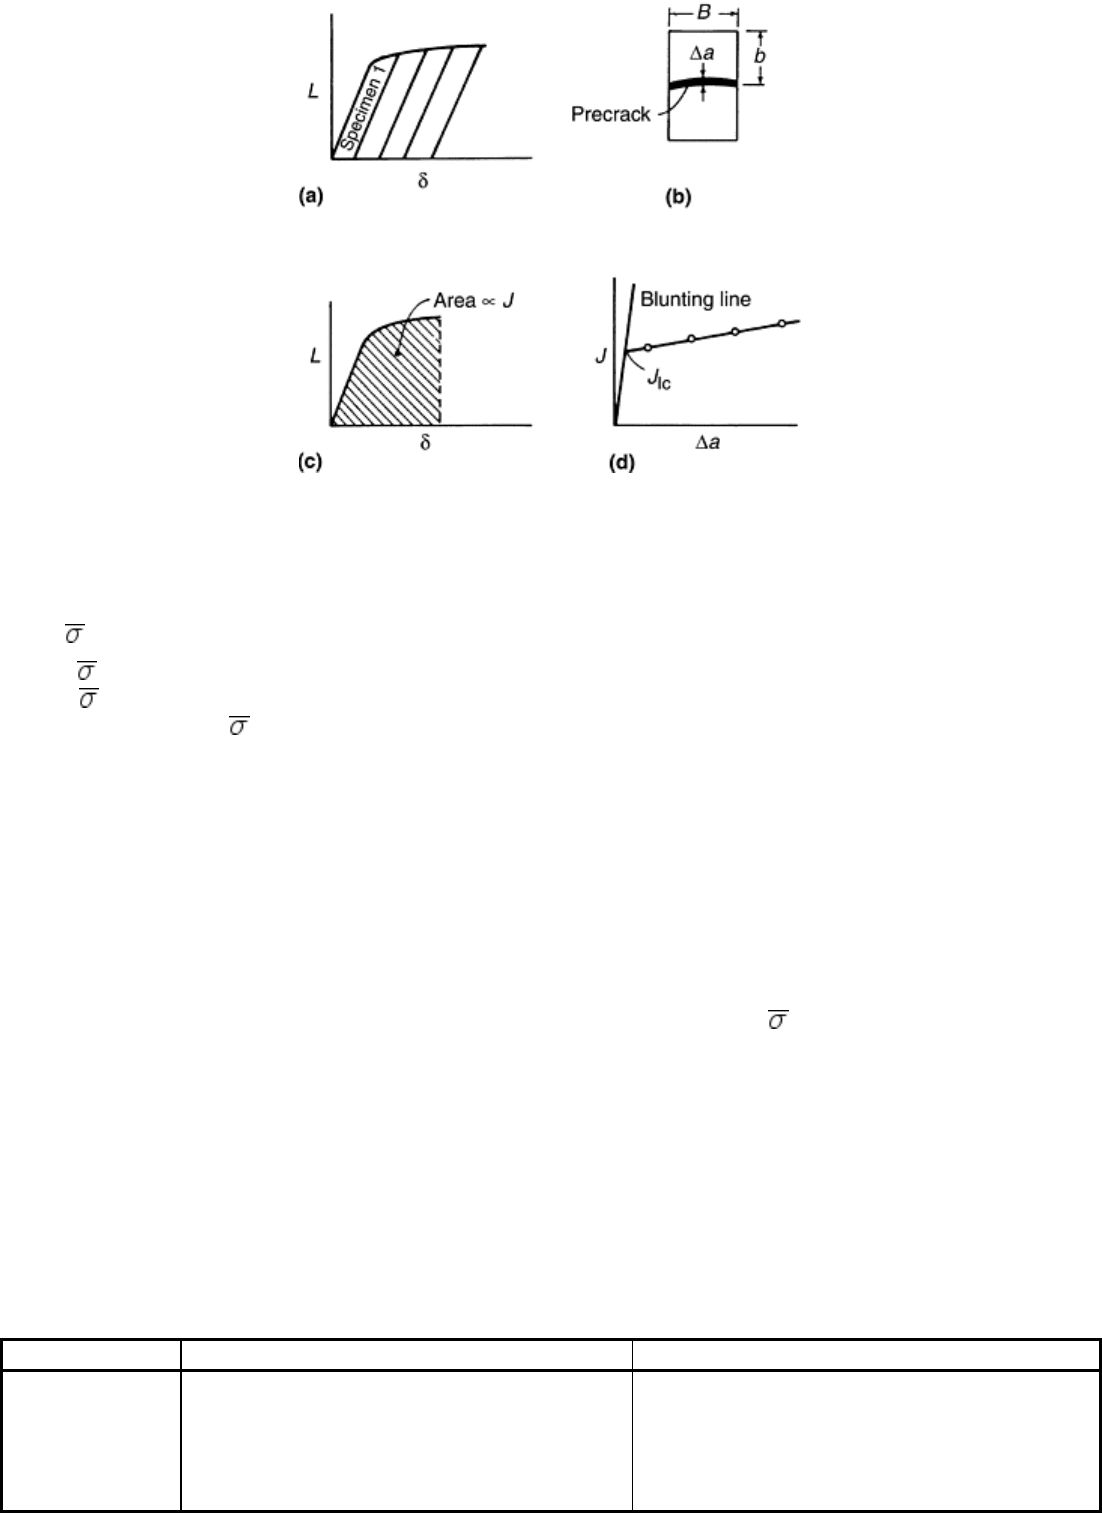
Fig. 16 J-resistance curve test method for J
Ic
determination. (a) Test records. (b) Heat-tinted fracture
surface. (c) J calculation. (d) Resistance curve
The results of a test series are plotted as J versus Δa. On the same graph, the line defined by Eq 23 is drawn:
J = 2 Δa
(Eq 23)
where is the flow stress (the average of the yield and ultimate strengths). The intersection of the J-Δa plot and
the J/2 line is defined as J
Ic
, the value of J at the onset of crack extension. Apparent crack extension at Δa
values of less than J/2 is attributed to deformation at the crack tip instead of material separation. The linear-
elastic plane-strain fracture toughness can be estimated from J
Ic
as follows:
K
Ic
(J) = [J
Ic
E/(1 - ν
2
)]
1/2
(Eq 24)
where E is Young's modulus and ν is Poisson's ratio.
The J-integral method has been combined into ASTM E 1820 (Ref 22), and the individual standard E 813 was
withdrawn from the Annual Book of ASTM Standards in 1998.
Other Test Methods. Fracture toughness data can be obtained using test methods other than the currently
favored K
Ic
and J
Ic
methods. Care must be taken in comparing these data with K
Ic
and J
Ic
values and in applying
the data to materials selection or design. Difficulties arise owing to differences in measurement criteria and
fracture criteria.
In both K
Ic
and J
Ic
testing, the measurement point (i.e., P
Q
for K
Ic
and the J/2 intersection for J
Ic
) is near the
onset of crack extension. Fracture toughness data are frequently reported where the maximum load values are
used to calculate fracture toughness, and the results are reported in terms of K or J values—often with a change
of subscript (e.g., K
max
, K
IE
, K
C
, J
C
).
Significant differences in toughness also may be attributed to differences in the fracture criteria. Data obtained
by the CTOD or R-curve methods evaluate the fracture toughness of ductile materials after significant crack
extension and plasticity have occurred. Consequently, the toughness values for the same material are higher
than those obtained by the K
Ic
or J
Ic
methods. Advantages and disadvantages of various fracture toughness tests
are shown in Table 1.
Table 1 Fracture toughness tests
Method Advantages
Disadvantages
K
Ic
, ASTM E
399
This method is the most reliable to get
fracture toughness values at lower
temperatures. The success of all other
methods is based on their ability to give data
comparable to this method.
The high cost of testing the large specimens
required for higher temperature tends to
reduce the number of data points. Linear
extrapolation from valid K
Ic
at lower
temperature to higher temperature

produces conservatism. No valid K
Ic
values
at higher temperature.
J-integral,
ASTM E 813
Provides fracture toughness values that
agree with K
Ic
method. Yields realistic
fracture toughness data at higher
temperature. Has the advantage (over
CTOD) of a sound theoretical basis, which
permits evaluation of stable crack growth.
Determination of dJ/da is a measure of the
resistance to continued crack propagation.
Testing many small J specimens provides an
indication of material toughness variation.
Not able to evaluate irregular crack
propagation due to residual stress or at
HAZ near welds. Not accurate enough at
low temperatures. Measurements are
inaccurate due to irregular crack fronts.
Not valid for thin materials where K
J
is 2.5
K
Ic
. When heat tinting is used, the
additional number of specimens adds to
testing costs.
CTOD, BS
7448, ASK-
AAN 220
Provides fracture toughness values that
agree with ASTM K
Ic
method. Yields
realistic fracture toughness data at higher
temperatures. CTOD results have shown
good consistency and comparability with
toughness values using other methods.
Simultaneous measurement of CTOD and J-
integral is possible for a minor extra cost.
Variations in the measurement of δ results
in variations of K
Ic
of up to a factor of 2.
This method restricted to temperatures
above -60 °C.
Simple equal
energy
Provides fracture toughness values that
agree with ASTM K
Ic
method. Yields
realistic fracture toughness data at higher
temperatures. Toughness data are identical
or closely similar to J-integral data.
Limitations similar to those of the J-
integral method. This method is more
empirical in nature, so J-integral testing is
preferred.
Instrumented
Charpy testing
Requires small specimens. Practically suited
for determination of toughness variations in
small regions of complex parts, in HAZ of
welds, and in other locally embrittled zones.
Error in K
Ic
is small (in comparison to
ASTM K
Ic
method) for predominantly
brittle failure.
Can provide very pessimistic values,
particularly at higher temperatures. K
Ic
is
slightly underestimated at low
temperatures, but considerable scatter of
measurements exists above the brittle-
transition temperature within a factor of 3
due to small size of specimens. Difficulty in
separating the crack-initiation and crack
propagation components of fracture.
Empirical
methods per
Begley and
Logsdon
Requires small specimens. Offers a rapid
and inexpensive technique to estimate K
Ic
for wrought ferritic steels. This method
indicates that Charpy K
Ic
values are
scattered and lie entirely below ASTM K
Ic
data. Conservative by a factor of up to 3.
K
Ic
by this method provides narrow
scatter band with the results below
ASTM K
Ic
by a factor of 2.
Can provide very pessimistic values,
particularly at higher temperatures.
Cannot give information relevant to small
regions such as HAZ at welds, castings, or
materials other than the ferritic steels.
CTOD, crack-tip opening displacement; HAZ, heat-affected zones.
Source: Ref 10
Specimens. There are many fracture-specimen types and sizes, each offering specific advantages and
disadvantages. Some of these are listed in Table 2. The choice of a particular specimen geometry depends on
technical purposes and test requirements. The three-point bend and compact specimens (standard specimens of
the ASTM E 399 and E 813 methods) are often preferred for general laboratory materials evaluation, because K
and J calibrations for these specimens are accurately known and relatively low loads are required during
testing. Data obtained with nonstandard specimens must be evaluated carefully to ensure that the same fracture
criteria are used, such as the onset of cracking.
Table 2 Advantages and disadvantages of selected fracture toughness test specimens

Specimen type Advantages
Disadvantages
Compact specimen High K
Ic
measurement capability for
size
Standard specimen (ASTM E 399)
Low loads required
Expense of machining
Three-point bend Standard specimen (ASTM E 399)
Low loads required
Suitable for wide range of orientations
A long span transverse to loading
direction, which may be a disadvantage
for some cryostats
Center-cracked
tension
Pure tensile loading
High loads and large material
requirements
Double-edge notched Pure tensile loading
High loads and large material
requirements
Single-edge notched Easy notch preparation
High loads and material requirements
Double cantilever
beam
Tapered specimens, can be designed
such that the value of K is independent
of crack length
Long span transverse to loading
direction
Side grooving may be necessary to guide
cracking direction
Machining expenses
Surface-flawed
specimen (part-
through crack)
Simulates a flaw type commonly found
in service
Size requirements are difficult to
establish
K solution not precisely known
High loads are required
C-shaped specimen Special geometry suitable for bar stock
Limited applicability
Wedge-opening-load
specimen
Larger width than compact specimen
May be bolt loaded at one end
Expense of machining
For K
Ic
measurements, ASTM E 399 describes procedures using test specimens such as those shown in Fig. 17.
The crack-tip plastic region is small compared with crack length and to the specimen dimension in the
constraint direction. A compact-type (CT) specimen, shown in Fig. 17(d), often is used to experimentally
determine fracture toughness and other fracture properties. From a record of load versus crack opening and
from previously determined relations of crack configuration to stress intensity, plane-strain fracture toughness
can be accurately measured if all the criteria for a valid test are met.
