Morling K. Geometric and Engineering Drawing
Подождите немного. Документ загружается.

Geometric and Engineering Drawing34
Circles and Curves Drawn in Isometric Projection
All of the faces of a cube are square. If a cube is drawn in isometric projection, each
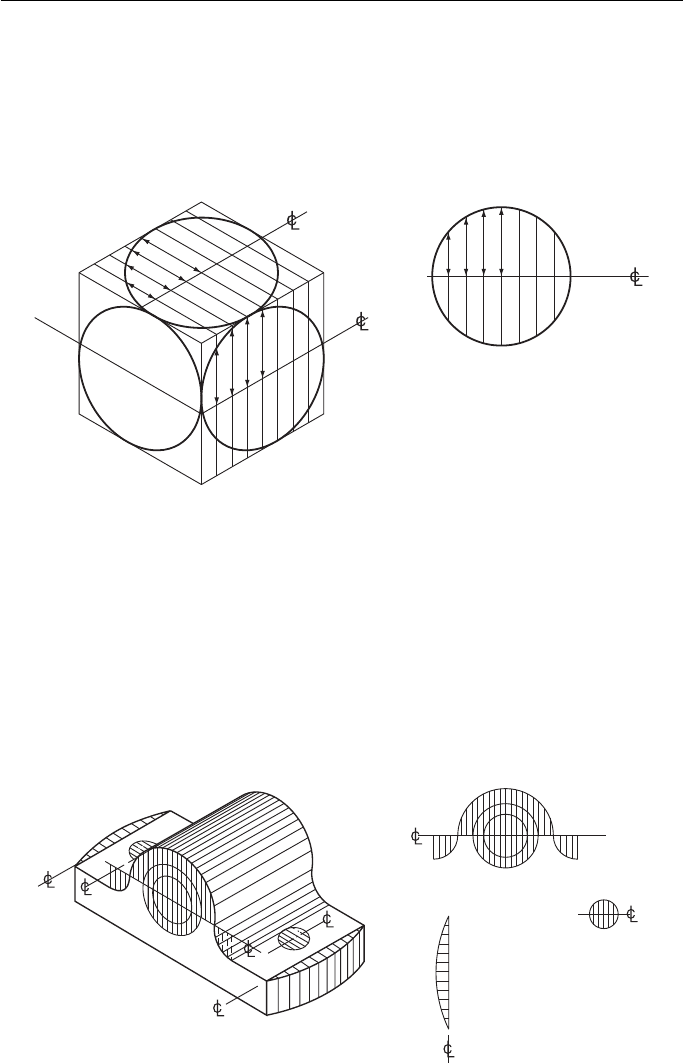
square side becomes a rhombus. If a circle is drawn on the face of a cube, the circle
will change shape when the cube is drawn in isometric projection. Figure 3.4 shows
how to plot the new shape of the circle.
1
2
3
4
1
2
3
4
1
2
3
4
Figure 3.4
2
3
1
2
2
3
1
3
Figure 3.5 How circles and part circles can be drawn isometrically.
The circle is first drawn as a plane figure, and is then divided into an even number
of equal strips. The face of the cube is then divided into the same number of equal
strips. Centre lines are added and the measurement from the centre line of the circle
to the point where strip 1 crosses the circle is transferred from the plane drawing to
the isometric drawing with a pair of dividers. This measurement is applied above and
below the centre line. This process is repeated for strips 2, 3, etc.
The points that have been plotted should then be carefully joined together with a
neat freehand curve.
Figure 3.5 illustrates how this system is used in practice.
Isometric Projection 35
Since a circle can be divided into four symmetrical quadrants, it is really neces-
sary to draw only a quarter of a circle instead of a whole plane circle.
The dimensions which are transferred from the plane circle to the isometric view
are called ‘ ordinates ’ and the system of transferring ordinates from plane figures to
isometric views is not confined to circles. It may be used for any regular or irregular
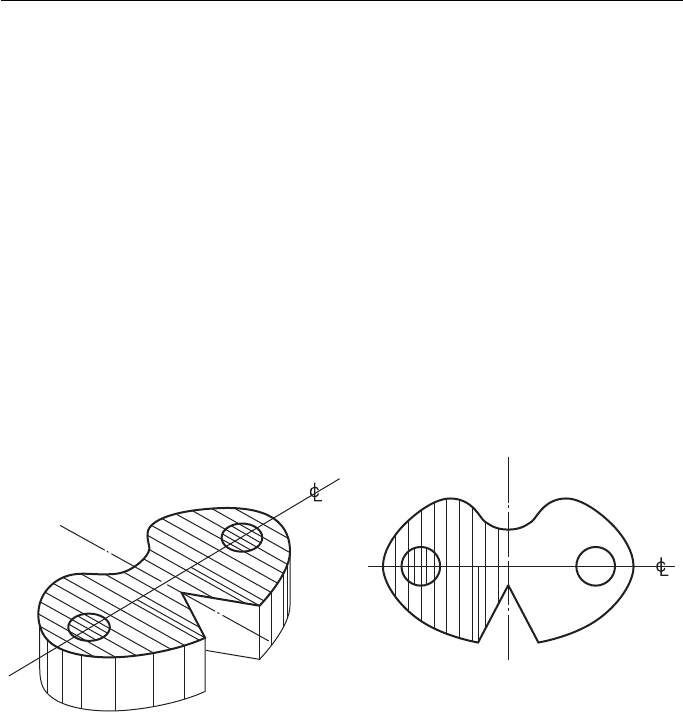
shape. Figure 3.6 shows a shaped plate.
There are several points worth noting from Fig. 3.6 .
(a) Since the plate is symmetrical about its centre line, only half has been divided into strips
on the plane figure.
(b) In proportion to the plate, the holes are small. They have, therefore, ordinates much closer
together so that they can be drawn accurately.
(c) The point where the vee cut-out meets the elliptical outline has its own ordinate so that
this point can be transferred exactly to the isometric view.
(d) Since the plate has a constant thickness, the top and bottom profiles are the same. A quick
way of plotting the bottom profile is to draw several vertical lines down from the top pro-
file and, with dividers set at the required thickness of the plate, follow the top curve with
the dividers, marking the thickness of the plate on each vertical line.
Figure 3.6 A shaped plate drawn in isometric projection.
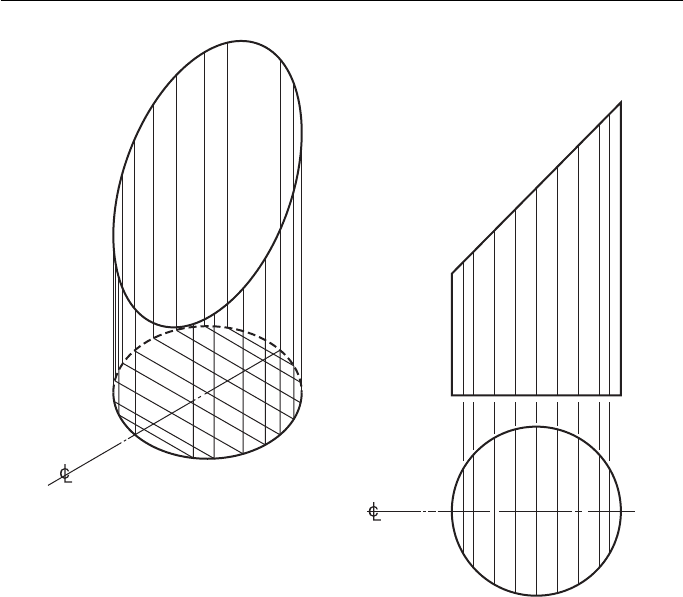
It is sometimes necessary to draw circles or curves on faces that are not parallel to
any of the three isometric axes. Figure 3.7 shows a cylinder cut at 45 ° . Two views of
the cylinder have to be drawn: a plan view and an elevation. The plan view is divided
into strips and the positions of these strips are projected onto the elevation.
The base of the cylinder is drawn in isometric projection in the usual way. Points
1 to 20, where the strips cross the circle, are projected vertically upwards and the
height of the cylinder, measured from the base with dividers, is transferred for each
point in turn from the elevation to the isometric view. These points are then carefully
joined together with a neat freehand curve.
True Isometric Projection
Isometric projection is a method of drawing with instruments which gives a pictorial
view of an object. It is not often used in industry and, when it is, the vast majority of
Geometric and Engineering Drawing36
drawings are made using conventional isometric projection. Conventional isometric
projection is a distorted and simplified form of true isometric. True isometric is found
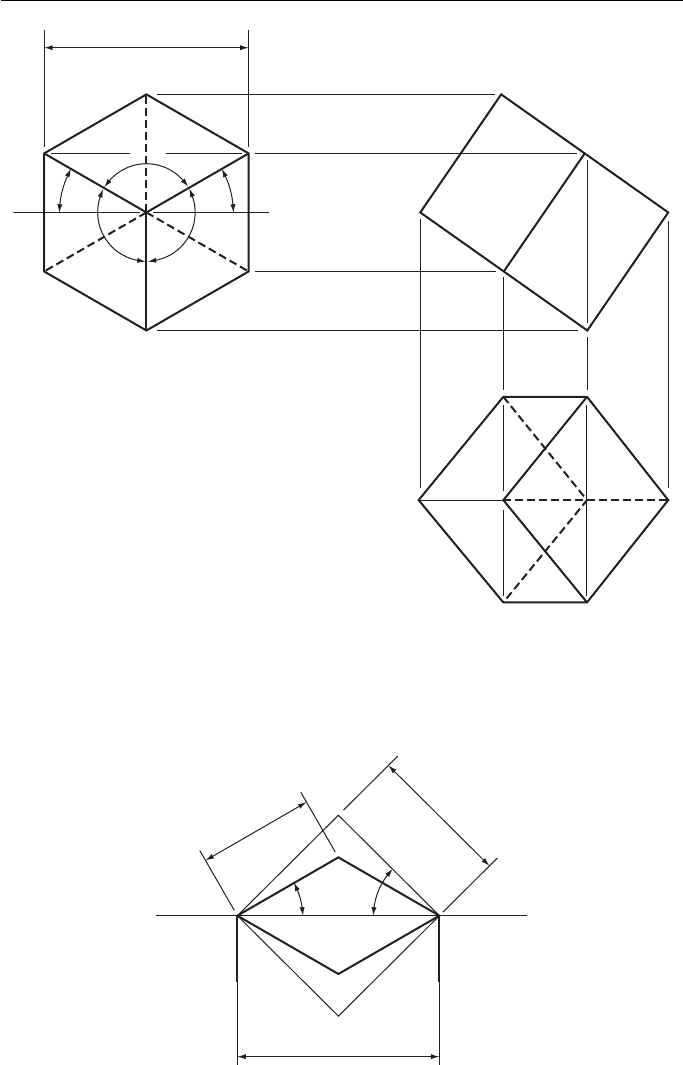
by taking a particular view from an orthographic projection of an object. Figure 3.8
shows a cube, about 25 mm side, drawn in orthographic projection with the cube so
positioned that the front elevation is a true isometric projection of the cube. The three
isometric axes are still at 120 ° to each other. In conventional isometric, distances
measured parallel to these axes are true lengths. In true isometric projection they are
no longer true lengths although they are proportional to their true lengths. However,
the horizontal distances on a true isometric projection are true lengths. The reduction
of lengths measured parallel to the isometric axes makes the overall size of the true
isometric drawing appear to look more natural, particularly when directly compared
with an orthographic or plane view of the same object (compare the relative sizes of
the prism in Fig. 3.2 ).
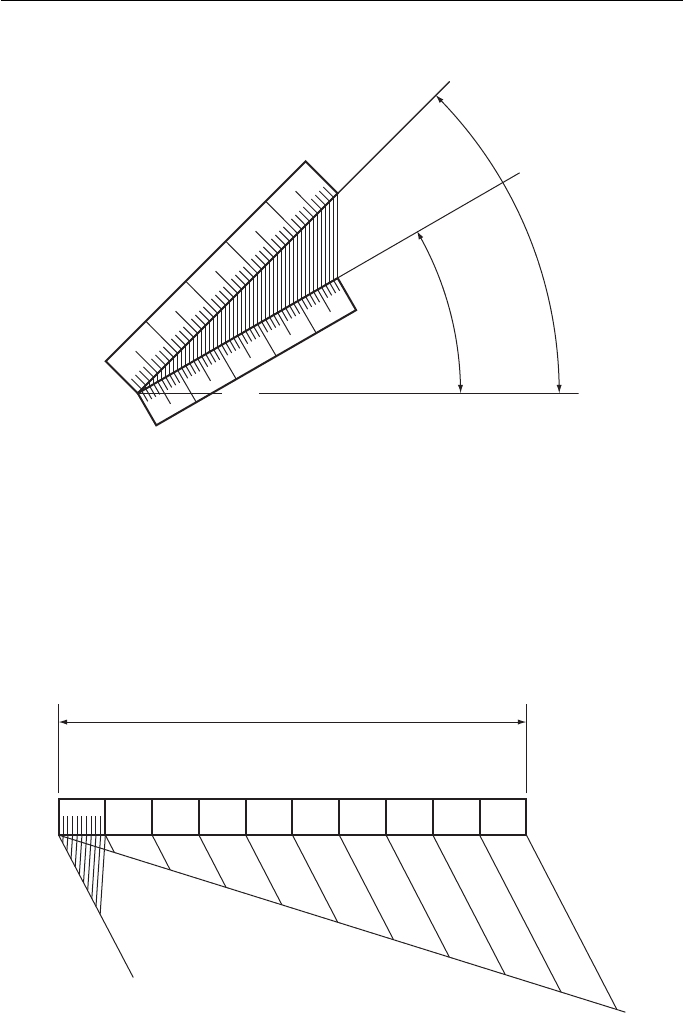
If the horizontal length and the length parallel to the isometric axes were both to
be true lengths, the isometric axes would have to be at 45 ° ( Fig. 3.9 ). Since the iso-
metric axes are at 30 ° , the 45 ° lengths must be reduced.
1
1
1
2.20
3.19
4.18
5.17
6.16
7.15
8.14
9.13
10.12
11
2
3
4
5
6
7
8
9
10
11
12
13
14
15
16
17
18
19
20
1
2
3
4
5
6
7
8
9
10
11
12
13
14
15
16
17
18
19
20
2
3
4
5
6
7
8
9
10
11
12
13
14
15
16
17
18
19
20
Figure 3.7 An cylinder cut obliquely.
Isometric Projection 37
30°30°
120° 120°
120°
30°30°
120°
True length
Figure 3.8 True isometric projection (drawn orthographically).
True length
True length
Isometric
length
30° 45°
Figure 3.9
Geometric and Engineering Drawing38
This operation is shown in Fig. 3.10 .
True length
50 mm
50 mm
40
30
20
10
0
40
30
20
10
0
Isometric length
30°
45°
Figure 3.10
mm
010203040
100 × 0.8165 = 81.65 mm
50 60 70 80 90
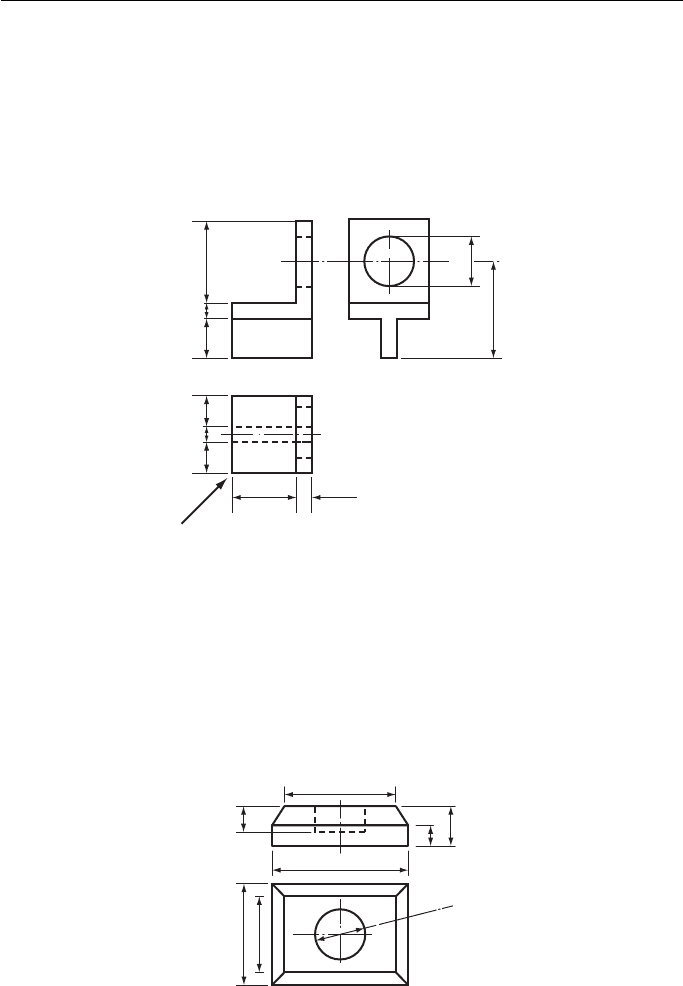
Figure 3.11 A plain scale to measure true isometric lengths.
The ratio between the true length and the isometric length is isometric
length true length 0.8165.
This ratio is constant for all lines measured parallel to any of the isometric axes.
If you are asked to draw an object using an isometric scale, your scale may be con-
structed as in Fig. 3.10 or you may construct a conventional plain scale as shown in
Fig. 3.11 . The initial length of this scale is 100 0.8165 81.65 mm. The scale is
then completed as shown in Chapter 1.
Isometric Projection 39
Exercise 3
(All questions originally set in imperial units.)
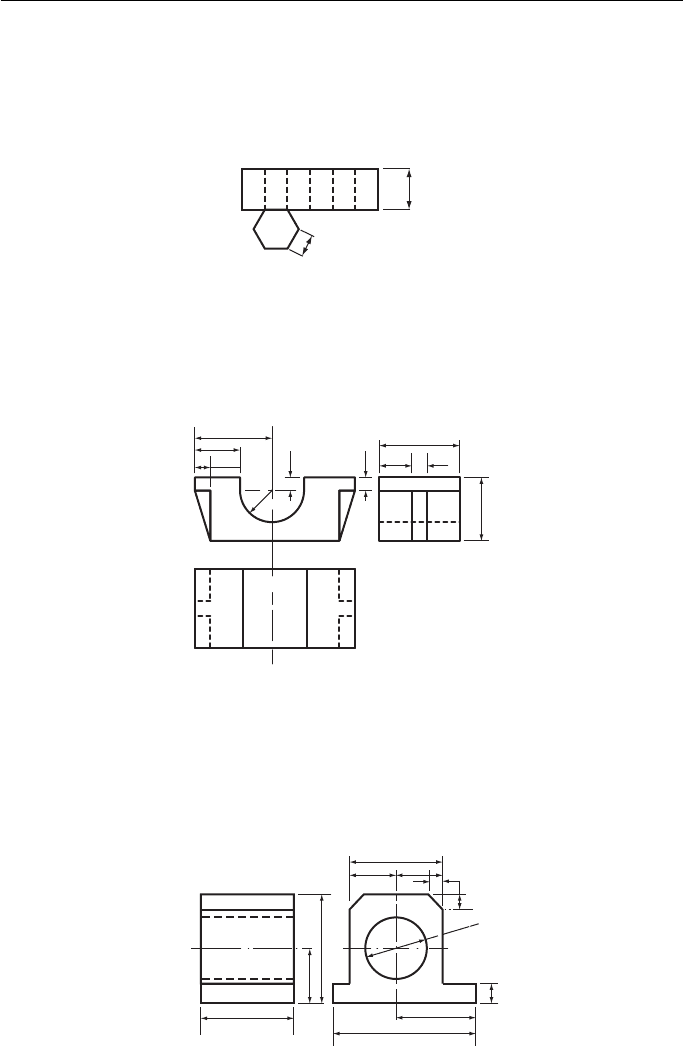
1. Draw, full size, an isometric projection of the component shown in Fig. 1 looking in the
direction of the arrow A. Hidden details are not to be shown.
Associated Lancashire Schools Examining Board
66
φ40
77.5
Dimensions in mm
50
A
12.5
12.5322525 12.5
Figure 1
Dimensions in mm
φ40
80
20
18
38
110
90
60
A
A
Figure 2
2. Figure 2 shows the front elevation and plan of an ink bottle stand. Make a full size isomet-
ric drawing of the stand with corner A nearest to you. Hidden details should not be shown.
West Midlands Examinations Board
Geometric and Engineering Drawing40
3. Figure 3 shows the development of a hexagonal box. Draw, in isometric projection, the
assembled box standing on its base. Ignore the thickness of the material and omit hidden
detail.
North Western Secondary School Examinations Board (see Chapter 14 for information not
in Chapter 3).
62
A
A
First angle
projection
Dimensions in mm
37
12
25
62
50
12
6
6
Figure 4
Dimensions in mm
44
75
75
115
16
65
12
φ50
AA
88
==
Figure 5
18
Dimensions in mm
32
Figure 3
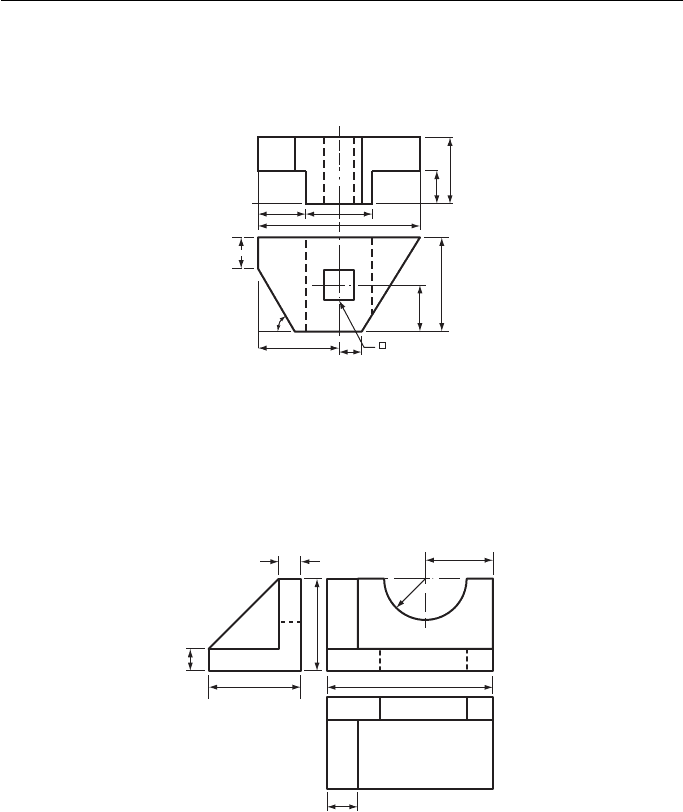
4. Three views of a bearing are shown in Fig. 4 . Make an isometric drawing of the bearing.
Corner A should be the lowest point on your drawing. No hidden details are required.
South-East Regional Examinations Board
5. Two views of a plain shaft bearing are shown in Fig. 5 . Make a full size isometric drawing
of the bearing. Hidden details should not be shown.
West Midlands Examinations Board
Isometric Projection 41
6. Construct an isometric drawing of the casting shown in Fig. 6 . Make point X the lowest
point of your drawing. Do not use an isometric scale.
University of London School Examinations
37.5
X
Dimensions in mm
50
125
25
62.5
X
25
37.5
75
19
60°
25
50
Figure 6
25
Dimensions in mm
X
X
R35
13575
18
75
18
55
Figure 7
7. Construct an isometric scale and use it to make a true isometric view of the casting shown
in Fig. 7 . Corner X is to be the lowest corner of your drawing.
University of London School Examinations
8. A plan and elevation of the base of a candlestick are shown in Fig. 8 . Draw (a) another ele-
vation when the base is viewed in the direction of the arrow and (b) an accurate isometric
view of that half of the candlestick base indicated by the letters abcd on the plan view. The
edge ab is to be in the foreground of your drawing.
Southern Universities ’ Joint Board (see Chapter 8 for information not in Chapter 3).

9. Figure 9 shows the plan and elevation of an angle block. Make a full size isometric pro-
jection of the block, making the radiused corner the lowest part of your drawing. Do not
use an isometric scale. Hidden detail should be shown.
Oxford and Cambridge Schools Examinations Board
82 mmφ 64 mm
φ 38 mm
Elevation
Plan
S
R
41 mm
Figure 10
75
25
c
d
b
a
Dimensions in mm
4.5
21
φ28
R50
R28
Figure 8
18
18
125
Dimensions in mm
44
32
R25
64
64
18
12
Figure 9
10. Figure 10 shows two views of a cylindrical rod with a circular hole. Make an isometric
drawing of the rod in the direction of the arrows R and S. Hidden detail is not required.
Associated Examining Board
Geometric and Engineering Drawing. DOI:
© 2010 Elsevier Ltd. All rights reserved.2010
10.1016/B978-0-08-096768-4.00004-8
The Construction of Circles to
Satisfy Given Conditions
The Greatest Invention of All Time
About 6000 years ago, an unknown Mesopotamian made one of the greatest inventions
of all time: the wheel. This was the most important practical application ever made of
a shape that fascinated early mathematicians. The shape is, of course, the circle. After
the wheel had been invented, the Mesopotamians found many more applications for
the circle than just for transport. The potter ’ s wheel was developed and vessels were
made much more accurately and quickly. Pulleys were invented and engineers and
builders were able to raise heavy weights. Since that time, the circle has been the most
important geometric shape in the development of all forms of engineering.
Apart from its practical applications, the circle has an aesthetic value which
makes it unique among plane figures. The ancients called it ‘ the perfect curve ’ and
its symmetry and simplicity has led artists and craftsmen to use the circle as a basis
for design for many thousands of years .
Definitions
A circle is the locus of a point which moves so that it is always a fixed distance from
another stationary point.
Concentric circles are circles that have the same centre.
Eccentric circles are circles that are not concentric.
Figure 4.1 shows some of the parts of the circle.
Constructions
The length of the circumference of a circle is π D or 2 π R , where D is the diameter
and R the radius of the circle, π is the ratio of the diameter to the circumference and
may be taken as 22/7 or, more accurately, as 3.142.
If you need to draw the circumference of a circle (this is required quite often in
subsequent chapters), you should either calculate it, or use the construction shown in
Fig. 4.2 . This construction is not exact but is accurate enough for most needs. For the
4
