Morling K. Geometric and Engineering Drawing
Подождите немного. Документ загружается.

Geometric and Engineering Drawing24
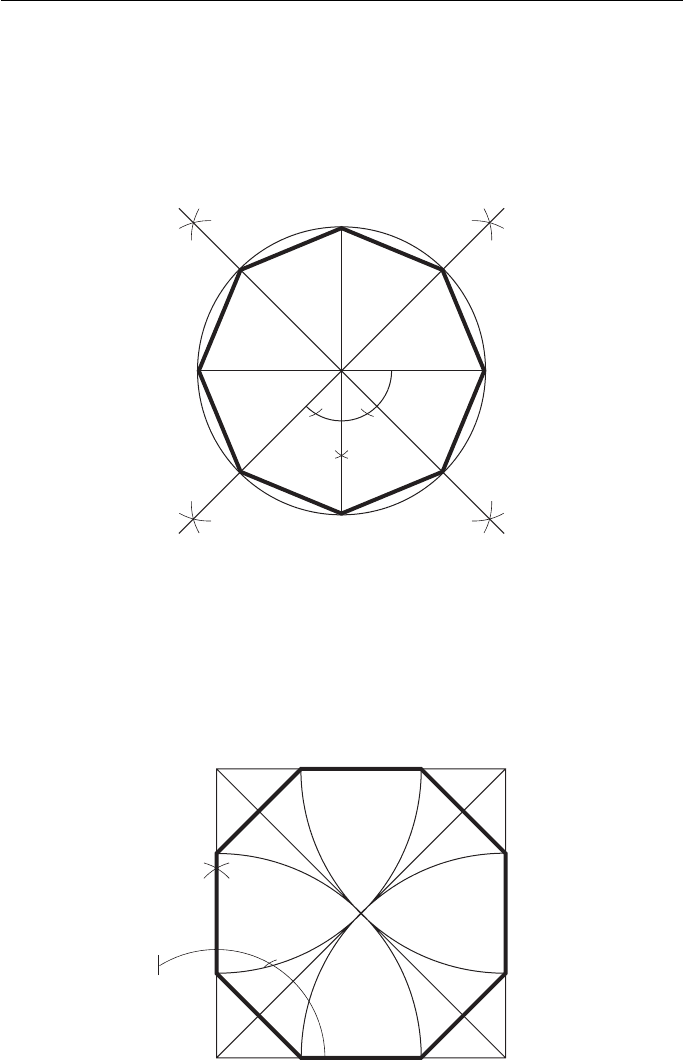
To construct a regular octagon given the diagonal, i.e. within a given circle
( Fig. 2.29 ).
1. Draw the circle and insert a diameter AE.
2. Construct another diagonal CG, perpendicular to the first diagonal.
3. Bisect the four quadrants thus produced to cut the circle in B, D, F and H.
ABCDEFGH is the required octagon.
C
G
DB
FH
AE
Figure 2.29
T
CDR
E
F
GHP
A
B
S
Q
Figure 2.30
To construct a regular octagon given the diameter, i.e. within a given square
( Fig. 2.30 ).
1. Construct a square PQRS, length of side equal to the diameter.
2. Draw the diagonals SQ and PR to intersect in T.
3. With centres P, Q, R and S draw four arcs, radius PT ( QT R T ST) to cut the square
in A, B, C, D, E, F, G and H.
The Construction of Geometric Figures from Given Data 25
ABCDEFGH is the required octagon.
To construct any given polygon, given the length of a side.
There are three fairly simple ways of constructing a regular polygon. Two meth-
ods require a simple calculation and the third requires very careful construction if it
is to be exact. All three methods are shown. The construction work for any polygon,
and a heptagon (seven sides), has been chosen to illustrate them.
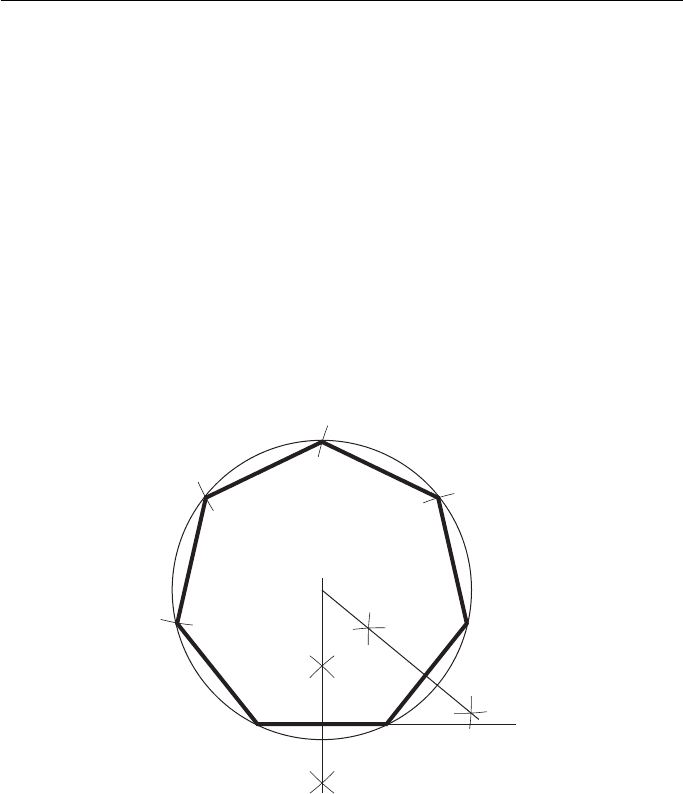
Method 1 ( Fig. 2.31 ).
1. Draw a line AB equal in length to one of the sides and produce AB to P.
2. Calculate the exterior angle of the polygon by dividing 360 ° by the number of sides. In this
case the exterior angle is 360 ° /7 51 3 ° /7.
3. Draw the exterior angle PBC so that BC AB.
4. Bisect AB and BC to intersect in O.
5. Draw a circle, centre O and radius OA ( OB OC).
6. Step off the sides of the figure from C to D, D to E, etc.
ABCDEFG is the required heptagon.
E
F
G
APB
D
C
O
Figure 2.31
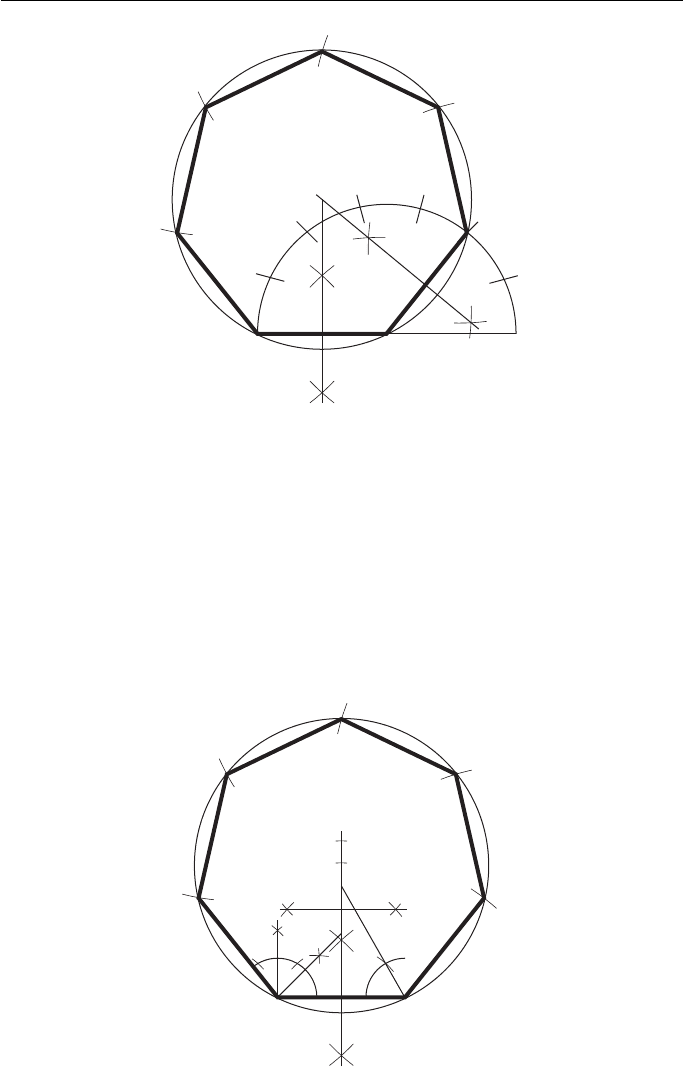
Method 2 ( Fig. 2.32 ).
1. Draw a line AB equal in length to one of the sides.
2. From A erect a semi-circle, radius AB to meet BA produced in P.
3. Divide the semi-circle into the same number of equal parts as the proposed polygon has
sides. This may be done by trial and error or by calculation (180 ° /7 25 5 ° /7 for each arc).
4. Draw a line from A to point 2 (for ALL polygons). This forms a second side to the polygon.
5. Bisect AB and A
2
to intersect in O.
6. With centre O draw a circle, radius OB ( O A O
2
).
7. Step off the sides of the figure from B to C, C to D, etc.
ABCDEFG is the required septagon.
Geometric and Engineering Drawing26
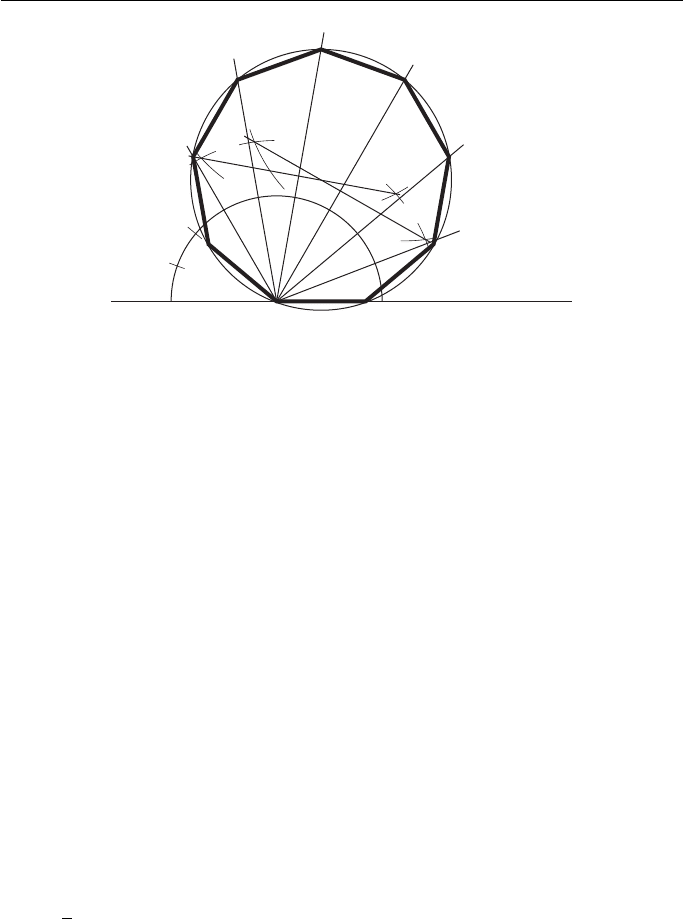
Method 3 ( Fig. 2.33 ).
1. Draw a line GA equal in length to one of the sides.
2. Bisect GA.
3. From A construct an angle of 45 ° to intersect the bisector at point 4.
4. From G construct an angle of 60 ° to intersect the bisector at point 6.
5. Bisect between points 4 and 6 to give point 5.
Point 4 is the centre of a circle containing a square. Point 5 is the centre of a circle contain-
ing a pentagon. Point 6 is the centre of a circle containing a hexagon. By marking off points
at similar distances the centres of circles containing any regular polygon can be obtained.
D
C
B
A
G
E
F
8
7
6
5
4
Figure 2.33
E
D
C
BP
7
6
5
4
3
1
2
A
F
G
O
Figure 2.32

The Construction of Geometric Figures from Given Data 27
6. Mark off point 7 so that 6 to 7 5 to 6 ( 4 to 5).
7. With centre at point 7 draw a circle, radius 7 to A ( 7 to G).
8. Step off the sides of the figure from A to B, B to C, etc.
ABCDEFG is the required heptagon.
To construct a regular polygon given a diagonal, i.e. within a given circle
( Fig. 2.34 ).
1. Draw the given circle and insert a diameter AM.
2. Divide the diameter into the same number of divisions as the polygon has sides.
3. With centre M draw an arc, radius MA. With centre A draw another arc of the same radius
to intersect the first arc in N.
4. Draw N
2
and produce to intersect the circle in B (for any polygon).
5. AB is the first side of the polygon. Step out the other sides BC, CD, etc.
ABCDE is the required polygon.
E
D
M
C
A
B
54321
N
Figure 2.34
To construct a regular polygon given a diameter ( Fig. 2.35 ).
1. Draw a line MN.
2. From some point A on the line draw a semi-circle of any convenient radius.
3. Divide the semi-circle into the same number of equal sectors as the polygon has sides (in
this case nine, i.e. 20 ° intervals).
4. From A draw radial lines through points 1 to 8.
Geometric and Engineering Drawing28
5. If the polygon has an even number of sides, there is only one diameter passing through A.
In this case, bisect the known diameter to give centre O. If, as in this case, there are two
diameters passing through A (there can never be more than two), then bisect both diam-
eters to intersect in O.
6. With centre O and radius OA, draw a circle to intersect the radial lines in C, D, E, F, G and H.
7. From A mark off AB and AJ equal to CD, DE, etc.
ABCDEFGHJ is the required polygon.
The constructions shown above are by no means all the constructions that you
may be required to do, but they are representative of the type that you may meet.
If your geometry needs a little extra practice, it is well worthwhile proving these
constructions by Euclidean proofs. A knowledge of some geometric theorems is
needed when answering many of the questions shown below, and proving the above
constructions will make sure that you are familiar with them.
Exercise 2
1. Construct an equilateral triangle with sides 60 mm long.
2. Construct an isosceles triangle that has a perimeter of 135 mm and an altitude of 55 mm.
3. Construct a triangle with base angles 60 ° and 45 ° and an altitude of 76 mm.
4. Construct a triangle with a base of 55 mm, an altitude of 62 mm and a vertical angle of
37
1
2
°.
5. Construct a triangle with a perimeter measuring 160 mm and sides in the ratio 3:5:6.
6. Construct a triangle with a perimeter of 170 mm and sides in the ratio 7:3:5.
7. Construct a triangle given that the perimeter is 115 mm, the altitude is 40 mm and the ver-
tical angle is 45 ° .
8. Construct a triangle with a base measuring 62 mm, an altitude of 50 mm and a vertical
angle of 60 ° . Now draw a similar triangle with a perimeter of 250 mm.
9. Construct a triangle with a perimeter of 125 mm, whose sides are in the ratio 2:4:5. Now
draw a similar triangle whose perimeter is 170 mm.
F
E
D
C
B
MN
2
1
A
J
9
H
G
O
3
4
5
6
7
8
Figure 2.35

The Construction of Geometric Figures from Given Data 29
10. Construct a square of side 50 mm. Find the mid-point of each side by construction and
join up the points with straight lines to produce a second square.
11. Construct a square whose diagonal is 68 mm.
12. Construct a square whose diagonal is 85 mm.
13. Construct a parallelogram given two sides 42 mm and 90 mm long, and the angle between
them 67 ° .
14. Construct a rectangle that has a diagonal 55 mm long and one side 35 mm long.
15. Construct a rhombus if the diagonal is 75 mm long and one side is 44 mm long.
16. Construct a trapezium given that the parallel sides are 50 mm and 80 mm long and are
45 mm apart.
17. Construct a regular hexagon, 45 mm side.
18. Construct a regular hexagon if the diameter is 75 mm.
19. Construct a regular hexagon within an 80 mm diameter circle. The corners of the hexagon
must all lie on the circumference of the circle.
20. Construct a square, side 100 mm. Within the square, construct a regular octagon. Four
alternate sides of the octagon must lie on the sides of the square.
21. Construct the following regular polygons:
a pentagon, side 65 mm;
a heptagon, side 55 mm;
a nonagon, side 45 mm;
a decagon, side 35 mm.
22. Construct a regular pentagon, diameter 82 mm.
23. Construct a regular heptagon within a circle, radius 60 mm. The corners of the heptagon
must lie on the circumference of the circle.
This page intentionally left blank
Geometric and Engineering Drawing. DOI:
© 2010 Elsevier Ltd. All rights reserved.2010
10.1016/B978-0-08-096768-4.00003-6
Isometric Projection
Engineering drawings are always drawn in orthographic projection. For the presenta-
tion of detailed drawings, this system has been found to be far superior to all others.
The system has, however, the disadvantage of being very difficult to understand by
people not trained in its usage. It is always essential that an engineer be able to com-
municate his ideas to anybody, particularly people who are not engineers, and it is
therefore an advantage to be able to draw using a system of projection that is more
easily understood. There are many systems of projection and this book deals with
three: isometric, oblique and orthographic projections. Isometric and oblique projec-
tions present the more pictorial view of an object.
True isometric projection is an application of orthographic projection and is dealt
with in greater detail later in this chapter. The most common form of isometric pro-
jection is called ‘ conventional isometric ’ .
Conventional Isometric Projection (Isometric Drawing)
If you were to make a freehand drawing of a row of houses, the house furthest away
from you would be the smallest house on your drawing. This is called the ‘ perspec-
tive ’ of the drawing and, in a perspective drawing, none of the lines are parallel.
Isometric drawing ignores perspective altogether. Lines are drawn parallel to each
other and drawings can be made using a T-square and a set square. This is much sim-
pler than perspective drawing.
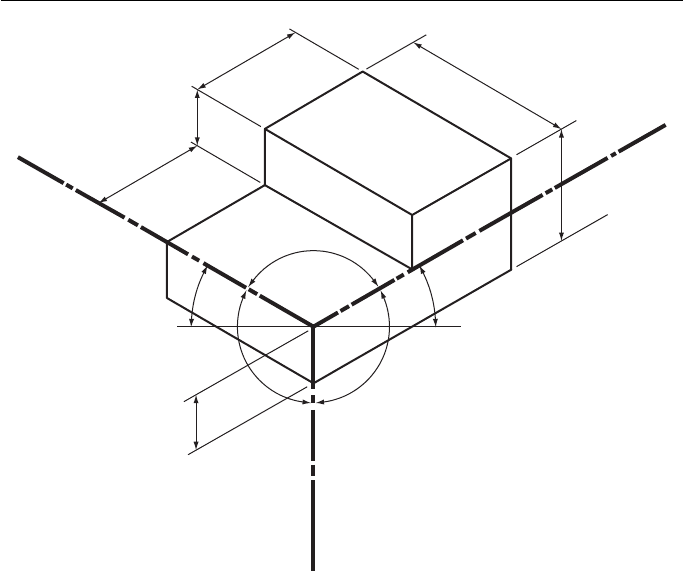
Figure 3.1 shows a shaped block drawn in conventional isometric projection.
You will note that there are three isometric axes. These are inclined at 120 °
to each other. One axis is vertical and the other two axes are therefore at 30 ° to the
horizontal. Dimensions measured along these axes, or parallel to them, are true
lengths.
The faces of the shaped block shown in Fig. 3.1 are all at 90 ° to each other. The
result of this is that all of the lines in the isometric drawing are parallel to the isomet-
ric axes. If the lines are not parallel to any of the isometric axes, they are no longer
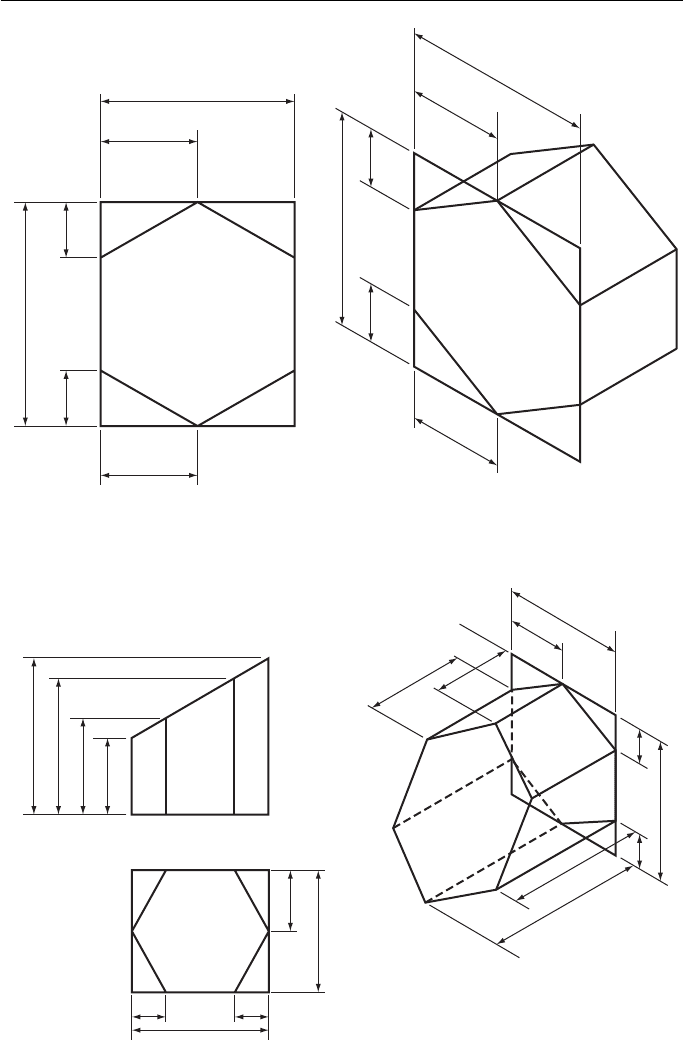
true lengths. An example of this is shown in Fig. 3.2 which shows an isometric draw-
ing of a regular hexagonal prism. The hexagon is first drawn as a plane figure and a
simple shape, in this case a rectangle, is drawn around the hexagon. The rectangle
is easily drawn in isometric and the positions of the corners of the hexagon can be
transferred from the plane figure to the isometric drawing with a pair of dividers.
3
Geometric and Engineering Drawing32
The dimensions of the hexagon should all be 25 mm and you can see from Fig.
3.2 that lines not parallel to the isometric axes do not have true lengths.
Figure 3.3 shows another hexagonal prism. This prism has been cut at an incline
and this means that two extra views must be drawn so that sufficient information to
draw the prism in isometric can be transferred from the plane views to the isometric
drawing.
This figure shows that, when making an isometric drawing, all dimensions must
be measured parallel to one of the isometric axes.
120°
120°
12 mm
12 mm
24 mm
25 mm
25 mm
37 mm
120°
30°30°
Isometric axis
Isometric axis
Isometric axis
Figure 3.1 Shaped block drawn in conventional isometric projection.
Isometric Projection 33
b
b
b
a
a
b
a
A
A
B
B
a
Figure 3.2 An isometric drawing of a regular hexagonal prism.
c
b
aa
f
e
aa
B
A
d
d
c
b
B
A
e
f
Figure 3.3 A hexagonal prism cut obliquely.
