Kounadis A.N., Gdoutos E.E. (Eds.) Recent Advances in Mechanics
Подождите немного. Документ загружается.

Photoelastic Tomography as Hybrid Mechanics 189
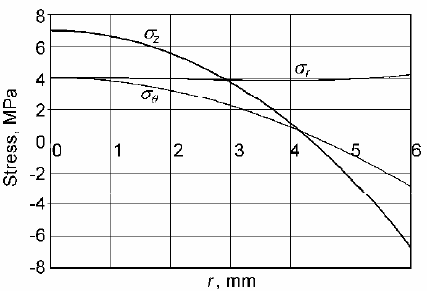
Fig. 4. Normal stress components in section B – B.
4 Conclusions
It has been shown that using equations of the theory of elasticity, hybrid algo-
rithms can be constructed for complete determination of axisymmetric stress fields
in photoelastic tomography. Determination of the residual stress in glass needs ap-
plication of a different algorithm as compared with the case of external loads.
Acknowledgments
Support of the Estonian Science Foundation (grant No. 7840) is gratefully
acknowledged.
References
1. Herman, C.T.: Image Reconstruction from Projections. Academic Press, New York
(1980)
2. Sharafutdinov, V.A.: Integral Geometry of Tensor Fields. VSP, Utrecht (1994)
3. Aben, H.K., Josepson, J.I., Kell, K.-J.: The case of weak birefringence in integrated
photoelasticity. Opt. Lasers Eng. 11, 145–157 (1989)
4. Aben, H., Guillemet, C.: Photoelasticity of Glass. Springer, Berlin (1993)
5. Schupp, D.: Optische Tensortomographie zur Bestimmung räumlicher Spannungs-
verteilungen. Tech. Mess. 66, 54–60 (1999)
6. Aben, H., Errapart, A., Ainola, L., et al.: Photoelastic tomography for residual stress
measurement in glass. Opt. Eng. 44, 093601-1–8 (2005)
7. Dash, C.J.: One-dimensional tomography: a comparison of Abel, onion-peeling, and
filtered backprojection methods. Appl. Opt. 31, 1146–1152 (1992)
8. Aben, H., Ainola, L., Errapart, A.: Application of the Abel inversion in case of a tensor
field. Inverse Problems in Sci. Eng. 18, 241–249 (2010)
9. Doyle, J.F., Danyluk, H.T.: Integrated photoelasticity for axisymmetric problems. Exp.
Mech. 18, 215–220 (1978)
190 H. Aben, L. Ainola, and A. Errapart
10. Doyle, J.F.: Closed-form inversion of the axisymmetric integrated photoelasticity
equations. Appl. Mech. 47, 431–433 (1980)
11. Bartenev, G.M.: The Structure and Mechanical Properties of Inorganic Glasses. Wolt-
ers-Nordhoff, Groningen (1970)
12. Gardon, R.: Thermal tempering of glass. In: Uhlman, D.R., Kreidl, N.J. (eds.) Elastic-
ity and strength of glass, vol. 5, pp. 146–170. Academic Press, New York (1980)
13. Melan, E., Parkus, H.: Wärmespannungen infolge stationärer Temperaturfelder.
Springer, Wien (1953)
14. O’Rourke, R.C.: Three-dimensional photoelasticity. J. Appl. Phys. 22, 872–878 (1951)
Using an Electronic Speckle Interferometry for
Measurement of a Stress-Deformation State
of Elastic Bodies and Structures
Robert V. Goldstein, Viktor M. Kozintsev, and Aleksandr L. Popov
A.Yu.Ishlinsky Institute for Problems in Mechanics, the Russian
Academy of Sciences, 119526, Vernadskogo 101, Moscow, Russia
goldst@ipmnet.ru
Abstract. The method and equipment of the electronic speckle pattern interfer-
ometry (ESPI) for studying a stress-deformation state (SDS) of elastic bodies and
structures are presented. Examples of use ESPI for measurements of residual
stresses in welded structures, microdisplacements related to delamination of thin
coatings, diagnostics of shrinkage stresses in coatings, determination of their elas-
tic characteristics, generalization of the ESPI method for measurements of dis-
placements of the nanometer scale fulfilled in IPMech RAS are given.
1 Introduction
Starting from pioneer studies by Burch and Tokarski [1] a practical speckle interfer-
ometry of small surface displacements of a body being analyzed has gained wide
recognition of scientists and engineers as one of effective tools for studying SDS of
elastic bodies and structures, in particular, - after replacement of photographic plates
by analogue television systems [2, 3] and introduction of numerical handling of im-
ages on computer [4]. The key advantages of the method are related with quickness
of information receiving, contact-free measurements, almost full absence of special
requirements for preparing an analyzed surface, presentation of direct measurements
as a map of level lines of microdisplacements of a surface under consideration.
Two methods of microdisplacements recording are used. The first two-exposition
method implies registration of specklograms of a part of an investigated surface be-
fore and after creation of the perturbation providing small displacements. The level
lines of the displacements are reflected in the form of interference bands with a step
equals a half-length of the wave induced by laser used in the interferometer. The
second method consists in observation of time changes of a specklogram of a sur-
face transmitted through a specklogram of some reference state (analogue of a holo-
graphic interferogram of real time). As a result of such superposition a continuously
changing speckle interferogram occurs. The interferogram represents a system of
mobile interference bands. The used algorithm of the image treatment provides
192 R.V. Goldstein, V.M. Kozintsev, and A.L. Popov
translation of the mobile interferogram of DVD-quality (768x576 points) on the
screen of a computer monitor with the rate being non less than the translation rate of
specklograms without superposition (30 frames per second).
Generally the scheme of using the ESPI method consists of following stages:
• development of a theoretical model of an expected stress-deformed state of a
body;
• making a speckle image of a body initial state;
• action on a body;
• making a speckle image of the body deformed state;
• interferogram making;
• determination of number, shifts and orientation of fringes;
• comparison of the real and calculated interferograms;
• evaluation of stresses and displacements levels of a body, elastic properties, etc.
The technique for SDS measuring by means of the ESPI method was implemented
in the portable speckle interferometer "LIMON-TV" designed and fabricated in
IPMech RAS. The equipment provides visual and numerical registration of fields
of small elastic surfaces displacements, observation of a deformation process in
time, recalculation of levels of the registered displacements to stresses.
2 Combined Methods of the ESPI and Blind-Hole Drilling
Among the applications of the electronic speckle interferometry for SDS meas-
urements, in particular, - in welded joints, first of all one can mention a direction
of studying residual stresses by measuring the displacements near a part through
probing hole. This direction has scored recently 75
th
anniversary. Accuracy of the
method is essentially higher as compared to other methods (ultrasonic, X-ray,
magnetic, etc.) which have the errors comparable to the measured value in view of
heterogeneity of a welded joint, ambiguity of interrelation of registered physical
properties with mechanical stresses. A range of stresses measured by the ESPI
method, e.g. in steels, is rather wide - from 15 MPa to yield strength. The error of
measurements is varied from ~ 10% for small stresses to ~ 2-3% for the stresses of
order the yield strength.
2.1 Calculating Models in the Blind-Hole Method
Calculating models in the blind-hole method are based on several assumptions:
a) within the diameter of a blind hole residual stresses are remained constant
in any section parallel to the surface of a body;
b) changes of stresses through the depth of a hole are approximated by linear
functions;
c) a mutual influence of adjacent holes and body edges is absent.
The initial hypotheses are illustrated in Fig. 1 where interrelations between a hole
diameter 2R and a characteristic curvature radius of a surface of investigated body
R
1
(a) as well as linear approximation for changes of the principal residual stresses

Using an Electronic Speckle Interferometry 193
01
(1 2 / ), ,
ii ii ii
zh i xy
σσσ
=+ − =
at depth h of a small blind hole (b) are shown. These changes are described by the
formula
where the first term - constant component of residual stresses, and second - the
component self-counterbalanced on depth of a hole.
Fig. 1. Calculating models in the blind-hole method: a - interrelations between a hole di-
ameter 2R and a characteristic curvature radius of a surface of investigated body R
1
, R
2
; b -
linear approximation for changes of the principal residual stresses at depth h of a blind hole
Despite simplified nature of a model of stress changes through depth of a hole,
the numerical solution of the appropriate 3D elasticity problem is needed for search-
ing for interrelations between the interior SDS and surface microdisplacements. As a
result of making of a hole of radius R and depth h in an stressed body the lateral area
and a bottom of a hole became to be stress free. Under the influence of the stresses
acting in a remaining part of a body, the lateral area and a bottom of a hole are de-
formed; together with them the body surface in a hole neighbourhood is also de-
formed. Microdisplacements of this surface are a diagnostic indication for evaluation
of the interior stresses existing in a body before drilling of a hole.
At the numerical solving of the problem on searching for a SDS perturbed by a
hole it was accounted for that at hole drilling by an usual drill, the hole has a cylin-
droconical form. This circumstance leads to additional difficulties at generation of a
finite-element mesh, but as it became clear, has a small influence on the final de-
pendences between the stresses in a body and displacements at its external surface.
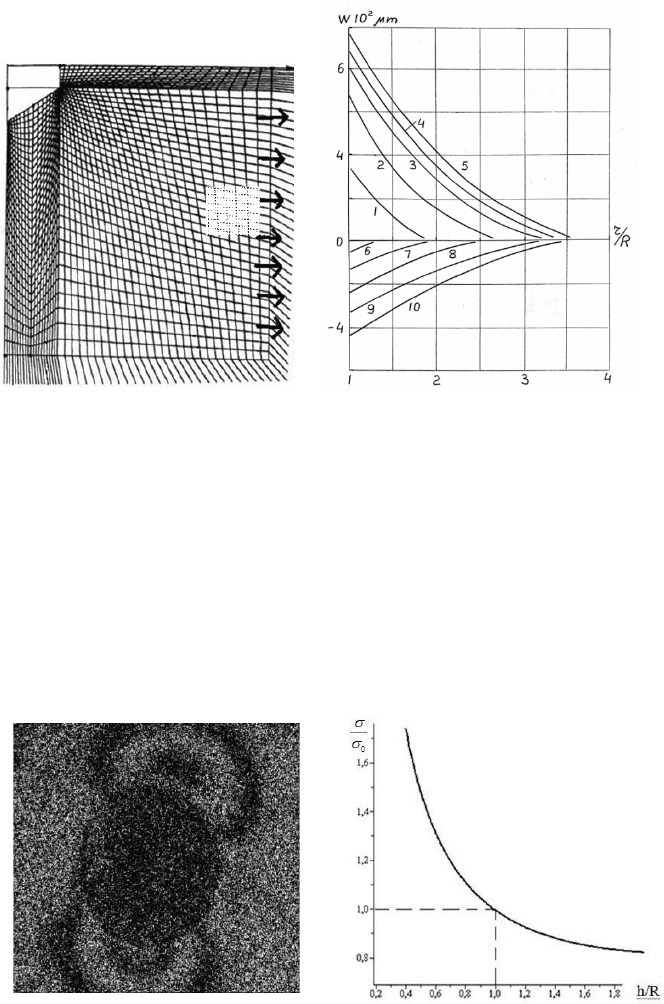
The longitudinal section of the hole and the scheme of finite elements near to a
hole is given in Fig. 2. One of the stress components is also shown by arrows.
Calculations were performed at the given unit value of one of the stress
0
xx
σ
, or
1
xx
σ
for different ratios of the hole depth and radius. Plots of displacements w of a
surface of an aluminum body in the direction of the action of the stress
0
xx
σ
= 10
MPa are given in Fig. 3 (curves 1÷5) for various hole depths: from 0.4R to 2R
with a step 0.4R at R=1mm. The surface displacements in the transverse direction
are also given in Fig. 3 (curves 6÷10). The coordinate r on the abscissa axis can
have a sense of a distance from the hole edge on axis Ox, or - on axis Оy depend-
ing on the plots considered: above the value w=0 or below this value.
a
b a
194 R.V. Goldstein, V.M. Kozintsev, and A.L. Popov
ߪ
௫௫
Fig. 2. The form of hole and the finite
element mesh
Fig. 3. Plots of normal displacements w:
1 - 5 - on an axis Ox, 6 - 10 - on axis Оy;
numbering corresponds to increase of a ref-
erence blind-hole (R = 1 mm) depth from
0,4R to 2R with step 0,4R at
0
xx
σ
=10 MPa
On the basis of the results given in Fig. 3 one can determine an interference
fringe value at the experimental diagnostics of stresses in a body, i.e. the quantity of
a stress providing displacement of an edge of a hole on a step of fringes. The step of
fringes is a difference of heights between the adjacent fringes of the same type (dark
or bright) equals the length of a half-wave of the laser used in a measuring system.
One of the characteristic interferograms of microdisplacements of a surface of a
body in a neighbourhood of the blind- hole (dark circle) is given in Fig. 4.
,
Fig. 4. The interferogram of uniaxial stress
state
Fig. 5. The fringe value in stresses depend-
ing on a reference blind-hole depth (Ϭ
0
=40
MPa, R=1 mm)

Using an Electronic Speckle Interferometry 195
()
ref
ref
D
AE
BN
hDE
σ
=+
Level lines of normal surfaces displacements near to a hole are mapped on an
interferogram by the system of dark and bright fringes. Multiplying the number of
fringes by the fringe value, it is possible to calculate the quantity of an acting
stress. Directions of the displacement gradient related to a difference of the states
before and after the blind-hole drilling are also seen in Fig. 4. Owing to the
adopted linear model of a deforming of a body, the gradient directions coincides
with the directions of principal stresses in a body in the same place before hole
drilling. Note that a dominating stress of one direction is better established namely
by not deep holes (h/R <1) whereas in case of a through hole the stress of one di-
rection leads to displacements of the same moduli both in the direction of the
stress action and in the perpendicular direction [5]. At the same time the general
threshold of the method sensitivity to stresses decreases with growth of the
relative depth of a hole (see Fig. 5). At this figure the unit stress is related to the
displacement of one fringe value at the hole edge.
On the basis of the dependence,
given in Fig. 5 and similar ones for different
materials the express method for stresses evaluation in a direction of the symmetry
axis of the interferogram has been formulated. The stress value is calculated by the
following formula
where h and D=2R are depth and diameter of a hole, Е is the Young modulus of a
tested material, N is number of the fringes registered on an interferogram in the
chosen direction, А and В are the calculated constants, D
ref
=2 mm is the diameter
of a hole in an etalon material aluminium (E
ref
= 70 GPa).
Deficiency of a two-exposition speckle interferometry is lack of a possibility for
the determining of the stress sign (compressive or tensile) by the form interfero-
grams; in both cases interferograms are identical if the values of stresses moduli co-
incide. To overcome this difficulty one can observe a neighbourhood of a hole after
its drilling in the conditions of an interferogram of real time and making a small shift
of fringes (without change of their number) in the course of this observation. The
shift for instance, can be caused by an action on the optical block of the interferome-
ter. As a result of this action the course of the beams is changed leading to a shift of
interferogram fringes. In the direction of this shift the relief of the surface displace-
ments in a hole neighbourhood becomes visible. Then by incorporating relations
between stresses and displacements given in [5] the sign of the stress can be deter-
mined. The given process of definition of a stress sign searching for is illustrated in
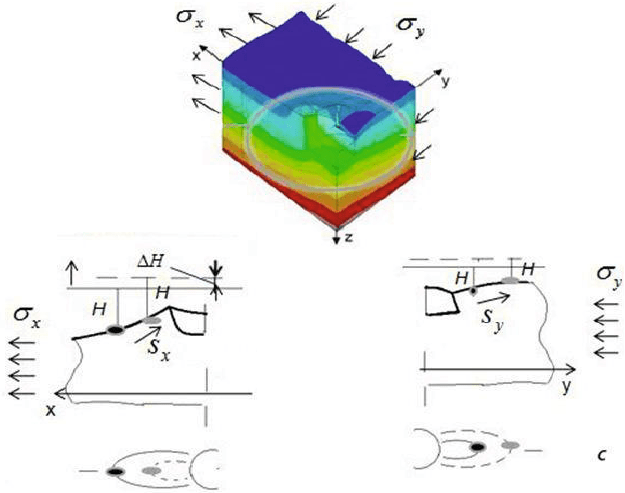
Fig. 6. A three-dimensional element of the body model (a) in a neighbourhood of a
blind- hole with the given tensile,
σ
x
, and compressive,
σ
y
, stresses is shown in
Fig. 6a. The central sections of the element xOz and yOz with a hole contour and a
profile of a deflection of a surface of a body after deformation from stresses
σ
x
and
σ
y
are shown in Fig. 6b and Fig. 6c, respectively. Under each section it is shown the top
view on the level lines of a deflection of a surface. The level lines contain a point,
marked on a deflection lateral view by the black stain, similar to the form of the
interference fringes observed in experiment. The horizontal lines located on the
196 R.V. Goldstein, V.M. Kozintsev, and A.L. Popov
a
b
Fig. 6. Directions of shift of «live fringes» at small change of an optical difference
of a beam path length in the interferometer are determined by the stress sign (a - a three-
dimensional element of the body model in a neighbourhood of a blind hole, b - central cross
section of a body along the direction of tensile stress Ϭ
x
, c - cross section along the direc-
tion of compressive stress Ϭ
y
distance Н from these points show the initial position of an optical axis of an inter-
ferometer. It can be seen that at small change,
Δ
H, of the value H it is required a
shift of the appropriate fringe in the direction S
x
to the hole or in the direction S
y
from the hole in cases of tensile or compressive stresses, respectively, to restore the
optical trajectory for the given fringe (final positions of the fringes are shown in
Fig. 6b,c with grey stains and dashed lines).
2.2 Experimental Studies of the Residual Stresses
The method for studying SDS by means of an electronic speckle-pattern interfer-
ometry was realized in portable speckle interferometer "LIMON-TV" designed and
fabricated in IPMech RAS. The device provides visual and numerical registration of
fields of small elastic surfaces displacements of a body, as well as observation of a
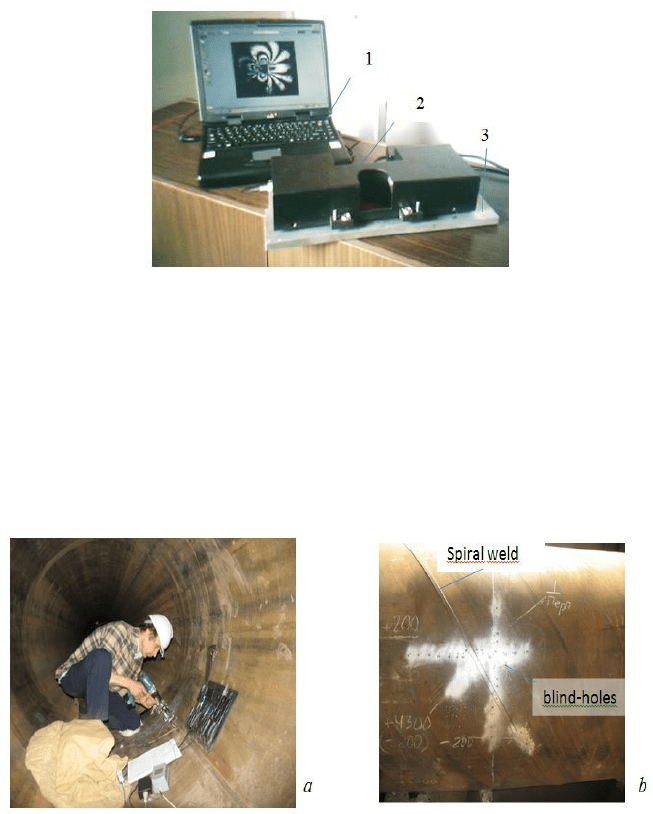
deformation process in time. The general view of interferometer "LIMON-TV" in
portable variant is given in Fig. 7. The device consists of computer (1) and optical
blocks of an interferometer (2). The sample with a weld is also presented (3). Over-
all dimensions of the optical block - 30x10x10 cm, weight - 2 kg; the observation
area varies in limits from 0,5 to 100 cm
2
; measurement limits: on normal displace-
ments 10
-7
÷10
-3
cm, on angular velocities of the relative motion of separate parts of
an observable surface of object –10
-2
÷10
2
degrees per hour.
Using an Electronic Speckle Interferometry 197
Fig. 7. The electronic speckle-pattern interferometer “LIMON-TV”: 1 - the computer
block, 2 - the optical block, 3 - the sample with a weld
Experimental studies of the residual stresses were performed on various objects
in laboratory, industrial and field conditions. Drilling of a blind hole in a weld in a
gas pipe of large diameter is shown in Fig. 8a. Numerous blind holes in a
neighbourhood of a spiral weld on an external surface of this pipe are shown in
Fig. 8b. On the basis of the measurement the data of principal stresses were evalu-
ated. To increase the data accuracy a surface region of hole drilling was coated
with a diffusely reflecting paint.
Fig. 8. The studies of the residual stresses in industrial conditions: a - drilling of a blind-
hole in a weld in a gas pipe of large diameter, b - disposition of blind holes in a neighbour-
hood of a spiral weld on an external surface of a pipe
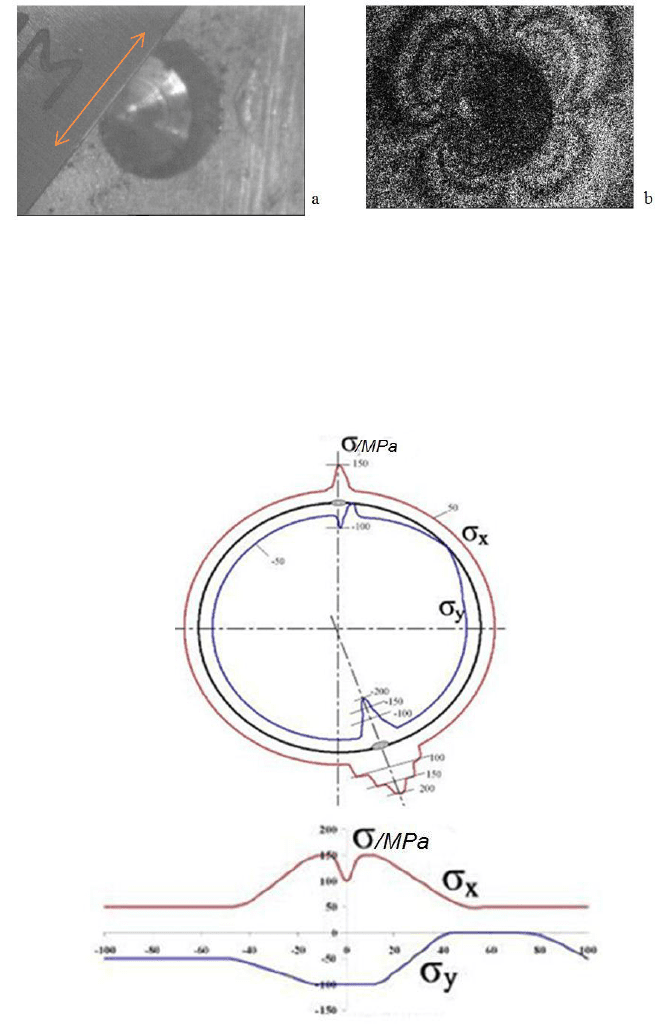
Directions of compressive and tensile stresses in welds and in heat affected
zones, as a rule, corresponded to theoretical predictions (see Fig. 9). The drilled
hole on an axis of a weld and a ruler marked a direction of a weld is shown in Fig.
9a. The interferogram of normal surfaces displacements of a pipe in a neighbour-
hood of this hole is given in Fig. 9b. The fringes characterize tensile (along a
weld) and compressive (in the transverse direction) stresses with similar moduli in
a weld before drilling of a hole.
198 R.V. Goldstein, V.M. Kozintsev, and A.L. Popov
Fig. 9. Appearance of a biaxial stress state on a weld axis: a - the drilled hole on an axis of
a weld and a ruler marked a direction of a weld, b - the interferogram of normal surfaces
displacements in a neighbourhood of this hole
Epures of principal stresses on an external surface of a pipe with a spiral weld
far from its end sections are given in Fig. 10. Stress distributions along pipe circles
and its generators are given in Fig. 10a and Fig.10b respectively. Maximal moduli
of tensile and compressive stresses are denoted by
σ
x
and
σ
y
.
a
b
Fig. 10. The diagrams of the measured residual stresses in the gas pipe along pipe circles
(a) and its generators (b)
a direction
of a weld
