Sha W., Malinov S. Titanium Alloys: Modelling of Microstructure, Properties and Applications
Подождите немного. Документ загружается.


Surface gas nitriding: phase composition and microstructure 423
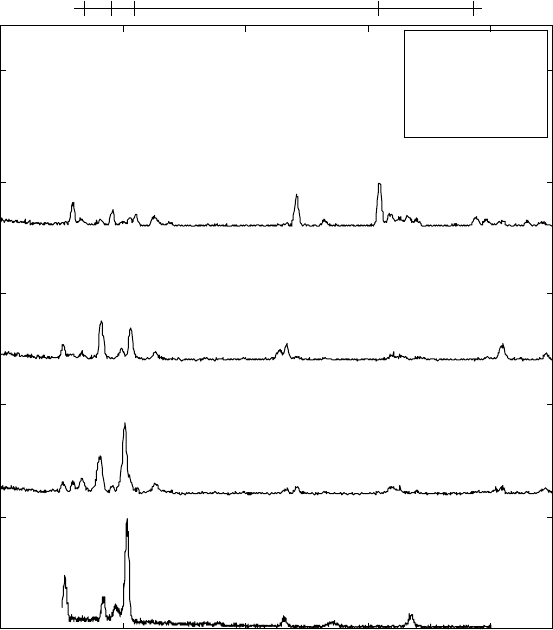
2Mo (Fig. 16.3). α-Ti(N) has a similar diffraction pattern to TiN
0.3
. TiN
0.3
has the lowest nitrogen content among all titanium nitrides and a similar
structure to α-Ti, and it was detected on the surface of titanium alloys nitrided
under similar processing conditions, as reported in the literature. It is difficult
to distinguish which of these phases is present, due to the similarity of their
diffraction patterns.
Ti-6Al-2Sn-4Zr-2Mo alloy, as well as Ti-8Al-1Mo-1V alloy, has a high
aluminium content and because of that it is supposed that the aluminium-
rich phases Ti
3
Al or Ti
2
AlN may exist under certain processing conditions.
XRD analyses (Fig. 16.3), however, do not show Ti
3
Al or Ti
2
AlN phases.
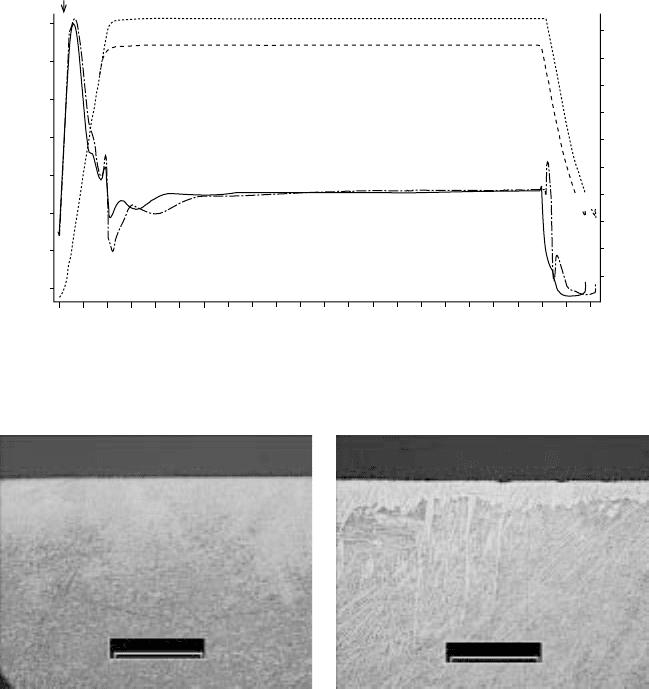
The formation of new phases is also evident in the differential scanning
calorimetry and thermo-gravimetry (DSC/TG) curves in Fig. 16.4. It can be
seen that phase transformations took place during heating and cooling for
• α-Ti (N)
⇓ TiN
↓ TiO
2
30 40 50 60 70
2θ (°)
Intensity (c.p.s)
2000
1500
1000
500
0
1 h
3 h
5 h
•
⇓•
⇓
•
•
{103}
← {310}
•
{110}
⇐ {220}
← {220}
← {211}
⇐ {200}
•
{102}
← {200}
•
{101}
← {101}
← {111}
⇓
•
⇓
•
⇓
•
•
⇓
⇐ {311}
•
•
⇐ {111}
•
{100}
⇓
•
{002}
← {210}
← {101}
16.3
X-ray diffraction patterns of Ti-6Al-2Sn-4Zr-2Mo after gas
nitriding at 1050 °C for 1, 3 and 5 hours.

Titanium alloys: modelling of microstructure424
the sample nitrided at 950 °C for 5 hours. These curves are from the DSC
with TG, so the increase of the sample mass could also be recorded during
the process of nitriding. An increase of about 0.5% is obtained for the sample
nitrided at 950 °C for 5 hours.
Titanium oxide TiO
2
is detected for all alloys. Further experiments were
carried out, removing the surface layers of a nitrided sample in steps of
approximately 10 µm, performing X-ray analyses after each removing step.
These experiments were carried out in order to see how the phase composition
changes with depth (Fig. 16.5). From the first scan, it can be seen that the top
layer consists of mainly TiO
2
. Underneath, TiN and α-Ti(N) are also detected.
The third scan shows the existence of only α-Ti(N). These results prove that
the oxide is present on the surface of the materials and does not penetrate the
sample.
16.3.2 Microstructure
There are differences in the microstructure of the alloy nitrided at different
temperatures and for different times (Fig. 16.6). The nitrided layer after
950 °C is uniform and homogeneous, and the layer thickness can be measured.
The layer thickness is 60, 120, and 180 µm after 1, 3, and 5 hours, respectively,
with an error of ±10 µm. By increasing the nitriding temperature to 1050 °C,
an irregular needle structure is formed under the surface. In this case, it is
difficult to define the layer thickness from the microstructure. The grain
growth at the higher nitriding temperature is because 1050 °C is above the β-
transus temperature for this alloy (995±15 °C). The grain size increases to
TG(%)
100.30
100.20
100.10
100.00
99.90
Time–temperature curve
TG signal
DTA signal
0 50 100 150 200 250 300 350
Time (min)
DTA (µV/mg)
Temperature
(°C)↑ exo
0.02
0
–0.02
–0.04
–0.06
–0.08
–0.10
–0.12
–0.14
900
800
700
600
500
400
300
200
100
0
16.4
DSC and TG curves of Ti-6Al-2Sn-4Zr-2Mo nitrided at 950 °C for
5 hours.

Surface gas nitriding: phase composition and microstructure 425
(b)
16.5
(a) X-ray diffraction patterns of Ti-6Al-2Sn-4Zr-2Mo after gas
nitriding at 950 °C for 5 hours and removing the surface layers in
steps of 10 µm; and (b) SEM micrograph of the microstructure and
the positions of the scans.
30 40 50 60 70
2θ (°)
(a)
1s
2s
3s
• α-Ti(N) ⇓ TiN
↓ TiO
2
Intensity (c.p.s.)
80000
60000
40000
20000
0
5000
0
3000
2000
1000
0
← {110}
← {101}
← {200}
← {210}
← {211}
← {220}
← {310}
← {301}
•
•
•
•
•
•
←
←
•
{100}
•
{002}
⇐
{111}
•
{101}
←
←
←
⇐
{200}
•
{102}
←
←
⇐
{220}
← /
•
{110}
←
← {112}
/
•
{103}
the order of 400 µm in length and 50 µm in width, after 5 hours nitriding
time, similar to the results for Ti-8Al-1Mo-1V. The alloys are in different
phase conditions during nitriding at 950 and 1050 °C. At 950 °C, the diffusion
zone is mainly in the α phase state, while at 1050 °C, the β phase is the only

Titanium alloys: modelling of microstructure426
16.6
Microstructure of Ti-6Al-2Sn-4Zr-2Mo after gas nitriding at 950
and 1050 °C for 1, 3 and 5 hours. (a) 950 °C, 1 h; (b) 1050 °C, 1 h; (c)
950 °C, 3 h; (d) 1050 °C, 3 h; (e) 950 °C, 5 h; (f) 1050 °C, 5 h. The dark
particles near the surface, most clearly seen in (f), are stains after
etching possibly due to residual etchant near the metal/resin
interface.
200 µm
200 µm
(a) (b)
200 µm 200 µm
(c) (d)
(e) (f)
200 µm
200 µm

Surface gas nitriding: phase composition and microstructure 427
phase. The mechanisms and kinetics of diffusion would be different, which
would result in the difference in the microstructure morphology.
The microstructure after nitriding at a lower temperature of 850 °C is
similar to the 950 °C microstructure. Both temperatures are below the
β-transus temperature for this alloy.
16.4
αα
αα
α +
ββ
ββ
β Ti-6Al-4V
16.4.1 Phase composition
As discussed in the previous sections about Ti-8Al-1Mo-1V and Ti-6Al-
2Sn-4Zr-2Mo, as a result of the diffusion process of gas nitriding, α-Ti(N),
16.7
X-ray diffraction patterns of Ti-6Al-4V after gas nitriding at (a)
950 and (b) 1050 °C for 1, 3 and 5 hours.
200 111 002 311
2
θ
(°)
Ti
2
N (5 h)
• α-Ti(N)
•α-Ti
⇓ TiN
↓ TiO
2
5 h
3 h
1 h
0 h
30 40 50 60 70
2θ (°)
(a)
Intensity (c.p.s.)
2500
2000
1500
1000
500
0
← {101}
⇐ {111}
•
{100}
← {200}
← {111}
⇐ {200}
← {210}
← {211}
← {220}
⇐ {220}
← {002}
← {310}
← {301}
← {112}
⇐ {311}
⇐
⇐
⇐
⇐
•
{002}
•
{101}
•
{102}
•
{110}
•
{103}
⇐
⇐
•
•
•
•
⇐
⇐
•
•
•
•
•
•
•

Titanium alloys: modelling of microstructure428
•α-Ti
• α-Ti(N)
⇓ TiN
↓ TiO
2
5 h
3 h
1 h
0 h
30 40 50 60 70
2θ (°)
(b)
Intensity (c.p.s.)
2500
2000
1500
1000
500
0
← {101}
⇐ {111}
← {200}
← {111}
⇐ {200}
← {210}
← {211}
← {220}
⇐ {220}
← {310}
← {301}
← {112}
⇐
⇐
⇐
⇐
•
{002}
•
{101}
⇐
⇐
•
•
←
•
•
•
•
•
⇐ {311}
•
{103}
⇐
•
{110}
•
{102}
•
{100}
←
←
←
←
←
←
16.7
Continued
cubic titanium nitride TiN and TiO
2
phases are formed on the surface of Ti-
6Al-4V alloy (Fig. 16.7). With the increase of the time to 10 hours and for
the alloy nitrided at 850 °C, the nitrided surface layer has the same phase
composition.
The coloration of the compound layer is different after nitriding at 950
and 1050 °C for different periods of time. After 1 hour of nitriding Ti-6Al-
4V has a golden colour, corresponding to the TiN compound. The red colour
of Ti-6Al-4V nitrided for 3 hours indicates the simultaneous formation of
titanium nitrides. Compounds identified by XRD are TiN and possibly Ti
2
N
at 950 °C, and TiN with a small amount of TiO
2
at 1050 °C. After 5 hours,
the metal colour is white, and the compounds are TiO
2
and TiN. The coloration
depends on the process parameters and the appearance of the new phases,
and is, by and large, consistent with the X-ray diffraction data.
As mentioned in the previous section about Ti-6Al-2Sn-4Zr-2Mo, the

Surface gas nitriding: phase composition and microstructure 429
phase transformations are also evident in the DSC curves obtained during
nitriding (Fig. 16.8). The peaks that appear during heating and cooling are
probably caused by the new phase formation.
16.4.2 Microstructure
The microstructure of Ti-6Al-4V, being an α + β alloy, is different from the
microstructure of the near-α alloys (Fig. 16.9, the microstructure of the alloy
nitrided for 10 hours, is similar).
16.8
DSC curves of Ti-6Al-4V nitrided at 950 (curve 1) and 1050
(curve 2) °C for 3 hours
exo
DSC (µV/mg)
0.300
0.250
0.200
0.150
0.100
0.050
0
–0.050
Time–temperature curves
DTA signals
0 50 100 150 200
Time (min)
[1][2]
[1][2]
Temperature
(°C)
1000
800
600
400
200
200 µm
200 µm
(a) (b)
16.9
Microstructure of Ti-6Al-4V after gas nitriding at 950 and 1050 °C
for 1, 3 and 5 hours. (a) 950 °C, 1 h; (b) 1050 °C, 1 h; (c) 950 °C, 3 h;
(d) 1050 °C, 3 h; (e) 950 °C, 5 h; (f) 1050 °C, 5 h.

Titanium alloys: modelling of microstructure430
200 µm
200 µm
(c) (d)
200 µm
200 µm
(e) (f)
16.9
Continued
(a)
Compound layer
16.10
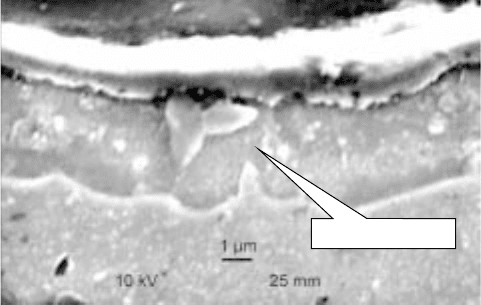
SEM images of compound layer of Ti-6Al-4V after gas nitriding
at (a) 950 and (b) 1050 °C for 3 hours.

Surface gas nitriding: phase composition and microstructure 431
(b)
Compound layer
16.10
Continued
The thickness of the compound layer increases with the increase of
temperature (Fig. 16.10).
16.5 Near-
ββ
ββ
β Ti-10V-2Fe-3Al
16.5.1 Phase composition
Ti-10V-2Fe-3Al forms the same phases as the titanium alloys in the previous
sections during nitriding at the same processing parameters (Fig. 16.11). The
initial alloy condition consists of α-Ti and β-Ti, and the reaction during the
process of nitriding is as follows: α-Ti + β-Ti → α-Ti(N) + TiN + TiO
2
. The
same phase constitution is observed after nitriding at the lower temperatures
of 750 and 850 °C.
The coloration of the compound layer is different after nitriding, grey
after 1 hour of at 950 and 1050 °C, turning red after 3 and 5 hours at same
temperature regimes.
Ti-10V-2Fe-3Al contains 10% vanadium, but no nitrides of vanadium are
detected on the surface of the metal after the nitriding.
The lattice parameters a and c of the α phase increase after nitriding for
1 hour at 950 and 1050 °C. There is no significant change of both a and c
with further increase of the nitriding time to 3 and 5 hours at the temperature
of nitriding of 950 °C. There is no clear tendency for the lattice parameter a
after nitriding for different periods of time at 1050 °C. The values of the
lattice parameters a and c of the α phase are higher for Ti-10V-2Fe-3Al after
nitriding at the same processing parameters, though lower for the initial
samples as compared to these for Ti-8Al-1Mo-1V, possibly related with the
difference in the chemical composition of these two titanium alloys.

Titanium alloys: modelling of microstructure432
16.5.2 Microstructure
The compound layer in most cases is continuous and its thickness for the
alloy nitrided at 950 and 1050 °C for 3 and 5 hours varies between 5 and 10
µm, as seen from the cross-section.
The microstructure of the alloy nitrided at 750 °C is homogeneous, because
this temperature is below the β-transus temperature for this alloy (see Fig.
16.12a,c,e). Similar results are obtained for the other three alloys above. The
16.11
X-ray diffraction patterns of Ti-10V-2Fe-3Al after gas nitriding at
(a) 950 and (b) 1050 °C for 1, 3 and 5 hours.
•α-Ti • α-Ti (N) ↓ TiO
2
¤ β-Ti ⇓ TiN
5 h
3 h
1 h
0 h
30 35 40 45 50 55 60 65 70 75
2θ (°)
(a)
Intensity (c.p.s.)
4000
3500
3000
2500
2000
1500
1000
500
0
← {101}
⇐ {111}
•
{002}
← {111}
⇐ {200}
← {211}
← {220}
⇐ {220}
⇐
⇐
⇐
⇐
•
{100}
⇐
⇐
•
•
•
•
•
⇐
¤ {211}
←
←
←
←
←
¤ {220}
•
{101}
•
{102}
•
{110}/←
•
{103}
⇐ {311}
•
•
•
•
•
/ ←{002}
•
⇐
•
/ ←
•
•
¤ {110}
•
•
←
•
←
←
•
