Groshong Richard H. 3-D Structural Geology(Second Edition)
Подождите немного. Документ загружается.

159
6.5
Changing the Dip of the Section Plane
If a cross section is not perpendicular to the fold axis, it is helpful for structural inter-
pretation to rotate the section plane until it is a normal section. Alternatively, it might
be necessary to rotate a normal section to vertical. The necessary relationships are
equivalent to removing (or adding) a vertical exaggeration, as done in the visual method
of down
-plunge viewing.
From the geometry of Fig. 6.33, the exaggeration in a vertical section across a plung-
ing fold (Eq. 6.1) is
V
e
= t
v
/ t =1/cos
φ
. (6.8)
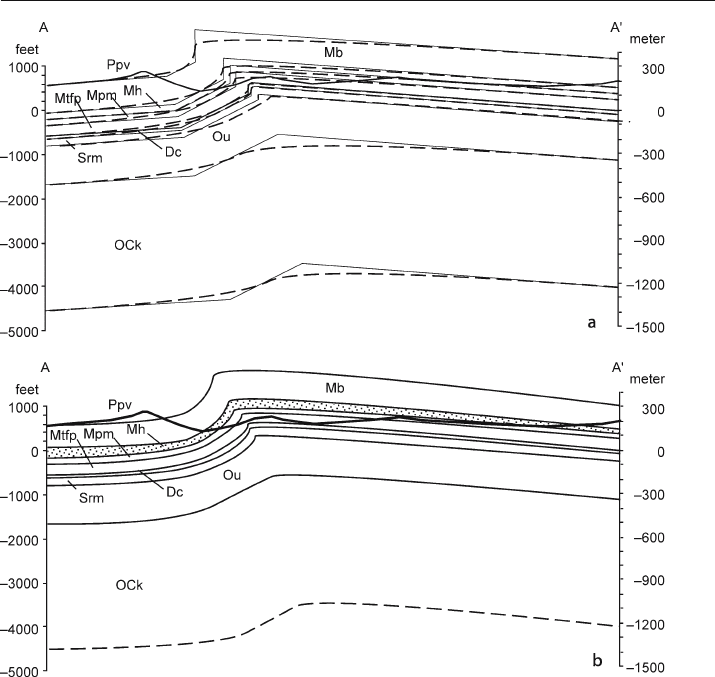
Fig. 6.32. Cross section of the Sequatchie anticline interpreted with spline curves. No vertical exag-
geration. a Dip-domain cross section (thin solid lines from Fig. 6.23) and computer-smoothed spline
interpretation (thick dashed curves). b Spline curve section edited to more closely resemble the dip-
domain section
6.5 · Changing the Dip of the Section Plane

160 Chapter 6 · Cross Sections, Data Projection and Dip-Domain Mapping
The section is changed from a normal section to a vertical section by exaggerating
the vertical scale with Eq. 6.8. The vertical exaggeration on a vertical section due to the
plunge is removed by multiplying the vertical scale of the section by the reciprocal of
the vertical exaggeration, cos
φ
.
The exaggeration on a horizontal section (map view), t
h
/ t, (Fig. 6.33) is
V
e
= t
h
/ t =1/sin
φ
. (6.9)
The exaggeration on a horizontal section due to the plunge is removed by multiply-
ing the vertical scale of the section by the reciprocal of the vertical exaggeration, sin
φ
.
The same procedure can be used to rotate the plane of a cross section around a
vertical axis. Treat Fig. 6.33 as being the map view and the vertical exaggeration as
being a horizontal exaggeration. Equation 6.8 then gives the horizontal exaggeration
of the profile, with
φ
= the angle between the normal to the line of section and the
desired direction of the section normal. Rotate the section by multiplying the horizon-
tal scale by the reciprocal of the horizontal exaggeration, cos
φ
.
6.6
Data Projection
In order to make maximum use of the available information, it is usually necessary to
project data onto the plane of the cross section from elsewhere in the map area. Data from
a zig
-zag cross section or seismic line should be projected onto a straight line to correctly
interpret the structure. Wells should be projected onto seismic lines for best stratigraphic
correlation and to confirm the proper depth migration of the seismic data. The additional
data that are obtained by projection from the map to the line of section help constrain the
interpretation of the cross section and help ensure that the interpretation is compatible
with the structure off the line of section. Projection of data to the line of section is an
important step in the geological interpretation, not a simple mechanical process.
Incorrect projection places the data in the wrong relative positions on the cross
section and renders the interpretation incorrect or impossible. The effect of the pro-
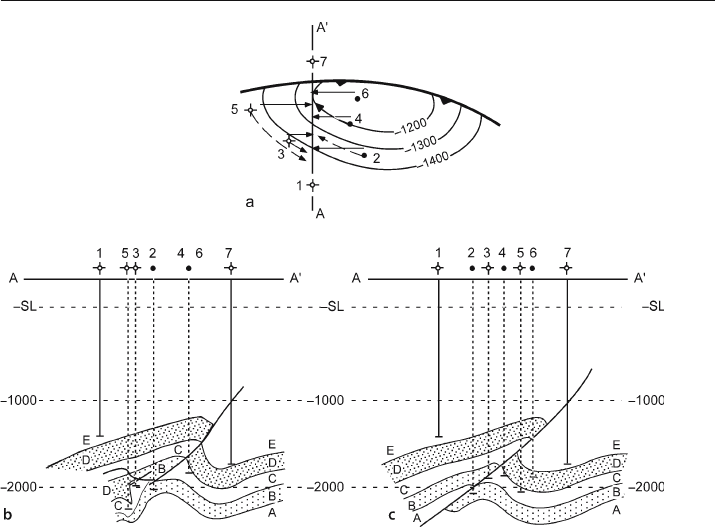
jection technique is illustrated with an example (Fig. 6.34) originally presented by Brown
(1984). A cross section of the structure in Fig. 6.34a has been constructed by project-
ing the wells onto the line of section along the strike of the structure contours
(Fig. 6.34b). The resulting profile is poor in terms of structural style. The cross section
shows multiple small faults instead of a single smooth fault. Note that no well shows
Fig. 6.33.
Vertical exaggeration in cross
section parallel to the plunge
direction, caused by a plunge
angle of
φ
. The true thickness
is t; the exaggerated thickness
is t
h
in the horizontal plane
and t
v
in the vertical plane
161
more than one fault, yet the cross section shows locations where a vertical well should
cut two faults. Projection along plunge (Fig. 6.34c) significantly improves the cross
section. The west half of the structure has a uniform cylindrical plunge to the west and
so projection along plunge produces a reasonable cross section. Only one fault is present
and it is relatively planar, as expected.
Three general approaches to projection will be presented: projection along plunge,
projection with a structure contour map, and projection within dip domains. For struc-
tures where the plunge can be defined from bedding attitude data, projection along
plunge is effective. Where formation tops are relatively abundant, but attitudes are not
available, projection by structure contouring is straightforward and accurate. Com-
puter mapping programs usually take this approach. It must be recognized that the
structure contours themselves are interpretive and may not be correct in detail until
after they have been checked on the cross section. Iterating between maps and the
cross section in order to maintain the appropriate bed thicknesses is a powerful tech-
nique for improving the interpretation of both the maps and the cross section. For dip
-
domain style structures, defining the dip-domain (axial-surface) network is an effi-
cient method for projecting the geometry in three dimensions.
Fig. 6.34. Different cross sections obtained by different methods of data projection. a Structure con-
tour map of horizon E, showing the alternative projection directions. Solid lines are parallel to the fold
axis; dashed lines are parallel to structure contours. b Cross section produced by projecting wells along
structure contours. c Cross section produced by projecting wells along the plunge of the fold axis. SL sea
level. (After Brown 1984)
6.6 · Data Projection
162 Chapter 6 · Cross Sections, Data Projection and Dip-Domain Mapping
Not all features in the same area will necessarily have the same projection direction.
For example, stratigraphic thickness changes may be oblique to the structural trends
and should therefore be projected along a trend different from the structural trend.
Folds and cross
-cutting faults may have different projection directions. The respective
trends and plunges should be determined from structure contour maps (Chap. 3), iso-
pach maps (Sect. 4.3.1) and dip-sequence analysis (Chap. 9).
6.6.1
Projection Along Plunge
Projection of information along plunge is most appropriate where the local data are
too sparse to generate a structure contour map, but where the trend and plunge can be
determined from bedding attitudes, for example, from a dipmeter.
6.6.1.1
Projecting a Point or a Well
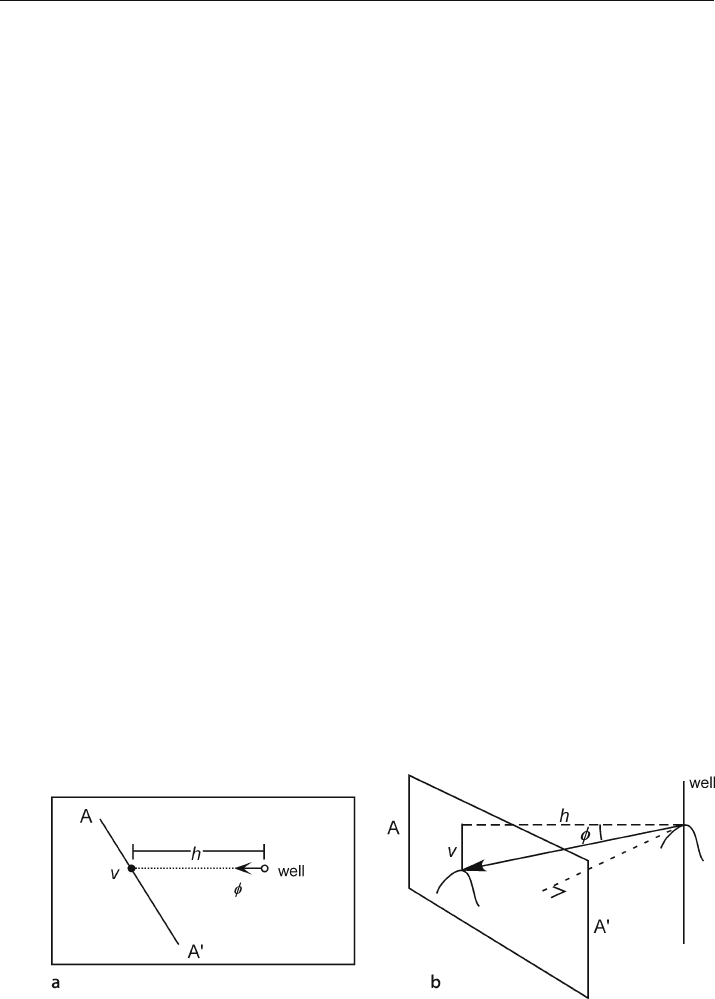
The projection of a point, such as a formation top in a well, along plunge to a new
location, such as a vertical cross section or a seismic line (Fig. 6.35) is done using
v = h tan
φ
, (6.10)
where v = vertical elevation change, h = horizontal distance in the direction of plunge
from projection point to the cross section, and
φ
= plunge. For example, if h =1 km
and the plunge is 15° (Fig. 6.35), the elevation of the projected point is 268 m lower on
the cross section than in the well.
6.6.1.2
Plunge Lines
Projection along plunge is conveniently done using plunge lines, which are lines in the
plunge direction, inclined at the plunge amount (Wilson 1967; De Paor 1988). Plunge lines
Fig. 6.35. Projection of a well along plunge to a cross section or seismic profile. a Map view of the projection
of the well to cross section A–A'. The arrow gives the plunge direction;
φ
plunge amount; h horizontal dis-
tance in direction of plunge from projection point to cross section; v vertical elevation change. b 3-D view
163
provide an effective means for quantitatively describing and projecting the 3-D geometry
of a fold. A series of plunge lines defines the shape of the structure (Fig. 6.36). The
plunge line for a cylindrical fold is parallel to the fold axis and is the same direction for
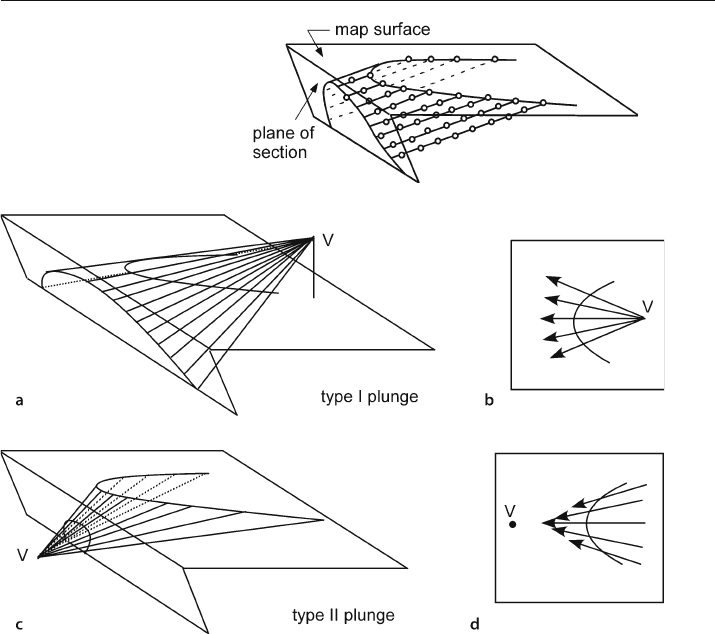
every point within the fold (Fig. 6.36). Each plunge line in a conical fold has its own
bearing and plunge (Fig. 6.37). The plunge lines fan outward from the vertex. In a type I
conical fold (Fig. 6.37a,b) the plunge is away from the vertex and in a type II fold the
plunge is toward the vertex (Fig. 6.37c,d). Plunge line directions in conical folds are
best determined from the tangent diagram as described previously (Sect. 5.2.2).
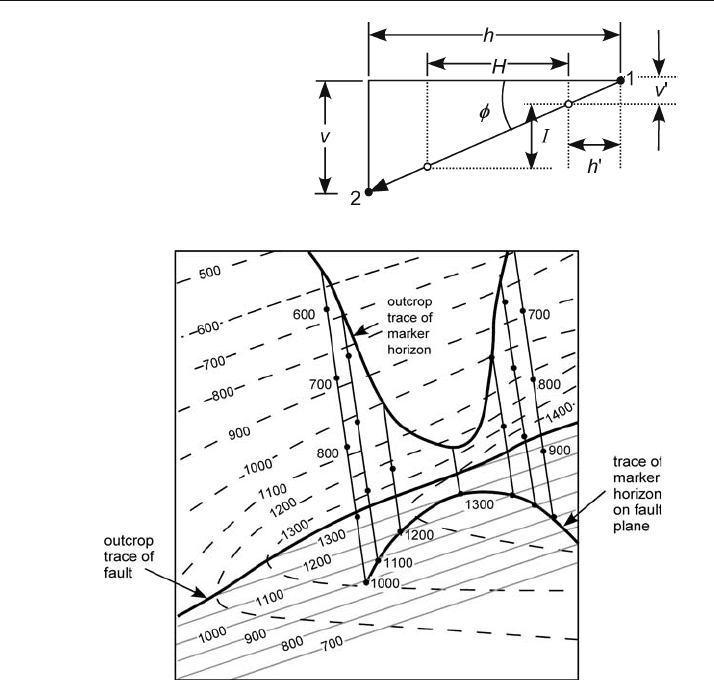
A plunge line lies in the surface of the bed. Begin the projection by drawing a line
on the map parallel to the plunge through the control point to be projected. Starting
from the known elevation of the control point, mark spot heights (Fig. 6.38) spaced
according to
H = I /tan
φ
, (6.11)
Fig. 6.36.
Plunge lines in a cylindrical
fold. The lines are parallel to
the plunge and points along
the lines mark elevations.
(After De Paor 1988)
Fig. 6.37. Plunge lines in conical folds. V Fold vertex. a Perspective view of type I fold. b Map view of
plunge lines in type I fold. Arrows point down the plunge direction. c Perspective view of type II fold.
d Map view of plunge lines in type II fold. Arrows point down the plunge direction
6.6 · Data Projection
164 Chapter 6 · Cross Sections, Data Projection and Dip-Domain Mapping
where H = horizontal spacing of points, I = contour interval, and
φ
=plunge. If the
control point is not at a spot height, the distance from the control point to the first spot
height is
h'=H v'/I , (6.12)
where h' = the horizontal distance from the control point to the first spot height and
v' = the elevation difference between the control point and the first spot height.
Projection along plunge lines is particularly suited to projecting data from an ir-
regular surface, such as a map, onto a surface, such as a cross section or fault plane,
that itself can be represented as a structure
-contour map. Figure 6.39 shows plunge
lines derived from a map of a folded marker horizon on a topographic base. The fold
Fig. 6.38.
Projection along plunge in a
vertical cross section. The
projection is parallel to plunge
along the plunge line from
point 1 to point 2. Open circles
are spot heights along the
plunge line. For explanation
of symbols, see text
Fig. 6.39. Projection of a marker horizon to a fault plane along plunge lines. Dashed lines are topo-
graphic contours above sea level. Dotted lines are subsurface structure contours on the fault. Plunge
lines are solid and marked by spot elevations. (After De Paor 1988)

165
is projected south, up plunge, along the plunge lines onto the structure contour map
of a fault. The intersection points where the plunge lines have the same elevation as
the fault contours are marked and then connected by a line that represents the trace
of the marker horizon of the fault plane (Fig. 6.39). In 3
-D (Fig. 6.40a), the outcrop
trace is projected up and down plunge from the outcrop trace to more completely
illustrate the fold.
A structure contour map can be constructed from the plunge lines by joining the
points of equal elevation (Fig. 6.40b). Figure 6.40b demonstrates that the plunge lines
are not parallel to the structure contours and that projections should be made parallel
to the plunge lines, not parallel to the structure contours. The structure contours pro-
vide an additional cross check on the geometry of the structure and on the internal
consistency of the data. Once the fold geometry is constructed the plunge lines can be
deleted and the shape shown by structure contours alone (Fig. 6.40c).
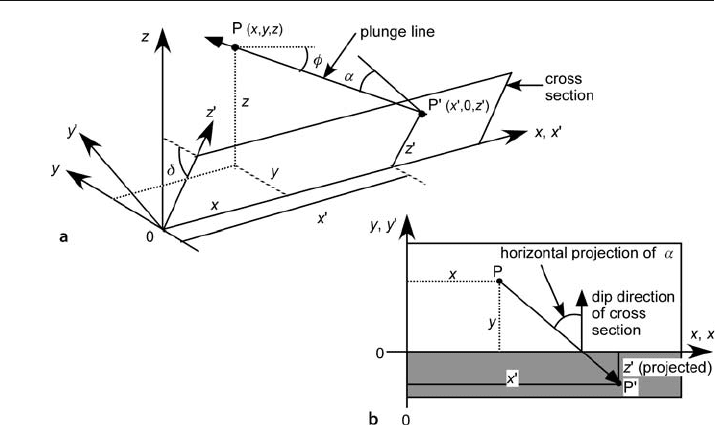
This technique can be performed analytically using the method of De Paor (1988).
An individual point P (Fig. 6.41), given by its xyz map coordinate position, can be pro-
jected along plunge to its new position P' (x',0, z') on the cross
-section plane (defined
by y' = 0). Select the map coordinate system such that x is parallel to the line of cross
section and y is perpendicular to the line of section. Choose y = z = 0 to lie in the plane
Fig. 6.40. 3-D views of the map in Fig. 6.39. a Oblique view to NW. Topographic surface with white
contours, fault with thin black contours, fold with thick black plunge lines. b Vertical view, N up. Struc-
ture contours (with elevations) and plunge lines on the fold, structure contours (with elevations) only
on the fault. White line is outcrop trace of fold. c Oblique view to NW. Same as a except fold shape
indicated by structure contours
6.6 · Data Projection
166 Chapter 6 · Cross Sections, Data Projection and Dip-Domain Mapping
of the cross section. The sign convention requires that the positive (down) plunge
direction be in the negative y direction. The elevation of a point is z. The dip of the
plunge line =
φ
, the angle between the plunge line and the normal to the cross
section =
α
, and the dip of the cross section =
δ
. The plunge line is constant in direc-
tion in a cylindrical fold but may be different for every location in a conical fold.
The general equations for the projected position of a point P', derived at the end of
the chapter (Eqs. 6.36 and 6.41), are:
x'=x + y tan
α
+tan
α
(z cos
α
– y tan
φ
) / (tan
φ
+tan
δ
cos
α
) , (6.13)
z'=(z cos
α
– y tan
φ
) / (tan
φ
cos
δ
+sin
δ
cos
α
) . (6.14)
For a vertical cross section, from Eqs. 6.42 and 6.43,
x'=x + y tan
α
, (6.15)
z'=z –(y tan
φ
)/cos
α
. (6.16)
A cross section perpendicular to the fold axis is possible only for a cylindrical fold.
The equations for projection to the normal section are (from Eqs. 6.44 and 6.45)
x'=x , (6.17)
z'=z cos
φ
– y sin
φ
. (6.18)
Fig. 6.41. Projection along plunge into the plane of the cross section. a Perspective diagram. b Horizontal
map projection. The projection of the section plane onto the map is shaded
167
In a conical fold the plunge amount and direction changes with location. A cross
section perpendicular to the crestal line will be closely equivalent to a normal section
in slightly conical structures. Substitute the plunge of the crestal line in Eqs. 6.17 and
6.18 to approximate a normal section. The shorter the projection distance, the better
the approximation.
6.6.1.3
Graphical Projection
The concept of projection along plunge is the basis of the graphical cross
-section con-
struction technique of Stockwell (1950). This method makes it possible to project data
onto cross sections that have steep dips, such as vertical sections or sections normal to
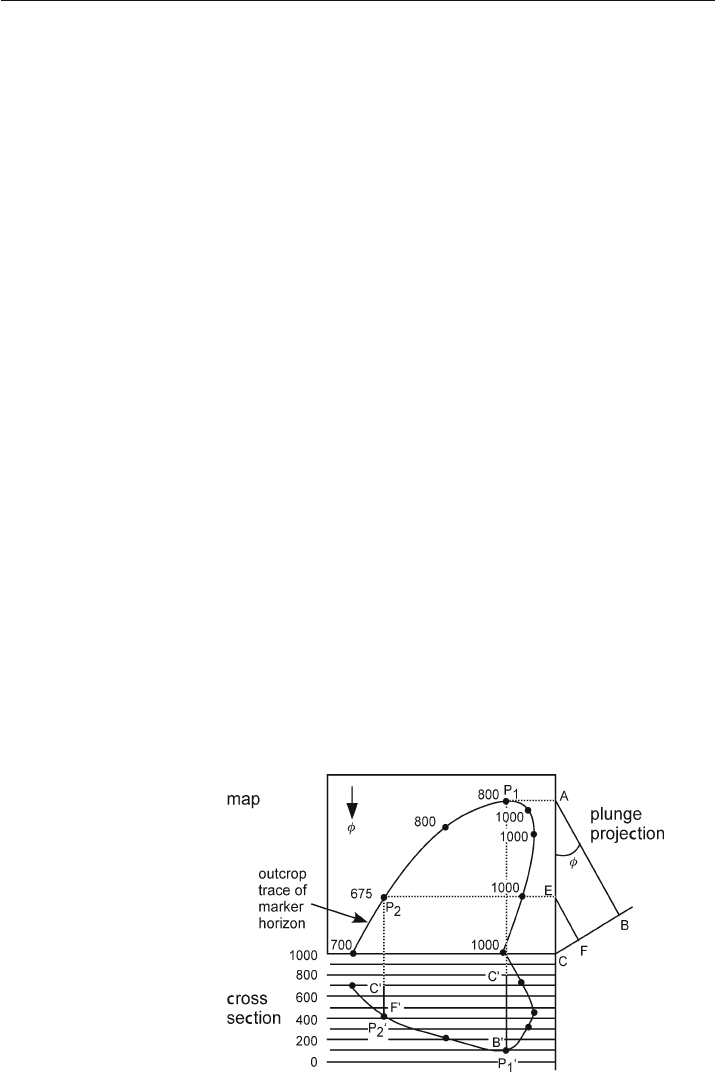
gently dipping fold axes. The graphical method is given by the following steps. Refer
to Fig. 6.42 for the geometry.
1. Create the graph on which the cross section will be constructed at the same scale as
the map and align it perpendicular to the plunge direction. Draw the line AC par-
allel to the plunge direction at the edge of the map. AC represents a horizontal line
on the plunge projection. The plunge projection will be constructed from this line.
2. Begin the projection with the point that is to be projected the farthest (P
1
). Project
this point along the dotted line P
1
A, perpendicular to the line AC to point A. From
point A, draw the line AB at the plunge angle,
φ
, from AC.
3. Draw the orientation of the plane of the cross section (line CB) at the desired ori-
entation to the vertical (angle ACB). In Fig. 6.42 the plane of the cross section has
been chosen to be perpendicular to the plunge (angle ABC = 90°). The plane of ABC
represents a vertical cross section in the plunge direction through point P
1
.
4. The length CB is the distance in the plane of the east
-west section from the map
elevation of P
1
to its location P
1
' on the cross section. Draw a vertical construction
line (dotted line P
1
C') through P
1
onto the line of section and measure the length C'B'
(solid line) = CB down from the map elevation of the point to find P
1
'.
5. Repeat step 4 to project all other points, for example P
2
is projected to P
2
'.
Fig. 6.42.
Projection of map data onto a
cross section normal to plunge.
The plunge is
φ
to the south.
Numbers on the map (square
box) are the topographic eleva-
tions of the points to be pro-
jected
6.6 · Data Projection
168 Chapter 6 · Cross Sections, Data Projection and Dip-Domain Mapping
The ratio of the vertical projection length AB to the cross-section projection length
CB is constant for all points, CB : CA = CF : CE = sin
φ
. Projection by hand is very rapid
if a proportional divider drafting tool is used. Set the divider to the ratio CB / AB; then
as the projection length AC is set, the divider gives the required length CB.
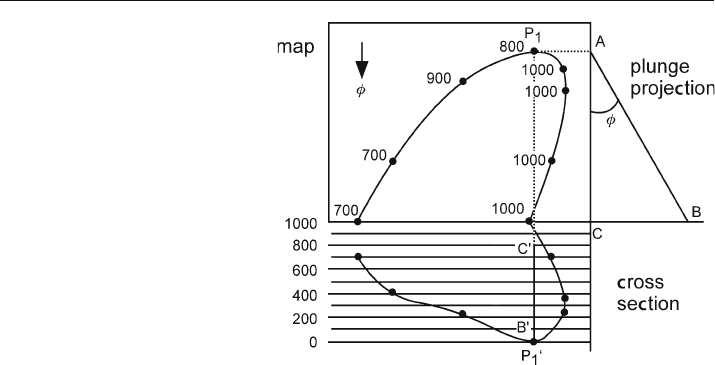
The method can be modified for other cross
-section orientations by changing the
orientation of the line of section on the plunge projection (Fig. 6.43). The orientation
of the plane of section on the plunge projection is CB. In Fig. 6.43, CB is at 90° to AC,
making the section plane vertical. The ratio CB : CA is constant for all points. Follow
steps 1 to 5 above, changing the orientation of the line CB.
The plunge of a fold typically changes along the axis. Cylindrical fold axes may be
curved along the plunge and cylindrical folds will change into conical folds at their
terminations. Projection along straight plunge lines should be done only within do-
mains for which the geometry of the structure is constant. Variable plunge can be
recognized from undulations of the crest line on a structure
-contour map or as exces-
sive dispersion of the bedding dips around the best
-fit curves on a stereogram or tan-
gent diagram. If the plunge is variable, then the geographic size of the region being
utilized should be reduced until the plunge is constant and all the bedding points fit
the appropriate line on the stereogram or tangent diagram. If the sequence of plunge
angle changes along the fold axis direction can be determined, then the straight line AB
(Figs. 6.42, 6.43) could be replaced by a curved plunge line.
6.6.2
Projection by Structure Contouring
Structure contours represent the position of a marker horizon or a fault between the control
points. Contouring provides a very general method for projecting data and can be used
where the plunge cannot be defined from attitude measurements. This is a convenient
method in three
-dimensional interpretation. The projection technique is to map the marker
surfaces between control points and draw cross illustrative sections through the maps.
Fig. 6.43.
Projection along plunge onto
a vertical cross section. Num-
bers on the map (square box)
are the topographic elevations
of the points to be projected
