Gjerde E. Origami Tessellations: Awe-Inspiring Geometric Designs
Подождите немного. Документ загружается.

4
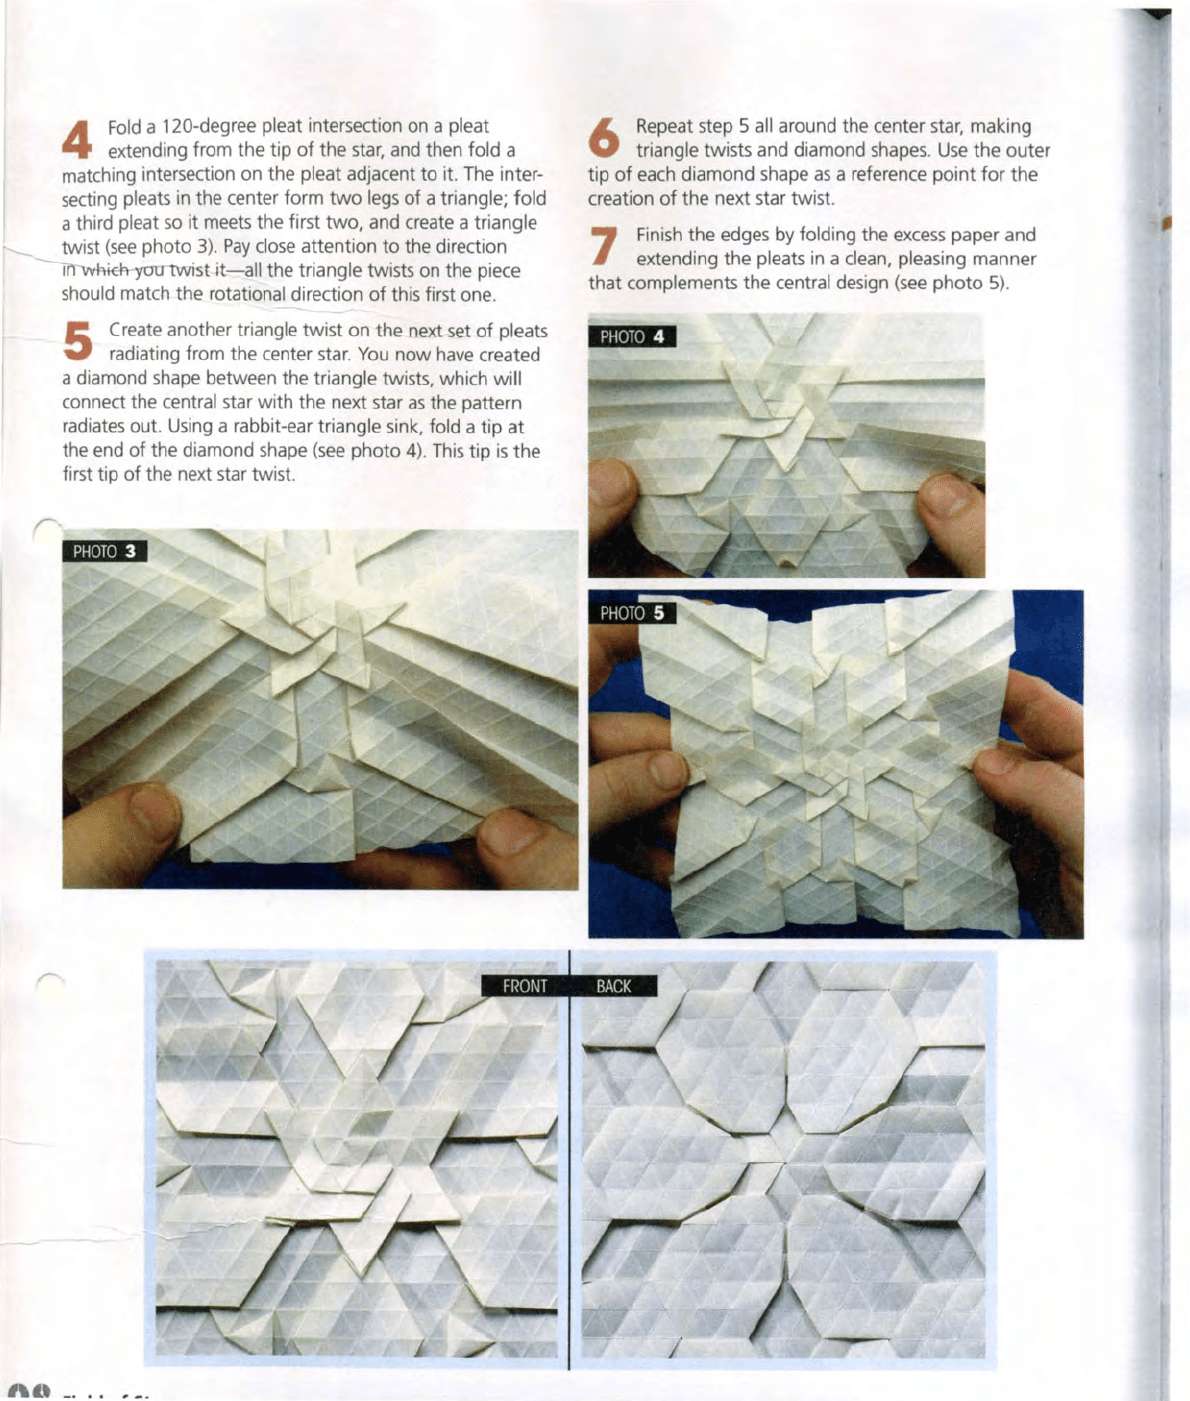
Fold
a 120-degree pleat intersection on a pleat
extending from the tip
of
the
star,
and
then fold a
matching intersection on the pleat adjacent
to
it. The inter-
secting
pleats
in
the center
form
two
legs
of
a triangle; fold
a third pleat
so
it meets the first
two,
and create a triangle
twist
(see
photo
3)
.
Pay
close
attention
to
the direction
Inwhiffi-ymrtwist
it-all
the triangle twists on the piece
should match the rotational direction
of
this first one.
S
Create another triangle twist on the next set
of
pleats
radiating from the center
star.
You
now
have
created
a diamond
shape
between the triangle twists, which will
connect the central star with the next star
as
the pattern
radiates out. Using a rabbit-ear triangle sink, fold a tip
at
the end
of
the diamond shape
(see
photo
4)
.
This
tip
is
the
first tip
of
the next star twist.
'UIIIUI"
"t.,
_.
..
._
.
6
Repeat step 5 all around the center star, making
triangle twists and diamond shapes.
Use
the outer
tip
of
each diamond shape
as
a reference point
for
the
creation
of
the next star twist.
7
Finish
the edges by folding the
excess
paper and
extending the
pleats
in
a clean, pleasing manner
that
complements the central design
(see
photo
5)
.
'UIII](lt·
-
advanced projects
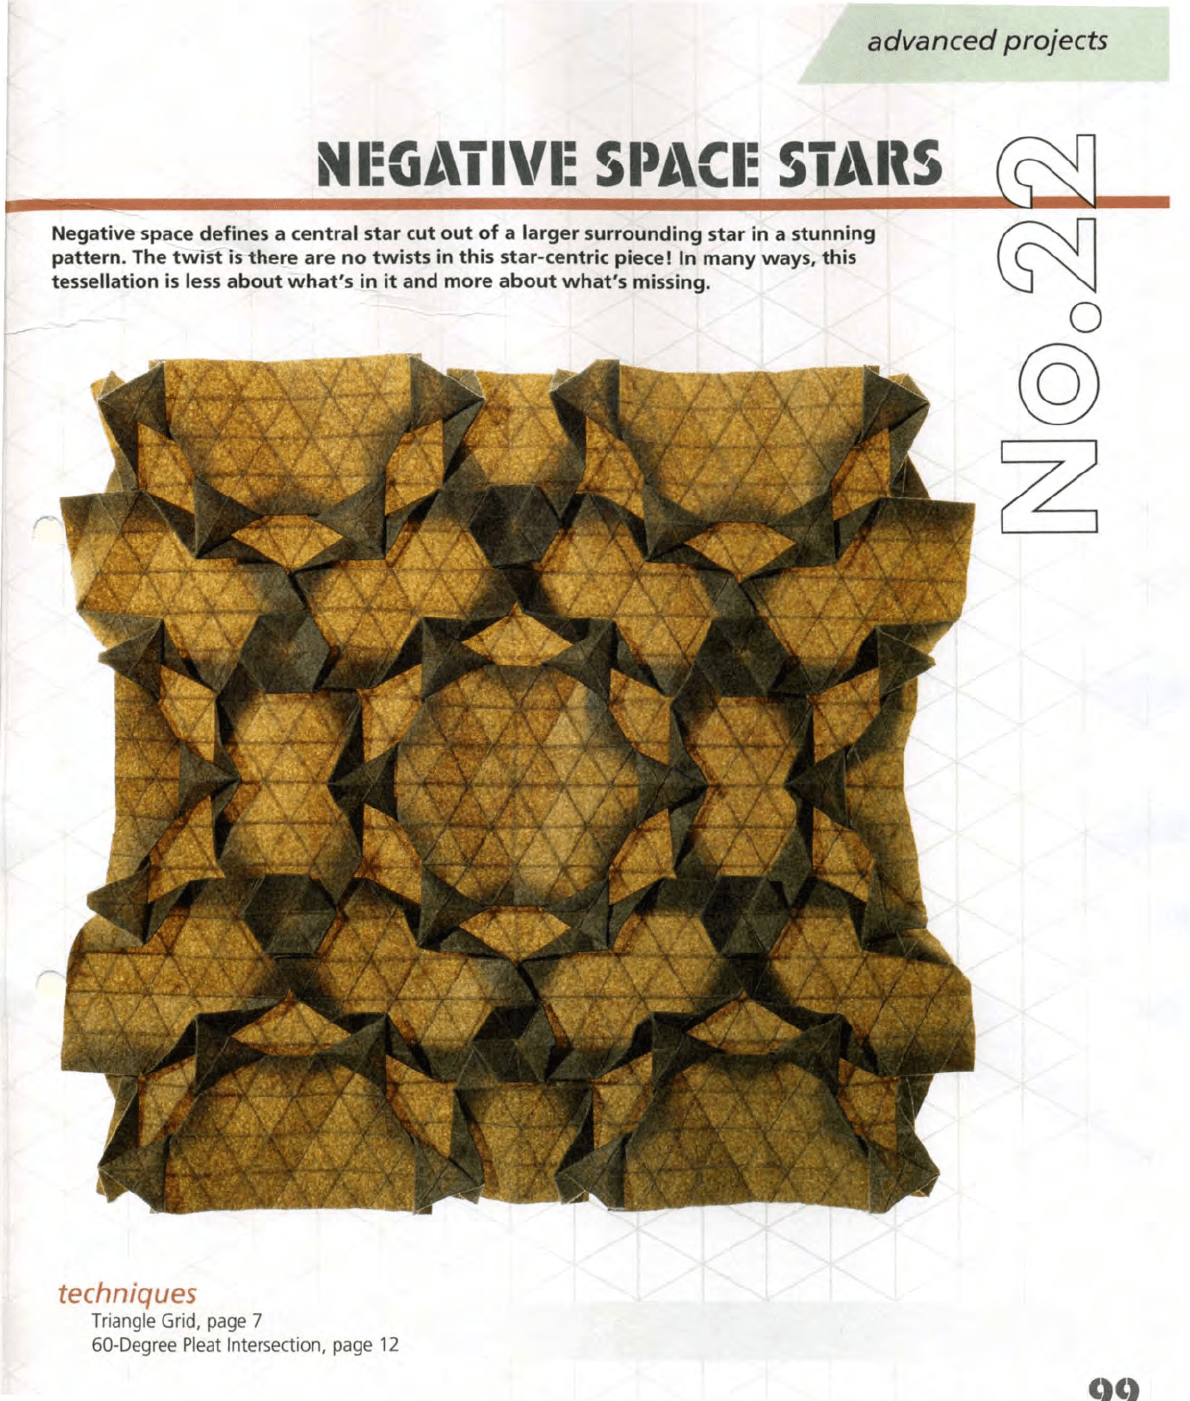
NI:Gi\il\'I: SI'i\CI: Sii\IIS
Negative
space
defines a central
star
cut
out
of
a larger surrounding
star
in a stunning
pattern. The
twist
is
there
are
no
twists
in
this
star
-centric piece!
In
many
ways, this
tessellation
is
less
about
what's
in it
and
more
about
what's
missing.
techniques
Triangle Grid, page 7
60-Degree Pleat Intersection, page 12
(
Ne
ative S
ace
Stars
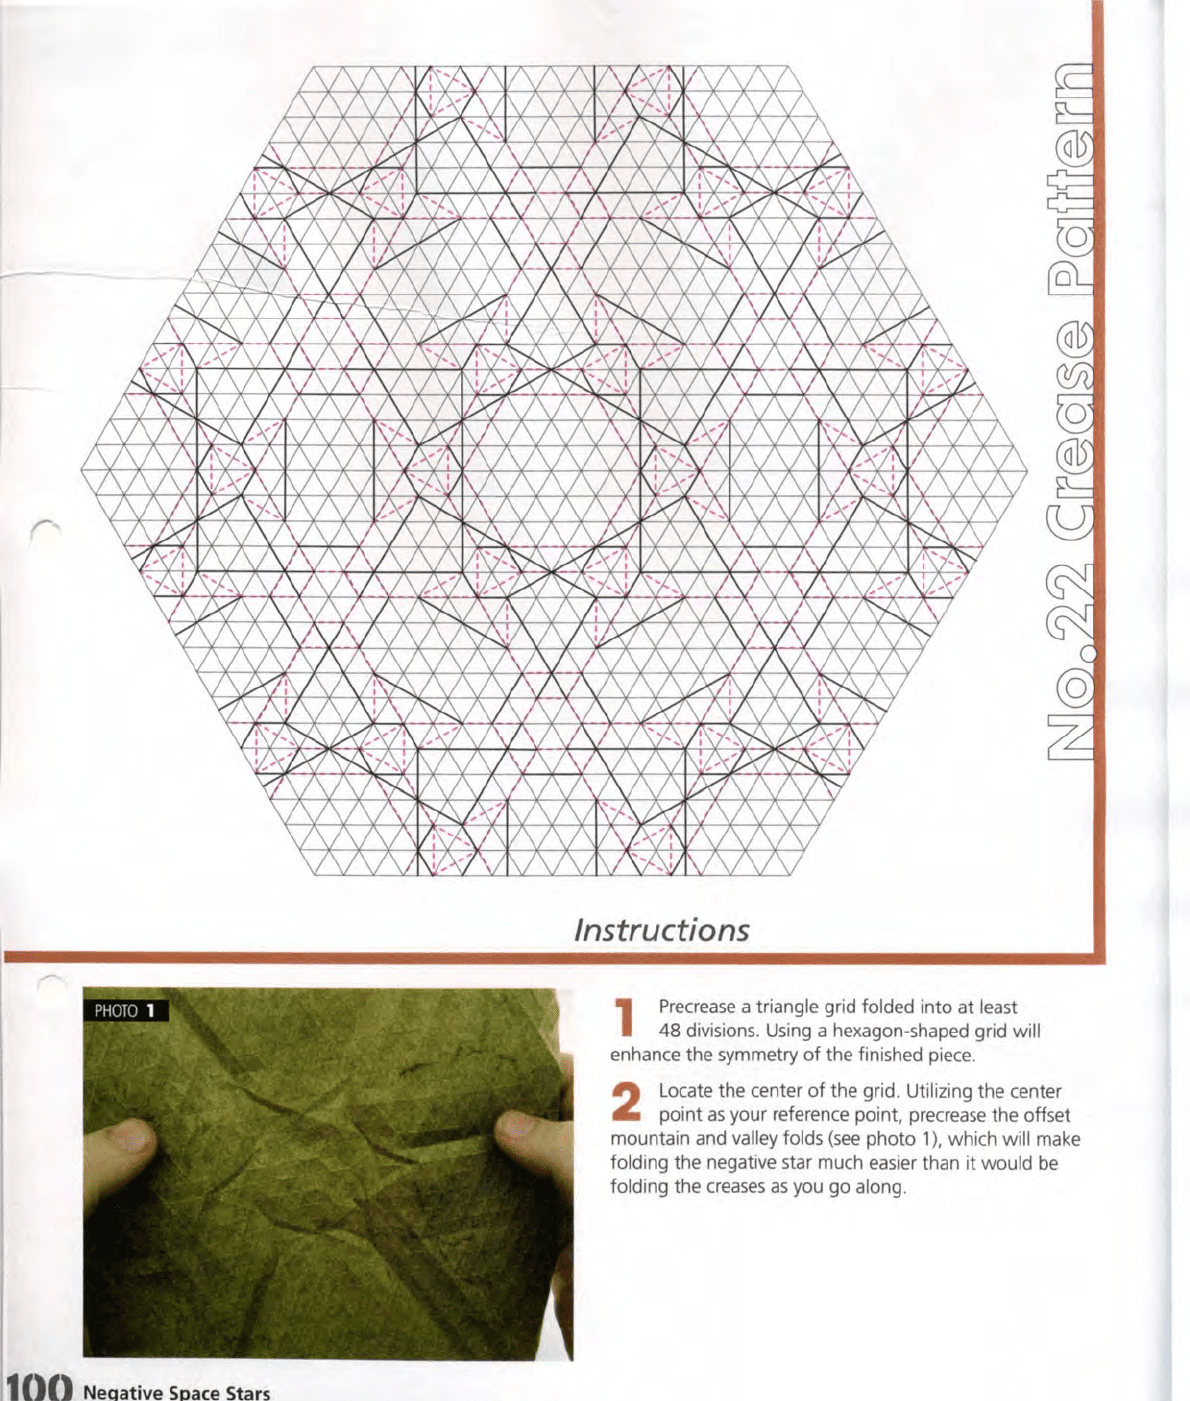
Instructions
1
Precrease
a triangle grid folded into at least
48
divisions. Using a hexagon-shaped grid will
enhance the symmetry
of
the finished piece.
2
Locate the center
of
the grid. Utilizing the center
point
as
your reference point, precrease the offset
mountain and valley folds
(see
photo
1),
which will make
folding the negative star much easier than it would
be
folding the
creases
as
you go along.
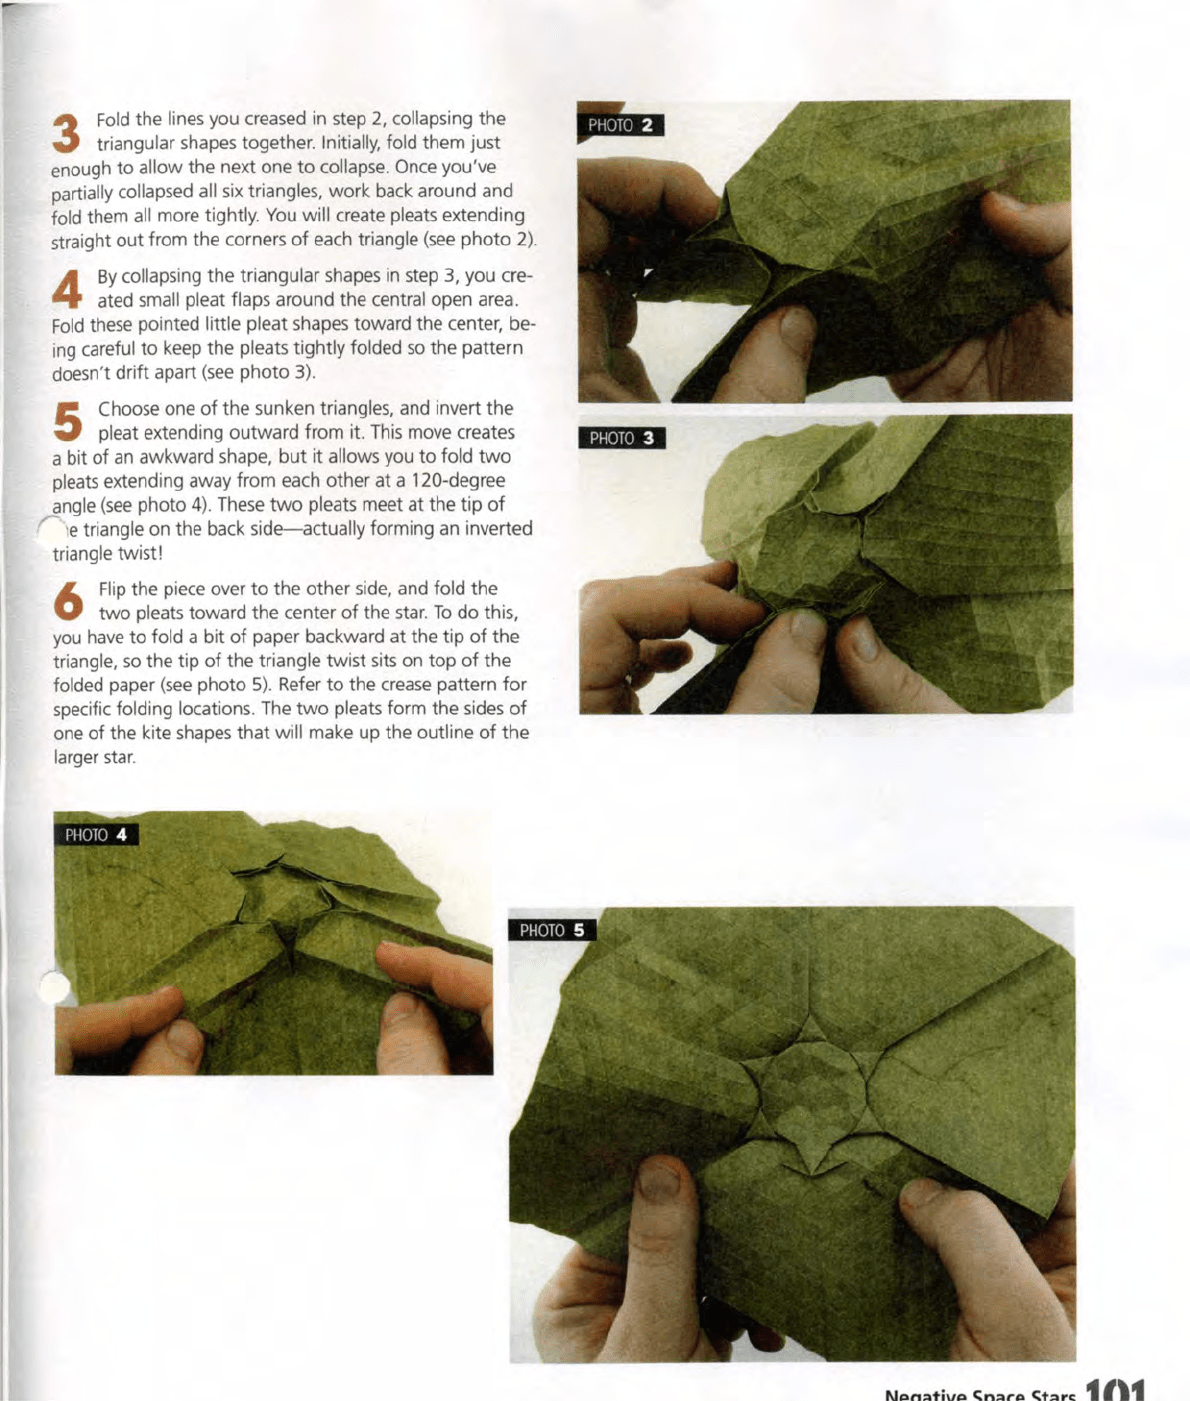
3
Fold
the lines you creased in step
2,
collapsing the
triangular shapes together.
Initially, fold them just
enough
to
allow the next one
to
collapse.
Once
you've
partially collapsed all
six
triangles,
work
back
around and
fold them a
ll
more tightly.
You
will create pleats extending
straight
out
from the corners
of
each triangle
(see
photo
2)
.
4
By
collapsing the triangular
shapes
in
step 3, you cre-
ated small pleat flaps around the central open area.
Fold
these pointed little pleat shapes toward the center, be-
i
ng
careful
to
keep
the pleats tightly folded
so
the pattern
doesn
't
drift
apart
(see
photo
3)
.
5
Choose one
of
the sunken triangles, and invert
the
pleat extending outward from it.
This
move creates
a bit
of
an
awkward shape,
but
it allows you
to
fold
two
pleats
extending away from each other at a 120-degree
angle
(see
photo
4)
.
These
two
pleats meet at the tip
of
r 'e
tr
iangle on the back
side-actually
forming
an
inverted
triangle twist!
6
Fl
ip the piece over
to
the other
side,
and fold the
two
pleats toward the center
of
the star.
To
do this,
you
have
to
fold a bit
of
paper backward at the tip
of
the
triangle,
so
the tip
of
the triangle twist si
ts
on top
of
the
folded paper
(see
photo
5)
.
Refer
to
the
crease
pattern
for
specific folding locations.
The
two
pleats form the
sides
of
one
of
the kite
shapes
that
will make up the outline
of
the
larger star.
.."
..
'$11')("
·'
, Ne ative S
ace
Stars
7
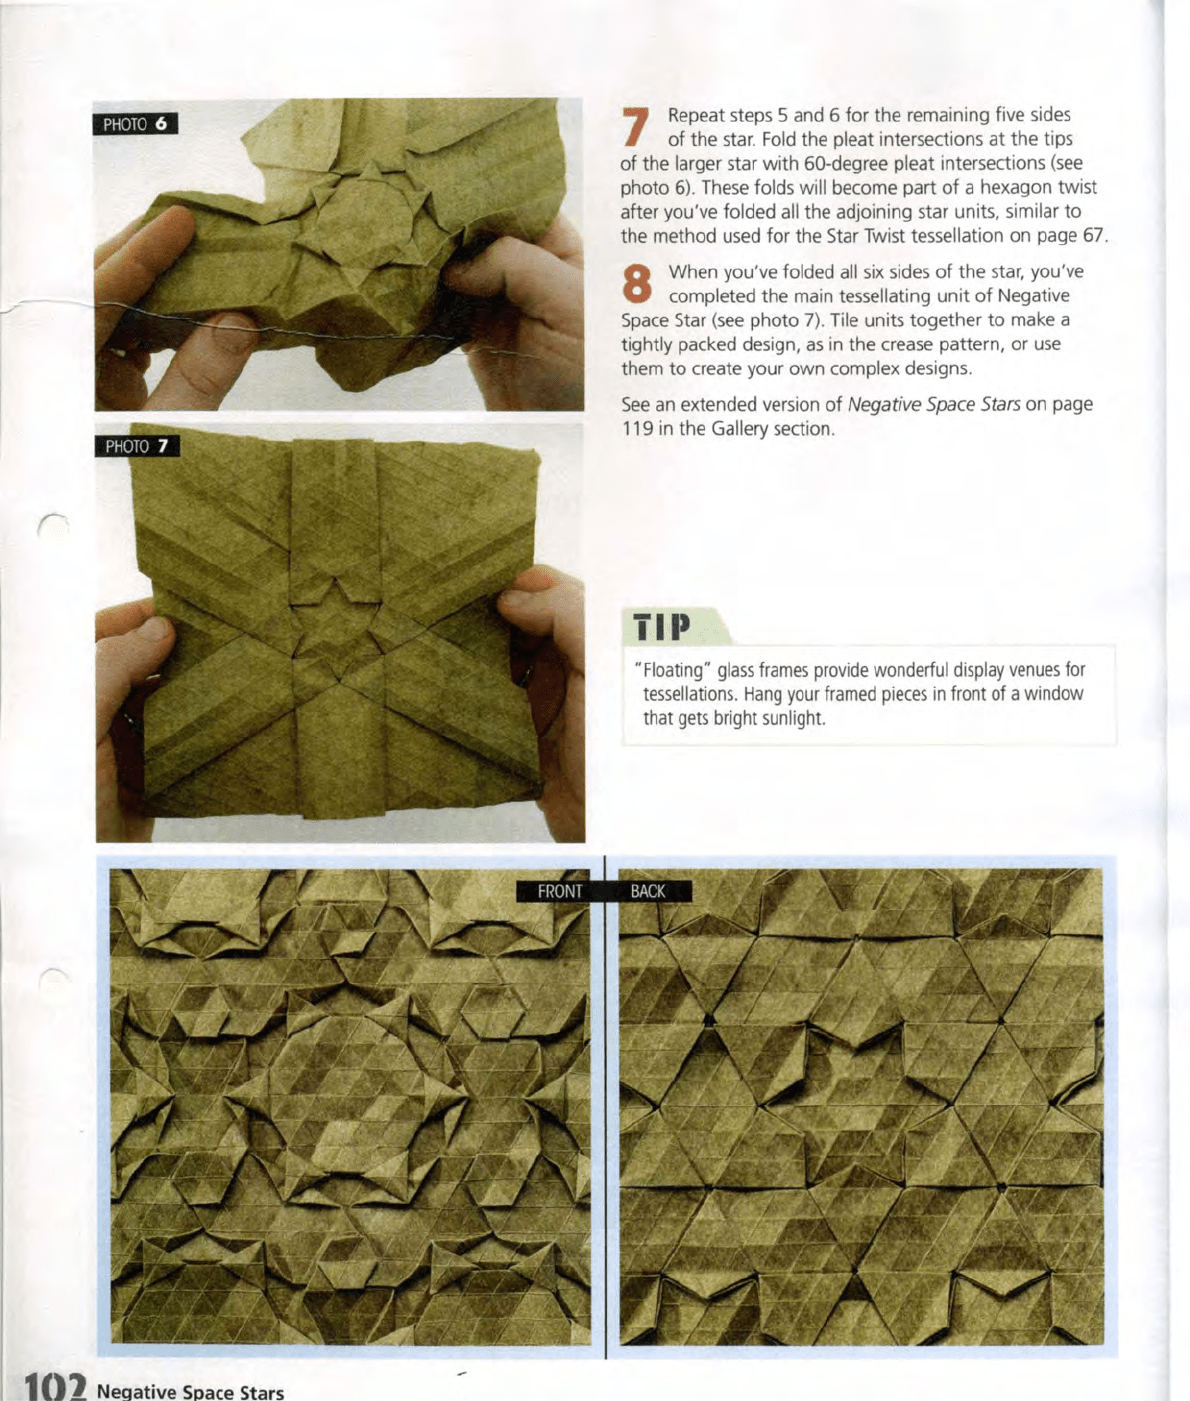
Repeat steps 5 and 6
for
the remaining five sides
of
the star.
Fold
the pleat intersections
at
the
tips
of
the larger star
with
60-degree pleat intersections
(see
photo
6)
. These folds will become
part
of
a hexagon
twist
after you've folded
all
the adjoining star units, similar
to
the method used
for
the Star Twist tessellation on page 67.
8
When you've folded
all
six
sides
of
the
star, you'
ve
completed the main tessellating
unit
of
Negative
Space
Star
(see
photo
7).
Tile units
together
to
make a
tightly packed design,
as
in the crease pattern,
or
use
them
to
create your own complex designs.
See
an extended version
of
Negative
Space
Stars
on page
119 in
the
Gallery section.
ill'
"Floating"
glass
frames
provide
wonderful
display
venues
for
tessellations.
Hang
your
framed
pieces
in
front of a window
that
gets
bright sunlight.
advanced
projects
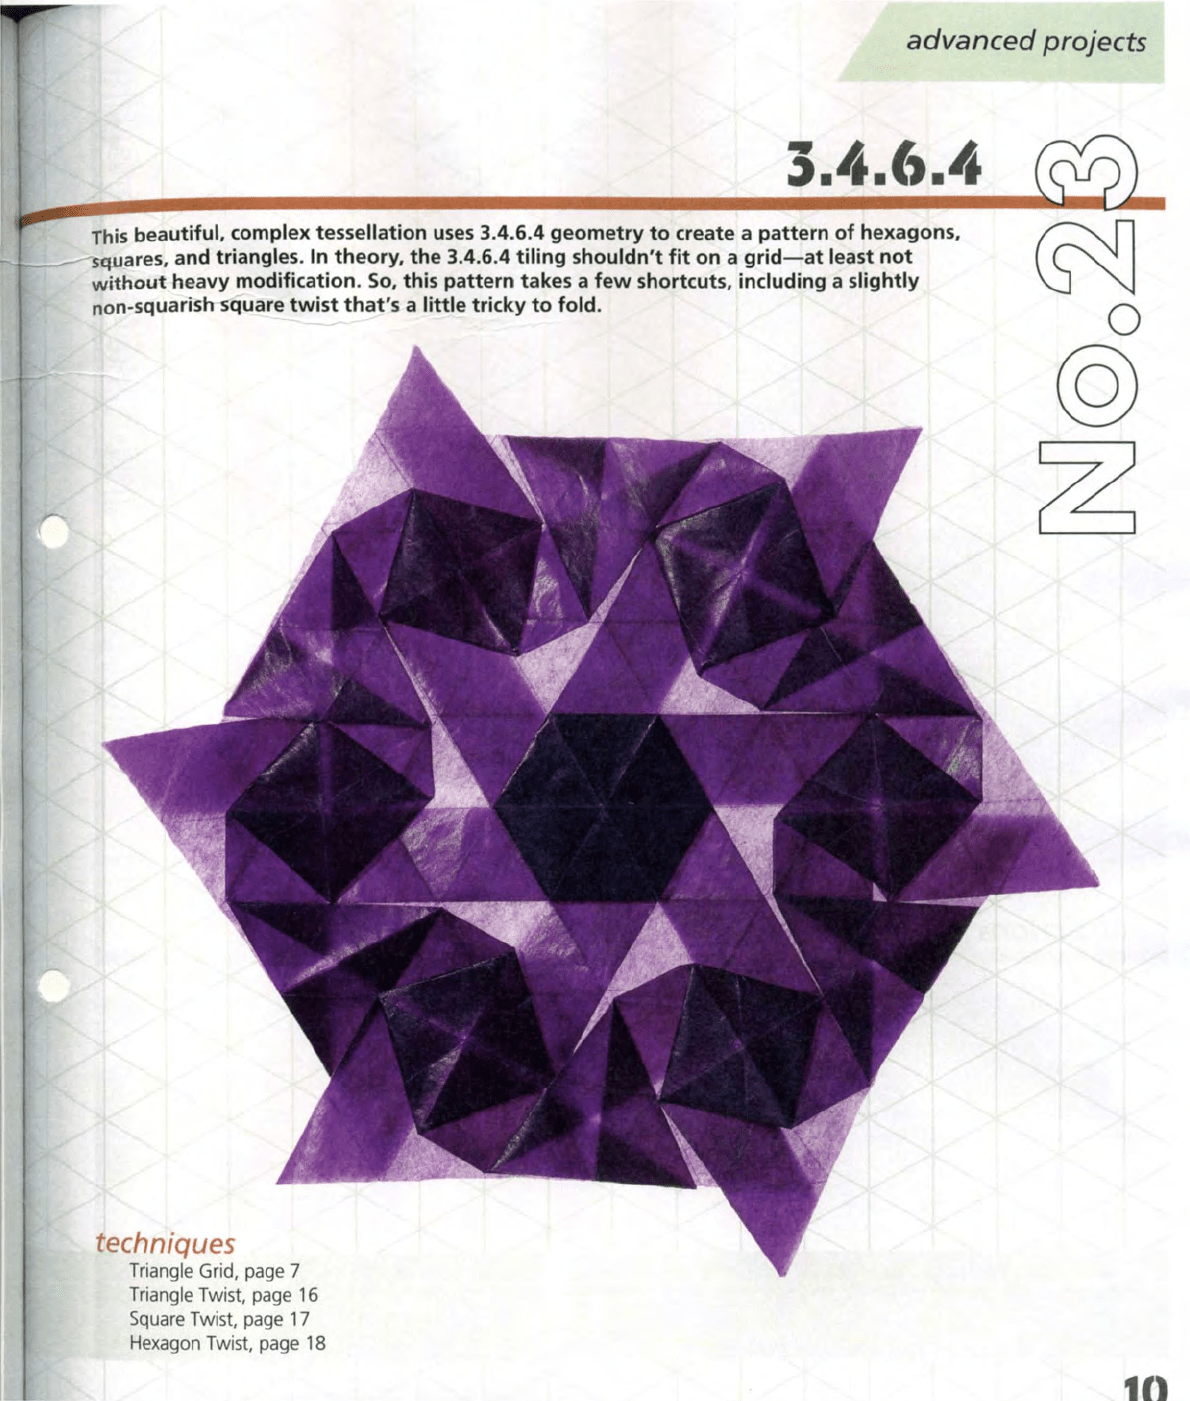
This
beautiful, complex tessellation
uses
3.4.6.4 geometry to create a pattern of hexagons,
r-+-
__
s
qJ..Iares,
and triangles. In theory, the 3.4.6.4 tiling shouldn't
fit
on a
grid-at
least
not
without heavy modification.
So,
this pattern takes a
few
shortcuts, including a slightly
n
on
-squarish square twist that's a little tricky
to
fold.
techniques
Triangle Grid, page 7
Triangle Twist, page 16
Square Twist, page 17
Hexagon
Tw
ist, page 18
Instructions
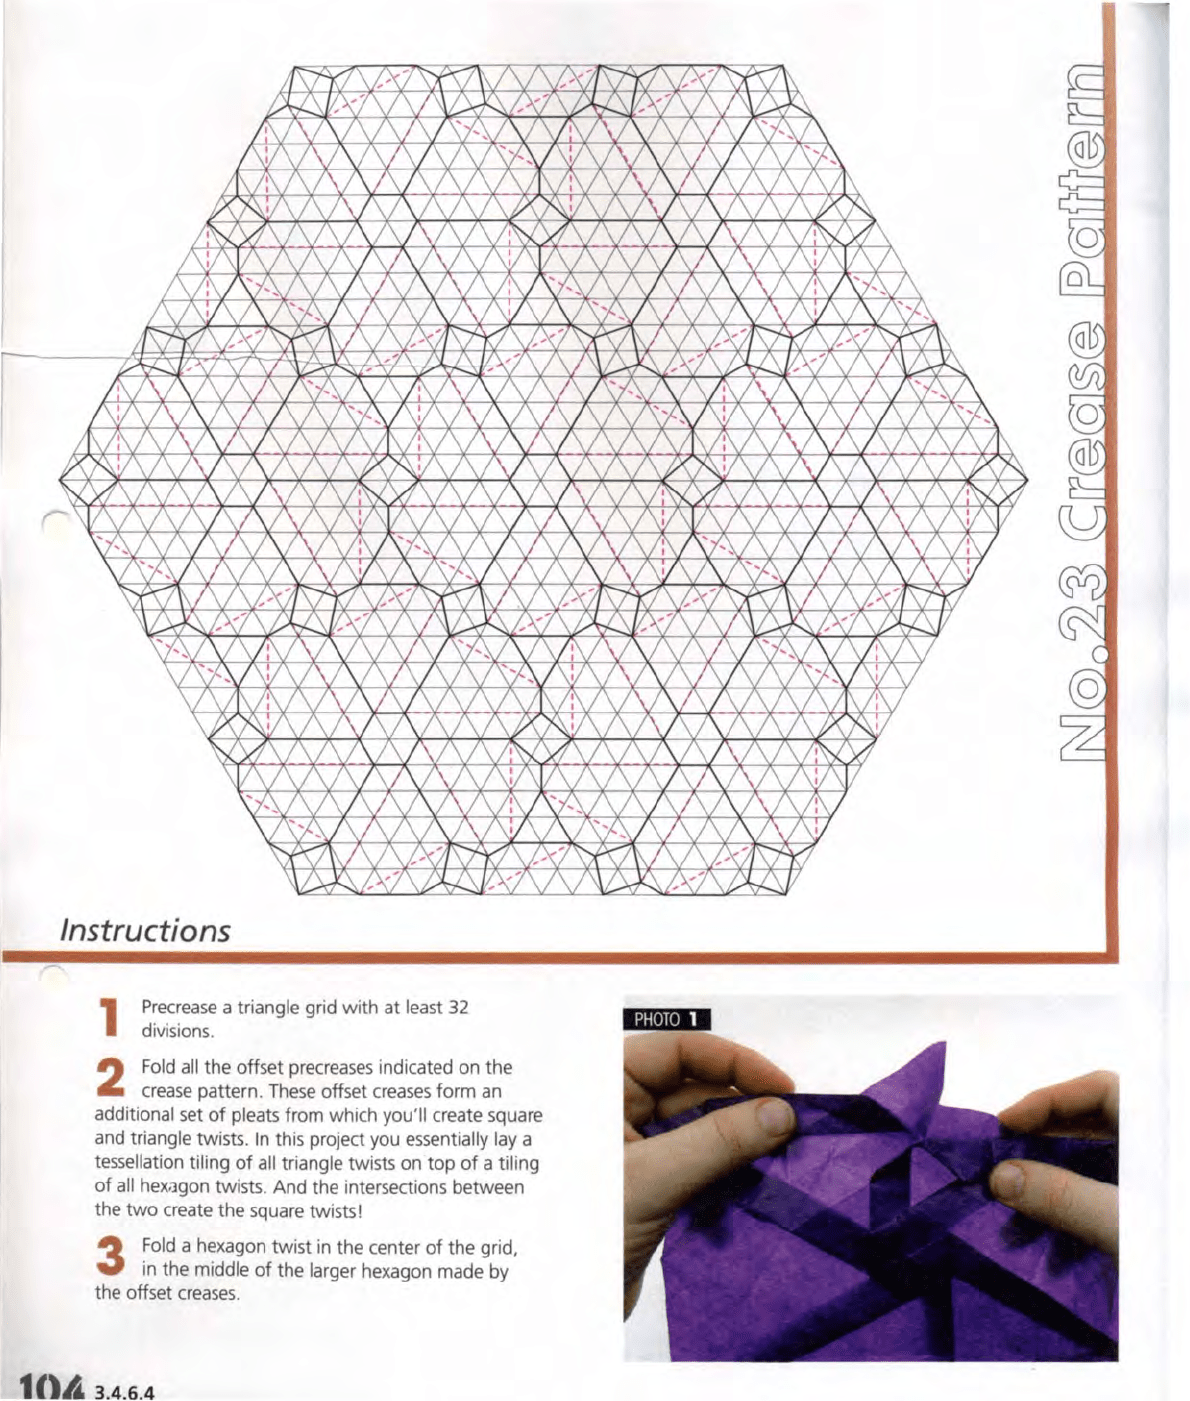
1
Precrease
a triangle grid with
at
least 32
divisions.
2
Fold
all
the offset precreases indicated on
the
crease
pattern.
These
offset
creases
form
an
additional set
of
pleats from which you'
ll
create square
and triangle twists.
In
this project you essentially lay a
tessellation tiling
of
all
tr
iangle twists on
top
of
a tiling
of
all
hex;)gon twists. And the intersections between
the
two
create the square twists!
3
Fold
a hexagon twist
in
the center
of
the
gr
id,
in the middle
of
the larger hexagon made by
the offset
creases
.
1 "A
3.4.6.4
4
Following one
of
the pleats extending
out
from
the central hexagon twist, find the point where it
intersects
an
offset pleat
(see
photo
1)
. Using the existing
pleat
as
a guide, fold the offset pleat
in
the same rotational
direction
to
create a square
twist
(see
photo
2)
.
5
The
offset pleats form a triangle twist point. Fold a
triangle twist from these pleats, using the rotational
direction
of
the square twist
as
your guide.
Keep
moving
in
the
same
direction around the central hexagon, and fold
the next square twist adjoining the triangle twist
(see
photo
3).
Continue folding
as
you move around the central hexa-
gon
twist, forming square twists and triangle twists one
after another
until you complete the circle
(see
photo 4).
See
an
amazing design using 3.4.6.4 symmetry
by
Chris
Palmer
on page 116
in
the Gallery section.
3.4.6.41(
]
advanced projects
1()6
i\Zil:C
TWIST
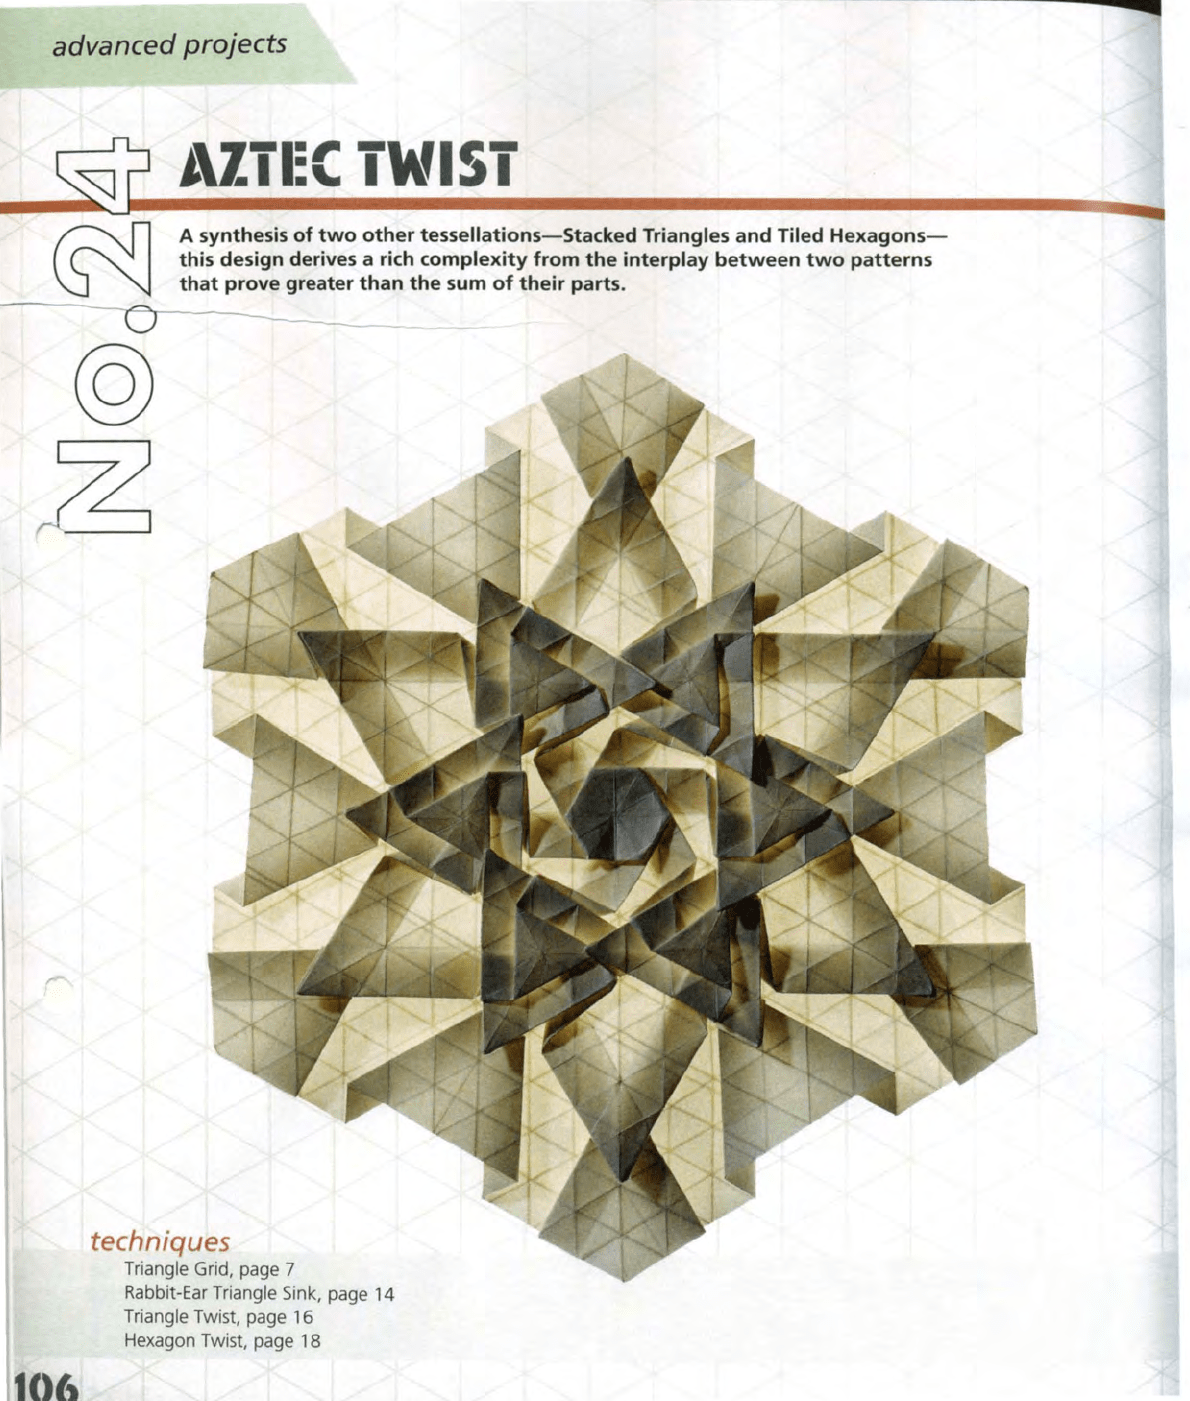
A synthesis of
two
other tessellations-Stacked Triangles and Tiled
Hexagons-
this design derives a
rich
complexity from
the
interplay
between
two
patterns
that prove greater than
the
sum
of
their parts.
techniques
Triangle Grid, page 7
-
Rabbit-Ear Triangle Sink, page 14
Triangle Twist, page 16
Hexagon
Twist, page 18
1
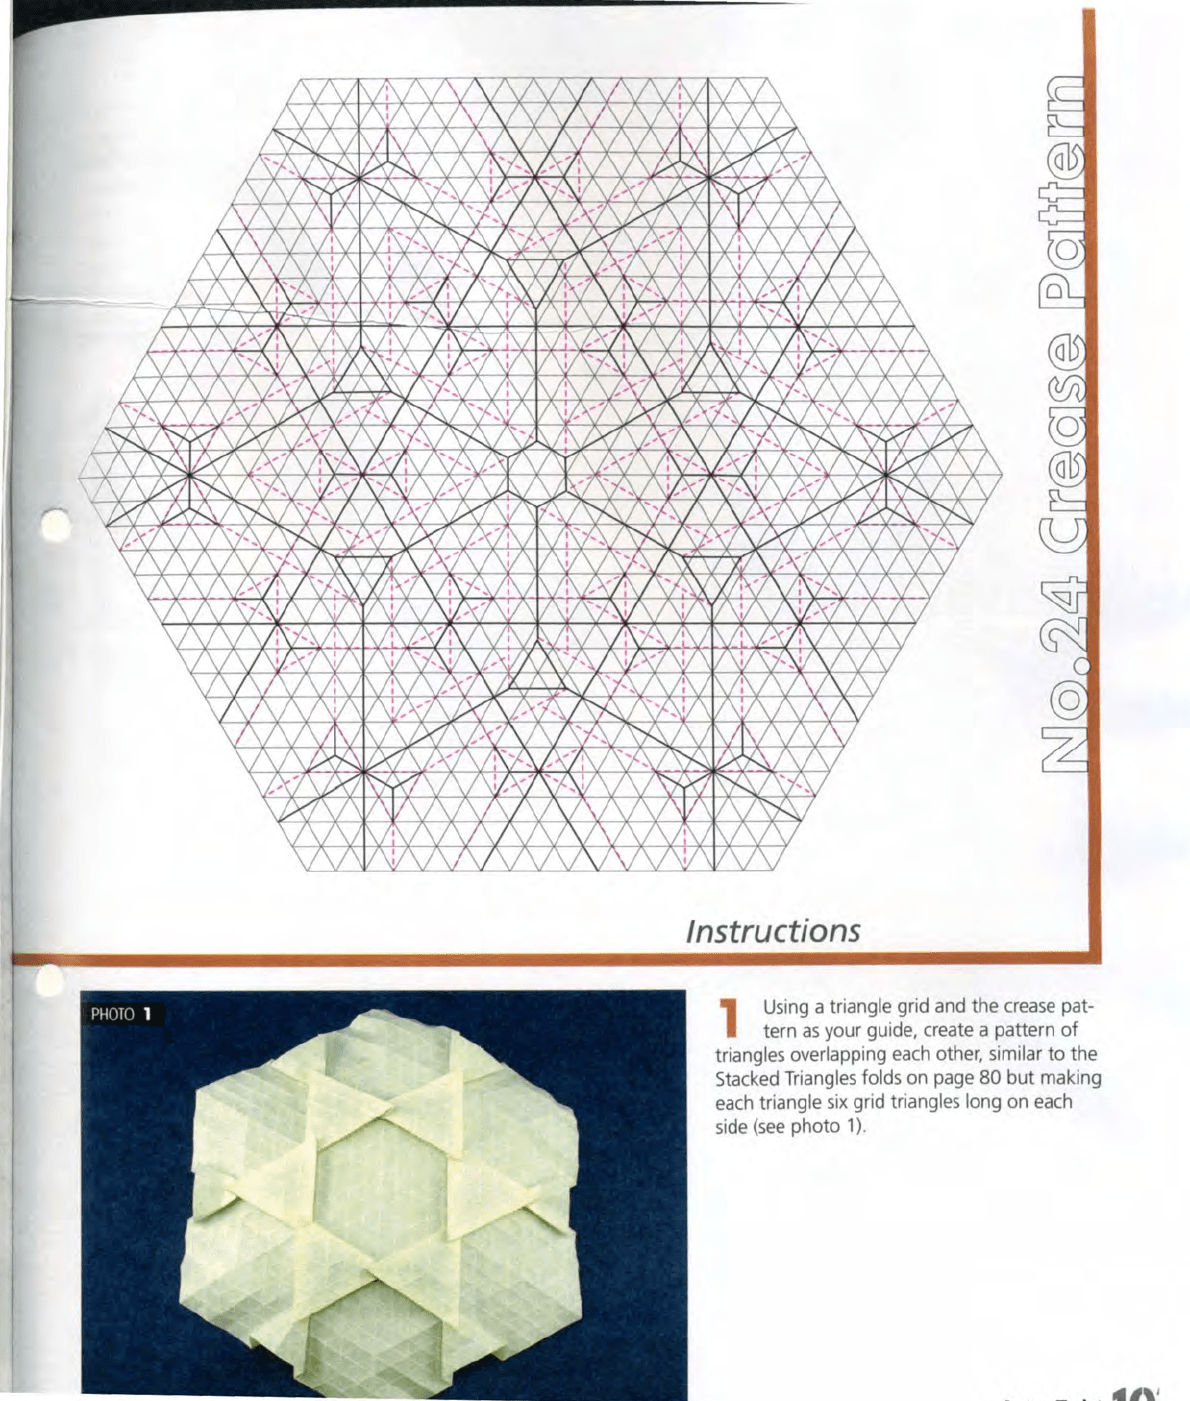
Instructions
1
Using a triangle grid and the
crease
pat-
tern
as
your guide, create a pattern
of
triangles overlapping
each
other, similar
to
the
Stacked Triangles folds on page
80
but
making
each
triangle
six
grid triangles long on each
side
(see
photo
1)
.