Gjerde E. Origami Tessellations: Awe-Inspiring Geometric Designs
Подождите немного. Документ загружается.

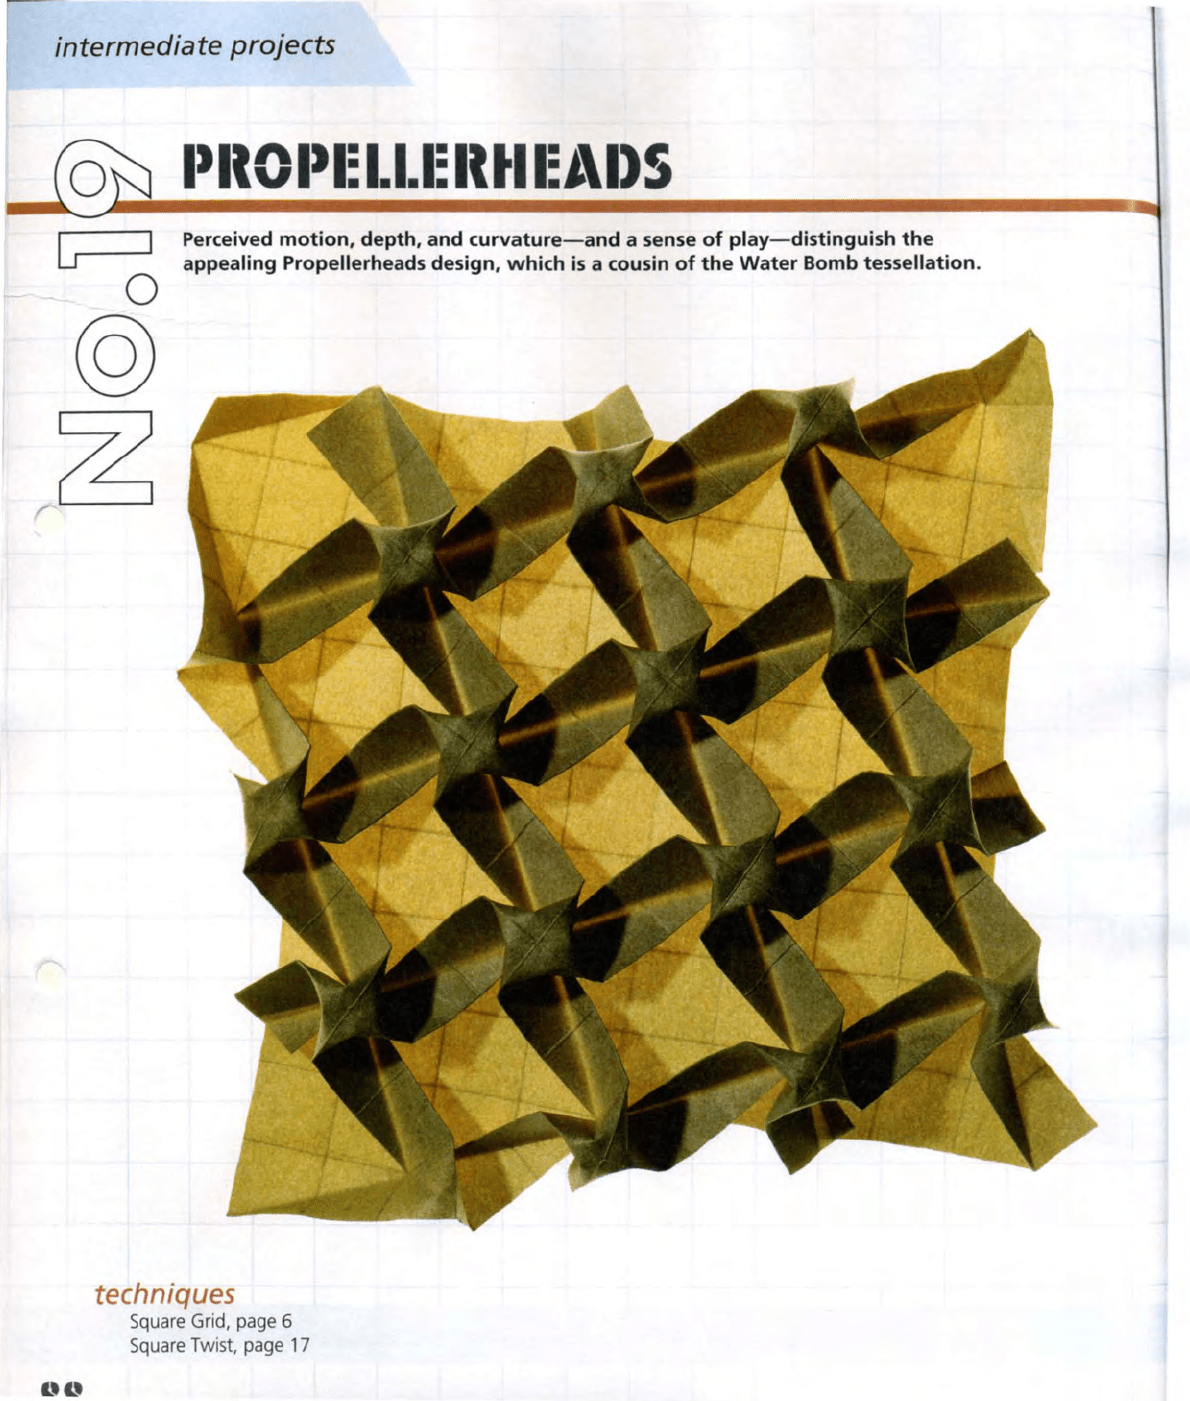
intermediate projects
Perceived motion, depth, and
curvature-and
a
sense
of play-distinguish the
appealing Propellerheads design, which
is
a
cousin
of the Water
Bomb
tessellation.
techniques
Square
Gr
i
d.
page
6
Square
Tw
i
st
.
page
17
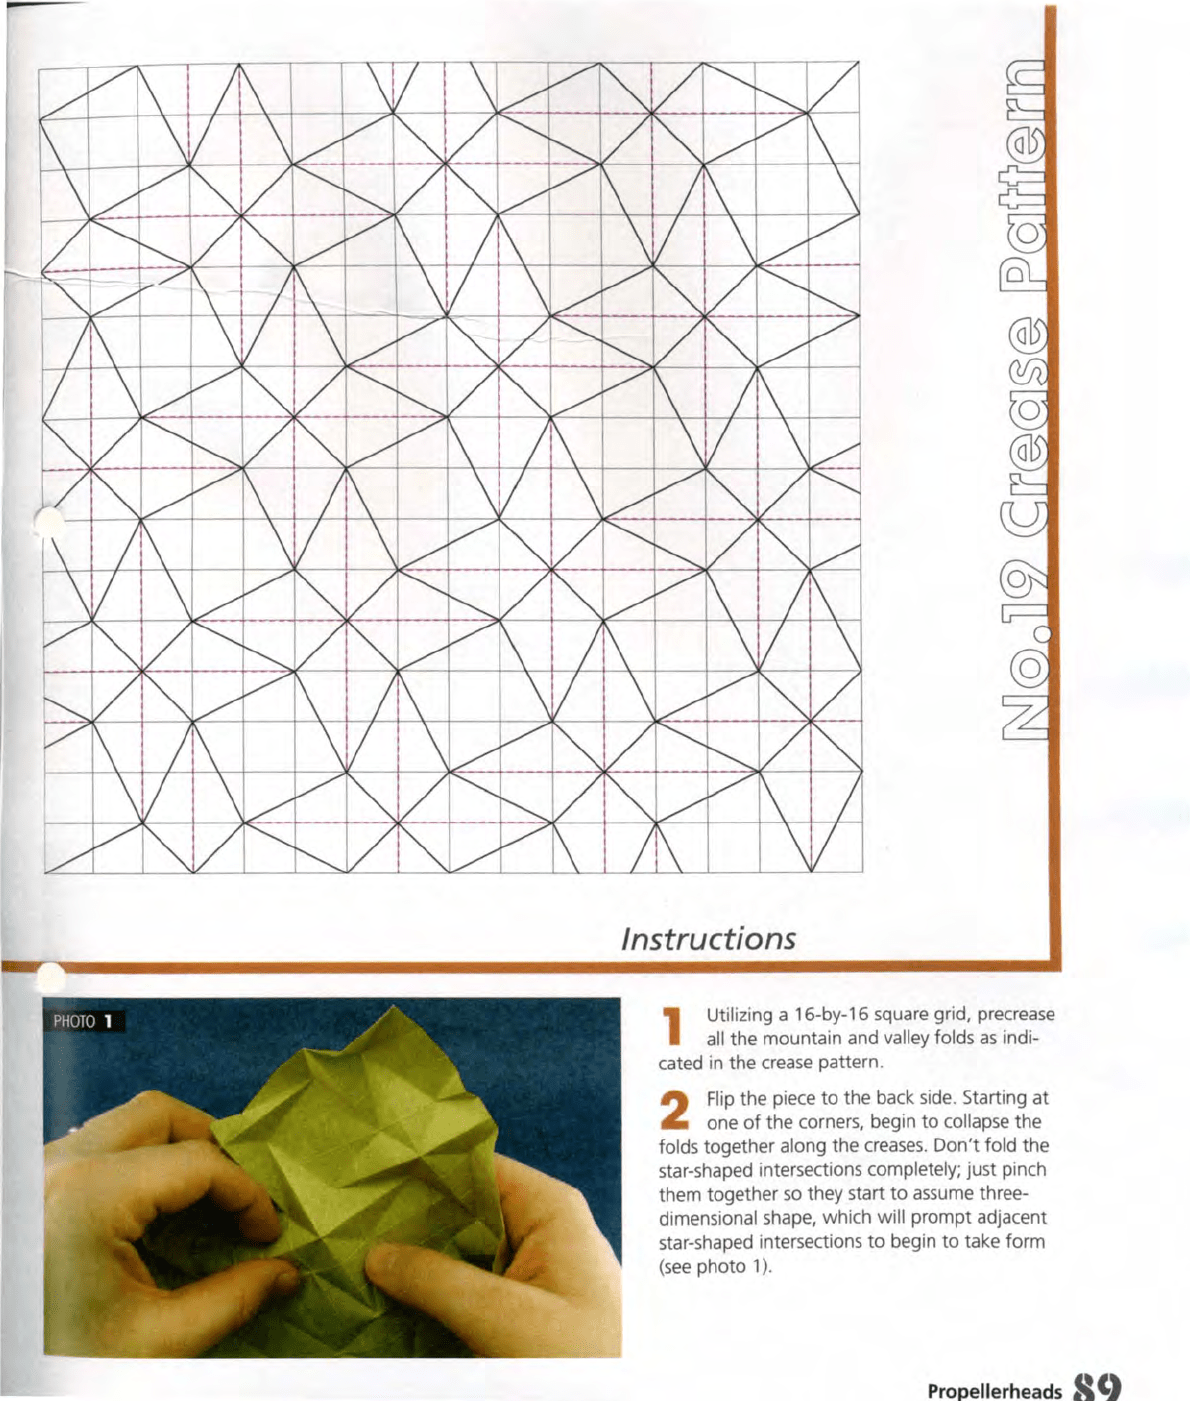
Instructions
1
Utilizing a 16-by-16 square grid, precrease
all
the mountain and valley folds
as
indi-
cated
in
the
crease
pattern.
2
Flip
the piece
to
the back
side
. Starting at
one
of
the corners, begin
to
collapse the
folds together along the
creases.
Don't fold the
star-shaped intersections
completely; just pinch
them together
so
they start
to
assume three-
dimensional shape, which will prompt adjacent
star-shaped intersections
to
begin
to
take form
(see
photo
1)
.
Propellerheads S 9
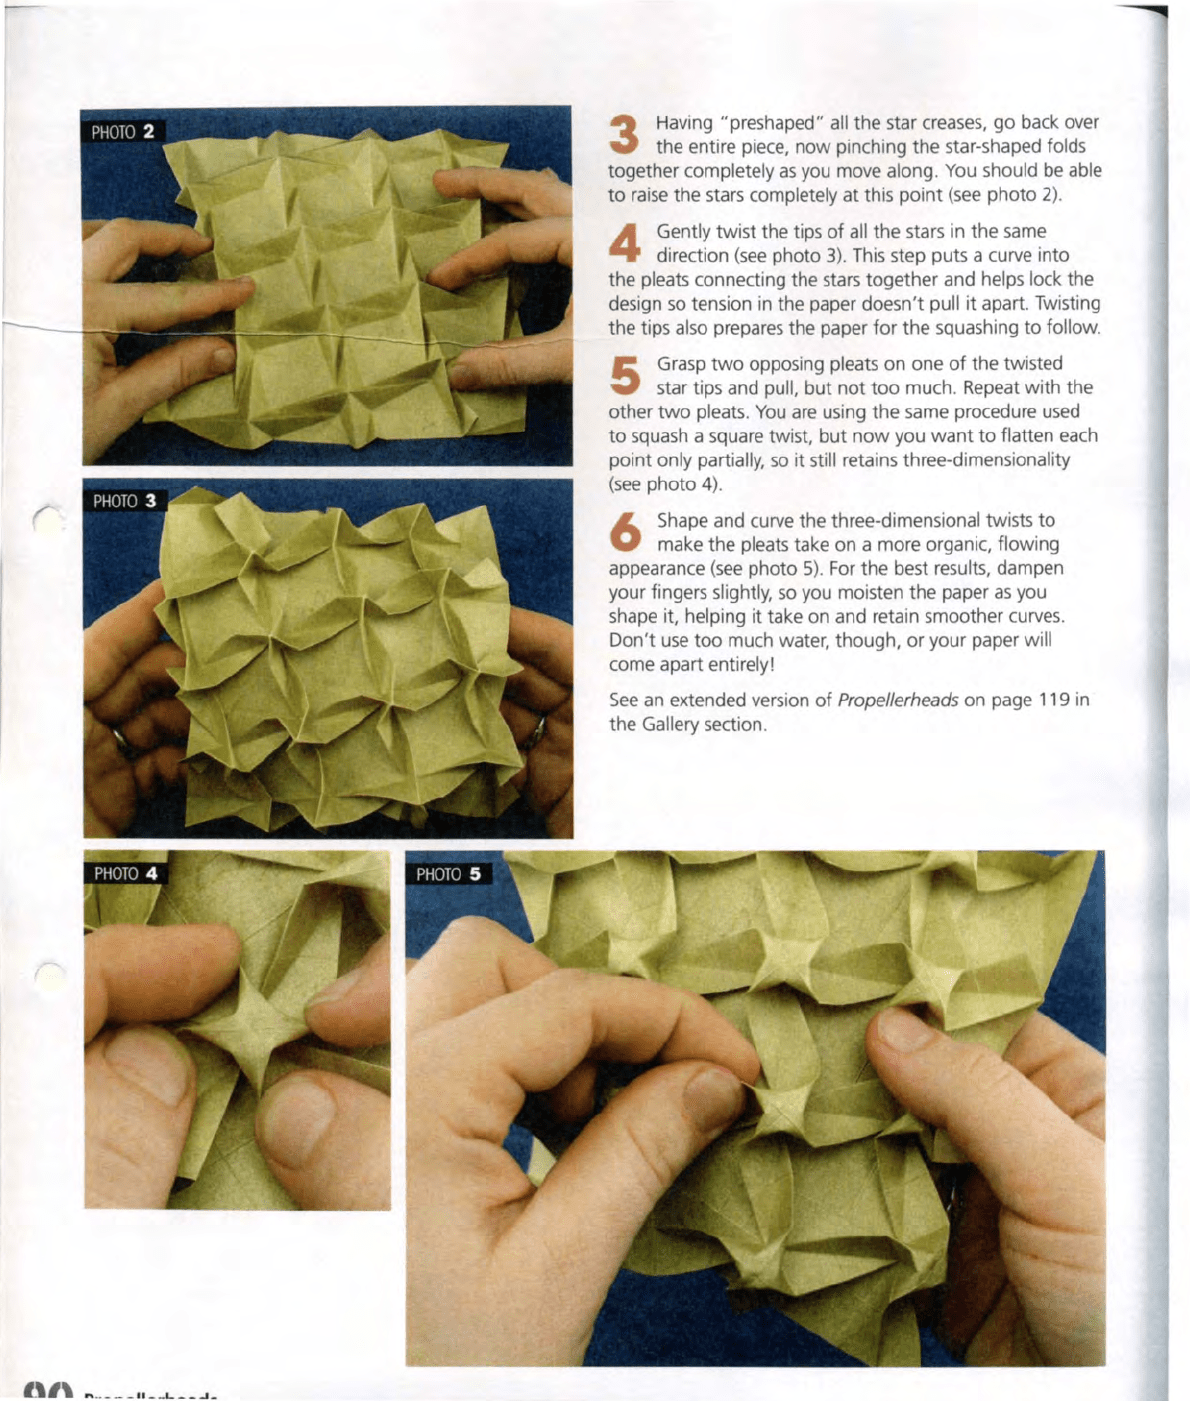
3
Having "preshaped" all the star creases,
go
back over
the entire piece,
now
pinching the star-shaped folds
together completely
as
you move along. You should
be
able
to
raise
the stars completely at this
point
(see
photo
2)
.
4
Gently
twist
the tips
of
all the stars in the
same
direction
(see
photo
3)
.
This
step puts a curve into
the pleats connecting the stars together and helps lock the
design
so
tension
in
the paper doesn't pull
it
apart. Twisting
the tips also prepares the paper
for
the
squashing
to
follow.
S
Grasp
two
opposing pleats on one
of
the twisted
star tips and
pull,
but
not
too
much. Repeat with the
other
two
pleats.
You
are
using
the
same procedure
used
to
squash a square twist,
but
now
you
want
to
flatten each
point only
partially,
so
it still retains three-dimensionality
(see
photo 4).
6
Shape
and curve the three-dimensional twists
to
make the pleats take on a more organic,
flow
ing
appearance
(see
photo
5)
.
For
the best results, dampen
your fingers slightly,
so
you moisten the paper
as
you
shape
it, helping it take on and retain smoother curves.
Don't
use
too
much water, though, or your paper will
come apart entirely!
See
an
extended version
of
Prope/lerheads on page 119
in
the Gallery section.
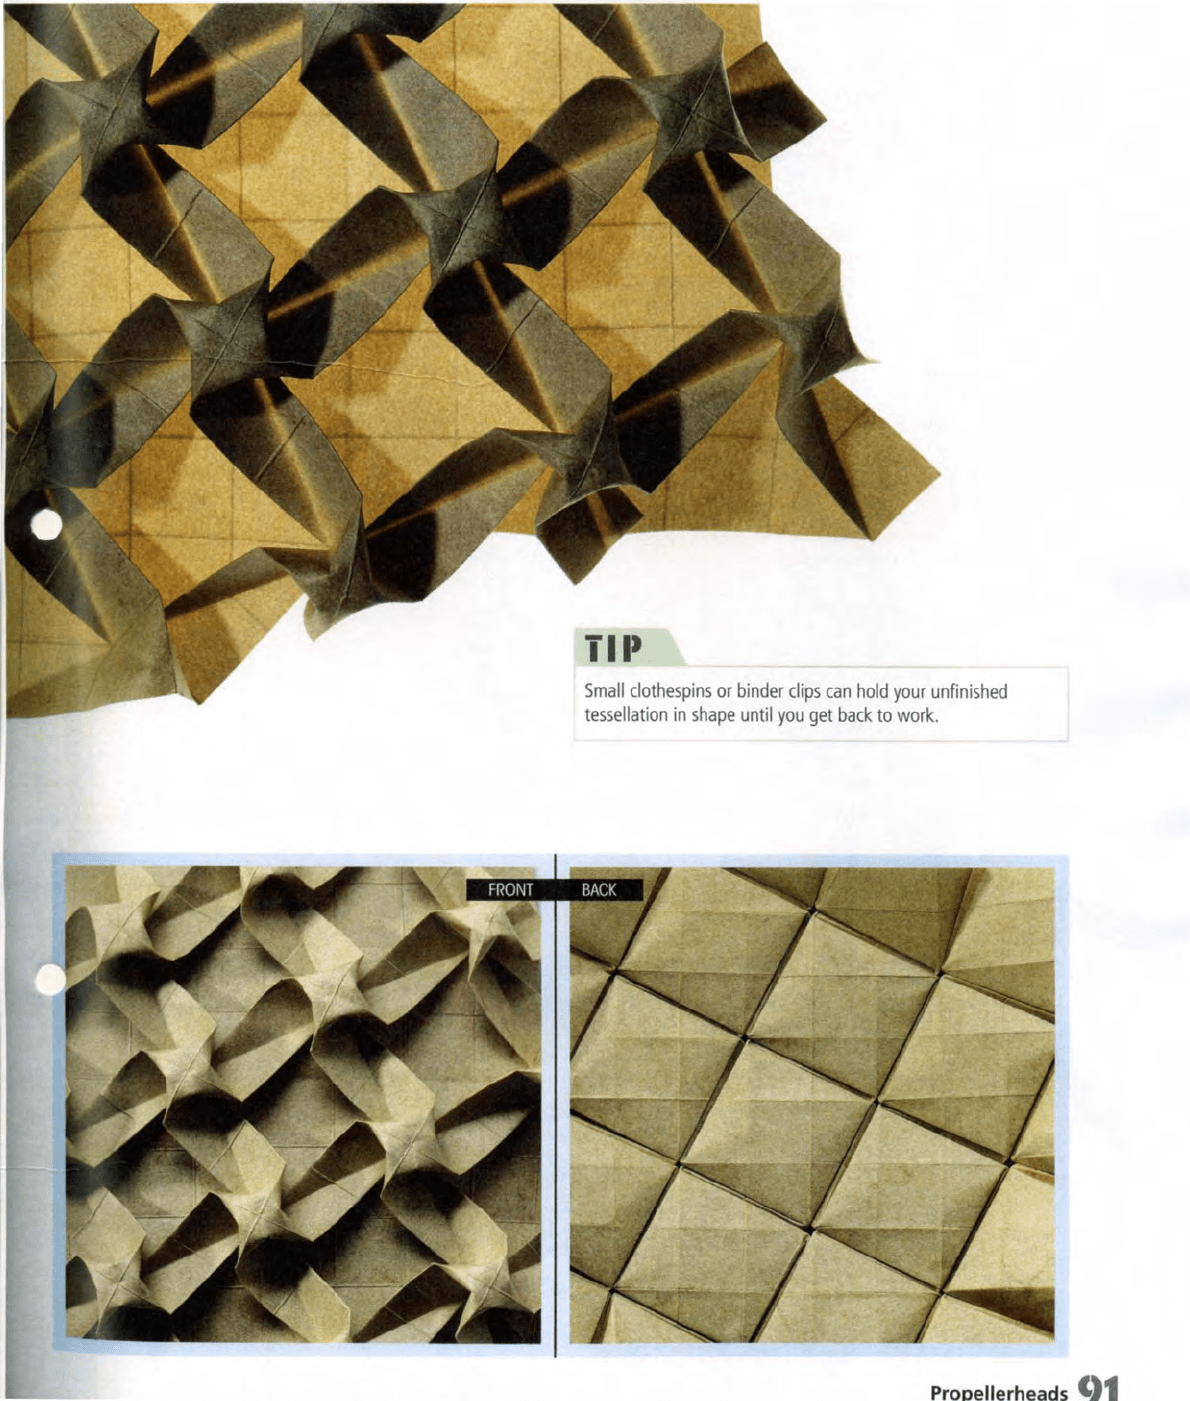
ill'
Small
clothespins
or
binder
clips
can
hold
your
unfinished
tessellation
in
shape
until
you
get
back
to
work
.
Propel/erheads 9
advanced
projects
i\lli\ISI:SQIJI:
1:1.()IJIIIStl
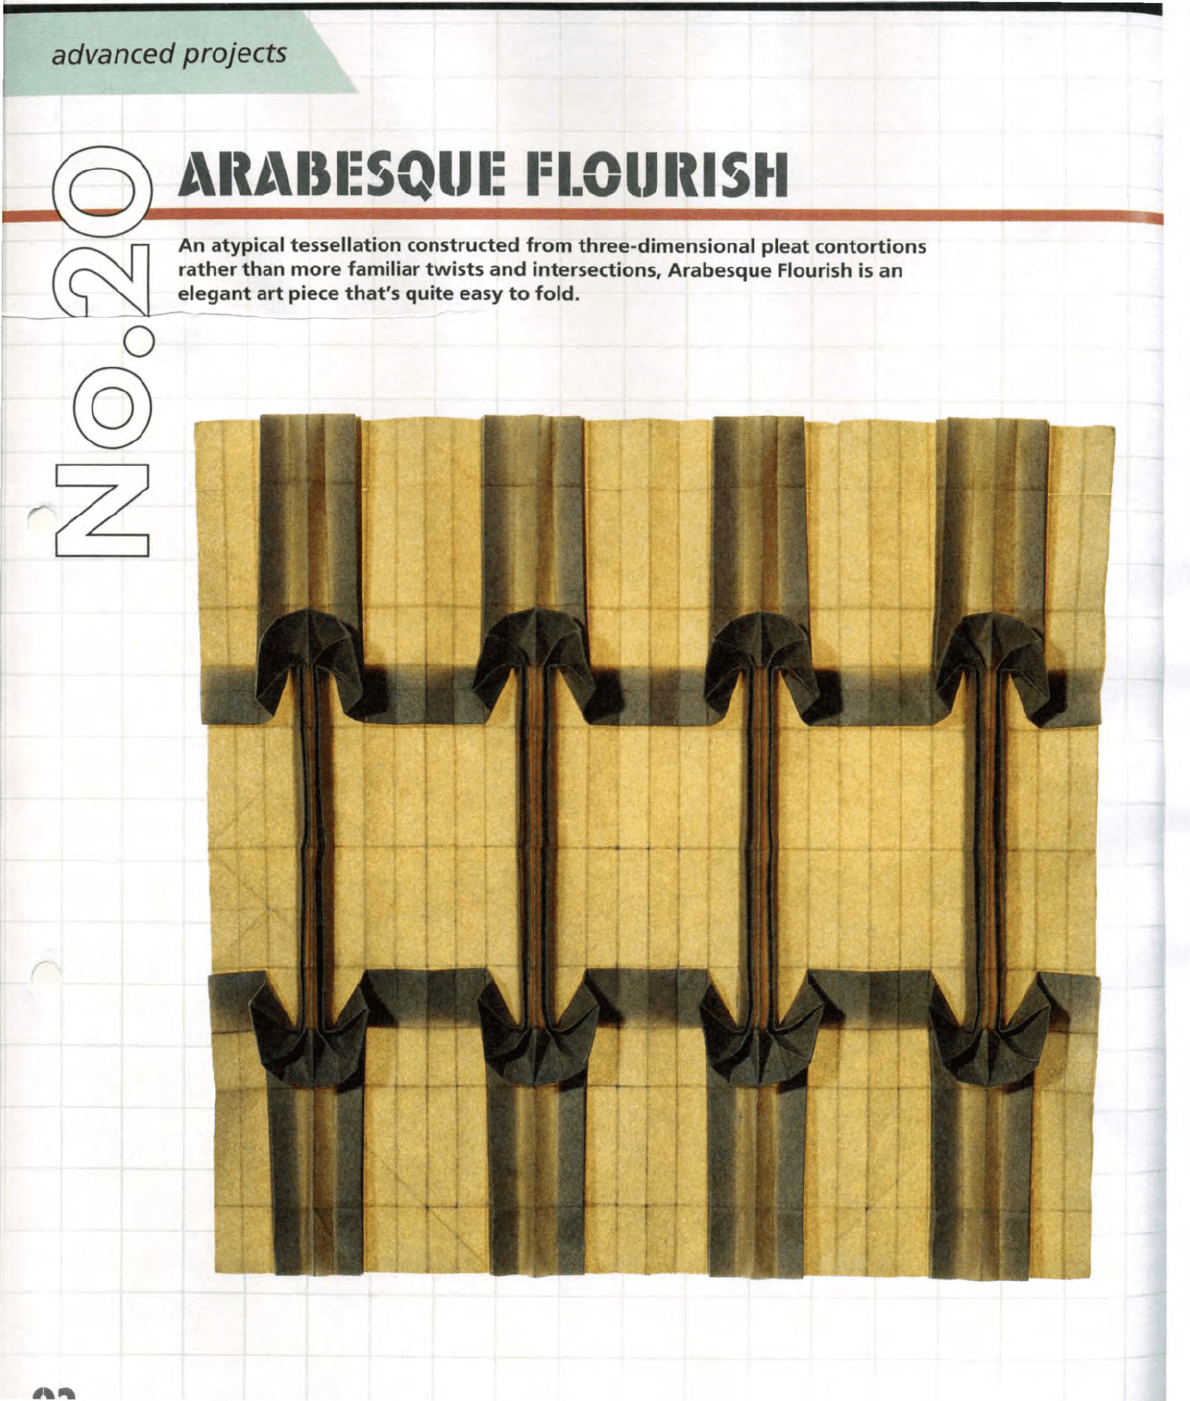
An
atypical
tessellation
constructed
from
three-dimensional
pleat
contortions
rather
than
more
familiar
twists
and
intersections,
Arabesque
Flourish is an
elegant
art
piece
that's
quite
easy
to
fold
.
I
r
"
\ /
,
I
,
I
,
,
I
,
I
,
I
,
I
,
I
,
I
,
I
,
I
,
I
,
I
I
,
I
,
I
\
II
,
I
I
,
I
,
I
,
I
I
,
I
,
I
,
I
I
, I , I , I
I
\
I,
" " "
I
,
I
,
I
,
I
,
I
,
I
,
I
,
I
,
I
,
I
,
I
,
I
,
I
,
I
,
I
,
I
,
\
I
,
I
,
I
,
I
I
,
I
,
I
,
I
I
,
I
,
I
,
I
I
, I , I , I
I
Instr
uctions
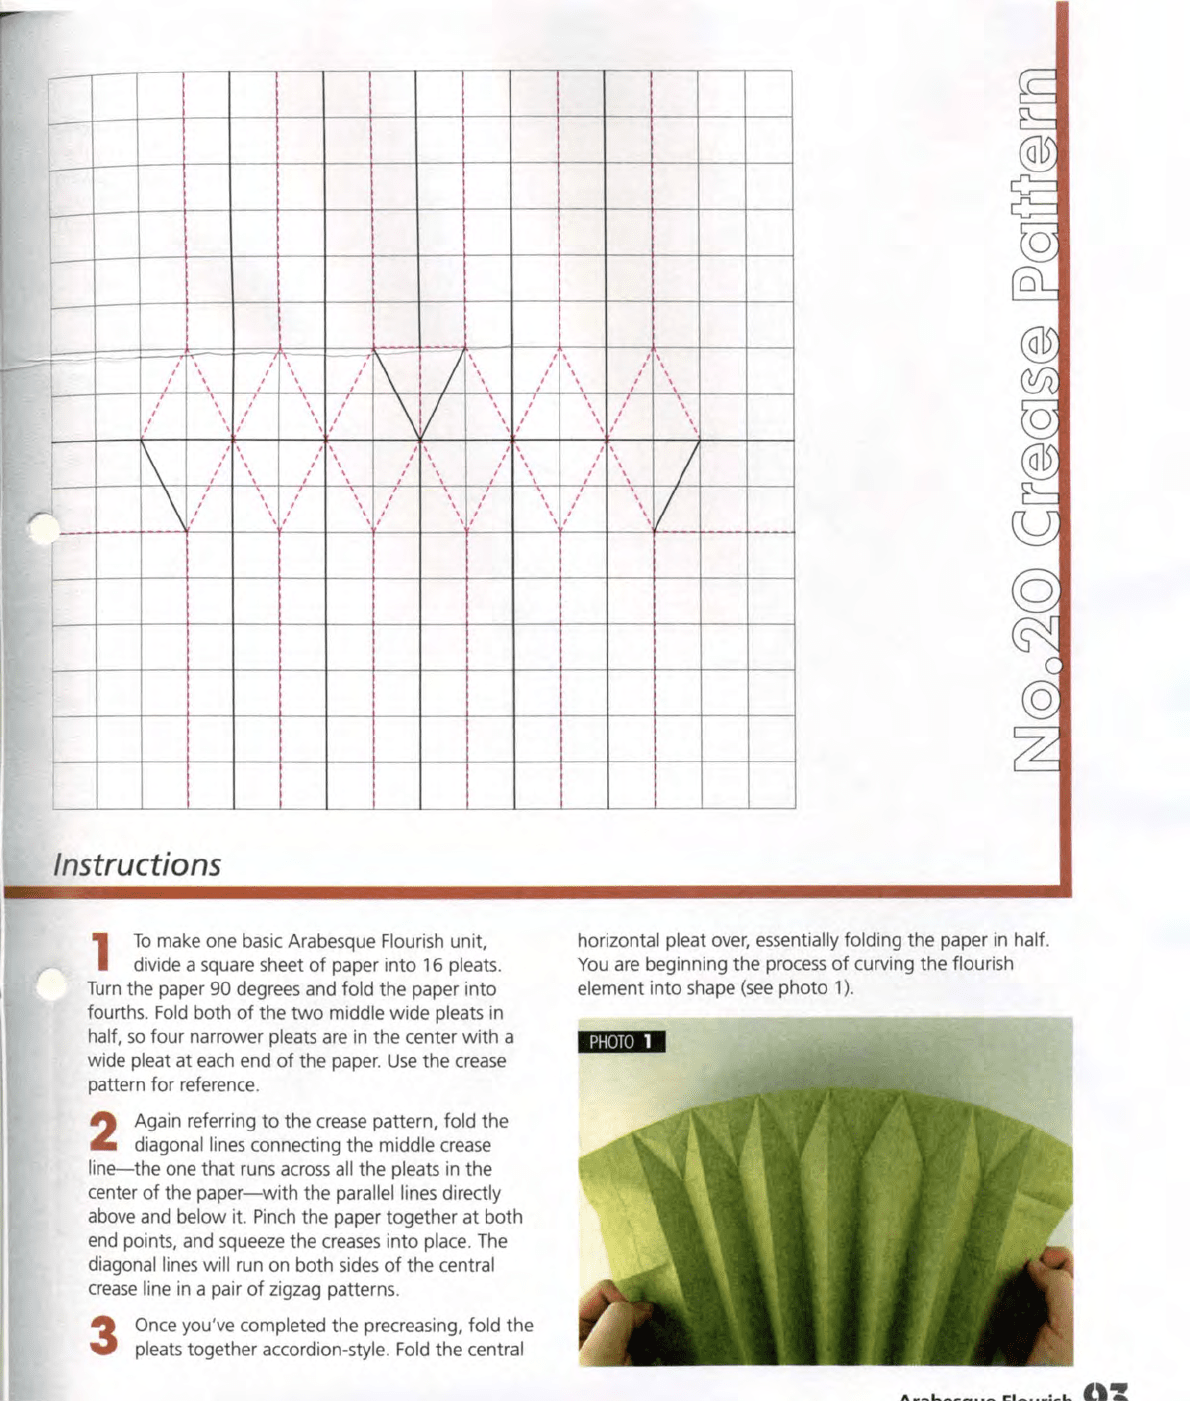
1
To
make one
basic
Arabesque Flouri
sh
unit,
divide a square sheet
of
paper i
nto
16 pleats.
Turn
the paper 90 degrees and fold the paper into
fourths.
Fold
both
of
the
two
middle wide pleats in
half,
so
four narrower pleats
are
in the center
with
a
wide
pleat at
each
end
of
the paper.
Use
the
crease
pattern
for
reference.
2
Again referring
to
the
crease
pattern, fold the
diagonal lines connecting the middle
crease
line-the
one
that
runs
across
all the pleats in the
center
of
the
paper-with
the parallel lines directly
above
and below it.
Pinch
the paper together at both
end
points, and squeeze the
creases
into place.
The
diagonal lines wi
ll
run on both
sides
of
the central
crease
line
in
a pair
of
zigzag patterns.
3
Once you'
ve
completed the precreasing, fold the
pleats together accordion-style.
Fold
the central
I,
I
,
I
,
I
I
,
,
I
,
I
, I
"
I
,
I
,
,
I
,
,
I
,
,
I
,
,
I
,
,
I
,
, I
,
"
/
I
,
I
,
I
,
I
,
I
,
/
,
,
,
horizontal pleat
over,
essentially folding the paper in half.
You
are
beginning the process
of
curving the flourish
element
into shape
(see
photo
1)
.
'UII.U
•••
..
IU:IIUI.I
IUIII)(I,I
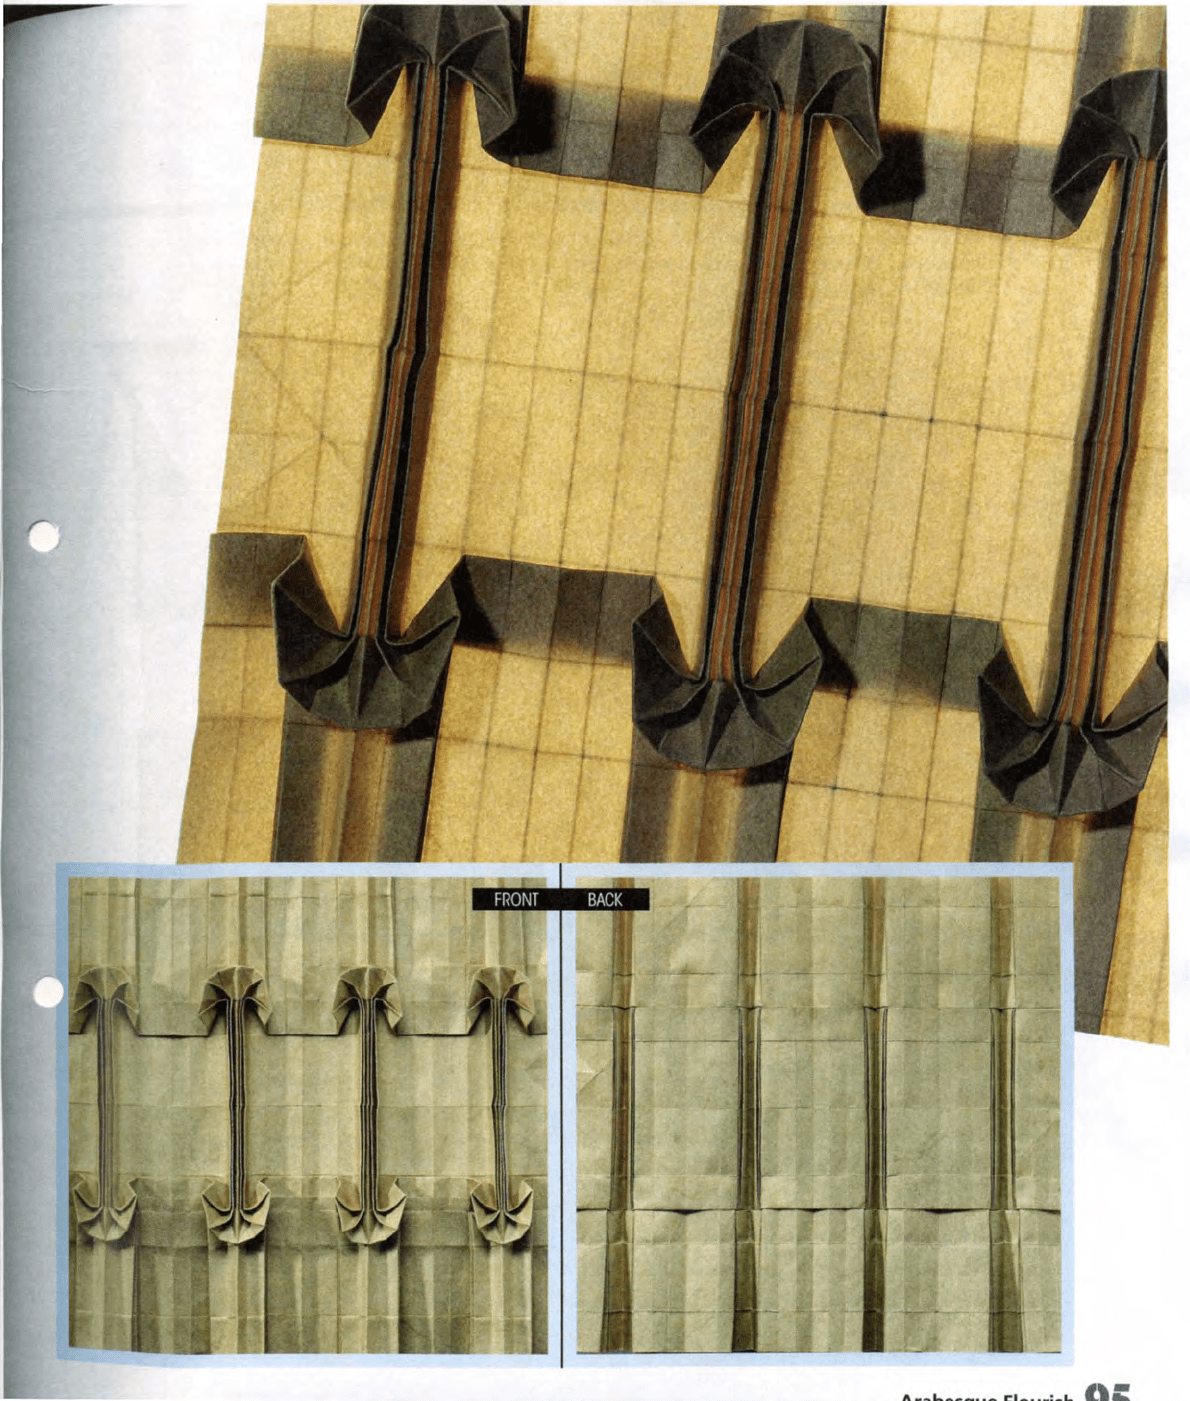
Backlighting
tessellations
is
one
of
the
best
ways
to
display
them-and
also
gives
great
insight into
how
they
are
con-
structed.
Many
origamists
design
tessellations
specifically
for
this
style
of
display.
( A Arabes ue Flourish
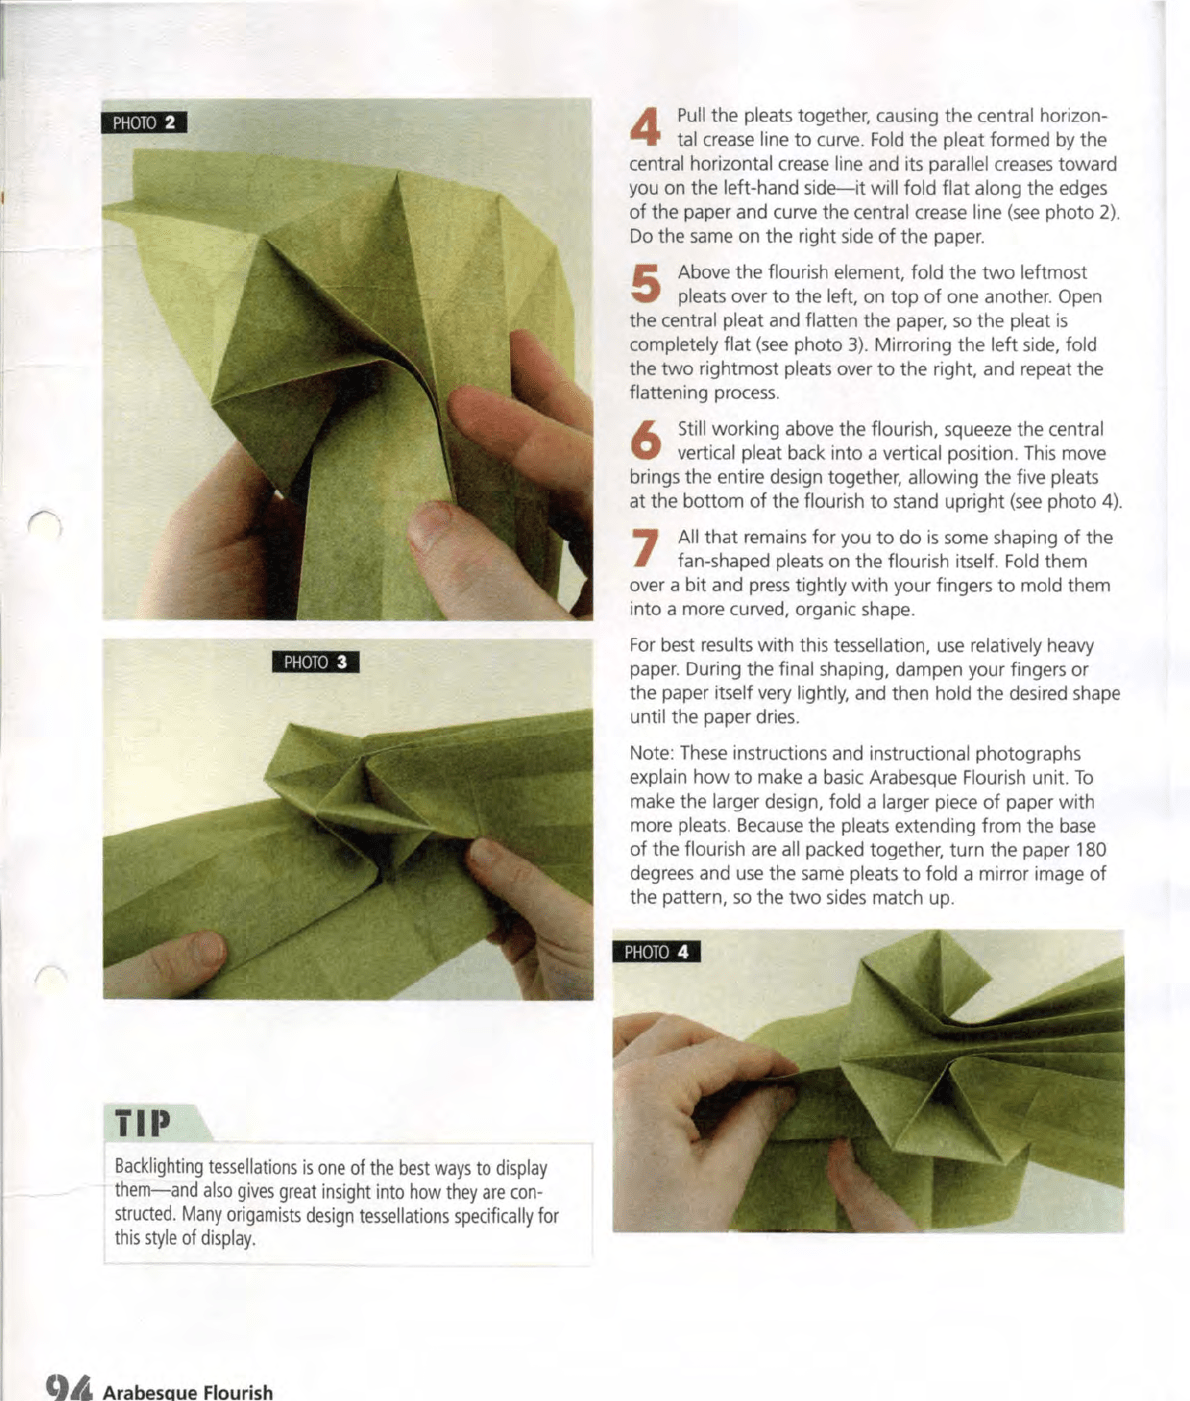
4
Pull
the pleats together, causing
the
central horizon-
tal crease line
to
curve.
Fold
the
pleat formed by the
central horizontal
crease
line and its parallel
creases
toward
you on the
left-hand
side-it
will fold flat along the edges
of
the paper and curve the central crease line
(see
photo 2).
Do
the same on the right side
of
the
paper.
5
Above
the
flourish element, fold
the
two
leftmost
pleats
over
to
the left, on
top
of
one another. Open
the central pleat and flatten the paper,
so
the
pleat
is
completely flat
(see
photo
3).
Mirroring
the
left
side, fold
the
two
rightmost pleats over
to
the
right, and repeat the
flattening process.
6
Still
working
above the flourish, squeeze the central
vertical pleat
back into a vertical position.
This
move
brings the entire design together,
allowing the five pleats
at
the
bottom
of
the flourish
to
stand
upright
(see
photo 4).
7
All
that
remains
for
you
to
do
is
some shaping
of
the
fan-shaped
pleats on the flourish itself. Fold them
over a
bit
and
press
tightly
with
your fingers
to
mold them
into a more curved, organic shape.
For
best results
with
this tessellation,
use
relatively heavy
paper. During the
final shaping, dampen your fingers or
the paper
itself very lightly, and then hold the desired shape
until the paper dries.
Note:
These
instructions and instructional photographs
explain
how
to
make a basic Arabesque Flourish unit.
To
make the larger design, fold a larger piece
of
paper
with
more pleats.
Because
the pleats extending
from
the
base
of
the flourish are
all
packed together,
turn
the
paper 180
degrees and
use
the same pleats
to
fold a mirror image
of
the pattern,
so
the
two
sides match up.
IUIIIUltl
Ar~hQcnllQ
~Inllrich
( -
r
advanced projects
[J,-------'
o
@
~
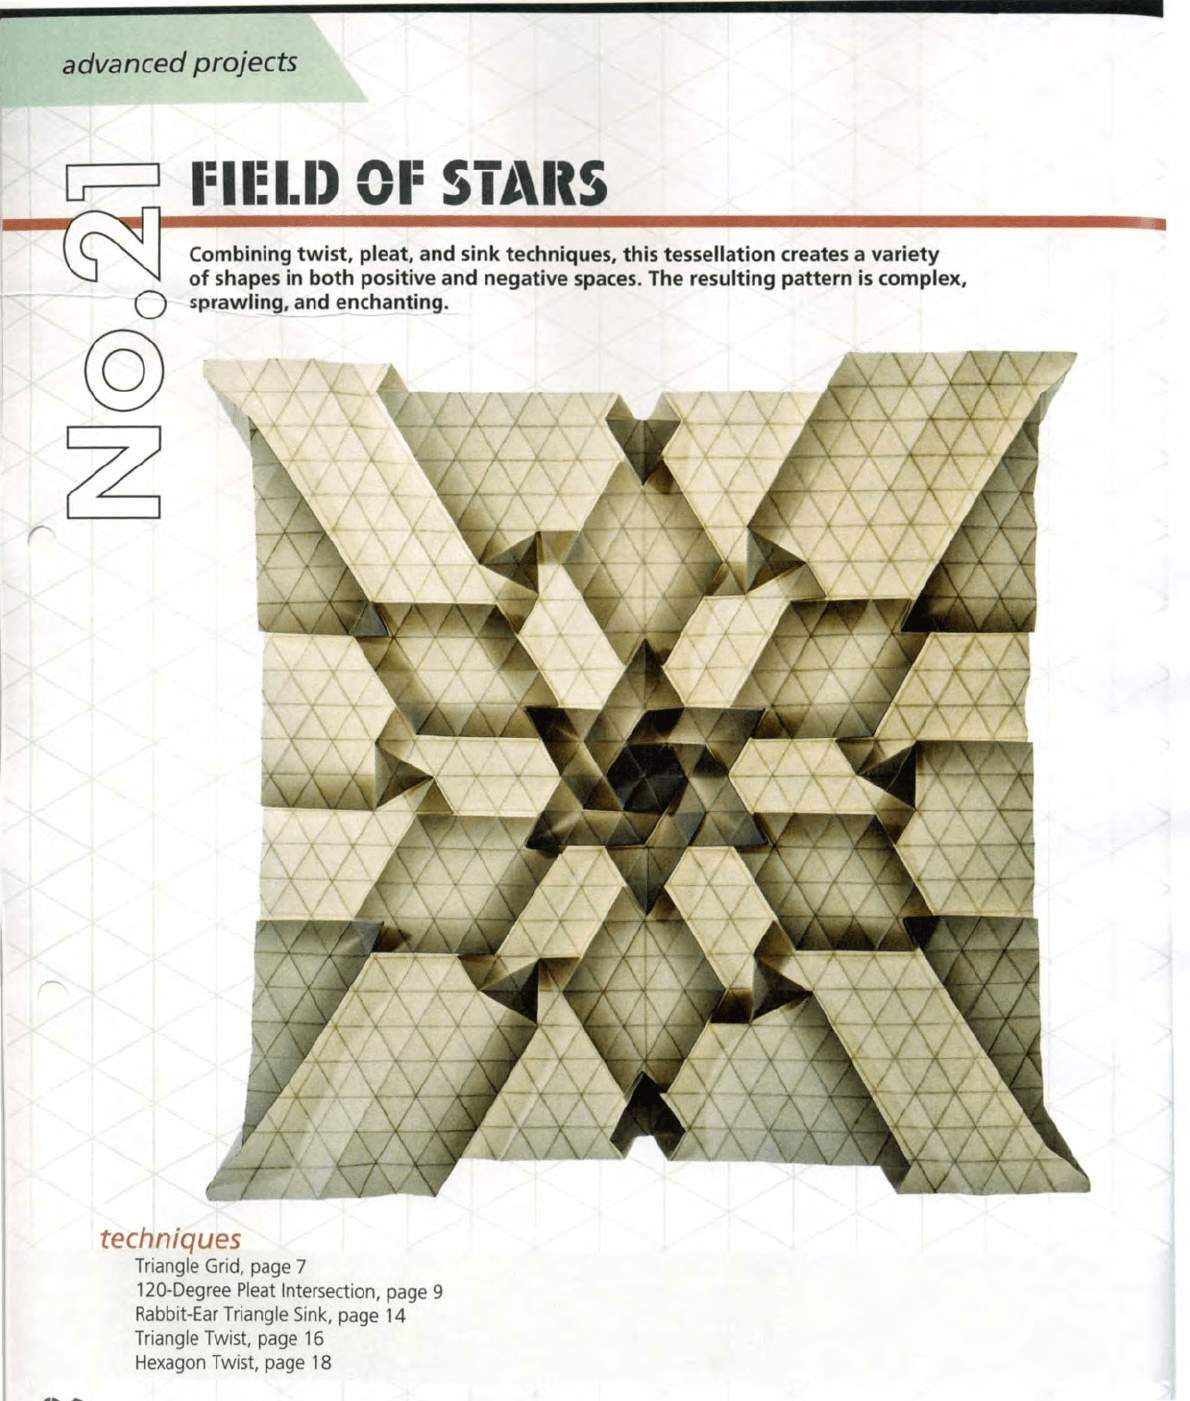
Combining twist, pleat, and sink techniques, this tessellation creates a variety
of
shapes
in
both positive and negative
spaces
. The resulting pattern
is
complex,
sprawling, and enchanting.
---
techniques
Triangle Grid, page 7
120-Degree
Pleat Intersection, page 9
Rabbit-Ear
Triangle Sink, page
14
Triangle Twist, page 16
Hexagon Twist, page 18
&
lill·n
•••
..
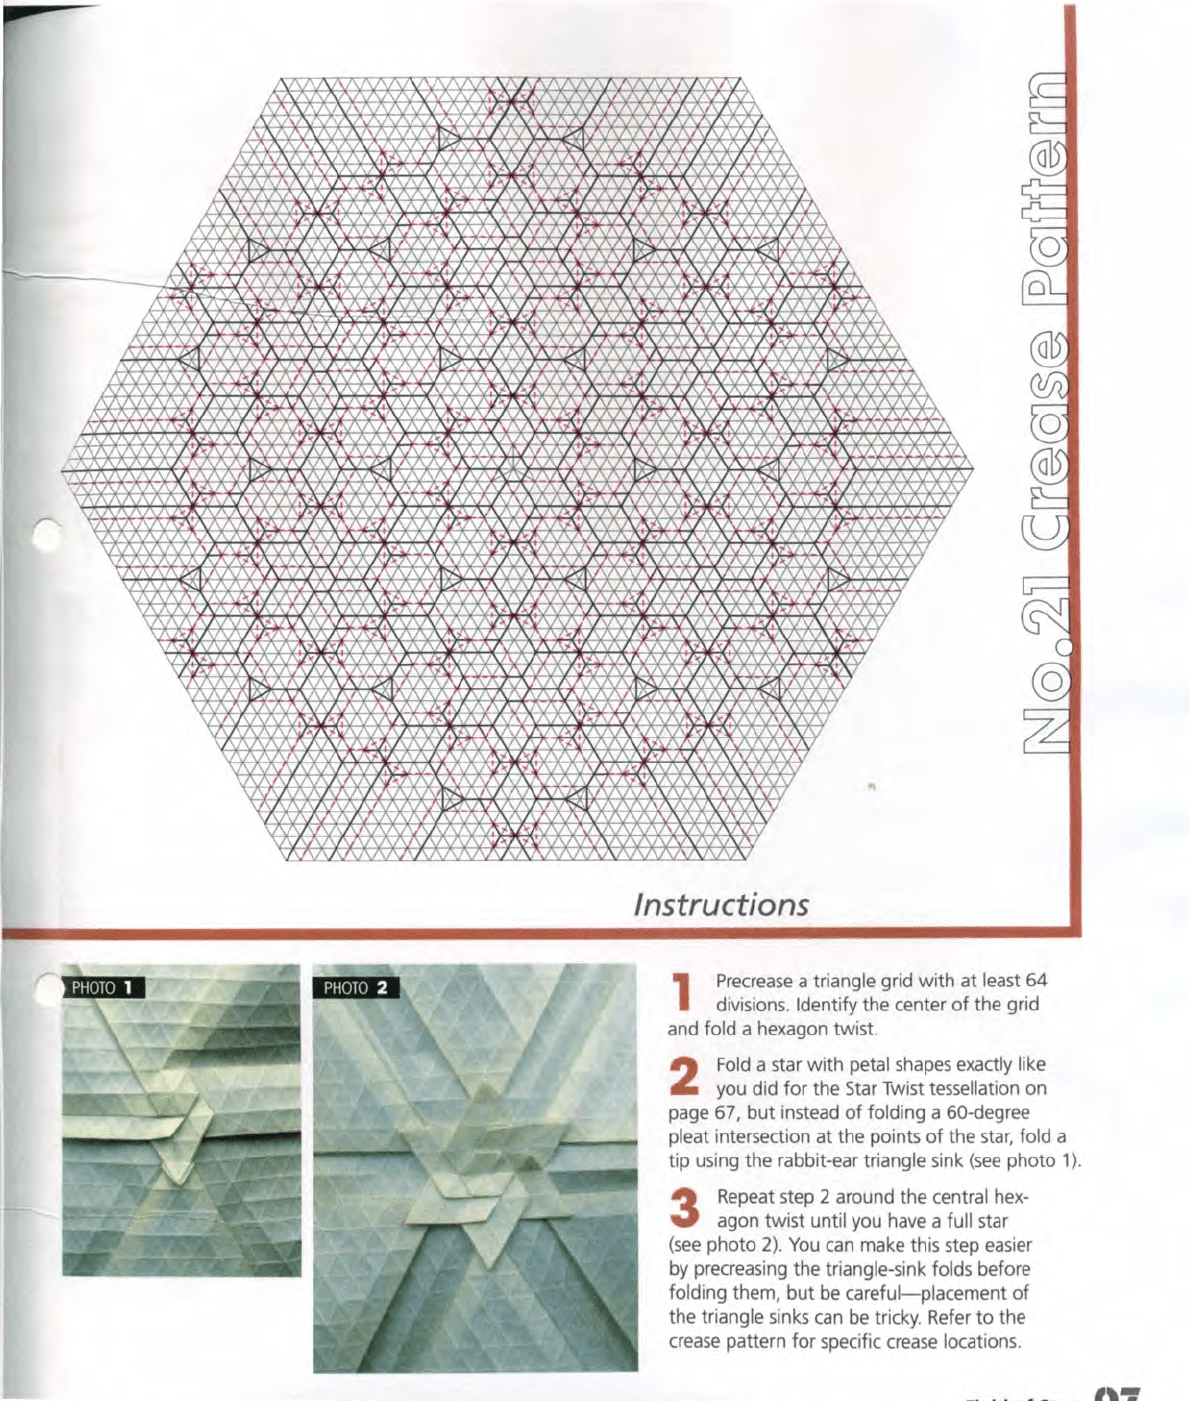
Instructions
1
Precrease
a triangle grid
with
at least 64
divisions.
Identify the center
of
the grid
and
fold a hexagon twist.
2
Fold
a star
with
petal shapes exactly like
you did
for
the Star Twist tessellation on
page
67,
but
instead
of
folding a 60-degree
pleat
intersection at the points
of
the
star,
fold a
tip using the rabbit-ear
triangle sink
(see
photo
1)
.
3
Repeat step 2 around the central hex-
agon twist until you have a full star
(see
photo
2)
.
You
can
make this step easier
by precreasing the triangle-sink folds before
folding them,
but
be
careful-placement
of
the triangle sinks
can
be
tricky. Refer
to
the
crease
pattern
for
specific
crease
locations.