AWS A5.29-98/SFA-5.29 Specification for Low-Alloy Steel Electrodes for Flux Cored Arc Welding (Eng)
Подождите немного. Документ загружается.

ASME B&PVC sec2c$u135 05-25-99 11:30:12 pd: sec2c Rev 14.04
PART C — SPECIFICATIONS FOR WELDING RODS,
ELECTRODES, AND FILLER METALS SFA-5.29
GENERAL NOTES:
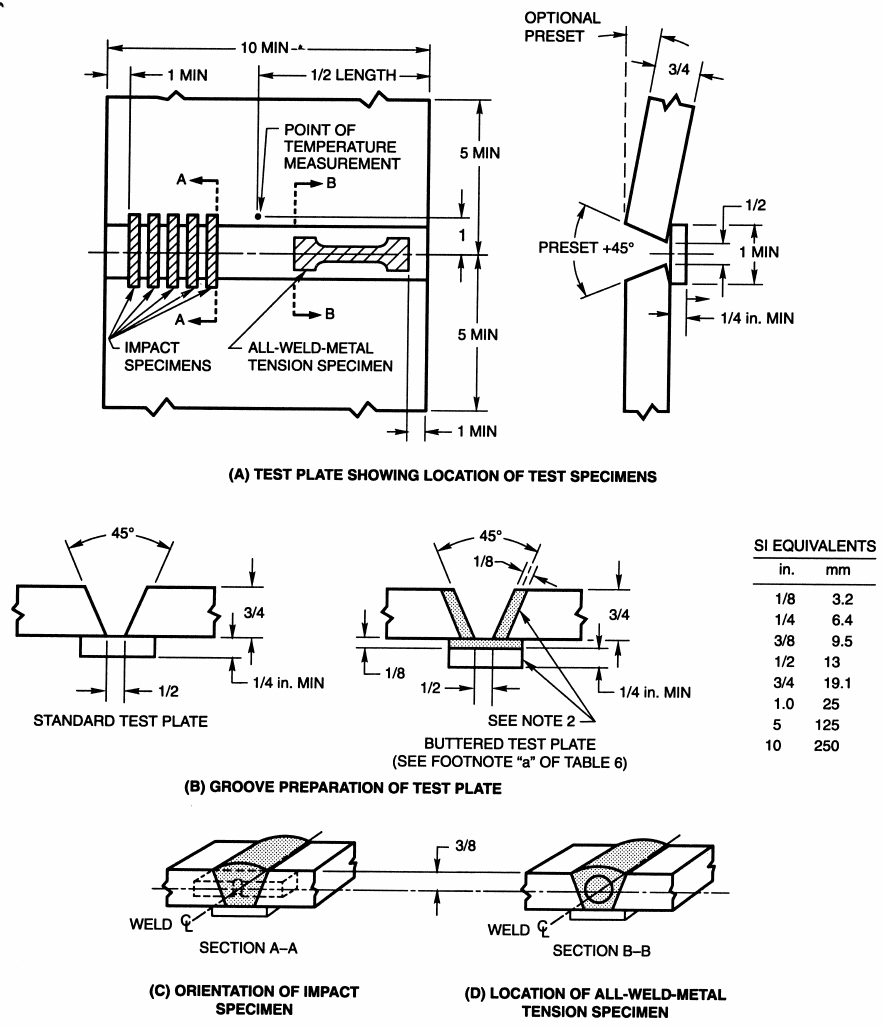
1. Prior to welding, the assembly may be preset as shown so that the welded joint will be sufficiently flat to facilitate test specimen removal.
As an alternative, restraint or a combination of restraint and preset may be used.
2. When required, edges of the grooves and the contacting face of the backing shall be buttered as shown. Any size of the electrode being tested
may be used for buttering.
3. All dimensions except angles are in inches.
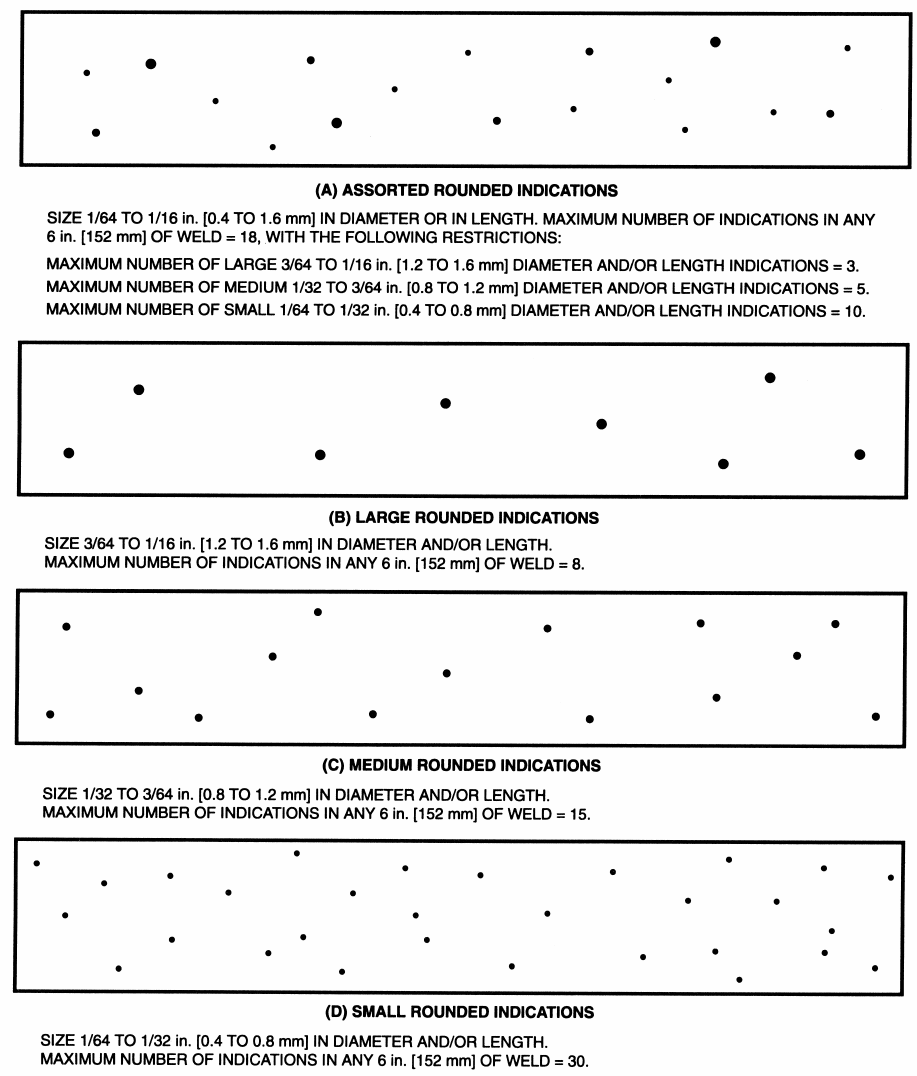
FIG. 2 GROOVE WELD TEST ASSEMBLY FOR MECHANICAL PROPERTIES AND SOUNDNESS OF WELD
METAL
607
ASME B&PVC sec2c$u135 05-25-99 11:30:12 pd: sec2c Rev 14.04
SFA-5.29 1998 SECTION II
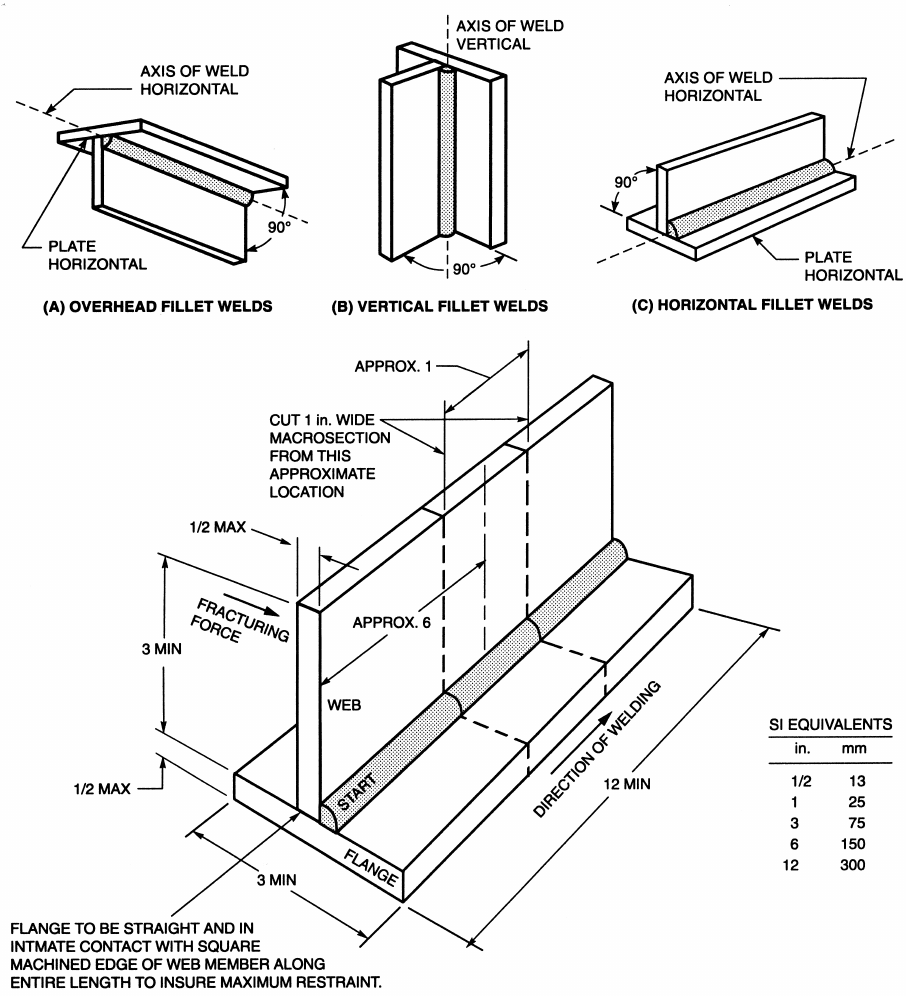
GENERAL NOTES:
1. The surfaces to be welded shall be clean.
2. One assembly shall be welded for each position specified in Table 3, using the required shielding gas and polarity to the classification specified.
3. The preheat shall be 60°F (16°C) minimum.
4. A single-pass fillet weld shall be made on one side of the joint.
5. Welding in the vertical position shall be as described in Table 3.
6. Weld cleaning shall be limited to slag chipping, brushing, and needle scaling. Grinding or filing of the weld surface is prohibited.
7. The tests shall be conducted without postweld heat treatment.
8. All dimensions are in inches.
9. If the web and flange thicknesses are less than or equal to
1
⁄
4
in. (6.4 mm), the web and flange widths shall be 2 in. (51 mm) min.
FIG. 3 FILLET WELD TEST ASSEMBLY
608
ASME B&PVC sec2c$u135 05 25 99 11:30:12 pd: sec2c Rev 14 04
PART C — SPECIFICATIONS FOR WELDING RODS,
ELECTRODES, AND FILLER METALS SFA-5.29
TABLE 6
BASE-METAL REQUIREMENTS
a
Base Metal
Weld Metal
Designation ASTM and Military Standards
a
UNS Number
b
A1 A 204, Grade A, B, or C (A) K11820
(B) K12020
(C) K12320
B1, B2, B2L, B2H A 387, Grade 11 K11789
B3, B3L, B3H A 387, Grade 22 K21590
B6, B6L A 387, Grade 5 S50200
B8, B8L A 387, Grade 9 S50400
Ni1 A 537, Class 1 or 2 K12437
Ni2, Ni3 A 203, Grade E K32018
HY80 or HY100 steel in accordance with K31820 or K32045
MIL-S-16216
D1, D2, D3 A 302, Grade A or B K12021, K12022
W2 A 588, Grade A, B, or C (A) K11430
(B) K12043
(C) K11538
K1, K3, K4, K5, K7, A 514, any grade (A) K11856
K9
c
HY80 or HY100 steel in accordance with K31820 or K32045
MIL-S-16216
K6, K2, K8 A 537, Class 1 or 2 K12437
NOTES:
a. ASTM A 35 or A 285 base metals may be used; however, the joint surfaces shall be buttered (see Figure 2) using any electrode of the same
composition as the classification being tested. Buttering is not necessary for EXXT4-X, EXXT6-X, EXXT7-X, EXXT8-X, and EXXT11-X
electrodes with 70 ksi tensile strength or lower classification. Buttering is also not required for the fillet weld test.
b. SAE/ASTM Unified Numbering System for Metals and Alloys.
c. Buttering not allowed for K9 weld metal designation.
10. Chemical Analysis
10.1 A sample for chemical analysis of the weld
metal shall be obtained for all electrodes in this specifi-
cation. The samples may be taken from the weld pad
prepared in accordance with 9.3, from the reduced
section of the fractured tension test specimen, or from
a corresponding location (or any location above it) in
the weld metal in the groove weld in Fig. 2. In case
of dispute, the weld pad is the referee method.
10.2 The top surface of the pad described in 9.3
and shown in Fig. 1, shall be removed and discarded,
and a sample for analysis obtained from the underlying
metal no closer than
3
⁄
8
in. (9.5 mm) to the surface
of the base metal in Fig. 1 by any appropriate mechanical
means. The sample shall be free of slag. When the
sample is taken from the groove weld or the reduced
section of the fractured tension test specimen, that
material shall be prepared for analysis by any suitable
mechanical means.
609
10.3 The sample shall be analyzed by accepted
analytical methods. The referee method shall be ASTM
E 350, Standard Test Methods for Chemical Analysis
of Carbon Steel, Low-Alloy Steel, Silicon Electrical
Steel, Ingot Iron, and Wrought Iron.
10.4 The results of the analysis shall meet the
requirements of Table 4 for the classification of electrode
under test.
11. Radiographic Test
11.1 The groove weld described in 9.4.1 and shown
in Fig. 2 shall be radiographed to evaluate the soundness
of the weld metal. In preparation for radiography, the
backing shall be removed and both surfaces of the
weld shall be machined or ground smooth and flush
with the original surfaces of the base metal. Both
surfaces of the test assembly, in the area of the weld,
shall be smooth enough to avoid difficulty in interpreting
the radiograph.
ASME B&PVC sec2c$u135 05-25-99 11:30:12 pd: sec2c Rev 14.04
SFA-5.29 1998 SECTION II
TABLE 7
REQUIREMENTS FOR PASS AND LAYER CONTROL FOR MULTIPLE PASS ELECTRODE CLASSIFICATIONS
a
Electrode Size Required Suggested Passes Per Layer Suggested
AWS Total Number of
Classification in. mm Passes Layer #1 Layer #2 — Top Layers
0.030 0.8
0.035 0.9 12–19 1 or 2 2 or 3
b
6–9
0.045 1.1
0.052 1.3
EXXT1-X, -XM
d
1
⁄
16
1.6 10–17 1 or 2 2 or 3
b
5–8
EXXT5-X, -XM
5
⁄
64
2.0
3
⁄
32
2.4
7
⁄
64
2.8 7–14 1 or 2 2 or 3
b
4–7
1
⁄
8
3.2
EXXT4-X All Sizes
c
7–11 1 or 2 2 or 3
b
4–6
EXXT6-X
All Sizes
c
7–14 1 or 2 2 or 3
b
4–8
EXXT7-X
EXXT8-X All Sizes
c
12–18 1 or 2 2 or 3
b
6–9
EXXT11-X All Sizes
c
9–18 1 or 2 2 or 3
b
5–9
EXXTG-X
EXXTX-G Not Specified, To be Recorded
EXXTG-G
NOTES:
a. Actual number of passes, electrode diameter, wire feed speed or amperes, arc voltage, travel speed, and electrode extension (electrical
extension) shall be recorded and made available to the user on request. See A6.2 in the annex.
b. The final layer may be 4 passes.
c. The electrode size shall be
3
⁄
32
in. (2.4 mm) or the size that the manufacturer produces that is closer to
3
⁄
32
in. (2.4 mm).
d. For class E10XT1-K9, -K9M, both the pass and layer sequence are controlled by the required heat input rate of 50–55 kJ/inch.
11.2 The weld shall be radiographed in accordance
with ASTM E 142, Standard Test Methods for Control-
ling Quality of Radiographic Testing. The quality level
of inspection shall be 2-2T.
11.3 The soundness of the weld metal meets the
requirements of this specification if the radiograph
shows no cracks, no incomplete fusion, and no rounded
indications in excess of the largest size or numbers
permitted by the radiographic standards in Fig. 4. One
inch (25 mm) of the weld measured from each end
of the assembly shall be excluded from the radiographic
evaluation.
11.3.1 A rounded indication is an indication (on
the radiograph) whose length is no more than three
times its width. Rounded indications may be circular,
elliptical, conical, or irregular in shape, and they may
have tails. The size of a rounded indication is the
largest dimension of the indication, including any tail
that may be present. The indication may be porosity
610
or slag. Indications where the largest dimension does
not exceed
1
⁄
64
in. (0.4 mm) shall be disregarded.
Test assemblies with indications larger than the largest
indications permitted in the radiographic standards (Fig.
4) do not meet the requirements of this specification.
12. Tension Test
12.1 One all-weld-metal round tensile specimen, as
specified in the Tension Tests section of ANSI/AWS
B4.0, Standard Methods for Mechanical Testing of
Welds, shall be machined from the groove weld de-
scribed in 9.4 and shown in Fig. 2A. The tensile
specimen shall have a nominal diameter of 0.500 in.
(12.5 mm) and a nominal gage length-to-diameter ratio
of 4:1.
12.2 For classifications shown in the as-welded condi-
tion in Table 2, the specimen, after machining, but
before testing, may be aged at 200 to 220°F (90 to

ASME B&PVC sec2c$u135 05-25-99 11:30:12 pd: sec2c Rev 14.04
PART C — SPECIFICATIONS FOR WELDING RODS,
ELECTRODES, AND FILLER METALS SFA-5.29
TABLE 8
PREHEAT, INTERPASS AND PWHT TEMPERATURES
Preheat and Interpass
Temperature
b
PWHT Temperature
b
AWS Classification
a
°F °C °F °C
E7XT5-A1, -A1M
E8XT1-A1, -A1M
E8XT5-Ni1, -Ni1M
E8XT5-Ni2
c
, -Ni2M
300 ⫾ 25 150 ⫾ 15 1150 ⫾ 25 620 ⫾ 15
E8XT5-Ni3
c
, -Ni3M
E9XT5-Ni3
c
, -Ni3M
E9XT5-D2, -D2M
E10XT5-D2, -D2M
E8XT5-B6, -B6M
E8XT5-B6L, -B6LM
400 ⫾ 100 200 ⫾ 50 1375 ⫾ 25
d
745 ⫾ 15
E8XT5-B8, -B8M
E8XT5-B8L, -B8LM
E8XT1-B1L, -B1LM
E8XT1-B1, -B1M
E8XT1-B2L, -B2LM
E8XT1-B2, -B2M
E8XT5-B2, -B2M
E8XT1-B2H, -B2HM
350 ⫾ 25 176 ⫾ 15 1275 ⫾ 25 690 ⫾ 15
E8XT5-B2L, -B2LM
E9XT1-B3, -B3M
E9XT5-B3, -B3M
E10XT1-B3, -B3M
E9XT1-B3H, -B3HM
E9XT1-B3L, -B3LM
(Table 8 continued on next page)
104°C) for up to 48 hours, then allowed to cool to
room temperature. Refer to A8.3 for a discussion on
the purpose of aging.
12.3 After cooling, the specimen shall be tested in
the manner described in the tension test section of
ANSI/AWS B4.0, Standard Methods for Mechanical
Testing of Welds.
12.4 The results of the all-weld-metal tension test
shall meet the requirements specified in Table 1.
13. Impact Test
13.1 For those classifications for which impact testing
is specified in Table 2, five Charpy V-notch impact
specimens, as specified in the Fracture Toughness Test-
ing of Welds section of ANSI/AWS B4.0, shall be
machined from the test assembly shown in Fig. 2.
611
The Charpy V-notch specimens shall have the notched
surface and the surface to be struck parallel within
0.002 in. (0.005 mm). The other two surfaces shall be
square with the notched or struck surface within ⫾10
minutes of a degree. The notch shall be smoothly cut
by mechanical means and shall be square with the
longitudinal edge of the specimen within one degree.
The geometry of the notch shall be measured on at
least one specimen in a set of five specimens. Measure-
ment shall be done at a minimum 50 times magnification
on either a shadowgraph or metallograph. The correct
location of the notch shall be verified by etching before
or after machining.
13.2 The five specimens shall be tested in accordance
with the impact test section of ANSI/AWS B4.0. The
test temperature shall be that specified in Table 2, for
the classification under test. For those electrodes to be
identified by the optional supplemental impact designa-

ASME B&PVC sec2c$u135 05-25-99 11:30:12 pd: sec2c Rev 14.04
SFA-5.29 1998 SECTION II
TABLE 8 (CONT’D)
PREHEAT, INTERPASS AND PWHT TEMPERATURES
Preheat and Interpass
Temperature
b
PWHT Temperature
b
AWS Classification
a
°F °C °F °C
E6XT1-Ni1, -Ni1M
E7XT6-Ni1
E7XT8-Ni1
E8XT1-Ni1, -Ni1M
E7XT8-Ni2
E8XT1-Ni2, -Ni2M
E8XT8-Ni2
E8XT11-Ni3
E9XT1-Ni2, -Ni2M
E9XT1-D1, -D1M
E9XT1-D3, -D3M
E8XT5-K1, -K1M
E7XT4-K2
E7XT7-K2
E7XT8-K2
E7XT11-K2
E8XT1-K2, -K2M
E8XT5-K2, -K2M 300 ⫾ 25 150 ⫾ 15 None None
E9XT1-K2, -K2M
E9XT5-K2, -K2M
E10XT1-K3, -K3M
E10XT5-K3, -K3M
E11XT1-K3, -K3M
E11XT5-K3, -K3M
E11XT1-K4, -K4M
E11XT5-K4, -K4M
E12XT1-K4, -K4M
E12XT1-K5, -K5M
E6XT8-K6
E7XT8-K6
E7XT5-K6, -K6M
E9XT8-K8
E10XT1-K7, -K7M
EXXT1-K9, -K9M
E8XT1-W2, -W2M
EXXTX-G
EXXTG-X Not Specified
e
EXXTG-G
NOTES:
a. In this table “X” before the letter “T” may bea0or1toindicate the primary welding position for
which the electrode is designed (usability). See footnote b to Table 3 and section A2.
b. These temperatures are specified for testing under this specification and are not to be considered as
recommendation for preheat and postweld heat treatment (PWHT) in production welding. The requirements
for production welding must be determined by the user.
The schedule for PWHT for classification testing is as follows:
Raise to required temperature at a rate not exceeding 500°F (280°C) per hour, hold at required temperature
for 1 hour, furnace cool to 600°F (315°C) at a rate not exceeding 350°F (195°C) per hour, air cool.
c. PWHT temperatures in excess of 1150°F (620°C) will decreases the impact value.
d. Held at specified temperature for two hours. Furnace cool at a rate not exceeding 100°F (55°C) per
hour to 1100°F (595°C). Remove from furnace and air cool. These compositions are air hardening.
e. See Table 1, Note b.
612
ASME B&PVC sec2c$u135 05-25-99 11:30:12 pd: sec2c Rev 14.04
PART C — SPECIFICATIONS FOR WELDING RODS,
ELECTRODES, AND FILLER METALS SFA-5.29
GENERAL NOTES:
1. In using these standards, the chart which is most representative of the size of the rounded indications present in the test specimen radiograph
shall be used for determining conformance to these radiographic standards.
2. Since these are test welds specifically made in the laboratory for classification purposes, the radiographic requirements for these test welds
are more rigid than those which may be required for general fabrication.
3. Indications where the largest dimension does not exceed
1
⁄
64
in. (0.4 mm) diameter and/or length shall be disregarded.
FIG. 4 RADIOGRAPHIC STANDARDS FOR TEST ASSEMBLY IN FIG. 2
613
ASME B&PVC sec2c$u135 05-25-99 11:30:12 pd: sec2c Rev 14.04
SFA-5.29 1998 SECTION II
tor, ‘‘J,’’ the test temperature shall be as specified in
Note b of Table 2.
13.3 In evaluating the test results, the lowest and
the highest values obtained shall be disregarded. Two
of the remaining three values shall equal or exceed
the specified 20 ft·lbf (27 J) energy level. One of the
three may be lower, but not lower than 15 ft·lbf (20
J), and the average of the three shall be not less than
the required 20 ft·lbf (27 J) energy level.
14. Fillet Weld Test
14.1 The required fillet welds shall be made in
accordance with 9.5 and Fig. 3, and shall be examined
visually over the entire face of each weld. There shall
be no indication of cracks, and the weld shall be
reasonably free of undercut, overlap, trapped slag, and
surface porosity. After the visual examination, a speci-
men containing approximately 1 in. (25 mm) of the
length of the weld shall be removed as shown in Fig.
3. One cross-sectional surface of the specimen shall
be polished and etched, and then examined as required
in 14.2
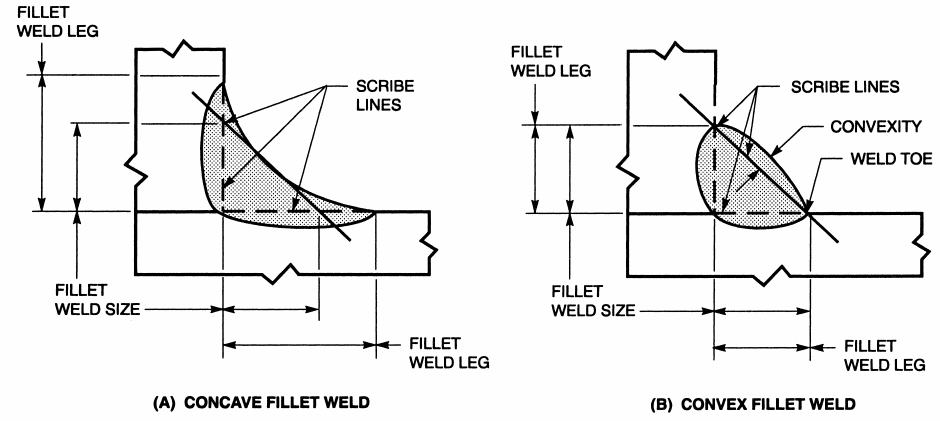
14.2 Scribe lines shall be placed on the prepared
surface, as shown in Fig. 5, and the fillet weld size,
fillet weld legs, and convexity of the weld shall be
determined to the nearest
1
⁄
64
in. (0.4 mm) by actual
measurement. These measurements shall meet the re-
quirements specified in Table 9.
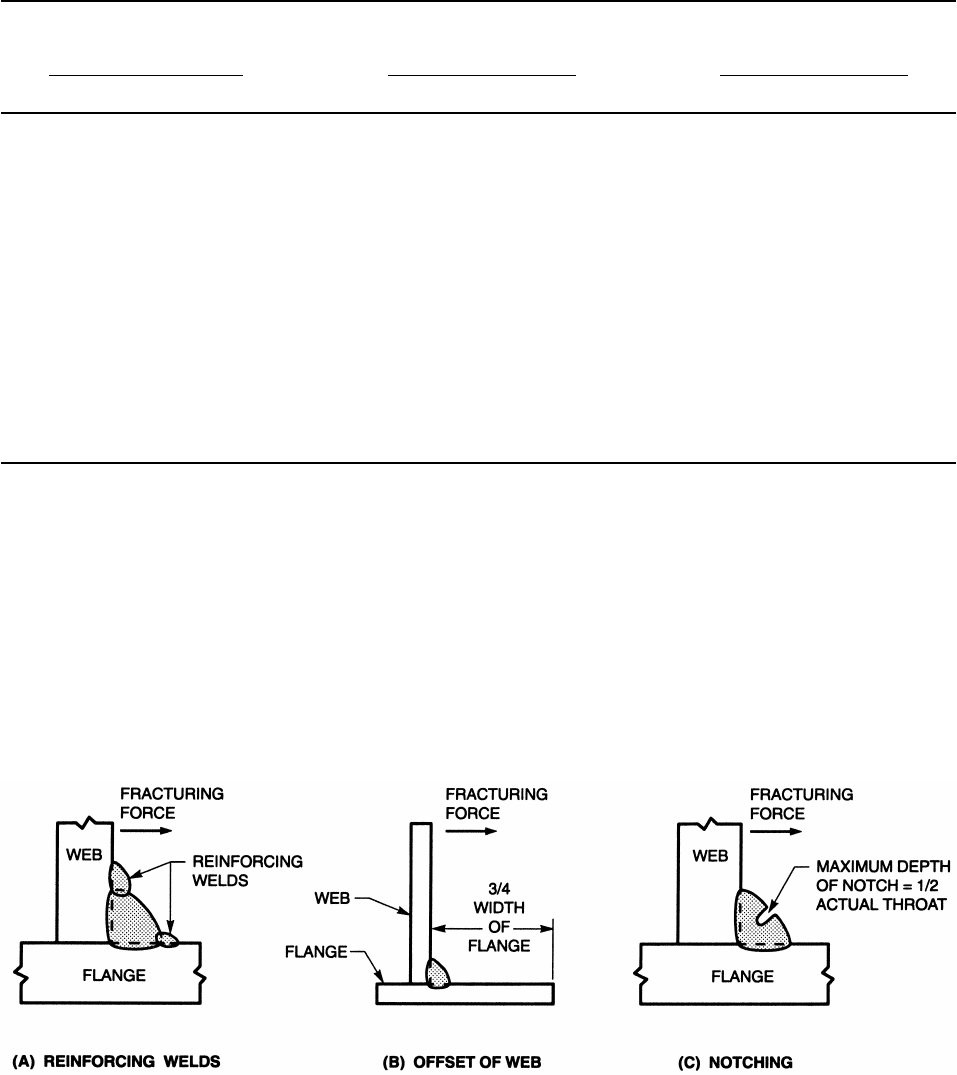
14.3 The remaining two sections of the test assembly
shall be broken longitudinally through the fillet weld
by a force exerted as shown in Fig. 3. When necessary,
to facilitate fracture through the fillet, one or more of
the following procedures may be used:
(a) A reinforcing bead, as shown in Fig. 6A, may
be added to each leg of the weld.
(b) The position of the web on the flange may be
changed, as shown in Fig. 6B.
(c) The face of the fillet may be notched, as shown
in Fig. 6C.
Tests in which the weld metal pulls out of the base
metal during bending are invalid tests. Specimens in
which this occurs shall be replaced, specimen for
specimen, and the test completed. In this case, the
doubling of specimens required for retest in Section
8, Retest, does not apply.
14.4 The fractured surfaces shall be examined visu-
ally. They shall be free of cracks and shall be reasonably
free of porosity and trapped slag. Incomplete fusion at
the root of the weld shall not exceed 20 percent of
the total length of the weld. Slag beyond the vertex
614
of the isosceles triangle with the hypotenuse as the
base, as shown in Fig. 5, shall not be considered
incomplete fusion.
15. Diffusible Hydrogen Test
15.1 The smallest and largest size of an electrode
to be identified by an optional supplemental diffusible
hydrogen designator shall be tested according to one
of the methods given in ANSI/AWS A4.3, Standard
Methods for Determination of the Diffusible Hydrogen
Content of Martensitic, Bainitic, and Ferritic Steel Weld
Metal Produced by Arc Welding. Based upon the average
value of test results which satisfy the requirements of
Table 10, the appropriate diffusible hydrogen designator
may be added at the end of the classification.
15.2 Testing shall be done with electrode in the ‘‘as-
received’’ condition. Conditioning of the electrode prior
to testing is not permitted. The use of electrical electrode
extensions in excess of those which would be used in
the routine application of the electrode is not permitted.
15.3 For purposes of certifying compliance with
diffusible hydrogen requirements, the reference atmo-
spheric condition shall be an absolute humidity of 10
grains of moisture per pound (1.43 g per kg) of dry
air at the time of welding. The actual atmospheric
conditions shall be reported along with the average
value for the tests according to ANSI/AWS A4.3.
15.4 When the absolute humidity equals or exceeds
the reference condition at the time of preparation of
the test assembly, the test shall be acceptable as demon-
strating compliance with the requirements of this speci-
fication, provided the actual test results satisfy the
diffusible hydrogen requirements for the applicable
designator, as specified in Table 10. Likewise, if the
actual test results for an electrode meet the requirements
for the lower or lowest hydrogen designator as specified
in Table 10, the electrode also meets the requirements
for all higher hydrogen designators in Table 10 without
the need for retest.
PART C — MANUFACTURE,
IDENTIFICATION, AND PACKAGING
16. Method of Manufacture
The electrodes classified according to this specifica-
tion may be manufactured by any method that will
produce electrodes that meet the requirements of this
specification.
ASME B&PVC sec2c$u135 05-25-99 11:30:12 pd: sec2c Rev 14.04
PART C — SPECIFICATIONS FOR WELDING RODS,
ELECTRODES, AND FILLER METALS SFA-5.29
GENERAL NOTES:
1. Fillet weld size is the leg lengths of the largest isosceles right triangle which can be inscribed within the fillet weld cross-section.
2. Convexity is the maximum distance from the face of a convex fillet weld perpendicular to a line joining the weld toes.
3. Fillet weld leg is the distance from the joint root to the toe of the fillet weld.
FIG. 5 DIMENSIONS OF FILLET WELDS
17. Standard Sizes
Standard sizes for filler metal in the different package
forms (coils with support, coils without support, drums,
and spools, see Section 19, Standard Package Forms),
are shown in Table 11.
18. Finish and Uniformity
18.1 All electrodes shall have a smooth finish that
is free from slivers, depressions, scratches, scale, seams,
laps (exclusive of the longitudinal joint), and foreign
matter that would adversely affect the welding character-
istics, the operation of the welding equipment, or the
properties of the weld metal.
18.2 Each continuous length of electrode shall be
from a single lot of material, as defined in ANSI/AWS
A5.01, and welds, when present, shall have been made
so as not to interfere with the uniform, uninterrupted
feeding of the electrode on automatic and semiautomatic
equipment.
18.3 Core ingredients shall be distributed with suffi-
cient uniformity throughout the length of the electrode
so as not to adversely affect the performance of the
electrode or the properties of the weld metal.
615
18.4 A suitable protective coating may be applied
to any electrode in this specification.
19. Standard Package Forms
19.1 Standard package forms are coils with support,
coils without support, spools, and drums. Standard
package dimensions and weights for each form are
given in Table 12 and Figs. 7, 8, and 9. Package
forms, sizes, and weights other than these shall be as
agreed by purchaser and supplier.
19.2 The liners in coils with support shall be designed
and constructed to prevent distortion of the coil during
normal handling and use and shall be clean and dry
enough to maintain the cleanliness of the electrode.
19.3 Spools shall be designed and constructed to
prevent distortion of the electrode during normal han-
dling and use, and shall be clean and dry enough to
maintain the cleanliness of the electrode.
20. Winding Requirements
20.1 Electrodes on spools and in coils (including
drums) shall be wound so that kinks, waves, sharp
ASME B&PVC sec2c$u135 05-25-99 11:30:12 pd: sec2c Rev 14.04
SFA-5.29 1998 SECTION II
TABLE 9
DIMENSIONAL REQUIREMENTS FOR FILLET WELD USABILITY TEST SPECIMENS
Maximum Difference
Between
Measured Fillet Weld Size Maximum Convexity
a
Fillet Weld Legs
in. mm in. mm in. mm
1
⁄
8
3.2
5
⁄
64
2.0
1
⁄
32
0.8
9
⁄
64
3.6
5
⁄
64
2.0
3
⁄
64
1.2
5
⁄
32
4.0
5
⁄
64
2.0
3
⁄
64
1.2
11
⁄
64
4.4
5
⁄
64
2.0
1
⁄
16
1.6
3
⁄
16
4.8
5
⁄
64
2.0
1
⁄
16
1.6
13
⁄
64
5.2
5
⁄
64
2.0
5
⁄
64
2.0
7
⁄
32
5.6
5
⁄
64
2.0
5
⁄
64
2.0
15
⁄
64
6.0
5
⁄
64
2.0
3
⁄
32
2.4
1
⁄
4
6.4
5
⁄
64
2.0
3
⁄
32
2.4
17
⁄
64
6.7
3
⁄
32
2.4
7
⁄
64
2.8
9
⁄
32
7.1
3
⁄
32
2.4
7
⁄
64
2.8
19
⁄
64
7.5
3
⁄
32
2.4
1
⁄
8
3.2
5
⁄
16
8.0
3
⁄
32
2.4
1
⁄
8
3.2
21
⁄
64
8.3
3
⁄
32
2.4
9
⁄
64
3.6
11
⁄
32
8.7
3
⁄
32
2.4
9
⁄
64
3.6
23
⁄
64
9.1
3
⁄
32
2.4
5
⁄
32
4.0
3
⁄
8
9.5
3
⁄
32
2.4
5
⁄
32
4.0
NOTE:
a. Maximum convexity for fillet welds made using EXXT5-X and EXXT5-XM electrodes may be
1
⁄
32
in. (0.8 mm) larger than the listed
requirements.
FIG. 6 ALTERNATE METHODS FOR FACILITATING FILLET WELD FRACTURE
616
