Singh R. Introduction to Basic Manufacturing Processes and Workshop Technology
Подождите немного. Документ загружается.

378 Introduction to Basic Manufacturing Processes and Workshop Technology
0
10
20
30
50
4060
70
80
90
MADE IN
INDIA
1
0
5
0
1
5
6
9
0
8
M
A
D
E
I
N
I
N
D
I
A
5
1
0
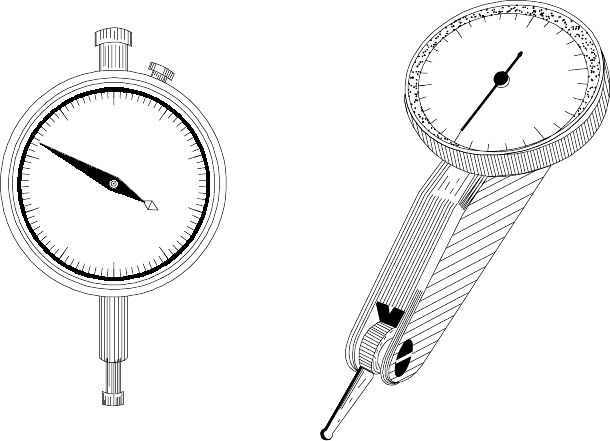
Fig. 19.23 (a) A continuous type Fig. 19.23 (b) A dial indicator of
dial indicator Brown and Sharp Co.
19.2.3.10 Combination Set
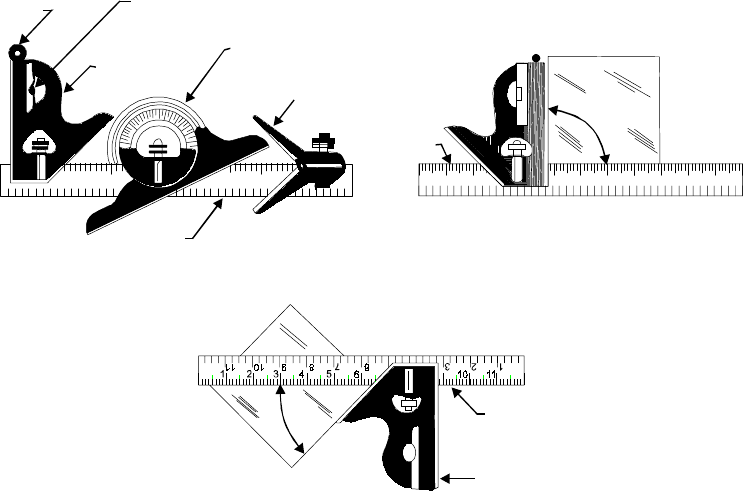
Combination set is an important instrument which has the combination of instruments
namely square head, a centre head, and a bevel protractor and sprit level as depicted in Fig.
19.24. It is a very useful instrument frequently utilized in the bench work and machine shop
measurements. The three portions of the combination set are used separately being held
in at any desired position by nuts which engage in a slot machined on the whole length of
the beam at its back. The beam of the instrument acts as a rule, which is marked in inches
or centimeters or in both for measuring the length and height as and when required. The
square head possesses one edge square to the rule, giving a right angle, where as the other
edge form an angle of 45°. It is provided with a spirit level. The scale on the protractor may
be divided into degrees or a vernier attached whereby the angle can be measured in degrees
and minutes. It is also fitted with a spirit level to help in leveling the work of setting it
at an angle. The centre head with the rule fastened to it is called a centre square. It has
two arms at right angles to one another and is so set on the rule that this angle is exactly
divided in two by the edge of the rule. It may be used to find the centre of a round bar or
shaft. Spirit level is commonly used for checking levels and other measurement. It is
designed to handle measurements, layout and checking of angles. The square head is used
for checking 90° angle or as a square as shown in Fig 19.25. The protractor head may be
utilized with a rule to measure angles or to measure the slope of a surface as shown in
Fig. 19.26.
19.2.3.11 Semi-circular Protractor
It resembles with a semi-circular protractor and is commonly used is geometrical drawings.
Protractor used in sheet metal work is made from steel and often required for making or
measuring angles.
Fitting 379
34 89
34 8 9
Rule
Centre head
Square
head
Bevel
protractor
Spirit-level
Scriber
1 2 3 4 5 6 7 10 11
1
2
3
5
6
7
8
9
1
0
11
90°
Rule
Fig. 19.24 A combination set Fig. 19.25 Checking 90° angle using combination set
45°
Rule
Square
head
Fig. 19.26 Checking 45° angle using combination set
19.2.3.12 Slip Gauges
Slip gauges are also called as precision gauges blocks. They are made of rectangular blocks
using alloy steel, which are being hardened before finishing them to size of high degree of
accuracy. They are basically used for precise measurement for verifying measuring tools such
as micrometers, comparators, and various limit gauges. The distance between two opposite
faces determines the size of the gauge. They are made in higher grades of accuracy. The grade
most commonly used in the production of components, tools, and gauges is Grade I, for rough
work. Grade II and for checking other gauges. They are supplied in sets, the size of which
varies from a set of about 112 pieces down to one containing 32 pieces. In English measurement
there are five sets containing 81,49,41,35 and 28 pieces. An 81-set has a wide range of combination
but for general purpose a 49-set is usually preferred. The measurement is made by end to end
assembly of slip gauge blocks and very little pressure in wring form is being applied.
19.2.3.13 Inspection Gauges
Inspection gauges are commonly employed to avoid costly and lengthy process of testing
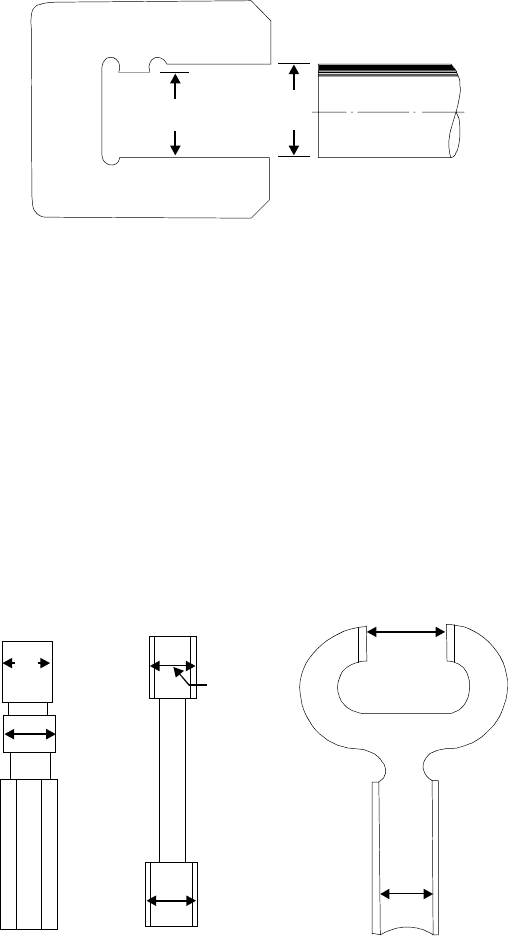
the component dimensions. Fig. 19.27 represented the principle of limit gauging. These
gauges are basically used for checking the size, shape and relative positions of various parts.
These are of fixed type measuring devices and are classified as standard and limit. Standard
gauges are made to the nominal size of the part to be tested and have the measuring member
equal in size to the mean permissible dimension of the part to be checked. Limit gauges or
“go” and “no go” gauges are made to the limit sizes of the job to be measured. Sides or ends
of the gauge are made corresponding to maximum and minimum permissible size of the job
for its acceptance or rejection. The objective of limit gauges is to identify whether the actual
dimensions of the work are within or outside the specified limits of acceptance. The double
380 Introduction to Basic Manufacturing Processes and Workshop Technology
end kind of limit gauge has the GO portion at one end and the NO GO portion at the other
end. GO portion must pass into or over an acceptable piece but the NO GO portion should
not pass. Inspection gauges may be classified as working, inspection, and reference or master
gauges. The working and inspection gauges are generally employed for inspection of components
from stage to stage.
Go
Not
g
o
Low
limit
Hi
g
h
limit
Shaft
Fig. 19.27 A principle of limit gauge
Reference or master gauges are needed only for checking the size or condition of other
gauges. The gauges are generally classified into:
1. Gauges for checking shafts
2. Gauges for checking holes
3. Gauges for checking forms
4. Gauges for checking threads
5. Gauges for checking tapers
The gauges commonly used in production work are
1. Progressive or step plug gauge (Fig. 19.28(a))
2. Thread plug gauge (Fig. 19.28(b))
3. A combination of internal and external non adjustable gauges (Fig. 19.28(c))
For OD
Go
Not
Go
Go
Not
Go
ID
For
(a) Pro
g
ressive
or Step plu
g
Gau
g
e.
(b) Thread
plu
g
g
au
g
e.
(c) A combination of internal and
external non-adjustable
g
au
g
es
Fig. 19.28 Types of gauges
Fitting 381
4. Ring gauge
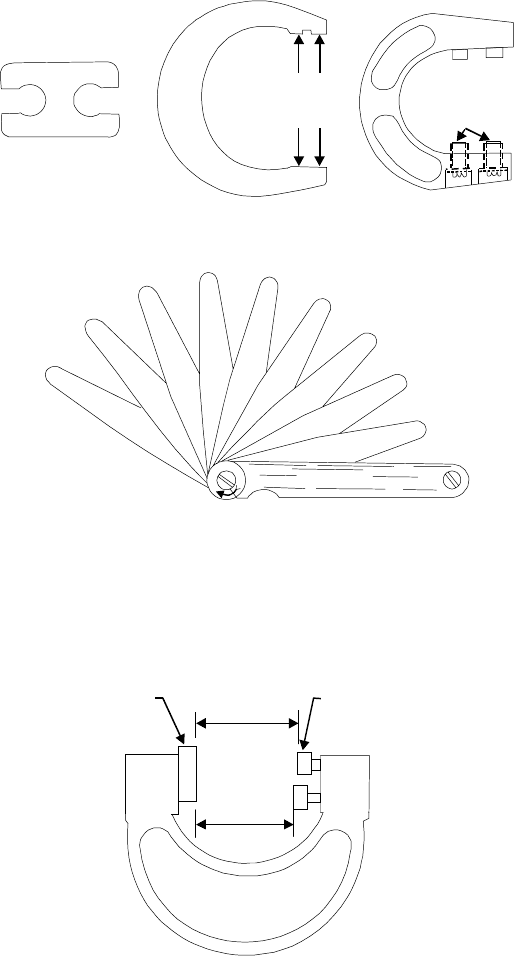
5. Snap gauges (Fig. 19.29)
No Go
No Go
Go
Go
Fixed anvils
Adjustable
anvils
Fig. 19.29 Snap gauges
6. Feeler gauge (Fig. 19.30)
.
0
1
0
.
0
0
8
.
0
0
6
.
0
0
4
.
0
0
3
.
0
0
2
.
0
0
1
5
.
0
1
5
.
0
1
2
Hindustan
L
O
C
K
Fig. 19.30 A feeler gauge
7. Wire gauge
8. Template gauge
9. Adjustable gap gauge (Fig. 19.31)
10. Screw pitch gauge (Fig. 19.9)
11. Fillet and radius gauge
Go
Fixed
anvils
Adjustable
anvil
Not
Go
Fig. 19.31 An adjustable gap gauge
For manufacturing the above gauges, high carbon and alloy steels materials are commonly
employed for manufacturing or production of gauges. Steel gauges may be used subject to
some distortion during hardening. These difficulties can be overcome by making gauges by
use of cemented carbide material or providing chrome plating at the surface of the gauge.
382 Introduction to Basic Manufacturing Processes and Workshop Technology
Plug Gauges
These are used for checking cylindrical, tapered, threaded, splined and square holes
portions of manufacture components.
19.2.4 Holding Tools
Holding tools used in fitting shop comprises of basically vices and clamps. The clamps are
C or G clamp, plane slot, goose neck, double end finger, u-clamp, parallel jaw, and clamping
block. The various types of vices used in fitting shop are given as under:
19.2.4.1 Vices
The vices are hand vice, bench vice, machine vices, carpenter vice, shaper vice, leg vice,
pipe vice, and pin vice.
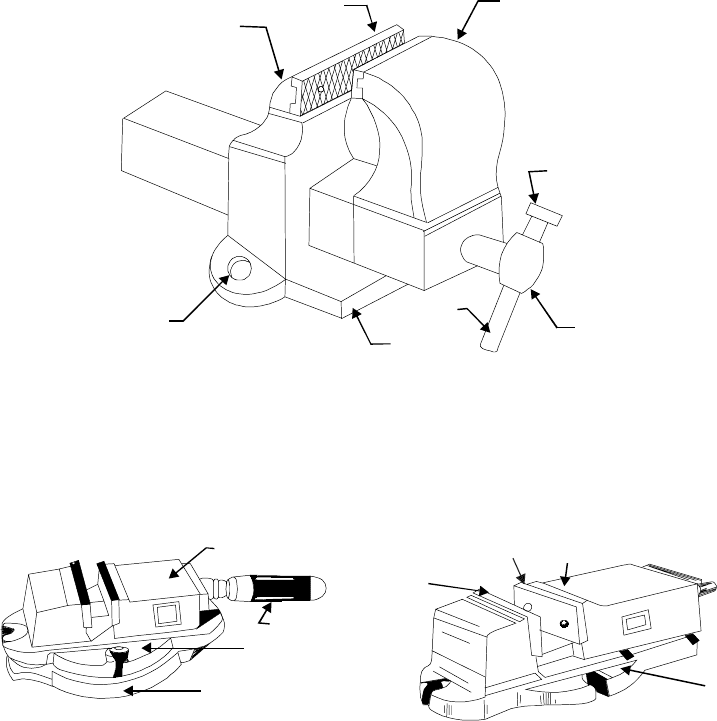
19.2.4.1.1 Bench vice
Fig 19.32 shows a bench vice commonly used in fitting shop for holding a variety of jobs.
Fixed Jaw
Jaw
Plate
Hole for
fixin
g
the vice
Movable Jaw
Collar
Handle
Base
Spindle
Fig. 19.32 A bench vice
19.2.4.1.2 Machine vice
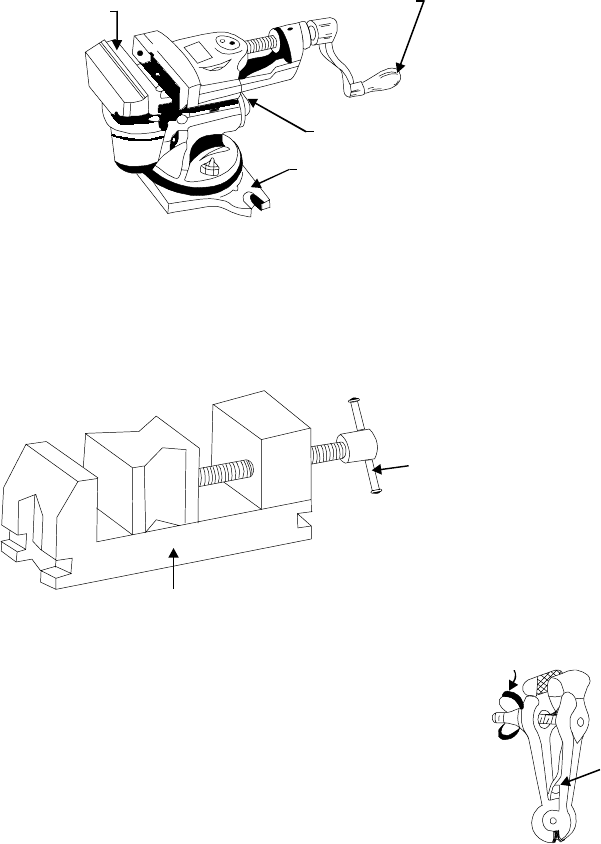
Fig 19.33 and Fig. 19.34 shows machine vice with swivel base and parallel jaw machine
vice. These types of vices are commonly used in fitting shop for holding a variety of jobs. They
are used for precision work on the machine table like shaping, milling, drilling and grinding.
They are generally made of grey cast iron.
Jaw
Handle
Bod
y
fixed
on base
Swivel base
Machine vice with swivel base.
Parallel jaw machine vice.
Jaw
Movable Jaw
Fix Jaw
Bod
y
Fig. 19.33 A machine vice with swivel base Fig. 19.34 A machine vice with parallel jaw
Fitting 383
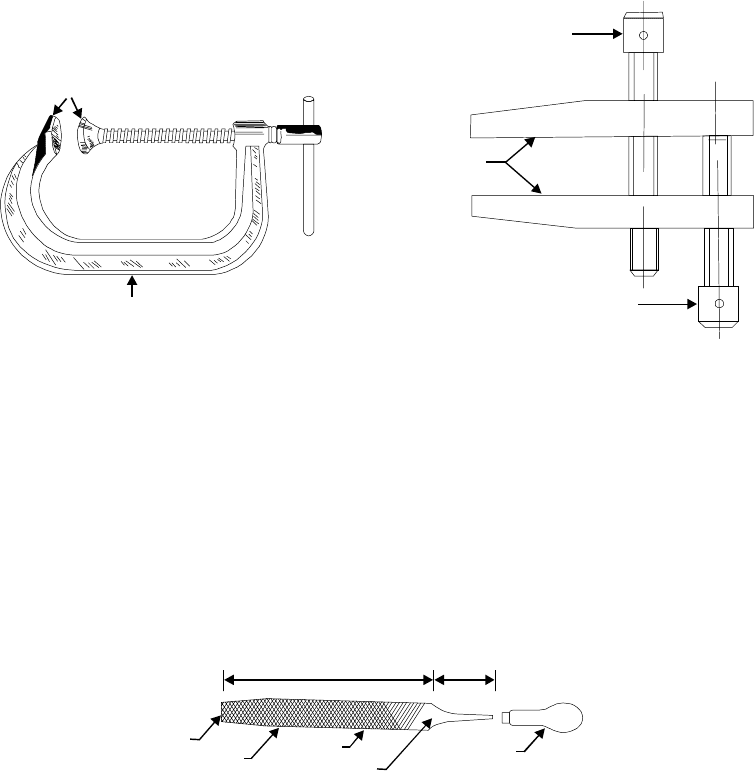
19.2.4.1.3 Universal swivel base machine vice
Fig. 19.35 shows a special type of universal swivel base machine vice made with swivelling
head. It is commonly used in fitting shop for holding a variety of jobs. The jobs after holding
in jaws can be adjusted at any angle either horizontally or vertically with the help of swelling
head.
Handle
Jaw plate
Pivot
Swivel base
Fig. 19.35 A universal swivel base machine vice
19.2.4.1.4 Toolmaker’s vice
Fig 19.36 shows a small tiny vice known as tool maker vice. It is commonly used by tool
maker, watch maker, die maker and goldsmith for holding a variety of small parts for carrying
some operation.
Handle
Base
Fig. 19.36 A tool maker’s vice
19.2.4.1.5 Hand vice
Hand vice is shown in Fig. 19.37 which is utilized for holding
keys, small drills, screws, rivets, and other similar objects which are
very small to be easily held in the bench vice. This is made in various
shapes and sizes. It consists of two legs made of mild steel which hold
the jaws at the top and are hinged together at the bottom. A flat
spring held between the legs which tend to keep the jaws open. Its
jaws can be opened and closed by a wing nut which moves through a
screw that is fastened to one leg and passes through the other.
19.2.4.1.6 Pin vice
Pin vice is used for holding round jobs of small diameter such as wire and pins, during
working. It also forms a very useful handle for small files. It consists of a handle and a
tapered nose covering a small collet chuck at its end. The chuck carries the jaws which are
operated by turning the handle. It is commonly used by a watch maker.
Win
g
nut
Sprin
g
Fig. 19.37 Hand vice
384 Introduction to Basic Manufacturing Processes and Workshop Technology
19.2.4.2 Clamping Divices
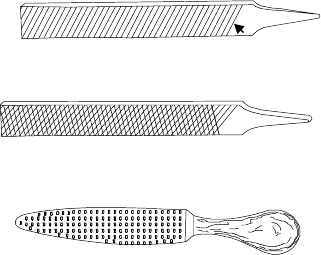
There are two types of clamps namely C clamp and tool maker clamp. A C-clamp is
shown in Fig. 19.38 which is used for gripping the work during construction or assembly
work. Whereas tool maker clamp (Fig. 19.39) is used for gripping or holding smaller jobs.
Jaw
Screw
Grippin
g
ends
Screw
Fig. 19.38 C-clamp Fig. 19.39 A tool maker clamp
19.2.5 Cutting Tools
The important common cutting tools are discussed below
19.2.5.1 Files
The widely used hand cutting tool in workshops is the file. It is a hardened piece of high
grade steel with slanting rows of teeth. It is used to cut, smooth, or fit metal parts. It is used
file or cut softer metals. It consists of the following parts as shown in Fig. 19.40. The tang
is the pointed part, which fitted into the handle. The point is the end opposite the tang. The
heel is next to the handle. The safe edge or side of a file is that which has no teeth. It is
classified on bases of type or cut of teeth and sectional form.
Tan
g
Ed
g
e
Cuttin
g
points
Handle
Heel
Face
Len
g
th
Fig. 19.40 Parts of a file
19.2.5.1.1 Size of a File
Size of a file is specified by its length. It is the distance from the point to the heel,
without the tang. Files for fine work are usually from 100 to 200 mm and those for heavier
work from 200 to 450 mm in length.
19.2.5.1.2 Classification of Files
The files are classified on basis of type of cuts, grade and shapes. These are further sub
classified as under
Fitting 385
(A) Type of Cut
The most commonly used files according to cuts of teeth are shown in Fig.19.41.
(i) Single
(ii) Double and
(iii) Rasp
(a) Sin
g
le cut file
(b) Double cut file
(c) Rasp cut file.
60°
Fig. 19.41 Types of files according to cuts of teeth
(B) Grade of Cut
Files are cut with teeth of different grades. Those in general are
(i) Smooth
(ii) Second cut
(iii) Bastered
(iv) Rough
(C) Shape of File
Common shapes of files are having different cross sections, which cover most requirements.
19.2.5.1.3 Cut or teeth on files
Teeth or cuts of files can be categorized into two groups namely single cut and double
cut. In single cut files, the teeth are cut parallel to other across the file at an angle of about
60° to the centre line of the file. Such types of file are named as flats and are widely used
on hard metal.
A double-cut file possesses two sets of teeth, the over-cut teeth being cut at about 60°
and the up cut at 75 to 80° to the centre line.
Single-cut and double-cut files are further classified according to the coarseness or spacing
between the rows of the teeth. In descending order of roughness, such files are listed as:
(i) Smooth
(ii) Dead smooth
(iii) Rough
(iv) Bastard
386 Introduction to Basic Manufacturing Processes and Workshop Technology
(v) Second cut
(vi) Super smooth
These files are used for finishing general surface work. Both faces of file are double cut
and both edges are single cut. Such files are commonly tapered in width and thickness.
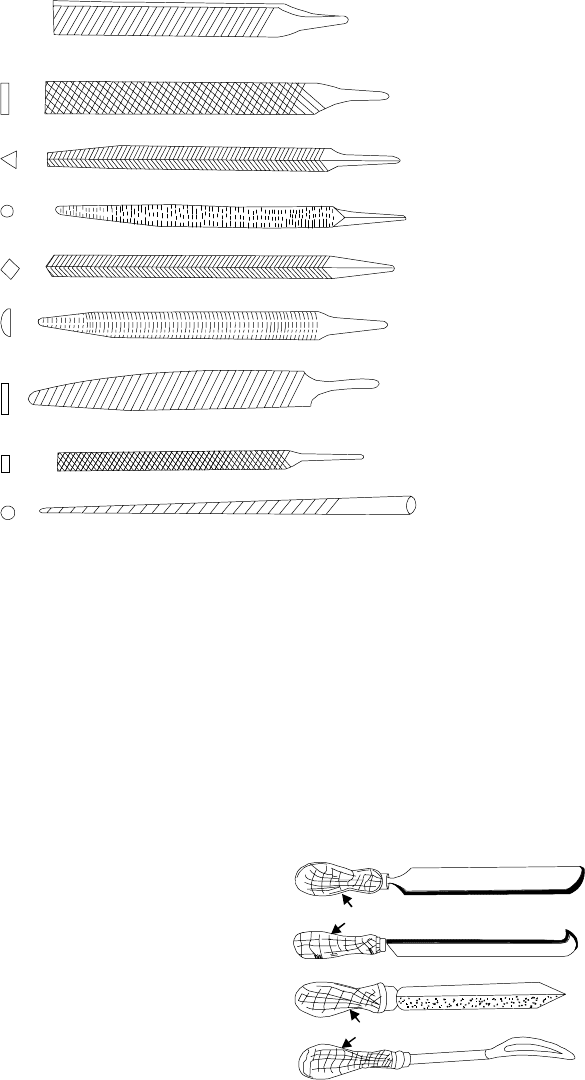
General classification of files based on shapes or cross sections are shown in Fig. 19.42
along with their uses are as under:
19.2.5.1.4 Hand files
Hand files are commonly used for finishing surface work. Both faces of the file are double
cut. Either both edges are single cut or one is uncut to provide a safe edge.
19.2.5.1.5 Flat files
Flat files are generally used for filing flat surfaces in fitting shop.
19.2.5.1.6 Triangular files
Triangular files are commonly used for filing corners between 60° and 90°. They are
double cut on all faces.
19.2.5.1.7 Square files
Square files are commonly used for filing in corners in jobs. They are double cut on all
sides and tapers.
19.2.5.1.8 Round files
Round files are generally used for opening out holes and rounding inside corners. Rough,
bastard, second cut and smooth files under 15 cm in length are single cut.
19.2.5.1.9 Half round files
These files comprises of flat and half round sides. The flat side of half round file is used
for general work and the half round side for filing concave surfaces. These files are double
cut on the flat side. The curved side is single cut, smooth or second cut.
19.2.5.1.10 Knife-edge files
These files are commonly used for cleaning out acute-angled corners. The two faces of
these files are double cut, while the edge is single cut. These files are made in sizes from
10 to 20 cm of various shapes and cuts. They are extremely delicate and are used for fine
work such as pierced designed in thin metal.
19.2.5.1.11 Pillar files
These files are used for finishing narrow slots. Both faces are double cut and either both
edges are single cut or one is uncut to provide a safe edge of the file.
19.2.5.1.12 Needle files
Needle files are generally used for filling keys tooth wheels of clocks and other curved
surfaces.
19.2.5.1.13 Mill files
Mill files are commonly used for filing half round recess and gullet of mill saw.
Fitting 387
1. Hand file
2. Flat file
3. Trian
g
ular file
4. Round file
5. Square file
6. Half round file
7. Knife Ed
g
e file
8. Pillar file
9. Needle file
Fig. 19.42 General classification of files based on shapes or cross sections
19.2.5.2 Scrapers
Scrapers are made up of old files and the cutting edge of scraper is hardened and
tempered. They are mainly used to scrap metal surfaces by rubbing the work surface. They
also produce a bearing surface, which has been filed or machined earlier. The scrapers are
hand cutting tools used for removing metal from surfaces in form of thin slices or flakes to
produce smooth and fine surfaces. Machined surfaces are not always perfectly true. If a very
true surface is needed, the high spots must be located and removed. It is normally done with
the help of a scraper. The scrapers are made in a variety of lengths from 100 mm upwards
and in many shapes, depending upon the type of work to be done. The following types of
scrappers according to shape are commonly classified as
(i) Flat
(ii) Hook
(iii) Triangular
(iv) Half round
Fig 19.43 shows various scraper which are
generally used for scraping job work in fitting
shop. These are discussed as under.
19.2.5.2.1 Flat scrapers
Flat scrapers are commonly used for
removing slight irregularities on a flat surface.
Flat scrapper
Handle
Hook scrapper
Trian
g
ular scrapper
Half round scrapper
Handle
Fig. 19.43 Common types of scraper
