AWS A5.25/A5.25M-97/ASME SFA-5.25 Specification for Carbon and Low-Alloy Steel Electrodes and Fluxes for Electroslag Welding (Eng)
Подождите немного. Документ загружается.

ASME B&PVC sec2c$u120 05-25-99 11:11:12 pd: sec2c Rev 14.04
SPECIFICATION FOR CARBON AND LOW-ALLOY
STEEL ELECTRODES AND FLUXES FOR
ELECTROSLAG WELDING
SFA-5.25
(Identical to AWS Specification A5.25/A5.25M-97.)
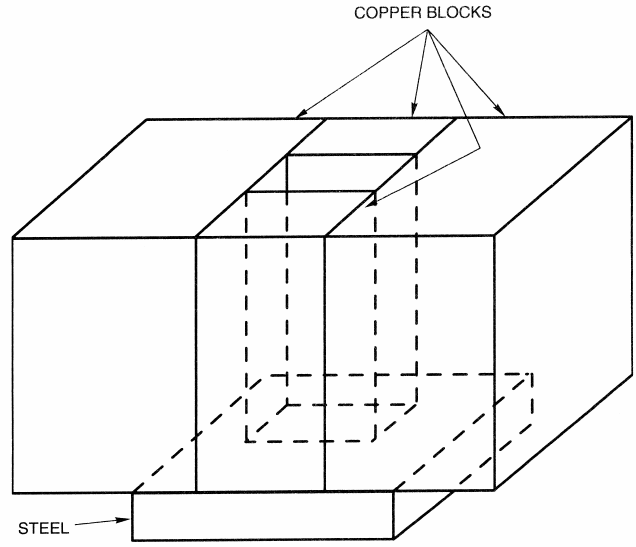
1. Scope
This specification prescribes requirements for the
classification of electrodes (both solid and composite
metal cored) and fluxes for electroslag welding of
carbon and low-alloy steels.
PART A — GENERAL REQUIREMENTS
2. Classification
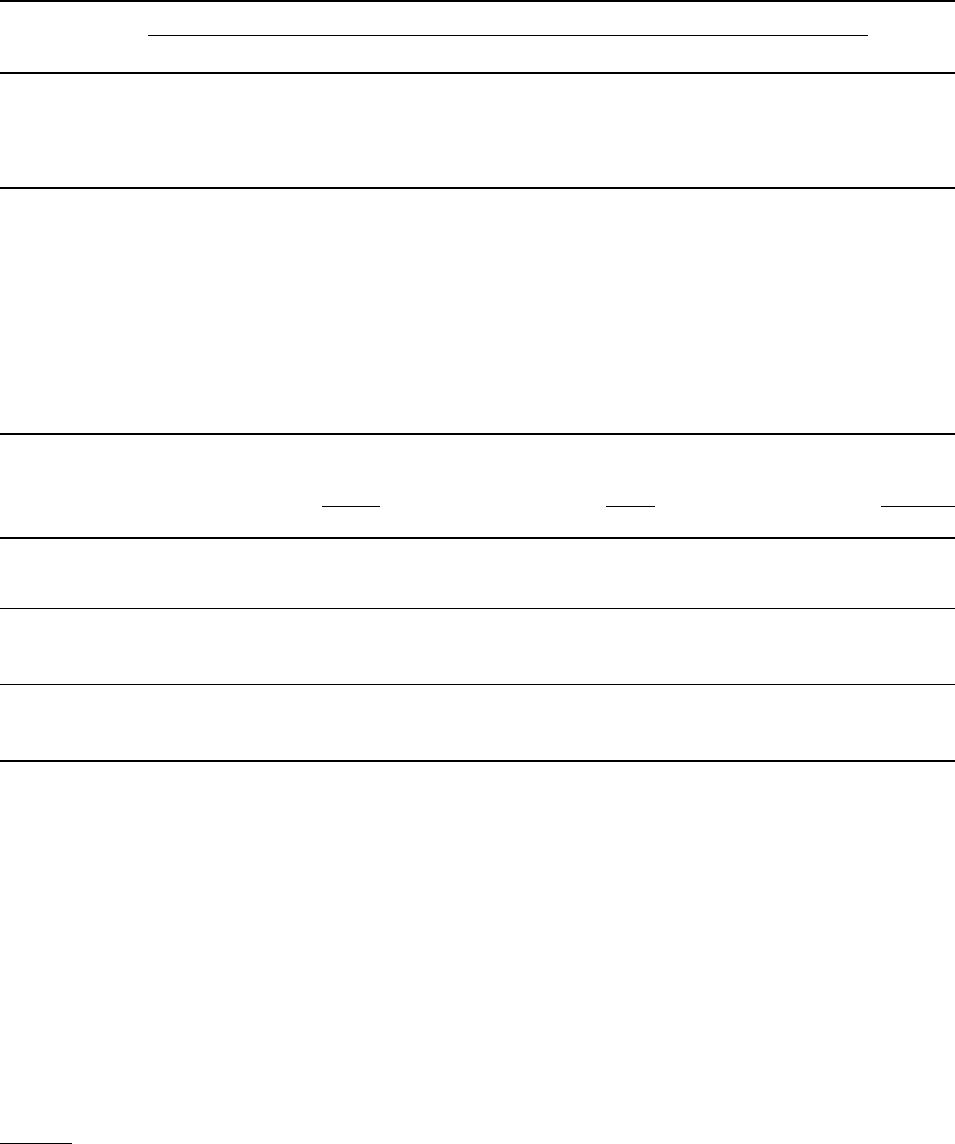
2.1 The solid electrodes covered by this specification
are classified according to the chemical composition
of the electrode, as specified in Table 1.
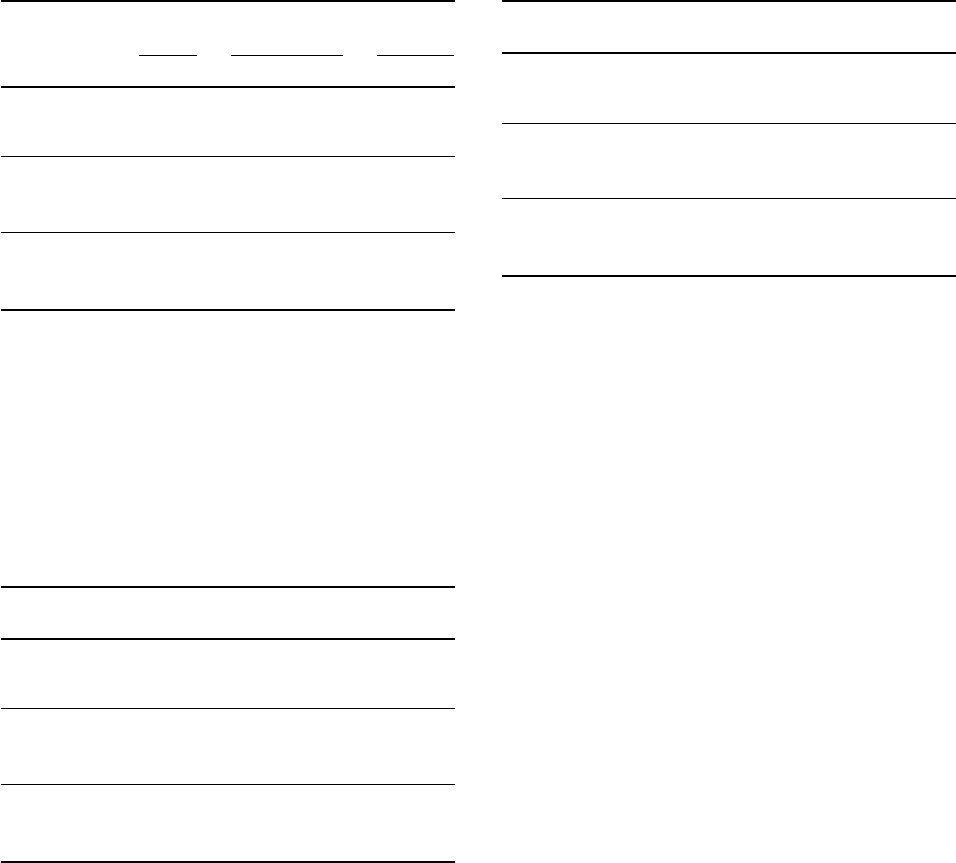
2.2 The composite metal cored electrodes covered
by this specification are classified according to the
chemical composition of the weld metal produced by
use with a specific flux of a particular manufacturer
and trade designation as specified in Table 2.
2.3 Fluxes covered by this specification are classified
according to the mechanical properties of the weld
metal as specified in Tables 3 and 4, when using an
electrode of a particular classification.
2.4 Electrodes classified under one classification shall
not be classified under any other classification in this
specification. Fluxes may be classified under any number
of classifications using a different electrode for each.
Fluxes classified as FESX2-XXX may also be classified
as FESX0-XXX and FESXZ-XXX, as specifically per-
mitted by Note (a) to Table 4.
2.5 The electrodes and fluxes classified under this
specification are intended for electroslag welding, but
529
that is not to prohibit their use with any other process
for which they are found suitable.
3. Acceptance
Acceptance
1
of the electrodes and fluxes shall be in
accordance with the provisions of ANSI/AWS A5.01,
Filler Metal Procurement Guidelines.
2
4. Certification
By affixing the AWS Specification and Classification
designations to the packaging, or the classification to
the product, the manufacturer certifies that the product
meets the requirements of this specification.
3
5. Units of Measure and Rounding-Off
Procedure
5.1 This specification makes use of both U.S. Custom-
ary Units and the International System of Units (SI).
The measurements are not exact equivalents; therefore,
each system must be used independently of the other
without combining in any way. The specification with
the designation A5.25 uses U.S. Customary Units. The
specification A5.25M uses SI units. The latter are shown
1
See Section A3 (in the Annex), Acceptance, for further information
concerning acceptance, testing of the material shipped, and the ANSI/
AWS A5.01, Filler Metal Procurement Guidelines.
2
AWS standards can be obtained from the American Welding Society,
550 N.W. LeJeune Road, Miami, FL 33126.
3
See Section A4 (in the Annex), Certification, for further information
concerning certification and the testing called for to meet this
requirement.
A99
ASME B&PVC sec2c$u120 05-25-99 11:11:12 pd: sec2c Rev 14.04
SFA-5.25 1998 SECTION II
TABLE 1
CHEMICAL COMPOSITION REQUIREMENTS FOR SOLID ELECTRODES
Weight-Percent
a,b
Other
AWS UNS Elements,
Classification
c
Number
d
CMnPSSiNiCrMoCu
e
Ti Zr Al Total
Medium-Manganese Classes
EM5K-EW K10726 0.07 0.90–1.40 0.025 0.030 0.40–0.70 — — — 0.35 0.05–0.15 0.02–0.12 0.05–0.15 0.50
EM12-EW K01112 0.06–0.15 0.80–1.25 0.030 0.030 0.10 — — — 0.35 — — — 0.50
EM12K-EW K01113 0.05–0.15 0.80–1.25 0.030 0.030 0.10–0.35 — — — 0.35 — — — 0.50
EM13K-EW K01313 0.06–0.16 0.90–1.40 0.030 0.030 0.35–0.75 — — — 0.35 — — — 0.50
EM15K-EW K01515 0.10–0.20 0.80–1.25 0.030 0.030 0.10–0.35 — — — 0.35 — — — 0.50
High-Manganese Classes
EH14-EW K11585 0.10–0.20 1.70–2.20 0.030 0.030 0.10 — — — 0.35 — — — 0.50
Special Classes
EWS-EW K11245 0.07–0.12 0.35–0.65 0.030 0.030 0.22–0.37 0.40–0.75 0.50–0.80 — 0.25–0.55 — — — 0.50
EA3K-EW
f
K10945 0.07–0.12 1.60–2.10 0.025 0.025 0.50–0.80 0.15 — 0.40–0.60 0.35 — — — 0.50
EH10K-EW K01010 0.07–0.14 1.40–2.00 0.025 0.030 0.15–0.30 ———————0.50
EH11K-EW K11140 0.06–0.15 1.40–1.85 0.025 0.030 0.80–1.15 — — — 0.35 — — — 0.50
ES-G-EW — NOT SPECIFIED
g
NOTES:
a. The electrode shall be analyzed for the specific elements for which values are shown in this table. If the presence of other elements is indicated, in the course of this work, the amount of
those elements shall be determined to ensure that their total (excluding iron) does not exceed the limit specified for “Other Elements, Total” in the last column of the table.
b. Single values are maximums.
c. Chemical composition requirements may be similar to those in other AWS specifications; see Table A1 in the Annex.
d. SAE/ASTM Unified Numbering System for Metals and Alloys.
e. The copper limit includes copper that may be applied as a coating on the electrode.
f. Formerly classified EH10Mo-EW in ANSI/AWS A5.25-91.
g. Composition shall be reported; the requirements are those agreed to by the purchaser and the supplier.
530
ASME B&PVC sec2c$u120 05 25 99 11:11:12 pd: sec2c Rev 14 04
PART C — SPECIFICATIONS FOR WELDING RODS,
ELECTRODES, AND FILLER METALS SFA-5.25
TABLE 2
CHEMICAL COMPOSITION REQUIREMENTS FOR
WELD METAL FROM COMPOSITE METAL CORED ELECTRODES
a
AWS Weight Percent
b,c
Other
Classifi- UNS Elements,
cation Number
d
C Mn P S Si Ni Cr Mo Cu V Total
EWT1 W06040 0.13 2.00 0.03 0.03 0.60 —————0.50
EWT2 W20140 0.12 0.50–1.60 0.03 0.04 0.25–0.80 0.40–0.80 0.40–0.70 — 0.25–0.75 — 0.50
EWT3 W22340 0.12 1.00–2.00 0.02 0.03 0.15–0.50 1.50–2.50 0.20 0.40–0.65 — 0.05 0.50
EWTG — NOT SPECIFIED
e
NOTES:
a. The flux used, when classifying composite electrodes shall be one with which the electrode is classified for mechanical properties (see Tables
3 or 3M and 4 or 4M).
b. The weld metal shall be analyzed for the specific elements for which values are shown in this table. If the presence of other elements is
indicated, in the course of this work, the amount of those elements shall be determined to ensure that their total (excluding iron) does not
exceed the limit specified for “Other Elements, Total” in the last column of the table.
c. Single values are maximums.
d. SAE/ASTM Unified Numbering System for Metals and Alloys.
e. Composition shall be reported; the requirements are those agreed to by the purchaser and supplier.
TABLE 3
A5.25 TENSION TEST REQUIREMENTS (AS-WELDED)
Yield
Tensile Strength, Elongation,
Strength min.
b
min.
b
AWS A5.25
Classification
a
psi psi percent
FES6Z-XXX 60 000
FES60-XXX to 36 000 24
FES62-XXX 80 000
FES7Z-XXX 70 000
FES70-XXX to 50 000 22
FES72-XXX 95 000
FES8Z-XXX 80 000
FES80-XXX to 60 000 20
FES82-XXX 100 000
NOTES:
a. The letters “XXX” as used in the AWS Classification column in this table refer to the electrode classification used.
b. Yield strength at 0.2 percent offset and elongation in 2 in. (51 mm) gage length.
in appropriate columns in tables or within brackets []
when used in the text.
5.2 For the purpose of determining conformance with
this specification, an observed or calculated value shall
be rounded to the nearest 1000 psi [10 MPa] for tensile
and yield strength, and to the ‘‘nearest unit’’ in the
last right-hand place of figures used in expressing the
limiting value for other quantities in accordance with
the rounding-off method given in ASTM E29, Standard
Practice for Using Significant Digits in Test Data to
Determine Conformance with Specifications.
4
4
ASTM standards can be obtained from the American Society for
Testing and Materials, 100 Barr Harbor Drive, West Conshohocken,
PA 19428-2959.
531
PART B — TESTS, PROCEDURES, AND
REQUIREMENTS
6. Summary of Tests
6.1 Chemical analysis of solid electrodes is the only
test required for classification of a solid electrode under
this specification, as shown in Table 5.
6.2 Chemical analysis of undiluted weld metal from
the composite electrode and a specific flux of a particular
manufacturer and trade designation is the only test
required for classification of a composite electrode
under this specification, as shown in Table 5.
6.3 The tests required for classification of each
electrode/flux combination are specified in Table 5.
ASME B&PVC sec2c$u120 05-25-99 11:11:12 pd: sec2c Rev 14.04
SFA-5.25 1998 SECTION II
TABLE 3M
A5.25M TENSION TEST REQUIREMENTS (AS
WELDED)
Tensile Yield Elongation,
Strength Strength, min.
(2)
min.
(2)
AWS A5.25M
Classification
(1)
MPa MPa Percent
FES43Z-XXX 430
FES432-XXX to 250 24
FES433-XXX 550
FES48Z-XXX 480
FES482-XXX to 350 22
FES483-XXX 650
FES55Z-XXX 550
FES552-XXX to 410 20
FES553-XXX 700
NOTES:
(1) The letters “XXX” as used in the AWS A5.25M Classification
column in this table refer to the electrode classification used.
(2) Yield strength at 0.2 percent offset and elongation in 50 mm
gage length.
TABLE 4
A5.25 IMPACT TEST REQUIREMENTS
a
(AS WELDED)
AWS A5.25 Average Impact Strength, min.
c
Classification
b
ft·lbf
FES6Z-XXX Not specified
FES7Z-XXX Not specified
FES8Z-XXX Not specified
FES60-XXX 15 @ 0°F
FES70-XXX 15 @ 0°F
FES80-XXX 15 @ 0°F
FES62-XXX 15 @ −20°F
FES72-XXX 15 @ −20°F
FES82-XXX 15 @ −20°F
NOTES:
a. A flux-electrode combination that meets impact requirements at
a given temperature also meets the requirements at all higher
temperatures in this table. In this manner, FESX2-XXX may also
be classified as FESXO-XXX and FESXZ-XXX and FESXO-XXX
may be classified as FESXZ-XXX.
b. The letters “XXX” used in the AWS Classification column in this
table refer to the electrode classification used.
c. Both the highest and lowest of the five test values obtained shall
be disregarded in computing the impact strength. Two of the
remaining three values shall equal or exceed 15 ftWlbf and one of
the three remaining values may be lower than 15 ftWlbf but not
lower than 10 ftWlbf. The average of the three shall not be less
than the 15 ftWlbf specified.
532
TABLE 4M
A5.25M IMPACT TEST REQUIREMENTS
(AS WELDED)
(1)
AWS A5.25M Average Impact Strength, min.
(3)
Classification
(2)
J
FES43Z-XXX Not specified
FES48Z-XXX Not specified
FES55Z-XXX Not specified
FES432-XXX 20 @ −20°C
FES482-XXX 20 @ −20°C
FES552-XXX 20 @ −20°C
FES433-XXX 20 @ −30°C
FES483-XXX 20 @ −30°C
FES553-XXX 20 @ −30°C
NOTES:
(1) A flux-electrode combination that meets impact requirements at
a given temperature also meets the requirements at all higher
temperatures in this table. In this manner, FESXX3-XXX may
also be classified as FESXX2-XXX and FESXXZ-XXX and
FESXX2-XXX may be classified as FESXXZ-XX.
(2) The letters “XXX” used in the AWS Classification column in
this table refer to the electrode classification used.
(3) Both the highest and lowest of the five test values obtained shall
be disregarded in computing the impact strength. Two of the
remaining three values shall equal or exceed 20 J and one of the
three remaining values may be lower than 20 J, but not lower
than 14 J. The average of the three shall not be less than the 20
J specified.
The purpose of these tests is to determine the mechanical
properties and soundness of the weld. The base metal
for the weld test assemblies, the welding and testing
procedures to be employed, and the results required
are given in Sections 8 through 12.
7. Retest
If the results of any test fail to meet the requirement,
that test shall be repeated twice. The results of both
retests shall meet the requirement. Specimens for retest
may be taken from the original test assembly or from
one or two new test assemblies. For chemical analysis,
retest need be only for those specific elements that
failed to meet the test requirement.
If the results of one or both retests fail to meet the
requirement, the material under test shall be considered
as not meeting the requirements of this specification
for that classification.
In the event that, during preparation or after comple-
tion of any test, it is clearly determined that prescribed
or proper procedures were not followed in preparing
the weld test assembly or test specimens or in conducting
the test, the test shall be considered invalid without
regard to whether the test was actually completed, or
ASME B&PVC sec2c$u120 05-25-99 11:11:12 pd: sec2c Rev 14.04
PART C — SPECIFICATIONS FOR WELDING RODS,
ELECTRODES, AND FILLER METALS SFA-5.25
TABLE 5
REQUIRED TESTS
Chemical Analysis
Material to AWS Radiographic Tension Impact
be Classified Classification
a
Electrode Weld Metal Test Test Test
Solid
All Required Not Required Not Required Not Required Not Required
Electrodes
Composite
All Not Required Required Not Required Not Required Not Required
Electrodes
b
FES6Z-XXX
FES7Z-XXX
FES8Z-XXX
Not Required Not Required Required Required Not Required
FES43Z-XXX
FES48Z-XXX
FES55Z-XXX
FES60-XXX
FES70-XXX
FES80-XXX
Not Required Not Required Required Required Required
FES432-XXX
FES482-XXX
FES552-XXX
FES62-XXX
FES72-XXX
FES82-XXX
Not Required Not Required Required Required Required
FES433-XXX
FES483-XXX
FES553-XXX
Fluxes
NOTES:
a. The letters “XXX” used in the AWS Classification column in this table refer to the electrode classification used.
b. The flux used when classifying composite electrodes shall be one with which the electrode is classified for mechanical properties.
whether test results met, or failed to meet, the require-
ment. That test shall be repeated, following prescribed
procedures. In this case, the requirement for doubling
of the number of test specimens does not apply.
8. Weld Test Assemblies
8.1 No weld test assemblies are required for classifi-
cation of solid electrodes. One weld test assembly is
required for classification of composite electrodes. It
is the weld ingot as shown in Fig. 1, for chemical
analysis of weld metal. In addition to the above, one
weld test assembly is required for each classification
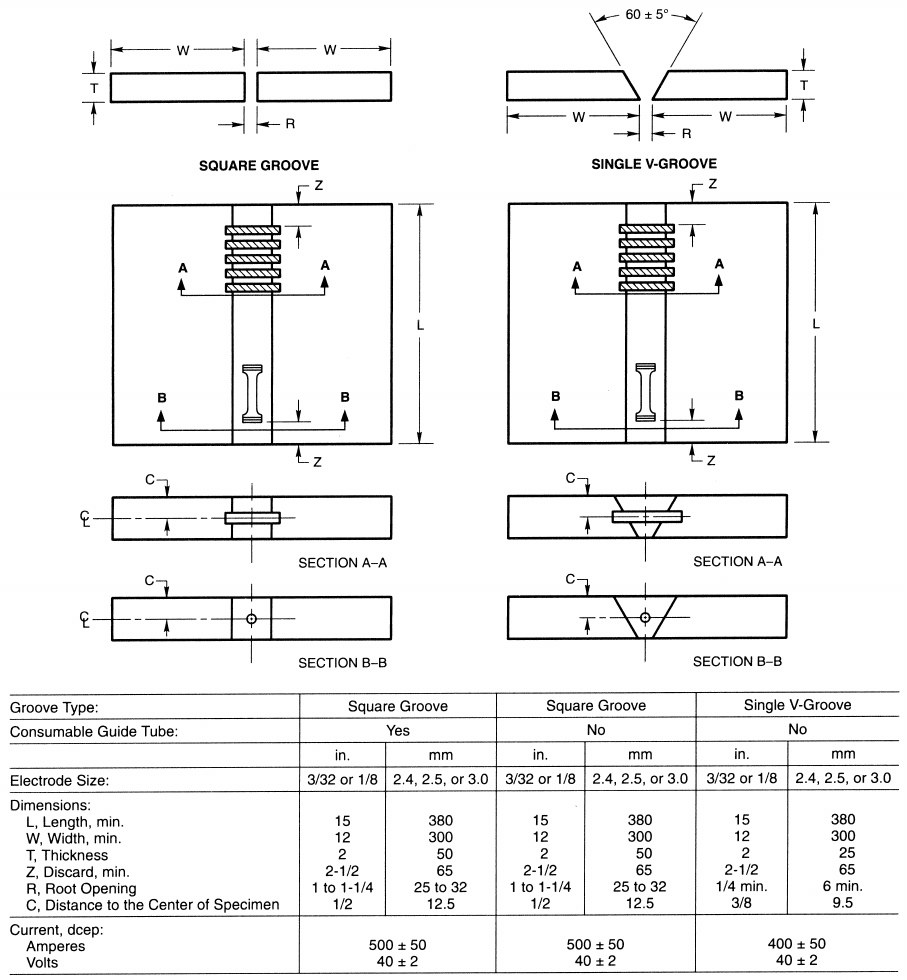
of an electrode-flux combination. This is the groove
weld in Fig. 2 for mechanical properties and soundness
of the weld metal in the as-welded condition.
8.2 Preparation of each weld test assembly shall be
as prescribed in 8.3, 8.4, and 9.2. The base metal for
each assembly shall be as required in Table 6 and
533
shall meet the requirements of the appropriate ASTM
specification shown there, or an equivalent specification.
Testing of the assemblies shall be as prescribed in 9.3
and Sections 10 through 12.
8.3 Weld Ingot. An ingot shall be prepared as
specified in Fig. 1.
8.4 Groove Weld for Mechanical Properties and
Soundness for Flux-Electrode Combinations. A test
assembly shall be chosen and welded as specified in
Fig. 2 using base metal of the appropriate type specified
in Table 6. Testing of this assembly shall be as specified
in Sections 10 through 12. The assembly shall be tested
in the as-welded condition.
9. Chemical Analysis
9.1 For solid electrodes, a sample of the electrode
shall be prepared for chemical analysis. Solid electrodes,
ASME B&PVC sec2c$u120 05-25-99 11:11:12 pd: sec2c Rev 14.04
SFA-5.25 1998 SECTION II
NOTES:
(1) Weld ingot shall be deposited by arc welding in a water-cooled copper mold using welding conditions shown in Figure 2.
(2) Weld ingot shall be of any convenient shape that provides approximately 4 in.
2
[25 cm
2
] of weld metal cross-section.
(3) The weld ingot shall be started on a piece of carbon steel of sufficient size as to avoid complete fusion, and the copper mold shall be a
sufficient heat sink to avoid contamination of the ingot by molten copper.
(4) The sample for chemical analysis shall be taken at least 2 in. [50 mm] above the bottom of the ingot, and at least 2 in. [50 mm] below
the crater.
(5) Consumable guide tubes shall be used for preparing the weld ingot if guide tubes were used in welding the groove weld test assembly, as
use of consumable guide tubes will affect chemical composition.
FIG. 1 WELD INGOT
when analyzed for elements that are present in a coating
(copper flashing, for example), shall be analyzed without
removing the coating. When the electrode is analyzed
for elements other than those in the coating, the coating
must be removed if its presence affects the results of
the analysis for other elements.
9.2 Composite electrodes shall be analyzed in the
form of undiluted weld metal, not electrode. The sample
for analysis shall be taken from weld metal obtained
with the electrode and a specific flux of a particular
manufacturer and trade designation with which it was
classified. The sample shall come from an ingot (Fig.
1). The top surface of the ingot shall be removed and
discarded, and a sample for analysis shall be obtained by
any appropriate mechanical means from the underlying
534
metal at a location at least 2 in. [50 mm] from the
start of the ingot and at least 1 in. [25 mm] from the
end. The sample shall be free of slag.
9.3 The sample shall be analyzed by accepted analyti-
cal methods. The referee method shall be ASTM Stan-
dard Method E350, Chemical Analysis of Carbon Steel,
Low-Alloy Steel, Silicon Electrical Steel, Ingot Iron
and Wrought Iron.
9.4 The results of the analysis shall meet the require-
ments of Table 1 for solid electrodes or Table 2 for
composite electrodes, for the classification of electrode
under test.
ASME B&PVC sec2c$u120 05-25-99 11:11:12 pd: sec2c Rev 14.04
PART C — SPECIFICATIONS FOR WELDING RODS,
ELECTRODES, AND FILLER METALS SFA-5.25
GENERAL NOTES:
a. Weld test assembly shall be welded in the vertical position with upward progression.
b. The test assembly shall be chosen and fixtured based on the manufacturer’s recommendations. Water-cooled copper shoes shall be used except
when using consumable guide tubes. For welding with consumable guide tubes, follow the manufacturer’s recommendations regarding the
use of water-cooled shoes. When using water cooling, the outgoing water temperature shall not exceed 180°F [82°C] near the exit point.
c. If the manufacturer does not make the electrode size specified, the nearest size may be used. For sizes other than that shown, follow the
manufacturer’s recommended procedure.
d. Welding shall begin with the assembly at room temperature, 65°F [18°C] minimum. No external heat shall be applied during welding. Run-
on and run-off tabs are not required if the test assembly is of sufficient length to provide the required test specimens.
e. The weld shall be completed in one pass.
f. No thermal treatment shall be performed on the assembly subsequent to the completion of welding.
FIG. 2 GROOVE WELD TEST ASSEMBLY FOR MECHANICAL PROPERTIES AND SOUNDNESS
535

ASME B&PVC sec2c$u120 05-25-99 11:11:12 pd: sec2c Rev 14.04
SFA-5.25 1998 SECTION II
TABLE 6
BASE METALS FOR TEST ASSEMBLIES
AWS Classification
ASTM
A5.25 A5.25M Base Metal Specification
FES6X-XXX FES43X-XXX ASTM A36
FES7X-XXX FES48X-XXX ASTM A242 Type 2 or A572 Grade 50
FES8X-XXX FES55X-XXX ASTM A537 Class 2, A572 Grade 60 or 65,
or A633 Grade E
The following classifications are exceptions to the above general requirements:
FESXX-EWS-EW FESYYY-EWS-EW ASTM A588
FESXX-EWT2 FESYYY-EWT2
10. Radiographic Test
10.1 The groove weld described in 8.4 and shown
in Fig. 2 shall be radiographed to evaluate the soundness
of the weld metal. In preparation for radiography, both
surfaces of the weld may be machined or ground
smooth and flush with the original surfaces of the base
metal or with a uniform reinforcement not exceeding
3
⁄
32
in. [2.5 mm]. Both surfaces of the test assembly,
in the area of the weld, shall be smooth enough to
avoid difficulty in interpreting the radiograph.
10.2 The weld shall be radiographed in accordance
with ASTM E142, Standard Method for Controlling
Quality of Radiographic Testing. The quality level of
inspection shall be 2-2T.
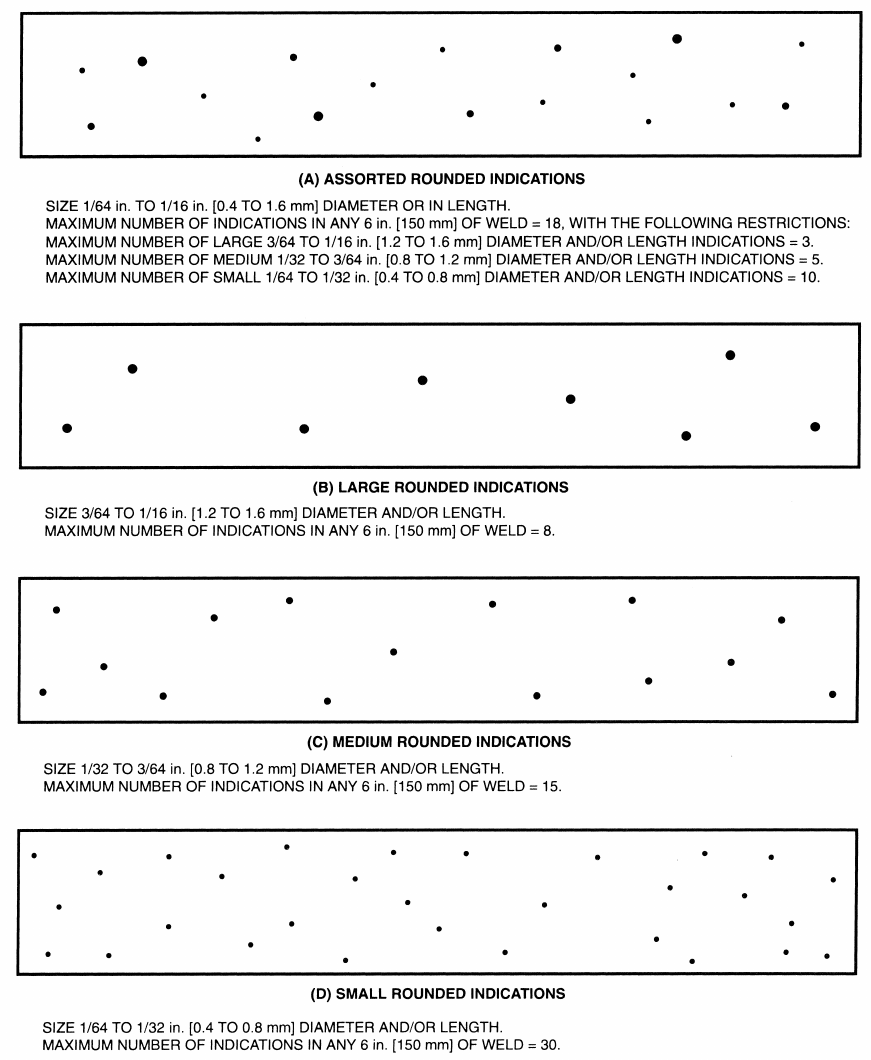
10.3 The soundness of the weld metal meets the
requirements of this specification if the radiograph
shows no cracks, no incomplete fusion, and no rounded
indications in excess of those permitted by the radio-
graphic standards in Fig. 4.
In evaluating the radiograph, 2-
1
⁄
2
in. [65 mm] of
the weld on each end of the test assembly shall be
disregarded.
A rounded indication is an indication (on the radio-
graph) whose length is no more than three times its
width. Rounded indications may be circular, elliptical,
conical, or irregular in shape, and they may have tails.
The size of a rounded indication is the largest dimension
of the indication, including any tail that may be present.
The indication may be of porosity or slag. Indications
whose largest dimension does not exceed
1
⁄
64
in. [0.4
mm] shall be disregarded. Test assemblies with indica-
tions greater than the largest indications permitted in
536
the radiographic standards do not meet the requirements
of this specification.
11. Tension Test
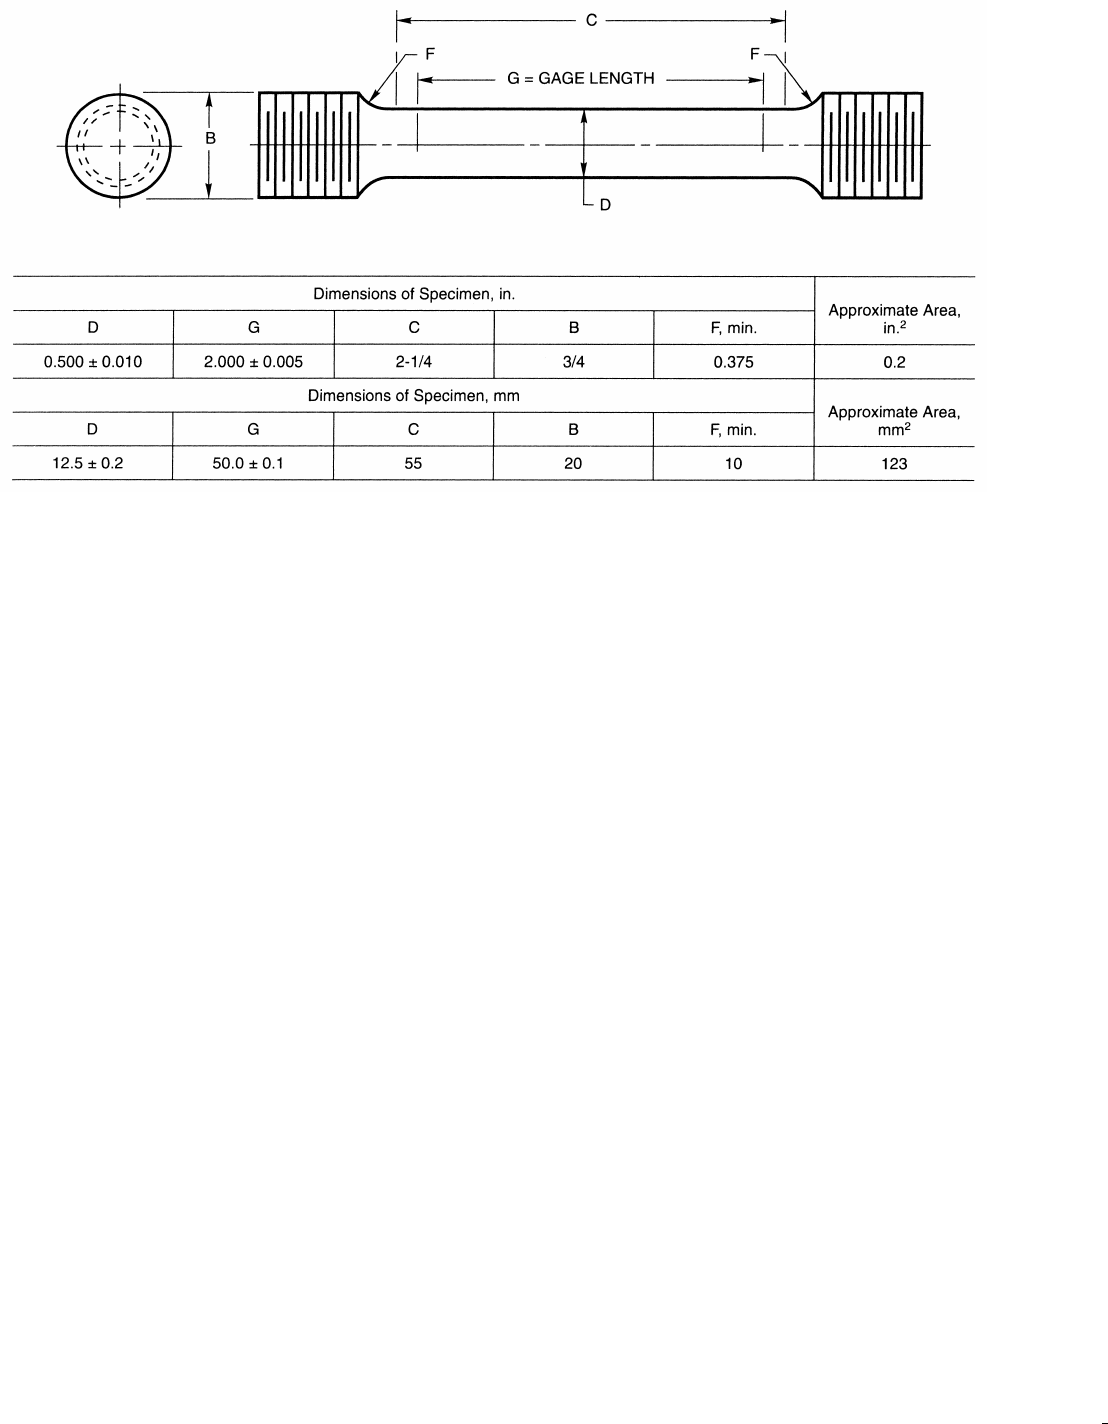
11.1 One all-weld-metal tension test specimen shall
be machined from the groove weld described in 8.4
and shown in Fig. 2. The dimensions of the specimen
shall be as shown in Fig. 3.
11.2 The specimen shall be tested in the manner
described in the tension test section of ANSI/AWS
B4.0, Standard Methods for Mechanical Testing of
Welds.
11.3 The results of the tension test shall meet the
requirements specified in Table 3, or Table 3M, as
applicable.
12. Impact Test
12.1 Five Charpy V-notch impact test specimens
(Fig. 5) shall be machined from the test assembly
shown in Fig. 2, for those flux-electrode classifications
for which impact testing is required in Table 5. The
five specimens shall be tested in accordance with the
fracture toughness test section of ANSI/AWS B4.0,
Standard Methods for Mechanical Testing of Welds.
The test temperature and the test results shall be those
specified in Table 4 or Table 4M, as applicable, for
the classification under test.
12.2 In evaluating the test results, the lowest and
the highest values obtained shall be disregarded. Two
of the remaining three values shall equal, or exceed,
ASME B&PVC sec2c$u120 05-25-99 11:11:12 pd: sec2c Rev 14.04
PART C — SPECIFICATIONS FOR WELDING RODS,
ELECTRODES, AND FILLER METALS SFA-5.25
GENERAL NOTES:
(1) Dimensions G and C shall be as shown, but ends may be of any shape to fit the testing machine holders as long as the load is axial.
(2) The diameter of the specimen within the gage length shall be slightly smaller at the center (controlling dimension) than at the ends. The
difference shall not exceed one percent of the diameter.
(3) When the extensometer is required to determine yield strength, dimension C may be modified. However, the percent of the elongation shall
be based on dimension G.
(4) The surface finish within the C dimension shall be no rougher than 63
in. [1.6
m].
FIG. 3 TENSION TEST SPECIMEN
the specified 15 ft·lbf [20 J] energy level. One of the
three may be lower, but not lower than 10 ft·lbf [14
J], and the average of the three shall be not less than
the required 15 ft·lbf [20 J] energy level.
PART C — MANUFACTURE,
IDENTIFICATION, AND PACKAGING
13. Method of Manufacture
The welding materials classified according to this
specification may be manufactured by any method that
will produce material that meets the requirements of
this specification.
14. Electrode Requirements
14.1 Standard Sizes. Standard sizes for electrodes
in the different package forms (coils with support,
coils without support, spools and drums) are shown in
Table 7.
537
14.2 Finish and Uniformity
14.2.1 All electrodes shall have a smooth finish
that is free from slivers, depressions, scratches, scale,
seams or laps (exclusive of the longitudinal joint in
cored electrodes), and foreign matter that would ad-
versely affect the welding characteristics, the operation
of the welding equipment or the properties of the weld
metal.
14.2.2 Each continuous length of electrode shall
be from a single lot of material, and welds, when
present, shall have been made so as not to interfere
with the uniform, uninterrupted feeding of the electrode
on automatic equipment.
14.2.3 The core ingredients in composite electrodes
shall be distributed with sufficient uniformity throughout
the length of the electrode so as not to adversely affect
the performance of the electrode or the properties of
the weld metal.
ASME B&PVC sec2c$u120 05-25-99 11:11:12 pd: sec2c Rev 14.04
SFA-5.25 1998 SECTION II
GENERAL NOTES:
(1) In using these standards the chart which is most representative of the size of the porosity and/or inclusions present in the test specimen
radiograph shall be used for determining conformance to these radiographic standards.
(2) Since these are test welds specifically made in the laboratory for classification purposes, the radiographic requirements for these test welds
are more rigid than those which may be required for general fabrication.
(3) Indications smaller than
1
⁄
64
in. [0.4 mm] shall be disregarded.
FIG. 4 RADIOGRAPHIC ACCEPTANCE STANDARDS
538
