ASM Metals HandBook Vol. 8 - Mechanical Testing and Evaluation
Подождите немного. Документ загружается.

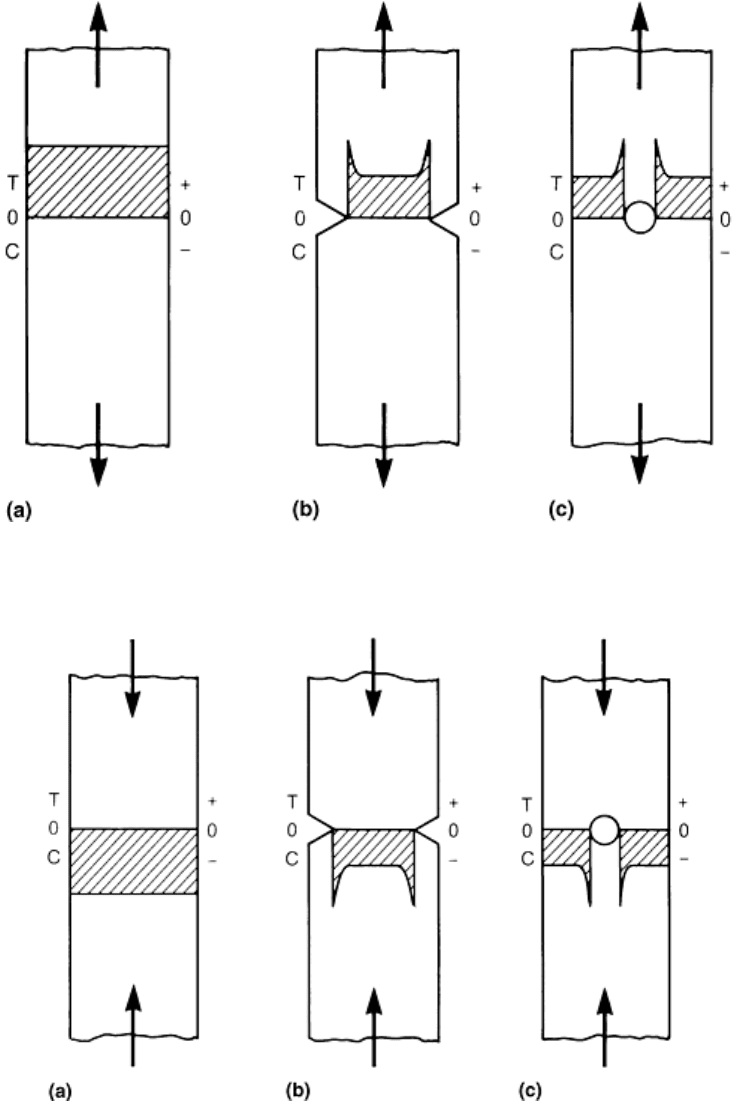
nominal cross section of the part. Figures 4 , 5 , 6 , and 7 (Ref 10) show the effects of notches on the stress field
in tension, compression, torsion, and bending, respectively.
Fig. 4 Effect of stress concentrations in tension. (a) No stress concentration. (b) Surface stress
concentrations. (c) Transverse hole stress concentration.
Fig. 5 Effect of stress concentrations in compression. (a) No stress concentration. (b) Surface stress
concentrations. (c) Transverse hole stress concentration. Source: Ref 4
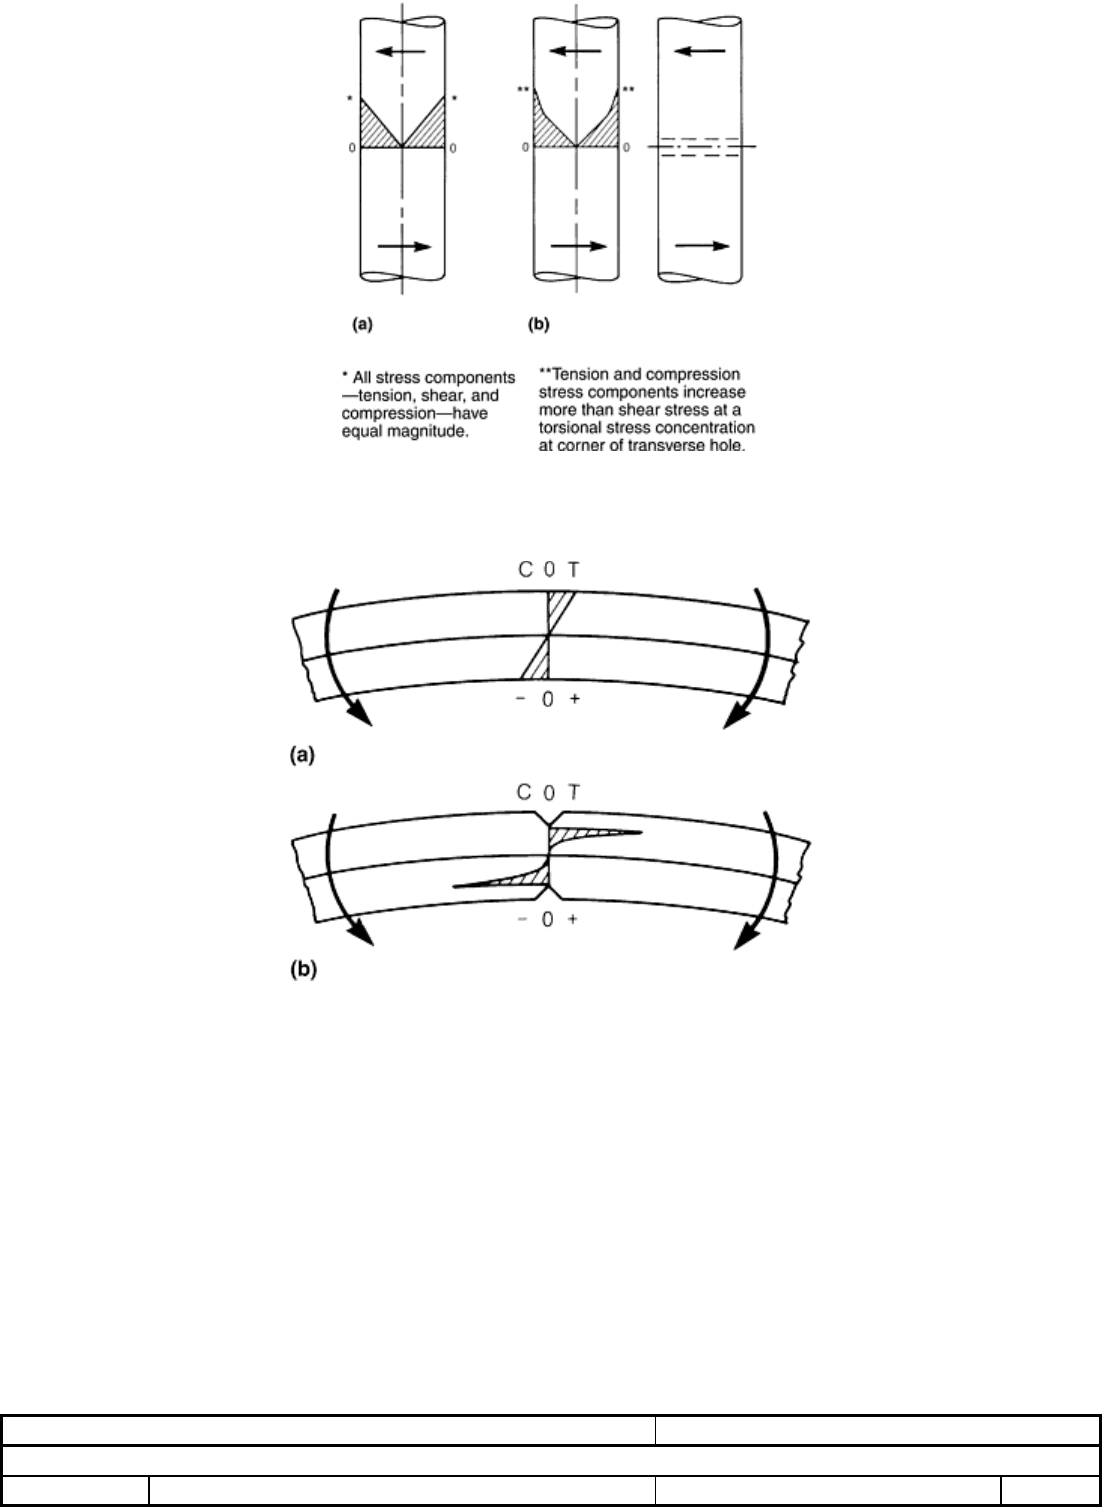
Fig. 6 Effect of stress concentrations in torsion. (a) No stress concentration. (b) Transverse hole stress
concentration. Source: Ref 4
Fig. 7 Effect of stress concentrations in bending. (a) No stress concentration. (b) Transverse surface
stress concentrations. Source: Ref 4
The severity of the stress concentration depends on the geometry of the discontinuity and the nature of the
material. A geometric, or theoretical, stress concentration factor, K
t
, is usually used to relate the maximum
stress, σ
max
, at the discontinuity to the nominal stress, σ
av
, according to the relationship:
K
t
= σ
max
/σ
av
Stress concentration factors have been published for many years in references such as Peterson's Stress
Concentration Factors, originally published in 1950 with a new edition recently published (Ref 11). The value
of K
t
depends on the geometry of the part and can be determined from stress concentration charts such as those
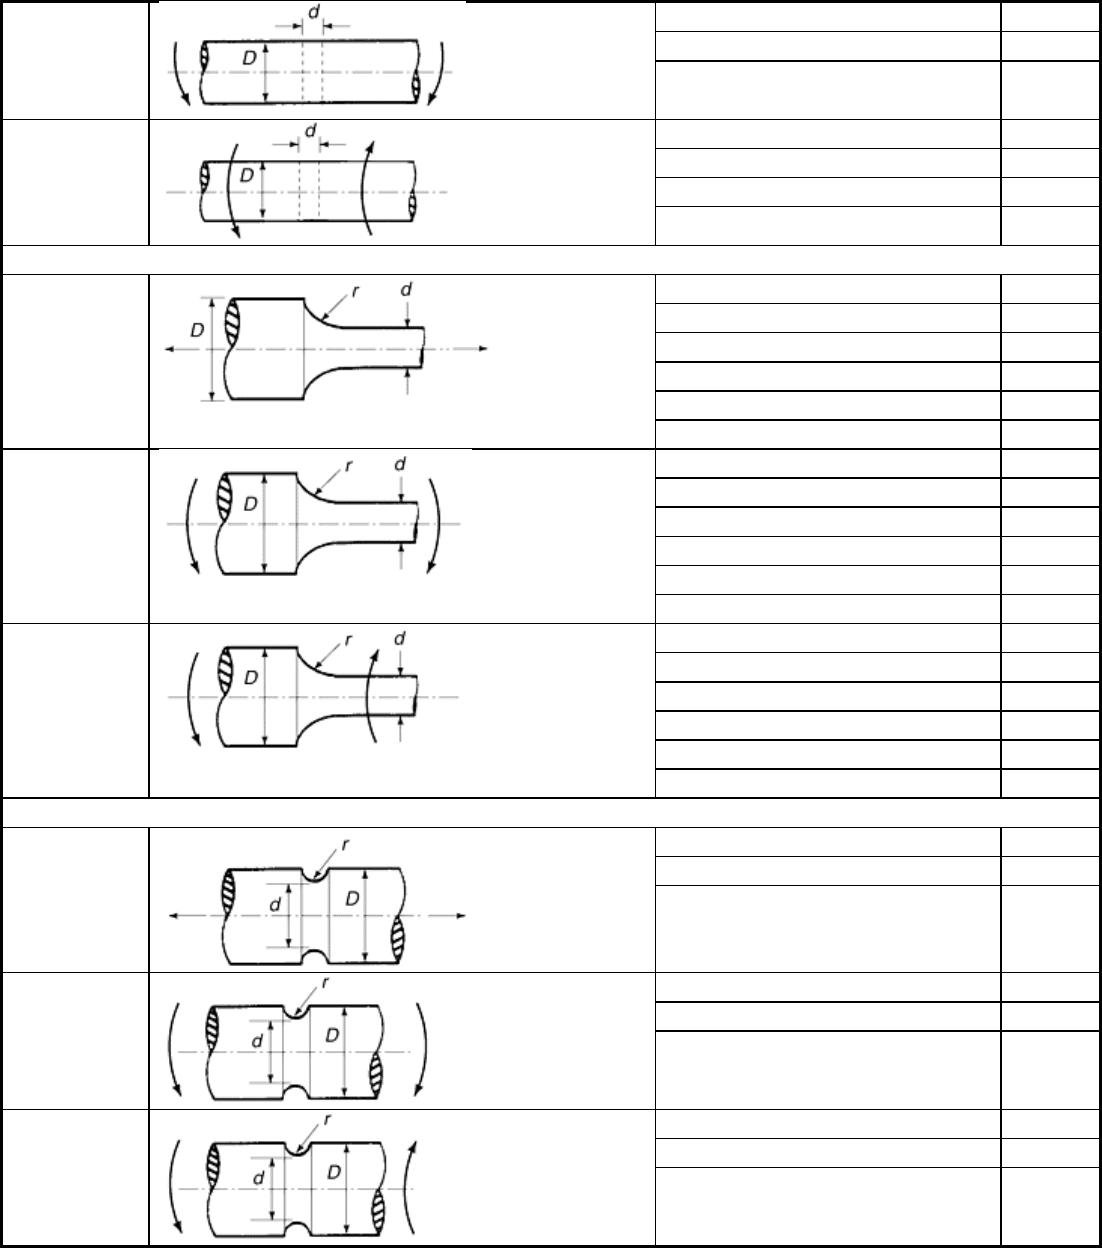
given in Ref 11 and 12. Table 4 (Ref 2) also gives some typical values of K
t
.
Table 4 Values of the stress concentration factor, K
t
Component shape
Value of critical parameter, K
t
Round shaft with transverse hole
Bending d/D = 0.025
2.65
= 0.05
2.50
= 0.10
2.25
= 0.20
2.00
d/D = 0.025
3.7
= 0.05
3.6
= 0.10
3.3
Torsion
= 0.20
3.0
Round shaft with shoulder
d/D = 1.5, r/d = 0.05
2.4
r/d = 0.10
1.9
r/d = 0.20
1.55
d/D = 1.1, r/d = 0.05
1.9
= 0.10
1.6
Tension
= 0.20
1.35
d/D = 1.5, r/d = 0.05
2.05
r/d = 0.10
1.7
r/d = 0.20
1.4
d/D = 1.1, r/d = 0.05
1.9
r/d = 0.10
1.6
Bending
r/d = 0.20
1.35
d/D = 1.5, r/d = 0.05
1.7
r/d = 0.10
1.45
r/d = 0.20
1.25
d/D = 1.1, r/d = 0.05
1.25
r/d = 0.10
1.15
Torsion
r/d = 0.20
1.1
Grooved round bar
d/D = 1.1, r/d = 0.05
2.35
r/d = 0.10
2.0
Tension
r/d = 0.20
1.6
d/D = 1.1, r/d = 0.05
2.35
r/d = 0.10
1.9
Bending
r/d = 0.20
1.5
d/D = 1.1, r/d = 0.05
1.65
r/d = 0.10
1.4
Torsion
r/d = 0.20 1.25
Source: Ref 2
Other methods of estimating K
t
for a certain geometry include photoelasticity, brittle coatings, and finite-
element techniques. Experience shows that under static loading, K
t
gives an upper limit to the stress
concentration value and applies it to high-strength, low-ductility materials. With more ductile materials, local
yielding in the very small area of maximum stress causes some relief in the stress concentration. Generally, the
following design guidelines should be observed if the deleterious effects of stress concentration are to be kept
to a minimum (Ref 2):
• Abrupt changes in cross section should be avoided. If they are necessary, generous fillet radii or stress-
relieving grooves should be provided.
• Slots and grooves should be provided with generous run-out radii and with fillet radii in all corners.
• Stress-relieving grooves or undercuts should be provided at the ends of threads and splines.
• Sharp internal corners and external edges should be avoided.
• Oil holes and similar features should be chamfered and the bore should be smooth.
• Weakening features such as bolt and oil holes, identification marks, and part numbers should not be
located in highly stressed areas.
• Weakening features should be staggered to avoid the addition of their stress-concentration effects.
Pin Bearing Testing. Special geometric conditions or configurations may also have specially designed tests for
strength evaluation. One example of this is the pin bearing test conducted on metal products that must sustain
loads that are applied when the material is riveted, bolted, or similarly mechanically fastened. The purpose of
the test is to determine the bearing strength properties and to indicate the bearing stress versus the deformation
of the hole. The bearing load is applied to the specimen through a cylindrical pin, which is fitted into a hole
normal to the surface of the specimen. The data obtained by this test procedure are used to calculate minimum
properties that can be used in the design of structural members used in the aerospace industry.
The properties of primary concern in pin bearing tests are bearing yield strength and bearing ultimate strength.
The bearing yield strength is the bearing stress at which a material exhibits a specified limiting deviation from
the proportionality of bearing stress to bearing strain. The bearing ultimate strength is the maximum bearing
stress a material is capable of sustaining. These values are normally determined at edge-distance ratios (e/D) of
1.5 and 2.0, where the edge-distance ratio is the ratio of the edge distance, e, to the pin diameter, D. Edge
distance, e, is the distance from the edge of a bearing specimen to the center of the hole in the direction of the
applied force. Bearing area is the product of the pin diameter and specimen thickness. The bearing loads are
divided by the bearing area to yield the bearing stress or strength, which is the force per unit of bearing area.
Although a standard method for the pin-type bearing test is covered in ASTM E 238, “Standard Test Method
for Pin-Type Bearing Test of Metallic Materials,” it is oriented to testing aluminum and magnesium.
Consequently, problems with pin distortion or failure may be encountered when testing higher-strength
materials such as titanium and high-strength steel at ultimate strengths of 1860 to 2070 MPa (270 to 300 ksi).
Much of ASTM E 238 is aimed toward obtaining consistent results among laboratories. Consequently, it must
be recognized that values obtained under laboratory-type conditions will not be representative of those achieved
under actual loading conditions of a part or structure.
Cleaning of the specimen and pin is also necessary to provide consistent, comparable results. However,
cleaning produces test results that are higher than in actual service (where fasteners may have platings, sealants,
or lubricants to facilitate installation). In aluminum and magnesium alloys, lubrication can cause reductions of
up to 15% in bearing yield strength values obtained in tests with clean, dry bearing surfaces. This includes the
unintentional application of oil from human fingers during handling of the specimens and test fixtures.
Pin bearing tests typically are conducted on sheet-type specimens, using the full thickness of the material when
possible. If the specimen is too thick in relation to the pin diameter, the test pin may bend or break before the
bearing strength can be achieved. Conversely, buckling may occur if the specimen is too thin in relation to the
pin diameter. To avoid pin deformation or failure and specimen buckling, a pin diameter to specimen thickness
ratio (D/t) of 2 to 4 is recommended in ASTM E 238. Most testing of aluminum is conducted using a D/t ratio
of 2. To test high-strength steel, D/t ratios up to 4 may be necessary. Using a higher D/t ratio, however,
increases the possibility of buckling.
Stress-Corrosion Cracking (SCC) occurs in a variety of materials as a result of internal and external stress
conditions in the component in conjunction with the operating environment. After completion of stress analysis
in the design process, a designer normally has a list of materials suitable for a given environment. However,
SCC and other environmentally asms are complex problems that warrant careful attention at the materials
selection stage. Unexpected causes, such as the use of cleaning agents on high-strength or stainless steels, can
be a factor. More details on the standards and tests associated with SCC and hydrogen embrittlement are
described in the article“Evaluation of Environmentally Assisted Crack Growth” in this Volume.
Wear can occur by a variety of mechanisms depending on the properties of the material and the service
condition. Wear resistance is, therefore, not a materials property as are strength, elastic modulus, endurance
limit, or fracture toughness. Wear and its corollary, wear resistance, are systems properties or responses. A

summary of designing for wear resistance is provided in the article “Design for Wear Resistance” in Materials
Selection and Design, Volume 20 of the ASM Handbook. Comprehensive information on the wear properties of
materials is provided in Friction, Lubrication, and Wear Technology, Volume 18 of the ASM Handbook.
The properties of castings vary widely as a function of the section thickness due to the differences in the
cooling rate and the specific characteristics of the alloy being cast. The reported properties of cast materials are
normally obtained from test bars, which have solidified under ideal conditions. Properties can be specified at
selected areas based on the expected design stress at these locations.
Forgings are often selected as the material form for components since the grain flow can be controlled to
produce directional properties that improve the performance of the component. For example, if the grain flow is
aligned with the direction of the maximum tensile stress, maximum properties can be realized. Gears are often
forged with the grain flow normal to the applied load in order to improve the resistance to crack initiation and
propagation.
Rolling and extrusion of metals also produce directional properties. For example, a strip of 1095 carbon steel
having a hardness of 58-60 HRC will tear like a piece of paper when loaded parallel to the rolling direction and
will be almost impossible to fracture in the transverse condition.
Powder metallurgy (P/M) parts must be carefully considered by designers. The mechanical properties and
fatigue performance of press-and-sintered P/M parts generally do not match those obtained by cast or wrought
materials of the same composition. Porosity is an integral part of castings and P/M materials. The net effect of
porosity on mechanical properties is a combination reduced cross-sectional area along with internal notches,
which reduces the ultimate strength and elongation of the component.
References cited in this section
2. M.M. Farag, Properties Needed for the Design of Static Structures, Materials Selection and Design, Vol
20, ASM Handbook, ASM International, 1997, p 510
4. R. Morrell, Handbook of Properties of Technical and Engineering Ceramics, Vol 1, Her Majesty's
Stationary Office, London, 1989
10. D. Wulpi, Understanding How Components Fail, 2nd ed., ASM International, 1999, p 51–53
11. W.D. Pilkey, Peterson's Stress Concentration Factors, 2nd ed., John Wiley & Sons, 1997
12. J.E. Shigley and L.D. Mitchell, Mechanical Engineering Design, 4th ed., McGraw-Hill, 1983
Introduction to Mechanical Testing of Components
References
1. M.R. Mitchell, Fundamentals of Modern Fatigue Analysis for Design, Fatigue and Fracture, Vol 19,
ASM Handbook, ASM International, 1996, p 231
2. M.M. Farag, Properties Needed for the Design of Static Structures, Materials Selection and Design, Vol
20, ASM Handbook, ASM International, 1997, p 510
3. C.R. Brinkman and G.D. Quinn, Standardization of Mechanical Properties Tests for Advanced
Ceramics, in Mechanical Testing Methodology for Ceramic Design and Reliability, Marcel Dekker,
1998, p 353–386

4. R. Morrell, Handbook of Properties of Technical and Engineering Ceramics, Vol 1, Her Majesty's
Stationary Office, London, 1989
5. G.D. Quinn and R. Morrell, “Design Data for Engineering Ceramics: A Review of the Flexure Test,” J.
Am. Ceram. Soc., Vol 74 (No. 9), 1991, p 2037–2066
6. D.W. Cameron and D. Hoeppner, Fatigue Properties in Engineering, Fatigue and Fracture, Vol 19,
ASM Handbook, ASM International, 1996, p 19
7. H. Pih and K.C. Liu, “Laser Diffraction Methods for High Temperature Strain Measurements,” Exp.
Mech., March 1991, p 60–64
8. K.C. Liu and J.L. Ding, “A Mechanical Extensometer for High Temperature Tensile Testing of
Ceramics,” J. Test. Eval., Sept 1993, p 406–413
9. J.Z. Gyekenyesi and P.A. Bartolotta, “An Evaluation of Strain Measuring Devices for Ceramic
Composites,” J. Test. Eval., Vol 20, 1992, p 285–295
10. D. Wulpi, Understanding How Components Fail, 2nd ed., ASM International, 1999, p 51–53
11. W.D. Pilkey, Peterson's Stress Concentration Factors, 2nd ed., John Wiley & Sons, 1997
12. J.E. Shigley and L.D. Mitchell, Mechanical Engineering Design, 4th ed., McGraw-Hill, 1983
Testing for Deformation Modeling
Dan Zhao, Johnson Controls, Inc.
Introduction
COMPUTER MODELING OF DEFORMATION has become a popular engineering tool and is used with
considerable success in the metal forming industry. The popularity of deformation modeling has increased with
the rapid advancement of computer hardware and software technology. However, one of the key factors in
successfully employing deformation modeling is accurate and adequate input of material properties. Various
mechanical, thermal, and interfacial properties are required depending on the particular material and process
being modeled.
The mechanical properties required for deformation modeling include flow stress, Young's modulus, Poisson's
ratio, and anisotropic properties. The most important property is flow stress, and it is usually required as a
function of strain, strain rate, and temperature.
Forming processes can be divided into three major categories: bulk forming, sheet-metal forming, and special
forming processes. Bulk forming includes forging, extrusion, drawing, and rolling. Sheet-metal forming
consists of stamping, deep drawing, blanking, punching, spinning, and superplastic forming. Semisolid forming
and polymer extrusion are some of the special forming processes. In this article, each processing category is
introduced with a brief description of the constitutive models. The required properties for process modeling are
outlined, and the test methods for determining these properties are described. Special attention is given to the
accuracy of data. Additional information on bulk workability testing and sheet formability is also contained in
ASM Handbook, Volume 14, Forming and Forging.
Testing for Deformation Modeling
Dan Zhao, Johnson Controls, Inc.
Testing for Bulk Forming
As the name implies, bulk forming usually involves workpieces that are bulky compared with sheet metal.
Because bulk forming usually involves large plastic deformation, the most important mechanical input for
modeling is stress-strain data. For warm and hot forming processes, data may be needed over a range of
temperatures and strain rates. Several efforts have been made to make such data available for a number of
alloys (Ref 1, 2, and 3). In this section, both compression and tension tests are discussed in detail. In addition to
stress-strain curves, other properties such as Young's modulus and workability data can also be obtained from
these tests. Data reduction procedures, such as temperature correction and fitting to constitutive equations, are
provided. Finally, testing for interfacial properties such as the friction coefficient and heat-transfer coefficient
are described briefly.
Constitutive Equations
The general form of the constitutive equation for deformation processing is:
= f( , ,T)
(Eq 1)
where is equivalent true stress, is equivalent true strain, is equivalent true strain rate, and T is processing
temperature.
Most software packages for bulk forming modeling have options to input the testing data in a tabular form or as
a constitutive equation. The tabular form is easy to use, but is not based on any fundamental metallurgical
principles, as with some of the constitutive equations. The most frequently used constitutive equation is:
= K
n m
+ Y
(Eq 2)
where n is the strain-hardening exponent, m is the strain-rate sensitivity, and Y and K are constants.
Strain-rate sensitivity is important at elevated temperatures, while it has little influence at room temperature for
most metallic materials. In contrast, the importance of the strain-hardening exponent increases with decreasing
temperature. The values of m and n can be found in Ref 4 for a number of metals and alloys.
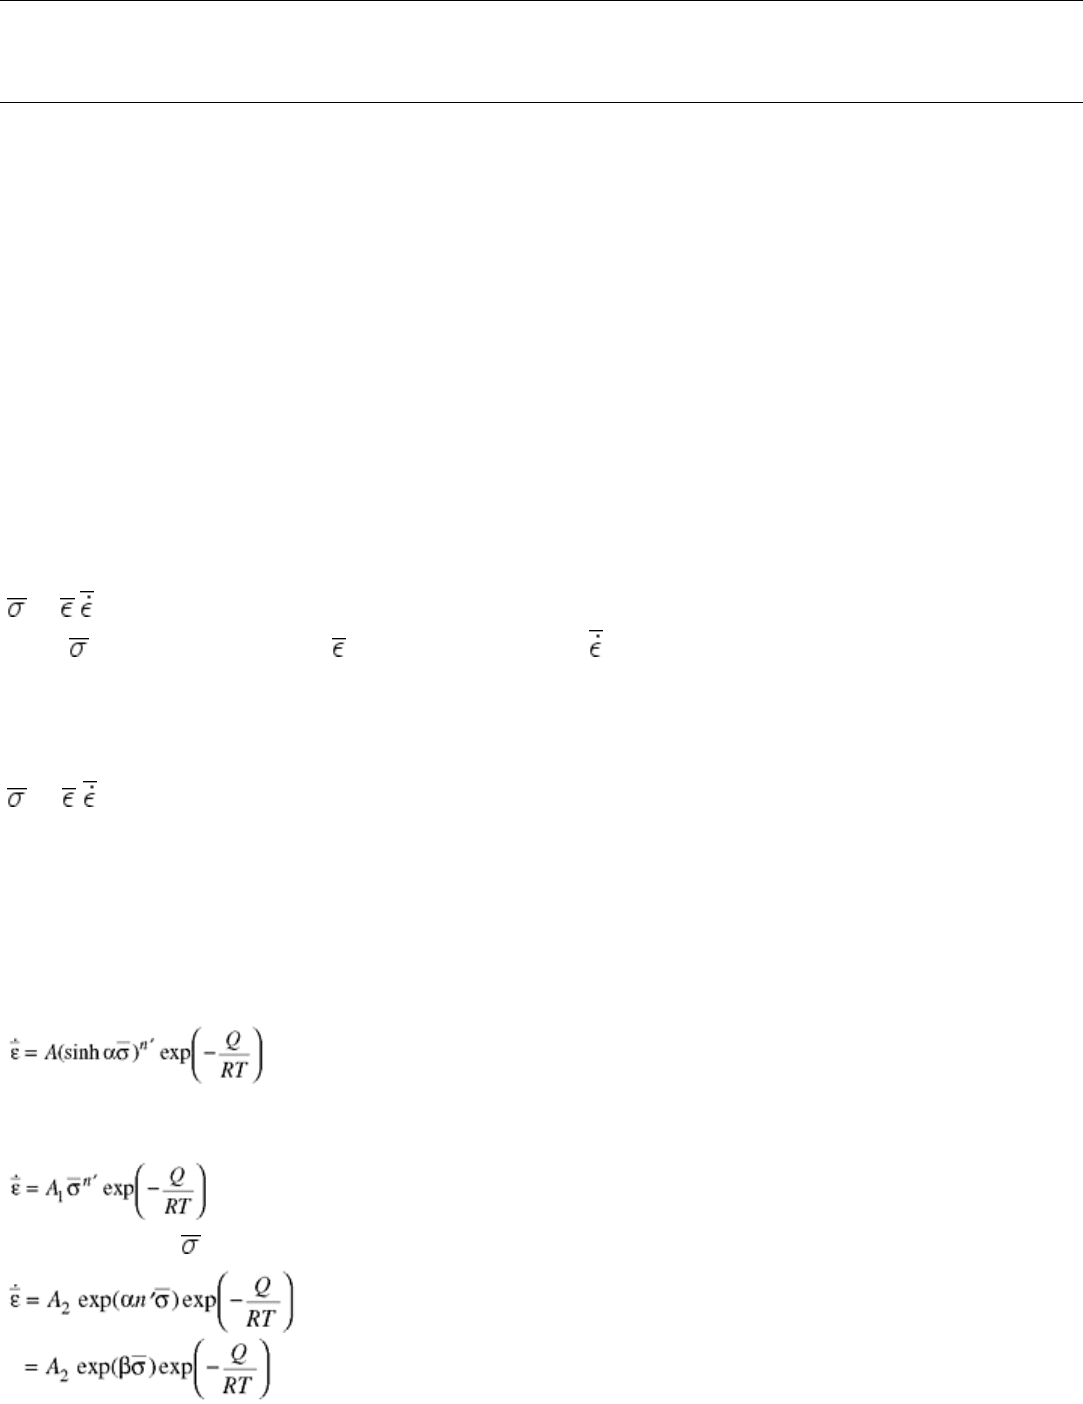
The equation above does not reflect the influence of temperature. For each temperature, there is a set of
constants. A more fundamentally sound equation was proposed by Sellars and Tegart (Ref 5) by assuming
material flow during deformation as a thermally activated process:
(Eq 3)
where A, α, and n′ are constants determined by fitting the empirical data, and Q is the apparent activation
energy. At low stresses (ασ < 0.8), Eq 3 reduces to a power law:
(Eq 4)
At high stresses (α is greater than 1.2), and Eq 3 reduces to an exponential relation:
(Eq 5)
where β is a material parameter.
Other constitutive relations have been proposed to describe dynamic recovery and dynamic recrystallization,
such as the Laasroui-Jonas model (Ref 6) and internal variable model (Ref 7). Those relationships have not
been implemented in commercially available software packages and can only be used as user-defined
subroutines. The testing and data reduction procedures for these models were documented by Thirukkonda,
Zhao, and Male (Ref 8).
Fracture Criteria
One of the most useful predictions that can be made from computer modeling is failure of parts during
processing. To predict failure, ductile-fracture criteria must be incorporated in modeling. The most popular
fracture criterion is the Cockcraft-Latham criterion, which states that fracture occurs when the integration of the
maximum principal stress over equivalent strain exceeds a constant (Ref 9):
σ
1
d ≥C
2
(Eq 6)
where σ
1
is the maximum principal stress,
f
is equivalent strain at fracture, and C
2
is a constant representing
the workability of the workpiece material. If σ
1
< 0, there are only compressive stresses, and no fracture occurs.
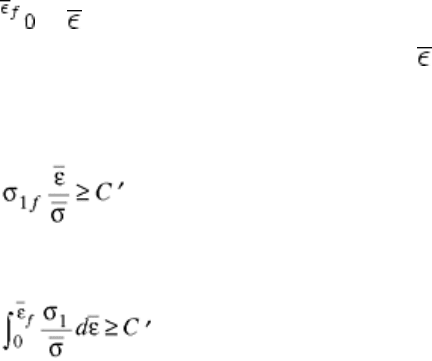
Zhao, Bandstra, and Kuhn (Ref 10) developed a new fracture criterion that can be directly related to the bulk
workability test (Ref 11):
(Eq 7)
where σ
1f
is the maximum principal stress at fracture, and C′ is a workability constant.
For incremental loading, Bandstra (Ref 12) proved the criterion can be expressed as:
(Eq 8)
A review of fracture criteria can be found in Ref 10.
Testing for Deformation Processing
It must be understood that testing for deformation processing is very different from testing for static mechanical
properties. Testing for static mechanical properties, such as tensile strength, yield strength, and elongation,
needs to be conducted at a very low loading rate, and according to standards such as those published by ASTM
(Ref 13, 14, 15, and 16). For example, the conventional strain rate specified in the standards for compression
testing is 8.33 × 10
-5
s
-1
, and the rapid strain rate is only 8.33 × 10
-3
s
-1
(Ref 14). Testing for deformation
processing must be conducted to cover the range of strain rates experienced by the workpiece, which can reach
1000 s
-1
. In addition, large strains, such as true strain of 120%, are common in metal forming processes. Such
high strains may not be needed when testing for static properties.
Compression Test
Compression tests are normally used to determine stress-strain curves for bulk forming, because most bulk
forming processes involve mainly compressive stresses. The test is also relatively easy to perform, and the
specimen geometry is usually simple.
Testing Apparatus. The testing machine can be either a servohydraulic or mechanical screw-driven machine. A
schematic of a testing apparatus is shown in Fig. 1. The capacity of the loading frame is rated in units of
kilonewtons (kN) or kilopounds (kip). Selection of loading capacity depends on the material being tested. In
general, a 300 kN servohydraulic machine is capable of testing most metallic materials over a wide range of
temperatures and strain rates. High-speed testing machines can also be ordered with custom design from
manufacturers.
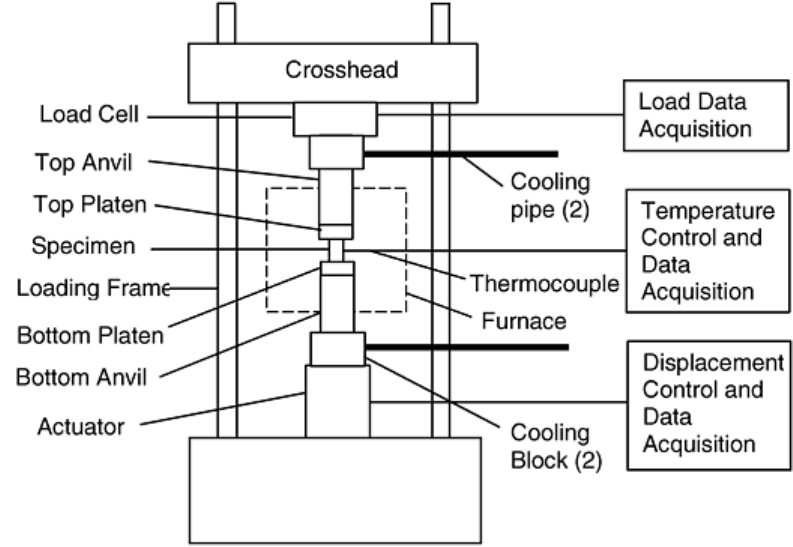
Fig. 1 Schematic of a compression-testing system
Load cells are rated for load capacity. Several load cells may be needed to cover different load ranges and
provide accurate readings. There are two kinds of load cells: static and dynamic. Hydraulic machines usually
come with dynamic load cells. Dynamic load cells can be used for both static and dynamic loading.
For elevated-temperature testing, a furnace is mounted on the testing machine, usually on the loading frame.
The furnace can also be mounted on a cart to be pushed in or out. Four types of furnaces are commonly used:
resistance heating, radiant heating, induction heating, and vacuum. A resistance-heating furnace is slower
compared to radiant and induction-heating furnaces, but usually has three heating zones and better temperature
control. A radiant-heating furnace is fast and has good temperature control, but the life of the radiant bulbs is
short, which increases maintenance cost. An induction-heating furnace is very rapid, but its temperature control
is poor. In addition, specimens may not be heated uniformly in such a furnace. A vacuum furnace or
environmental chamber is needed for specimens, such as titanium alloys, that can oxidize at elevated
temperatures. Quenching may be performed to retain microstructures at testing temperatures. For the first three
types of furnaces, quenching can be performed by opening the furnace and dropping the specimen in a
quenching medium such as water. For a vacuum furnace, quenching has to be performed with an inert gas, such
as helium, inside the furnace. The furnace door can only be opened after the furnace temperature is low enough
(below 300 °C, or 570 °F, for a tungsten heating element) to prevent damage to the heating element.
Cooling blocks must be installed between the load cell and the top anvil, and between the bottom anvil and the
actuator. Aluminum alloys can be used to construct cooling blocks. Several water channels are drilled through
the cooling blocks and connected with copper tubing to circulate cold water through the blocks.
The top and bottom anvils can be made of stainless steel, superalloys, Ti-Zr-Mo alloy (TZM), or graphite. For
temperatures below 1000 °C (1830 °F), stainless steel can be used. For temperatures below 1350 °C (2460 °F),
TZM can be used. For temperatures above 1350 °C (2460 °F), graphite can be used. The diameter of the anvils
should be at least three times that of the specimen. TZM and graphite are suitable in a vacuum furnace. In air,
alternative materials for TZM would be Inconel 718, stainless steel 17-7PH, or Haynes 188. However, the
temperature limits for these materials are not as high as for TZM.
The compression platens can be made of several materials. Table 1 shows the materials and their applicable
temperatures and strain rates. In most cases, TZM anvils and platens are used for temperatures of 800–1350 °C
(1470–2460 °F). For testing below 1000 °C (1830 °F), tungsten carbide (WC) platens can be used, especially
when testing steel specimens. D2 steel is good enough to test nonferrous alloys, such as aluminum and copper.
For testing above 1000 °C (1830 °F), silicon carbide (SiC), silicon nitride (SiN), and alumina can be used.
However, if high-speed impact is encountered, such as when testing with strain rates higher than 1 s
-1
, TZM or
ceramic composite (Al
2
O
3
+ SiC) platens should be used. If the specimen is a high-strength heat-resistant alloy,
only the ceramic composite platens can sustain the impact. In general, when choosing tooling materials, one
should consider the hardness of the material being tested and the impact strength and thermal conductivity of
platens. For example, a high-strength heat-resistant alloy, such as Udimet 720, would damage TZM platens
when tested at high strain rates and provide invalid testing data. In addition, high heating rates can explode the
ceramic composite platens because the thermal conductivity of alumina is low.
Table 1 Platen materials for different temperatures and strain rates
Temperature
Strain rate,
s
-1
RT-400 °C (RT-750
°F)
<1000 °C (<1830
°F)
1000–1350 °C (1830–2460
°F)
>1350 °C (>2460
°F)
<1 D2 Steel WC TZM, SiC, SiN, Al
2
O
3
+
SiC
Graphite
1–60 D2 Steel WC, TZM TZM, Al
2
O
3
+ SiC Al
2
O
3
+ SiC
The flat and parallel tolerance of platens should be within 0.0002 (Ref 13). To improve parallelism, adjustable
platens (such as bearing blocks) may be used. A drawing of such blocks is shown in Ref 13. Using a subpress is
suggested in the ASTM standards (Ref 13, 14), but it is very difficult with the limited space inside the furnace.
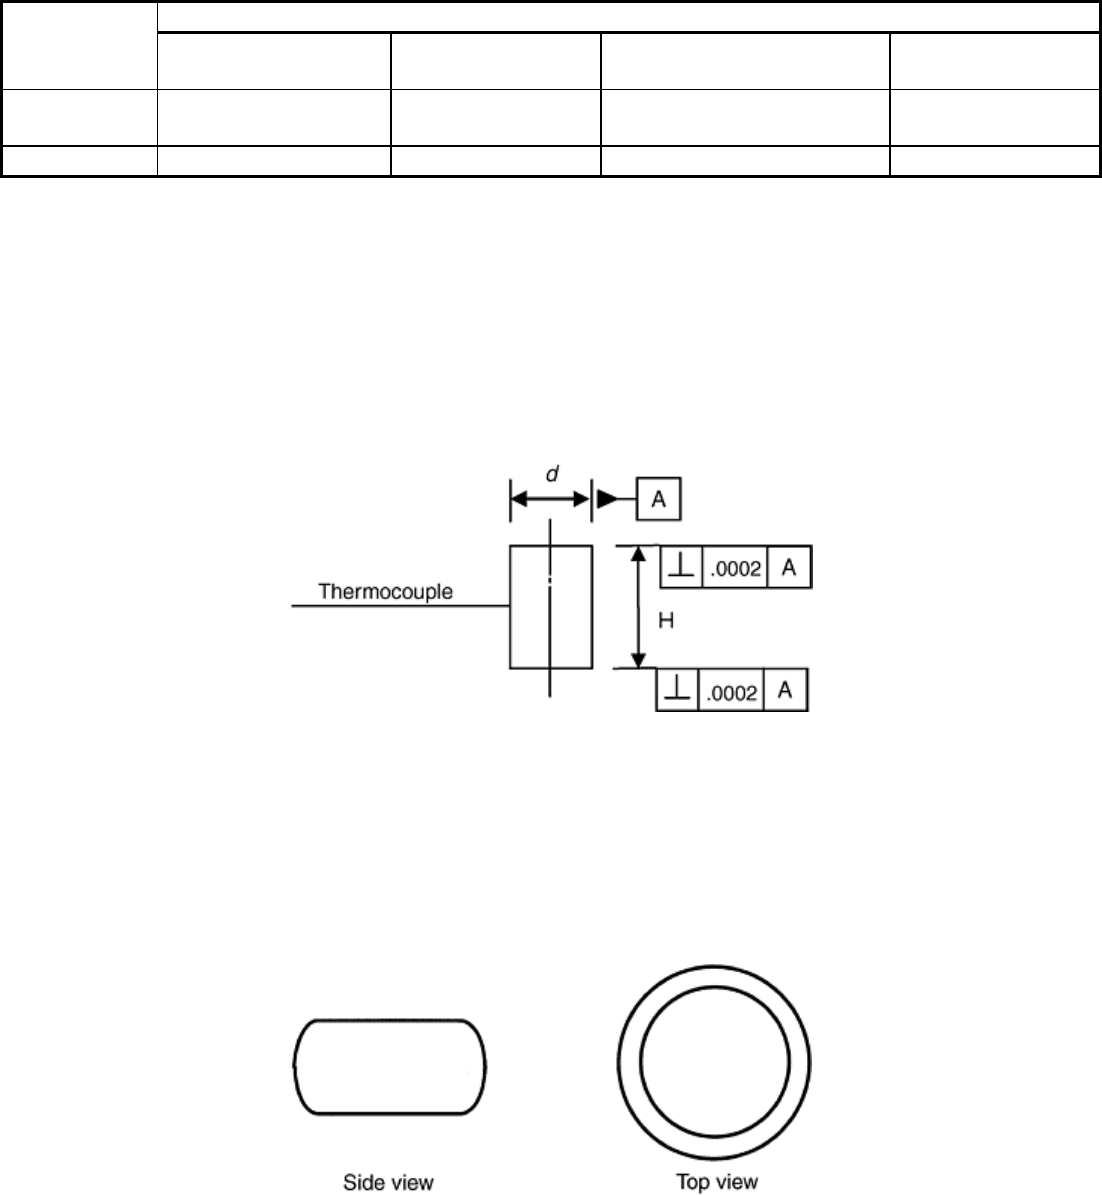
Specimen Geometry. The simplest specimen geometry is a cylinder, as shown in Fig. 2. The height-diameter
aspect ratio (H/d) is usually between 1 and 2. An aspect ratio that is too high can cause the specimen to buckle,
while one that is too low can increase friction even if lubricant is applied. Excellent results have been obtained
using H/d = 1.25 for high-strength steel specimens (Ref 8). Typical specimen diameter is 10 to 15 mm (0.4–0.6
in.), depending on microstructure. For a cast alloy with a coarse grain structure, larger specimens may be
necessary. Subscale specimens can also be used for materials with a fine grain structure. In general, the
specimen size must be representative of the material being tested.
Fig. 2 Cylindrical compression specimen geometry
The parallelism of the top and the bottom of specimens should be 0.0005 or better. The surface finish of
specimens should be 1.6 μm (63 μin.) or better, which usually requires turning or grinding. A typical specimen
with friction looks like Fig. 3 (Ref 17). The specimen shown in Fig. 3 exhibits bulging due to friction between
the platens and the top and bottom surfaces of the specimen. Ideally, the test is frictionless, and the specimen is
compressed homogeneously, as shown in Fig. 4. Shear banding may occur during compression testing, as
shown in Fig. 5 (Ref 17). It can be caused by localized flow (Ref 18) or unparalleled platens or specimens.
Fig. 3 Schematics of a regularly tested specimen
