Arne Kjolle. Hydropower in Norway. Mechanical equipment
Подождите немного. Документ загружается.


Performance Tests 5.1
CHAPTER 5
Performance Tests
Introduction
Performance tests of hydro turbines are part of the commissioning and acceptance of the
delivery of electro-hydraulic equipment.
The tests of hydro turbines should be made in accordance with the IEC recommendations. This
is a claim by model tests as well if the prototype is a low head turbine and performance tests on
the prototype is difficult to carry out with acceptable tolerances.
A turbine must in general meet a guarantee of the efficiency within a certain range of output
and head variation. The turbine power output must fulfil the guarantee as a function of the net
head as well. The operation in the given range of head shall also be without damage such as
cavitation pittings and fatigue problems, on the turbine during the guarantee period.
Shuts down tests of inlet valves are also often a part of the acceptance tests when required.
In the course of the running time wear occur on vital parts of the turbine and the efficiency
decreases accordingly. Therefore efficiency tests of a turbine may come into question several
times.
Detailed guidelines for field acceptance tests are given in the International standard IEC 41
/9/
and for model tests in IEC 193
/10/
.
5.1 Tests on prototype
5.1.1 Principles for test
The efficiency of hydro turbines may be determined according to two different principles:
1. Measuring the output P and the available power P
n
at the turbine inlet and calculate
the efficiency
η
=
P
P
n
(5.1)
2. Measurement of the total power losses
∆
P
loss
in the turbine and the suction pipe and
determine the efficiency
η= −1
∆P
P
loss
n
(5.2)
5.1.2 Measurement of the turbine power
Performance Tests 5.2
Power output P
For a prototype turbine the electrical power output from the generator P
G
is measured. Through
the knowledge of the efficiency
η
G
of the electrical generator the turbine power output P is
calculated.
The generator efficiency as function of cos
φ
and the load can always be obtained from the
generator manufacturer or measured on site as part of the generator performance tests.
The available power P
n
P
n
=
ρ
QgH
n
(5.3)
The discharge Q and the net head H
n
are to be measured. The density
ρ
= 1000 kg/m
3
is
generally used in the calculations if the contract of the measurements do not involve
requirements of an exact check. For the acceleration of gravity g = 9.82 m/sec
2
.
The net head H
n
is evaluated above tail water level just at the outlet of the suction pipe of a full
turbine, and above average level of the inlet of the jets in the buckets of a Pelton turbine. Net
head H
n
is composed of the hydraulic pressure head and the velocity head in the pipe cross
section area A just in front of the turbine. For the velocity head it is usual to evaluate this
directly as the average velocity head c
m
2
/(2g) = Q
2
/(2gA
2
).
The main methods for the determination of the discharge in hydro power plants are described in
the following section.
5.1.3 Methods for determination of discharge
Measuring methods being used for the determination of the discharge in water power plants are:
1. Current meter method
2. Pitot tube gauging
3. Pressure-time method (Gibson method)
4. Tracer methods
5. Ultrasonic method
6. Weirs
7. Standardised differential pressure devices
8. Volumetric gauging method
9. Relative discharge measurement
Weirs, venturimeters, nozzles and volumetric meters are used especially for the measurements
of discharge of smaller turbines.
Not all of these methods are generally applicable, and which of them are to be used in the
respective power plants is a matter of choice based on main aspects as compatibility, economy
and accuracy.
5.1.3.1 Current meter method
The current meter method requires a number of propeller-type current meters. These are located
at specified points in a suitable cross section of an open channel or closed conduit.
Simultaneous measurements of local mean velocity with the meters are integrated over the
gauging section to estimate the discharge.
Performance Tests 5.3
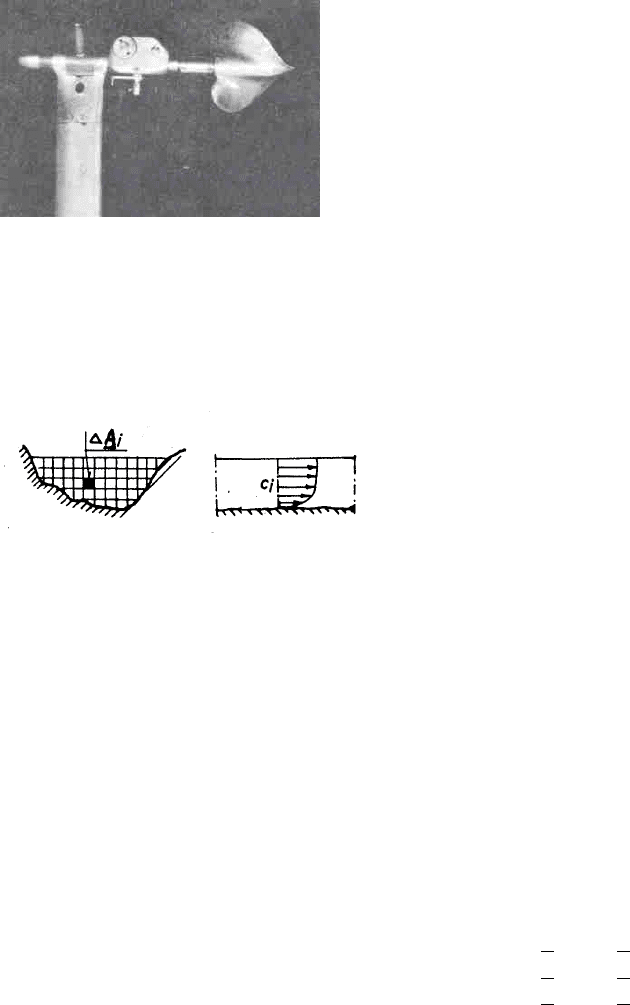
Current meters are instruments designed as propellers with 2 or 3 blades. Fig. 5.1 shows an
example of a current meter design with a two-blade
propeller.
The current meter is put in the flow with the propeller axis
parallel to the flow direction and the propeller peak
against the flow. The rotational speed n of the propeller is
a linear function of the flow velocity c in the measuring
point.
c = kn + b (5.4)
where k and b are constants of the respective current
meter and has to be determined by calibration tests.
The rotational speed of the current meter is detected by an electric contact giving a pulse
frequency signal proportional to rotational speed.
The flow velocity is recorded in the centre of gravity of each grid element of the cross section
area as shown on Fig. 5.2. By considering an arbitrary element with area A
i
where the recorded
velocity is c
i
, the discharge
∆
Q
i
= c
i
A
i
through
this element. If the flow cross section is divided
in n elements, the total flow discharge is found
by
QcA
i
i
n
i
=
=
∑
1
(5.5)
Depending on the conditions on site the
arrangement of current meter measurements may be carried out by a number of current meters
installed in a kind of structure being built across the flow section.
Current meter measurements may be applied in open drains, channels, rivers as well as in
closed pipes. To achieve accurate results, it is however important that the flow through the
cross section of the measurements is regular and as rectilinear as possible.
The accuracy by current meter gauging of the discharge depends essentially on factors related
to the flow, the quality of measurements, a careful reflection of the gauge point distribution
and the method of discharge calculation. With good measuring techniques and flow
conditions, the
estimated uncertainties
/9/
should be about:
- in closed conduits +
1 to + 1.5 %
- in open channels with rectangular section +
1.2 to + 2 %
- in open channels with trapezoidal section +
1.4 to + 2.3 %
5.1.3.2 Pitot tube gauging
The pitot tube gauging means to measure the stagnation pressure of the flow velocity directed
into the tube end opening. Pitot tubes are found in a great variety of designs. Fig. 5.3 shows an
example of a frequently applied type called Prandtl tube.
Standardised pitot tubes are reported in ISO 3966
/13/
, which covers the design, installation and
use of these tubes. This standard also gives guidelines for the selection and installation of pitot
static tubes, choice of measuring section and the computation of the discharge and its
Fig. 5.1 Current meter /3/
Fig. 5.2 Flow cross section /3/

Performance Tests 5.4
uncertainty. ISO 3966 shall be used only with the standardised
Pitot tubes that are described therein and equipped with a single
total pressure tap and one or more static pressure taps. Such tubes
may be used uncalibrated and the flow coefficient assumed to be
unity.
The local velocity v
i
is given by:
ii
v2p/
=
∆ρ
(5.6)
where
∆
p
i
is the difference between the total stagnation pressure
and the static pressure measured with the pitot tube located at
point “i”.
Pitot tubes are applied in the same way as described for current
meter measurements, for gauging the flow velocity in chosen points
of a flow cross section. The total discharge Q is also determined analogous to the scheme
described for current meters.
Pitot tubes are not well fit for velocity measurements in liquids when the flow velocity is lower
than 1 m/s.
With good measuring techniques and flow conditions the estimated uncertainty should be about
1.5 to 2.5 %.
5.1.3.3 The pressure-time method (Gibson method)
The pressure-time method
/1/
for discharge determination is based on the pressure rise when a
flow regulating device in a closed conduit reduces the water flow.
The pressure rise on the upstream side of the regulation device depends on the closing speed,
Fig. 5.4 Measurement of differential Fig. 5.5 Pressure differential-time-diagram /3/
pressure in a pipeline /3/
the conduit length, the net head and the flow velocity in the conduit at the start of the closing
operation. On Fig. 5.4 is schematically shown a turbine connected with a pipeline. A
differential manometer is connected to the pipe through pressure tappings in the pipe wall, and
the distance between the upstream and downstream tappings is called L.
When the turbine admission has a closing movement, a pressure head difference
∆
h as function
of time may be recorded on the differential manometer, as shown on the diagram Fig. 5.5.
This pressure head differential-time-diagram is a measure of the total flow.
The equilibrium of the retarded water flow mass for an element of the cross section in the
considered pipe length L may be expressed by:
Fig. 5.3 Prandtl tube /3/
Performance Tests 5.5
dc
g hdA LdA
dt
ρ∆ =−ρ
(5.7)
If t
l
is the time during which the velocity changes, and if
∆
h
loss
is the pressure head loss due to
friction between the two pipe sections, then:
Adc
gA
L
hhdt
t
tt
loss
t
tt
ll
=− +
=
=
=
=
∫∫
00
()∆∆
(5.8)
The discharge Q before the closure operation begins, is then:
QAc
gA
L
hhdtAc
olosst
t
tt
l
o
== + +
=
=
∫
()∆∆
0
(5.9)
The discharge q = Ac
t1
is the leakage flow past the gate after shut off. This leakage must be
determined separately with the machine running.
The pressure-time method is applicable on flow in closed pipes only. Moreover the measuring
length L must be 9 meter or two times the pipe diameter if this product is greater than 9 meter.
The pressure-time method requires especially good instrumentation
/1/
and a highly qualified
staff of specialists to carry out the tests. Under favourable conditions an overall uncertainty of
about +
1.5 % to + 2 % may be expected.
Indications are that applying the pressure-time method in conduits less than 1 meter in diameter
leads to overestimating the discharge.
5.2.3.4 Tracer methods
Allen salt velocity method
A salt in water dilution increases the electric
conductivity of the water. By injecting a salt
dilution dose in a water flow conduit, the
transit time of this dose between two
electrodes in the conduit can be traced
electrically. The conduit volume V between
these two electrodes divided by the average
transit time t
mean
of the passage of this salt
dose, gives the true value of the discharge:
Q
V
t
mean
=
(5.10)
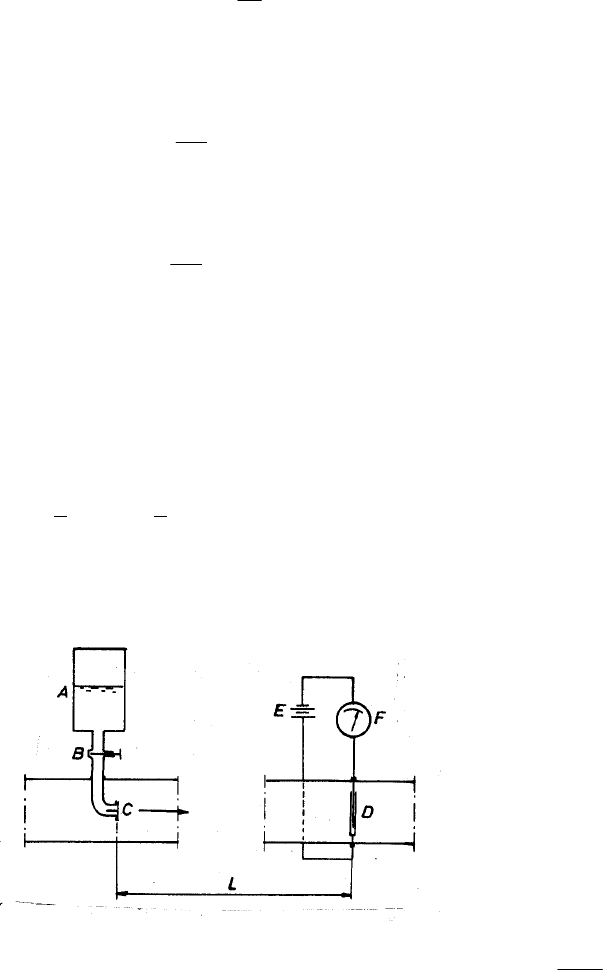
Fig. 5.6 shows schematically an arrangement
/6/
for the application of this method.
A dilution of common salt is kept in the container A. This dilution is pressurised to a certain
level. As soon as the rapid operating valve B opens, an adequate dose of salt dilution is forced
into the pipeline through the spring loaded valve C. The injected dose is transported along the
pipeline with the same velocity as the main flow. However, it will be rapidly diluted and its
extension in the flow direction is durably increasing due to the larger flow velocity in the
central part than in the neighbourhood of the wall of the pipe cross section.
Fig. 5.6 Allen salt velocity method /6/
Performance Tests 5.6
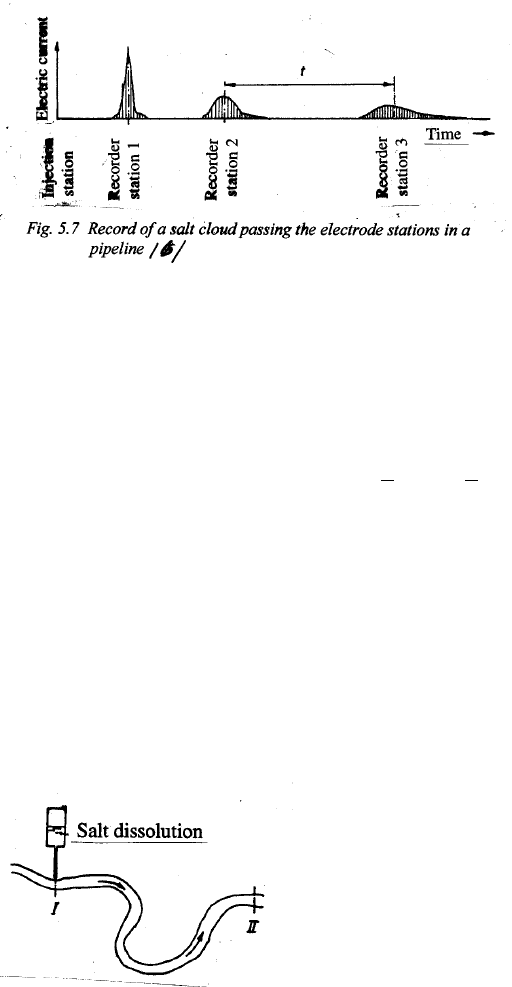
In cross sections of the chosen lengths of the pipe, electrodes are installed as shown
schematically on the figure. When an electric voltage E and an electric recorder F is connected
in series with the electrodes, the recorder will record an electric current dependent on the
conductivity of the water analogous to the diagram shown on Fig. 5.7.
For the application of this
method expert knowledge of a
number of details in the
experimental equipment is
needed.
For the evaluation of the
discharge, several methods
have been applied for the
calculation of the time interval
of the passage of the salt cloud
between the respective
electrode stations. However,
these methods do not differ
from each other so much that
not any of them is recommended as the most preferable. Therefore this is a matter of choice for
the experts.
With good measuring techniques and flow conditions, it is generally accepted that the discharge
may be determined to an accuracy around +
1 % to + 1.5 % by the use of the Allen salt velocity
method.
Salt dilution method
This method is apt to be called the chemical method. It incorporates Mohr’s procedure for
titration of chlorides by means of silver nitrate.
The method has been used for the measurements of the discharge in mountain rivers
/5/
. The
results being obtained has shown a development of accuracy that has led to application of this
method for efficiency determination of water turbines.
The salt dilution method is principally different from the Allen salt velocity method. In a flow
through pipes or open channels as shown on Fig. 5.8, two cross sections (I) and (II) with a
certain mutual distance, are chosen. In cross
section (I) a steady continuous flow of a
homogeneous and relatively strong concentrated
solution of sodium dichromate is injected into
the main water flow in points evenly distributed
over the cross section. The flow downstream in
the channel becomes a dilution with a
concentration depending on the relation between
the magnitude of the main water flow and the
magnitude of the injected flow of salt solution.
In cross section (II), which is a distance far
enough downstream to ensure thorough mixing, samples are taken out from several positions in
the cross section. By means of Mohr’s titration method and application of silver nitrate and
Fig. 5.7 Record of a salt cloud passing the electrode stations in a
pipeline /6/
Fig. 5.8 Dilution method /5/

Performance Tests 5.7
potassium chromate an accurate gauging of the concentration of the dilution may be obtained in
these samples.
It is not necessary to know the geometric characteristics of the pipe, but it is essential to ensure
that reverse or side currents do not exist which could abort some of the injected solution. Also
the concentration of salt in the natural water must be constant and not exceed 15 % of the
concentration at the sampling point during injection of the salt solution.
The discharge Q can be determined from:
o2
21
CC
CC
qQ
−
−
=
(5.11)
where Q is the discharge to be measured
q is the discharge of the salt solution injected
C
o
is the initial concentration of the salt in natural water
C
1
is the concentration of salt in the injected salt solution
C
2
is the concentration of the salt dilution at the sampling station
For the application of this method the flow must be perfectly turbulent, otherwise the mixture
of the salt solution and the main water flow will be uneven. Moreover, the salt solution must be
injected in points positioned relatively close to each other over the cross section. The samples
in the cross section downstream as well must be taken in points correspondingly close
distributed.
The concentration of the injected salt solution may be one part by weight of salt to four parts by
weight of water.
Instead of the salt solution being described above, other radioactive and non-radioactive tracers
can be used, provided the recommendations and procedures described in Parts 1, 6 and 7 of ISO
2975
/12/
are applied.
With good measuring techniques and flow conditions, the obtained accuracy of the discharge
determined by the dilution method should be about +
1 % to + 1.5 %.
5.1.3.5 Ultrasonic method
Small-magnitude pressure disturbances are propagated through a fluid at velocity which is the
sound velocity
relative to the fluid. If the fluid also has a velocity, the absolute velocity of the
pressure disturbance propagation is the algebraic sum of the two. Since the discharge is related
to fluid velocity, this effect may be used in several ways as the operating principle of ultrasonic
flow metering.
The term ultrasonic refers to the fact that the pressure disturbances usually are short bursts of
sine waves whose frequency is above the range audible to human hearing.
The various methods
!2/,/4/
of application of the above phenomenon all depend on the existence
of transmitters and receivers of acoustic energy. A common approach is to utilise piezoelectric
crystal transducers for both functions. In a transmitter electrical energy in the form of a short
burst of high-frequency voltage, is applied to a crystal and causing it to vibrate. If the crystal is
in contact with the fluid, the vibration will be communicated to the fluid and propagated
through it. The receiver crystal is exposed to these pressure fluctuations and responds by
vibrating. The vibratory motion produces an electric current signal in proportion according to
the action of piezoelectric displacement transducers.
Performance Tests 5.8
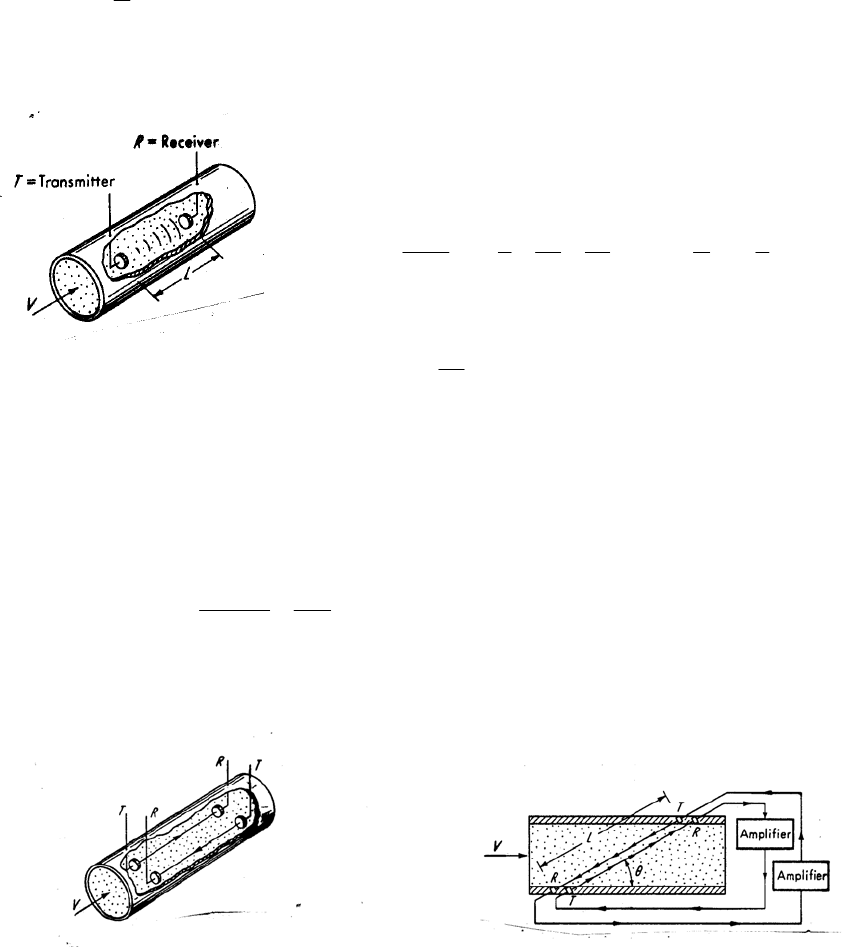
Fig. 5.9 shows the most direct application
/2/
of these principles. With zero flow velocity the
transit time t
o
of pulses from the transmitter to the receivers is given by
t
L
a
o
=
(5.12)
where L is the distance between transmitter and receiver.
The velocity
a is the acoustic (sound) velocity in the fluid
If the fluid is moving at a velocity c, the transit time
becomes
t
L
ac
L
a
c
a
c
a
L
a
c
a
=
+
=−+−
≈−
1
1
2
2
3
.....
(5.13)
and defining
∆
t = t
o
- t, then
∆t
Lc
a
≈
2
(5.14)
Thus, if a and L are known, measurement of
∆
t allows
calculation of c. However, while L may be taken as constant, a varies both with temperature
and pressure and may cause significant error because of its appearance as a
2
. Also,
∆
t is quite
small since c is a small fraction of a. Since it is not directly provided for measurement of t
o
in
this arrangement, the modification of Fig. 5.10a may be preferable. If t
1
is the transit time with
the flow and t
2
is the transit time against the flow, then it is obtained
∆tt t
Lc
ac
Lc
a
=−=
−
≈
21
22 2
22
(5.15)
This
∆
t is twice as large as before and is also a time increment that may be directly measured.
However, the dependence on a
2
is still a drawback.
Fig. 5.10a Sound signal sent with and against the Fig. 5.10b Two self-excited oscillated systems /2/
flow direction /2/
In Fig. 5.10b two self-excited oscillating systems are created by using the received pulses to
trigger the transmitted pulses in a feedback arrangement. The pulse repetition frequency in the
forward propagating loop is 1/t
1
while in the backward loop is 1/t
2
. The frequency difference
∆
f
Fig. 5.9 Principle of ultrasonic
signalling /2/

Performance Tests 5.9
= 1/t
1
- 1/t
2
can be measured by multiplying the two signals together to get a beat frequency.
Since t
1
= L/(a + c cos
θ
) and t
2
= L/(a - c cos
θ
), then
2ccos
f
L
θ
∆=
(5.16)
which is independent of a and thus not subject to errors due to changes in a.
The above analysis assumes a square velocity profile which does not occur in practice. For
actual profiles c can be replaced by c
mean
as long as the profiles are symmetrical about the pipe
centre line. If certain mathematical conditions such as continuity and differentiability are met
by the velocity distribution, the discharge can be obtained from the equation for a circular
section:
Qk
D
Wc D
i meani
i
n
i
=
=
∑
2
1
sinα
(5.17)
where D is the diameter of the pipe in the intersecting acoustic plane
W
i
are weighting coefficients depending on the number of paths and the applied
integration technique
n is the number of acoustic paths in one plane
k is correction coefficient which accounts for the error introduced by the integration
technique
α
i
defines the angular location of the end path relative to D
Experience with the acoustic methods of discharge measurement is limited and obtained
accuracy is about +
2 %.
5.1.3.6 Weirs
The measurement principle is to measure the discharge by interposing a thin plate weir in a free
surface flow and observe the head over the weir. A unique functional relationship between the
discharge and the head over the weir is employed. In order to have the best known relationship,
only rectangular weirs without side contraction sharp crested, with complete crest contraction
and free overflow shall be used.
The basic formula for calculating the discharge is due to Poleni and can be written as
/9/
:
QCbgh=
2
3
2
3
(5.18)
where Q is the discharge
C is the discharge coefficient
b is the length of the weir crest (perpendicular to the flow)
g is the acceleration of gravity
h is the measured upstream head over the weir
The weir plate shall be smooth and plain, particularly on the upstream face, and shall remain
unaltered for the whole duration of measurements. It shall preferably be made of metal which
can resist erosion and corrosion. It shall be rigid, watertight and perpendicular to the walls and
to the bottom of the channel.
Fig. 5.11 shows a sketch of a rectangular weir. The surface of the weir crest shall be a
horizontal, flat and smooth surface perpendicular to the upstream face of the plate. Its
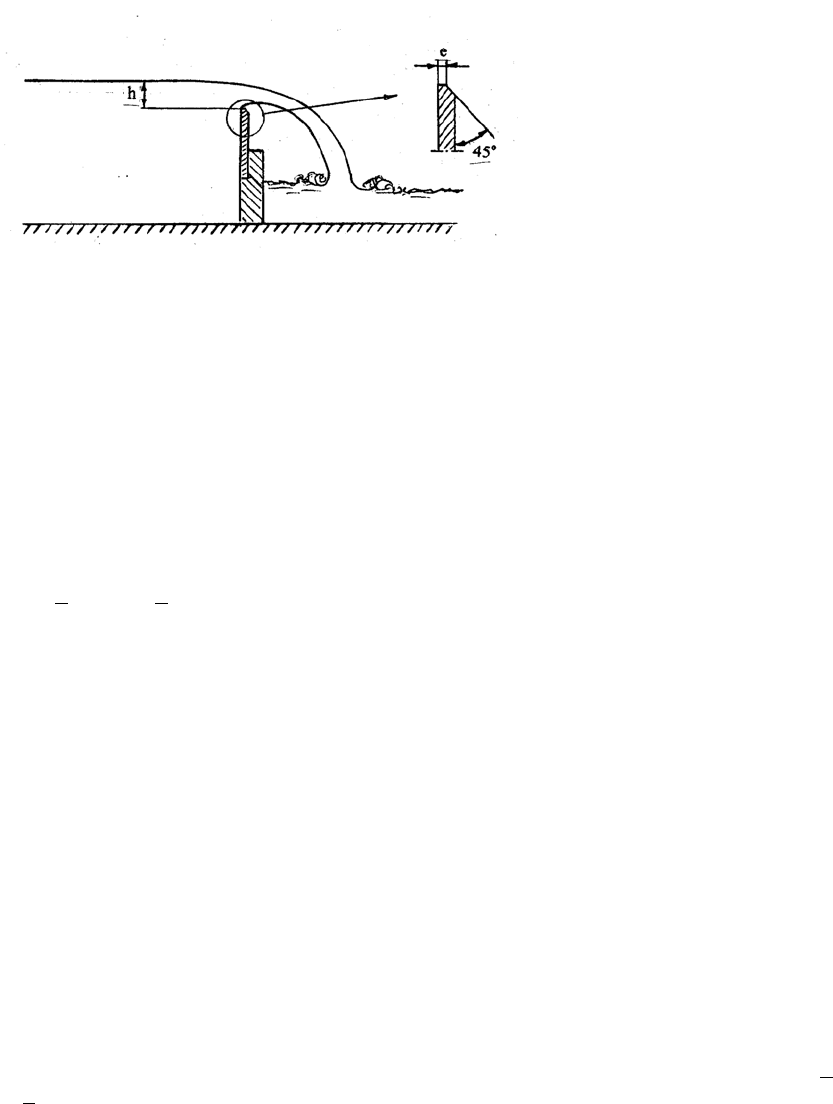
Performance Tests 5.10
intersection with the upstream face shall be straight and form sharp edges free from burrs or
scratches. The width e of the edge, perpendicular to the upstream face, shall be 1 to 2 mm. If
the weir plate is thicker than the allowable crest width, the downstream edge shall be chamfered
at a 45
o
angle.
Aeration of the free efflux from the weir shall be secured with a ventilation sufficient to keep
the air underneath the free
efflux at approximately
atmos-pheric pressure. The
weir is commonly located
on the low pressure side of
the turbine, and care shall be
taken to ensure that smooth
flow exists in the approach
channel. With this location
it shall moreover, be far
enough from the turbine or
the discharge conduit outlet
to enable the water to
release the air bubbles
before reaching the weir.
The approach channel shall be straight and of a uniform cross section and with smooth walls for
a length of at least 10 times the length of the weir crest b. Along this length the bottom slope
must be very small (< 0.005).
The sides of the channel above the level of the crest of the weir shall extend without
discontinuity at least 0.3h
max
downstream of the plane of the weir.
With good measuring techniques and flow conditions, estimated obtainable accuracy should be
about +
1.7 % to + 3 %.
5.1.3.7 Standardised differential pressure devices
Discharge determination by pressure differential is based on installing a device creating a
constricted cross section in the conduit and gauging the pressure difference generated by this
constriction. Such devices are orifice plates, nozzles and venturi tubes.
The method of discharge measurement by differential pressure devices is the subject of ISO
5167
/14/
supplemented by ISO 2186
/11/
, concerning pressure signal transmission.
These standards give all the necessary directions concerning the design and the setting of the
primary element, the choice of the section of measurement, the value of the flow coefficient, the
computation of discharge and its uncertainty. These standards apply only in the range of the
pipe diameter D and Reynolds number R
eD
specified in ISO 5167.
Whenever possible to satisfy the requirements of the ISO standards, it is unnecessary to
calibrate the apparatus as the flow coefficients indicated in the standards may be used provided
their resulting accuracy is considered sufficient. All data necessary to estimate the total
uncertainty in discharge measurement are given in ISO 5167.
With good measuring techniques and flow conditions, obtainable accuracy is estimated to +
1%
to +
1.5 % for orifice plate, nozzle and venturi tube.
Fig. 5.11 Sketch of a sharp-crested rectangular weir
